boot MERCEDES-BENZ E-CLASS SALOON 2009 Owner's Guide
[x] Cancel search | Manufacturer: MERCEDES-BENZ, Model Year: 2009, Model line: E-CLASS SALOON, Model: MERCEDES-BENZ E-CLASS SALOON 2009Pages: 373, PDF Size: 12.37 MB
Page 251 of 373

Where will I find...?
Warning triangle
Saloon The warning triangle is secured on the inside
of the boot lid. X
Turn the catch 90° in the direction of the
arrow and remove warning triangle :.
Estate The warning triangle is located behind the
right-hand side trim panel in the luggage com-
partment.
X Open the right-hand side trim panel. X
Remove warning triangle :.Setting up the warning triangle X
Fold feet =down and out to the side.
X Pull side reflectors ;up to form a triangle
and lock them at the top using press-
stud :. First-aid kit
i Check the expiry date of the first-aid kit
annually, and replace the contents when
necessary.
Saloon The first-aid kit is located in the boot, in the
right-hand side trim panel behind the wheel
arch.
X
Slide down the luggage net.
X Open the stowage compartment. X
Release strap :.
X Remove first-aid kit ;.248
Where will I find...?Practical advice
212_AKB; 2; 4, en-GB
mkalafa,
Version: 2.11.8.1 2009-05-05T14:17:16+02:00 - Seite 248
Dateiname: 6515346702_buchblock.pdf; erzeugt am 07. May 2009 14:17:05; WK
Page 252 of 373

Estate
The first-aid kit is located in the rear of the
luggage compartment on the right-hand side.
Vehicles without a TV tuner
Vehicles with a TV tuner
X On vehicles with a TV tuner: open the
right-hand side trim panel.
X Remove first-aid kit :. Fire extinguisher*
i Have the fire extinguisher refilled after
each use and checked every two years.
Otherwise, it may fail in an emergency.
Observe the legal requirements in all coun-
tries concerned. The fire extinguisher is located underneath
the front of the driver's seat. X
Pull tab :upwards.
X Remove fire extinguisher ;. Vehicle tool kit
*, jack*, TIREFIT kit
and the "Minispare" emergency
spare wheel*
Saloon: the vehicle tool kit, jack, TIREFIT kit
and "Minispare" emergency spare wheel are
in the stowage compartment under the boot
floor (Y page 204).
Estate: the vehicle tool kit, jack, TIREFIT kit
and "Minispare" emergency spare wheel are
in the stowage compartment under the lug-
gage compartment floor (Y page 204). G
Risk of injury
The jack is designed only to raise and hold the
vehicle for a short time while a wheel is being
changed.
You must use axle stands if you are carrying
out work on the vehicle.
Make sure that the jack is placed on a firm,
non-slip, level surface. Do not use wooden
blocks or similar objects as a jack underlay.
The vehicle could otherwise fall off the jack
and seriously injure you.
Do not start the engine at any time while a
wheel is being changed.
Do not lie under the vehicle when it is being
supported by the jack. If you do not raise the
vehicle as described, it could slip off the jack Where will I find...?
249Practical advice
* optional
212_AKB; 2; 4, en-GB
mkalafa,
Version: 2.11.8.1 2009-05-05T14:17:16+02:00 - Seite 249 Z
Dateiname: 6515346702_buchblock.pdf; erzeugt am 07. May 2009 14:17:06; WK
Page 253 of 373
(e.g. if the engine is started or if a door or the
boot lid/tailgate is opened or closed) and you
could be seriously injured.
i When using the jack, you should also
observe the safety notes in the "Flat tyre"
section (Y page 316).
Vehicles with a TIREFIT kit X
Saloon: open the boot floor (Y page 204).
X Estate: open the EASY-PACK folding lug-
gage compartment floor (Y page 204).:
TIREFIT kit
; Folding wheel chock
= Electric air pump
? Towing eye
A Jack
B Centring pin
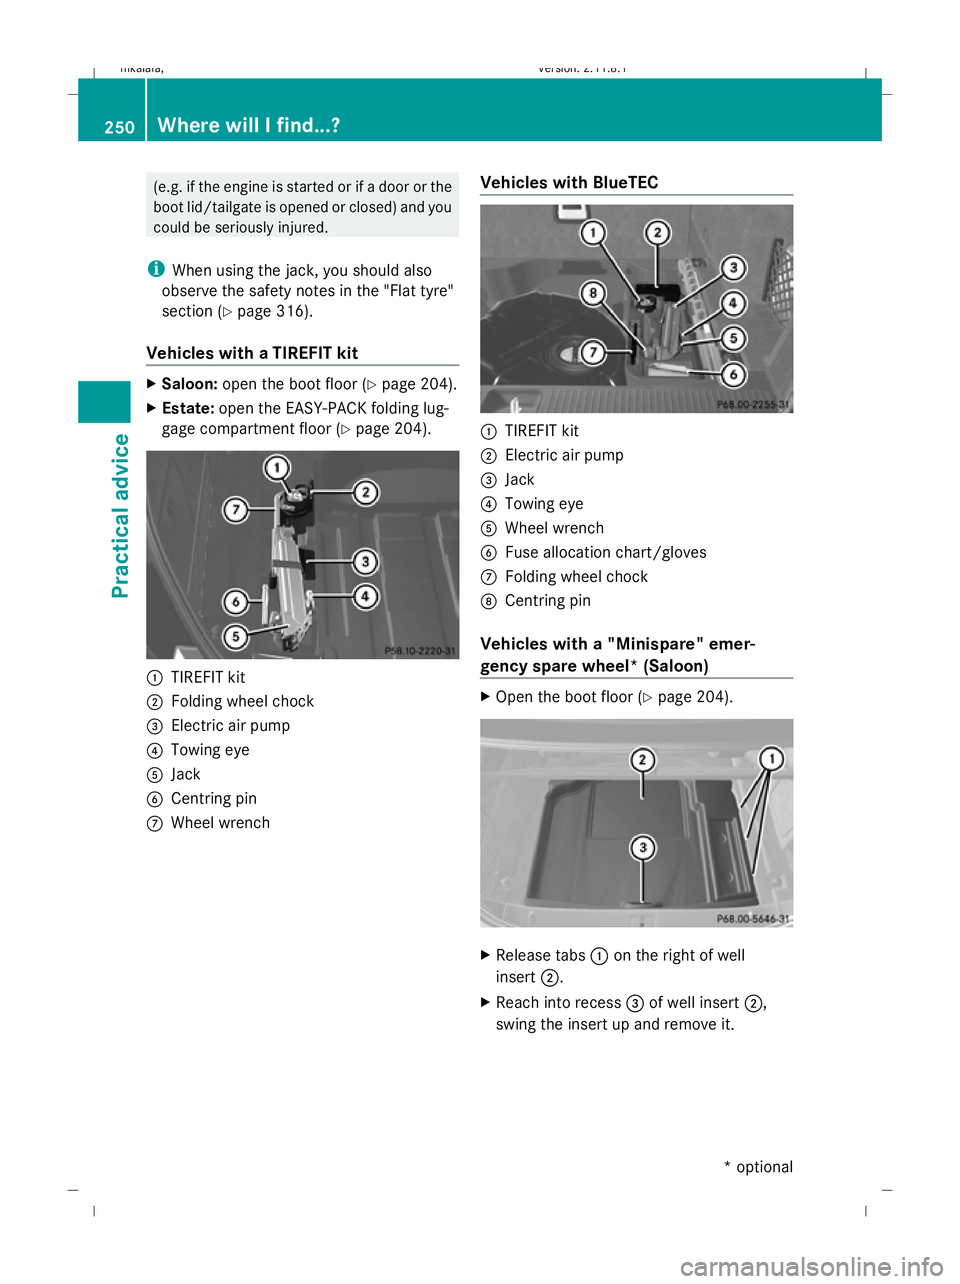
C Wheel wrench Vehicles with BlueTEC :
TIREFIT kit
; Electric air pump
= Jack
? Towing eye
A Wheel wrench
B Fuse allocation chart/gloves
C Folding wheel chock
D Centring pin
Vehicles with a "Minispare" emer-
gency spare wheel* (Saloon) X
Open the boot floor (Y page 204). X
Release tabs :on the right of well
insert ;.
X Reach into recess =of well insert ;,
swing the insert up and remove it. 250
Where will I find...?Practical advice
* optional
212_AKB; 2; 4, en-GB
mkalafa,
Version: 2.11.8.1
2009-05-05T14:17:16+02:00 - Seite 250
Dateiname: 6515346702_buchblock.pdf; erzeugt am 07. May 2009 14:17:06; WK
Page 266 of 373

Symbol messages
G
Risk of accident and injury
The operating safety of the vehicle can be compromised if maintenance work is carried out
incorrectly. This could cause you to lose control of the vehicle and cause an accident. The safety
systems may also not be able to protect you or others as they are designed to do.
Always have maintenance work carried out at a qualified specialist workshop. The qualified spe-
cialist workshop must have the necessary specialist knowledge and tools to carry out the work
required. Mercedes-Benz recommends that you use a Mercedes-Benz Service Centre for this
purpose. In particular, work relevant to safety or on safety-related systems must be carried out
at a qualified specialist workshop. Display messages
Possible causes/consequences and
X
X Solutions 7 If the symbol appears in the multi-function display, a seat belt
tongue has been clipped into a rear seat belt buckle.
Further information on the status indicator for the rear seat
belts (Y
page 91) a G
Risk of injury
If the symbol appears in the multi-function display, a seat belt
tongue has not been clipped into a rear seat belt buckle.
X If necessary, ask occupants in the rear to fasten their seat
belts.
Further information on the status indicator for the rear seat
belts (Y page 91) N Saloon: the boot lid is open.
X
Close the boot lid. A Estate: the tailgate is open.
X
Close the tailgate. M
or
? G
Risk of accident
The bonnet is open. A warning tone also sounds.
X Stop immediately, paying attention to road and traffic con-
ditions.
X Close the bonnet.
If the active bonnet (pedestrian protection) is triggered:
X Reset the bonnet (Y page 302).
X Close the bonnet. ; At least one door is open. A warning tone also sounds.
X
Close the doors. Display messages
263Practical advice
212_AKB; 2; 4, en-GB
mkalafa, Version: 2.11.8.1 2009-05-05T14:17:16+02:00 - Seite 263 Z
Dateiname: 6515346702_buchblock.pdf; erzeugt am 07. May 2009 14:17:09; WK
Page 292 of 373
 has been trig-
gered. Your vehicle has been involved in a frontal collision.
X
Reset the t")
Problem
Possible causes/consequences and
X
X Solutions The active bonnet func-
tion (pedestrian protec-
tion) has been trig-
gered. Your vehicle has been involved in a frontal collision.
X
Reset the triggered active bonnet (pedestrian protection)
(Y page 302). The NECK-PRO head
restraints on the driv-
er's and the front-pas-
senger's seats have
been triggered. Your vehicle has been involved in a rear-end collision.
X
Reset the NECK-PRO head restraints (Y page 303).Fuel and fuel tank
Problem
Possible causes/consequences and
X
X Solutions Fuel is leaking from the
vehicle.
G
Risk of explosion or fire
The fuel line or the fuel tank is defective.
X Turn the key to position 0(Y page 75) in the ignition lock imme-
diately and remove it.
X Do not restart the engine under any circumstances.
X Consult a qualified specialist workshop. The fuel filler flap can-
not be opened. The fuel filler flap is not released.
Or:
The key batteries are discharged.
X
Unlock the vehicle using the emergency key element
(Y page 299).
X Open the boot/tailgate (Y page 72).
X Manually unlock the tailgate using the emergency release
(Y page 301). The fuel filler flap is released, but the opening mechanism is jam-
med.
X
Release the fuel filler flap by hand (Y page 301).
X Consult a qualified specialist workshop. Troubleshooting
289Practical advice
212_AKB; 2; 4, en-GB
mkalafa, Version: 2.11.8.1 2009-05-05T14:17:16+02:00 - Seite 289 Z
Dateiname: 6515346702_buchblock.pdf; erzeugt am 07. May 2009 14:17:13; WK
Page 302 of 373

Locking/unlocking in an emergency
Emergency key element
If the vehicle can no longer be locked or
unlocked with the key, use the emergency
key element.
If you use the emergency key element to
unlock and open the driver's door or the boot
lid, the anti-theft alarm system* will be trig-
gered (Y page 65).
There are several ways to turn off the alarm:
X Press the %or& button on the key.
or
X Insert the key into the ignition lock.
or
X Press the start/stop button *in the ignition
lock. The key must be in the vehicle.
or
X Lock or unlock the vehicle using KEYLESS
GO*. The key must be outside the vehicle.
If you unlock the vehicle using the emergency
key element, the fuel filler flap will not be
unlocked automatically.
X To unlock the fuel filler flap: insert the
key in the ignition lock.
Removing the emergency key element X
Push release catch :in the direction of
the arrow and at the same time remove
emergency key element ;from the key. Unlocking the vehicle
If the vehicle can no longer be unlocked cen-
trally with the key or KEYLESS GO*:
X Remove the emergency key element from
the key (Y page 299). X
Insert the emergency key element into the
lock of the driver's door as far as it will go.
X Turn the emergency key element anti-
clockwise to position 1.
The door is unlocked.
i On right-hand-drive vehicles, turn the
emergency key element clockwise.
X Turn the emergency key element back and
remove it. Locking the vehicle
If the vehicle can no longer be unlocked cen-
trally with the key or KEYLESS GO*:
X Open the driver's door.
X Close the front-passenger door and the
boot lid.
Close the front-passenger door and the
boot lid/tailgate.
X Press the locking button (Y page 71).
X Check whether the locking knobs on the
doors are still visible. Press the locking
knobs down manually, if necessary.
X Close the driver's door.
X Remove the emergency key element from
the key (Y page 299). Locking/unlocking in an emergency
299Practical advice
* optional
212_AKB; 2; 4, en-GB
mkalafa,
Version: 2.11.8.1 2009-05-05T14:17:16+02:00 - Seite 299 Z
Dateiname: 6515346702_buchblock.pdf; erzeugt am 07. May 2009 14:17:15; WK
Page 303 of 373

X
Insert the emergency key element into the
lock of the driver's door as far as it will go.
X Turn the emergency key element clockwise
as far as it will go to position 1.
i On right-hand-drive vehicles, turn the
emergency key element anti-clockwise.
X Turn the emergency key element back and
remove it.
X Check whether the doors and the boot lid/
tailgate are locked. Opening the boot (Saloon)
! The boot lid swings upwards when
opened. Therefore, make sure that there is
sufficient clearance above the boot lid.
If the boot can no longer be unlocked with the
key or KEYLESS GO*:
X Remove the emergency key element from
the key (Y page 299). X
Insert the emergency key element fully into
the tailgate lock.
X Turn the emergency key element anti-
clockwise as far as it will go to position
1.
The boot is unlocked.
X Turn the emergency key element back and
remove it. Opening the tailgate (Estate)
If the tailgate can no longer be opened from
the outside, use the emergency release on
the inside of the tailgate.
On vehicles with a folding bench seat*, you
can use the handle to open the tailgate from
the inside (Y page 73).
X Remove the emergency key element from
the key (Y page 299). !
When opening, the tailgate swings up and
out. Therefore, make sure that there is suf-
ficient clearance above and behind the tail-
gate.
X Insert emergency key element ;into
opening in trim :.
X Turn emergency key element ;90° clock-
wise.
X Push emergency key element ;in the
direction of the arrow and open the tail-
gate. 300
Locking/unlocking in an emergencyPractical advice
* optional
212_AKB; 2; 4, en-GB
mkalafa
,V ersion: 2.11.8.1
2009-05-05T14:17:16+02:00 - Seite 300
Dateiname: 6515346702_buchblock.pdf; erzeugt am 07. May 2009 14:17:15; WK
Page 304 of 373

Emergency fuel filler flap release
G
Risk of injury
The edges on the inside of the vehicle body
can be sharp. You could injure yourself when
using the fuel filler flap emergency release.
Avoid contact with the edges on the inside of
the vehicle body.
The emergency release is located in the
boot/luggage compartment behind the side
trim on the right-hand side, when viewed in
the direction of travel.
Saloon X
Slide down the luggage net.
X Open the side trim. X
Detach the emergency release from
retainer :.
X Pull the emergency release in the direction
of arrow ;.
The fuel filler flap is unlocked.
X Open the fuel filler flap.
Estate X
Open the side trim.
X Fold down the trim. X
Pull the emergency release in the direction
of arrow :.
The fuel filler flap is unlocked.
X Open the fuel filler flap. Releasing the parking lock manually
i The following description does not apply
to vehicles with DIRECT SELECT levers and
AMG vehicles.
In the event of an electrical fault, it is possible
to release the selector lever lock manually to
move it out of position P, e.g. if you wish to
tow the vehicle away. X
Depress the parking brake firmly.
X Prise out selector lever gaiter :with a flat,
blunt object, (e. g. a screwdriver wrapped Locking/unlocking in an emergency
301Practical advice
212_AKB; 2; 4, en-GB
mkalafa, Version: 2.11.8.1 2009-05-05T14:17:16+02:00 - Seite 301 Z
Dateiname: 6515346702_buchblock.pdf; erzeugt am 07. May 2009 14:17:16; WK
Page 313 of 373

X
Vehicles without KEYLESS GO*: remove
the key from the ignition lock.
X Vehicles with KEYLESS GO*: open the
driver's door.
The on-board electronics have status 0,
which is the same as the key having been
removed.
X Get out of the vehicle.
X Close the driver’s door.
X Place the warning triangle (Y page 248) at
a suitable distance. Observe legal require-
ments. Using the TIREFIT kit
You can use the TIREFIT kit to seal small
punctures, particularly those in the tyre tread.
You can use TIREFIT at outside temperatures
down to -20 †. G
Risk of accident
In the following cases your safety is especially
endangered, as tyre sealant is insufficient if:
R there are cuts or punctures in the tyre
greater than 4 mm.
R the wheel rim is damaged.
R you have driven at very low tyre pressures
or on a flat tyre.
Do not drive any further. Consult a qualified
specialist workshop which has the necessary
specialist knowledge and tools to carry out
the work required.
Mercedes-Benz recommends that you use a
Mercedes-Benz Service Centre for this pur-
pose. In particular, work relevant to safety or
on safety-related systems must be carried out
at a qualified specialist workshop.
X Do not remove any foreign objects which
have penetrated the tyre, e.g. screws or
nails.
X Remove the TIREFIT kit, the accompanying
"max. 80 km/h" sticker and the electric air
pump from the stowage well underneath the boot/luggage compartment floor
(Y
page 249). X
Affix part :of the sticker within the driv-
er's field of vision.
X Affix part ;of the sticker near the valve
on the wheel with the defective tyre. G
Risk of injury
TIREFIT must not come into contact with your
skin, eyes or clothing.
R If TIREFIT comes into contact with your
eyes or skin, immediately rinse thoroughly
with clean water.
R Change out of clothing which has come into
contact with TIREFIT immediately.
R If an allergic reaction occurs, consult a doc-
tor immediately.
Keep TIREFIT away from children.
R If TIREFIT is swallowed, immediately rinse
your mouth out thoroughly and drink plenty
of water.
R Do not induce vomiting. Consult a doctor
immediately.
R Do not inhale TIREFIT fumes.
i If TIREFIT leaks out, allow it to dry. It can
then be removed like a layer of film.
If you get TIREFIT on your clothing, have it
cleaned as soon as possible with perchloro-
ethylene. 310
Flat tyrePractical advice
* optional
212_AKB; 2; 4, en-GB
mkalafa
,V ersion: 2.11.8.1
2009-05-05T14:17:16+02:00 - Seite 310
Dateiname: 6515346702_buchblock.pdf; erzeugt am 07. May 2009 14:17:20; WK
Page 318 of 373

G
Risk of accident
Have the collapsible emergency spare
wheel *replaced with a new wheel as soon as
possible at a qualified specialist workshop
which has the necessary specialist knowledge
and tools to carry out the work required.
Mercedes-Benz recommends that you use a
Mercedes-Benz Service Centre for this pur-
pose. In particular, work relevant to safety or
on safety-related systems must be carried out
at a qualified specialist workshop.
Preparing the vehicle i
Vehicles without a spare wheel* are not
equipped with a vehicle tool kit at the fac-
tory. For more information on which tools
are required to perform a wheel change on
your vehicle, e.g. wheel chock, jack, cen-
tring pin or wheel wrench, consult a
Mercedes-Benz Service Centre.
X Prepare the vehicle as described
(Y page 309).
X If a trailer is coupled, uncouple it.
X Place the wheels in the straight-ahead posi-
tion.
X Remove the following items from the stow-
age well under the boot/luggage compart-
ment floor:
R the "Minispare" emergency spare
wheel*
R the vehicle tool kit
R the folding wheel chock
R the jack
Prevent the vehicle from rolling away using
the folding wheel chock. X
Fold both plates :upwards.
X Fold out lower plate ;.
X Guide the lugs on the lower plate fully into
openings in base plate =. Securing the vehicle on level ground
X
On level ground: place chocks or similar
items under the front and rear of the wheel
that is diagonally opposite the wheel you
wish to change. Securing the vehicle on slight downhill gradients Flat tyre
315Practical advice
* optional
212_AKB; 2; 4, en-GB
mkalafa,
Version: 2.11.8.1 2009-05-05T14:17:16+02:00 - Seite 315 Z
Dateiname: 6515346702_buchblock.pdf; erzeugt am 07. May 2009 14:17:22; WK