fuel MERCEDES-BENZ E-CLASS SALOON 2011 Owner's Guide
[x] Cancel search | Manufacturer: MERCEDES-BENZ, Model Year: 2011, Model line: E-CLASS SALOON, Model: MERCEDES-BENZ E-CLASS SALOON 2011Pages: 409, PDF Size: 10.47 MB
Page 202 of 409

Vehicle level
The vehicle automatically sets the vehicle
level at the rea raxle .Rear axle level control
ensures the best possible suspension and
that the ground clearance remains constant
even when the vehicle is loaded. This
improves driving safety and fuel consump-
tion.
Suspension tuning General notes
The electronically controlled damping system
works continuously. This improves driving
safety and ride comfort.
The damping is tuned individually to each
wheel and depends on:
R your driving style, e.g. sporty
R the road surface condition, e.g. bumps
R your individual selection of Sport, Sport +
or Comfort
If you select Sport or Sport + mode and
restart the engine, the suspension setting
reverts to Comfort mode. Sport mode
The firmer suspension tunin
ginSport mode
ensures even better contact with the road.
Select this mode when employing a sporty
driving style, e.g. on winding country roads.
X Press button :once.
Indicator lamp ?lights up. You have selec-
ted Sport mode. The
AMG Ride Control SPORT message
appears in the multifunction display.
Sport + mode
The very firm setting of the suspension tuning
in Sport +mode ensures the best possible
contact with the road. Select this mode only
when driving on race circuits.
If indicator lamps =and ?are off:
X Press button :twice.
Indicator lamps =and ?light up. You
have selected Sport +mode.
The AMG Ride Control SPORT + message
appears in the multifunction display.
If indicator lamp ?lights up:
X Press button :once.
Second indicator lamp =lights up. You
have selected Sport +mode.
The AMG Ride Control SPORT + message
appears in the multifunction display.
Comfort mode
In comfort mode, the driving characteristics
of your vehicle are more comfortable. There-
fore, select this mode if you prefer a more
comfortable driving style. Select comfort
mode also when driving fast on straight roads,
e.g. on straight stretches of motorway.
X Press button :repeatedly until indicator
lamps =and ?go out.
You have selected Comfort mode.
The AMG Ride Control COMFORT mes-
sage appears in the multifunction display.
Storing and calling up settings
Once the suspension tuning and drive pro-
gram have been selected, you can store and
call up your settings using AMG button ;.
X To store: press AMG button ;until you
hear a tone.
X To call up: press AMG button ;.
The stored suspension tuning and drive
program are selected. Driving systems
199Driving and parking Z
Page 225 of 409

The vehicle/trailer combination:
R
is heavier
R is restricted in its acceleration and gradi-
ent-climbing capability
R has an increased braking distance
R is affected more by strong crosswinds
R demands more sensitive steering
R has a larger turning circle
As a result, the handling characteristics may
be impaired and you may lose control of the
vehicle. This could lead to an accident with
serious or even fatal injuries.
When towing a trailer, always adjust your
speed to the current road and weather con-
ditions. Do not exceed the maximum permis-
sible speed for your vehicle/trailer combina-
tion. G
WARNING
Never depress the brake pedal continuously
while the vehicle is in motion, e.g. never cause
the brakes to rub by applying constant slight
pedal pressure. This causes the brake system
to overheat, increases the braking distance
and can lead to the brakes failing completely. G
WARNING
On no account should you attempt to draw the
vehicle/trailer combination out by increasing
speed. G
WARNING
If you exceed the maximum noseweight when
using a carrier system on the ball coupling:
R the carrier system may be thrown around.
R the ball coupling and the carrier system
may become detached from the vehicle.
As a result, you may injure others or cause an
accident.
Do not exceed the maximum noseweight.
When driving with a loaded carrier system,
always adjust your driving style to the prevail- ing road, traffic and weather conditions and
drive particularly carefully.
You can use carrier systems, e.g. bicycle
racks or load-bearing implements, on the ball
coupling. The maximum noseweight of
75 kg applies when using carrier systems on
the ball coupling.
General notes i
When towing a trailer, set the tyre pres-
sure on the rear axle of the towing vehicle
for a maximum load; see the tyre pressure
table in the fuel filler flap (Y page 365).
You will find installation dimensions and loads
in the "Technical data" section
(Y page 395).
The maximum noseweight of the trailer draw-
bar on the ball coupling is 84 kg 21
. However,
the actual noseweight must not exceed the
value given on the trailer tow hitch or trailer
identification plates. The lowest weight
applies.
! Use a drawbar noseweight as close as
possible to the maximum permissible nose-
weight. Do not use a noseweight of less
than 50kg, otherwise the trailer may come
loose.
Note that the payload and the rear axle load
are reduced by the actual payload.
Please note that when towing a trailer, PARK-
TRONIC (Y page 200), parking guidance
(Y page 203) and Blind Spot Assist
(Y page 212) are only available with limita-
tions, or not at all.
i On vehicles without level control, the
height of the ball coupling will alter accord-
ing to the load placed on the vehicle. If nec-
essary, use a trailer with a height-adjusta-
ble drawbar.
21 Missing values for the E300 model were not available at the time of going to print. 222
Towing
atrailerDriving an d parking
Page 226 of 409
.
The maximum permissible speed fo rvehicle/
trailer combinations depends on the type of
trailer. Before beginning the jou")
Driving tips
i
Observe the notes on ESP ®
trailer stabi-
lisation (Y page 75).
The maximum permissible speed fo rvehicle/
trailer combinations depends on the type of
trailer. Before beginning the journey, check
the trailer's documents to see what the max-
imum permitted speed is. Observe the legally
prescribed maximum speed in the relevant
country.
For certain Mercedes-Benzv ehicles, the max-
imum permissible rear axle load is increased
when towing a trailer. Refer to the "Technical
data" section to find out whether this applies
to your vehicle. If you utilise any of the added
maximum rear axle load when towing a trailer,
the vehicle/trailer combination may not
exceed a maximum speed of 100 km/h for
reasons concerning the operating permit.
This also applies in countries in which the
permissible maximum speed for vehicle/
trailer combinations is above 100 km/h.
When towing a trailer, your vehicle's handling
characteristics will be differen tincomparison
to when driving without a trailer and it will
consume more fuel.
On long and steep downhill gradients, you
must shift to a lower gear in good time, or on
vehicles with automatic transmission, select
the shift range 1,2or 3.
i This also applies if you have activated
cruise control, SPEEDTRONIC or DIS-
TRONIC PLUS.
This will use the braking effect of the engine,
so less braking will be required to prevent the
vehicle from gaining speed. This relieves the
load on the brake system and prevents the
brakes from overheating and wearing too
quickly. If you need additional braking,
depress the brake pedal repeatedly rather
than continuously. Driving tips R
Maintain a greater distance from the vehi-
cle in front than when driving without a
trailer.
R Avoid braking abruptly. If possible, brake
gently at first to allow the trailer to run on.
Then, increase the braking force rapidly.
R The values given for gradient-climbing
capabilities from a standstill refer to sea
level. When driving in mountainous areas,
note that the power output of the engine,
and consequently the vehicle's gradient-
climbing capability, decrease with increas-
ing altitude.
If the trailer swings from side to side:
X Do not accelerate.
X Do not counter-steer.
X Brake if necessary. Folding out the ball coupling
Before you can tow a trailer with your vehicle,
you must fold out the ball coupling.
The release wheel is located behind the left-
hand side trim panel in the boot/luggage
compartment. G
WARNING
Make sure that the ball coupling is engaged,
either in its folded-out or folded-in position,
and that the indicator lamp is off.
Do not turn the release wheel when a trailer
is coupled up. Otherwise, the trailer might
detach. Towing
atrailer
223Driving an d parking Z
Page 233 of 409

Useful information
i This Owner's Manual describes all models
and all standard and optional equipment
available to your vehicle at the time of pub-
lication of the Owner's Manual. Country-
specific deviations are possible. Please
note that your vehicle may not be equipped
with all features described. This also
applies to safety-relevan tsystems and
functions.
i Please read the information on qualified
specialist workshops (Y page 25).Important safety notes
You will find an illustration of the instrument
cluster in the "At a glance" section
(Y page 30). G
WARNING
Only use the on-board computer when road
and traffic conditions permit .You would oth-
erwise be distracted and unable to concen-
trate properly on driving, and could cause an
accident. G
WARNING
No messages will be displayed if either the
instrument cluster or the multifunction dis-
play is inoperative.
As a result, you will not be able to see infor-
mation about your driving conditions, such as
speed, outside temperature, warning and indi-
cator lamps, display messages or system fail-
ures. Driving characteristics may be impaired.
Adjust your driving style and vehicle speed
accordingly.
Contact a qualified specialist workshop
immediately. G
WARNING
The on-board computer only records and dis-
plays malfunctions and warnings from certain
systems. For this reason, you should always make sure that your vehicle is safe to use. You
could otherwise cause an accident by driving
an unsafe vehicle.
G
WARNING
The operating safety of your vehicle could be
impaired if maintenance work is carried out
incorrectly. This could cause you to lose con-
trol of your vehicle and cause an accident.
Moreover, the safety systems may no longer
be able to protect you or others as they are
designed to do.
Always have service work carried out at a
qualified specialist workshop. Displays and operation
Coolant temperature gauge
The coolant temperature gauge is in the
instrument cluster on the right-hand side.
The reading may rise up to 120 †undernor-
mal driving conditions if the coolant has been
filled correctly.
At high outside temperatures and when driv-
ing uphill, the coolant temperature may rise
to the end of the scale. Rev counter
The red band in the rev counter indicates the
engine's overrevving range.
! Do not drive in the overrevving range.
Doing so will damage the engine.
The fuel supply is interrupted to protec tthe
engine when the red band is reached. Outside temperature display
The outside temperature displayi s in the mul-
tifunction display (Y page 232). G
WARNING
At temperatures just above freezing point, the
street may be icy, especially in wooded areas 230
Displays and operationOn-board computer and displays
Page 238 of 409
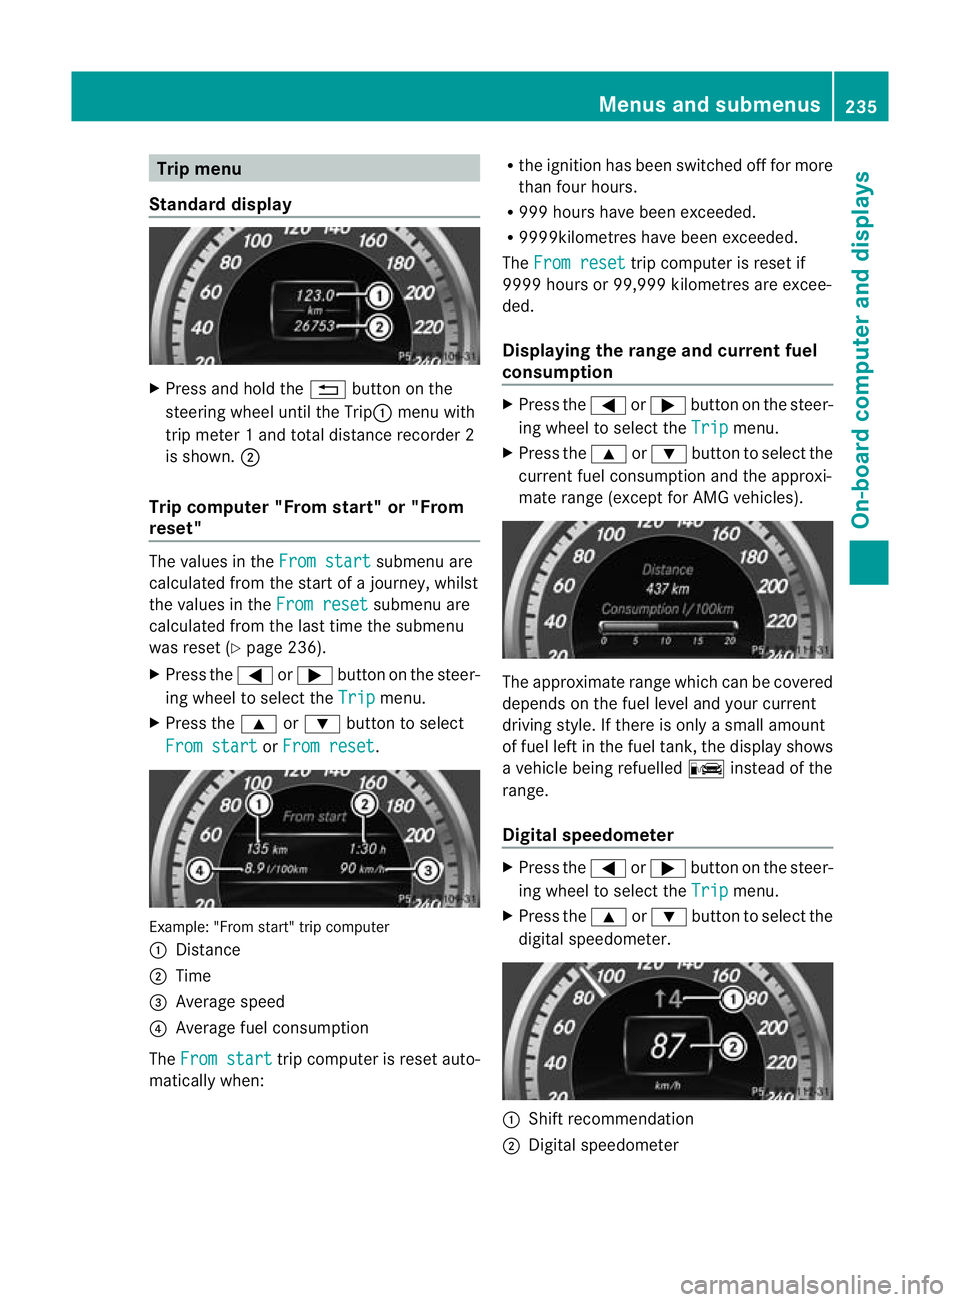
Trip menu
Standard display X
Press and hold the %button on the
steering wheel until the Trip: menu with
trip meter 1 and total distance recorder 2
is shown. ;
Trip computer "From start" or "From
reset" The values in the
From start submenu are
calculated fro mthe start of a journey, whilst
the values in the From reset submenu are
calculated from the last time the submenu
was reset (Y page 236).
X Press the =or; button on the steer-
ing wheel to select the Trip menu.
X Press the 9or: button to select
From start or
From reset .
Example: "From start" trip computer
:
Distance
; Time
= Average speed
? Average fuel consumption
The From start trip computer is reset auto-
matically when: R
the ignition has been switched off for more
than four hours.
R 999 hours have been exceeded.
R 9999kilometres have been exceeded.
The From reset trip computer is reset if
9999 hours or 99,999 kilometres are excee-
ded.
Displaying the range and current fuel
consumption X
Press the =or; button on the steer-
ing wheel to select the Trip menu.
X Press the 9or: button to select the
current fuel consumption and the approxi-
mate range (except for AMG vehicles). The approximate range which can be covered
depends on the fuel level and your current
driving style. If there is only a small amount
of fuel left in the fuel tank, the display shows
a vehicle being refuelled
Cinstead of the
range.
Digital speedometer X
Press the =or; button on the steer-
ing wheel to select the Trip menu.
X Press the 9or: button to select the
digital speedometer. :
Shift recommendation
; Digital speedometer Menus and submenus
235On-board computer and displays Z
Page 251 of 409

confined spaces withou
tanextraction sys-
tem, e.g. a garage. G
WARNING
Whe noperating the auxiliary heating parts of
the vehicle can get very hot. Make sure that
the exhaust system does not under any cir-
cumstances come into contact with easily
ignitable material such as dry grass or fuels.
The material could otherwise ignite and set
the vehicle alight. Choose your parking spot
accordingly.
Operating the auxiliary heating is thus pro-
hibited at filling stations or when your vehicle
is being refuelled. You must therefore switch
off the auxiliary heating at filling stations.
! Operating the auxiliary heating/ventila-
tion draws on the vehicle battery. After you
have heated or ventilated the vehicle a
maximum of two times, drive for a longer
distance.
i Switch the auxiliary heating on regularly
once a month for about ten minutes.
Selecting the departure time or deactivat-
ing a selected departure time
X Press the =or; buttononthe steer-
ing wheel to select the Settings menu.
X Press the :or9 button to select the
Heating submenu.
X Press the abutton to confirm.
You will see the selected setting.
X Press the abutton to confirm.
X Press the :or9 button to select
one of the three departure times or Timeroff (no timer active).
X Press the abutton to confirm.
When a departure time is selected, the yel-
low indicator lamp lights up on the auxiliary
heating button. Changing the departure time
X
Press the =or; button on the steer-
ing wheel to select the Settings menu.
X Press the :or9 button to select the
Heating submenu.
X Press the abutton to confirm.
You will see the selected setting.
X Press the abutton to confirm.
X Press the :or9 button to select
Change A ,
B or
C .
X Press the abutton to confirm.
You can now change the departure time.
X Press the =or; button to select the
display to be changed: hours, minutes.
X Press the :or9 button to set the
selected display.
X Press the abutton to store the entry.
The yellow indicator lamp on the auxiliary
heating button lights up.
Convenience Activating/deactivating the EASY-
ENTRY/EXIT feature
You can use the
Easy Entry/Exit: function
to activate or deactivate the EASY ENTRY/
EXIT feature (Y page 115). G
WARNING
The steering wheel moves when the EASY-
ENTRY/EXIT feature is active. There is a risk
of occupants becoming trapped. Before acti-
vating the EASY-ENTRY/EXIT feature, make
sure that nobody can become trapped.
Do not leave children unsupervised in the
vehicle, even if they are secured in a child
restraint system. The children could open the
driver's door and thereby unintentionally acti-
vate the EASY-ENTRY/EXIT feature and
become trapped.
X Press the =or; button on the steer-
ing wheel to select the Settings menu.
X Press the :or9 button to select the
Convenience submenu.248
Menus and submenusOn-board computer and displays
Page 267 of 409

Display messages Possible causes/consequences and
M Solutions
# The battery is no
tbeing charged.
Aw arning tone also sounds.
Possible causes:
R faulty alternator
R torn poly-V-belt
R a malfunction in the electronics
X Stop the vehicle immediately, paying attentio ntoroad and traf-
fic conditions, and switch off the engine.
X Open the bonnet.
X Check whether the poly-V-belt is torn.
If the poly-V-belt is torn:
! Do not continue driving. The engine could otherwise overheat.
X Consult a qualified specialist workshop.
If the poly-V-belt is OK:
X Visit a qualified specialist workshop. 4
Check eng. oil
lev. when next
refuelling The engine oil level has dropped to the minimum level.
Aw
arning tone also sounds.
X Chec kthe oil level when next refuelling, at the latest
(Y page 322).
X If necessary, top up the engine oil (Y page 323).
X Have the engine checked at a qualified specialist workshop if
the engine oil needs topping up more often than usual. 8
Reserve fuel level The fuel level has dropped into the reserve range.
Operation of the auxiliary heating is deactivated when the fuel level
drops into the reserve range.
X
Refuel at the nearest filling station. C There is only a very small amount of fuel in the fuel tank.
The auxiliary heating cannot be operated.
X
Refuel at the nearest filling station without fail. ¸
Replace
air cleaner Vehicles with a diesel engine: the engine air filter is dirty and must
be replaced.
X
Visit a qualified specialist workshop. 264
Display messagesOn-board computer and displays
Page 268 of 409

Display messages Possible causes/consequences and
M Solutions
!
Clean
the fuel fil‐
ter Vehicles with a diesel engine: there is water in the fuel filter. The
water mus
tbe drained off.
X Visit a qualified specialist workshop. ¯
Refill AdBlue at
workshop See Own‐
er's Manual The AdBlue
®
level has fallen below the reserve range. Awarning
tone also sounds.
X Have AdBlue ®
refilled as soon as possible at a qualified spe-
cialist workshop. ¯
Refill AdBlue at
workshop No start
in ..km The AdBlue
®
level is only sufficient for the indicated distance. A
warning tone also sounds.
X Have AdBlue ®
refilled as soon as possible at a qualified spe-
cialist workshop. ¯
Refill AdBlue at
workshop Eng.
start not possible The AdBlue
®
tan kis empty. Awarning tone also sounds. You can
no longer start the engine.
X Consult a qualified specialist workshop immediately. ¯
Check AdBlue See
Owner's Manual The AdBlue
®
system is malfunctioning. A warning tone also
sounds.
X Visi taqualified specialist workshop. ¯
AdBlue Eng. start
not possible
in ..km The AdBlue
®
system is malfunctioning. A warning tone also
sounds.
X Visit a qualified specialist workshop immediately. ¯
AdBlue Eng. start
not possible The AdBlue
®
system is malfunctioning. A warning tone also
sounds. You can no longer start the engine.
X Consult a qualified specialist workshop immediately. Display messages
265On-board computer and displays Z
Page 280 of 409

Display messages Possible causes/consequences and
M Solutions
_
Rear left seat
backrest not
locked or
Rear right seat back‐
rest not locked G
Risk of injury
Saloon with through-loading feature in the rear bench seat:
The backrest in the rear is no tengaged on the left-hand and/or
right-hand side .Awarning tone also sounds.
X Push the backres tback until it engages. j
Check trailer
hitch lock G
Ris
kofa ccident
The trailer tow hitch is no tcorrectly engaged.
Aw arning tone also sounds.
X Stop the vehicle immediately, paying attentio ntoroad and traf-
fic conditions, and switch off the engine.
X Apply the parking brake.
X Allow the trailer tow hitch ball coupling to engage in the end
position (Y page 223). D
Power
steering mal‐
function See Own‐
er's Manual G
Risk of accident
The power steering assistance is faulty.
You will need to use more force to steer.
Aw arning tone also sounds.
X Chec kwhether you are able to apply the extra force required.
X If you are able to steer safely: carefully drive on to a qualified
specialist workshop.
X If you are unable to steer safely: do not drive on. Contact the
nearest qualified specialist workshop. &
inoperative Bat‐
tery low The on-board voltage is too low. The auxiliary heating has switched
itself off or cannot be switched on (Y page 145).
X Drive for a longer distance.
The battery is being charged. The auxiliary heating is operational
again as soon as the on-board electrical system voltage is suf-
ficient. &
inoperative
Refuel
vehicle The fuel level in the fuel tank is too low. The auxiliary heating can-
not be switched on (Y page 145).
X Refuel at the nearest filling station. Display messages
277On-board computer and displays Z
Page 288 of 409

Engine
Problem Possible causes/consequences and
M Solutions
;
The yellow engine diag-
nostics warning lamp
lights up while the
engine is running.
There may be a fault, for example:
R in the engine management
R in the fuel injection system
R in the exhaust system
R in the ignition system (for vehicles with petrol engines)
R in the fuel system
The emission limit values may be exceeded and the engin emay
be running in emergency mode.
X Have the vehicle checked as soon as possible at a qualified
specialist workshop. Vehicles with a diesel engine: the fuel tan
khas been run dry
(Y page 175).
X Start the engine three to four times after refuelling.
If the yellow engine diagnostics warning lamp goes out, emer-
gency running mode is cancelled. The vehicle need no tbe
checked. 8
The yellow reserve fuel
warning lamp lights up
while the engine is run-
ning.
The fuel level has dropped into the reserve range.
Operation of the auxiliary heating is deactivated when the fuel level
drops into the reserve range.
X
Refuel at the nearest filling station. ?
The red coolant warn-
ing lamp lights up while
the engine is running
and the coolant tem-
perature gauge is at the
star toft he scale. The temperature sensor for the coolant temperature gauge is
faulty.
The coolant temperature is no longer being monitored. There is a
risk of engine damage if the coolant temperature is too high.
X Stop the vehicle immediately, paying attention to road and traf-
fic conditions, and switch off the engine. Do not continue driving
under any circumstances.
X Apply the parking brake.
X Consult a qualified specialist workshop. Warning and indicator lamps in the instrument cluster
285On-board computer and displays Z