spare wheel MERCEDES-BENZ E-CLASS SALOON 2011 Owners Manual
[x] Cancel search | Manufacturer: MERCEDES-BENZ, Model Year: 2011, Model line: E-CLASS SALOON, Model: MERCEDES-BENZ E-CLASS SALOON 2011Pages: 409, PDF Size: 10.47 MB
Page 11 of 409
Cockpit
Overview .......................................... 28
see Instrument cluster
Collapsible emergency spare
wheel see Emergency spare wheel
COMAND
see Separate operating instructions
Combination switch ..........................124
Combine dluggage cover and net ....300
Constant headlamp mode see Daytime driving lamps
Consumption statistics (on-board
computer) .......................................... 235
Convenience box ............................... 302
Convenience closing feature ..............96
Convenience opening/closing (air-
recirculation mode) ........................... 144
Convenience opening feature ............96
Coolan t(engine)
Checkin gthe level ......................... 324
Display message ............................ 263
Notes ............................................. 390
Temperature (on-board computer) .249
Temperature gauge ........................ 230
Warning lamp ................................. 285
Cooling
see Climate control
Cornering light function
Display message ............................ 259
Function/notes ............................. 126
Crash-responsive emergency light-
ing ....................................................... 129
Cruise control Cruise control leve r....................... 181
Deactivating ................................... 182
Display message ............................ 272
Driving system ............................... 181
Important safety notes ..................181
LIM indicator lamp .........................181
Selecting ........................................ 182
Setting aspeed .............................. 182
Storing and maintaining current
speed ............................................ .182
Cup holder
Centre console .............................. 307
Folding bench sea t........................ 309Important safety notes
..................307
Rea rcompartmen t......................... 308 D
Dashboard see Cockpit
Data
see Technical data
Date (on-board computer) ................244
Daytime driving lights Display message ............................ 261
Switching on/off (on-board com-
puter) ............................................. 244
Switching on/off (switch) ..............123
Dealership
see Qualified specialist workshop
Delaye dswitch-off
Exterio rlighting (on-board com-
puter )............................................. 245
Interior lighting .............................. 246
Diagnostics connection ......................25
Diesel ................................................. .386
Diesel particle filter ..........................178
Digital speedometer .........................235
Dipped-beam headlamps Changing bulbs .............................. 131
Display message ............................ 259
Setting for driving abroad (sym-
metrical) ........................................ 122
Setting for driving on the right/
left ................................................. 245
Switching on/off ........................... 123
DIRECT SELECTl ever
see Automatic transmission
Displa y(cleaning instructions) ........331
Display message General information .......................253
Hiding (on-board computer) ...........253
KEYLESS-GO .................................. 278
Display messages
ASSYST PLUS service interval dis-
play................................................ 325
Calling up (on-board computer) .....253
Driving systems ............................. 266
Engine ............................................ 263
Key ................................................ 278
Lights ............................................ .259 8
Index
Page 13 of 409
Automatic transmission
.................168
Brakes ........................................... 178
DISTRONI CPLUS ........................... 193
Downhill gradient ........................... 178
Driving abroad ............................... 122
Driving in winter ............................ .180
Driving on flooded road s................ 180
Driving on wet road s...................... 180
General .......................................... 178
Icy road surfaces ........................... 180
Limited braking efficiency on sal-
ted road s....................................... 179
New brake pads/linings ................179
Running-in tips ............................... 154
Snow chains .................................. 365
Symmetrical dipped bea m............. 122
Towing atrailer .............................. 221
Tyr egrip ........................................ 180
Wet road surface ........................... 179
DVD audio (on-board computer) ......238 E
EASY-ENTRY feature Activating/deactivating .................248
Function/notes ............................. 115
EASY-EXIT feature
Crash-responsive ........................... 116
Function/notes ............................. 115
Switching on/off ........................... 248
EASY-PACK convenience box ...........302
EASY-PACK folding luggage-com-
partment floor ................................... 305
EASY-PACK loading sill protector ....306
EASY-PACK load-securing kit ...........303
EASY-PACK luggage compartment
management system ........................303
EBD (electronic brake force distri-
bution)
Display message ............................ 255
Function/notes ................................ 75
ECO start/stop function
Deactivating/activating .................160
General information .......................158
Electrical fuses
see Fuses Electronic Brake force Distribution
see EBD (Electronic Brake force
Distribution)
Electronic Stability Program
see ESP ®
(Electroni cStability Program)
Electronic Traction System
see ETS/4ETS (Electronic Trac-
tionS ystem)
Emergency key
Unlocking the driver's door ..............90
Emergency key element
Function/notes ................................ 84
Locking vehicle ................................ 90
Emergency release
Driver's door .................................... 90
Fuel filler fla p................................. 174
Emergency spare wheel
Inflating the collapsible spare
wheel ............................................. 348
Notes/data .................................... 373
Storage location ............................ 339
Stowing .......................................... 340
Emergency unlocking
Boot ................................................. 94
Tailgate ............................................ 95
Vehicle ............................................. 90
Engine
Display message ............................ 263
ECO start/stop function ................158
Engine number ............................... 383
Jump-starting ................................. 354
Running irregularl y......................... 162
Starting problems ..........................162
Starting the engine with the key ....157
Starting with KEYLESS GO .............157
Stopping ........................................ 176
Tow-starting (vehicle) ..................... 358
Warning lamp (engine diagnos-
tics) ............................................... 285
Engine electronics
Notes ............................................. 381
Problem (fault) ............................... 162
Engine oil
Additives ........................................ 390
Checking the oil level ..................... 322
Checking the oil level using the
dipstick .......................................... 32310
Index
Page 14 of 409

Display message
............................ 264
Filling capacity ............................... 389
Notes about oil grades ................... 388
Notes on oil level/consumption ....322
Temperature (on-board computer) .249
Topping up ..................................... 323
Viscosity ........................................ 390
Environmental protection
Note ................................................ .23
Returning an end-of-life vehicle .......23
ESP ®
(Electronic Stability Pro-
gram) AMG menu (on-board computer) ...250
Deactivating/activating (AMG
vehicles) .......................................... 73
Deactivating/activating (except
AMG vehicles) ................................ 241
Deactivating/activating (notes;
except AMG vehicles) ......................72
Display message ............................ 254
ETS/4ETS ........................................ 72
Function/notes ................................ 72
Important safety guidelines .............72
Trailer stabilisatio n.......................... 75
Warning lamp ................................. 283
ETS/4ETS (Electronic Traction Sys-
tem) ...................................................... 72
Exhaus ttail pipe (cleaning instruc-
tions) .................................................. 330
Exterior lighting see Lights
Exterior mirrors
Adjusting ....................................... 117
Anti-dazzle mode (automatic) ........118
Folding in/ou t(automatically) .......117
Folding in/ou t(electrically) ...........117
Folding in whe nlocking (on-board
computer) ...................................... 249
Out of position (troubleshooting) ...118
Parking position ............................. 118
Resetting ....................................... 117
Storing settings (memory func-
tion) ............................................... 119 F
Fatigue Assist see ATTENTION ASSIST
Faul tmessage
see Display messages
Filler cap
see Fuel filler flap
Fire extinguisher ............................... 337
First-aid kit ......................................... 336
Flat tyre Changing a wheel/fitting the
spare wheel ................................... 344
MOExtended run-fla tsystem ......... 349
Preparing the vehicle .....................340
Raising the vehicle .........................345
TIREFIT kit ...................................... 341
Floormat ............................................ .318
Foglamps Extended range .............................. 126
Switching on/off ........................... 123
Folding bench seat (luggage com-
partment) ........................................... 111
Frequencies Garage door opene r....................... 318
Mobile phone ................................. 381
Two-way radio ................................ 381
Front foglamps
Display message ............................ 261
Fron twindscreen
see Windscreen
Fuel
Additives ........................................ 386
Consumption statistic s.................. 235
Displaying the current consump-
tion ................................................ 235
Displaying the range ......................235
Fuel gauge ....................................... 30
Grade (petrol) ................................ 385
Important safety notes ..................384
Notes about consumption .............387
Notes for AMG vehicles .................385
Problem (malfunction) ...................175
Quality (diesel )............................... 386
Refuelling ...................................... .172
Tank content/reserve fuel .............384 Index
11
Page 21 of 409
Adjusting the head restraint
..........107
Cleaning the cover .........................332
Correct driver's sea tposition ........104
Important safety notes ..................105
Multicontour sea t.......................... 109
Seat heating problem ....................113
Seat ventilation problem ................114
Storing settings (memory func-
tion) ............................................... 119
Switching sea theating on/off .......113
Switching the sea tventilation on/
off .................................................. 114
Sensors (cleaning instructions) .......330
Service see ASSYST PLUS service interval
display
Service Centre
see Qualified specialist workshop
Service menu (on-board computer) .242
Service products
AdBlue ®
special additive s.............. 388
Brake fluid ..................................... 390
Coolant (engine) ............................ 390
Engine oil ....................................... 388
Fuel ................................................ 384
Important safety notes ..................383
Washer fluid .................................. .391
Settings
Factory (on-board computer) .........249
On-board computer .......................243
Setting the air distribution ...............141
Setting the airflow ............................142
SETUP (on-board computer) .............250
Shifting to neutral (manual trans-
mission) ............................................. 164
Short journeys (diesel particle fil-
ter) ...................................................... 178
Sidebag ................................................ 46
Side marker lamp Display mes-
sage .................................................... 261
Side windows Convenience closing ........................96
Convenience opening ......................96
Important safety notes ....................95
Opening/closing .............................. 96
Problem (malfunction) .....................98
resetting .......................................... 97Skibag
................................................ 293
Sliding sunroof Important safety information ...........98
Opening/closing .............................. 99
Problem (malfunction) ...................101
Rain closing feature .........................99
Resetting ......................................... 99
see Panorama sliding sunroof
Snow chains ...................................... 365
Socket Centre console .............................. 312
Luggage compartment ...................312
Points to observe before use .........311
Rea rcompartmen t......................... 312
Spare wheel
Storage location ............................ 339
Storing ........................................... 340
see Emergency spare wheel
Specialist workshop ............................ 25
Spectacles compartment .................291
Speed, controlling see Cruise control
Spee dLimit Assist
Activating/deactivating the warn-
ing function .................................... 240
Displayin g...................................... 240
Display message ............................ 267
Display message in the multifunc-
tion displa y.................................... 209
Important safety notes ..................208
Speedometer
Activating/deactivating the addi-
tional speedometer ........................243
Digita l............................................ 235
In the Instrument cluster .................30
Segments ...................................... 231
Selecting the unit of measure-
ment .............................................. 243
see Instrument cluster
SPEEDTRONIC
Deactivating variabl e..................... 185
Display message ............................ 271
Function/notes ............................. 183
Important safety notes ..................183
LIM indicator lamp .........................183
Permanent ..................................... 185
Selecting ........................................ 184 18
Index
Page 207 of 409
might therefore issue steering instructions
too soon. This may lead to a collision. For this
reason, you should avoid using Parking Guid-
ance in such situations.
G
WARNING
Make sure that no persons or animals are in
the manoeuvring range. Otherwise, they
could be injured.
When PARKTRONIC is deactivated, Parking
Guidance is also unavailable.
Use Parking Guidance for parking spaces:
R that are parallel to the directio noftravel
R that are on straight roads, not bends
R that are on the same level as the road, i.e.
not on the pavement, for example. Parking
Guidance may not detect flat kerbs
Parking tips:
R on narrow roads, drive as closely as possi-
ble pastt he parking space.
R parking spaces that are littered, overgrown
or partially occupied by trailer drawbars
might be identified incorrectly or not at all.
R snowfall or heavy rain may lead to a parking
space being measured inaccurately.
R pay attention to the PARKTRONIC
(Y page 201) warning messages during the
parking procedure.
R when transporting a load which protrudes
from your vehicle, you must not use Parking
Guidance.
R never use Parking Guidance with snow
chains or an emergency spare wheel fitted.
R make sure that the tyre pressures are
always correct.T his hasadirec teffect on
the steering instructions.
R the way you rvehicle is positioned in the
parking space after parkin gis dependent
on various factors. These include the posi-
tion and shape of the vehicles parked in
front and behind it and the conditions of the
location. In some cases, Parking Guidance
may guide you too far or not far enough into
a parking space. In some cases, it may also lead you across or onto the kerb. If neces-
sary, cancel the parking procedure with
Parking Guidance.
! If unavoidable, you should drive over
obstacles such as kerbs slowly and not at
a sharp angle. Otherwise, you may damage
the wheels or tyres.
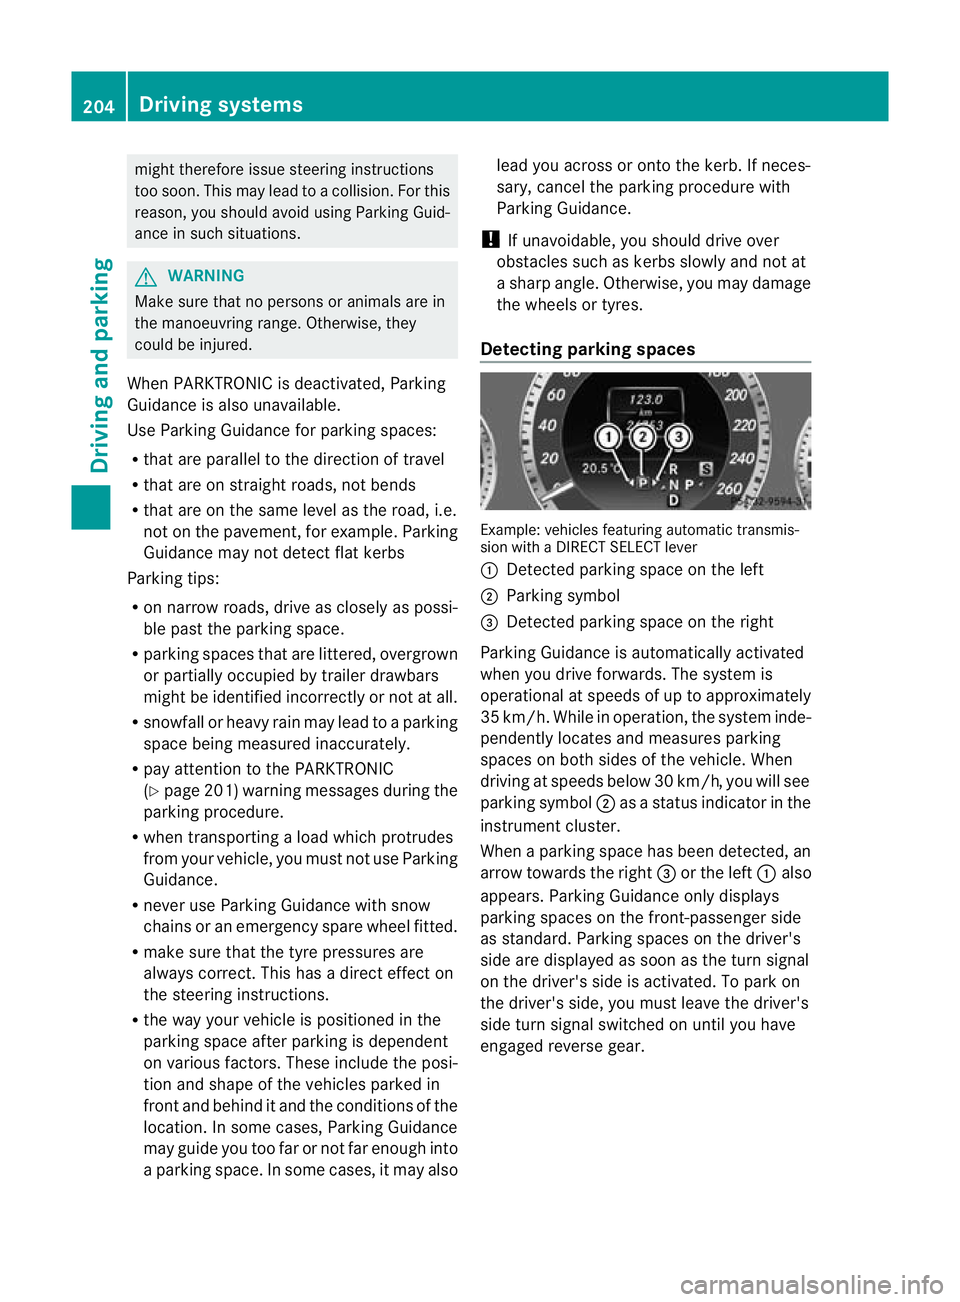
Detecting parking spaces Example: vehicles featuring automatic transmis-
sion with a DIRECT SELECT lever
:
Detected parking space on the left
; Parking symbol
= Detected parking space on the right
Parking Guidance is automatically activated
when you drive forwards. The system is
operational at speeds of up to approximately
35 km/h. While in operation, the system inde-
pendently locates and measures parking
spaces on both sides of the vehicle. When
driving at speeds below 30 km/h, you will see
parking symbol ;as a status indicator in the
instrument cluster.
When a parking space has been detected, an
arrow towards the right =or the left :also
appears. Parking Guidance only displays
parking spaces on the front-passenger side
as standard. Parking spaces on the driver's
side are displayed as soon as the turn signal
on the driver's side is activated. To park on
the driver's side, you must leave the driver's
side turn signal switched on until you have
engaged reverse gear. 204
Driving systemsDriving and parking
Page 308 of 409
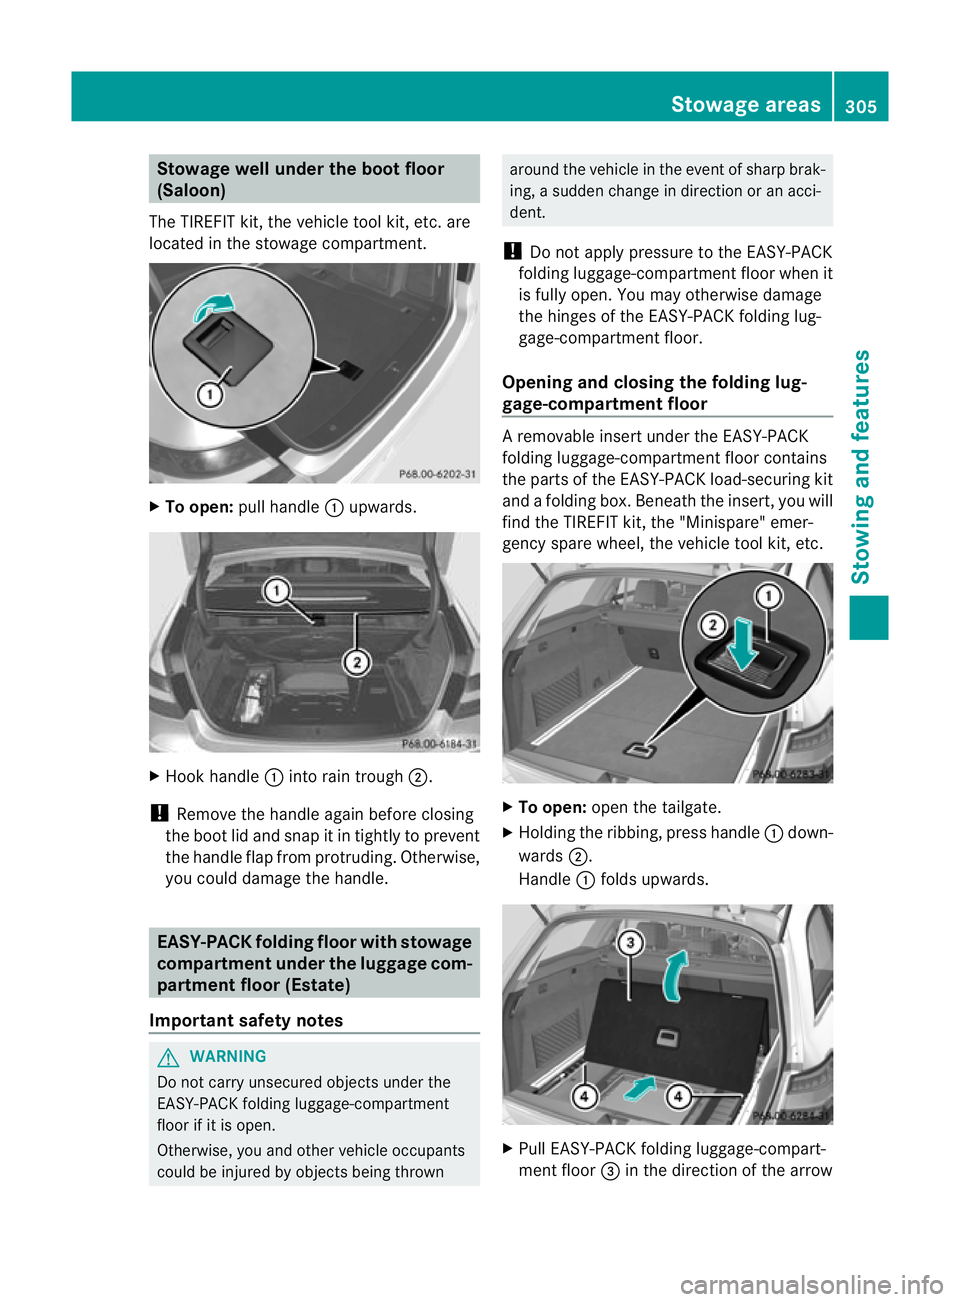
Stowage well under the boot floor
(Saloon)
The TIREFIT kit, the vehicle tool kit, etc. are
located in the stowage compartment. X
To open: pull handle :upwards. X
Hook handle :into rain trough ;.
! Remove the handle again before closing
the boot lid and snap it in tightly to prevent
the handle flap from protruding. Otherwise,
you could damage the handle. EASY-PACK folding floor with stowage
compartment under the luggage com-
partment floor (Estate)
Important safety notes G
WARNING
Do not carry unsecured objects under the
EASY-PACK folding luggage-compartment
floor if it is open.
Otherwise, you and other vehicle occupants
could be injured by objectsb eing thrown around the vehicle in the event of sharp brak-
ing, a sudden change in direction or an acci-
dent.
! Do not apply pressure to the EASY-PACK
folding luggage-compartment floor when it
is fully open. You may otherwise damage
the hinges of the EASY-PACK folding lug-
gage-compartmen tfloor.
Opening and closing the folding lug-
gage-compartment floor A removable insert under the EASY-PACK
folding luggage-compartmen
tfloor contains
the parts of the EASY-PACK load-securing kit
and a folding box. Beneath the insert, you will
find the TIREFIT kit ,the "Minispare" emer-
gency spare wheel, the vehicle tool kit, etc. X
To open: open the tailgate.
X Holding the ribbing, press handle :down-
wards ;.
Handle :folds upwards. X
Pull EASY-PACK folding luggage-compart-
ment floor =in the direction of the arrow Stowage areas
305Stowing and features Z
Page 341 of 409
i
Vehicles without a spare wheel are not
equipped with the tools needed to change
a wheel when they leave the factory, e.g. a
jack or wheel wrench. Country-specific
deviations are possible. Some tools for
changing a wheel are specific to the vehi-
cle. Tools approved for yourv ehicle are
available at a qualified specialist workshop.
X Vehicles with a TIREFIT kit: lift up the
boot floor/luggage compartment floor
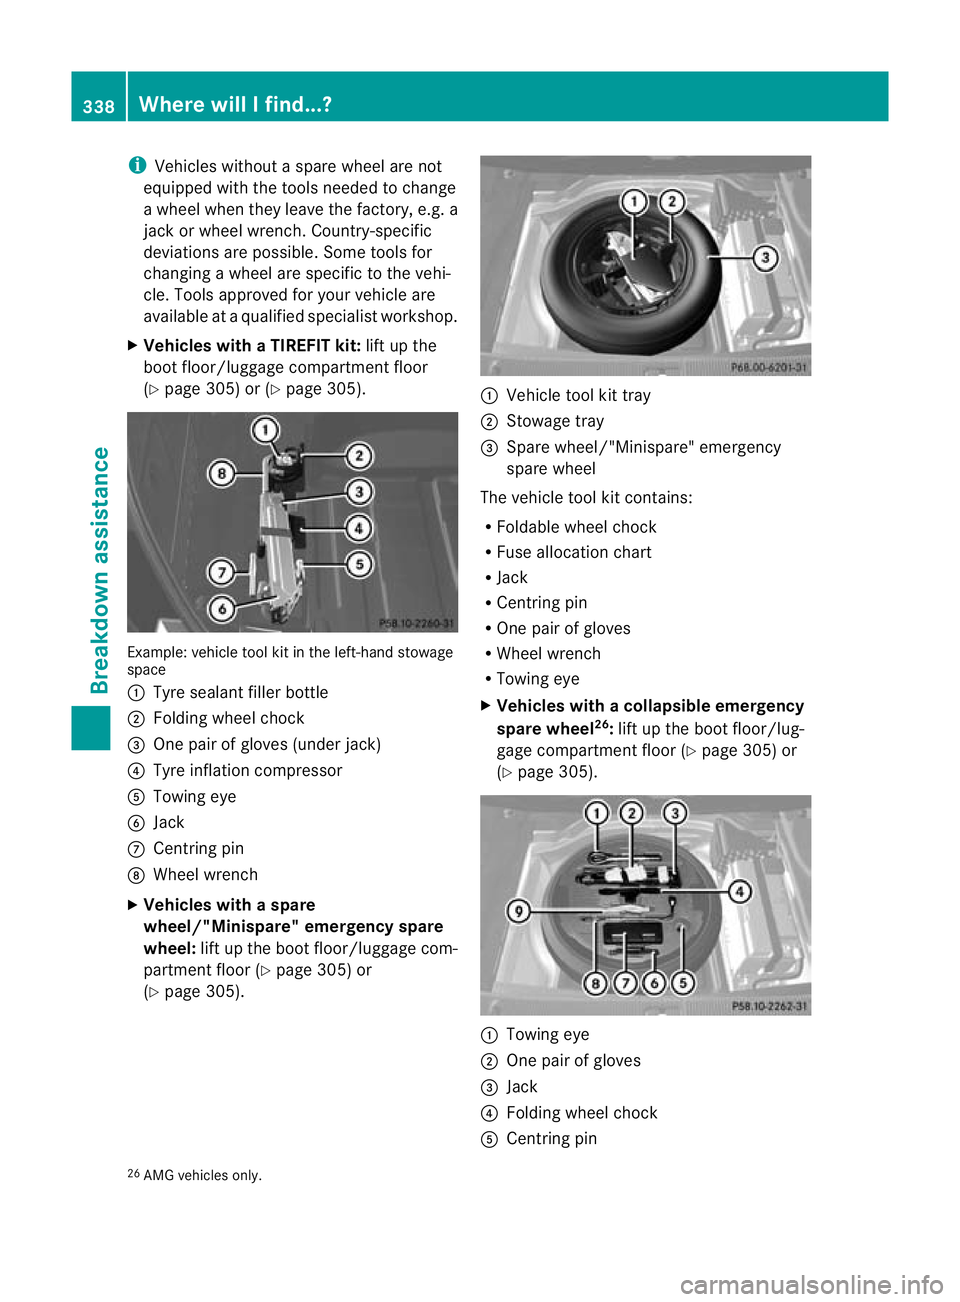
(Y page 305) or (Y page 305). Example: vehicle tool kit in the left-hand stowage
space
:
Tyre sealant filler bottle
; Folding wheel chock
= One pair of gloves (under jack)
? Tyre inflation compressor
A Towing eye
B Jack
C Centring pin
D Wheel wrench
X Vehicles with a spare
wheel/"Minispare" emergency spare
wheel: lift up the boot floor/luggage com-
partment floor (Y page 305) or
(Y page 305). :
Vehicle tool kit tray
; Stowage tray
= Spare wheel/"Minispare" emergency
spare wheel
The vehicle tool kit contains:
R Foldable wheel chock
R Fuse allocation chart
R Jack
R Centring pin
R One pair of gloves
R Wheel wrench
R Towing eye
X Vehicles with acollapsible emergency
spare wheel 26
:lift up the boot floor/lug-
gage compartment floor (Y page 305) or
(Y page 305). :
Towing eye
; One pair of gloves
= Jack
? Folding wheel chock
A Centring pin
26 AMG vehicles only. 338
Where will I find...?Breakdown assistance
Page 342 of 409
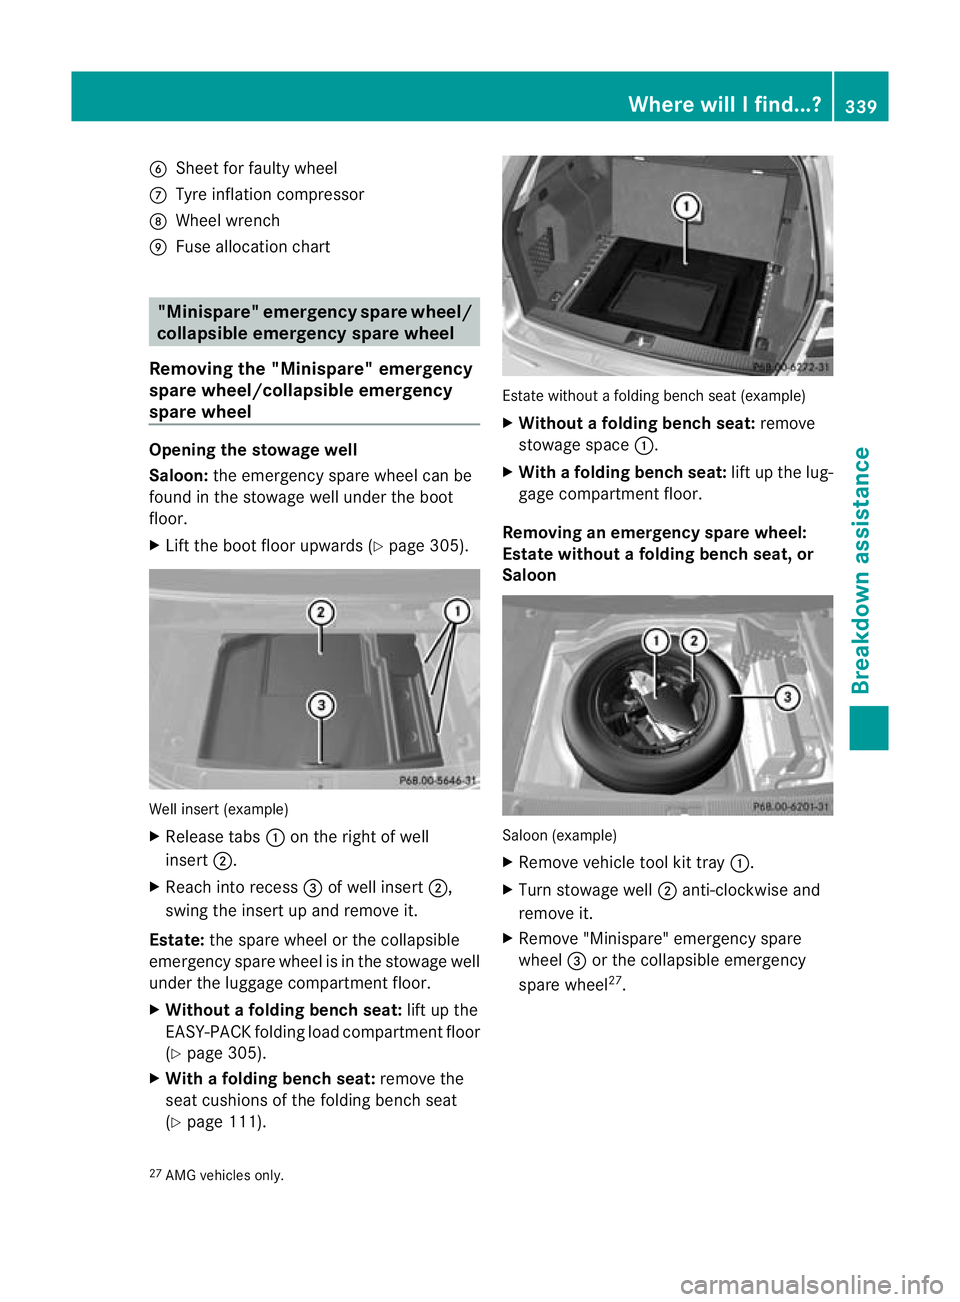
B
Shee tfor faulty wheel
C Tyre inflation compressor
D Wheel wrench
E Fuse allocation chart "Minispare" emergency spare wheel/
collapsible emergency spare wheel
Removing the "Minispare" emergency
spare wheel/collapsible emergency
spare wheel Opening the stowage well
Saloon:
the emergency spare wheel can be
found in the stowage well under the boot
floor.
X Lift the boot floor upwards (Y page 305).Well insert (example)
X
Release tabs :on the right of well
insert ;.
X Reach into recess =of well insert ;,
swing the insert up and remove it.
Estate: the spare wheel or the collapsible
emergency spare wheel is in the stowage well
under the luggage compartment floor.
X Without a folding bench seat: lift up the
EASY-PACK folding load compartment floor
(Y page 305).
X With a folding bench seat: remove the
seat cushions of the folding bench seat
(Y page 111). Estate without a folding bench seat (example)
X
Without a folding bench seat: remove
stowage space :.
X With afolding bench seat: lift up the lug-
gage compartmen tfloor.
Removing an emergency spare wheel:
Estate without a folding bench seat, or
Saloon Saloon (example)
X
Remove vehicle tool kit tray :.
X Turn stowage well ;anti-clockwise and
remove it.
X Remove "Minispare" emergency spare
wheel =or the collapsible emergency
spare wheel 27
.
27 AMG vehicles only. Where will I find...?
339Breakdown assistance
Page 343 of 409
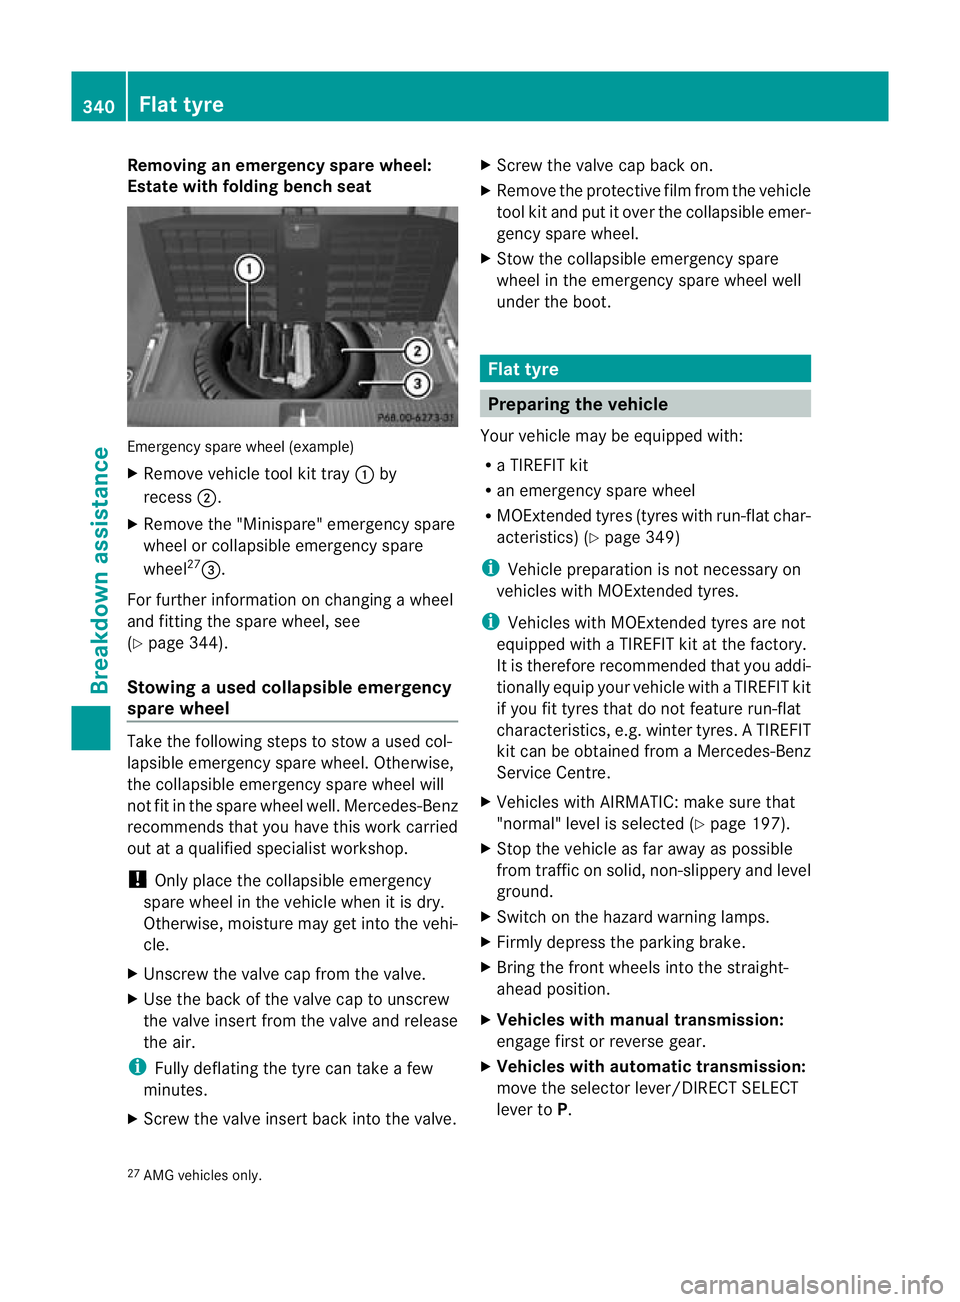
Removing an emergenc
yspare wheel:
Estate with folding benc hseat Emergency spare wheel (example)
X Remove vehicle tool kit tray :by
recess ;.
X Remove the "Minispare" emergency spare
wheel or collapsible emergency spare
wheel 27
=.
For further information on changing a wheel
and fitting the spare wheel, see
(Y page 344).
Stowing aused collapsible emergency
spare wheel Take the following steps to stow a used col-
lapsible emergency spare wheel. Otherwise,
the collapsible emergency spare wheel will
not fit in the spare wheel well. Mercedes-Benz
recommends that you have this work carried
out at a qualified specialist workshop.
! Only place the collapsible emergency
spare wheel in the vehicle when it is dry.
Otherwise, moisture may get into the vehi-
cle.
X Unscrew the valve cap from the valve.
X Use the back of the valve cap to unscrew
the valve insert from the valve and release
the air.
i Fully deflating the tyre can take a few
minutes.
X Screw the valve insert back into the valve. X
Screw the valve cap back on.
X Remove the protective film from the vehicle
tool kit and put it over the collapsible emer-
gency spare wheel.
X Stow the collapsible emergency spare
wheel in the emergency spare wheel well
under the boot. Flat tyre
Preparing the vehicle
Your vehicle may be equipped with:
R a TIREFIT kit
R an emergency spare wheel
R MOExtended tyres (tyres with run-flat char-
acteristics) (Y page 349)
i Vehicle preparation is not necessary on
vehicles with MOExtended tyres.
i Vehicles with MOExtended tyres are not
equipped with a TIREFIT kit at the factory.
It is therefore recommended that you addi-
tionally equip your vehicle with a TIREFIT kit
if you fit tyres that do not feature run-flat
characteristics, e.g. winter tyres. A TIREFIT
kit can be obtained from a Mercedes-Benz
Service Centre.
X Vehicles with AIRMATIC: make sure that
"normal" level is selected (Y page 197).
X Stop the vehicle as far away as possible
from traffic on solid, non-slippery and level
ground.
X Switch on the hazard warning lamps.
X Firmly depress the parking brake.
X Bring the fron twheels into the straight-
ahead position.
X Vehicles with manual transmission:
engage first or reverse gear.
X Vehicles with automatic transmission:
move the selector lever/DIRECT SELECT
lever to P.
27 AMG vehicles only. 340
Flat tyreBreakdown assistance
Page 347 of 409
X
To reduce the tyre pressure: press pres-
sure release button Enext to pressure
gauge F.
X Stow the tyre sealant bottle, the tyre infla-
tio nc ompressor and the warning triangle.
X Drive to the nearest specialist qualified
workshop and have the tyre changed there.
X Have the tyre sealant bottle replaced as
soon as possible at a qualified specialist
workshop. H
Environmental note
Have the used tyre sealant bottle disposed of
professionally, e.g. at aqualified specialist
workshop.
X Have the tyre sealan tbottle replaced every
four years at a qualified specialist work-
shop. Changing
awheel and fitting the spare
wheel
Preparing the vehicle When using an emergency spare wheel or
spare wheel of a different size, you must not
exceed the maximum speed of 80 km/h.
G
WARNING
The wheel/tyre dimensions and the tyre type
of the spare wheel/emergency spare wheel
and the wheel to be replaced may differ. Fit-
ting a spare wheel/emergency spare wheel
may severely impair the driving characteris-
tics. There is a risk of accident.
To prevent hazardous situations:
R Adap tyour driving style accordingly and
drive carefully.
R Never fit more than one spare wheel/emer-
gency spare wheel if the dimesions are dif-
ferent to those of the wheel being replaced.
R Only use a spare wheel/emergency spare
wheel briefly if the dimesions are different
to those of the wheel being replaced. R
Do not switch off ESP ®
.
R Have the spare wheel/emergency spare
wheel in question replaced at the nearest
qualified specialist workshop. Make sure
that the wheel/tyre dimensions and tyre
type are correct.
i Vehicles without an emergency spare
wheel/spare wheel are not equipped with
wheel-changing tools at the factory. For
more information on which tools are
required to perform a wheel change on your
vehicle, e.g. wheel chock, wheel wrench or
centring pin, consult a Mercedes-Benz
Service Centre.
X Prepare the vehicle as described
(Y page 340).
X If a trailer is coupled to the vehicle, uncou-
ple it.
X Remove the following items (depending on
the vehicle's equipment) from the stowage
well under the boot/luggage compartment
floor:
R
the emergency spare wheel
R the wheel wrench
R the folding wheel chock
R the jack
R the centring pin
R the tyre inflation compressor
X Secure the vehicle to prevent it from rolling
away.
Securing the vehicle to prevent it from
rolling away If your vehicle is equipped with a wheel chock,
it can be found in the vehicle tool kit
(Y
page 337).
The folding wheel chock is an additional
securing measure to prevent the vehicle from
rolling away, for example when changing a
wheel. 344
Flat tyreBreakdown assistance