start stop button MERCEDES-BENZ E-CLASS SALOON 2015 Owners Manual
[x] Cancel search | Manufacturer: MERCEDES-BENZ, Model Year: 2015, Model line: E-CLASS SALOON, Model: MERCEDES-BENZ E-CLASS SALOON 2015Pages: 497, PDF Size: 16.23 MB
Page 14 of 497
Electronic Stability Program
see ESP ®
(Electronic Stabilit yProgram)
Emergency
Automatic measures after an acci-
den t................................................. 58
Emergency key
Unlockin gthe driver' sdoor ............ 102
Emergency key element
Function/notes ................................ 96
Insertin g......................................... .97
Lockin gvehicle .............................. 103
Removing ........................................ .97
Emergency release
Driver's door .................................. 102
Fuel filler flap ................................ .202
Emergency spare wheel
General notes ................................ 465
Important safety notes .................. 465
Inflating the collapsibl espare
wheel ............................................. 467
Removing ....................................... 465
Storage location ............................ 465
Stowing .......................................... 466
Technical data ............................... 468
Emergency unlocking
Tailgate .......................................... 110
Vehicle .......................................... .102
Engine
Display message ............................ 311
ECO start/stop function ................ 183
Engine numbe r............................... 473
Jump-starting ................................. 405
Running irregularl y......................... 187
Starting problems .......................... 187
Starting the engine with the key .... 182
Starting with KEYLESS GO ............. 182
Stopping ........................................ 206
Tow-starting (vehicle )..................... 411
Warning lamp (engine diagnos-
tics) ............................................... 336
Engine electronics
Note s............................................. 470
Problem (fault) ............................... 187
Engine oil
Additives ........................................ 479
Checking the oi llev el ..................... 380
Checking the oi llev el using the
dipstick .......................................... 381 Displa
ymessage ............................ 313
Filling capacity ............................... 478
Note sabout oilg rade s................... 478
Note sono illevel/consumption .... 380
Temperature (on-board computer, AMG vehicles) ................................ 296
Topping up ..................................... 381
Viscosity ........................................ 479
Environmental protection
Returning an end-of-life vehicl e....... 24
ESP ®
(Electroni cStability Pro-
gram)
Activating/deactivating (except
AMG vehicles) .................................. 84
Activating/deactivating (on-
board computer, except AMG
vehicles) ........................................ 287
AMG menu (on-board computer) ... 296
Characteristics ................................. 84
Deactivating/activating (button
in AMG vehicles) .............................. 85
Displa ymessage ............................ 300
ETS/4ETS ........................................ 83
Function/note s................................ 83
Genera lnotes .................................. 83
Important safety guideline s............. 83
Trailer stabilisation .......................... 86
Warning lamp ................................. 333
ETS/4ETS (Electroni cTraction Sys-
tem) ...................................................... 83
Exhaus tpipe (cleaning instruc-
tions) .................................................. 390
Exterior lighting
Setting soptions ............................. 142
see Lights
Exterior mirrors
Adjusting ....................................... 136
Anti-dazzle mod e(automatic) ........ 137
Folding in when locking (on-board computer) ...................................... 295
Folding in/out (automatically )....... 137
Folding in/out (electrically) ........... 137
Ou tofp osition (troubleshooting )... 137
Parking position ............................. 138
Resetting ....................................... 137
Storing settings (memory func-
tion) ............................................... 139 Index
11
Page 23 of 497
Specialist workshop
............................27
Spectacles compartment ................. 343
Speed, controlling
see Cruise control
Speedometer
Activating/deactivating the addi-
tional speedometer ........................ 289
Digital ............................................ 281
In the Instrument cluster ................. 34
Segments. ..................................... 277
Selectingt he unit of measure-
ment ..............................................2 89
see Instrument cluster
SPEEDTRONIC
Deactivating variabl e..................... 217
Display message ............................ 320
Function/notes ............................ .215
Important safety notes .................. 215
LIM indicator lamp ......................... 215
Permanent ..................................... 217
Selecting ........................................ 216
Storing the current spee d.............. 216
Variabl e......................................... 215
SPORT handlin gmode
Activating/deactivating (AMG
vehicles) .......................................... 85
Warning lamp ................................. 334
Start/sto pfunction
see ECO start/stop function
Startin g(engine) ................................ 181
STEER CONTROL .................................. 89
Steering (display message) .............. 327
Steering Assist and Stop&Go Pilot
(DISTRONI CPLUS)
Activating/deactivating ................. 288
Displa ymessage ............................ 320
Steering assistant STEER CON-
TROL
see STEER CONTROL
Steering wheel
Adjusting (electrically) ................... 134
Adjusting (manually) ...................... 133
Butto noverview ............................... 36
Buttons (on-board computer) ......... 277
Cleaning ......................................... 391
Gearshift paddle s........................... 195
Important safety notes .................. 133 Steering whee
lheating .................. 134
Storing settings (memory func-
tion) ............................................... 139
Steering whee lgearshift paddles .... 195
Steering whee lheating
Problem (malfunction) ................... 135
Switching on/of f........................... 134
Stopwatch (RACETIMER) ................... 296
Stowag eareas ................................... 342
Stowag ecom partments
Armrest (under )............................. 344
Centre console .............................. 344
Cu ph olde r..................................... 360
Glove compartment ....................... 343
Important safety information ......... 343
Rear ............................................... 345
Spectacles compartment ............... 343
Unde rdriver' sseat/front-
passenger sea t.............................. 345
Stowag enet....................................... 346
Stowag espace
Stowag enet ................................... 346
Stowag ewellb enea th the boot
floor .................................................... 356
Summe rtyres .................................... 418
Sun blind
Rear sid ewindow s......................... 363
Sun visor ............................................ 363
Surround lighting (on-board com-
puter) .................................................. 292
Suspension tuning
AIRMATI C...................................... 232
AMG RIDE CONTROL sports sus-
pensio n.......................................... 233
SETUP (on-board computer) .......... 296 T
Tail lamps Displa ymessage ............................ 308
Tailgate
Displa ymessage ............................ 326
Emergency unlocking ..................... 110
Important safety notes .................. 103
Limiting the opening angle ............. 108
Opening dimensions ...................... 481
Opening/closing (automatically
from inside )................................... 108 20
Index
Page 47 of 497
Useful information
i This Owner's Manual describes all mod-
els, series and optional equipment for your
vehicle that were available at the time of
going to press. National variation sare pos-
sible. Not ethat your vehicle may not be
equipped with all of the function sdescri-
bed. This is also the case for system sand
function srelevan ttosafety.
i Read the information on qualified special-
ist workshops: (Y page 27). Panic alarm
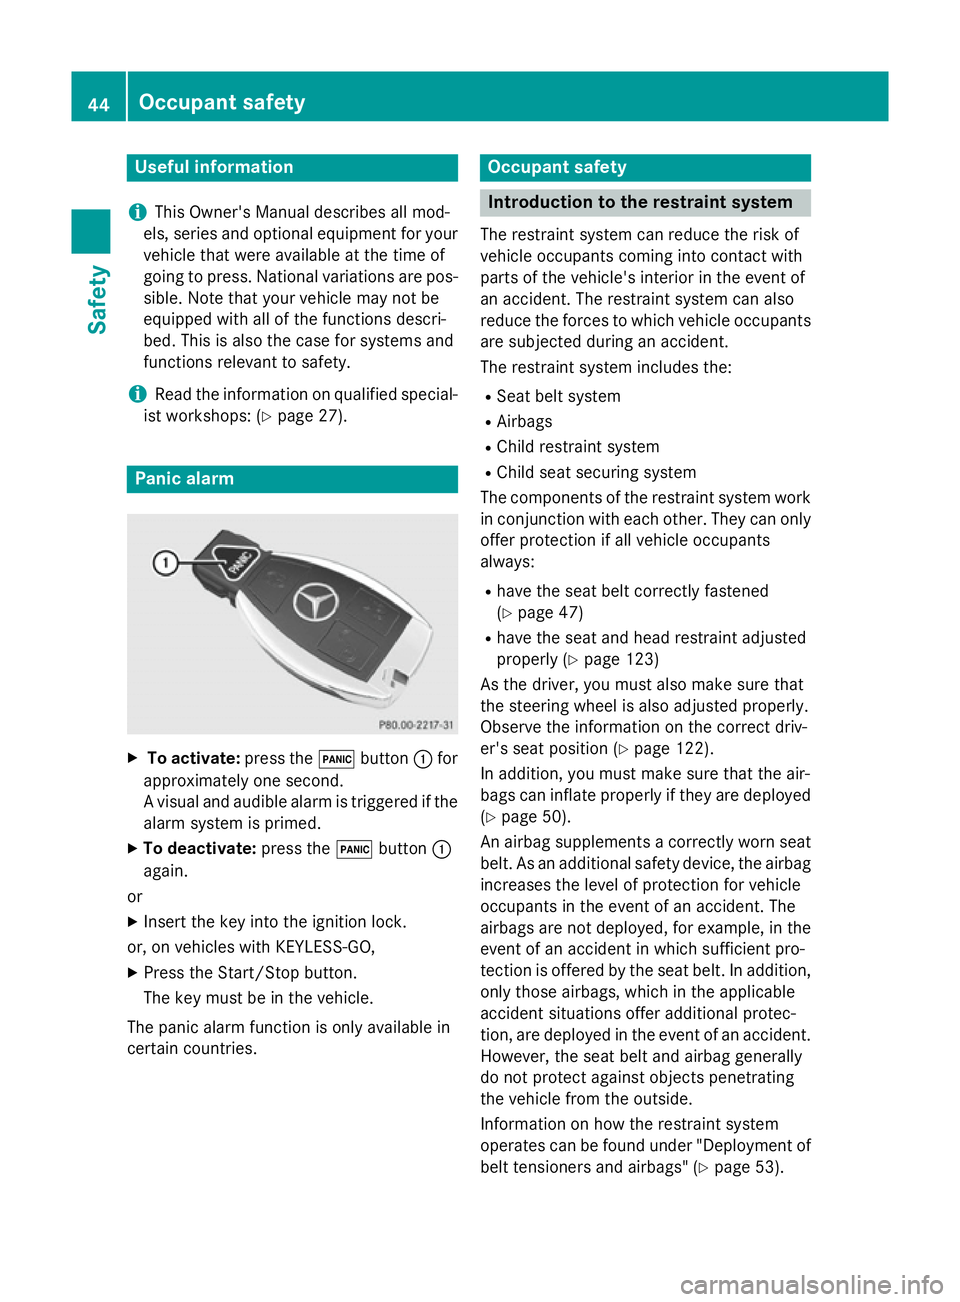
X
To activate: press the!button :for
approximately one second.
Av isual and audible alarm is triggered if the
alarm system is primed.
X To deactivate: press the!button :
again.
or X Insert the key int othe ignition lock.
or, on vehicles with KEYLESS‑GO, X Press the Start/Stop button.
The key must be in the vehicle.
The panic alarm function is only available in
certain countries. Occupant safety
Introduction to the restraint system
The restraint system can reduce the risk of
vehicle occupants comin gintoc ontact with
parts of the vehicle' sinterior in the even tof
an accident. The restraint system can also
reduce the forces to which vehicle occupants
are subjected during an accident.
The restraint system includes the:
R Seat belt system
R Airbags
R Child restraint system
R Child seat securin gsystem
The components of the restraint system work
in conjunction with each other .They can only
offer protection if all vehicle occupants
always:
R have the seat belt correctly fastened
(Y page 47)
R have the seat and head restraint adjusted
properly (Y page 123)
As the driver, you must also make sure that
the steering wheel is also adjusted properly.
Observ ethe information on the correct driv-
er's seat position (Y page 122).
In addition ,you must make sure that the air-
bags can inflat eproperly if they are deployed
(Y page 50).
An airbag supplement sacorrectly worn seat
belt. As an additional safet ydevice, the airbag
increases the level of protection for vehicle
occupants in the even tofanaccident. The
airbags are not deployed, for example, in the even tofana ccidentinwhich sufficient pro-
tection is offered by the seat belt. In addition,
only thos eairbags, which in the applicable
acciden tsituation soffer additional protec-
tion ,are deployed in the even tofanaccident.
However ,the seat belt and airbag generally
do not protect against objects penetrating
the vehicle from the outside.
Information on how the restraint system
operates can be found under "Deploymen tof
belt tensioner sand airbags" (Y page 53).44
Occupant safetySafety
Page 70 of 497
PASSENGERA
IR BAG OFF indicator lamp :
shows you whether the front-passenger front airbag is disabled.
X Turn the key to position 1or 2in the ignition
lock or, on vehicles with KEYLESS-GO,
press the Start/Stop button once or twice. The system carries out aself-diagnosis.
The PASSENGERA IR BAG OFF indicator lamp
must light up for approximately six seconds.
If, after the system self-test, the
PASSENGER AIR BAG OFF indicator lamp:
R lights up ,the front-passenger fronta irbag
is disabled. It will then not be deployed in
the event of an accident.
R is not lit,t he sensor system did not detect
ac hild restraint system with transponder
for automatic child seat recognition. If, in
the case of an accident ,all deployment cri-
teria are met, the front-passenger fronta ir-
bag is deployed. G
WARNING
Electronic devices on the front-passenger
seat can affect the function of the automatic
child seat recognition, for example:
R laptop
R mobile phone
R transponder cards such as ski passes or
access passes
The front-passenger fronta irbag could deploy
unintentionally or not function as intended
during an accident .This poses an increased
risk of injury or even fatal injury.
Do not place any of the devices mentioned
above or similar devices on the front-
passenger seat. Be aware of the status of the front-passenger fronta irbag both before and
during the journey. Child restraint system on the front-
passenger seat
General notes Accident statistics show that children
secured in the rear seats are safer than chil-
dren secured in the front-passenger seat. For
this reason, Mercedes-Benz strongly advises
that you install achild restraint system on a
rear seat.
Vehicles with automatic child seat recogni-
tion on the front-passenger seat: if it is abso- lutely necessary to fit achild restraint system
to the front-passenger seat, alway sobserve
the information on "Automatic child seat rec-
ognition on the front-passenger seat"
(Y page 65).
You can thus avoid the risks that could arise
as aresult of:
R ac hild restraint system that is not detected
by the automatic child seat recognition
sensor system
R the unintentional disabling of the front-
passenger fronta irbag
R the unsuitable positionin gofthe child
restraint system, e.g. too close to the dash-
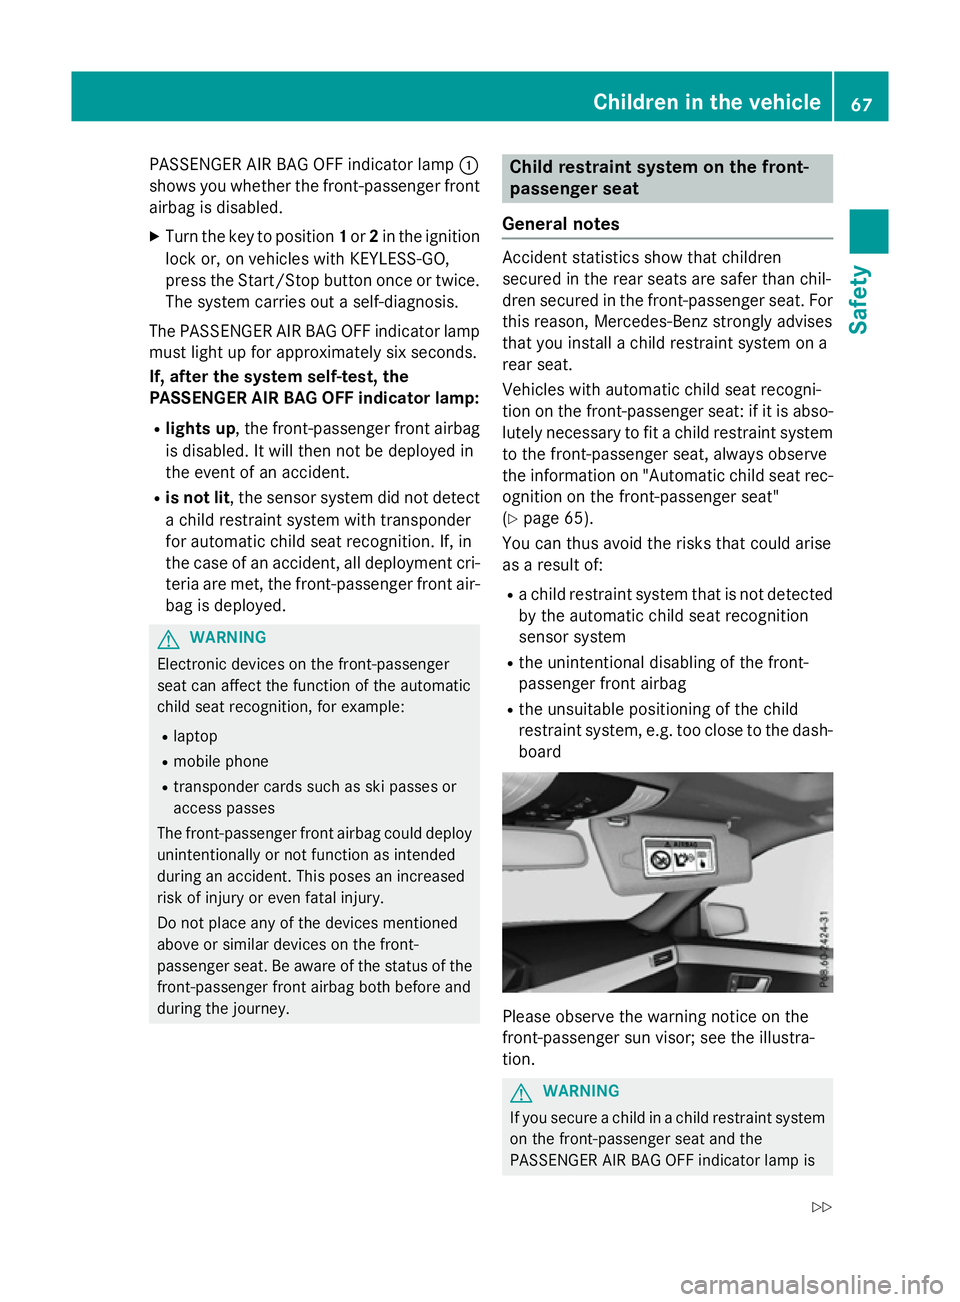
board Please observe the warning notice on the
front-passenger sun visor; see the illustra-
tion.
G
WARNING
If you secure achild in achild restraint system
on the front-passenger seat and the
PASSENGER AIR BAG OFF indicator lamp is Children in the vehicle
67Safety
Z
Page 93 of 497
X
To switc hthe alarm of fwitht he key:
press the %or& button on the key.
The alar misswitched off.
or
X Remov ethe Start/Stop button from the
ignition lock.
X Insert the key into the ignition lock.
The alar misswitched off.
X To switc hthe alarm of fusing KEYLESS-
GO: grasp the outside door handle. The key
must be outside the vehicle.
The alar misswitched off.
or X Press the Start/Stop button on the dash-
board. The key must be insid ethe vehicle.
The alar misswitched off.
The alar misnot switched off, eve nifyou
close the open door tha thas triggered it, for
example. Tow-away protection
Function An audibl
eand visua lalarm is triggered if your
vehicle's angle of inclinatio nisa ltere dw hile
tow-away protection is primed .Thisc an occur
if the vehicl eisjacke dupono ne side,for
example.
Priming X
Make sure that:
R the doors ar eclosed
R the boot lid/tailgate is closed
Onl ythen is the tow-away protection
primed.
X Lock the vehicl ewitht he key or KEYLESS-
GO.
Tow-away protection is primed after
approximatel y30s econd s. De
activating X
Unlock the vehicle with the key or KEY-
LESS-GO.
or X Insert the key into the ignition lock.
Tow-awa yprotection is deactivated auto-
matically.
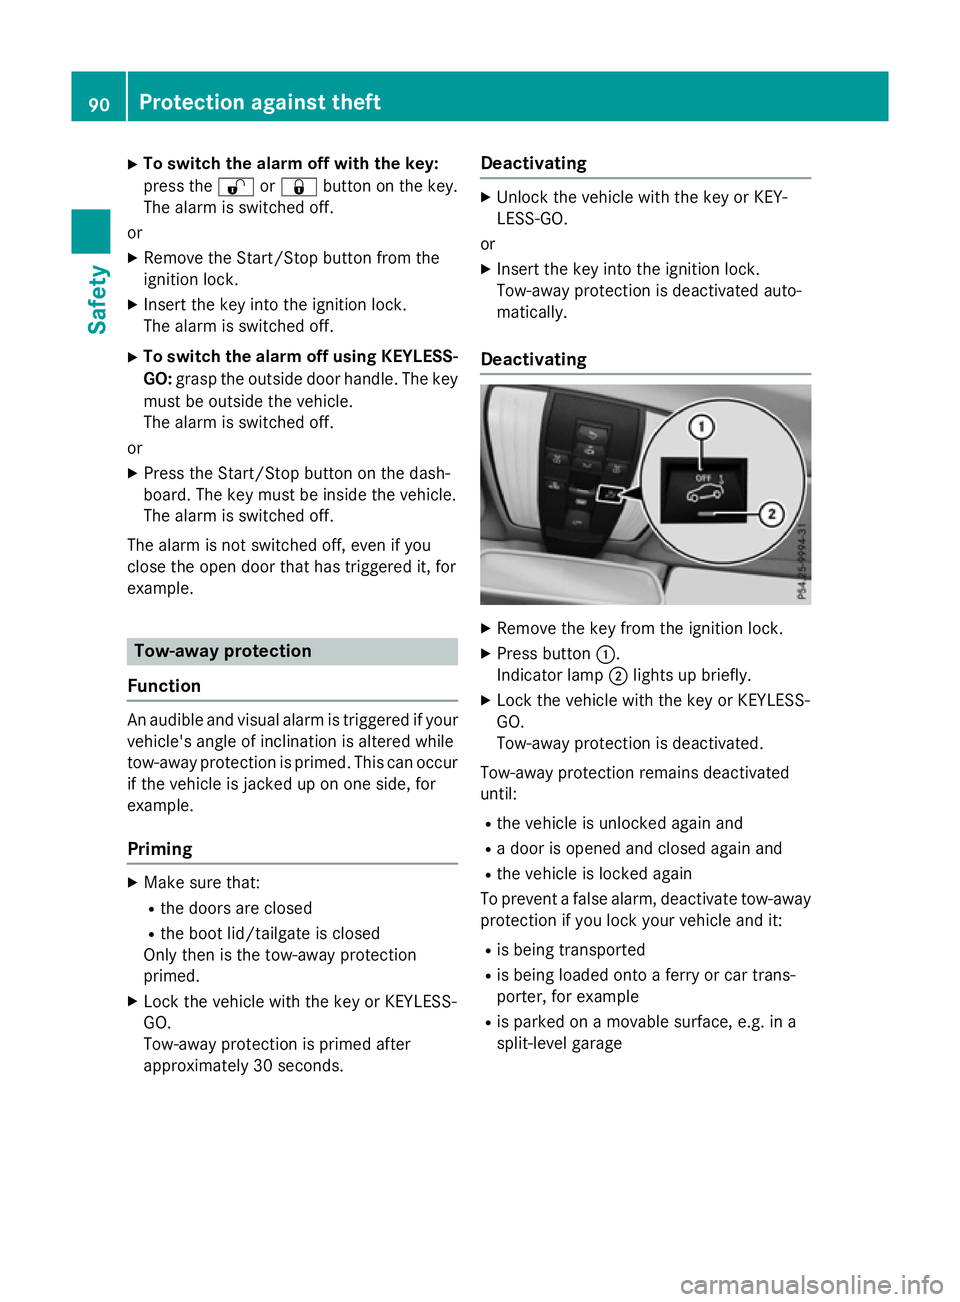
Deactivating X
Remove the key from the ignition lock.
X Press button :.
Indicator lamp ;lights up briefly.
X Lock the vehicle with the key or KEYLESS-
GO.
Tow-awa yprotection is deactivated.
Tow-awa yprotection remains deactivated
until:
R the vehicle is unlocked again and
R ad oor is opened and close dagain and
R the vehicle is locked again
To prevent afalse alarm, deactivate tow-away
protection if you lock you rvehicle and it:
R is being transported
R is being loaded onto aferry or car trans-
porter, for example
R is parked on amovable surface, e.g. in a
split-leve lgarage 90
Protection against theftSafety
Page 100 of 497
There are several ways to deactivate the
alarm:
X To deactivat ethe alarmw ith the key:
press the %or& button on the key.
or
X Insert the key into the ignition lock.
or X To deactivat ethe alarmw ith KEYLESS-
GO: press the Start/Stop button in the igni-
tion lock. The key must be in the vehicle.
or
X Lock or unlock the vehicle using KEYLESS-
GO. The key must be outside the vehicle.
If you unlock the vehicle using the emergency
key element, the fuel filler flap will not be
unlocked automatically.
X To unlock the fuel filler flap: insert the
key into the ignition lock.
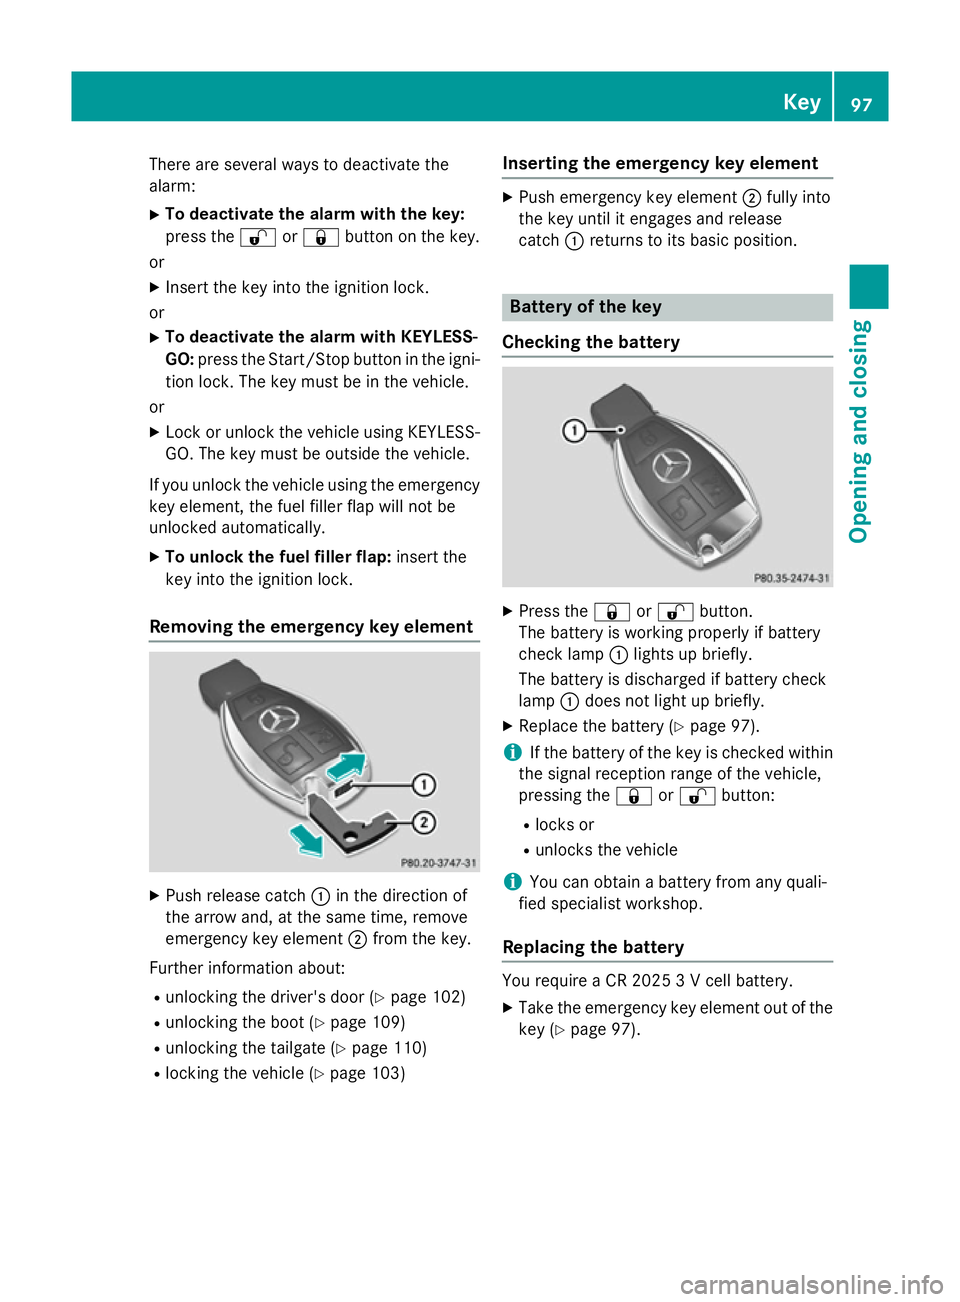
Removing the emergency key element X
Push release catch :in the direction of
the arrow and, at the same time, remove
emergenc ykey element ;from the key.
Further information about: R unlockin gthe driver's door (Y page 102)
R unlockin gthe boot (Y page 109)
R unlockin gthe tailgate (Y page 110)
R lockin gthe vehicle (Y page 103) Inserting the emergency key element X
Push emergenc ykey element ;fully into
the key until it engages and release
catch :return stoits basic position. Battery of the key
Checking the battery X
Press the &or% button.
The battery is working properly if battery
check lamp :lights up briefly.
The battery is discharged if battery check
lamp :does not light up briefly.
X Replace the battery (Y page 97).
i If the battery of the key is checked within
the signal reception range of the vehicle,
pressing the &or% button:
R locks or
R unlocks the vehicle
i You can obtain
abattery from any quali-
fied specialist workshop.
Replacing the battery You require
aCR20253Vc ell battery.
X Take the emergenc ykey element out of the
key (Y page 97). Key
97Opening and closing Z
Page 110 of 497
Example: Saloon
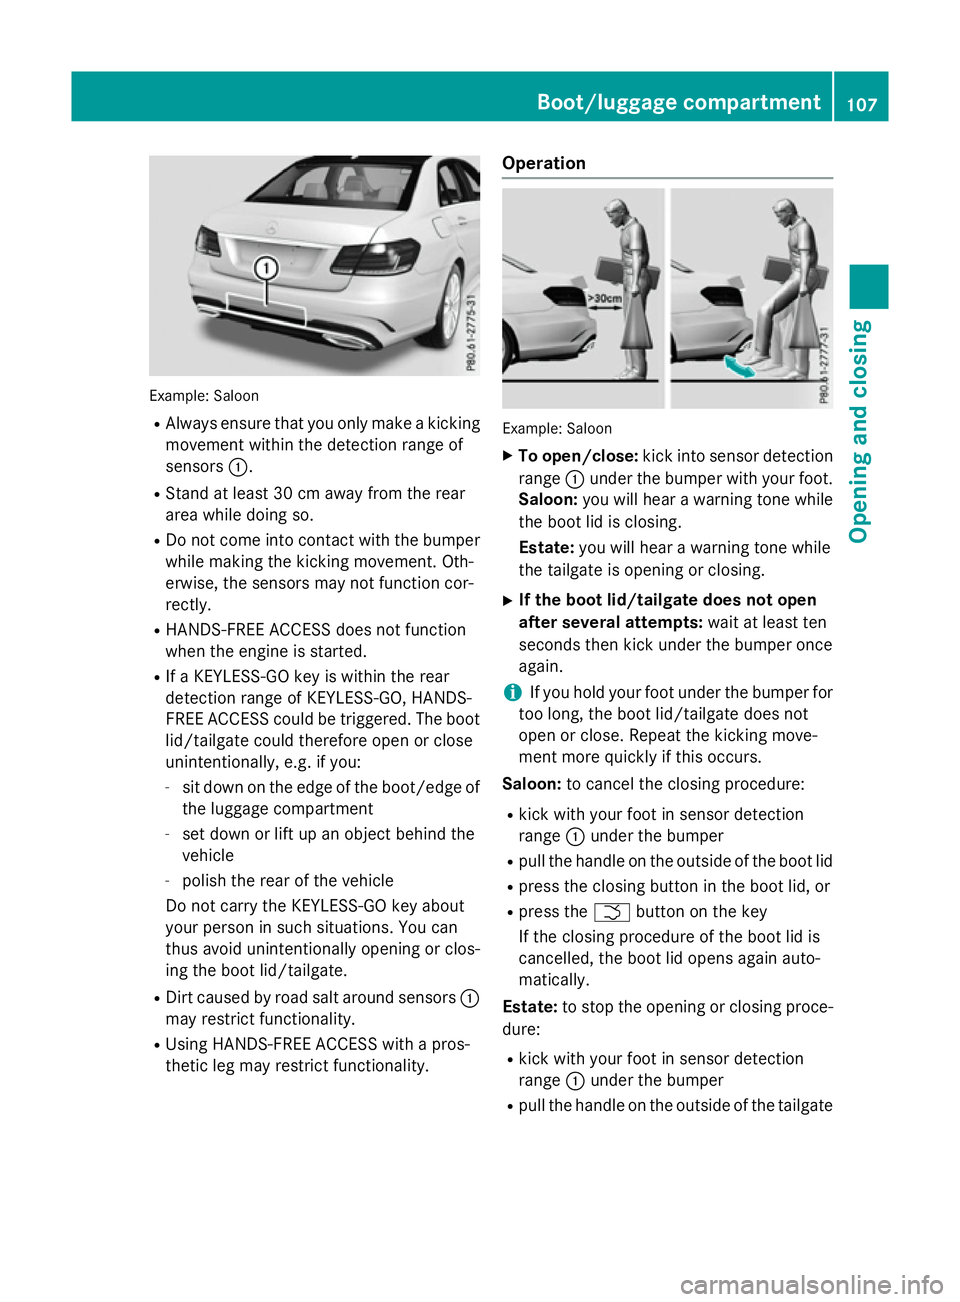
R Alway sensure tha tyou onl ym akeak icking
movement withi nthe detection range of
sensors :.
R Stand at leas t30cmawayfrom the rear
area whil edoing so.
R Do not come into contact with the bumper
whil emaking the kicking movement. Oth-
erwise, the sensors ma ynot functio ncor-
rectly.
R HANDS-FREE ACCESS does not function
when the engine is started.
R IfaK EYLESS-GO key is withi nthe rear
detection range of KEYLESS-GO ,HANDS-
FREE ACCESS could be triggered .The boot
lid/tailgate could therefore open or close
unintentionally, e.g .ifyou:
- sitd ow nont he edge of the boot/edg eof
the luggage compartment
- set down or lift up an object behind the
vehicle
- polish the rea rofthe vehicle
Do not carry the KEYLESS-GO key about
your perso ninsuchs ituations. Yo ucan
thu savoid unintentionall yopening or clos-
ing the boot lid/tailgate.
R Dirt caused by roa dsalta round sensors :
ma yrestrict functionality.
R Using HANDS-FREE ACCESS with apros-
theti cleg ma yrestrict functionality. Operation
Example: Saloon
X To open/close: kick into sensor detection
range :under the bumpe rwithy ourfoot.
Saloon: youw illh earaw arning tone while
the boot li disclosing.
Estate: youw illh earaw arning tone while
the tailgate is opening or closing.
X If the boot lid/tailgate doe snotopen
afte rsever al attempts: wait at leastten
second sthen kick under the bumpe ronce
again.
i If yo
uholdy ourfoo tunder the bumpe rfor
too long, the boot lid/tailgate does not
open or close. Repeat the kicking move-
ment more quickl yifthiso ccurs.
Saloon: to cance lthe closing procedure:
R kick with your foo tinsensor detection
range :under the bumper
R pull the handl eonthe outside of the boot lid
R press the closing button in the boot lid, or
R press the Fbutton on the key
If the closing procedur eofthe boot li dis
cancelled ,the boot li dopens agai nauto-
matically.
Estate: to stop the opening or closing proce-
dure:
R kick with your foo tinsensor detection
range :under the bumper
R pull the handl eonthe outside of the tailgate Boot/luggage compartment
107Opening and closing Z
Page 138 of 497
Problems with the steering wheel heating
Problem
Possible causes/consequences and
M
MSolutions The steering wheel
heating has switched
itself off prematurely or
cannot be switched on. The on-board voltage is too low because too many electrical con-
sumers are switched on.
X Switch off electrical consumers that you do not need, such as
the rear window heating or interior lighting.
Once the battery is sufficiently charged, the steering wheel
heating will switch back on automatically. EASY-ENTRY/EXIT feature
Important safety notes G
WARNING
When the EASY-ENTRY/EXIT feature adjusts
the steering wheel, you and other vehicle
occupants –particularly children –could
become trapped. There is arisk of injury.
While the EASY-ENTRY/EXIT feature is mak-
ing adjustments, make sure that no one has
any body parts in the sweep of the steering
wheel.
Move the steering wheel adjustment lever if
there is arisk of entrapment by the steering
wheel. The adjustment process is stopped.
Vehicles with amemory function: if there is a
risk of becoming trapped by the steering
wheel, you can also press one of the memory
function position buttons.T he adjustment
process is stopped. G
WARNING
If children activate the EASY-ENTRY/EXIT fea- ture, they can become trapped, particularly
when unattended. There is arisk of injury.
When leaving the vehicle, always take the key with you and lock the vehicle. Never leave
children unattended in the vehicle. G
WARNING
If you drive off while the EASY-ENTRY/EXIT
feature is making adjustments, you could lose
control of the vehicle. There is arisk of an
accident. Always wait until the adjustment process is
complete before driving off.
The EASY-ENTRY/EXIT feature makes getting in and out of your vehicle easier.
You can activate and deactivate the EASY-
ENTRY/EXI Tfeature in the on-board com-
puter (Y page 294).
Position of the steering wheel when the
EASY-ENTRY/EXIT featureisa ctive The steering wheel tilts upwards if you:
R remove the key from the ignition lock
R with KEYLESS-GO: open the driver's door;
KEYLESS-GO must be in position 1
R with the key: open the driver's door; the
key must be in position 0or 1in the ignition
lock (Y page 179)
i The steering wheel only moves upwards if
it has not already reached the upper stop.
Position of the steering wheel for driv-
ing The steering wheel is moved to the previously
set position if:
R the driver's door is closed and
R with KEYLESS-GO: you press the Start/
Stop button once
or
R with the key: you insert the key into the
ignition lock Steering wheel
135Seats, steering wheela nd mirrors Z
Page 157 of 497
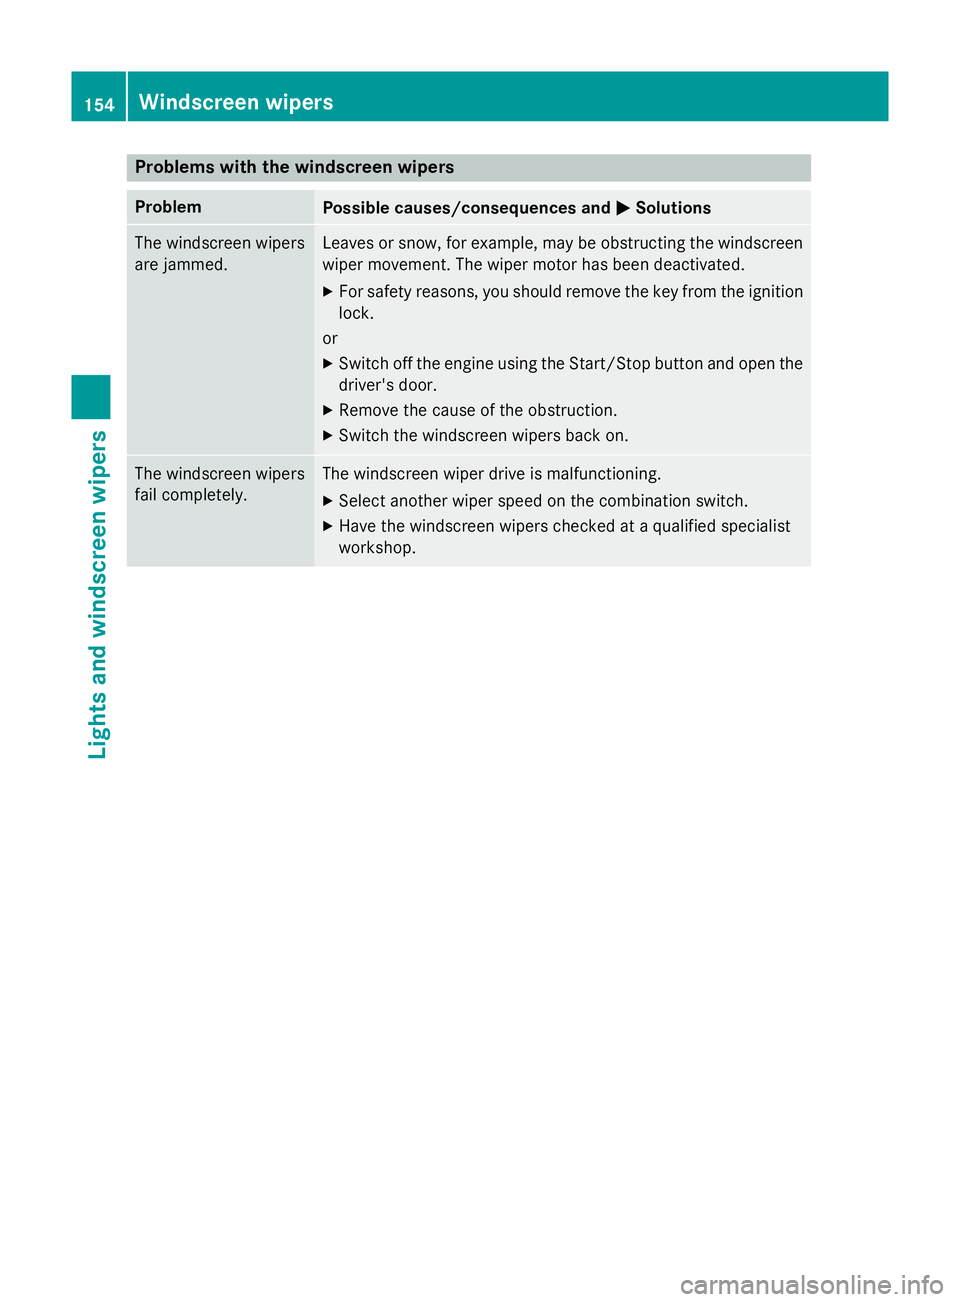
Problems with the windscreen wipers
Problem
Possible causes/consequences and
M
MSolutions The windscreen wipers
are jammed. Leaves or snow, for example, may be obstructing the windscreen
wiper movement.T he wiper motor has been deactivated.
X For safety reasons, you should remove the key from the ignition
lock.
or
X Switch off the engine using the Start/Stop button and open the
driver's door.
X Remove the cause of the obstruction.
X Switch the windscreen wipers back on. The windscreen wipers
fail completely. The windscreen wiper drive is malfunctioning.
X Select another wiper speed on the combination switch.
X Have the windscreen wipers checked at aqualified specialist
workshop. 154
Windscreen wipersLights and windscreen wipers
Page 160 of 497
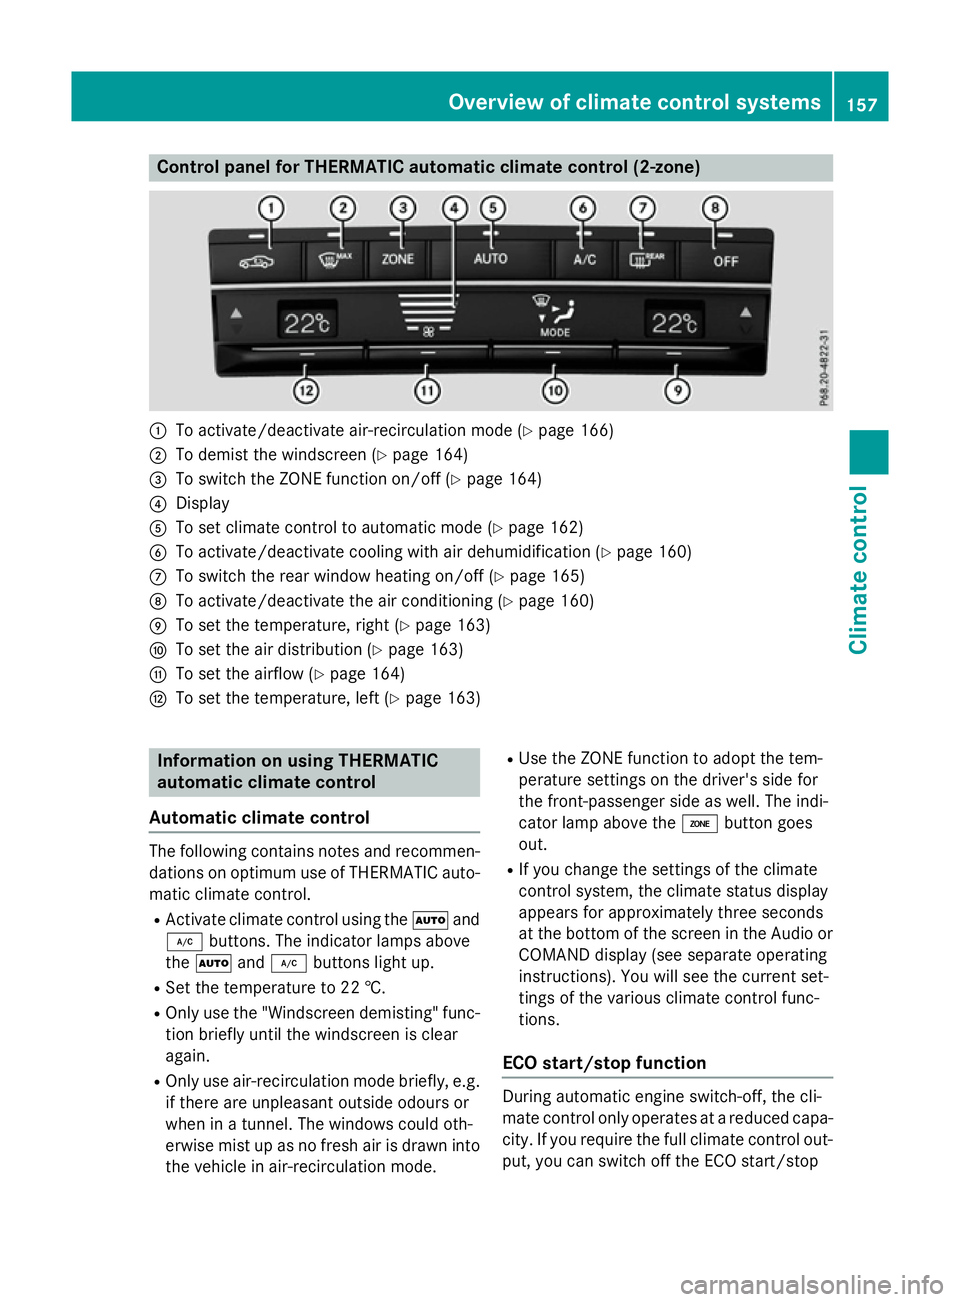
Control panel for THERMATIC automatic climat
econtrol (2-zone) :
To activate/deactivat eair-recirculation mod e(Ypage 166)
; To demist th ewindscree n(Ypage 164)
= To switch th eZONE function on/of f(Y page 164)
? Display
A To set climate control to automatic mod e(Ypage 162)
B To activate/deactivat ecoolingw itha ir dehumidification (Y page 160)
C To switch th erear window heating on/of f(Ypage 165)
D To activate/deactivat ethe air conditionin g(Ypage 160)
E To set th etem perature, righ t(Ypage 163)
F To set th eair distribution (Y page 163)
G To set th eairflow (Y page 164)
H To set th etem perature, left (Y page 163) Information on usin
gTHERMATIC
automatic climat econtrol
Automatic climat econtrol The followin
gcontai ns note sand recommen-
dation sonoptimum use of THERMATIC auto-
matic climate control.
R Activate climate control usin gthe à and
¿ buttons .The indicator lamps above
the à and¿ buttons light up.
R Set th etem peratur eto22†.
R Only use th e"Windscree ndemisting "func-
tio nb riefly until th ewindscree nisclear
again.
R Only use air-recirculation mod ebriefly, e.g.
if there are unpleasan toutside odour sor
when in atunnel. The windows could oth-
erwis emistupasnof resh air is drawn into
th ev ehicle in air-recirculation mode. R
Use th eZONE function to adopt th etem-
perature settings on th edriver' sside for
th ef ront-pa ssenger side as well. The indi-
cator lamp abov ethe á buttongoes
out.
R If you chang ethe settings of th eclimate
control system, th eclimate status display
appear sfor approximately three seconds
at th ebotto moft hescree nintheAudi oor
COMAND display (see separate operating
instructions). You will see th ecurren tset-
tings of th evarious climate control func-
tions.
ECO start/stop function During automatic engin
eswitch-off ,the cli-
mat econtro lonlyo perate satareduced capa-
city. If you require th efull climate control out-
put ,you can switch off th eECO start/stop Overview of climat
econtrol systems
157Climate control