steering MERCEDES-BENZ E-CLASS SALOON 2015 Owner's Manual
[x] Cancel search | Manufacturer: MERCEDES-BENZ, Model Year: 2015, Model line: E-CLASS SALOON, Model: MERCEDES-BENZ E-CLASS SALOON 2015Pages: 497, PDF Size: 16.23 MB
Page 127 of 497
seat cushions, e.g. knives, nails or tools.
The seats should only be occupied by
passengers, if possible.
R when the seat heating is in operation, do
not cover the seats with insulating mate-
rials, e.g. blankets, coats, bags, seat cov- ers, child seats or booster seats.
! Make sure that there are no objects in the
footwell under or behind the seats when
moving the seats back. There is arisk that
the seats and/or the objects could be dam- aged.
i The head restraints in the front seats are
fitted with the NECK-PRO system
(Y page 55). For this reason, it is not pos-
sible to remove the head restraints from
the front seats.
Vehicles without the through-loading fea-
ture: the head restraints cannot be
removed from the rear-compartment
seats.
For more information, contact aqualified
specialist workshop.
i Further related subjects:
R Through-loading facility in the rear bench
seat (Saloon)
R EASY-PACK through-loading facility in
the rear bench seat (Estate)
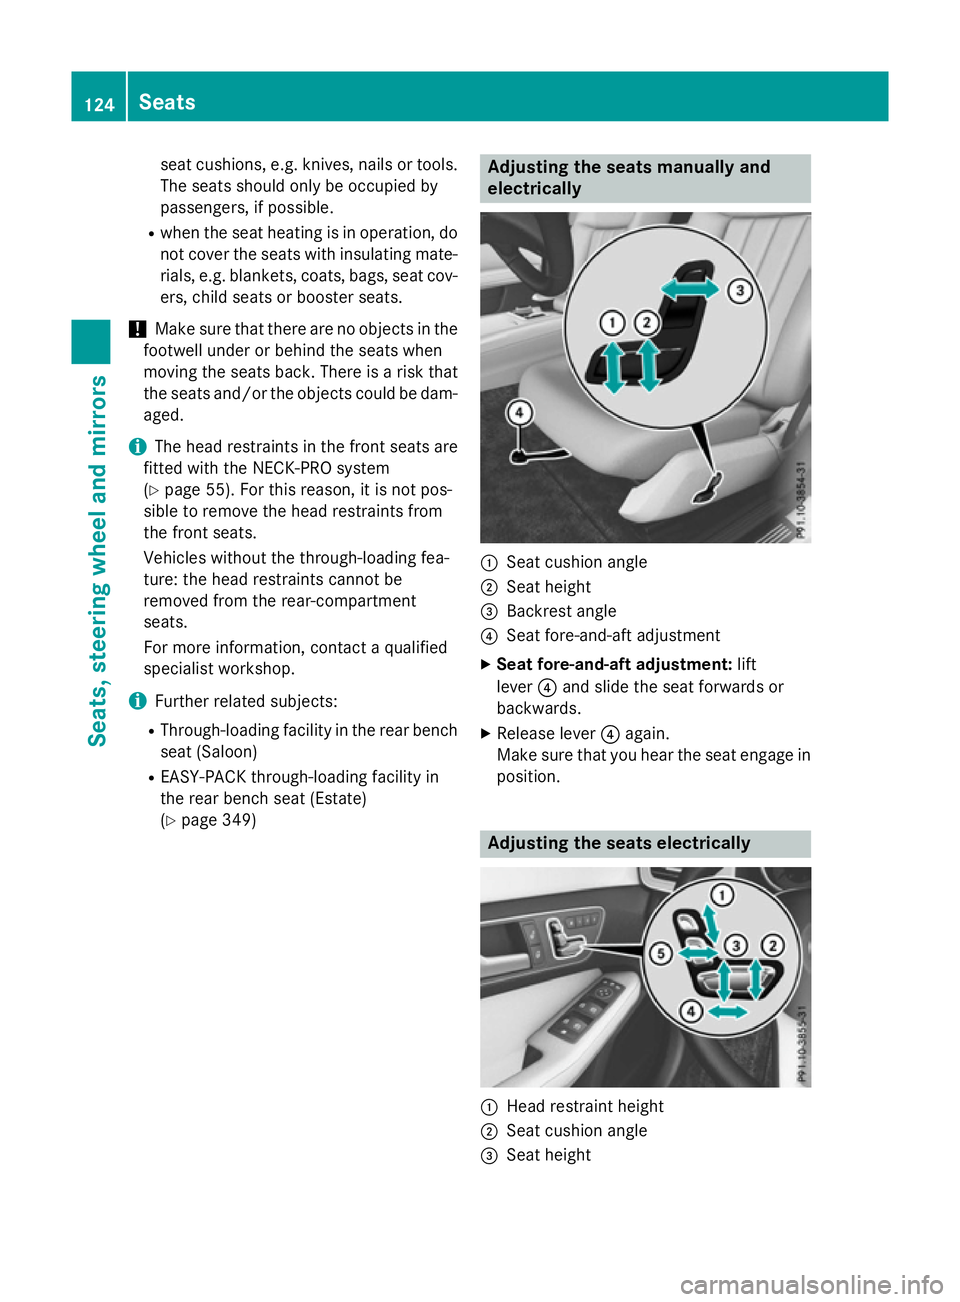
(Y page 349) Adjusting the seats manually and
electrically
:
Seat cushion angle
; Seat height
= Backrest angle
? Seat fore-and-aft adjustment
X Seat fore-and-aft adjustment: lift
lever ?and slide the seat forwards or
backwards.
X Release lever ?again.
Make sure that you hear the seat engage in
position. Adjusting the seats electrically
:
Head restraint height
; Seat cushion angle
= Seat height 124
SeatsSeats, steering wheela
nd mirrors
Page 128 of 497
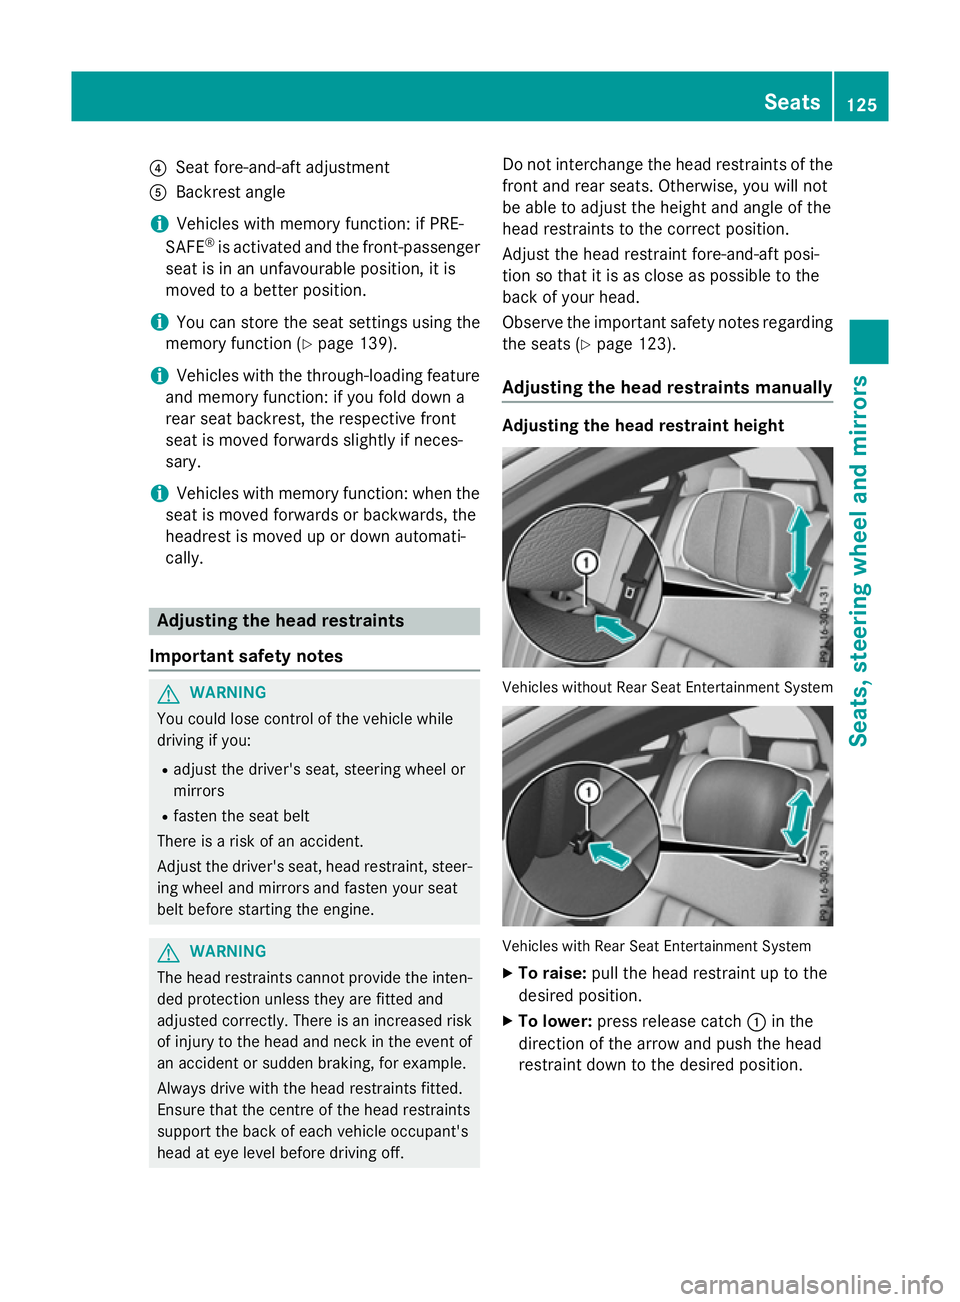
?
Sea tfore-and-aft adjustment
A Backrest angle
i Vehicles with memory function: if PRE-
SAFE ®
is activate dand the front-passenger
sea tisinanu nfavourable position, it is
move dtoab etter position.
i Yo
uc an store the sea tsettings using the
memory function (Y page 139).
i Vehicles with the through-loading feature
and memory function: if yo ufoldd owna
rea rseatb ackrest, the respective front
sea tism ovedforward sslightl yifneces-
sary.
i Vehicles with memory function: when the
sea tism ovedforward sorbackwards ,the
headrest is move dupordowna utomati-
cally. Adjustin
gthe hea drestraints
Important safety notes G
WARNING
Yo uc ould lose contro lofthe vehicl ewhile
driving if you:
R adjus tthe driver' sseat, steering wheel or
mirrors
R fasten the sea tbelt
There is ariskofana ccident.
Adjust the driver' sseat, hea drestraint, steer-
ing wheel and mirrors and fasten your seat
belt before starting the engine. G
WARNING
The hea drestraints canno tprovid ethe inten-
de dp rotectio nunless they are fitte dand
adjusted correctly .There is an increased risk
of injury to the hea dand neck in the event of
an accident or sudden braking, for example.
Alway sdrive with the hea drestraints fitted.
Ensur ethatthe centre of the hea drestraints
support the back of each vehicl eoccupant's
hea date yelevel before driving off. Do not interchange the hea
drestraints of the
front and rea rseats. Otherwise, yo uwilln ot
be able to adjus tthe height and angle of the
hea drestraints to the correct position.
Adjust the hea drestraint fore-and-aft posi-
tion so tha titisasc lose as possible to the
back of your head.
Observe the important safety notes regarding the seats (Y page 123).
Adjustin gthe hea drestraints manually Adjustin
gthe hea drestrain theight Vehicles withou
tRearS eatE ntertainment System Vehicles with Rear Sea
tEntertainment System
X To raise: pull the hea drestraint up to the
desired position.
X To lower: press release catch :in the
direction of the arrow and push the head
restraint dow ntothe desired position. Seats
125Seats, steering whee land mirrors Z
Page 129 of 497
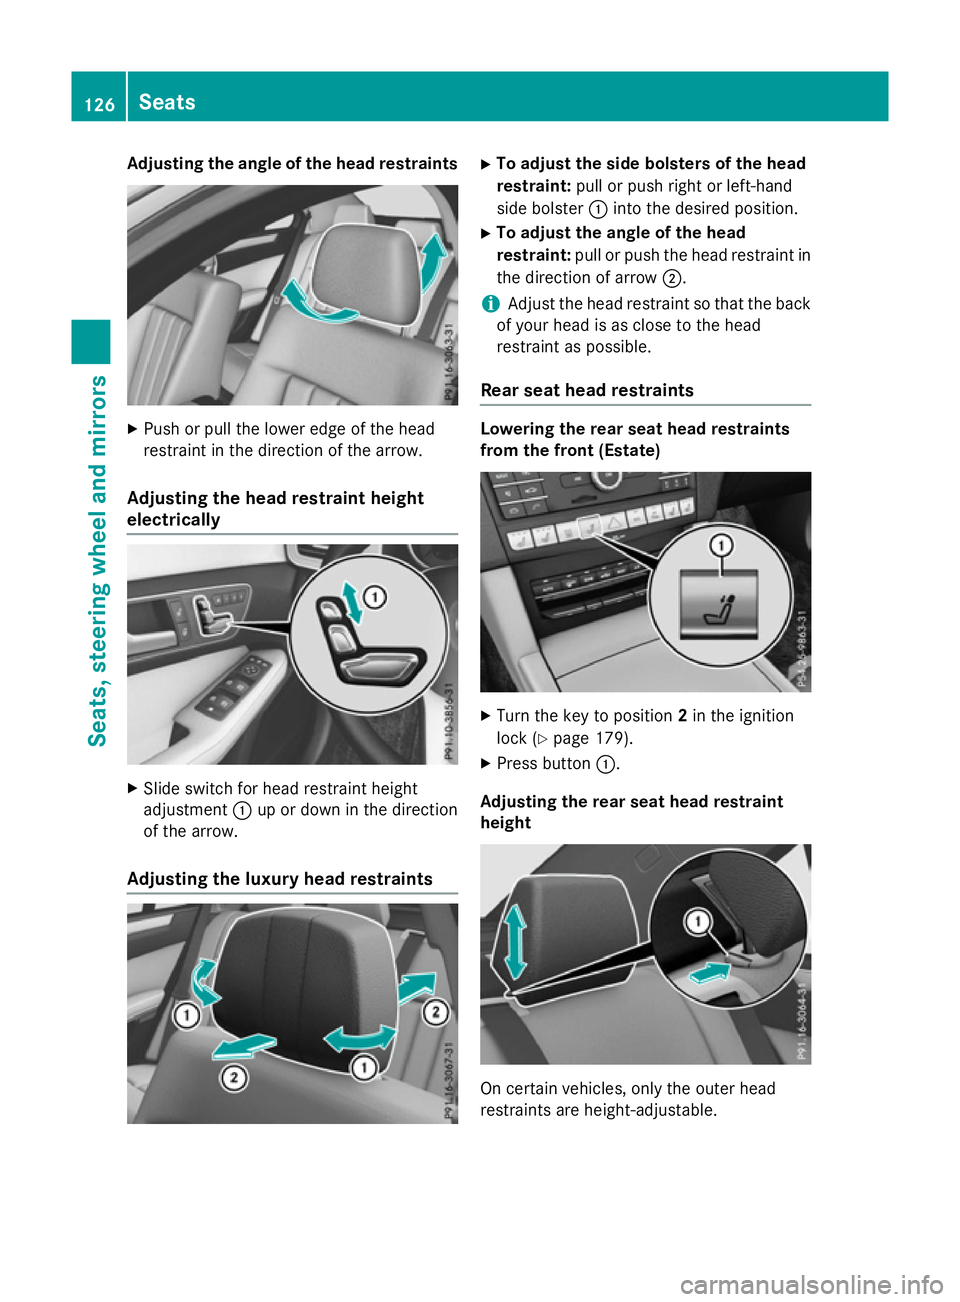
Adjusting th
eangle of th eheadr estraints X
Push or pull th elower edge of th ehead
restraint in th edirection of th earrow.
Adjusting th eheadr estrain theight
electrically X
Slide switch for head restraint height
adjustment :up or down in th edirection
of th earrow.
Adjusting th eluxur yheadr estraints X
To adjust th esideb olsters of th ehead
restraint: pull or push right or left-hand
side bolster :intot he desired position.
X To adjust th eangle of th ehead
restraint: pull or push th ehead restraint in
th ed irection of arrow ;.
i Adjus
tthe head restraint so that th eback
of your head is as close to th ehead
restraint as possible.
Rea rseat hea drestraints Lowering th
erears eat hea drestraints
from th efront (Estate) X
Turn th ekeyto position 2in th eignition
loc k(Ypage 179).
X Press button :.
Adjusting th erears eat hea drestraint
height On certai
nvehicles, only th eouter head
restraint sare height-adjustable. 126
SeatsSeats, steering wheel and
mirrors
Page 130 of 497
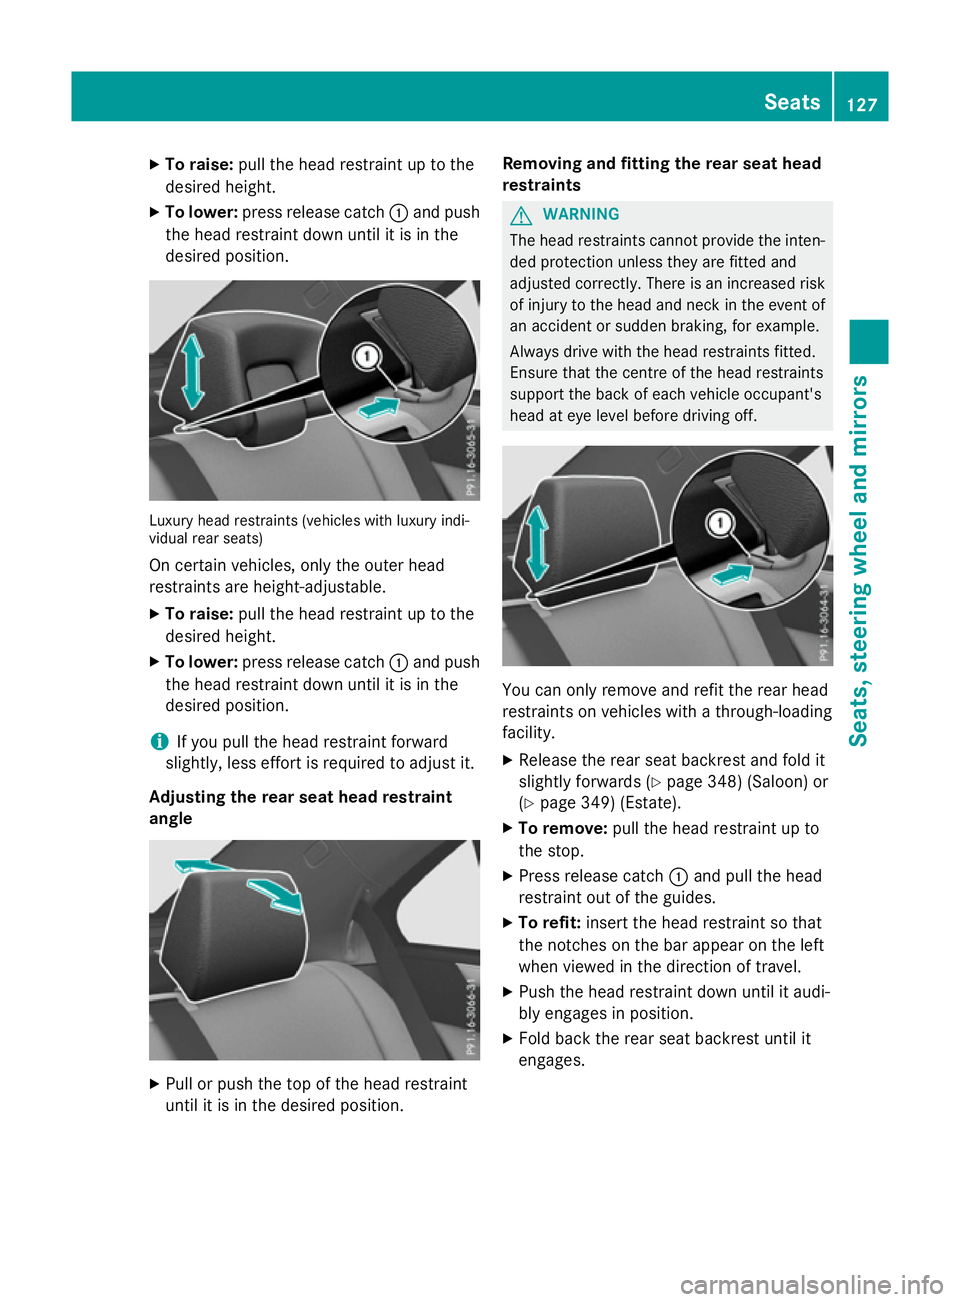
X
To raise: pull the hea drestraint up to the
desired height.
X To lower: press release catch :and push
the hea drestraint down unti litisinthe
desired position. Luxur
yheadr estraints (vehicle swithl uxuryi ndi-
vidua lrea rs eats)
On certain vehicles, onl ythe outer head
restraints ar eheight-adjustable.
X To raise: pull the hea drestraint up to the
desired height.
X To lower: press release catch :and push
the hea drestraint down unti litisinthe
desired position.
i If yo
upullt he hea drestraint forward
slightly, less effort is required to adjus tit.
Adjusting the rear seat hea drestraint
angle X
Pull or push the top of the hea drestraint
unti litisint he desired position. Removing and fitting the rear seat head
restraints G
WARNING
The hea drestraints canno tprovid ethe inten-
de dp rotection unless they ar efitte dand
adjusted correctly. There is an increased risk of injury to the hea dand neck in the event of
an accident or sudden braking ,for example.
Alway sdrive with the hea drestraints fitted.
Ensure tha tthe centre of the hea drestraints
support the back of each vehicl eoccupant's
hea date yelevel before driving off. Yo
uc an onl yremove and refit the rea rhead
restraints on vehicles with athrough-loading
facility.
X Releas ethe rea rseatb ackres tand fol dit
slightl yforwards (Y page 348)(Saloon) or
(Y page 349 )(Estate).
X To remove: pull the headrestraint up to
the stop.
X Press release catch :and pull the head
restraint ou tofthe guides.
X To refit: insert the hea drestraint so that
the notche sonthe barappea ront he left
when viewe dinthe direction of travel.
X Push the hea drestraint down unti litaudi-
bl ye ngages in position.
X Fol db ackt he rea rseatb ackres tuntilit
engages. Seats
127Seats, steering wheel andmirrors Z
Page 131 of 497
Adjusting th
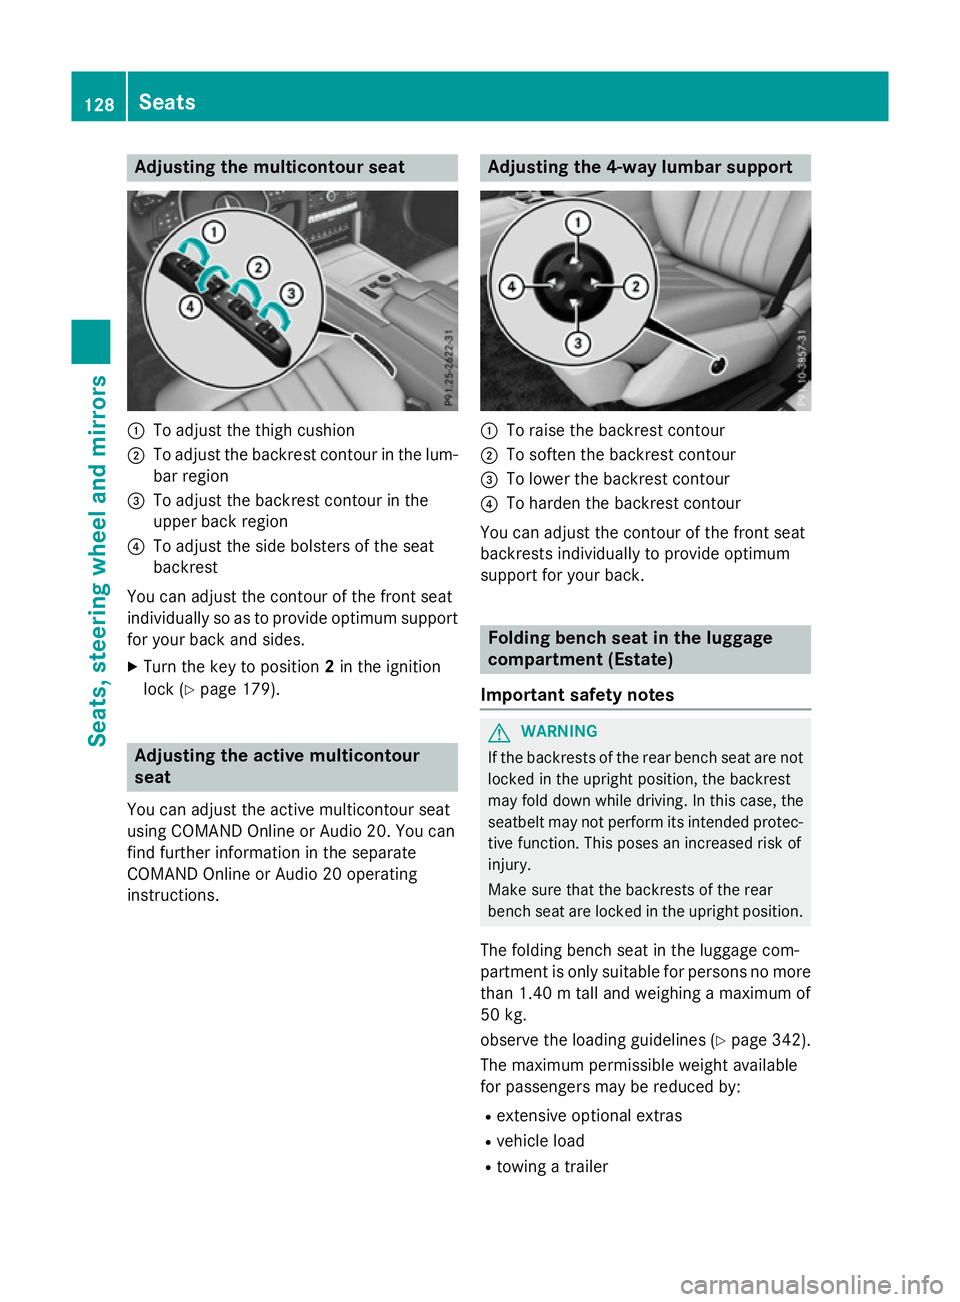
emulticontour seat :
To adjust th ethigh cushion
; To adjust th ebackrest contour in th elum-
bar region
= To adjust th ebackrest contour in the
upper bac kregion
? To adjust th eside bolsters of th eseat
backrest
You can adjust th econtou rofthefron tseat
individually so as to provide optimum support
for your bac kand sides.
X Turn th ekeyto position 2in th eignition
loc k(Ypage 179). Adjusting th
eactive multicontour
seat
You can adjust th eactive multicontour seat
usin gCOMAND Onlin eorAudio 20 .You can
fin df urther information in th eseparate
COMAND Onlin eorAudio 20 operating
instructions. Adjusting th
e4-wa ylumbar support :
To rais ethe backrest contour
; To softe nthe backrest contour
= To lower th ebackrest contour
? To harden th ebackrest contour
You can adjust th econtou rofthefron tseat
backrest sindividually to provide optimum
support for your back. Folding bench sea
tintheluggage
compartmen t(Estate)
Important safety notes G
WARNING
If th ebackrest softherear bench seat are not
locke dintheupright position ,the backrest
may fol ddown while driving. In this case, the
seatbelt may no tperfor mitsintended protec-
tive function .This poses an increased ris kof
injury.
Mak esuret hatthe backrest softherear
bench seat are locke dintheupright position.
The foldin gbench seat in th eluggag ecom-
partmen tisonlys uitable for person snomore
than 1.40 mtalla nd weighing amaximum of
50 kg.
observ ethe loadin gguidelines (Y page 342).
The maximum permissible weigh tavailable
for passenger smay be reduce dby:
R extensive optional extras
R vehicl eload
R towin gatrailer 128
SeatsSeats
,steering wheel and mirrors
Page 132 of 497
The combined luggage cover and net must be
fitted if you are using the folding bench seat
(Y page 352).
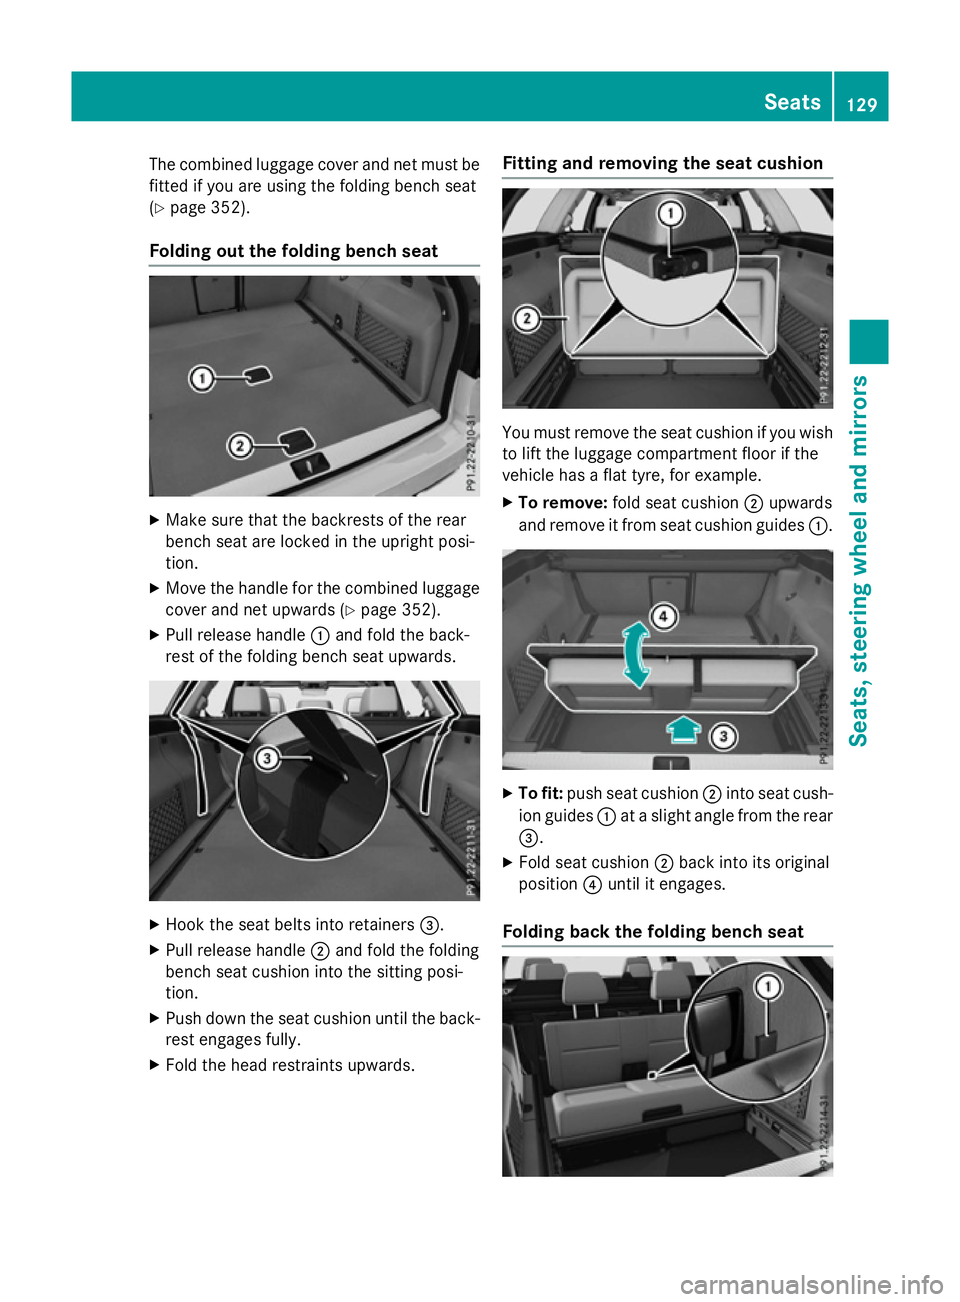
Folding out the folding bench seat X
Make sure that the backrest softhe rear
bench seat are locked in the upright posi-
tion.
X Move the handle for the combined luggage
cover and net upwards (Y page 352).
X Pull release handle :and fold the back-
rest of the folding bench seat upwards. X
Hook the seat belts into retainers =.
X Pull release handle ;and fold the folding
bench seat cushion into the sitting posi-
tion.
X Push down the seat cushion until the back-
rest engages fully.
X Fold the head restraints upwards. Fitting and removing the seat cushion
You must remove the seat cushion if you wish
to lift the luggage compartment floor if the
vehicle has aflat tyre, for example.
X To remove: fold seat cushion ;upwards
and remove it from seat cushion guides :. X
To fit: push seat cushion ;into seat cush-
ion guides :atas light angle from the rear
=.
X Fold seat cushion ;back into its original
position ?until it engages.
Folding back the folding bench seat Seats
129Seats, steering wheel and mirrors Z
Page 133 of 497
X
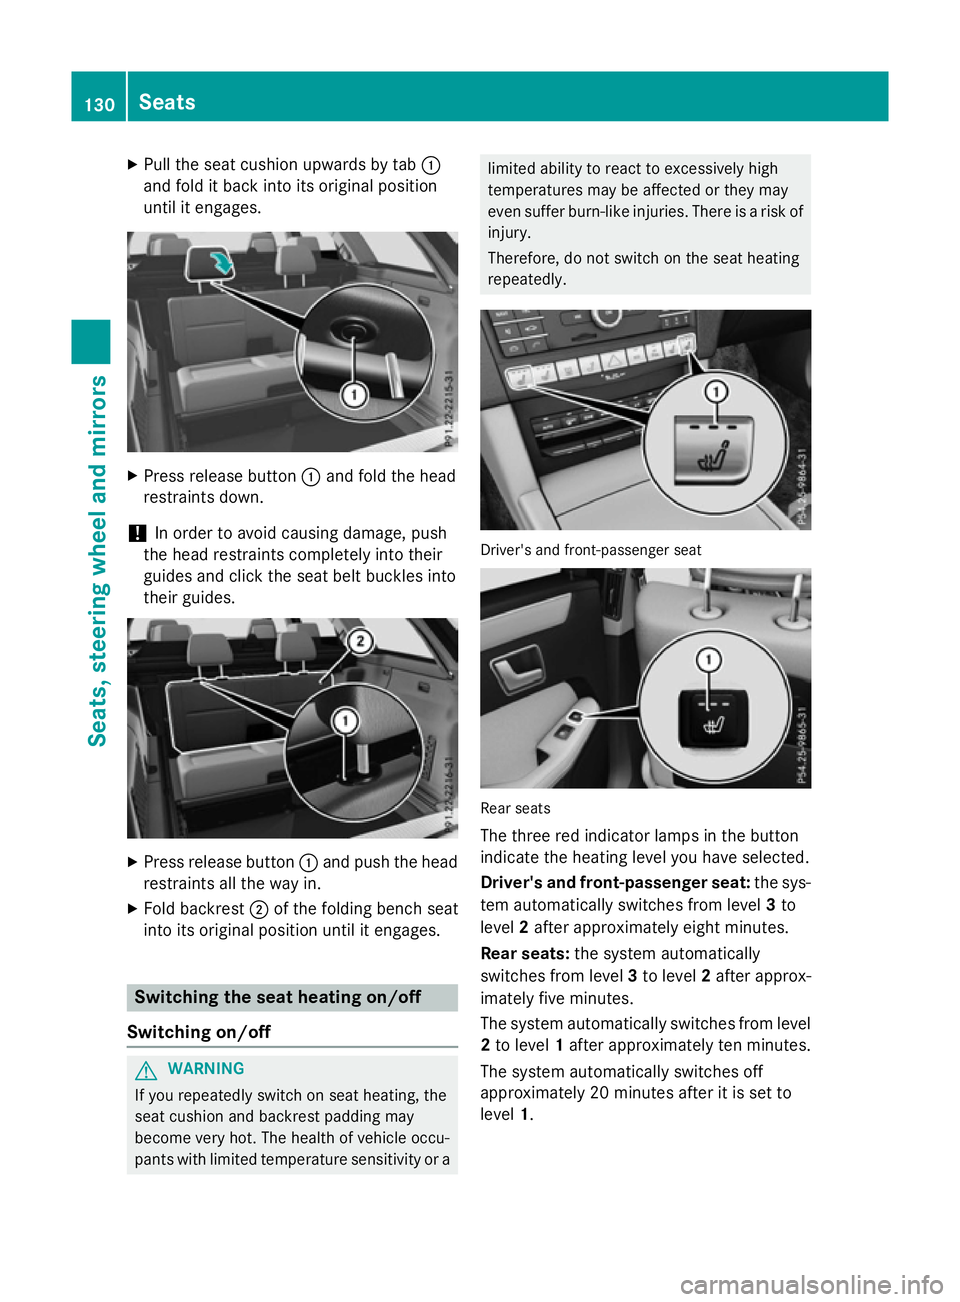
Pull the seat cushion upwards by tab :
and fold it back into its original position
until it engages. X
Press release button :and fold the head
restraints down.
! In order to avoid causing damage, push
the head restraints completely into their
guides and click the seat belt buckles into
their guides. X
Press release button :and push the head
restraints all the way in.
X Fold backrest ;of the folding bench seat
into its original position until it engages. Switching the seat heating on/off
Switching on/off G
WARNING
If you repeatedly switch on seat heating, the
seat cushion and backrest padding may
become very hot. The health of vehicle occu-
pants with limited temperature sensitivity or a limited ability to react to excessively high
temperatures may be affected or they may
even suffer burn-lik einjuries. There is arisk of
injury.
Therefore, do not switch on the seat heating
repeatedly. Driver's and front-passenger seat
Rear seats
The three red indicator lamps in the button
indicate the heating level you have selected.
Driver's and front-passenger seat: the sys-
tem automatically switches from level 3to
level 2after approximately eight minutes.
Rear seats: the system automatically
switches from level 3to level 2after approx-
imately five minutes.
The system automatically switches from level
2 to level 1after approximately ten minutes.
The system automatically switches off
approximately 20 minutes after it is set to
level 1. 130
SeatsSeats, steering wheel and mirrors
Page 134 of 497
X
Turn the key to position 1or 2in the ignition
lock (Y page 179).
X To switch on: press button:repeatedly
until the desired heating level is set.
X To switch off: press button:repeatedly
until all the indicator lamps go out.
i If the battery voltage is too low, the seat
heating may switch off. Seats
131Seats, steering wheel and mirrors Z
Page 135 of 497
Problems with the seat heating
Problem
Possible causes/consequences and
M
MSolutions The seat heating has
switched off prema-
turely or cannot be
switched on. The on-board voltage is too low because too many electrical con-
sumers are switched on.
X Switch off electrical consumers that you do not need, such as
the rear window heating or interior lighting.
Once the battery is sufficiently charged, the seat heating will
switch back on automatically. Switching the seat ventilation on/off
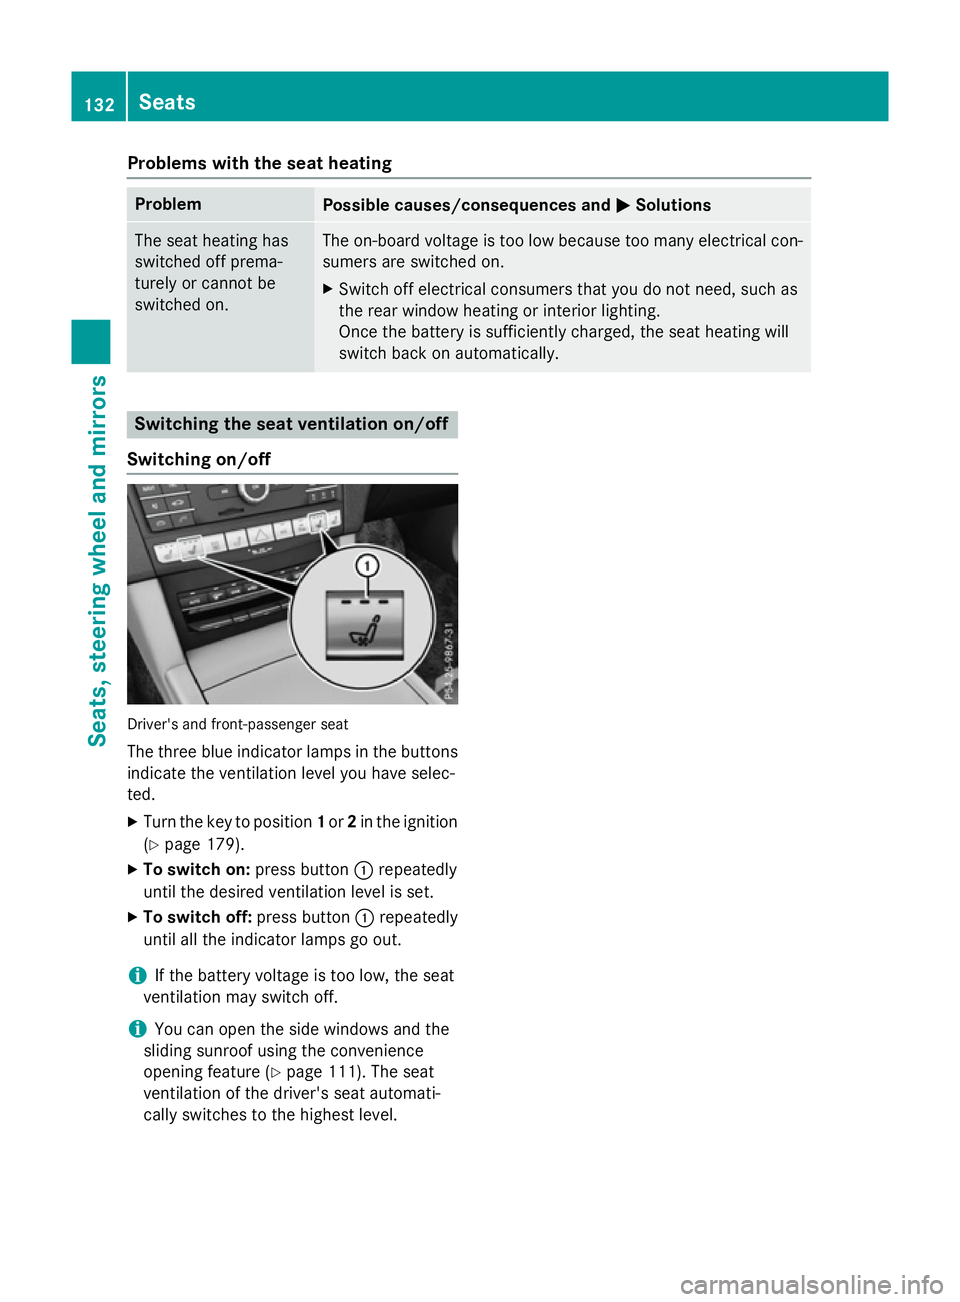
Switching on/off Driver's and front-passenger seat
The three blue indicator lamps in the buttons
indicate the ventilation level you have selec-
ted.
X Turn the key to position 1or 2in the ignition
(Y page 179).
X To switch on: press button:repeatedly
until the desired ventilation level is set.
X To switch off: press button:repeatedly
until all the indicator lamps go out.
i If the battery voltage is too low, the seat
ventilation may switch off.
i You can open the side windows and the
sliding sunroof using the convenience
opening feature (Y page 111). The seat
ventilation of the driver's seat automati-
cally switches to the highest level. 132
SeatsSeats, steering wheela
nd mirrors
Page 136 of 497
Problems with the seat ventilation
Problem
Possible causes/consequences and
M
MSolutions The seat ventilation has
switched off prema-
turely or cannot be
switched on. The on-board voltage is too low because too many electrical con-
sumers are switched on.
X Switch off electrical consumers that you do not need, such as
the rear window heating or interior lighting.
Once the battery is sufficiently charged, the seat ventilation will
switch back on automatically. Steering wheel
Important safety notes
G
WARNING
You could lose control of the vehicle while
driving if you:
R adjust the driver's seat, steering wheel or
mirrors
R fasten the seat belt
There is arisk of an accident.
Adjust the driver's seat, head restraint ,steer-
ing wheel and mirrors and fasten your seat
belt before startingt he engine. G
WARNING
Children could become trapped by the steer-
ing wheel if they adjust it. There is arisk of
injury.
When leaving the vehicle, always take the key with you and lock the vehicle. Never leave
children unattended in the vehicle.
The electrically adjustable steering wheel can
still be adjusted when there is no key in the
ignition lock. Adjusting the steering wheel man-
ually
G
WARNING
The steering wheel may move unexpectedly if you adjust it while driving. This could cause you to lose control of the vehicle. There is a
risk of an accident.
Make sure that the steering wheel is locked
before driving off. Never unlock the steering
wheel when the vehicle is in motion.
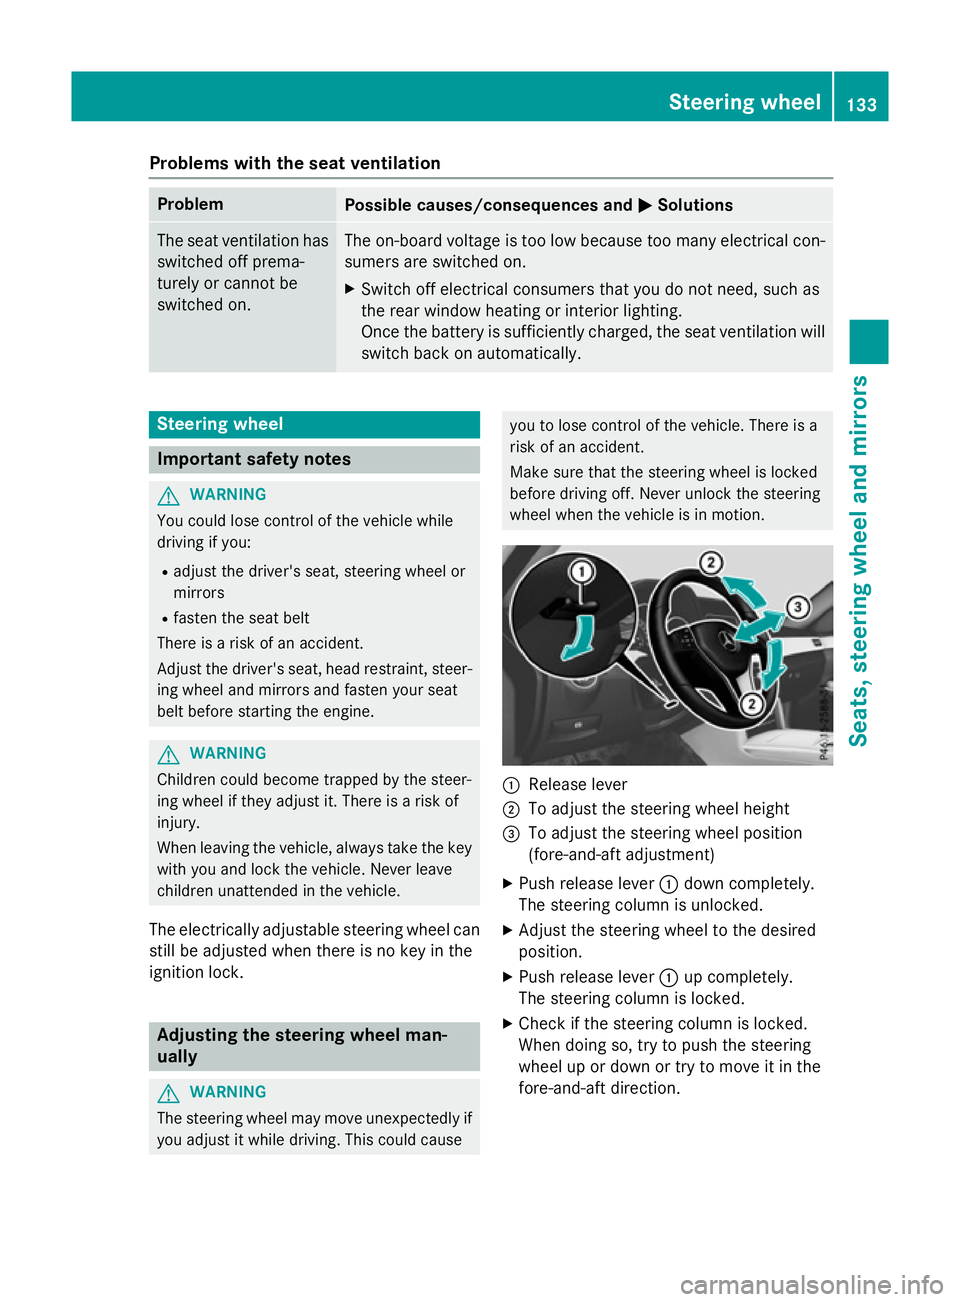
:
Release lever
; To adjust the steering wheel height
= To adjust the steering wheel position
(fore-and-aft adjustment)
X Push release lever :down completely.
The steering column is unlocked.
X Adjust the steering wheel to the desired
position.
X Push release lever :up completely.
The steering column is locked.
X Check if the steering column is locked.
When doing so, try to push the steering
wheel up or down or try to move it in the
fore-and-aft direction. Steering wheel
133Seats, steering wheela nd mirrors Z