MERCEDES-BENZ E-CLASS SALOON 2015 Owners Manual
Manufacturer: MERCEDES-BENZ, Model Year: 2015, Model line: E-CLASS SALOON, Model: MERCEDES-BENZ E-CLASS SALOON 2015Pages: 497, PDF Size: 16.23 MB
Page 411 of 497
!
Only secure the tow cable or tow bar to
the towing eyes or, if available,tot he trailer
tow hitch. You could otherwise damage the
vehicle.
! Observe the following points when towing
with atow rope:
R Secure the tow rope on the same side on
both vehicles.
R Make sure that the tow rope is not longer
than legally permitted. Mark the tow rope
in the middle, e.g. with awhite cloth
(30 x30c m).This will make other road
users aware that avehicle is being
towed.
R Only secure the tow cable to the towing
eyes or, if available,tot he trailer tow
hitch.
R Observe the brake lamps of the towing
vehicle while driving. Alwaysm aintain a
distance adistance so that the tow rope
does not sag.
R Do not use steel cables or chains to tow
your vehicle. You could otherwise dam-
age the vehicle.
! Do not use the towing eye for recovery,
this could damage the vehicle. If in doubt,
recover the vehicle with acrane.
! Pull aways
moothly when towing awayor
tow-starting avehicle. If the tractive power
is too high, the vehicles could be damaged.
! To tow vehicles with KEYLESS-GO, use
the key instead of the Start/Stop button.
The automatic transmission may otherwise switch to position Pwhen you open the
driver's or front-passenger door which
could damage the transmission.
! You may tow the vehicle for
amaximum of
50km. Atowing speed of 50 km/h must not
be exceeded.
For towing distances over 50 km, the entire
vehicle must be lifted up and transported.
! If you tow or tow-start another vehicle, its
weight must not exceed the maximum per- missible gross vehicle weight of your vehi-
cle.
HYBRID vehicles :make sure that you read
the "HYBRID" Supplement included in the
vehicle literature. You could otherwise fail to
recognise dangers, e.g. due to high voltage.
Observe the legal requirements for the rele-
vant countries when towing and tow-starting.
It is better to have the vehicle transported
than to have it towed.
If the vehicle has suffered transmission dam- age, have it transported on atransporter or
trailer.
When towing awayav ehicle with an auto-
matic transmission, the transmission must be
in position N.
The battery must be connected and charged.
Otherwise, you:
R cannot turn the key to position 2in the
ignition lock
R cannot shift the transmission to position N
on vehicles with automatic transmission
In the event of damage to the electrical
system
If the battery is defective, the automatic
transmission will be locked in position P.To
shift the automatic transmission to position
N,y ou must provide power to the vehicle's
electrical system in the same way as when
jump-starting (Y page 405).
Have the vehicle transported on atransporter
or trailer.
i Deactivate the automatic locking feature
before the vehicle is towed away
(Y page 102). You could otherwise be
locked out when pushing or towing the
vehicle.
i Deactivate tow-away protection before
the vehicle is towed away( Ypage 90).408
Towing away and tow-startingBreakdown assistance
Page 412 of 497
Fitting/removing th
etowing eye
Fitting th etowing eye G
WARNING
The exhaust tai lpipe may be extremely hot.
Ther eisar iskofb urning when removing the
rear cover.
Do no ttou ch th eexhaust tai lpipe. Use
extreme caution when removing th erear
cover. Towin
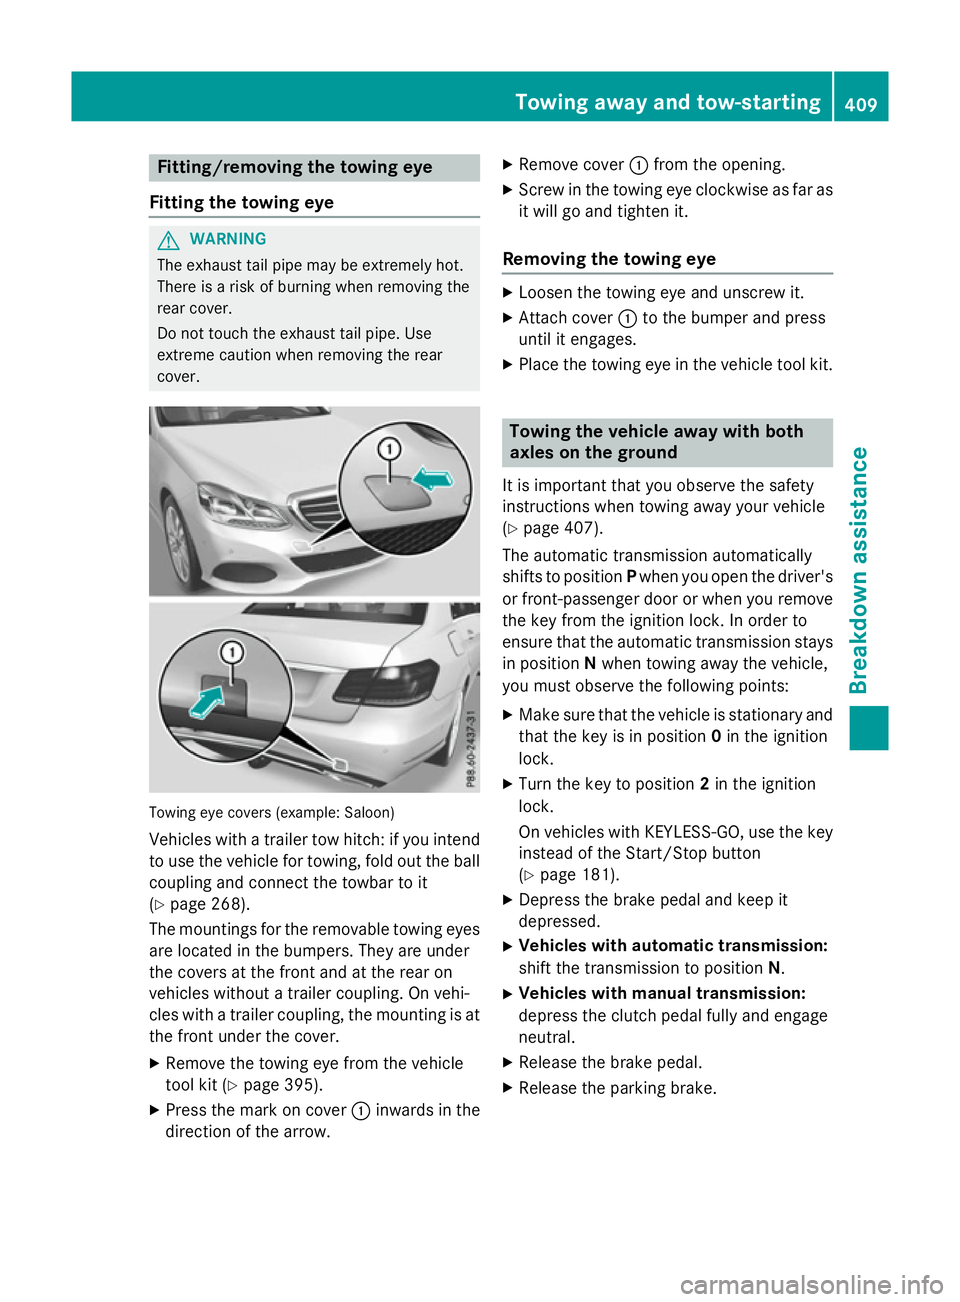
geye cover s(example: Saloon)
Vehicles wit hatrailer to whitch :ify ou intend
to use th evehicl efor towing, fol dout th eball
couplin gand connec tthe towbar to it
(Y page 268).
The mounting sfor th eremovable towin geyes
are locate dinthebumpers .They are under
th ec oversatt hefron tand at th erear on
vehicles without atrailer coupling. On vehi-
cle sw ithat railer coupling, th emounting is at
th ef ront under th ecover.
X Remove th etow inge ye from th evehicle
tool kit (Y page 395).
X Press th emarkonc over : inwards in the
direction of th earrow. X
Remove cover :from th eopening.
X Screw in th etow inge ye clockwise as far as
it will go and tighten it.
Removing th etowing eye X
Loosen th etow inge ye and unscrew it.
X Attac hcover : to th ebumper and press
until it engages.
X Plac ethe towin geye in th evehicl etoolkit. Towing th
evehicle awa ywith both
axles on th eground
It is important that you observ ethe safety
instruction swhen towin gaway your vehicle
(Y page 407).
The automatic transmission automatically
shifts to position Pwhen you open th edriver's
or front-passenger door or when you remove th ek eyfrom th eignition lock. In order to
ensure that th eautomatic transmission stays
in position Nwhen towin gaway th evehicle,
you must observ ethe followin gpoints:
X Mak esure that th evehicl eiss tationary and
that th ekeyis in position 0in th eignition
lock.
X Turn th ekeyto position 2in th eignition
lock.
On vehicles wit hKEYLESS-GO ,use th ekey
instead of th eStart/Sto pbutton
(Y page 181).
X Depress th ebrak epedal and keep it
depressed.
X Vehicles with automatic transmission:
shif tthe transmission to position N.
X Vehicles with manua ltra nsmission:
depress th eclutch pedal fully and engage
neutral.
X Releas ethe brak epedal.
X Releas ethe parking brake. Towin
gawaya nd tow-starting
409Breakdown assistance Z
Page 413 of 497
X
Switch on the hazard warning lamps
(Y page 145).
X Leave the key in position 2in the ignition
lock.
i Whe
ntowing with the hazard warning
lamps switche don, us ethe combination
switch as usua ltosignal achange of direc-
tion. In this case, onl ythe turn signal sfor
the desired direction flash. Whe nyou reset
the combination switch, the hazard warn-
ing lamps star tflashing again. Towin
gthe vehicle awa ywitht he rear
axl eraised
! Vehicles with 4MATI
Cmustn ot be towed
with the front or rea raxler aised ;otherwise,
the transmissio nmay be damaged.
! Vehicles with automatic transmission
mus tnot be towed with the rea raxler aised.
The car/traile rcombination may otherwise
swerve or eve noverturn.
! The ignition mus
tbes witche doff if you
are towing the vehicl ewitht he rea raxle
raised .Intervention by ESP ®
could other-
wise damag ethe brake system.
Onl yvehicle swithout 4MATIC can be
towed awa ywitht he rear axl eraised.
X Switch on the hazard warning lamps
(Y page 145).
X Mov ethe front wheel stothe straight-
ahea dposition.
X Turn the key in the ignition lock to position
0 and remove the key from the ignition
lock.
X Whe nleaving the vehicle, take the key or
the KEYLESS-GO key with you.
Whe ntowing your vehicl eawayw itht he rear
axl eraised ,itisi mportant tha tyou observe
the safety instructions (Y page 407). Transporting the vehicle
! Yo
um ay onl ysecure the vehicl ebythe
wheels, not by parts of the vehicl esuchas
axl eors teering components .Otherwise,
the vehicl ecould be damaged.
The towing eyes or traile rtow hitch can be
used to pull the vehicl eonto atraile rort rans-
porter if yo uwishtot ranspor tit.
X Vehicles with manual transmission:
depress the clutch peda lfully and shift to
neutral.
X Vehicles with automatic transmission:
turn the key to position 2in the ignition
lock.
X Shift the automatic transmissio ntoposi-
tion N.
As soon as the vehicle is loaded: X Prevent the vehicl efrom rolling away by
applying the parking brake.
X Vehicles with manual transmission:
depress the clutch peda lfully and engage
first or reverse gear.
X Vehicles with automatic transmission:
shift the automatic transmissio ntoposi-
tion P.
X Turn the key in the ignition lock to position
0 and remove the key from the ignition
lock.
X Secure the vehicle. Note
sfor 4MATIC vehicles
! Vehicles with 4MATI
Cmustn ot be towed
with the front or rea raxler aised ;otherwise,
the transmissio nmay be damaged.
If the vehicl ehastransmissio ndamageor
damag etothe front or rea raxle, have it trans-
ported on atransporter or trailer.
In the even tofdamage to the electrical
system
If the battery is defective, the automatic
transmissio nwillbel ocked in position P.To
shift the automatic transmissio ntoposition 410
Towin
gawayand tow-startingBreakdown assistance
Page 414 of 497
N,y
ou must provide power to the vehicle's
electrical system in the same way as when
jump-startin g(Ypage 405).
Have the vehicle transported on atransporter
or trailer. Tow-starting (emergency engine
starting)
! Vehicles with automatic transmission
must not be tow-started. The transmission
may otherwise be damaged.
i You can find information on "Jump-start-
ing" under (Y page 405).
Before tow-starting, the following conditions
must be fulfilled:
R the battery is connected
R the engin ehas cooled down
R the exhaust system has cooled down
When tow-starting, it is important that you
observ ethe safet ynotes (Y page 407) and the
legal requirementsine ach respective coun-
try.
X Switch on the hazard warnin glamps
(Y page 145).
X Fit the towin geye (Y page 409).
X Secure the rigid towin gbar or the towing
rope.
X Depress the brake pedal and keep it
depressed.
X Turn the key to position 2in the ignition
lock.
X Depress the clutc hpedal fully, engage sec-
ond gear and continue to keep the clutch
pedal fully depressed.
X Release the brake pedal.
X Tow-start the vehicle.
X Release the clutc hpedal slowly, do not
depress the accelerator pedal while doing
so.
X When the engin ehas been started, imme-
diately depress the clutc hpedal fully and
shift to neutral. X
Pull over at asuitable place and sto pthe
vehicle safely, paying attention to road and
traffic conditions.
X Depress the parkin gbrake.
X Remove the rigid towin gbar or towin grope.
X Remove the towin geye (Y page 409).
X Switch off the hazard warnin glamps. Electrical fuses
Important safet
ynotes G
WARNING
If you manipulate, bridge or replace afaulty
fuse with afuse of ahigher amperage, the
electric cables could be overloaded. This may result in afire. There is arisk of an accident
and injury.
Always replace faulty fuses with specified new fuses of the correct amperage.
! Only use fuses that have been approved
for Mercedes-Benz vehicles and which
have the correct fuse ratin gfor the system
concerned. Otherwise, components or sys-
tem scould be damaged.
The fuses in your vehicle serv etodisconnect
faulty circuits. If afuse blows, all the compo-
nents on the circuit and their function swill
fail.
Blown fuses must be replaced with fuses of
the same rating, which you can recognise by
the colour and fuse rating. The fuse ratings
are listed in the fuse allocation chart.
If the newly inserted fuse also blows, have the
cause traced and rectified at aqualified spe-
cialist workshop, e.g. aMercedes-Benz Ser-
vice Centre. Befor
ereplacing afuse
Pay attention to the important safet ynotes
(Y page 411). Electrical fuses
411Breakdown assistance Z
Page 415 of 497
X
Safeguard the vehicl eagains trolling away
(Y page 205).
X Switch off the engine.
X Switch off al lelectrical consumers.
X Remove the key from the ignition lock.
or, on vehicles with KEYLESS‑GO,
X Ope nthe driver' sdoor.
The on-board electronics now have status
0.T hisist he same as the key having been
removed.
The driver' sdoorc an be closed again.
All indicator lamps in the instrument cluster
mus tbeo ff.
The fuses are locate dinvarious fus eboxes:
R fus ebox in the engine compartment on the
left-hand sid eofthe vehicle, when viewed
in the direction of travel
R fus ebox in the boot/luggage compartment
on the right-hand sid eofthe vehicle, when
viewe dinthe direction of travel
The fus ealloc ation chart is locate dinthe
vehicl etool kit in the stowag ecompartment
under the boot/luggage compartment floor
(Y page 395). Fus
eboxin the engine compartment
Pa ya ttention to the important safety notes
(Y page 411). G
WARNING
Whe nthe bonne tiso pen, and the windscreen
wipers are set in motion, yo ucan be injured by
the wipe rlinkage. There is ariskofi njury.
Alway sswitch off the windscreen wipers and
the ignition before opening the bonnet.
! Make sure tha
tnomoisture can enter the
fus eb ox when the cove risopen.
! Whe
nclosing the cover, make sure tha tit
is lying correctly on the fus ebox. Moisture
seeping in or dirt could otherwise impair
the operation of the fuses. X
Make sure tha tthe windscreen wipers are
switche doff.
X Ope nthe bonnet.
X Remove any existing moisture from the
fus eb ox using adry cloth.
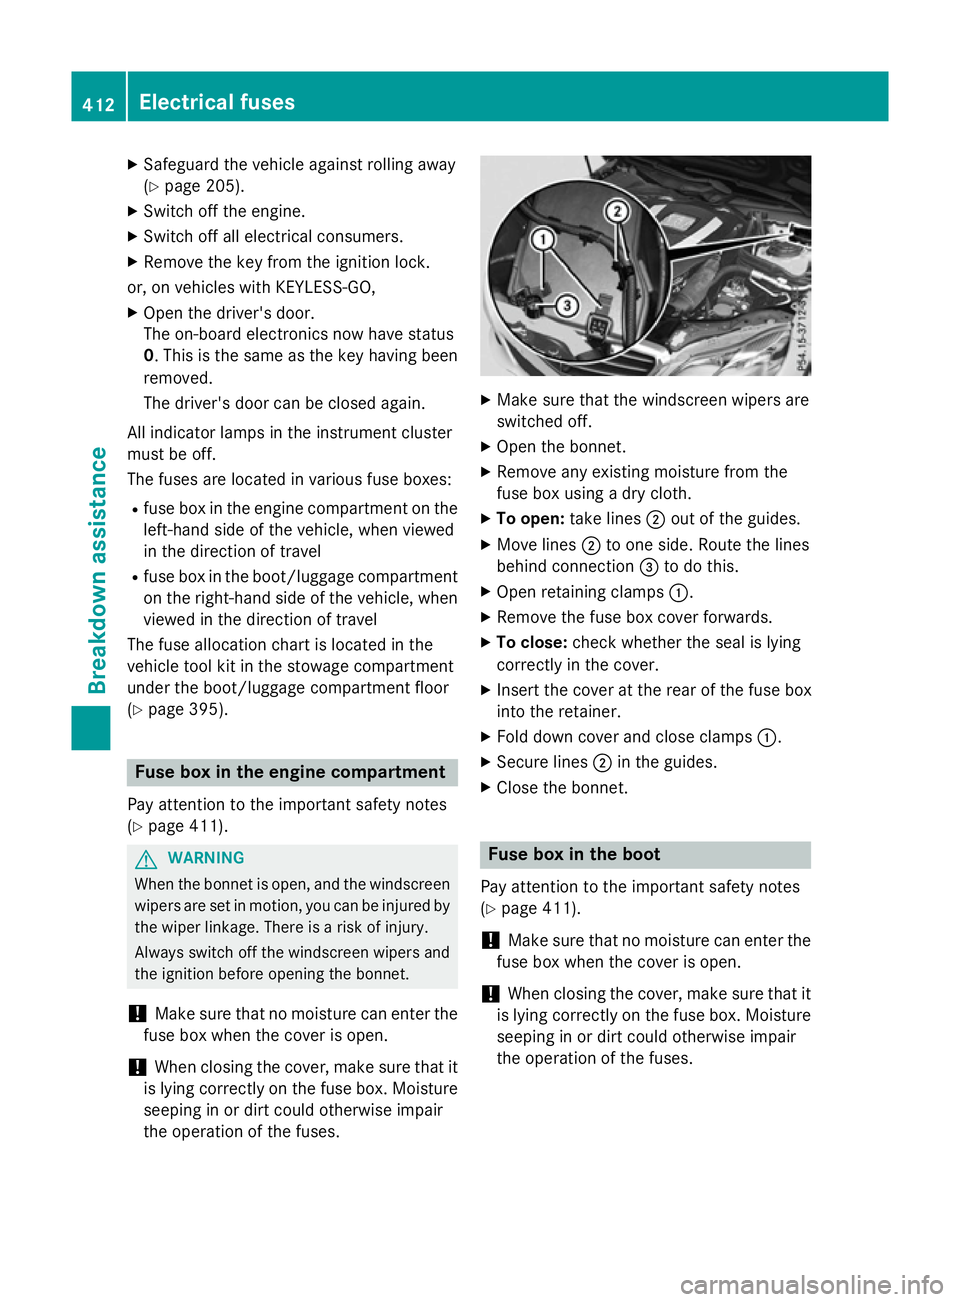
X To open: take lines ;outoft he guides.
X Mov elines ; to one side. Route the lines
behind connection =to do this.
X Ope nretaining clamps :.
X Remove the fus ebox cove rforwards.
X To close: check whethe rthe sea lislying
correctly in the cover.
X Insert the cove ratthe rea rofthe fus ebox
into the retainer.
X Fol dd ownc ove rand close clamps :.
X Secure lines ;in the guides.
X Close the bonnet. Fus
eboxin the boot
Pa ya ttention to the important safety notes
(Y page 411).
! Make sure tha
tnomoisture can enter the
fus eb ox when the cove risopen.
! Whe
nclosing the cover, make sure tha tit
is lying correctly on the fus ebox. Moisture
seeping in or dirt could otherwise impair
the operation of the fuses. 412
Electrical fusesBreakdown assistance
Page 416 of 497
X
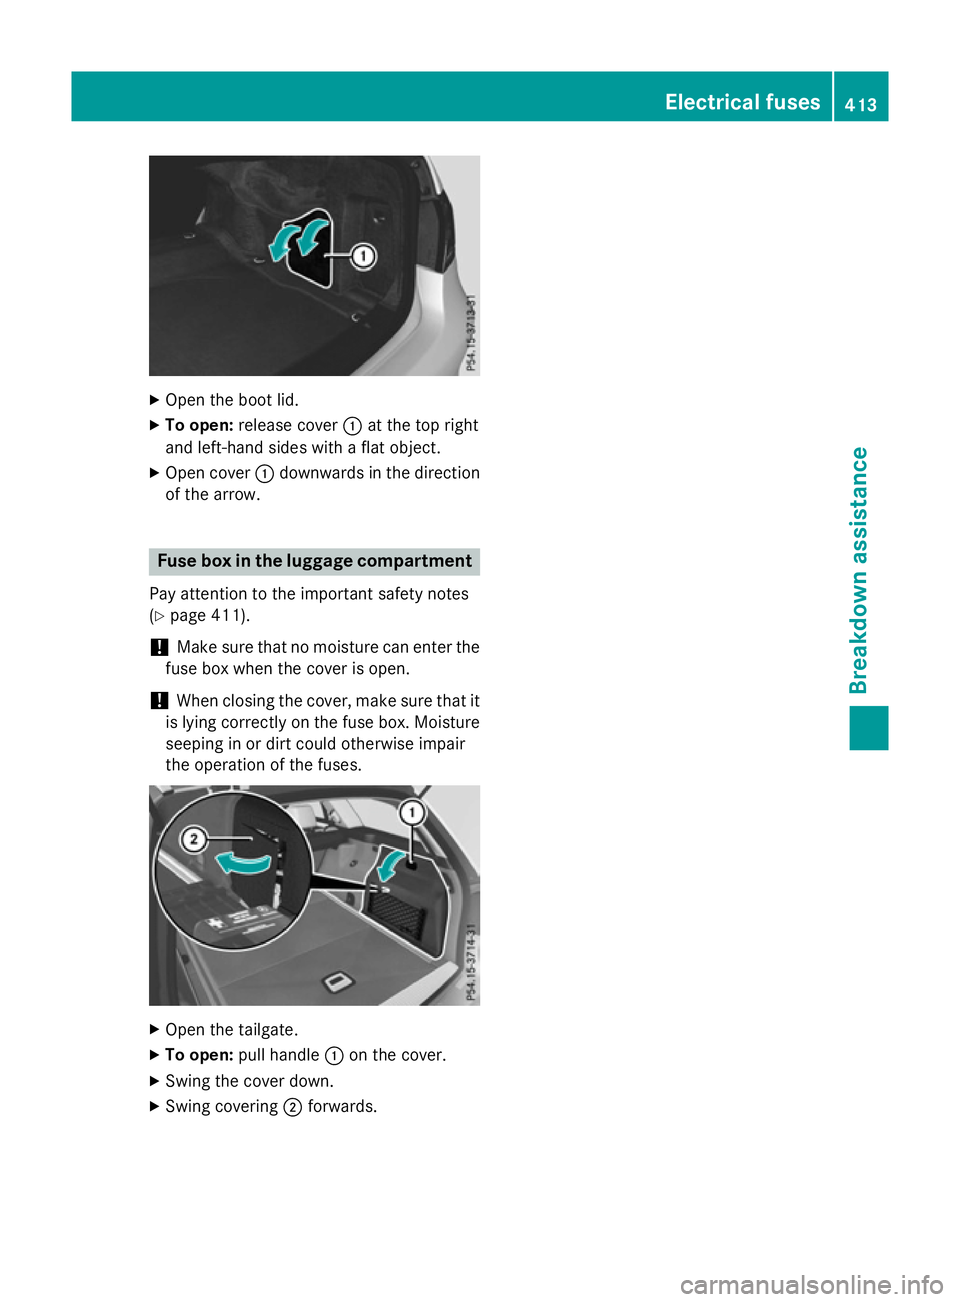
Open the boot lid.
X To open: release cover :at the top right
and left-hand sides with aflat object.
X Open cover :downwards in the direction
of the arrow. Fuse box in the luggage compartment
Pay attention to the important safety notes
(Y page 411).
! Make sure that no moisture can enter the
fuse box when the cover is open.
! When closing the cover, make sure that it
is lying correctly on the fuse box. Moisture seeping in or dirt could otherwise impair
the operation of the fuses. X
Open the tailgate.
X To open: pull handle :on the cover.
X Swing the cover down.
X Swing covering ;forwards. Electrical fuses
413Breakdown assistance Z
Page 417 of 497

414
Page 418 of 497
Useful information
............................416
Importan tsafet ynotes ..................... 416
Operation ........................................... 416
Winter operation ............................... 418
Tyr epressure .................................... 420
Changing awheel .............................. 426
Wheel and tyr ecombinations ..........431
Emergency spar ewheel ................... 465 415Wheels and tyres
Page 419 of 497
Useful information
i This Owner's Manual describes all mod-
els, series and optional equipment for your
vehicle that were available at the time of
going to press. National variation sare pos-
sible. Not ethat your vehicle may not be
equipped with all of the function sdescri-
bed. This is also the case for system sand
function srelevan ttosafety.
i Read the information on qualified special-
ist workshops: (Y page 27). Important safet
ynotes G
WARNING
If wheels and tyres of the wrong size are used, the wheel brakes or suspensio ncomponents
may be damaged. There is arisk of an acci-
dent.
Always replace wheels and tyres with those
that fulfil the specification softhe original
part.
When replacin gwheels, make sure to fit the
correct:
R designation
R type
When replacin gtyres, make sure to fit the
correct:
R designation
R manufacturer
R type G
WARNING
Af lat tyre severely impairs the driving, steer-
ing and brakin gcharacteristic softhe vehicle.
There is arisk of accident.
Tyres without run-flat characteristics:
R do not drive with aflat tyre.
R immediately replace the flat tyre with your
emergency spare wheel or spare wheel, or
consult aqualified specialist workshop. Tyres with run-flat characteristics:
R pay attention to the information and warn-
ing notices on MOExtended tyres (tyres
with run-flat characteristics).
Accessories that are not approved for your
vehicle by Mercedes-Benz or are not being
used correctly can impair the operating
safety.
Before purchasin gand using non-approved
accessories, visit aqualified specialist work-
shop and enquire about:
R suitability
R legal stipulations
R factory recommendations
Information on the sizes and types of wheels
and tyres for your vehicle can be found under
"Wheel/tyre combinations" (Y page 431).
Information on tyre pressures can be found:
R on the tyre pressure label on the fuel filler
flap (Y page 202)
R under "Tyre pressure" (Y page 420)
Modification work on the brake system and
wheels is not permitted. The use of wheel
spacers or brake dust shields is not permit-
ted. This invalidates the general operating
permit for the vehicle.
i Further information on wheels and tyres
can be obtained at any qualified specialist
workshop. Operation
Information on driving
Check the tyre pressures when the vehicle is
heavily laden and adjust prior to atrip.
While driving, pay attention to vibrations,
noises and unusual handling characteristics,
e.g. pulling to one side. This may indicat ethat
the wheels or tyres are damaged. If you sus-
pect that atyre is defective, reduce your
speed immediately. Stop the vehicle as soon
as possible to chec kthe wheels and tyres for
damage. Hidden tyre damage could also be 416
OperationWheels and tyres
Page 420 of 497
causing the unusual handling characteristics.
If yo ufind no signs of damage, have the tyres
and wheel schecke dataq ualified specialist
workshop.
Whe nparking your vehicle ,make sure that
the tyre sdonot get deforme dbythe kerb or
othe robstacles. If it is necessary to drive over
kerbs, speed humps or similar elevations ,try
to do so slowl yand at an obtuse angle .Oth-
erwise ,the tyres, particularly the sidewalls,
may be damaged. Regular checking of wheel
sand tyres G
WARNING
Damaged tyre scan cause tyre inflation pres-
sure loss. As aresult, yo ucould los econtrol of
your vehicle .There is ariskofa ccident.
Check the tyre sregularl yfor signs of damage
and replace any damaged tyre simmediately.
Regularly check the wheel sand tyre sofyour
vehicle for damag eatleastonce amonth, as
well as afte rdriving off-road or on rough
roads. Damaged wheel scan cause alossof
tyre pressure. Pa yparticula rattention to
damag esucha s:
R cuts in the tyres
R punctures
R tears in the tyres
R bulge sont he tyres
R deformation or severe corrosio nonwheels
Regularly check the tyre trea ddepth and the
condition of the trea dacross the whol ewidth
of the tyre (Y page 417). If necessary, turn
the front wheel stofullloc kino rder to inspect
the inner sid eofthe tyre surface.
All wheel smusth aveav alve cap to protect
the valve against dirt and moisture. Do not fit
anything onto the valve othe rthan the stand-
ard valve cap or othe rvalve cap sapproved for
your vehicle by Mercedes-Benz. Do not fit any othe rvalve cap sorsystems ,e.g. tyre pres-
sure monitoring systems. Regularly check the pressure of al
lthe tyres,
particularly prior to long trips. Adjust the tyre pressure as necessary (Y page 420).
Observe the notes on the emergency spare
wheel (Y page 465).
The service life of tyre sdepends on various
factors, including the following:
R driving style
R tyre pressure
R mileage Note
sont he tyre tread G
WARNING
Insufficient tyre trea dwillr educe tyre trac-
tion. The tyre is no longer able to dissipate
water. Thi smeans that on we troa ds urfaces,
the ris kofaquapl aning increases, in particular
where speed is not adapted to suit the driving
conditions .There is ariskofa ccident.
If the tyre pressure is too hig hortoo low ,tyres
may exhibi tdifferent level sofwearatd iffer-
ent locations on the tyre tread. Thus, you
shoul dregularl ycheck the trea ddepth and
the condition of the trea dacross the entire
width of al ltyres.
Minimum tyre trea ddepth for:
R summer tyres: 3mm
R M+S tyres: 4mm
For safety reasons, replace the tyre sbefore
the legall yprescribed limit for the minimum
tyre trea ddepth is reached. Selecting, fitting and replacing tyres
G
WARNING
Exceeding the state dtyre load-bearing capa-
city and the approved maximum speed could
lead to tyre damag eorthe tyre bursting .There
is ar iskofa ccident.
Therefore, only us etyre types and sizes
approved for your vehicle model .Observe the Operation
417Wheels and tyres
Z