flat tire MERCEDES-BENZ E-CLASS SALOON 2016 Owners Manual
[x] Cancel search | Manufacturer: MERCEDES-BENZ, Model Year: 2016, Model line: E-CLASS SALOON, Model: MERCEDES-BENZ E-CLASS SALOON 2016Pages: 557, PDF Size: 11.09 MB
Page 22 of 557
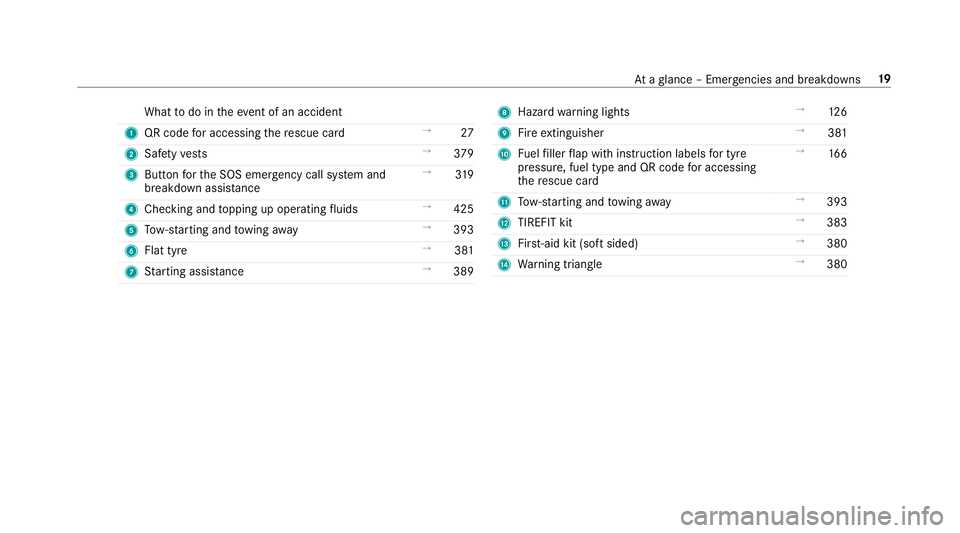
What
todo in theeve nt of an accident
1 QR code for accessing there scue card →
27
2 Safetyve sts →
379
3 Button forth e SOS emer gency call sy stem and
breakdown assis tance →
319
4 Checking and topping up operating fluids →
425
5 Tow- starting and towing away →
393
6 Flat tyre →
381
7 Starting assis tance →
389 8
Haza rdwa rning lights →
12 6
9 Fire extinguisher →
381
A Fuelfiller flap with instruction labels for tyre
pressu re, fuel type and QR code for accessing
th ere scue card →
16 6
B Tow- starting and towing away →
393
C TIREFIT kit →
383
D First-aid kit (so ftsided) →
380
E Warning triangle →
380 At
aglance – Emer gencies and breakdowns 19
Page 384 of 557
Re
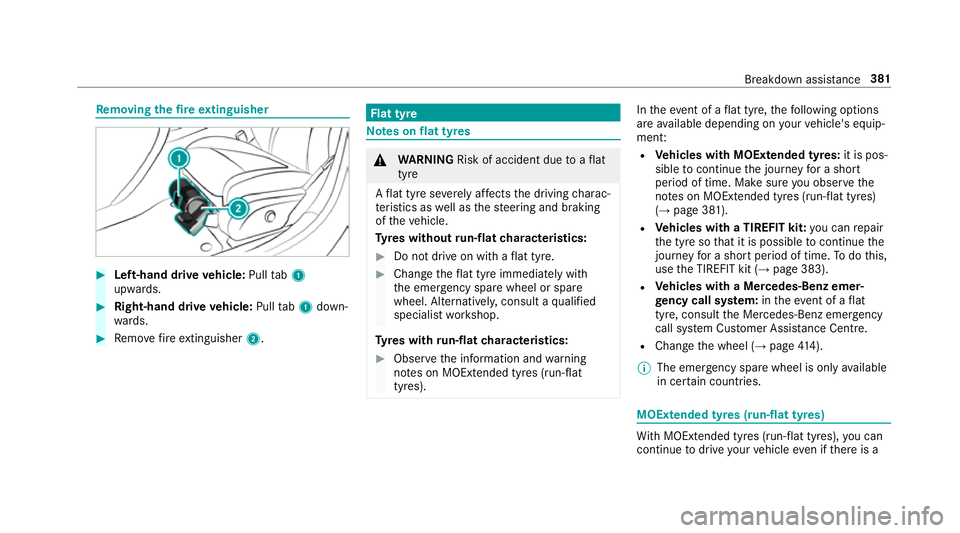
moving the fire extinguisher #
Left-hand drive vehicle: Pulltab1
upwards. #
Right-hand drive vehicle: Pulltab1 down‐
wa rds. #
Remo vefire extinguisher 2. Flat tyre
Note
s onflat tyres &
WARNING Risk of accident due toaflat
tyre
A flat tyre se verely affects the driving charac‐
te rist ics as well as thesteering and braking
of theve hicle.
Ty res without run-flat characteristics: #
Do not drive on with a flat tyre. #
Chan getheflat tyre immediately with
th e emer gency spa rewheel or spare
wheel. Alternativel y,consult a qualified
specialist workshop.
Ty res with run-flat characteristics: #
Obse rveth e information and warning
no tes on MOExtended tyres (run-flat
tyres). In
theeve nt of a flat tyre, thefo llowing options
are available depending on your vehicle's equip‐
ment:
R Vehicles with MOEx tended tyres: it is pos‐
sible tocontinue the journey for a short
period of time. Make sure you obse rvethe
no tes on MOExtended tyres (run-flat tyres)
(→ page 381).
R Vehicles with a TIREFIT kit: you can repair
th e tyre so that it is possible tocontinue the
jou rney for a short period of time. Todo this,
use the TIREFIT kit (→ page 383).
R Vehicles with a Mercedes-Benz emer‐
ge ncy call sy stem: intheeve nt of a flat
tyre, consult the Mercedes-Benz emer gency
call sy stem Cus tomer Assis tance Centre.
R Change the wheel (→ page414).
% The emer gency spa rewheel is only available
in cer tain countries. MOExtended tyres (run-
flat tyres) Wi
th MOExtended tyres (run-flat tyres), you can
continue todrive your vehicle even if there is a Breakdown assis
tance 381
Page 385 of 557
tot
al loss of pressure in one or more tyres. How‐
eve r,th e tyre af fected must not show any clearly
visible damage.
Yo u can recognise MOExtended tyres bythe
MOExtended marking which appears on the side
wa ll of the tyre.
Ve hicles with tyre pressure loss warning sys‐
te m: MOExtended tyres may only be used in
conjunction wi than activated tyre pressure loss
wa rning sy stem.
Ve hicles with tyre pressure monitoring sys‐
te m: MOExtended tyres may only be used in
conjunction wi than activated tyre pressure mon‐
itoring sy stem.
If a pressure loss warning message appears in
th e multifunction display:
R Check the tyres for dama ge
R If driving on, obser vethefo llowing no tes &
WARNING Risk of accident when driving
in run-flat mode
When driving in run-flat mode, the handling
ch aracteristics are impaired. e.g. when cor‐ nering, when accelerating
stronglyand when
braking. #
Do not exceed the maximum permissi‐
ble speed. #
Avoid any abrupt steering and driving
manoeuvres as well as driving over
obs tacles (kerbs, pot holes, off-road).
This applies, in pa rticular, toa loaded
ve hicle. #
Stop driving in run-flat mode if you
notice:
R banging noise
R vehicle vibration
R smoke which smells like rubber
R continuous ESP ®
inter vention
R crac ksin tyre side walls #
After driving in run-flat mode, ha vethe
ri ms checkedby aqu alified specialist
wo rkshop with rega rd totheir fur ther
use. #
The defective tyre must be replaced in
eve rycase. Driving distance possible in li
mp-home mode
af te r the pressure loss warning Load condition Driving distance pos‐
sible in limp-homemode
Pa rtially laden 80 km
Fu lly laden 30 km R
The driving dis tance possible in li mp-home
mode may vary depending on the driving
st yle.
R Maximum permissible speed 80 km/h.
If a tyre has gone flat and cannot be replaced
with an MOEx tended tyre, a standard tyre may
be used as a temp orary measure. TIREFIT kit
storage location The TIREFIT kit is located under
the boot floor. 382
Breakdown assis tance
Page 386 of 557
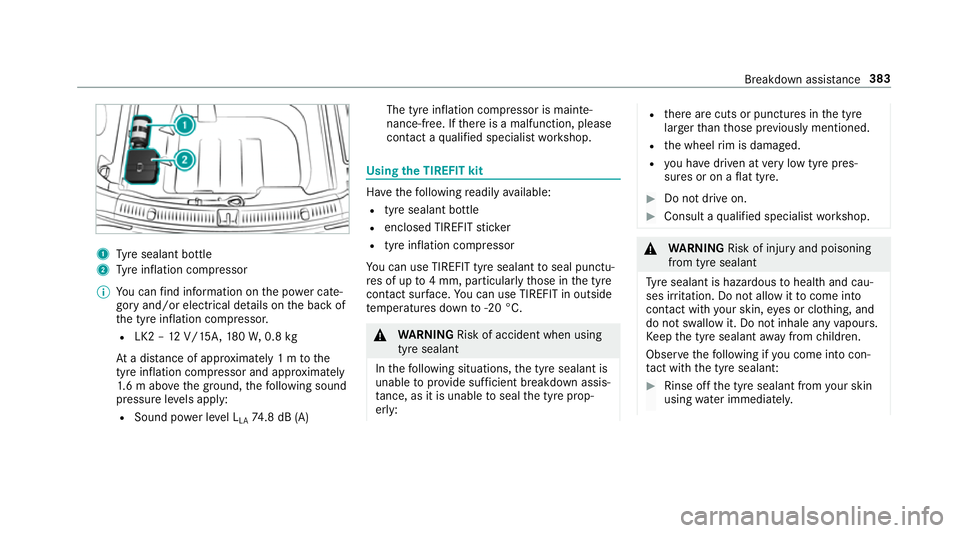
1
Tyre sealant bottle
2 Tyre inflation compressor
% You can find information on the po wer cate‐
gory and/or electrical de tails on the back of
th e tyre inflation compressor.
R LK2 – 12V/15A, 180W, 0.8 kg
At a dis tance of appr oximately 1 m tothe
tyre inflation compressor and appr oximately
1. 6 m abo vethe ground, thefo llowing sound
pressure le vels apply:
R Sound po wer le vel L
LA 74
.8 dB (A) The tyre inflation compressor is mainte‐
nance-free. If
there is a malfunction, please
conta ct aqualified specialist workshop. Using
the TIREFIT kit Ha
ve thefo llowing readily available:
R tyre sealant bottle
R enclosed TIREFIT sticker
R tyre inflation compressor
Yo u can use TIREFIT tyre sealant toseal punctu‐
re s of up to4 mm, particularly those in the tyre
conta ct surface. You can use TIREFIT in outside
te mp eratures down to-20 °C. &
WARNING Risk of accident when using
tyre sealant
In thefo llowing situations, the tyre sealant is
unable toprov ide suf ficient breakdown assis‐
ta nce, as it is unable toseal the tyre prop‐
erly: R
there are cuts or punctures in the tyre
larger than those pr eviously mentioned.
R the wheel rim is dama ged.
R you ha vedriven at very low tyre pres‐
sures or on a flat tyre. #
Do not drive on. #
Consult a qualified specialist workshop. &
WARNING Risk of inju ryand poisoning
from tyre sealant
Ty re sealant is hazardous tohealth and cau‐
ses ir rita tion. Do not allow it tocome into
contact wi thyour skin, eyes or clo thing, and
do not swallow it. Do not inhale any vapours.
Ke ep the tyre sealant away from children.
Obser vethefo llowing if you come into con‐
ta ct wi th the tyre sealant: #
Rinse off the tyre sealant from your skin
using water immediatel y. Breakdown assis
tance 383
Page 387 of 557
#
If tyre sealant gets into your eyes, thor‐
oughly rinse them using clean water
immediatel y. #
If tyre sealant has been swallowe d,
th oroughly rinse out your mouth imme‐
diately and drink plenty of water.Do not
induce vomiting and seek medical
attention immediately. #
Change out of clo thing which has come
into con tact wi thtyre sealant immedi‐
ately. #
If an alle rgic reaction occurs, seek med‐
ical attention immediatel y.*
NO
TEOverheating due tothe tyre infla‐
tion compressor running too long #
Do not runth e tyre inflation compres‐
sor for longer than ten minu tes without
inter ruption. Comply with
the manufacturer's saf ety no tes on
th est icke r on the tyre inflation compressor. Ha
ve the tyre sealant bottle replaced everyfour
ye ars at a qualified specialist workshop. #
Do not remo veany fore ign objects which
ha ve penetra tedth e tyre. #
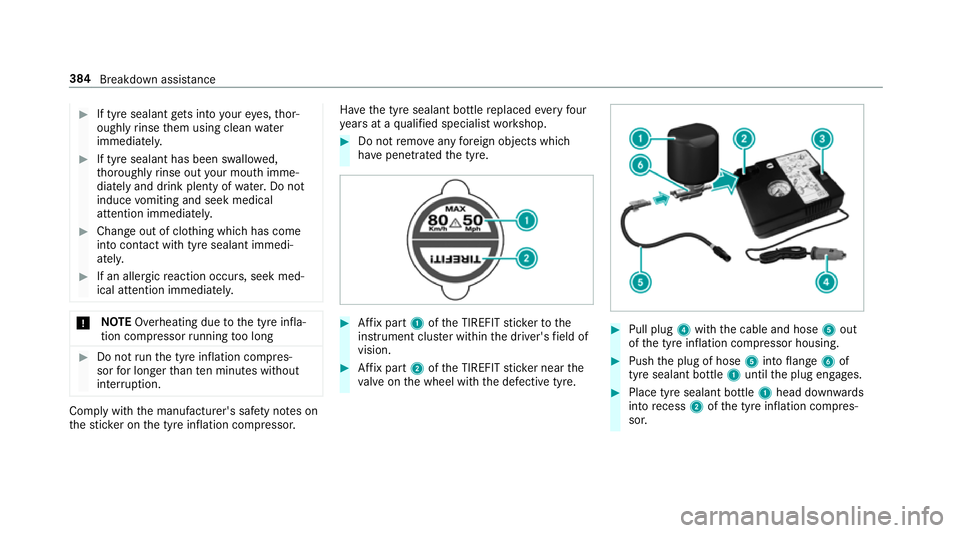
Affix pa rt1 ofthe TIREFIT sticke rto the
instrument clus ter within the driver's field of
vision. #
Affix pa rt2 ofthe TIREFIT sticke r near the
va lve on the wheel with the defective tyre. #
Pull plug 4with the cable and hose 5out
of the tyre inflation compressor housing. #
Push the plug of hose 5into flange 6of
tyre sealant bottle 1until the plug engages. #
Place tyre sealant bottle 1head down wards
into recess 2ofthe tyre inflation compres‐
sor. 384
Breakdown assis tance
Page 389 of 557
If, af
terte n minutes, a tyre pressure of
200 kPa (2.0 bar/29 psi) has been achie ved: &
WARNING Risk of accident from driving
wi th sealed tyres
A tyre temp orarily sealed with tyre sealant
impairs handling characteristics and is not
suitable for higher speeds. #
Adapt your driving style according lyand
drive carefull y. #
Do not exceed the specified maximum
speed with a tyre that has been sealed
using tyre sealant. #
Obse rveth e maximum permissible speed for
a tyre sealed with tyre sealant 80 km/h. #
Affix th e upper section of the TIREFIT sticker
to the instrument clus ter where it will be eas‐
ily seen bythe driver.
* NO
TEStaining from leaking tyre sealant Af
ter use, excess tyre sealant may leak out
from thefilling hose. #
Therefore, place thefilling hose in the
plastic bag that con tained the TIREFIT
kit. +
ENVIRONMEN
TALNO TEEnvironmental
pollution caused byenvironmen tally ir re‐
sponsible disposal Ty
re sealant contains polluta nts. #
Have the tyre sealant bottle disposed of
professionall y,e.g. at a Mercedes-Benz
service cent re. #
Switch off the tyre inflation compressor. #
Unscr ew thefilling hose from theva lve of the
defective tyre. #
Stow th e tyre sealant bottle, the tyre inflation
compressor and thewa rning triangle. #
Pull away immediatel y. #
Stop af ter driving for appro ximately ten
minutes and check the tyre pressure using
th e tyre inflation compressor.
The tyre pressure must now be at least
13 0 kPa (1.3 bar/19 psi). &
WARNING Risk of accident due tothe
specified tyre pressure not being ach‐
ie ved
If th e specified tyre pressure is not achie ved
af te r a brief drive, the tyre is too badly dam‐
aged. The tyre sealant cannot repair the tyre
in this ins tance.
Dama ged tyres and a tyre pressure that is
to o low can significantly impair braking and
handling characteristics. #
Do not drive on. #
Consult a qualified specialist workshop. Countries
that ha veMercedes-Benz
Service24h: ast icke r with the phone number
can also be found in your vehicle, e.g. on the
B‑pillar on the driver's side. #
Cor rect the tyre pressure if it is still at least
13 0 kPa (1.3 bar/19 psi). See the tyre pres‐
sure table on the fuel filler flap forva lues. #
Toincrease the ty repressure: switch on
th e tyre inflation compressor. 386
Breakdown assis tance
Page 415 of 557
Obser
vethefo llowing when selecting, fitting and
re placing tyres:
R Countr y-specific requirements for tyre
appro valth at define a specific tyre type for
yo ur vehicle.
Fu rthermore, the use of cer tain tyre types in
cer tain regions and areas of operation can
be highly beneficial.
R Only use tyres and wheels of the same type
(summer tyres, winter tyres, MOEx tended
tyres) and the same make.
R Only fit wheels of the same size on one axle
(left and right).
It is only permissible tofit a di fferent wheel
size in theeve nt of a flat tyre in order to
drive tothe specialist workshop.
R Only fit tyres of the cor rect size onto the
wheels.
R Do not make any modifications tothe brake
sy stem, the wheels or the tyres.
The use of shims or brake dust shields is not
permitted and may in validate theve hicle's
ge neral operating pe rmit. R
Vehicles with a tyre pressure monitoring
sy stem: Allfitted wheels mu stbe equipped
with functioning sensors forth e tyre pres‐
sure monitoring sy stem.
R Attemp eratures below 7 °C, use winter tyres
or all-season tyres mar ked M+S for all
wheels.
Wi nter tyres bearing thei snowflake
symbol in addition tothe M+S marking pro‐
vide the best possible grip in wintry road
conditions.
R For M+S tyres, only use tyres with the same
tread.
R Obser vethe maximum permissible speed for
th e M+S tyres fitted.
If th is is below theve hicle's maximum speed,
th is must be indicated in an appropriate label
in the driver's field of vision.
R Run in new tyres at moderate speeds forthe
fi rs t10 0 km.
R Replace the tyres af ter six years at the latest,
re ga rdless of wear. R
When replacing with tyres that do not
fe ature run-flat characteristics: Vehicles
with MOExtended tyres are not equipped
with a TIREFIT kit at thefa ctor y.Equip the
ve hicle with a TIREFIT kit af terre placing with
tyres that do not feature run-flat characteris‐
tics, e.g. winter tyres.
Fo r more information on wheels and tyres, con‐
ta ct a qualified specialist workshop.
Be sure toalso obse rveth efo llowing fur ther
re lated subjects:
R Notes on tyre pressure (→ page 402)
R Tyre pressure table (→ page 403)
R Notes on the emer gency spa rewheel
(→ page 419) Note
s on inter changing wheels &
WARNING Risk of inju rythro ugh dif fer‐
ent wheel sizes
Inter changing the front and rear wheels if the
wheels or tyres ha vediffere nt dimensions 412
Wheels and tyres
Page 528 of 557
Engine number
........................................ 423
Engine oil ................................................ .368
Ad ditives .............................................4 30
Che cking the oil le vel using the oil
dipstick ................................................ 367
Checking the oil le vel using the on-
board computer ................................... 367
Filling capacity .....................................4 31
MB-F reigabe or MB-Appr oval .............. .431
To pping up ...........................................3 68
Entering characters
Fu nction/no tes .................................... 274
On theto uchpad .................................. 275
Using the controller ............................. 275
ERA-GLONASS test mode
St arting/ending .................................. 322
ESC (Elect ronic Stability Control)
see ESP ®
(Electronic Stability Prog ram)
ESP ®
(Electronic Stability Prog ram) ....... 181
Crosswind Assist ................................ .184
Fu nction/no tes .................................... 181
Switching on/off ................................. 184
Tr ailer stabilisation .............................. 184
EU type appr oval number ....................... 423 Exterior lighting
Care ..................................................... 374
Exterior lighting see Lights F
Fa tigue warning
see ATTENTION ASSIST
Fa ult message
see Displ aymessa ge
Favo urites
Ad ding .................................................2 72
Calling up ............................................ 272
Del eting .............................................. .273
Moving .................................................2 73
Overview ............................................. 272
Re naming ............................................ 273
Fi lling station sear ch
St arting an automatic filling station
sear ch................................................. 290
Switching the automatic filling sta‐
tion sear chon/off ...............................2 93
Fire extinguisher ..................................... 381 Fi
rs t-aid kit (soft sided) .......................... 380
Flacon Inse rting/ removing ............................. 14 5
Flat ty re
MOExtended tyres ...............................3 81
No tes ................................................... 381
TIREFIT kit ...........................................3 83
Wheel change ...................................... 414
Flat ty re
see Breakdown
Floor mat .................................................. 12 2
Fo g light (extended range) ......................1 27
Fr ag rance
see Frag rance sy stem
Fr ag rance sy stem .................................... 14 5
Inserting/removing theflacon ............ .145
Setting ................................................. 14 5
Fr equencies
Mobile phone ...................................... 422
Tw o-w ayradio ...................................... 422
Fr equency band
Selecting (on-board computer) ............ 252 Index
525
Page 548 of 557

Calling up
the menu (CA module) ........ 360
Commands (LINGU ATRO NIC) .............. 264
Displaying telete xt ............................... 359
Displa ysintheTV control menu .......... 355
Fu nction/no tes (audio language,
subtitles) ............................................. 358
Information .......................................... 352
Inserting theCA module ...................... 359
Overview ............................................. 354
Picture settings ................................... 359
Picture settings overview .................... 359
Setting subtitles .................................. 358
Setting the audio language .................. 358
Showing/hiding theTV menu .............. 355
Te lete xt overview ................................. 358
TV channel
Ac tivating/deactivating channel fix ..... 356
Channel fix .......................................... 356
Channel li stove rview .......................... 357
EPG (elect ronic programme guide) ...... 356
Overview of favo urites ........................ .357
Qui cksave ........................................... 357
Selecting from thech annel list ............ 355
Selecting from the control menu ......... 355
Selecting from thefa vo urites .............. 355 Selecting in
the bac kground ................ 356
St oring .................................................3 57
Using a voice tag ................................. 357
Tw o-w ayradio telephone
see Mobile phone
Tw o-w ayradios ........................................ 421
Fr equencies ......................................... 422
No tes on ins tallation ............................ 421
Tr ansmission output (maximum) ........ .422
Ty pe appr oval number (EU) .................... 423
Ty pes of commands (LINGU ATRO NIC) ... 258
Ty re inflation compressor
see TIREFIT kit
Ty re pressure ........................................... 383
Checking (ty repressure monitoring
sy stem) ............................................... 405
No tes .................................................. 402
Re starting the tyre pressure loss
wa rning sy stem ................................... 409
Re starting the tyre pressure monitor‐
ing sy stem ...........................................4 05
Ty re pressure loss warning sy stem
(function) ............................................. 408 Ty
re pressure monitoring sy stem
(function) ............................................. 404
Ty re pressure table .............................. 403
Ty re pressure loss warning sy stem
Fu nction .............................................. 408
Re starting ............................................ 409
Ty re pressure moni toring sy stem
Checking the tyre pressures ................4 05
Fu nction .............................................. 404
Re starting ............................................ 405
Te ch nical da ta..................................... 406
Ty re pressure table ................................. 403
Ty re tread ................................................. 401
Ty re-change tool kit
Overview .............................................. 413
Ty res
Changing .............................................. 414
Changing hub caps .............................. 414
Checking the tyre pressure (tyre
pressure monitoring sy stem) ............... 405
Fitting .................................................. 417
Flat tyre ............................................... 381
MOExtended tyres ............................... 381
Noise ................................................... 401 Index
545
Page 551 of 557
7Seat belt
warning lamp flashes .. .502
7Seat belt warning lamp lights
up ........................................................ 501
jTr ailer hit chwarning lamp .......... .503
hTy repressure monitoring sys‐
te m wa rning lamp flashes .................. .509
hTy repressure monitoring sys‐
te m wa rning lamp lights up ................ .508
!Ye llow elect ric pa rking brake
indicator lamp is malfunctioning ........ .500
Wa rning/indicator lamps .......................493
Instrument display (o verview) ................ 10
Overview ............................................. 493
PA SSENGER AIR BAG ............................ .41
Wa rranty .................................................... 27
Wa sher fluid
see Windsc reen washer fluid
Wa shing byhand (care) .......................... 372
We ather information ............................... 306
We b br owser
Calling up a website ............................ 334 Calling up options ...............................3
34
Calling up settings ............................... 334
Closing ................................................ 335
Deleting Internet favo urites ................ .335
Deleting Internet his tory ...................... 335
Overview ............................................. 334
Setting Internet favo urites .................. .335
We bsite
Calling up ............................................ 334
Wheel change .......................................... .419
Fitting a new wheel .............................. 417
Lo we ring theve hicle ............................4 18
Preparation .......................................... 414
Ra ising theve hicle ...............................4 15
Re moving a wheel ................................ 417
Re moving/fitting hub caps .................. 414
Wheel chock ............................................ .413
Wheel rotation ........................................ .412
Wheels Care ..................................................... 374
Changing .............................................. 414
Changing hub caps .............................. 414
Checking ............................................ .401 Checking
the tyre pressure (tyre
pressure monitoring sy stem) ............... 405
Fitting .................................................. 417
Flat tyre ............................................... 381
MOExtended tyres ............................... 381
Noise ................................................... 401
No tes on fitting ................................... 409
Re moving ............................................. 417
Re placing ............................................ 409
Re starting the tyre pressure loss
wa rning sy stem ................................... 409
Re starting the tyre pressure monitor‐
ing sy stem ...........................................4 05
Ro tating ............................................... 412
Selection ............................................. 409
Snow chains ........................................ 401
St oring .................................................4 13
TIREFIT kit ...........................................3 83
Ty re pressure (N otes) .......................... 402
Ty re pressure loss warning sy stem
(function) ............................................. 408
Ty re pressure monitoring sy stem
(function) ............................................. 404
Ty re pressure table .............................. 403
Un usual handling characteristics ........ .401 548
Index