fold seats MERCEDES-BENZ E-CLASS SALOON 2016 Owners Manual
[x] Cancel search | Manufacturer: MERCEDES-BENZ, Model Year: 2016, Model line: E-CLASS SALOON, Model: MERCEDES-BENZ E-CLASS SALOON 2016Pages: 557, PDF Size: 11.09 MB
Page 20 of 557
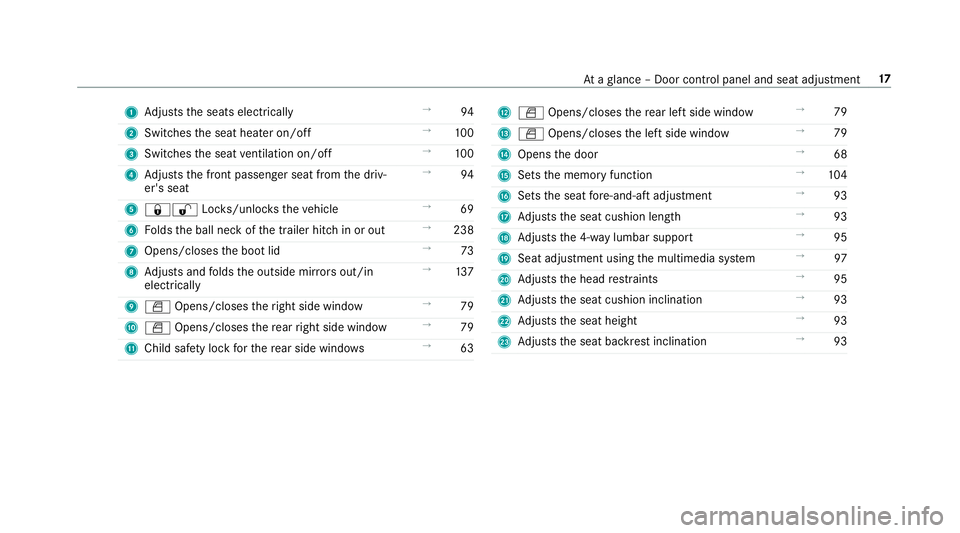
1
Adjusts the seats electrically →
94
2 Switches the seat heater on/off →
100
3 Switches the seat ventilation on/o ff →
100
4 Adjusts the front passenger seat from the driv‐
er's seat →
94
5 &% Locks/unloc kstheve hicle →
69
6 Folds the ball neck of the trailer hitch in or out →
238
7 Opens/closes the boot lid →
73
8 Adjusts and folds the outside mir rors out/in
electrically →
137
9 W Opens/closes theright side window →
79
A W Opens/closes there ar right side window →
79
B Child saf ety lock forth ere ar side wind ows →
63 C
W Opens/closes there ar left side wind ow→
79
D W Opens/closes the left side window →
79
E Opens the door →
68
F Sets the memory function →
104
G Sets the seat fore -and-aft adjustment →
93
H Adjusts the seat cushion length →
93
I Adjusts the 4-w aylumbar support →
95
J Seat adjustment using the multimedia sy stem →
97
K Adjusts the head restra ints →
95
L Adjusts the seat cushion inclination →
93
M Adjusts the seat height →
93
N Adjusts the seat backrest inclination →
93 At
aglance – Door control panel and seat adjustment 17
Page 52 of 557

tions and
the instructions for cor rect use of the
ch ild restra int sy stem.
Before every trip, make sure that the ISOFIX
ch ild restra int sy stem or the i-Size child restra int
sy stem is engaged cor rectly in bo thISOFIX or
i‑Size mounting brac kets. 1
ISOFIX mounting brac kets
2 i-Size mounting brac kets *
NO
TEDama getothe seat belt forthe
centre seat When
fitting a child restra int sy stem, the seat
belt forth e cent reseat could be damaged. #
Make sure that the seat belt is not trap‐
ped. #
Remo veeach co verfo r ISOFIX mounting
brac kets 1 or i‑Size mounting brac kets 2. #
Attach the ISOFIX child restra int sy stem to
bo th ISOFIX mounting brac kets 1 or i‑Size
mounting brac kets 2.
or #
Attach the i‑Size child restra int sy stem to
bo th i‑Size mounting brac kets 2. #
Afterre moving thech ild seat, replace each
co verfo r ISOFIX mounting brac kets 1 or
i‑Size mounting brac kets 2. Secu
ring TopTe ther &
WARNING Risk of inju ryifth e seat
backrests of there ar seats are not
loc ked af terfitting TopTe ther belts
If th ere ar seat backrests are not loc ked, they
could fold forw ards in theeve nt of an acci‐
dent, heavy braking or sudden changes of
direction.
As a result, child restra int sy stems cann ot
per form their intended pr otective function.
Re ar seat backrests that are not loc ked can
also cause additional injuries, e.g. in the
ev ent of an accident. This poses an
increased risk of injury or even fata l injur y. #
Alw ays lock rear seat backrests af ter
fi tting TopTe ther belts. #
Obser vethe lock verification indicator. If
th e seat backrest is not engaged and loc ked,
th is will be shown in the multifunction display in
th e instrument clus ter.
The risk of injury can be reduced byTopTe ther
as TopTe ther pr ovides an additional connection Occupant saf
ety49
Page 53 of 557

between
thech ild restra int sy stem secured with
ISOFIX and theve hicle.
The child restra int sy stem must be equipped
with a TopTe ther belt. #
If necessar y,mo vehead restra int 1
upwards (→ page97). #
Fold up co ver2 ofTopTe ther anchorage
3. #
Fitthe ISOFIX child restra int sy stem with To p
Te ther. Alw ays comply with thech ild restra int
sy stem manufacturer's ins tallation instruc‐
tions when doing so. #
Route TopTe ther belt 5under head
re stra int 1 between the two head restra int
bars. #
Hook TopTe ther hook 4ofTopTe ther belt
5 without twisting into TopTe ther anchor‐
age 3. #
Tension TopTe ther belt 5. Alw ays comply
with thech ild restra int sy stem manufactur‐
er's ins tallation instructions when doing so. #
Fold down co ver2 ofTopTe ther anchorage
3. #
If necessar y,mo vehead restra int 1 down‐
wa rds (→ page 97). Make sure that you do
not inter fere with the cor rect routing of To p
Te ther belt 5. Child
restra int sy stems on the front
passenger seat Note
s onchild restra int sy stems on the front
passenger seat
Ac cident statistics show that children secured in
th ere ar seats are safer than children secured in
th e front seats. Forth is reason, Mercedes-Benz
stro ngly advises that you ins tall a child restra int
sy stem on a rear seat.
If it is absolutely necessary toins tall a child
re stra int sy stem on the front passenger seat,
alw ays obser vethe information on the automatic
front passenger airbag shutoff (→ page 39).50
Occupant saf ety
Page 100 of 557
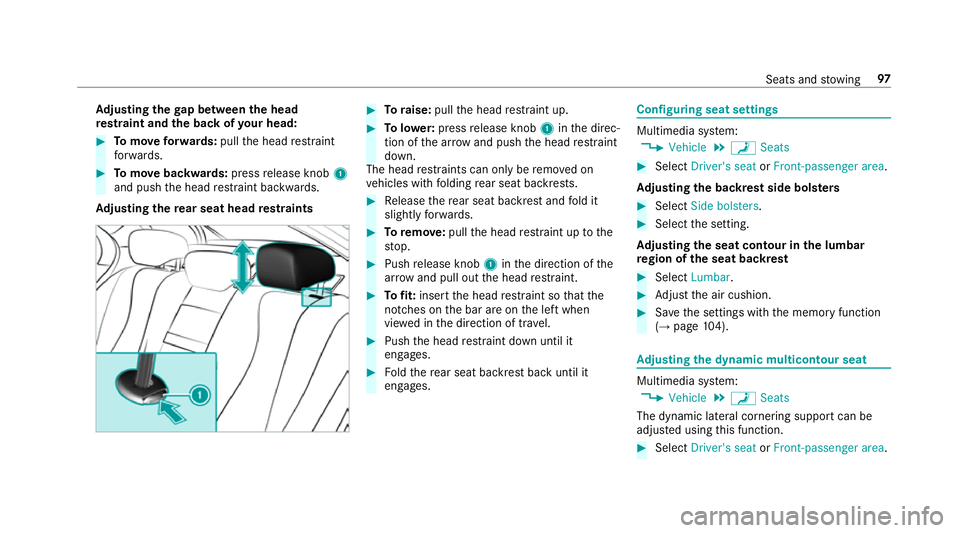
Ad
justing the gap between the head
re stra int and the back of your head: #
Tomo veforw ards: pullthe head restra int
fo rw ards. #
Tomo vebackwards: pressrelease knob 1
and push the head restra int backwards.
Ad justing the rear seat head restra ints #
Toraise: pullthe head restra int up. #
Tolowe r:press release knob 1inthe direc‐
tion of the ar row and push the head restra int
down.
The head restra ints can only be remo ved on
ve hicles with folding rear seat backrests. #
Release there ar seat backrest and fold it
slight lyforw ards. #
Toremo ve:pull the head restra int up tothe
st op. #
Push release knob 1inthe direction of the
ar row and pull out the head restra int. #
Tofit: inse rtthe head restra int so that the
notches on the bar are on the left when
vie we d in the direction of tra vel. #
Push the head restra int down until it
engages. #
Foldthere ar seat backrest back until it
engages. Configuring seat settings
Multimedia sy
stem:
, Vehicle .
a Seats #
Select Driver's seat orFront-passenger area.
Ad justing the backrest side bols ters #
Select Side bolsters . #
Select the setting.
Ad justing the seat contour in the lumbar
re gion of the seat backrest #
Select Lumbar . #
Adjust the air cushion. #
Save the settings with the memory function
(→ page 104). Ad
justing the dynamic multicon tour seat Multimedia sy
stem:
, Vehicle .
a Seats
The dynamic lateral cornering support can be
adjus ted using this function. #
Select Driver's seat orFront-passenger area. Seats and
stowing 97
Page 110 of 557
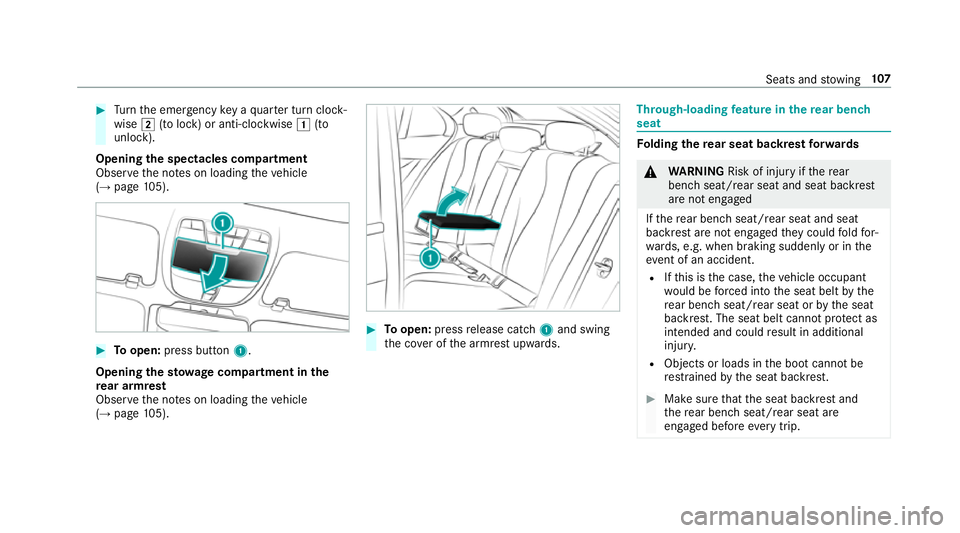
#
Turn the emer gency key a quarter turn clock‐
wise 2(to lock) or anti-clockwise 1(to
unlock).
Opening the spectacles compa rtment
Obse rveth e no tes on loading theve hicle
(→ page 105). #
Toopen: press button 1.
Opening thesto wage compa rtment in the
re ar armrest
Obse rveth e no tes on loading theve hicle
(→ page 105). #
Toopen: pressrelease cat ch1 and swing
th e co ver of the armrest upwards. Through-loading
feature in there ar ben ch
seat Fo
lding there ar seat backrest forw ards &
WARNING Risk of inju ryifth ere ar
ben chseat/rear seat and seat backrest
are not engaged
If th ere ar ben chseat/rear seat and seat
backrest are not engaged they could fold for‐
wa rds, e.g. when braking suddenly or in the
ev ent of an accident.
R Ifth is is the case, theve hicle occupant
wo uld be forc ed into the seat belt bythe
re ar ben chseat/rear seat or bythe seat
backrest. The seat belt cann otprotect as
intended and could result in additional
injur y.
R Objects or loads in the boot cann otbe
re stra ined bythe seat backrest. #
Make sure that the seat backrest and
th ere ar ben chseat/rear seat are
engaged before everytrip. Seats and
stowing 107
Page 111 of 557
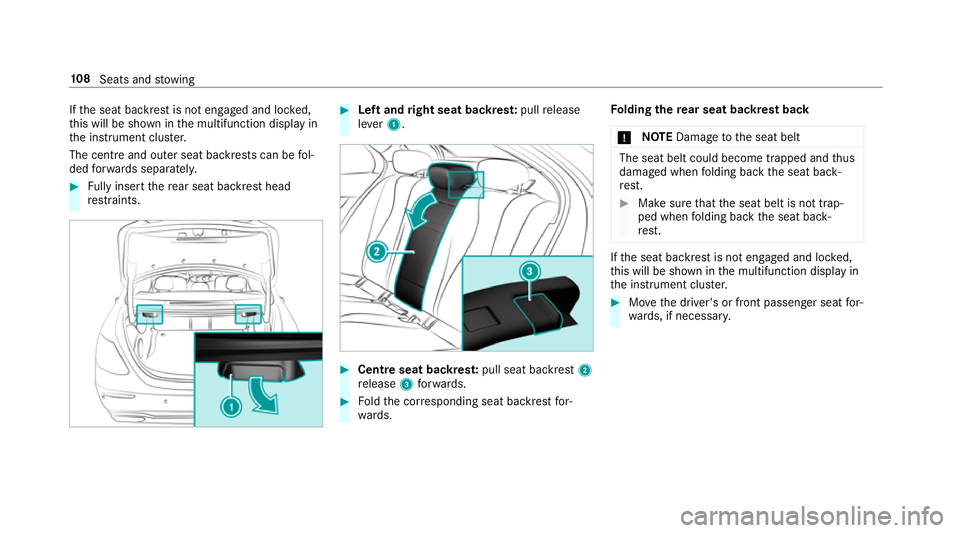
If
th e seat backrest is not engaged and loc ked,
th is will be shown in the multifunction display in
th e instrument clus ter.
The centre and outer seat backrests can be fol‐
ded forw ards separatel y.#
Fully inse rtthere ar seat backrest head
re stra ints. #
Left and right seat backres t:pull release
le ve r1. #
Centre seat backres t:pull seat backrest 2
re lease 3forw ards. #
Foldthe cor responding seat backrest for‐
wa rds. Fo
lding there ar seat backrest back
* NO
TEDama getothe seat belt The seat belt could become trapped and
thus
damaged when folding back the seat back‐
re st. #
Make sure that the seat belt is not trap‐
ped when folding back the seat back‐
re st. If
th e seat backrest is not engaged and loc ked,
th is will be shown in the multifunction display in
th e instrument clus ter. #
Movethe driver's or front passenger seat for‐
wa rds, if necessar y. 108
Seats and stowing
Page 112 of 557
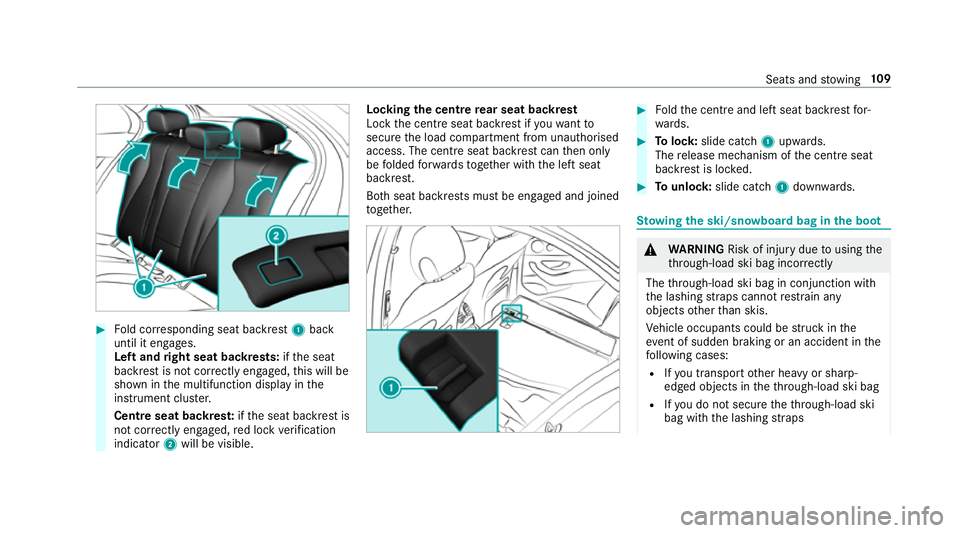
#
Fold cor responding seat backrest 1back
until it engages.
Left and right seat backrests: ifth e seat
backrest is not cor rectly engaged, this will be
shown in the multifunction display in the
instrument clus ter.
Centre seat backres t:ifth e seat backrest is
not cor rectly engaged, red lock verification
indicator 2will be visible. Lo
cking the centre rear seat backrest
Lock the cent reseat backrest if youwa ntto
secure the load compartment from unauthorised
access. The cent reseat backrest can then only
be folded forw ards toge ther with the left seat
backrest.
Bo th seat backrests must be engaged and joined
to ge ther. #
Foldthe cent reand left seat backrest for‐
wa rds. #
Tolock: slide cat ch1 upwards.
The release mechanism of the cent reseat
backrest is loc ked. #
Tounlo ck:slide catch 1down wards. St
ow ing the ski/sn owboard bag in the boot &
WARNING Risk of inju rydue tousing the
th ro ugh-load ski bag incor rectly
The thro ugh-load ski bag in conjunction with
th e lashing stra ps cann otrestra in any
objects other than skis.
Ve hicle occupants could be stru ck inthe
ev ent of sudden braking or an accident in the
fo llowing cases:
R Ifyo u transpo rtother heavy or sharp-
edged objects in theth ro ugh-load ski bag
R Ifyo u do not secure theth ro ugh-load ski
bag with the lashing stra ps Seats and
stowing 109
Page 113 of 557
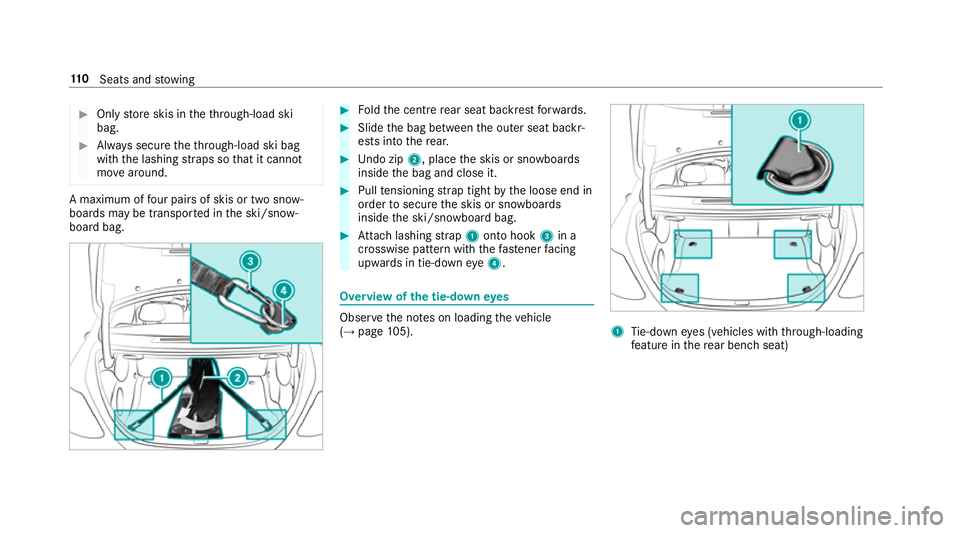
#
Only store skis in theth ro ugh-load ski
bag. #
Alw ays secure theth ro ugh-load ski bag
with the lashing stra ps so that it cannot
mo vearound. A maximum of
four pairs of skis or two sn ow‐
boards may be transpor ted in the ski/snow‐
board bag. #
Foldthe cent re rear seat backrest forw ards. #
Slide the bag between the outer seat backr‐
ests into there ar. #
Undo zip 2, place the skis or snowboards
inside the bag and close it. #
Pull tensioning stra p tight bythe loose end in
order tosecure the skis or snowboards
inside the ski/snowboard bag. #
Attach lashing stra p1 onto hook 3in a
crosswise pattern with thefast ener facing
up wa rds in tie-down eye4. Overview of
the tie-down eyes Obser
vethe no tes on loading theve hicle
(→ page 105). 1
Tie-down eyes (vehicles with thro ugh-loading
fe ature in there ar ben chseat) 11 0
Seats and stowing
Page 115 of 557
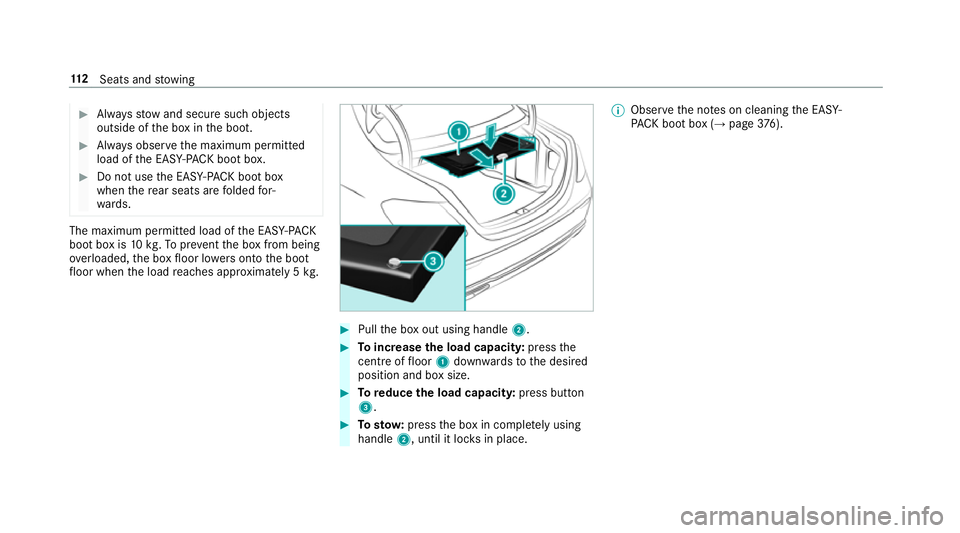
#
Alw aysstow and secure such objects
outside of the box in the boot. #
Alw ays obser vethe maximum permitted
load of the EASY -PAC K boot box. #
Do not use the EASY -PAC K boot box
when there ar seats are folded for‐
wa rds. The maximum permitted load of
the EASY -PACK
boot box is 10kg.To prev ent the box from being
ove rloaded, the box floor lo wersonto the boot
fl oor when the load reaches appr oximately 5 kg. #
Pull the box out using handle 2. #
Toincrease the load capacit y:press the
centre of floor 1down wardsto the desired
position and box size. #
Toreduce the load capacity: press button
3. #
Tosto w:press the box in comple tely using
handle 2, until it loc ksin place. %
Obser vethe no tes on cleaning the EASY-
PA CK boot box (→ page376). 11 2
Seats and stowing
Page 118 of 557
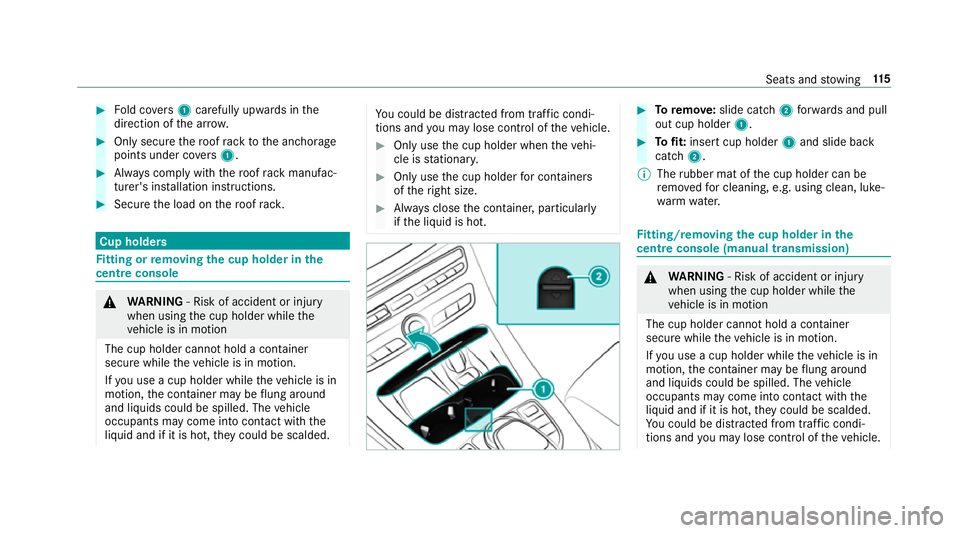
#
Fold co vers 1 carefully up wards in the
direction of the ar row. #
Only secure thero of rack tothe anchorage
points under co vers 1 . #
Alw ays comply with thero of rack manufac‐
turer's ins tallation instructions. #
Secure the load on thero of rack. Cup holders
Fi
tting or removing the cup holder in the
centre console &
WARNING ‑ Risk of accident or inju ry
when using the cup holder while the
ve hicle is in motion
The cup holder cannot hold a container
secure while theve hicle is in motion.
If yo u use a cup holder while theve hicle is in
motion, the conta iner may be flung around
and liquids could be spilled. The vehicle
occupants may come into contact with the
liquid and if it is hot, they could be scalded. Yo
u could be distracted from traf fic condi‐
tions and you may lose cont rol of theve hicle. #
Only use the cup holder when theve hi‐
cle is stationar y. #
Only use the cup holder for containers
of theright size. #
Alw ays close the conta iner, particularly
if th e liquid is hot. #
Toremo ve:slide catch 2forw ards and pull
out cup holder 1. #
Tofit: inse rtcup holder 1and slide ba ck
catch 2.
% The rubber mat of the cup holder can be
re mo vedfo r cleaning, e.g. using clean, luke‐
wa rm wate r. Fi
tting/ removing the cup holder in the
centre console (manual transmission) &
WARNING ‑ Risk of accident or inju ry
when using the cup holder while the
ve hicle is in motion
The cup holder cannot hold a container
secure while theve hicle is in motion.
If yo u use a cup holder while theve hicle is in
motion, the conta iner may be flung around
and liquids could be spilled. The vehicle
occupants may come into contact with the
liquid and if it is hot, they could be scalded.
Yo u could be distracted from traf fic condi‐
tions and you may lose cont rol of theve hicle. Seats and
stowing 11 5