tow MERCEDES-BENZ E-CLASS SALOON 2017 Workshop Manual
[x] Cancel search | Manufacturer: MERCEDES-BENZ, Model Year: 2017, Model line: E-CLASS SALOON, Model: MERCEDES-BENZ E-CLASS SALOON 2017Pages: 497, PDF Size: 10.38 MB
Page 127 of 497
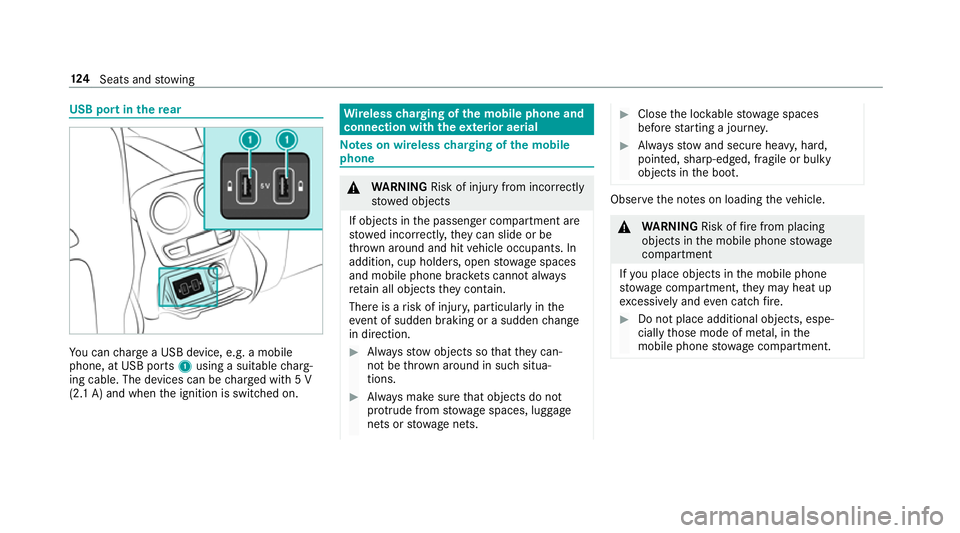
USB port in
there ar Yo
u can charge a USB device, e.g. a mobile
phone, at USB ports 1using a suitable charg‐
ing cable. The devices can be charge d with 5 V
(2.1 A) and when the ignition is switched on. Wire
lesscharging of the mobile phone and
connection with theex terior aerial Note
s on wireless charging of the mobile
phone &
WARNING Risk of inju ryfrom incor rectly
stowe d objects
If objects in the passenger compartment are
stowe d incor rectl y,they can slide or be
th ro wn around and hit vehicle occupants. In
addition, cup holders, open stowage spaces
and mobile phone brac kets cann otalw ays
re tain all objects they contain.
The reis a risk of injur y,particularly in the
ev ent of sudden braking or a sudden change
in direction. #
Alw aysstow objects so that they can‐
not be throw n around in su chsitua‐
tions. #
Alw ays make sure that objects do not
pr otru de from stowage spaces, luggage
nets or stowage nets. #
Close the loc kable stow age spaces
before starting a journe y. #
Alw aysstow and secure heavy, hard,
poin ted, sharp-edged, fragile or bulky
objects in the boot. Obser
vethe no tes on loading theve hicle. &
WARNING Risk offire from placing
objects in the mobile phone stowage
compartment
If yo u place objects in the mobile phone
stow age compartment, they may heat up
exc essively and even catch fire. #
Do not place additional objects, espe‐
cially those mode of me tal, in the
mobile phone stowage compartment. 124
Seats and stowing
Page 128 of 497
*
NO
TEDama getoobjects caused by
placing them in the mobile phone stow‐
age compartment If
yo u place objects in the mobile phone
stow age compartment, these may be dam‐
aged byelectromagnetic fields. #
Do not place credit cards, storage
media or other objects sensitive to
electromagnetic fields in the mobile
phone stowage compartment. *
NO
TEDama getothe mobile phone
stow age compartment caused byliquids If liquids enter
the mobile phone stowage
compartment, the compartment may be
damaged. #
Ensure that no liquids enter the mobile
phone stowage compartment. R
Depending on theve hicle equipment, the
mobile phone is connected totheve hicle's
ex terior aerial via thech arging module. R
The charging function and wireless connec‐
tion of the mobile phone totheve hicle's
ex terior aerial are only available if the ignition
is switched on.
R Small mobile phones may not be able tobe
ch arge d in everyposition of the mobile
phone stowage compartment.
R Largemobile phones which do not rest flat in
th e mobile phone stowage compartment may
not be able tobe charge d or connec ted with
th eve hicle's exterior aerial.
R The mobile phone may heat up during the
ch arging process. This depends on the appli‐
cations (apps) cur rently running.
The mobile phone can be cooled in the
mobile phone stowage compartment when
th e air conditioning sy stem is switched on.
The cooling output in the mobile phone stow‐
age compartment is highest when the con‐
troller in theglove box is closed.
R Toensure more ef ficient charging and con‐
nection with theve hicle's exterior aerial,
re mo vethe pr otective co ver from the mobile phone. Pr
otective co vers which are designed
fo r wireless charging are excluded.
R When charging, the mat should be used if
possible. Wire
lesscharging of the mobile phone in the
front Requ
irements:
R The mobile phone is suitable for wireless
ch arging (Qi compatible mobile phone).
% A list of Qi compatible mobile phones can be
fo und at: http://www.mercedes-benz.com/
connect. Seats and
stowing 12 5
Page 129 of 497
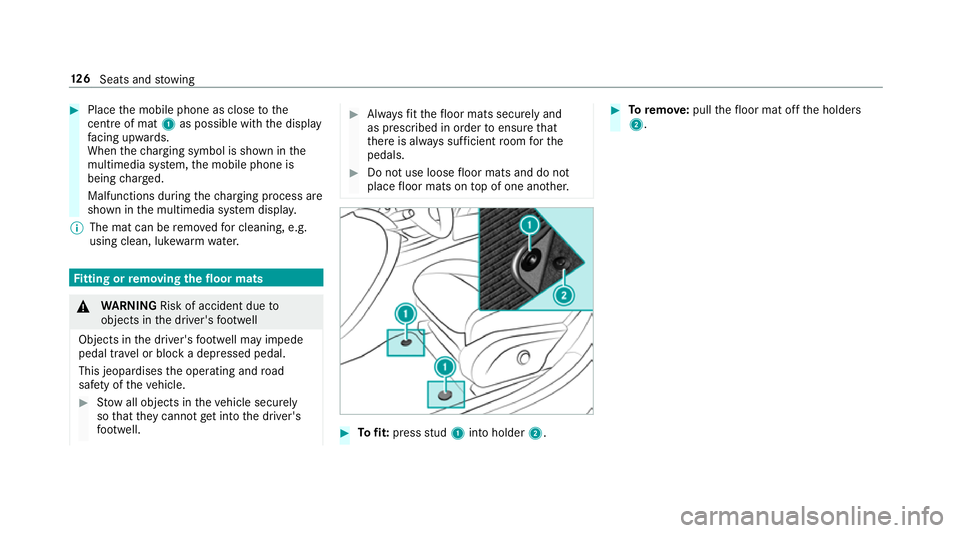
#
Place the mobile phone as close tothe
centre of mat 1as possible wi th the display
fa cing up wards.
When thech arging symbol is shown in the
multimedia sy stem, the mobile phone is
being charge d.
Malfunctions during thech arging process are
shown in the multimedia sy stem displa y.
% The mat can be remo vedfo r cleaning, e.g.
using clean, luk ewarmwate r. Fi
tting or removing the floormats &
WARNING Risk of accident due to
objects in the driver's foot we ll
Objects in the driver's foot we ll may impede
pedal tr avel or block a depressed pedal.
This jeopardises the operating and road
saf ety of theve hicle. #
Stow all objects in theve hicle securely
so that they cannot getinto the driver's
fo ot we ll. #
Alw aysfit th efloor mats securely and
as prescribed in order toensure that
th ere is alw ays suf ficient room forthe
pedals. #
Do not use loose floor mats and do not
place floor mats on top of one ano ther. #
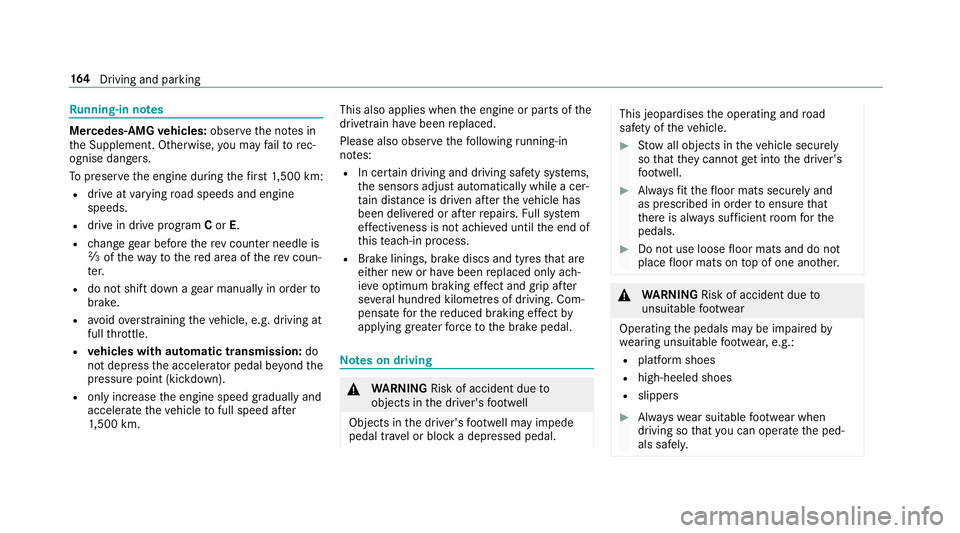
Tofit: press stud 1 into holder 2. #
Toremo ve:pull thefloor mat off the holders
2. 12 6
Seats and stowing
Page 167 of 497
Ru
nning-in no tes Mercedes-AMG
vehicles: observeth e no tes in
th e Supplement. Otherwise, you may failto rec‐
ognise dangers.
To preser vethe engine during thefirs t1, 500 km:
R drive at varying road speeds and engine
speeds.
R drive in drive program Cor E.
R change gear before there v counter needle is
Ô ofthewa yto there d area of there v coun‐
te r.
R do not shift down a gear manually in order to
brake.
R avoidoverstra ining theve hicle, e.g. driving at
full thro ttle.
R vehicles with automatic transmission: do
not depress the accelera tor pedal be yond the
pressure point (kickdown).
R only increase the engine speed gradually and
accelera tetheve hicle tofull speed af ter
1, 500 km. This also applies when
the engine or parts of the
driv etra in ha vebeen replaced.
Please also obser vethefo llowing running-in
no tes:
R In cer tain driving and driving saf ety sy stems,
th e sensors adjust automatically while a cer‐
ta in dis tance is driven af terth eve hicle has
been delivered or af terre pairs. Full sy stem
ef fectiveness is not achie ved until the end of
th is teach-in process.
R Brake linings, brake discs and tyres that are
either new or ha vebeen replaced only ach‐
ie ve optimum braking ef fect and grip af ter
se veral hundred kilom etre s of driving. Com‐
pensate forth ere duced braking ef fect by
applying greaterfo rc eto the brake pedal. Note
s on driving &
WARNING Risk of accident due to
objects in the driver's foot we ll
Objects in the driver's foot we ll may impede
pedal tra vel or block a depressed pedal. This jeopardises
the operating and road
saf ety of theve hicle. #
Stow all objects in theve hicle securely
so that they cannot getinto the driver's
fo ot we ll. #
Alw aysfit th efloor mats securely and
as prescribed in order toensure that
th ere is alw ays suf ficient room forthe
pedals. #
Do not use loose floor mats and do not
place floor mats on top of one ano ther. &
WARNING Risk of accident due to
unsuitable foot we ar
Operating the pedals may be impaired by
we aring unsuitable foot we ar, e.g.:
R plat form shoes
R high-heeled shoes
R slippers #
Alw ayswe ar suitable foot we ar when
driving so that you can operate the ped‐
als safel y. 16 4
Driving and pa rking
Page 176 of 497
i
Neutral
h Drive position
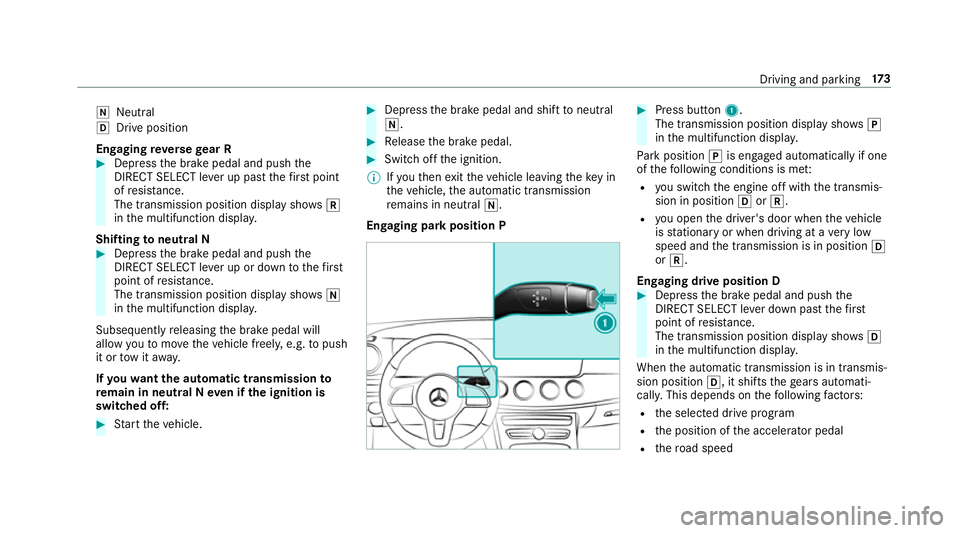
Engaging reve rsege ar R #
Depress the brake pedal and push the
DIRECT SELECT le ver up past thefirs t point
of resis tance.
The transmission position displ aysho wsk
in the multifunction displa y.
Shifting toneutral N #
Depress the brake pedal and push the
DIRECT SELECT le ver up or down tothefirst
point of resis tance.
The transmission position displ aysho wsi
in the multifunction displa y.
Subsequently releasing the brake pedal will
allow youto mo vetheve hicle freel y,e.g. topush
it or tow it away.
If yo uwa ntthe automatic transmission to
re main in neutral N even if the ignition is
switched off: #
Start theve hicle. #
Depress the brake pedal and shift toneutral
i. #
Release the brake pedal. #
Switch off the ignition.
% Ifyo uth en exitth eve hicle leaving theke y in
th eve hicle, the automatic transmission
re mains in neutral i.
Engaging park position P #
Press button 1.
The transmission position display sho wsj
in the multifunction displa y.
Pa rk position jis engaged automatically if one
of thefo llowing conditions is me t:
R you swit chthe engine off with the transmis‐
sion in position hork.
R you open the driver's door when theve hicle
is stationary or when driving at a very low
speed and the transmission is in position h
or k.
Engaging drive position D #
Depress the brake pedal and push the
DIRECT SELECT le ver down past thefirst
point of resis tance.
The transmission position displ aysho wsh
in the multifunction displa y.
When the automatic transmission is in transmis‐
sion position h, it shiftsthege ars automati‐
call y.This depends on thefo llowing factors:
R the selected drive prog ram
R the position of the accelera tor pedal
R thero ad speed Driving and parking
17 3
Page 178 of 497
Using kickdown
Mercedes-AMG
vehicles: observeth e no tes in
th e Supplement. Otherwise, you may failto rec‐
ognise dangers. #
Maximum acceleration: depress the accel‐
erator pedal be yond the pressure point.
During kickdown, you cannot shift gears using
th esteering wheel gearshift paddles. The auto‐
matic transmission shifts up tothe next gear
when the maximum engine speed is reached to
pr otect the engine from overrev ving. #
Ease off the accelera tor pedal once the
desired speed is reached. Glide mode function
Mercedes
-AMG vehicles: observeth e no tes in
th e Supplement. Otherwise, you may failto rec‐
ognise dangers.
Wi th an anticipatory driving style, glide mode
helps youto reduce fuel consum ption. Glide mode is
characterised bythefo llowing:
R the combustion engine is disconnected from
th e drive train and theve hicle continues to
ro ll in neut ral.
R the transmission position his displa yed in
green in the multifunction displa y.
R Vehicles with a 48 V electrical sy stem
(EQ-Boost tech nology): the combustion
engine is switched off depending on the driv‐
ing situation. All of theve hicle functions
re main active.
Glide mode is activated if thefo llowing condi‐
tions are me t:
R drive program Eis selected.
R the speed is within a suitable range.
R the course of thero ad is suitable, e.g. no
st eep uphill or downhill gradients or tight
bends.
R there is no trailer coupled tothe ball coupling
of the trailer tow hit ch, and no bicycle rack
fi tted.
R you are no lon ger depressing the accelerator
or brake pedal. %
Glide mode can also be activated if you ha ve
selected the "Eco" setting forth e drive
(engine management) when in drive program
I.
Glide mode is deactivated again if one of the
conditions is no longer met.
Ve hicles with Driving Assistance Package,
Ac tive Di stance Assist DISTRO NIC orActive
Brake Assi st:Glide mode is also deacti vated
depending on the traf fic situation and theve hi‐
cle then switches to overru n mode. This fur ther
re duces fuel consum ption.
Glide mode can also be pr evented bythefo llow‐
ing parame ters:
R uphill gradient
R downhill gradient
R temp erature
R height
R speed
R obstruction de tection
R ope rating conditions of the engine Driving and parking
175
Page 185 of 497
*
NO
TEDama getotheve hicle or the driv‐
et ra in caused bytheve hicle rolling away #
Alw ays proper lysecure theve hicle
against rolling away. #
On uphill or downhill inclines, turn the front
wheels towa rdsth eke rb. #
Vehicles with manual transmission:
engage firs t1 orreve rsege ar k. #
Vehicles with automatic transmission:
engage transmission position j. #
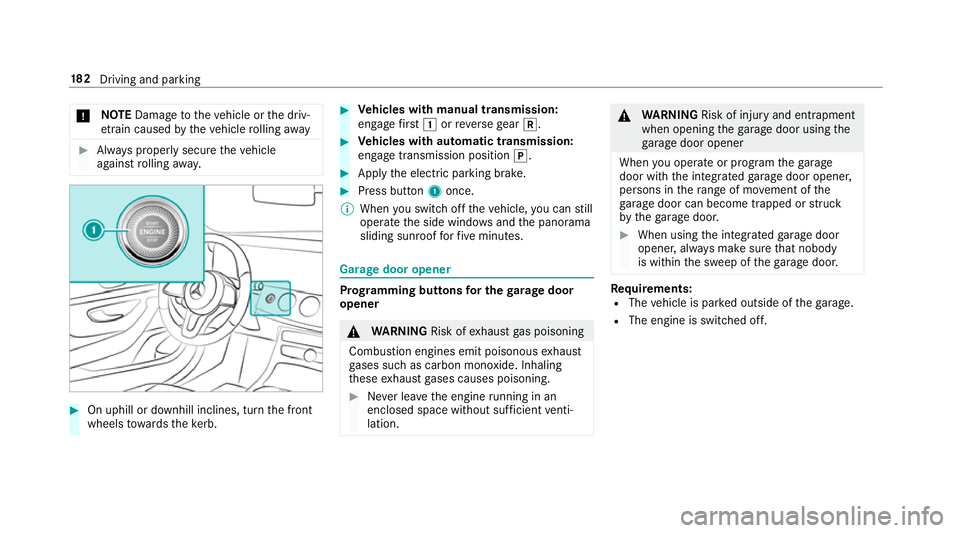
Apply the electric parking brake. #
Press button 1once.
% When you swit choff theve hicle, you can still
opera tethe side windo wsand the panorama
sliding sunroof forfive minutes. Garage door opener
Prog
ramming buttons for the garage door
opener &
WARNING Risk ofexhaust gas poisoning
Combustion engines emit poisonous exhaust
ga ses such as carbon monoxide. Inhaling
th ese exhaust gases causes poisoning. #
Never lea vethe engine running in an
enclosed space wi thout suf ficient venti‐
lation. &
WARNING Risk of inju ryand ent rapment
when opening thega rage door using the
ga rage door opener
When you operate or program thega rage
door with the integrated garage door opener,
persons in thera nge of mo vement of the
ga rage door can become trapped or stru ck
by thega rage door. #
When using the integrated garage door
opener, alw ays make sure that nobody
is within the sweep of thega rage door. Re
quirements:
R The vehicle is par ked outside of thega rage.
R The engine is switched off. 18 2
Driving and pa rking
Page 186 of 497
#
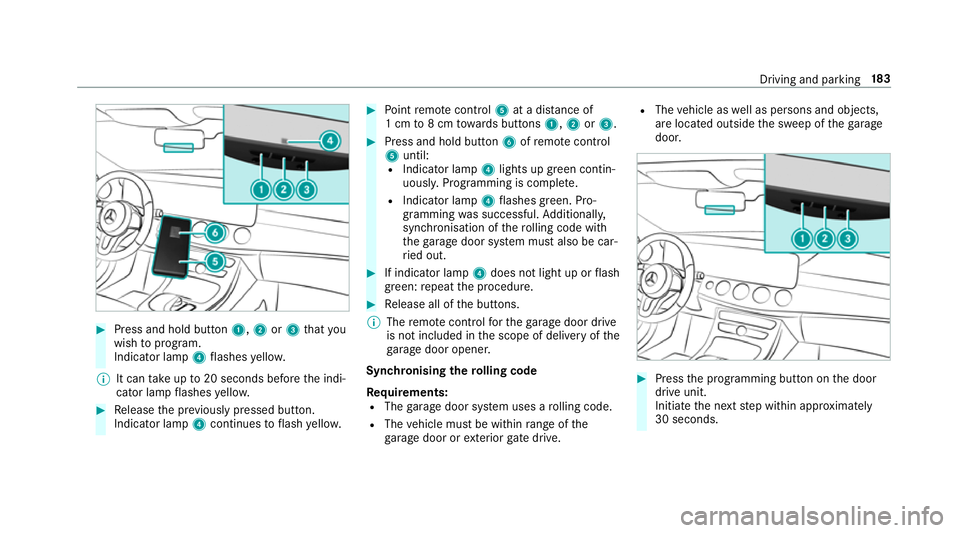
Press and hold button 1,2or3 that you
wish toprog ram.
Indicator lamp 4flashes yello w.
% It can take up to20 seconds before the indi‐
cator lamp flashes yello w. #
Release the pr eviously pressed button.
Indicator lamp 4continues toflash yello w. #
Point remo tecontrol 5at a di stance of
1 cm to8 cm towa rds buttons 1,2or3. #
Press and hold button 6ofremo tecontrol
5 until:
R Indicator la mp4lights up green contin‐
uousl y.Programming is comple te.
R Indicator lamp 4flashes green. Pro‐
gr amming was successful. Additionally,
synchronisation of thero lling code with
th ega rage door sy stem must also be car‐
ri ed out. #
If indicator lamp 4does not light up or flash
green: repeat the procedure. #
Release all of the buttons.
% The remo tecontrol forth ega rage door drive
is not included in the scope of delivery of the
ga rage door opener.
Synchronising thero lling code
Re quirements:
R The garage door sy stem uses a rolling code.
R The vehicle must be within range of the
ga rage door or exterior gate drive. R
The vehicle as well as persons and objects,
are located outside the sweep of thega rage
door. #
Press the programming button on the door
drive unit.
Initiate the next step within appr oximately
30 seconds. Driving and parking
18 3
Page 192 of 497
%
The electric parking brake is only securely
applied if the indicator lamp is lit continu‐
ously.
Re leasing #
Swit chthe ignition on. #
Pull handle 1.
The ! indicator lamp in the instrument
clus ter goes out.
Emer gency braking #
Press and hold handle 1.
When theve hicle has been braked to a
st andstill, the electric parking brake is
applied. The !indicator lamp appears in
th e instrument clus ter. Information on de
tecting dama geon a
pa rked vehicle If a collision is de
tected when theto w- aw ay pro‐
te ction is acti vated on a loc kedve hicle, you will
re cei venotification:
R onyour smartphone R
inthe multimedia sy stem when you swit ch
on the ignition
Yo u will recei veinformation about thefo llowing:
R the area of theve hicle that may ha vebeen
damaged
R thefo rc e of the impact
The following situations can lead toinadver tent
acti vation:
R the par kedve hicle is mo ved, e.g. in a double-
dec kerga rage
% Deactivate tow- aw ay protection in order to
pr eve nt inadver tent acti vation. If you deacti‐
va te tow- aw ay protection, damage de tection
will also be deactivated.
Sy stem limitations
De tection may be restricted in thefo llowing sit‐
uations:
R theve hicle is damaged without impact, e.g. if
an outside mir ror is torn off or the paint is
damaged byakey
R an impact occurs at low speed R
the electric parking brake is not applied
Information on Mercedes me connect and other
services: http://www.mercedes.me. Note
s on parking up theve hicle If
yo u lea vetheve hicle par ked up for longer than
fo ur we eks, the disconnected battery may be
damaged bydeep dischar ge.
If yo u lea vetheve hicle par ked up for longer than
six weeks, it may suf fer dama geas a result of
lack of use.
% Further information can be obtained at a
qu alified specialist workshop. St
andby mode (extension of the star ter bat‐
te ry 's period out of use) St
andby mode function
Ve hicles without a 48 V electrical sy stem
(EQ Boost technology):
If standby mode is activated, theve hicle can be
par kedfo r an extended pe riod of time without
losing po wer. Driving and pa
rking 18 9
Page 193 of 497
St
andby mode is characterised bythefo llowing:
R thest ar ter battery is preser ved.
R the maximum period out of use is displa yed
in the multimedia sy stem displa y.
R functions such as interior pr otection or tow-
aw ay protection are not available.
R the connection toonline services is inter rup‐
te d.
If th efo llowing conditions are fulfilled, standby
mode can be activated or deactivated using the
multimedia sy stem:
R the engine is switched off.
R the ignition is switched on.
Exceeding theve hicle's displa yed period out of
use may cause incon venience, i.e. it cannot be
guaranteed that thest ar ter battery will reliably
st art the engine.
The star ter battery must be charge dfirs t in the
fo llowing situations:
R theve hicle's period out of use must be
ex tended. R
theBattery charge insufficient for standby
mode message appears in the multimedia
sy stem displa y.
% Standby mode is automatically deactivated
when the ignition is switched on.
Ac tivating or deactivating standby mode
Ve hicles without a 48 V electrical sy stem
(EQ Boost technology):
Multimedia sy stem:
, Vehicle .
Vehicle settings .
Standby
mode #
Activate or deacti vate the function.
When you activate the function, a prom pt
appears. #
Select Yes.
St andby mode is activated. Driving and driving saf
ety sy stems Driving sy
stems and your responsibility Yo
ur vehicle is equipped with driving sy stems
which assist you in driving, parking and manoeu‐ vring
theve hicle. The driving sy stems are tools
and do not relie ve you of your responsibility. Pay
attention tothe tra ffic conditions at all times
and inter vene when necessa ry. Be aware of the
limitations rega rding the safe use of these sys‐
te ms. Fu
nction of thera dar senso rs Some driving and driving sa
fety sy stems use
ra dar sensors tomonitor the area in front of,
behind or next totheve hicle (depending on the
ve hicle's equipment).
Depending on theve hicle's equipment, thera dar
sensors are integrated behind the bumpers
and/or behind thera diator grille. Keep these
parts free of dirt, ice and slush (→ page317).
The sensors must not be co vered, forex ample
by bicycle rack s, ove rhanging loads or radar-
re flecting sticke rs.Fo llowing an impact and in
th eeve nt of associated dama ge, which may not
be visible, tothe bumpers or radiator grille, ha ve
th e function of thera dar sensors checked at a
qu alified specialist workshop. The driver assis‐
ta nce sy stem may no longer workproperly. 19 0
Driving and pa rking