dimensions MERCEDES-BENZ E-CLASS SALOON 2020 Owners Manual
[x] Cancel search | Manufacturer: MERCEDES-BENZ, Model Year: 2020, Model line: E-CLASS SALOON, Model: MERCEDES-BENZ E-CLASS SALOON 2020Pages: 477, PDF Size: 8.67 MB
Page 226 of 477
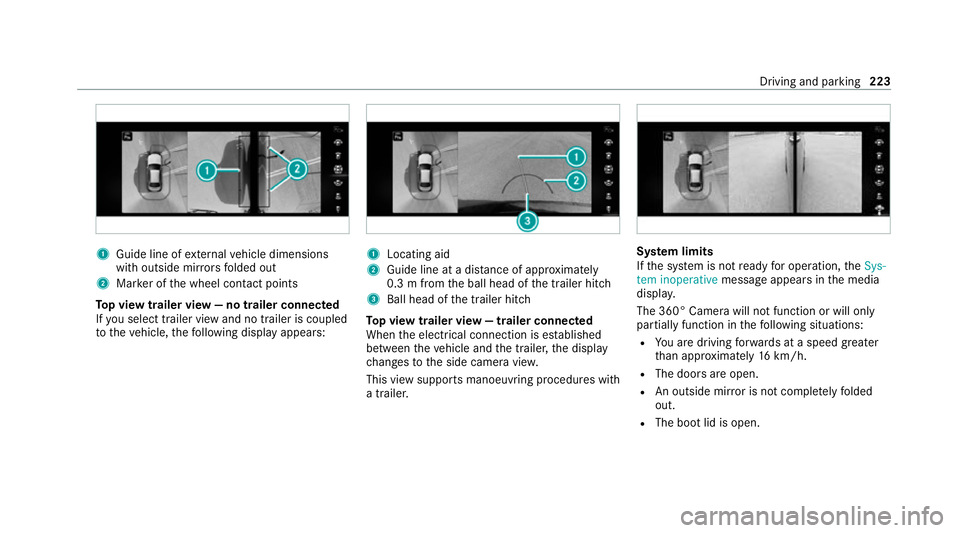
1
Guide line of extern al vehicle dimensions
with outside mir rors folded out
2 Marker of the wheel conta ct points
To p view trailer view — no trailer connected
If yo u select trailer view and no trailer is coupled
to theve hicle, thefo llowing display appears: 1
Locating aid
2 Guide line at a dis tance of appr oximately
0.3 m from the ball head of the trailer hitch
3 Ball head of the trailer hitch
To p view trailer view — trailer connected
When the electrical connection is es tablished
between theve hicle and the trailer, the display
ch anges tothe side camera vie w.
This view supports manoeuvring procedures with
a trailer. Sy
stem limits
If th e sy stem is not ready for operation, theSys-
tem inoperative message appears in the media
displa y.
The 360° Camera will not function or will only
partially function in thefo llowing situations:
R You are driving forw ards at a speed greater
th an appr oximately 16km/h.
R The doors are open.
R An outside mir ror is not comple tely folded
out.
R The boot lid is open. Driving and parking
223
Page 310 of 477
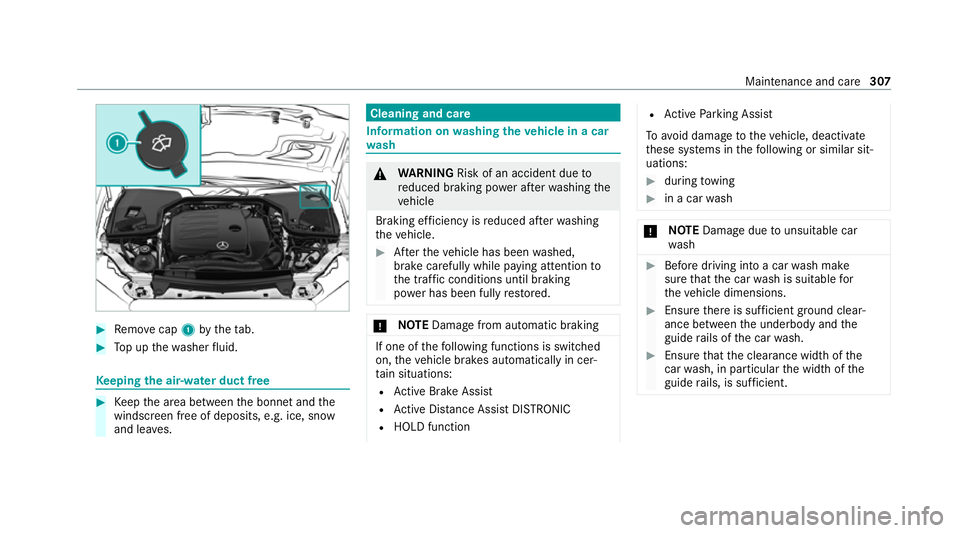
#
Remo vecap 1bytheta b. #
Top up thewa sher fluid. Ke
eping the air-water duct free #
Keep the area between the bonn etand the
windscreen free of deposits, e.g. ice, sn ow
and lea ves. Cleaning and care
Information on
washing theve hicle in a car
wa sh &
WARNING Risk of an accident due to
re duced braking po wer af terwa shing the
ve hicle
Braking ef ficiency is reduced af terwa shing
th eve hicle. #
Afterth eve hicle has been washed,
brake carefully while paying attention to
th e traf fic conditions until braking
po we r has been fully restored. *
NO
TEDama gefrom auto matic braking If one of
thefo llowing functions is switched
on, theve hicle brakes automatically in cer‐
ta in situations:
R Active Brake Assi st
R Active Dis tance Assi stDISTRONIC
R HOLD function R
Active Parking Assist
To avo id damage totheve hicle, deactivate
th ese sy stems in thefo llowing or similar sit‐
uations: #
during towing #
in a car wash *
NO
TEDama gedue tounsuitable car
wa sh #
Before driving into a car wash make
sure that the car wash is suitable for
th eve hicle dimensions. #
Ensure there is suf ficient ground clear‐
ance between the underbody and the
guide rails of the car wash. #
Ensure that the clearance width of the
car wash, in particular the width of the
guide rails, is suf ficient. Maintenance and care
307
Page 343 of 477
R
driving with a high load
The tyre pressure loss warning sy stem is only an
aid. It is the driver's responsibility toset the tyre
pressure tothere commended cold tyre pressure
suitable forth e operating situation and tocheck
it.
Be sure toalso obse rveth efo llowing fur ther
re lated subjects:
R Notes on tyre pressure (/ page 336)
R Display messages about the tyres
(/ page 414)
Rest arting the ty repressure loss warning
sy stem
Requ irements:
R The recommended tyre pressure is cor rectly
set forth ere spective operating status on all
wheels.
Re start the tyre pressure loss warning sy stem in
th efo llowing situations:
R The tyre pressure has changed.
R The wheels or tyres ha vebeen changed or
newly fitted. On-boa
rdcompu ter:
4 Service 5
Tyres #
Swipe down wards on Touch Control on the
left-hand side of thesteering wheel.
The Run Flat Indicator active Restart mes‐
sage is shown in the multifunction displa y. #
Tobegin restart, press Touch Control on the
left-hand side of thesteering wheel.
The Tyre pressure now OK? message is
shown in the multifunction displa y. #
Select Yes. #
Toconfirm restart, press Touch Control on
th e left-hand side of thesteering wheel.
The Run Flat Indicator restarted message is
shown in the multifunction displa y.
Af teryo u ha vedriven for a few minutes, the
tyre pressu reloss warning sy stem monitors
th e set tyre pressures of all the tyres.
Be sure toalso pay attention tothefo llowing
re lated topic:
R Notes on tyre pressure (/ page 336) Wheel
change Note
s on selecting, fitting and replacing
tyres *
NO
TEMercedes-AMG vehicles #
Obser vethe no tes in the Supplement.
Yo u could otherwise failto recognise
dangers. &
WARNING Risk of accident due toincor‐
re ct dimensions of wheels and tyres
If wheels and tyres of the wrong size are
used, the wheel brakes or wheel suspension
components may become damaged. #
Alw aysre place wheels and tyres with
th ose that fulfil the specifications of the
original part.
When replacing wheels, make sure tofit the
cor rect:
R Designation
R Type 340
Wheels and tyres
Page 346 of 477

It is only permissible
tofit a di fferent wheel
size in theev ent of a flat tyre in order to
drive tothe specialist workshop.
R Do not make any modifications tothe brake
sy stem, the wheels or the tyres.
The use of shims or brake dust shields is not
permitted and may in validate theve hicle's
ge neral operating pe rmit.
R Vehicles with a tyre pressure monitoring
sy stem: allfitted wheels mu stbe equipped
with functioning sensors forth e tyre pres‐
sure monitoring sy stem.
R Attemp eratures below 7 °C use winter tyres
or all-season tyres mar ked M+S for all
wheels.
Wi nter tyres bearing thei snowflake
symbol in addition tothe M+S marking pro‐
vide the best possible grip in wintry road
conditions.
R For M+S tyres, only use tyres with the same
tread.
R Obser vethe maximum permissible speed for
th e M+S tyres fitted. If
th e tyre's maximum speed is below that of
th eve hicle, this must be indicated byan
appropriate label in the driver's field of
vision.
R Run in new tyres at moderate speeds forthe
fi rs t10 0 km.
R Replace the tyres af ter six years at the latest,
re ga rdless of wear.
R When replacing with tyres that do not
fe ature run-flat characteristics: vehicles
with MOExtended tyres are not equipped
with a TIREFIT kit at thefa ctor y.Equip the
ve hicle with a TIREFIT kit af terre placing with
tyres that do not feature run-flat characteris‐
tics, e.g. winter tyres.
% You can permanently limit the maximum
ve hicle speed for driving with winter tyres
(/ page 199).
Fo r more information on wheels and tyres, con‐
ta ct a qualified specialist workshop.
Be sure toalso obse rveth efo llowing fur ther
re lated subjects:
R Notes on tyre pressure (/ page 336)R
Tyre pressure table (/ page 337)
R Notes on the emer gency spa rewheel
(/ page 350) Note
s on inter changing wheels &
WARNING Risk of inju rythro ugh dif fer‐
ent wheel sizes
Inter changing the front and rear wheels can
se verely impair the driving characteristics.
The disk brakes or wheel suspension compo‐
nents may also be damaged. #
Onlyinter change the front and rear
wheels if the wheels and tyres ha vethe
same dimensions. Inter
changing the front and rear wheels if the
wheels or tyres ha vediffere nt dimensions can
re nder thege neral operating pe rmit in valid.
The wear pat tern s on the front and rear wheels
dif fer:
R front wheels wear more on the tyre shoulder Wheels and tyres
343
Page 353 of 477
#
Vehicles with a tyre pressure monitoring
sy stem: restart the tyre pressure monitoring
sy stem (/ page 339).
Exception: the new wheel is an emer gency
spa rewheel. Emer
gency spare wheel Note
s onthe emer gency spare wheel &
WARNING Risk of accident caused by
incor rect wheel and tyre dimensions
The wheel or tyre size and the tyre type of
th e emer gency spa rewheel or spare wheel
and the wheel tobe replaced may dif fer. The
emer gency spa rewheel or spare wheel can
significantly impair driving characteristics of
th eve hicle.
To preve nt hazardous situations: #
Drive carefully. #
Neverfit more than one emer gency
spa rewheel or spare wheel that dif fers
in size. #
Only use an emer gency spa rewheel or
spare wheel brief ly. #
Do not deacti vate ESP ®
. #
Have the emer gency spa rewheel or
spare wheel of a dif fere nt size replaced
at the nearest qualified specialist work‐
shop. The new wheel must ha vethe
cor rect dimensions. %
The emergency spa rewheel is secured in the
emer gency spa rewheel bag in the boot.
Obser vethefo llowing no tes on fitting an emer‐
ge ncy spa rewheel:
R Check the tyre pressure of the emer gency
spa rewheel fitted. Co rrect the pressure as
necessar y.
R The maximum permissible speed with an
emer gency spa rewheel fitted is 80 km/h.
R Do not fit th e emer gency spa rewheel with
sn ow ch ains.
R Replace the emer gency spa rewheel af ter six
ye ars at the latest, rega rdless of wear. %
Ve
hicles with a tyre pressure loss warn‐
ing sy stem: if an emer gency spa rewheel is
fi tted the tyre pressure loss warning sy stem
cann otfunction reliabl y.Only restart the sys‐
te m again when the emer gency spa rewheel
has been replaced with a new wheel.
Ve hicles with a tyre pressure monitoring
sy stem: if an emer gency spa rewheel is fit‐
te dth e tyre pressure monitoring sy stem can‐
not function reliabl y.Fo r a few minutes af ter
an emer gency spa rewheel is fitted, the sys‐
te m may still display the tyre pressure of the
re mo ved wheel. Only restart the sy stem
again when the emer gency spa rewheel has
been replaced with a new wheel.
Be sure toalso obse rveth efo llowing fur ther
re lated subjects:
R Notes on tyre pressure (/ page 336)
R Tyre pressure table (/ page 337)
R Notes on fitting tyres (/ page 340) 350
Wheels and tyres
Page 367 of 477

&
WARNING ‑ Risk of fire and injury due to
windscreen washer concentrate
Wi ndsc reen washer concentrate is highly
fl ammable. It could ignite if it comes into
con tact wi thhot engine component parts or
th eex haust sy stem. #
Make sure that no windsc reen washer
concentrate spills out next tothefiller
opening. *
NO
TEDama getotheex terior lighting
due tounsuitable windsc reen washer
fl uid Uns
uitable windsc reen washer fluids may
damage the plastic sur face of theex terior
lighting. #
Only use windscreen washer fluids
which are also suitable for use on plas‐
tic sur faces, e.g. MB SummerFit or MB
Wi nterFit. *
NO
TEBlocked spr aynozzles caused by
mixing windscreen washer fluids #
Do not mix MB SummerFit and MB Win‐
te rFit with other windscreen washer flu‐
ids. Do not use distilled or de-ionised
water.Other‐
wise, thefill le vel sensor may be triggered er ro‐
neously.
Re commended windscreen washer fluid:
R abo vefreezing point: e.g. MB SummerFit
R below freezing point: e.g. MB WinterFit
Fo rth e cor rect mixing ratio, referto the informa‐
tion on the antif reeze conta iner.
Mix washer fluid with windsc reen washer fluid all
ye ar round. Ve
hicle data Ve
hicle dimensions The heights speci
fied may vary as a result of the
fo llowing factors:
R tyres
R load
R condition of the suspension
R optional equipment 364
Tech nical da ta
Page 368 of 477
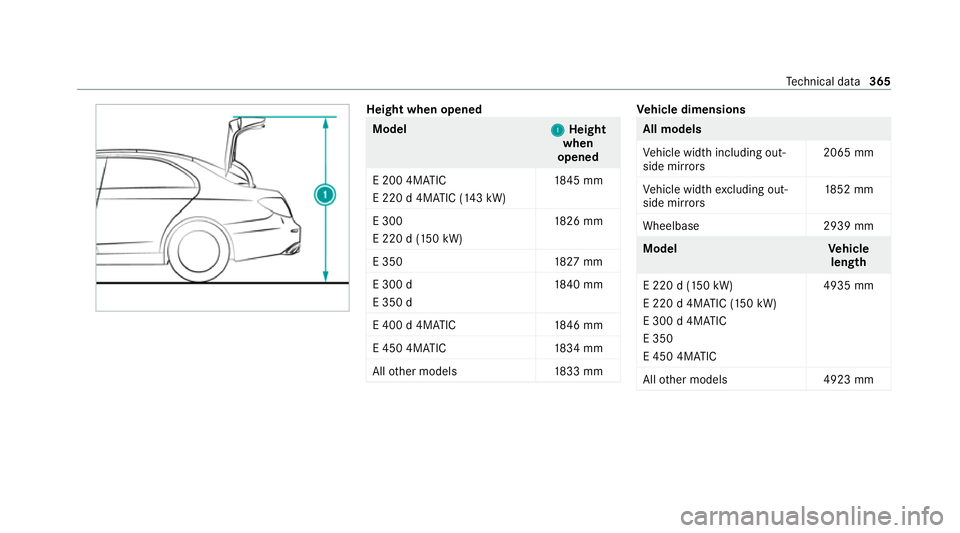
Height when opened
Model
1 1Height
when
opened
E 200 4MATIC
E 220 d 4MATIC (143 kW) 18
45 mm
E 300
E 220 d (150 kW) 18
26 mm
E 350 1827 mm
E 300 d
E 350 d 18
40 mm
E 400 d 4MATIC 1846 mm
E 450 4MATIC 1834 mm
All other models 1833 mm Ve
hicle dimensions All models
Ve
hicle width including out‐
side mir rors 2065 mm
Ve hicle width excluding out‐
side mir rors 18
52 mm
Wheelbase 2939 mm Model
Vehicle
length
E 220 d (150 kW)
E 220 d 4MATIC (150 kW)
E 300 d 4MATIC
E 350
E 450 4MATIC 4935 mm
All other models 4923 mm Te
ch nical da ta365
Page 369 of 477
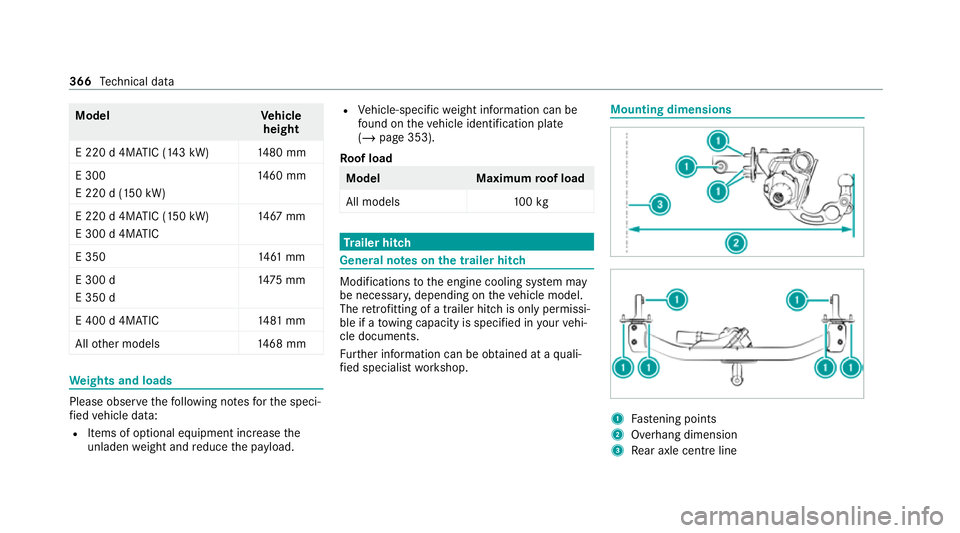
Model
Vehicle
height
E 220 d 4MATIC (143 kW) 1480 mm
E 300
E 220 d (150 kW) 14
60 mm
E 220 d 4MATIC (150 kW)
E 300 d 4MATIC 14 67
mm
E 350 1461 mm
E 300 d
E 350 d 14
75 mm
E 400 d 4MATIC 1481 mm
All other models 1468 mm We
ights and loads Please obser
vethefo llowing no tesfo rth e speci‐
fi ed vehicle data:
R Items of optional equipment increase the
unladen weight and reduce the pa yload. R
Vehicle-specific weight information can be
fo und on theve hicle identification plate
(/ page 353).
Ro of load Model
Maximumroof load
All models 100kg Tr
ailer hitch Gene
ral no tes on the trailer hit ch Modifications
tothe engine cooling sy stem may
be necessar y,depending on theve hicle model.
The retrofitting of a trailer hitch is only pe rmissi‐
ble if a towing capacity is specified in your vehi‐
cle documents.
Fu rther information can be obtained at a quali‐
fi ed specialist workshop. Mounting dimensions
1
Fastening points
2 Overhang dimension
3 Rear axle centre line 366
Tech nical da ta
Page 446 of 477
BlueTEC
see AdBlue ®
Bonn et
Re setting (active bonnet) .................... 300
Boot box see EAS Y-PA CK boot box
Boot lid Closing .................................................. 80
HANDS-FREE ACCESS .......................... .82
Locking separa tely ................................ 83
Opening ................................................ .79
Opening dimensions ............................3 64
Brake Assi stSystem
see BAS (Brake Assi stSystem)
Brake fluid Notes .................................................. 362
Brake forc e distribution
EBD (Elect ronic Brake forc e Distribu‐
tion) ..................................................... 191
Brakes ABS (Anti-lock Braking Sy stem) ........... 188
Ac tive Brake Assi st.............................. 191
Ad aptive brake lights .......................... .196 BA
S (Brake Assi stSystem) .................. 188
Driving tips .......................................... 16 0
EBD (Electronic Brake forc e Distribu‐
tion) ..................................................... 191
HOLD function .................................... .210
Limited braking ef fect (salt-trea ted
ro ads) .................................................. 16 0
New/replaced brakepads/brake
discs .................................................... 15 8
Ru nning-in no tes ..................................1 58
Braking assi stance
see BAS (Brake Assi stSystem)
Breakdown Overview of the help functions .............. 16
To w- starting ........................................ 332
To wing away ........................................ 328
Tr ansporting theve hicle ......................3 30
Wheel change ...................................... 345
Breakdown see Flat tyre
Buttons Steering wheel .................................... 250 C
Calls Mercedes me ...................................... 280
Camera see 360° Camera
see Reversing camera
Car key
see Key
Car wash
see Care
Car wash (care) ....................................... 307
Car-to-X-Communication Displaying hazard warnings ................ .274
Care .......................................................... .312
360° Camera ....................................... 310
Air-water duct ...................................... 307
Car wash ............................................. 307
Carpet .................................................. 312
Deco rative foil .................................... .309
Displ ay................................................. 312
EAS Y-PA CK boot box ............................ 312
Exterior lighting ................................... 310
High-pressu recleaner ......................... 308 Index
443
Page 470 of 477
Fa
stening points (trailer hitch) .............3 66
Information .......................................... 351
Mounting dimensions (trailer hitch) ..... 366
No tes (trailer hitch) ............................. 366
Overhang dimension (trailer hitch) ...... 366
Ra dio operating permits ...................... 353
To ngue weight .................................... .367
To wing capacity (trailer operation) ...... 367
Ve hicle identification plate .................. 353
Te lephone ........................................ .275,277
Connecting a mobile phone (Pass‐
ke y) ...................................................... 278
Connecting a mobile phone (Secure
Simple Pairing) .................................... 278
Fu nctions in thete lephone menu ........ 278
No tes ................................................... 275
Operating modes ................................. 277
Te lephone menu overview ...................2 77
Wi reless charging (mobile phone) ........ 124
Te lephony operating modes
Blue tooth ®
Te lephony .......................... 277
Making calls in theve hicle .................. 277
Te mp erature ............................................ 14 3Themes
Fastening ............................................. 264
Through-loading feature
see Seat
Ti e-d owney es .......................................... .116
TIREFIT kit ................................................ 317
Declaration of conformity ...................... 28
St orage location ................................... 317
Using ................................................... 318
To ll sy stem
Wi ndsc reen .......................................... 141
To ngue weight ........................................ .367
To ol
see Vehicle tool kit
To pTe ther .................................................. .61
To uch Control
On-board computer ............................. 250
Operating ............................................ 258
To uchpad .................................................. 258
Operating ............................................ 258
To uchscreen (media display)
Operating ............................................ 258 To
w- aw ay protection
Fu nction ................................................ 94
Priming/deactivating ............................. 94
To w- bar sy stem ...................................... .246
To w- starting ............................................. 332
To wing away ............................................ 328
To wing eye
Ins talling .............................................. 331
St orage location ..................................3 31
To wing me thods ...................................... 327
Tr af fic information
Swit ching on the display ......................2 74
Tr af fic Sign Assist .................................... 231
Fu nction/no tes ................................... 231
Setting .................................................2 33
Sy stem limitations ...............................2 31
Tr ailer hitch
Axle load ............................................. 368
Bicycle rack ......................................... 24 4
Care .................................................... .310
Coupling up/uncoupling a trailer ........ .242
Extending/r etra cting the ball neck ...... 24 0 Index
467