radio MERCEDES-BENZ E-Class SEDAN 2010 W212 Comand Manual
[x] Cancel search | Manufacturer: MERCEDES-BENZ, Model Year: 2010, Model line: E-Class SEDAN, Model: MERCEDES-BENZ E-Class SEDAN 2010 W212Pages: 224, PDF Size: 7.4 MB
Page 44 of 224
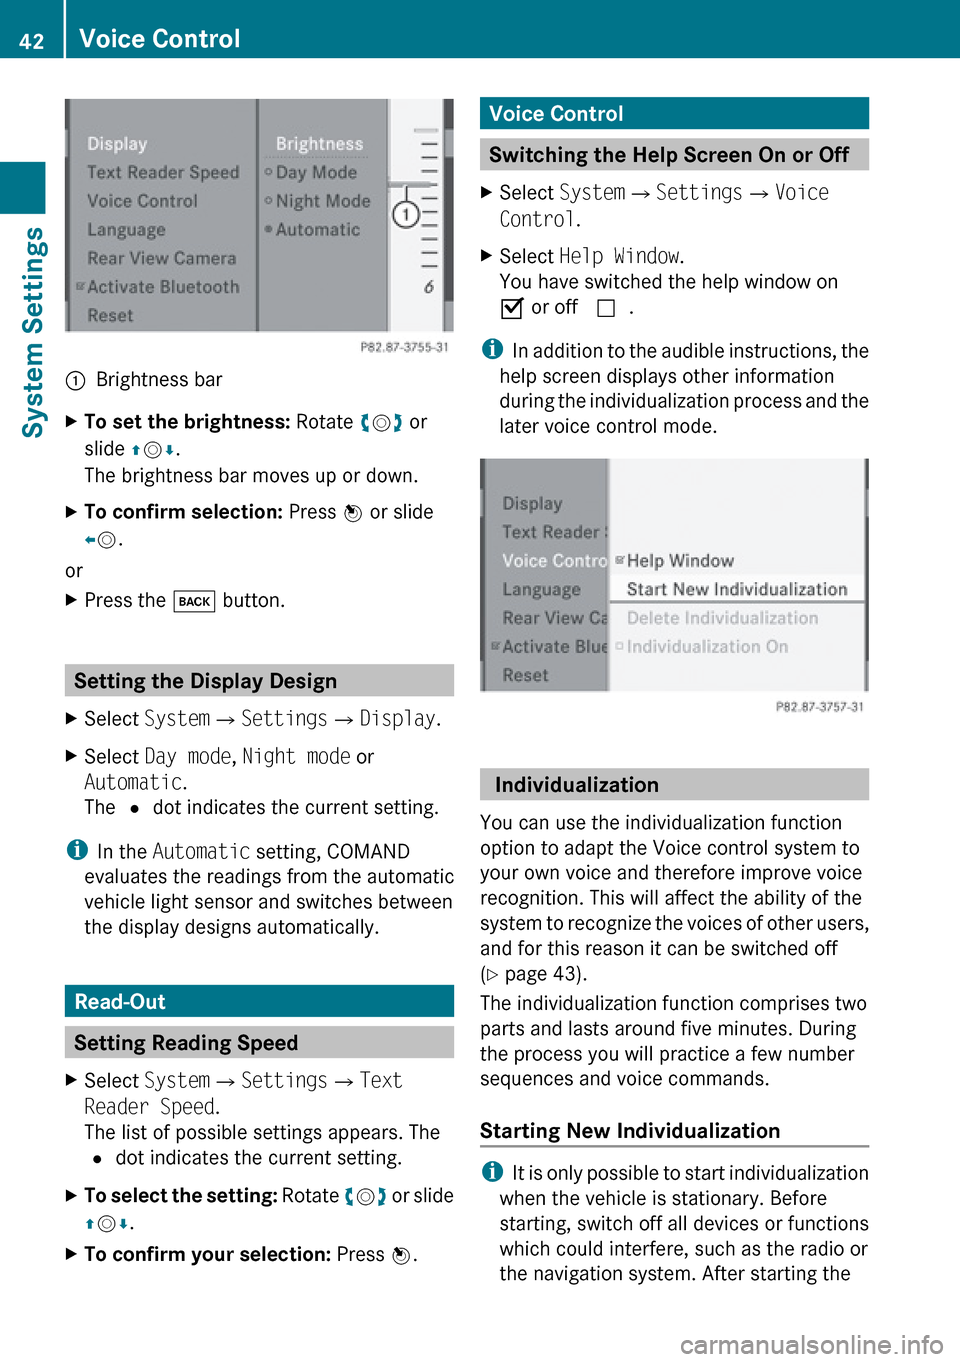
1Brightness barXTo set the brightness: Rotate ym z or
slide qm r.
The brightness bar moves up or down.XTo confirm selection: Press n or slide
o m .
or
XPress the k button.
Setting the Display Design
XSelect System £Settings £Display .XSelect Day mode , Night mode or
Automatic .
The R dot indicates the current setting.
i
In the Automatic setting, COMAND
evaluates the readings from the automatic
vehicle light sensor and switches between
the display designs automatically.
Read-Out
Setting Reading Speed
XSelect System £Settings £Text
Reader Speed .
The list of possible settings appears. The
R dot indicates the current setting.XTo select the setting: Rotate ym z or slide
q m r.XTo confirm your selection: Press n.Voice Control
Switching the Help Screen On or Off
XSelect System £Settings £Voice
Control .XSelect Help Window .
You have switched the help window on
Ç or off c.
i
In addition to the audible instructions, the
help screen displays other information
during the individualization process and the
later voice control mode.
Individualization
You can use the individualization function
option to adapt the Voice control system to
your own voice and therefore improve voice
recognition. This will affect the ability of the
system to recognize the voices of other users,
and for this reason it can be switched off
( Y page 43).
The individualization function comprises two
parts and lasts around five minutes. During
the process you will practice a few number
sequences and voice commands.
Starting New Individualization
i It is only possible to start individualization
when the vehicle is stationary. Before
starting, switch off all devices or functions
which could interfere, such as the radio or
the navigation system. After starting the
42Voice ControlSystem Settings
Page 60 of 224
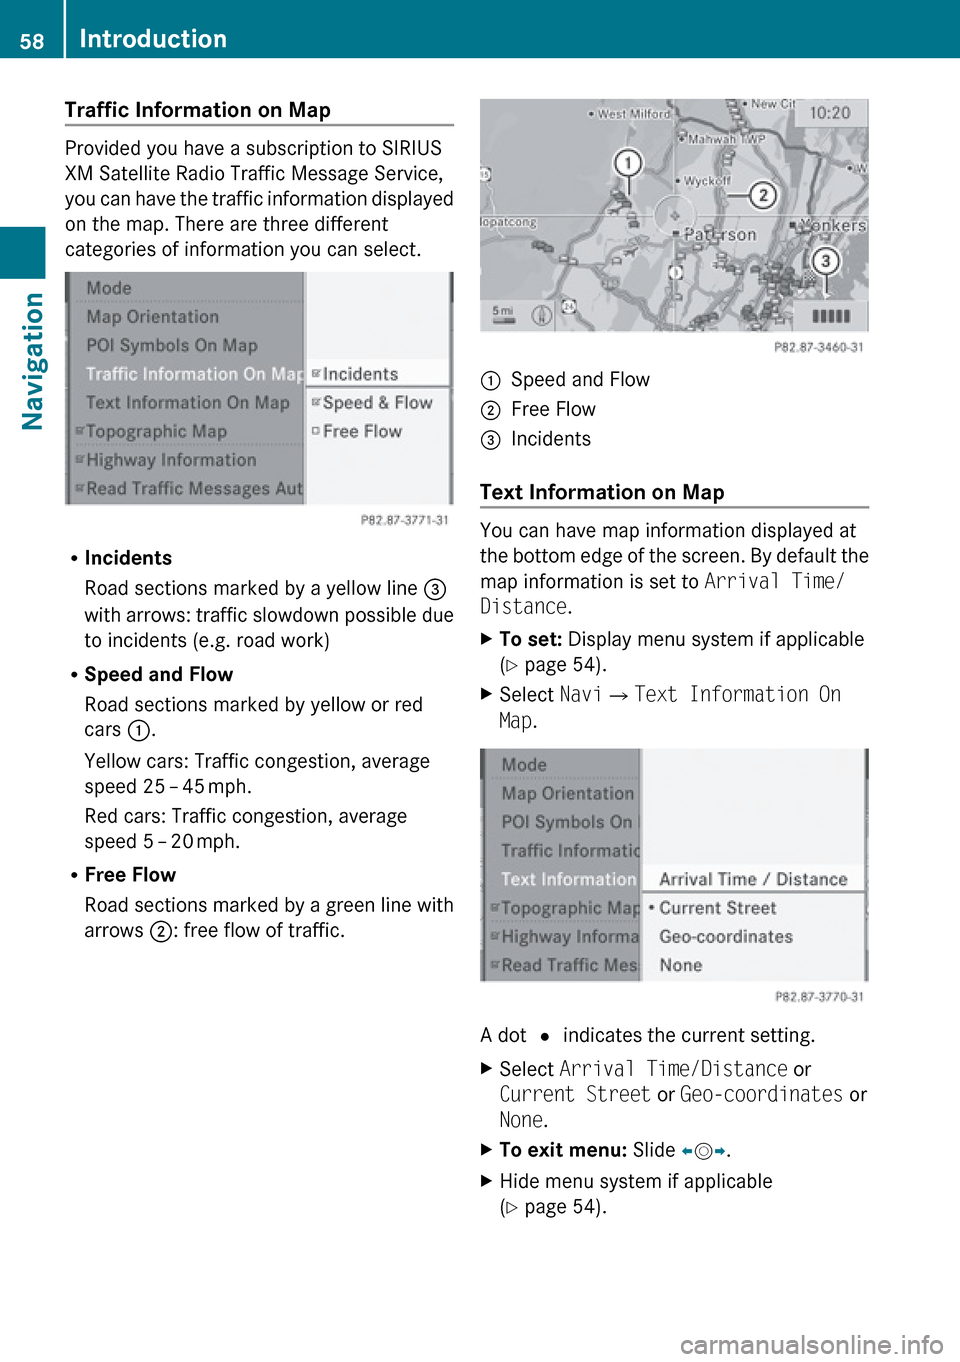
Traffic Information on Map
Provided you have a subscription to SIRIUS
XM Satellite Radio Traffic Message Service,
you can have the traffic information displayed
on the map. There are three different
categories of information you can select.
R Incidents
Road sections marked by a yellow line =
with arrows: traffic slowdown possible due
to incidents (e.g. road work)
R Speed and Flow
Road sections marked by yellow or red
cars :.
Yellow cars: Traffic congestion, average
speed 25 – 45 mph.
Red cars: Traffic congestion, average
speed 5 – 20 mph.
R Free Flow
Road sections marked by a green line with
arrows ;: free flow of traffic.
1Speed and Flow2Free Flow3Incidents
Text Information on Map
You can have map information displayed at
the bottom edge of the screen. By default the
map information is set to Arrival Time/
Distance .
XTo set: Display menu system if applicable
( Y page 54).XSelect Navi£Text Information On
Map .
A dot R indicates the current setting.
XSelect Arrival Time/Distance or
Current Street or Geo-coordinates or
None .XTo exit menu: Slide om p.XHide menu system if applicable
( Y page 54).58IntroductionNavigation
Page 64 of 224
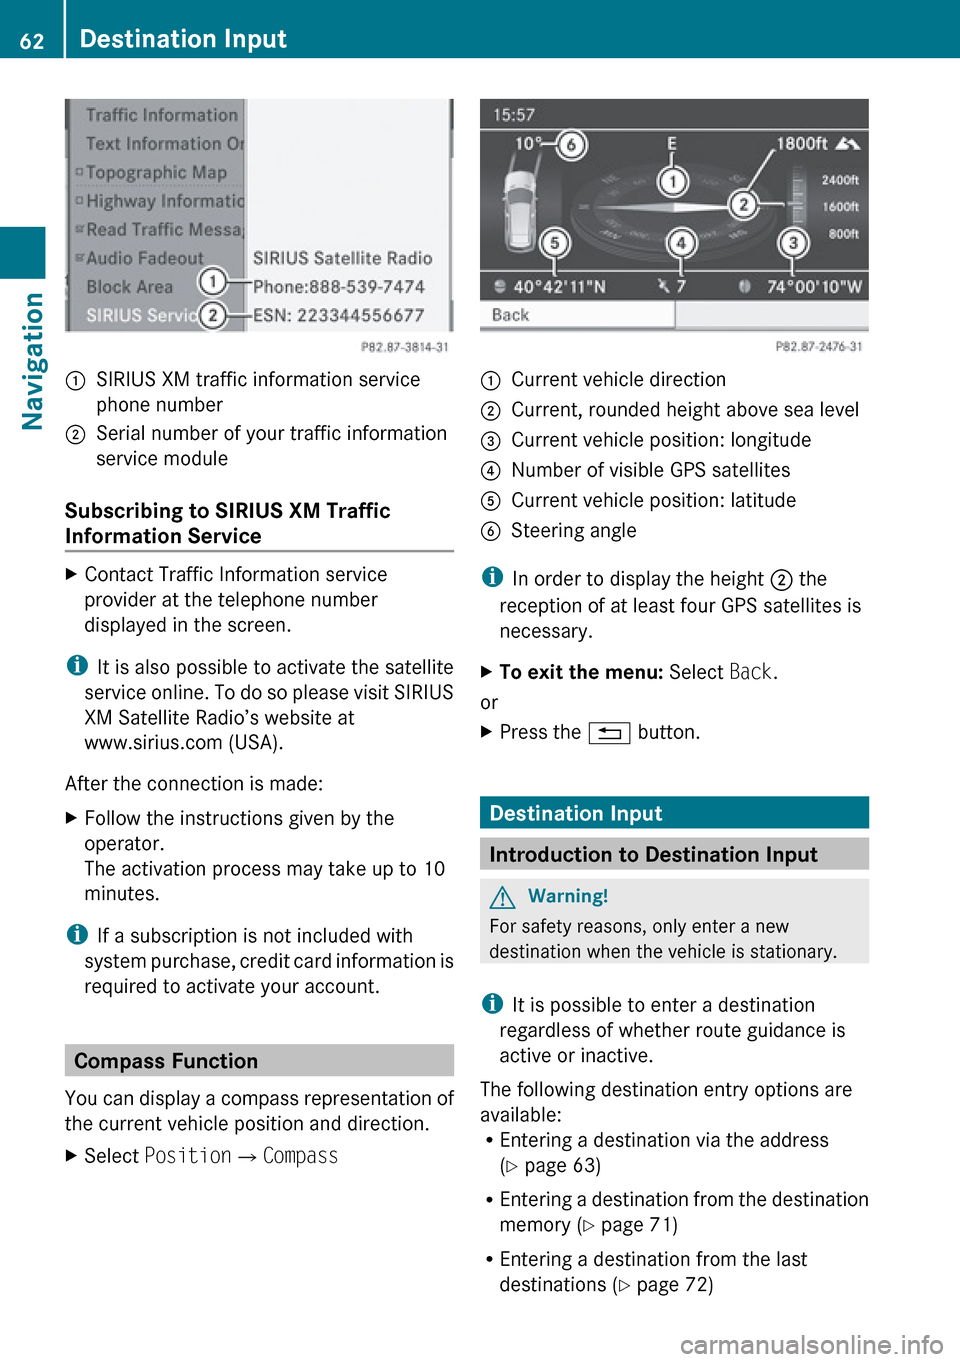
:SIRIUS XM traffic information service
phone number;Serial number of your traffic information
service module
Subscribing to SIRIUS XM Traffic
Information Service
XContact Traffic Information service
provider at the telephone number
displayed in the screen.
i It is also possible to activate the satellite
service online. To do so please visit SIRIUS
XM Satellite Radio’s website at
www.sirius.com (USA).
After the connection is made:
XFollow the instructions given by the
operator.
The activation process may take up to 10
minutes.
i If a subscription is not included with
system purchase, credit card information is
required to activate your account.
Compass Function
You can display a compass representation of
the current vehicle position and direction.
XSelect Position £Compass:Current vehicle direction;Current, rounded height above sea level=Current vehicle position: longitude?Number of visible GPS satellitesACurrent vehicle position: latitudeBSteering angle
i
In order to display the height ; the
reception of at least four GPS satellites is
necessary.
XTo exit the menu: Select Back.
or
XPress the % button.
Destination Input
Introduction to Destination Input
GWarning!
For safety reasons, only enter a new
destination when the vehicle is stationary.
i It is possible to enter a destination
regardless of whether route guidance is
active or inactive.
The following destination entry options are
available:
R Entering a destination via the address
( Y page 63)
R Entering a destination from the destination
memory ( Y page 71)
R Entering a destination from the last
destinations ( Y page 72)
62Destination InputNavigation
Page 89 of 224
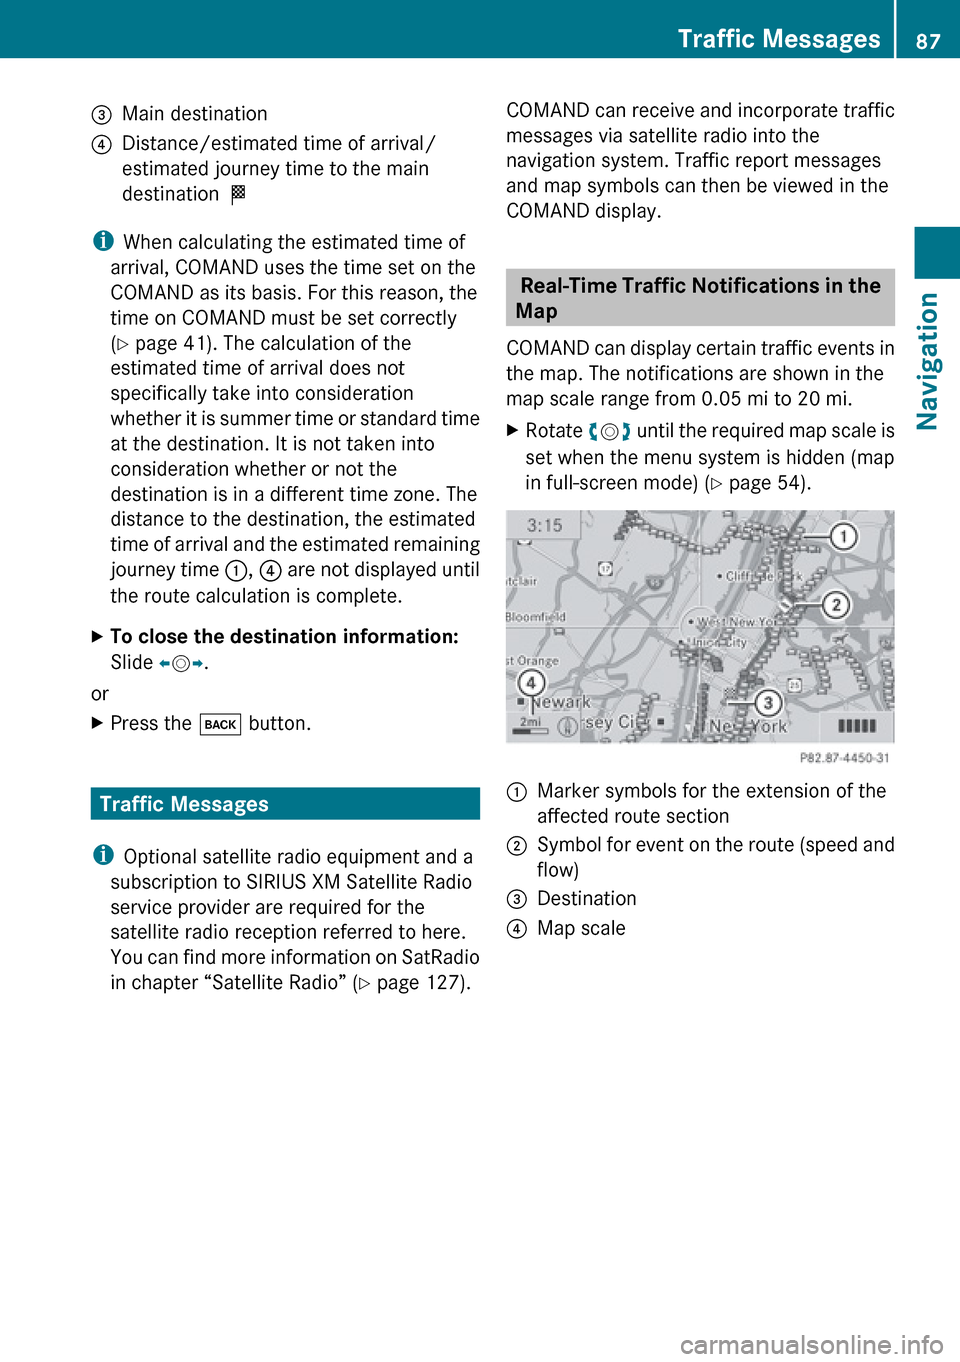
3Main destination4Distance/estimated time of arrival/
estimated journey time to the main
destination <
i
When calculating the estimated time of
arrival, COMAND uses the time set on the
COMAND as its basis. For this reason, the
time on COMAND must be set correctly
( Y page 41). The calculation of the
estimated time of arrival does not
specifically take into consideration
whether it is summer time or standard time
at the destination. It is not taken into
consideration whether or not the
destination is in a different time zone. The
distance to the destination, the estimated
time of arrival and the estimated remaining
journey time 1, 4 are not displayed until
the route calculation is complete.
XTo close the destination information:
Slide om p.
or
XPress the k button.
Traffic Messages
i Optional satellite radio equipment and a
subscription to SIRIUS XM Satellite Radio
service provider are required for the
satellite radio reception referred to here.
You can find more information on SatRadio
in chapter “Satellite Radio” ( Y page 127).
COMAND can receive and incorporate traffic
messages via satellite radio into the
navigation system. Traffic report messages
and map symbols can then be viewed in the
COMAND display.
Real-Time Traffic Notifications in the
Map
COMAND can display certain traffic events in
the map. The notifications are shown in the
map scale range from 0.05 mi to 20 mi.
XRotate ym z until the required map scale is
set when the menu system is hidden (map
in full-screen mode) ( Y page 54).1Marker symbols for the extension of the
affected route section2Symbol for event on the route (speed and
flow)3Destination4Map scaleTraffic Messages87NavigationZ
Page 123 of 224
Audio Menu ....................................... 122
Radio .................................................. 123
Satellite Radio ................................... 127
CD Audio/DVD Audio/MP3 ..............131
Music Register .................................. 144
Media Interface ................................. 147
Audio Aux .......................................... 153121Audio
Page 124 of 224
Audio Menu
i Information on the COMAND control
system and how to operate it can be found
on ( Y page 18).
i For many operating functions you can
also use the buttons on the multifunction
steering wheel, e.g. the =, ; ,
9 , : buttons, for selecting a channel
or a menu or scrolling through lists
( Y page 25).
Vehicle Equipment
i This Operator’s Manual describes all
features, standard or optional, potentially
available for your vehicle at the time of
purchase. Please be aware that your
vehicle might not be equipped with all
features described in this manual.
Calling up the Audio Menu
XSelect Audio
The audio mode last active is switched on.
or
XPress the $ function button.
Radio mode is switched onXSelect Audio
The audio menu appears.
i If radio mode was active last, you only
need to select Audio.
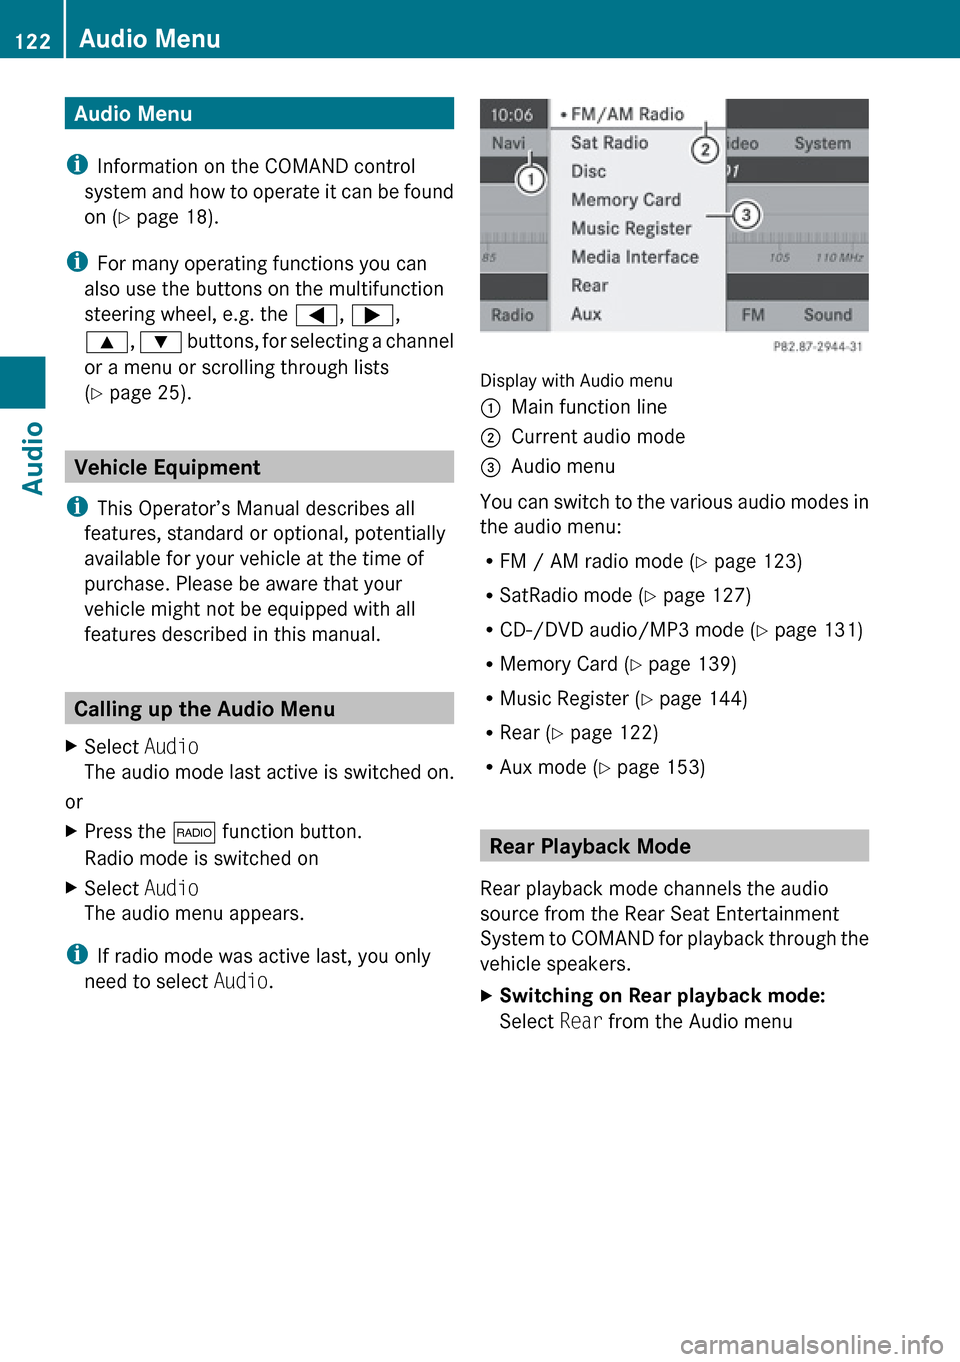
Display with Audio menu
1Main function line2Current audio mode3Audio menu
You can switch to the various audio modes in
the audio menu:
R FM / AM radio mode ( Y page 123)
R SatRadio mode ( Y page 127)
R CD-/DVD audio/MP3 mode ( Y page 131)
R Memory Card ( Y page 139)
R Music Register ( Y page 144)
R Rear ( Y page 122)
R Aux mode ( Y page 153)
Rear Playback Mode
Rear playback mode channels the audio
source from the Rear Seat Entertainment
System to COMAND for playback through the
vehicle speakers.
XSwitching on Rear playback mode:
Select Rear from the Audio menu122Audio MenuAudio
Page 125 of 224
Radio
Switching to the Radio
From the COMAND Control Unit
XPress the $ function button.
or
XSelect Audio£Audio £FM/AM Radio in
the display.
i Press the button repeatedly to switch
wavebands in the sequence FM, AM, WB
and SatRadio mode. Pressing again will
switch back to FM radio mode.
Within the Audio Function
XSelect Audio£FM/AM Radio .
The radio display appears. The last selected
station in the last selected waveband is
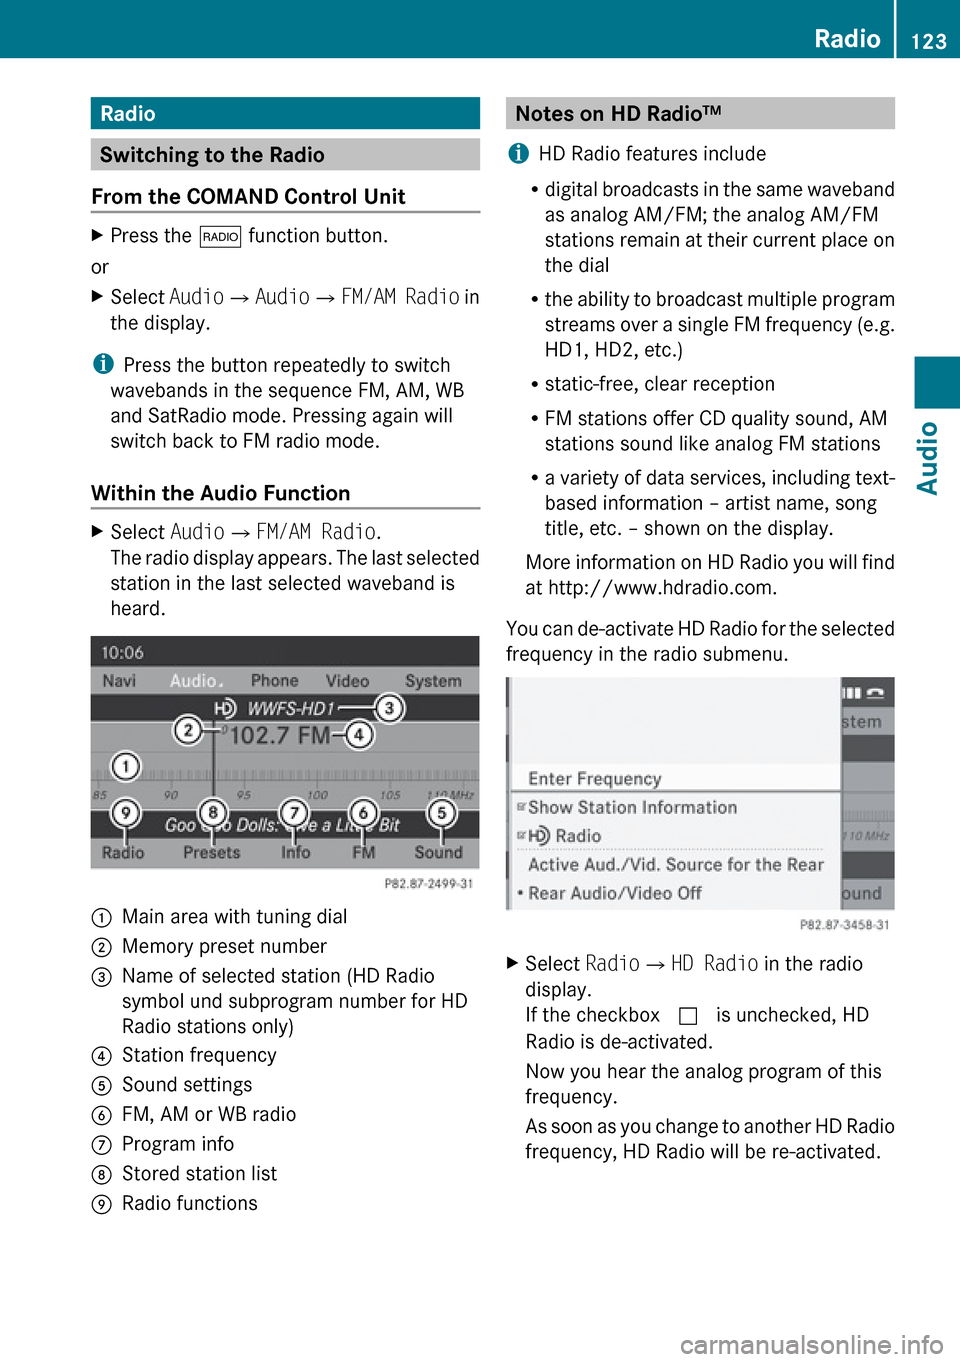
heard.1Main area with tuning dial2Memory preset number3Name of selected station (HD Radio
symbol und subprogram number for HD
Radio stations only)4Station frequency5Sound settings6FM, AM or WB radio7Program info8Stored station list9Radio functionsNotes on HD Radio™
i HD Radio features include
R digital broadcasts in the same waveband
as analog AM/FM; the analog AM/FM
stations remain at their current place on
the dial
R the ability to broadcast multiple program
streams over a single FM frequency (e.g.
HD1, HD2, etc.)
R static-free, clear reception
R FM stations offer CD quality sound, AM
stations sound like analog FM stations
R a variety of data services, including text-
based information – artist name, song
title, etc. – shown on the display.
More information on HD Radio you will find
at http://www.hdradio.com.
You can de-activate HD Radio for the selected
frequency in the radio submenu.XSelect Radio£HD Radio in the radio
display.
If the checkbox c is unchecked, HD
Radio is de-activated.
Now you hear the analog program of this
frequency.
As soon as you change to another HD Radio
frequency, HD Radio will be re-activated.Radio123AudioZ
Page 126 of 224
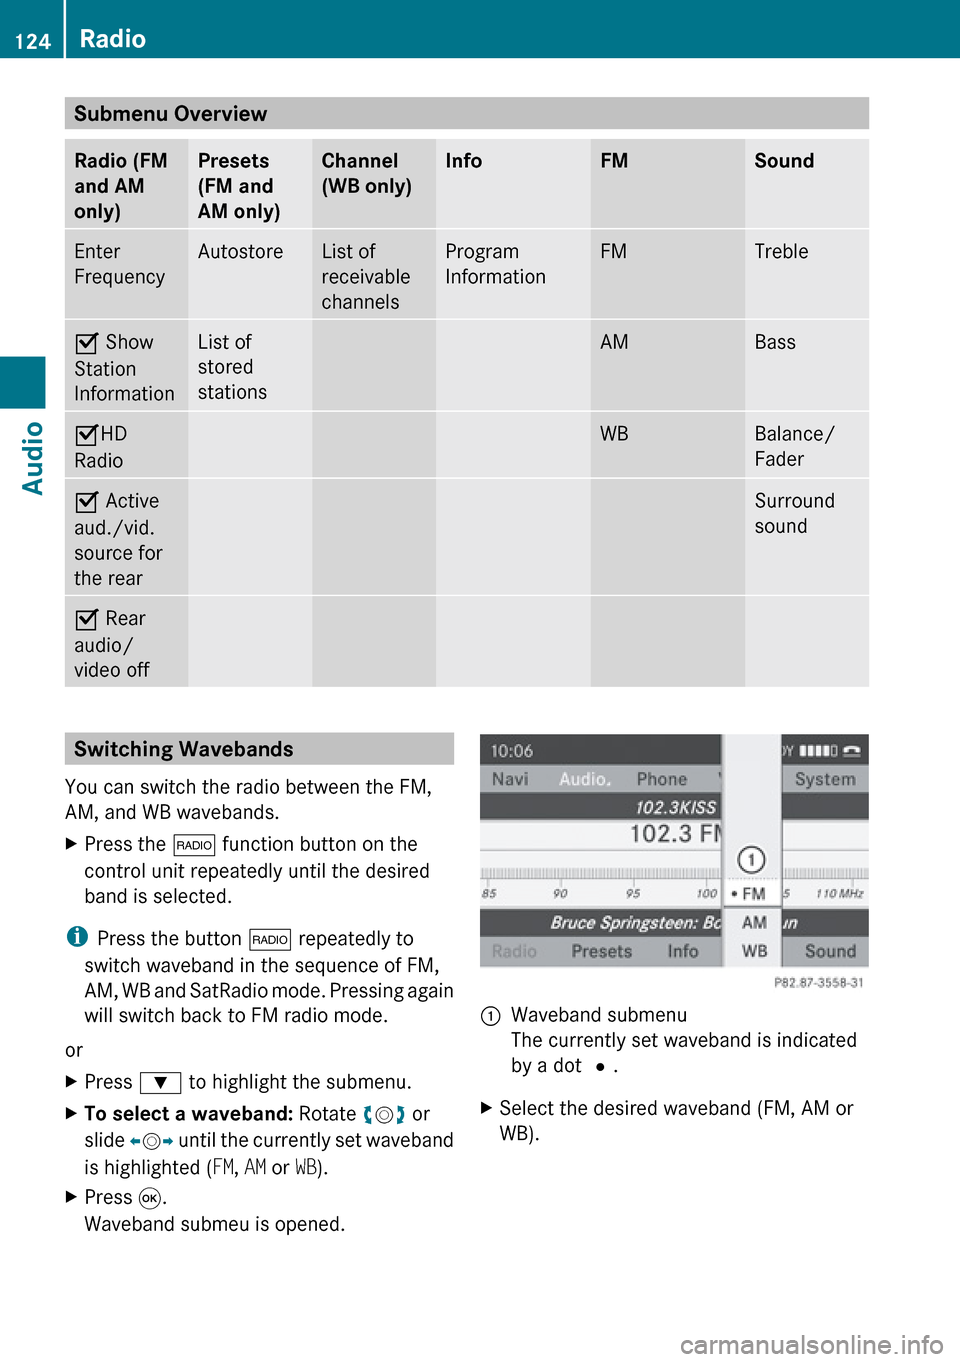
Submenu Overview Radio (FM
and AM
only)Presets
(FM and
AM only)Channel
(WB only)InfoFMSoundEnter
FrequencyAutostoreList of
receivable
channelsProgram
InformationFMTrebleÇ Show
Station
InformationList of
stored
stationsAMBassÇ HD
RadioWBBalance/
FaderÇ Active
aud./vid.
source for
the rearSurround
soundÇ Rear
audio/
video offSwitching Wavebands
You can switch the radio between the FM,
AM, and WB wavebands.XPress the $ function button on the
control unit repeatedly until the desired
band is selected.
i Press the button $ repeatedly to
switch waveband in the sequence of FM,
AM, WB and SatRadio mode. Pressing again
will switch back to FM radio mode.
or
XPress : to highlight the submenu.XTo select a waveband: Rotate ym z or
slide om p until the currently set waveband
is highlighted ( FM, AM or WB).XPress 9.
Waveband submeu is opened.1Waveband submenu
The currently set waveband is indicated
by a dot #.XSelect the desired waveband (FM, AM or
WB).124RadioAudio
Page 127 of 224
Tuning to a Station
You can tune to a station via station search,
by manual frequency input or via the station
memory.
Tuning to a Station via Station SearchXRotate ym z or slide om p when the main
area is highlighted.
or
XPress E or F on the COMAND
control unit.
The search proceeds upwards or
downwards and stops at the next
receivable station.
Tuning to a Station via Manual
Frequency Input
XSelect Radio£Enter Frequency in the
radio display.
An input menu appears.
or
XPress õ on the control unit.XTo enter a frequency: Press number
buttons on the control unit.
i You can only select numbers that are
currently permissible.
COMAND will tune to the frequency entered.
i If in the FM or AM wavebands you enter a
frequency outside the frequency sub-
range, COMAND will select the next
frequency down.
Tuning to a Station via the Station
Memory
XSelect Presets in the radio display.
or
XPress n when the main area is highlighted.
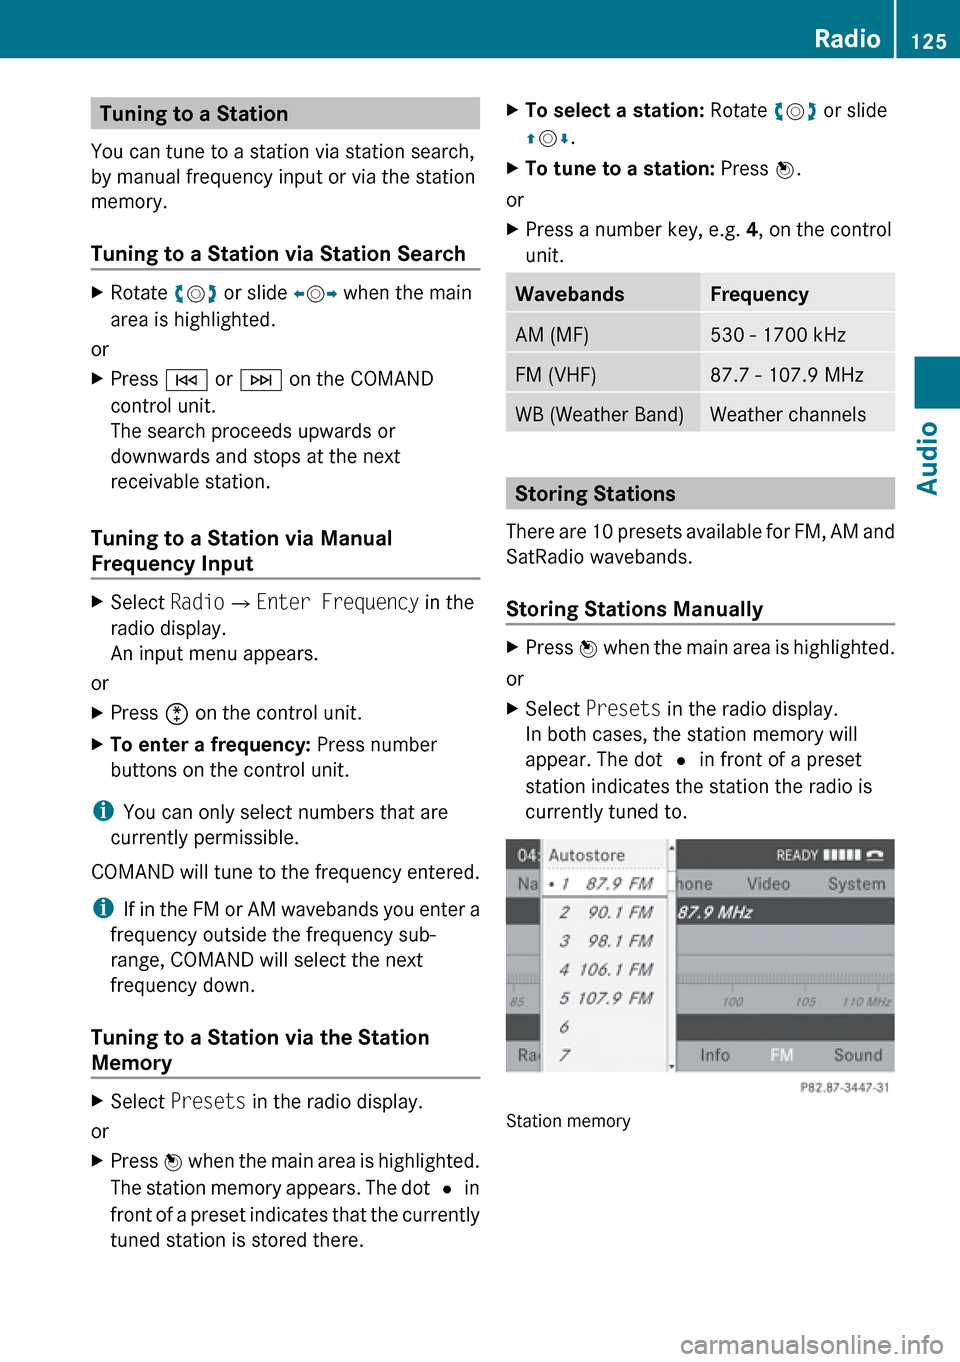
The station memory appears. The dot R in
front of a preset indicates that the currently
tuned station is stored there.XTo select a station: Rotate ym z or slide
q m r.XTo tune to a station: Press n.
or
XPress a number key, e.g. 4, on the control
unit.WavebandsFrequencyAM (MF)530 - 1700 kHzFM (VHF)87.7 - 107.9 MHzWB (Weather Band)Weather channels
Storing Stations
There are 10 presets available for FM, AM and
SatRadio wavebands.
Storing Stations Manually
XPress n when the main area is highlighted.
or
XSelect Presets in the radio display.
In both cases, the station memory will
appear. The dot R in front of a preset
station indicates the station the radio is
currently tuned to.
Station memory
Radio125AudioZ
Page 128 of 224
XTo store a station to a selected preset:
Press and hold n until a signal tone
sounds.
or
XPress and hold a number key, e.g. 4, until
a signal tone sounds.
The station is stored.
Storing via Autostore
i The function automatically assigns
receivable stations to the presets, sorted
according to reception quality. The stations
which were stored in the station memory
manually are overwritten.
XPress n when the main area is active.XSelect Autostore .
or
XSelect Presets £Autostore in the radio
display.
COMAND searches for receivable stations.
A corresponding message is displayed. The
available stations are automatically stored
under the presets.
Canceling Autostore Procedure
XSelect Cancel .
Switching to Weather Band
XPress the $ function button on the
control unit repeatedly until the weather
band is selected.
or
XSlide mr to highlight the submenu.XTo select the weather band: Rotate
y m z or slide o until the currently set
waveband is highlighted ( FM or AM).XPress 9.
Waveband submeu is opened.XSelect WB.Searching a ChannelXRotate ym z or slide om p when the main
area is highlighted.
or
XPress E or F on the control unit.
The search proceeds upwards or
downwards and stops at the next
receivable channel.
Selecting a Channel from Channel list
XSlide mr to highlight the submenu.XTo call up the channel list: Rotate ym z
or slide om p until Channel is highlighted.XPress n.
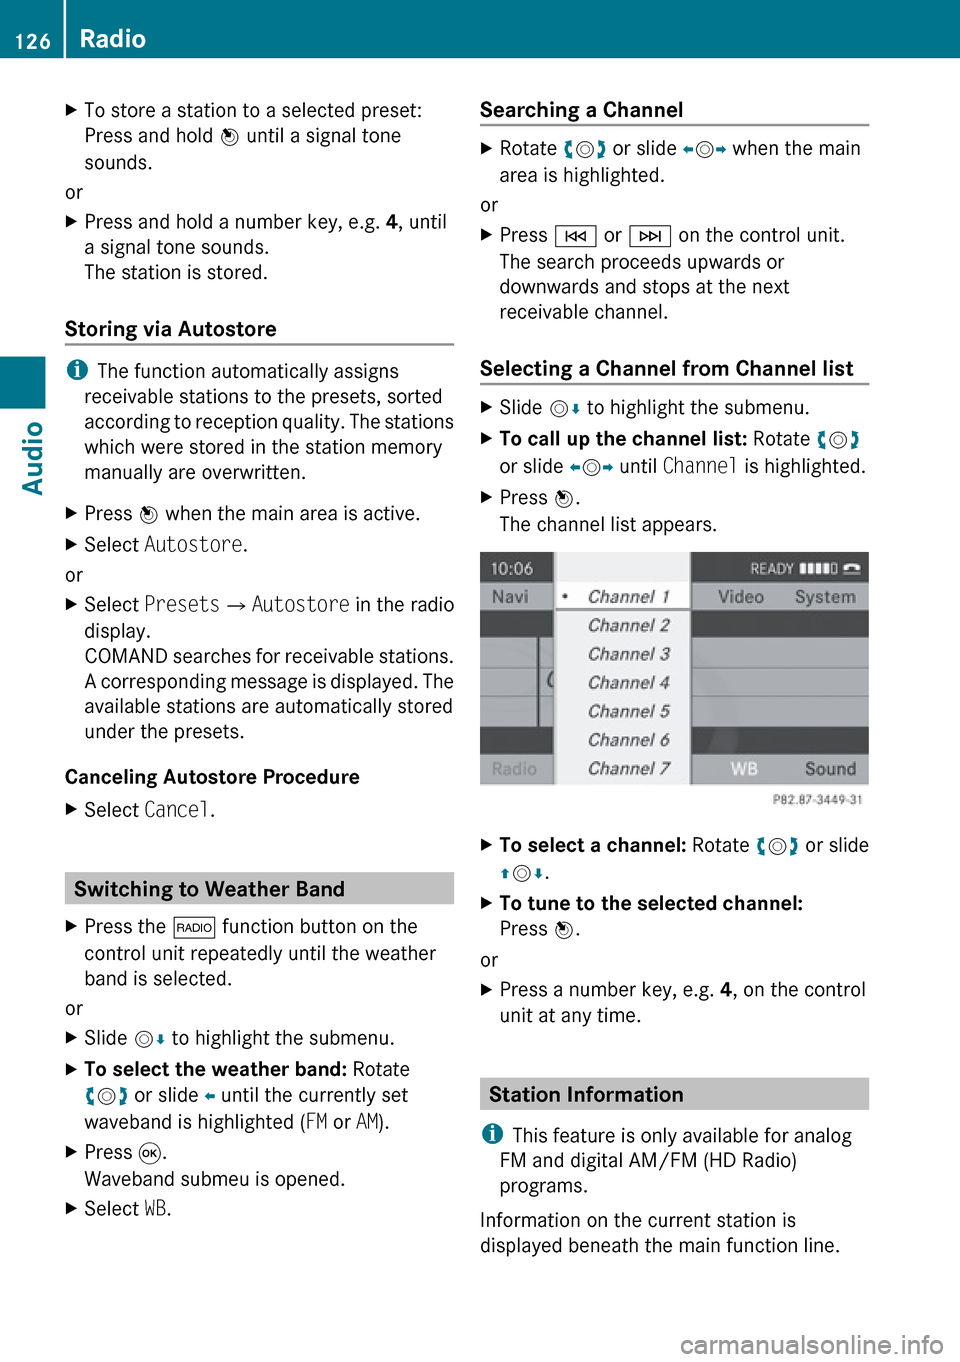
The channel list appears.XTo select a channel: Rotate ym z or slide
q m r.XTo tune to the selected channel:
Press n.
or
XPress a number key, e.g. 4, on the control
unit at any time.
Station Information
i This feature is only available for analog
FM and digital AM/FM (HD Radio)
programs.
Information on the current station is
displayed beneath the main function line.
126RadioAudio