Clock MERCEDES-BENZ E-Class SEDAN 2017 W213 Owner's Manual
[x] Cancel search | Manufacturer: MERCEDES-BENZ, Model Year: 2017, Model line: E-Class SEDAN, Model: MERCEDES-BENZ E-Class SEDAN 2017 W213Pages: 446, PDF Size: 6.23 MB
Page 98 of 446
RSecurethel oad using thet ie-down eyes and
distribut ethe load evenly.
Interior stow agec om partments
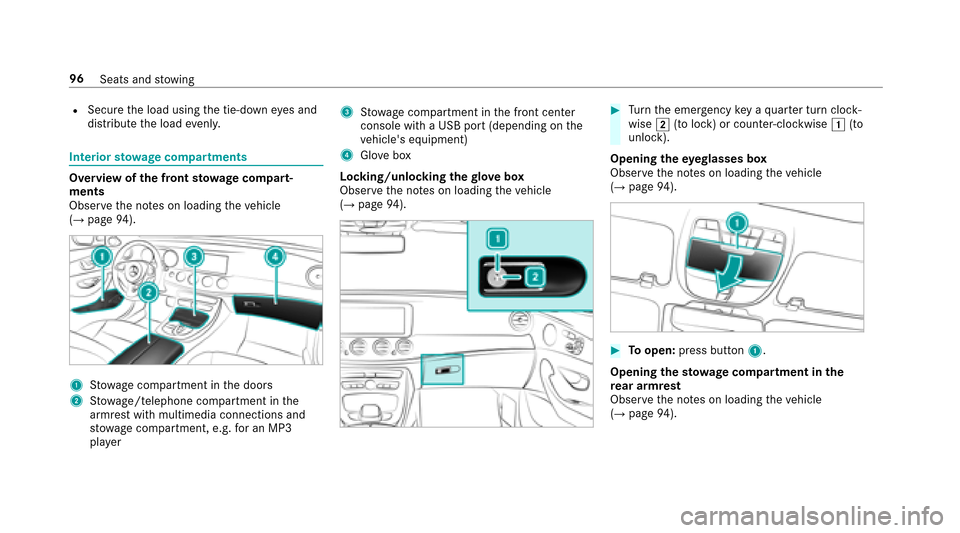
Overvie wofthe front stowage compa rt‐
ments
Observ ethe no tesonl oading thev ehicle
(
→pag e94).
1St ow agec ompartment in thed oors
2Stow age/telephonec ompartment inthe
armres twithm ultimedia connections and
stow agec ompartment ,e.g.f or an MP3
pla yer
3Stow agec ompartment in thef ront center
console wit haUSB por t(depending on the
ve hicle's equipment)
4Glo vebox
Locking/unlocking theg love box
Obser vethen otes on loading thev ehicle
(
→pag e94).
#Turn thee mer gency keyaq uartert urnc lock‐
wise 2(tol ock) or counter-clockwise 1(to
unlock).
Opening thee yeglasses box
Obser vethen otes on loading thev ehicle
(
→pag e94).
#Toopen: press button 1.
Opening thes towa ge compa rtmen tint he
re ar armrest
Observ ethe no tesonl oading thev ehicle
(
→pag e94).
96
Seats and stowing
Page 142 of 446
*NO
TEDo no toverfill thef uel tank as this
ma ydamag ethe fuel sy stem.
#Onl yfillthef uel tank unti lthe pump
nozzle switches off.
* NO
TEDo no toverfill thef uel tank as oth‐
erwise fuel could spr ayout when the
pum pnozzle is remo ved.
#Onl yfillthef uel tank unti lthe pump
nozzle switches off.
Re quirement:
The vehicle mus tbeunlocked.
% Do no tget intot he vehicle again during the
re fueling process. Otherwise, electros tatic
ch arge could buil dupagain.
Obser vethen otes on operating fluids
(
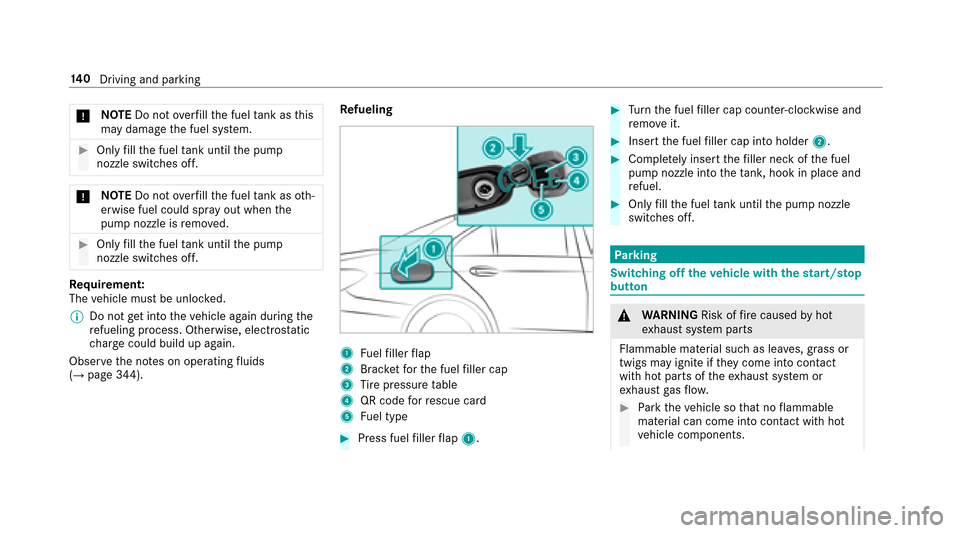
→pag e344). Re
fueling
1Fuelfiller flap
2Brac ketfor thef uel filler cap
3Ti re pressur etable
4QR code forr escue card
5Fu el type
#Press fuel filler flap 1.
#Turn thef uel filler cap coun ter-clockwise and
re mo veit.
#Inser tthe fuel filler cap int oholder 2.
#Comple tely inse rtthef iller nec kofthe fuel
pum pnozzle int othe tank ,h oo kinp lace and
re fuel.
#Onl yfillthef uel tank unti lthe pum pnozzle
switches off.
Pa rking
Switching of fthe vehicl ewiththes tart/ stop
button
& WARNING Risk offire caused byhot
ex haus tsystemp arts
Flammable material suc hasleaves, grass or
twigs ma yignit eift heyc ome int ocontact
wi th hotp arts of thee xhaust system or
ex haus tgas flow .
#Park thev ehicle so that no flammable
material can com eintoc ontact wi thhot
ve hicle components.
14 0
Driving and pa rking
Page 284 of 446
#Allow thee ngine tocool of fand thor‐
oughl yclean thee ngine oil from compo‐
nen tparts befor estartin gt he vehicle.
* NO
TEEngine damag ecaused byan
incor rect oil filter ,incor rect oil or addi‐
tives
#Do no tuse engine oil soroilfilters
whic hdon otcor respond tothes pecifi‐
cation sexplicit lyprescribed fort he
service inter vals.
#Do no talter thee ngine oil or oil filter in
order toachie velonger chang einter vals
th an prescri bed.
#Do notuse additives.
#Followt he instructions in thes ervice
inter vald ispla yregarding theo il
ch ange.
* NO
TEDama gecaused bytopping up too
muc hengine oil
Topping up toom uche ngine oil can cause
damag etothe engine or thec atalytic con‐
ve rter.
#Ha ve excess engine oil siphonedo ffat
aq ualified specialis tworks hop.
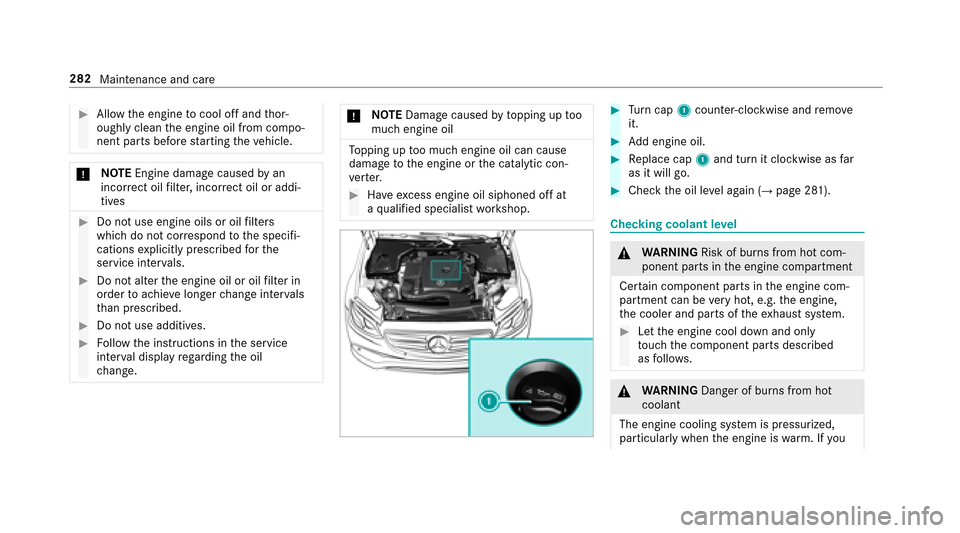
#Tu rn cap 1counter-clockwise and remo ve
it.
#Ad de ngin eoil.
#Replace cap 1and tur nitclockwise as far
as it will go.
#Chec kthe oil le vela ga in (→pag e281).
Checking coolant le vel
&
WARNING Risk of burn sfromh otcom‐
ponent parts in thee ngine compartment
Cer tain component parts in thee ngine com‐
partmen tcan be very hot, e.g. thee ngine,
th ec ooler and parts of thee xhaust system.
#Le tthe engine cool down and only
to uc ht he component parts described
as follo ws .
&
WARNING Danger of burn sfromh ot
coolant
The engine cooling sy stem is pressurized,
particularly when thee ngine is warm.Ify ou
282
Maintenance and care
Page 285 of 446
openthec ap, youc ould be scalded byhot
coolant spr aying out.
#Le tthe mo torc ool down befor eopening
th ec ap.
#When opening thec ap, wearglove sand
pr otectiv eeyewe ar.
#Slowl yturnt he cap half aturntoa llow
pressur etoescape.
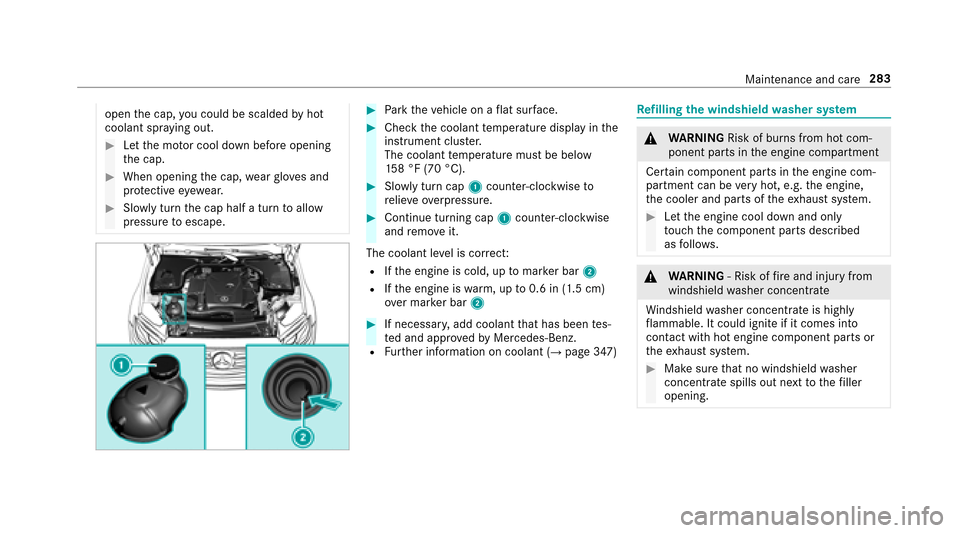
#Park thev ehicle on aflat sur face.
#Chec kthe coolant temp eratur edispla yint he
instrument clus ter.
The coolant temp eratur emustbeb elow
15 8°F( 70 °C).
#Slowly tur ncap 1 counter-clockwise to
re lie ve ove rpressure.
#Continue turning cap 1counter-clockwise
and remo veit.
The coolan tleve lisc orrect:
RIfth ee ngine is cold, up tomar kerb ar2
RIfth ee ngine is warm,upt o0.6 in (1.5 cm)
ove rmarke rb ar2
#If necessar y,add coolant that has been tes‐
te da nd appr ovedbyM ercedes-Benz.
RFurther information on coolant (→pag e347)
Re filling thew indshield washer sy stem
&
WARNING Risk of burn sfromh otcom‐
ponent parts in thee ngine compartment
Cer tain component parts in thee ngine com‐
partmen tcan be very hot, e.g. thee ngine,
th ec ooler and parts of thee xhaust system.
#Le tthe engine cool down and only
to uc ht he component parts described
as follo ws .
&
WARNING ‑Riskoff irea nd injur yfrom
windshield washer concentrate
Wi ndshield washer concentrat eishighly
fl ammable. It coul dignit eifitc omes into
con tact wi thhote ngine component parts or
th ee xhaust system.
#Mak esuret hat no windshield washer
concentrat espills out next tothef iller
opening.
Maintenance and care 283
Page 309 of 446
*NO
TEDama getothed rive trai ndueto
incor rect positioning
#Do no tposition thev ehicle abo vethe
connection point of thet ranspor tvehi‐
cle.
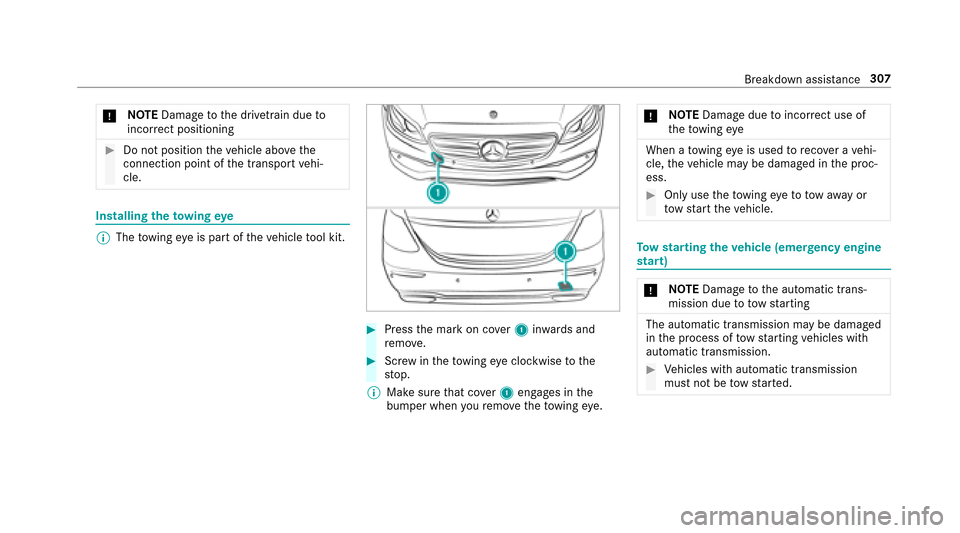
Installing thet ow ing eye
%
The towing eyeisp artoft hevehicle tool kit.
#Press them arkonc over 1 inwa rdsa nd
re mo ve.
#Scr ew inthet ow ing eye clockwise tothe
st op.
% Mak esuret hat co ver1 engages in the
bumper when your emo vethet ow ing eye. *
NO
TEDama gedue toincor rect us eof
th et ow ing eye
When atow ing eyeisu sedtoreco verav ehi‐
cle, thev ehicle ma ybedamaged in thep roc‐
ess.
#Onl yusethet ow ing eyetot owaway or
to ws tart thev ehicle.
Tows tarting thev ehicle (emer gency engine
st art)
* NO
TEDama getothea utomatic trans‐
mission due to towstarting
The automatic transmissionm aybe damaged
in thep rocess of tows tartin gv ehicles with
automatic transmission.
#Ve hicles wit hautomatic transmission
mus tnotbe tows tarted.
Breakdown assis tance 307
Page 336 of 446
Notesons toring wheels
RAf terr emoving wheels, stor et hem in acool,
dr ya nd preferably dar kplace.
RProtect thet ires from conta ct withoil, grease
or fuel.
Preparing thev ehicle foraw heelchange
Prerequisi tesRThe requ ired tire-chang etool kit is available.
If yo ur vehicle is no tequipped wit hthe tire-
ch ang etool kit, consult aqualified specialis t
wo rkshop tofind outa boutsuitable tools.
RThe vehicle is no tonaslope.
RThevehicle is on solid, non-slipper yand le vel
ground .
#Applythee lectric parking brak emanually.
#Movethef ront wheels tothes traight-ahead
position.
#Ve hicles with automatic transmission:
shif tint op osition j.
#Vehicles with AI RBODYC ONT ROL:setthe
normal vehicle le vel(→pag e171).
#Switc hoffthee ngine.
#Mak esuret hat thee ngine cannot bestar ted.
#Place choc ks orother suitable items under
th ef ront and rear of thew heel that is diago‐
nall yopposit ethe wheel youw ish tochange.
#Re mo vetheh ub caps if necessary
(→pag e334).
#Raise thev ehicle (→pag e335).
Removing and mounting hub caps
Requirements
#The vehicle is prepared foraw heelc hange
(→pag e334).
Plast ic hub cap
#Toremo ve:tur nthe center co veroft he hub
cap counter-clockwise and remo vetheh ub
cap.
#To mount: makesurethat thec enter co ver
of theh ub cap is turned counter-clockwise.
#Position theh ub cap and tur nthe center
co verc lockwise until theh ub cap engages
ph ysicall yand audibly.
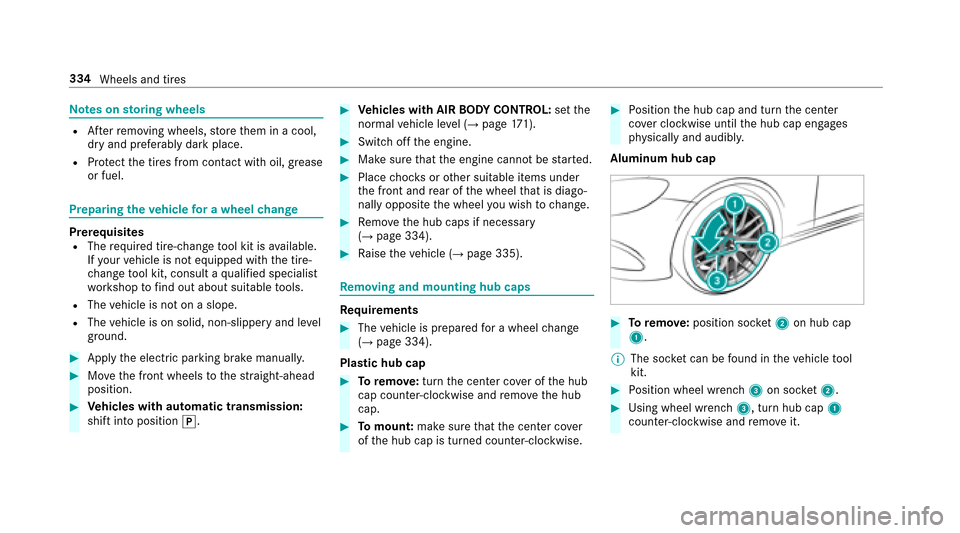
Aluminum hub cap
#To remo ve:positio nsocket2 on hubc ap
1.
% The soc ketc an be found in thev ehicle tool
kit.
#Po sition wheel wrench 3on soc ket2.
#Using whee lwrench 3,t urnh ub cap 1
counter-clo ckwise and remo veit.
334
Wheels and tires
Page 337 of 446
#Tomount: positionhub cap 1and turn
unti litisc ompletelyf lush wit hthe wheel.
#Position soc ket2 on hubc ap1.
#Position wheel wrench 3on soc ket2 and
tighten theh ub cap clockwise.
Specified tightening torq ue: 18lb-ft
(25 Nm).
#Ra ise thev ehicle (→pag e335).
Raising thev ehicle when changing awheel
RequirementsRTher eareno persons in thev ehicle.
RThe vehicle is prepared foraw heelc hange
(→pag e334).
RThe hub caps ha vebeen remo ved
(→pag e334).
Impor tant no tesonu singthej ack:
ROnl yusethev ehicle-specific jac kthat has
been tested and appr ovedbyM ercedes-Benz
to raise thev ehicle.
RThe jac kisonlyd esigned forr aising and
holdingt hevehicle foras horttime while a whee
lisbeing changed and no tfor mainte‐
nance workunder thev ehicle.
RThe jac kmustbep laced on afirm, flat and
non-slip sur face. If necessar y,use alarge ,
load-bearing, non-slip underla y.
RThe base ofthej ackm ustbep ositioned ver‐
tically under thej acks uppor tpoint.
Rules of conduct when thev ehicle is raised:
RNe verp lace your hands or feet under the
ve hicle.
RDo no tlie under thev ehicle.
RDo no tstar tthe engine and do no trelease
th ep arking brake.
RDo no topen or close an ydoor sort he trunk
lid.
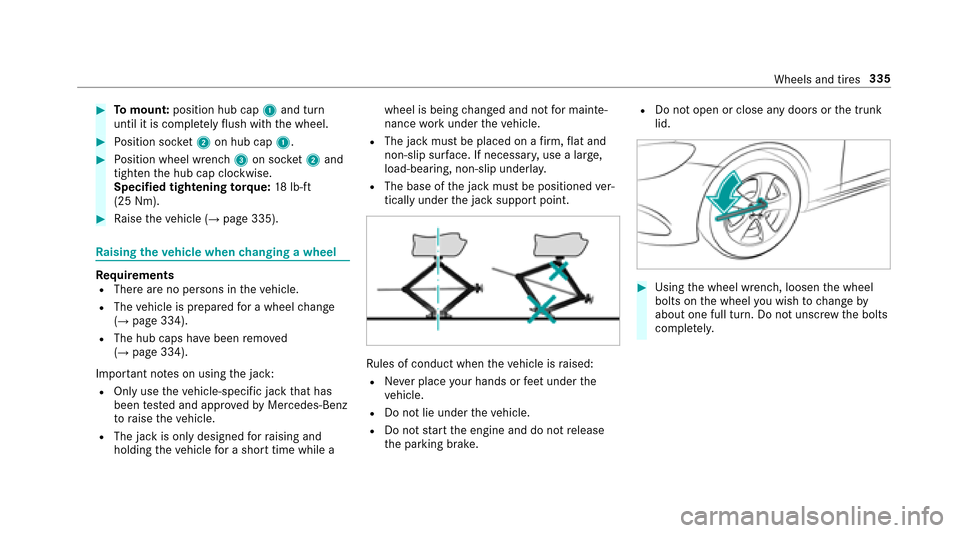
#Using thew heel wrench, loosen thew heel
bolts on thew heel youw ish tochang eby
about onef ull turn. Do no tunscr ewtheb olts
comple tely.
Wheels and tires 335
Page 338 of 446
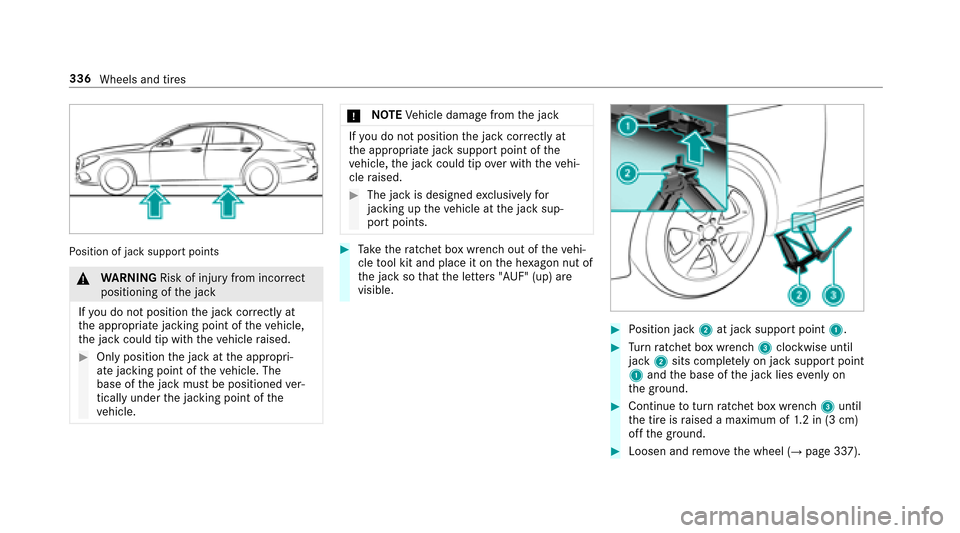
Position of jac ksuppor tpoints
&
WARNING Risk of injury from incorrect
positioning of thej ack
If yo udon otpositio nthe jac kcorrectly at
th ea ppropriat ejacking point of thev ehicle,
th ej ackc ould tip wit hthe vehicle raised.
#Onl yposition thej ackatt he appropri‐
at ej acking point of thev ehicle. The
base of thej ackm ustbep ositioned ver‐
tically under thej acking point of the
ve hicle.
* NO
TEVehicle damag efromt he jack
Ifyo udon otpositio nthe jac kcorrectl ya t
th ea ppropriat ejacks uppor tpoint of the
ve hicle, thej ackc ould tip overwitht he vehi‐
cle raised.
#The jac kisdesigned exclusively for
jacking up thev ehicle at thej acks up‐
por tpoints.
#Take ther atche tbox wrenc houtofthev ehi‐
cle tool kit and place it on theh exagon nut of
th ej acksot hatthel ette rs "AUF" (up) are
visible.
#Po sition jack 2at jac ksuppor tpoint 1.
#Turn ratche tbox wrench 3clockwise until
jack 2sitsc omple tely on ja cksuppor tpoint
1 and theb ase of thej ackl ies evenlyo n
th eg round.
#Continue totur nratche tbox wrench 3until
th et ireisr aised amaximum of 1.2i n(3c m)
of ft he ground.
#Loosen and remo vethew heel (→pag e337).
336
Wheels and tires
Page 340 of 446
#Slidethew heel tobe mounted ont othe cen‐
te ring pi nand push it on.
&
WARNING Risk of injury from tightening
whee lbolts and nuts
If yo ut ighten thew heel bolts or wheel nuts
when thev ehicle is raised, thej ackc ould tip.
#Onl ytighten wheel bolts or wheel nuts
when thev ehicle is on theg round.
#Fo rs afet yr easons, Mercedes-Benz recom‐
mend sthat youo nly use wheel boltswhich
ha ve been appr oved forM ercedes-Benz vehi‐
cles, as well as fort he wheel in question.
* NO
TEDama getopaintwor kofthe wheel
ri mw hen scr ewing on thef irst whee lbolt
If th ew heel has toom uchp layw hen scr ew‐
ing in thef irst whee lbolt, th ew heel rimp aint
can be dama ged.
#Press thew heel firm lyagains tthe
whee lhub when scr ewing on thef irst
wheel bolt.
#Ti ghten thew heel bolts until they aref inger-
tight.
#Un scr ew thec entering pin.
#Tighten thel astw heel bolt until it is finger-
tight.
#Lo we rthe vehicle(→pag e338).
Loweri ngthev ehicle af teraw heelchange
Re quirementsRThe ne wwheel has been mounted
(→pag e337).
#Place ther atche tbox wrenc hontot he he xa‐
gon nut of thej acksot hatthel ette rs "AB"
ar ev isible.
#To lowe rthe vehicle: turnthe ratche tbox
wrenc hofthe jac kcounter-clockwise.
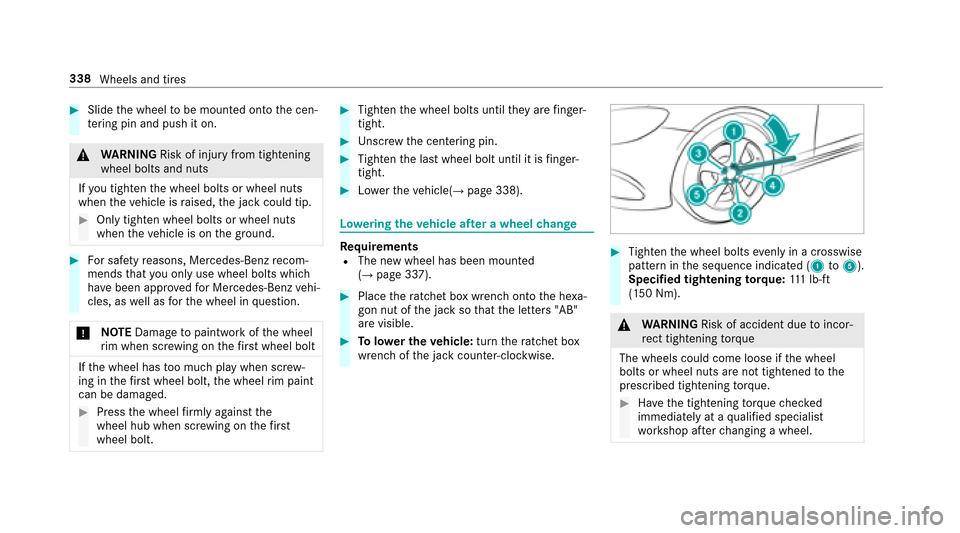
#Tighten thew heel bolts evenlyinac rosswise
patter ninthe sequence indicated (1 to5).
Specified tightening torq ue: 111 lb-ft
(150 Nm).
& WARNING Risk of accident duetoi ncor‐
re ct tigh tening torque
Th ew heelsc ould come loose if thew heel
bolts or wheel nuts ar enottightened tothe
prescribed tightenin gtorque.
#Ha ve thet ightening torque checked
immediatel yataqualified specialist
wo rkshop af terc hanging awheel.
338
Wheels and tires