MERCEDES-BENZ E-Class WAGON 2011 S212 Comand Manual
Manufacturer: MERCEDES-BENZ, Model Year: 2011, Model line: E-Class WAGON, Model: MERCEDES-BENZ E-Class WAGON 2011 S212Pages: 234, PDF Size: 8.64 MB
Page 211 of 234

Rear-c
ompartmen tscree ns :
AUX jacks, detailed viewinthe "CD/DVD drive and AUX jacks" section(Ypage 210)
; Disp lay Remo
tecontrol
Ove rview i
Tworemo tecontrol sareincl uded inthe
scop eofsup plyf or the USA andCanad a. :
Switches thescre enon/off
; Switches thebutton lighti ngon/off
= Selects thescre enfor the remo tecontrol
? Selects amenu ormenu item Gen
eral informati on
209Rear
Seat
Entertain men
tS
ystem Z
Page 212 of 234
A
Con firms asele ction orset ting
B Swit ches soun don/off( forc orded
headphones)
C Adjust sthe volume (forcorded
headphones)
D Skips toatrack, fast-forwa rd/fast-rew ind
E Selects atrack; directentry
F Exits amenu (back)
Sel ecting thescre enfor the remote
co ntrol You
canusetheremote controltoopera te
one ofthe two rear screens atat ime. Todo
so, you must switch the remote controltothe
desi redscreen.
X To sele ctthe left-hand screen:turn
thumbw heel=until "LREAR" is
high lighted inthe windo w.
X To sele ctthe right-hand screen:turn
thumbw heel=until "REAR R"is
high lighted inthe windo w.
Swi tching thescre enon/ off If
the SmartKey isin posi tion 0or 1in the
ignitio nlock (see thevehicle Operator's
Manual), orthe Smart Keyisnot insert ed,the
screen sint he rear willswitch offafter 30
minutes. Beforethescreen sswitch off,they
show amessage tothis effect .
You canswitch thescreen sback on.
How ever,this will disc harg ethe start er
bat tery.
X Poin tthe rem otec ontro latthe rear -
co mpar tments cree nwhich hasbeen
selected forremote operation.
X Press button :onthe remote control.
The respective rearscreen switches onor
off.
i You canonly switch thescreens onusing
the remote controlifthe ignition is
switched on. Switching
thebutt onlighting on/off X
Press button ;onthe remote control.
Depending onthe previous status,the
button lighting isswitched onoroff.
i Ifyou donot use theremote controlfor
about 15seconds, thebutton lighting
switches offautomatically .
Switching thesound on/off(corded
headph onesonly) X
Press button Bonthe remote control.
The sound isswitched on/off.
Selec tingamenu/m enuitem and
confir mingyour select ion X
Sele ctam enu/m enuitemu singthe
=;9 :buttonso nthe
rem otec ontrol and pres sthe 9 butt onto
con firm. CD/DVD
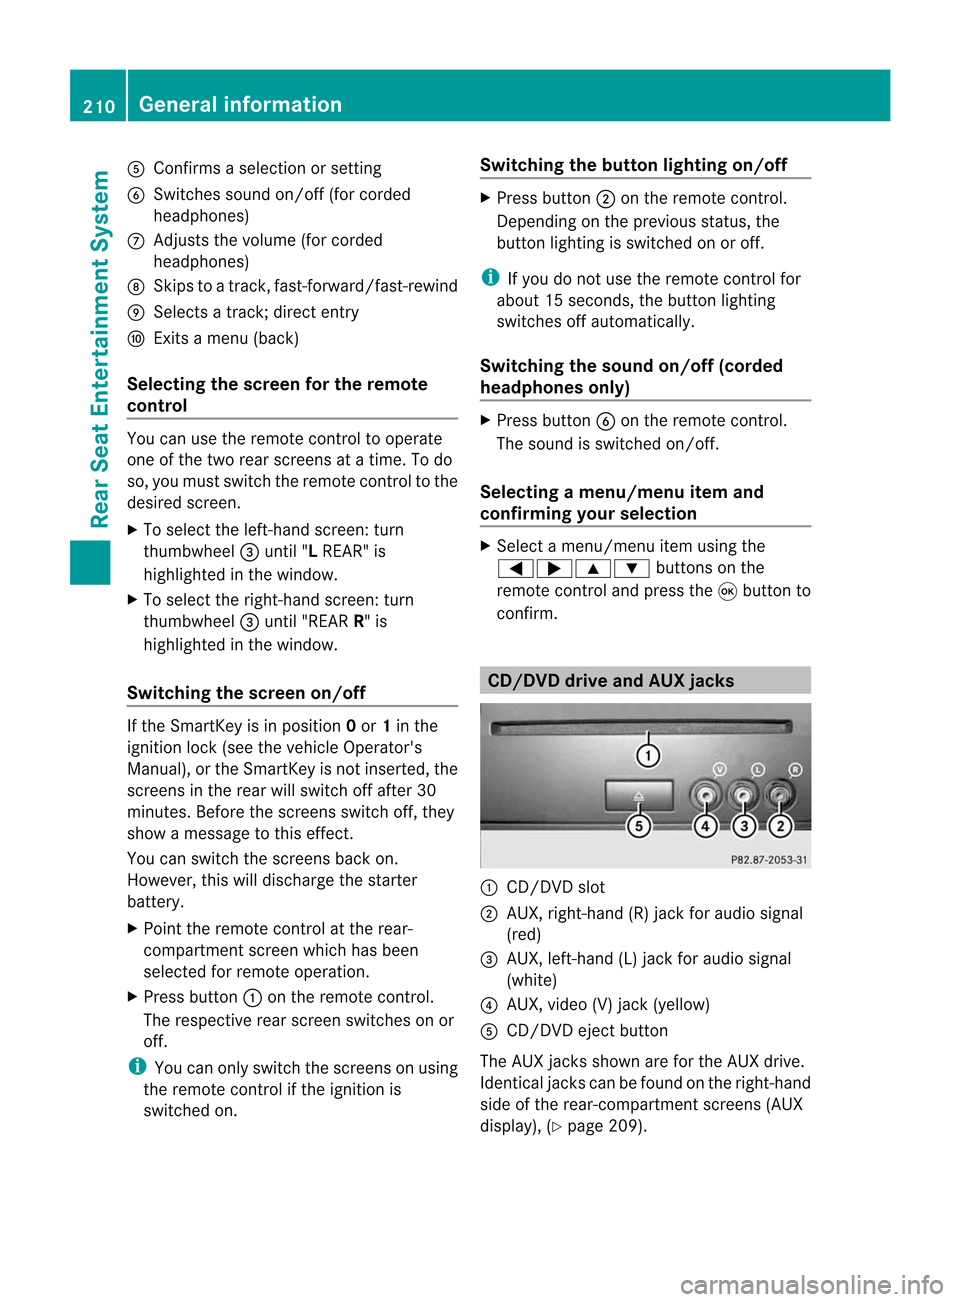
drive and AUX jacks :
CD/ DVDs lot
; AUX,righ t-han d(R) jac kfor audio signal
(red)
= AUX, left-hand (L)jack foraudio signal
(white)
? AUX, video (V)jack (yellow )
A CD/D VDeject button
The AUX jacksshown areforthe AUX drive.
Ident icaljack scan be found onthe right- hand
side ofthe rear-com partmentscreen s(AUX
display ),(Y page 209). 210
General
informationRear
Seat
Entert ainment System
Page 213 of 234
Cord
lessheadphones
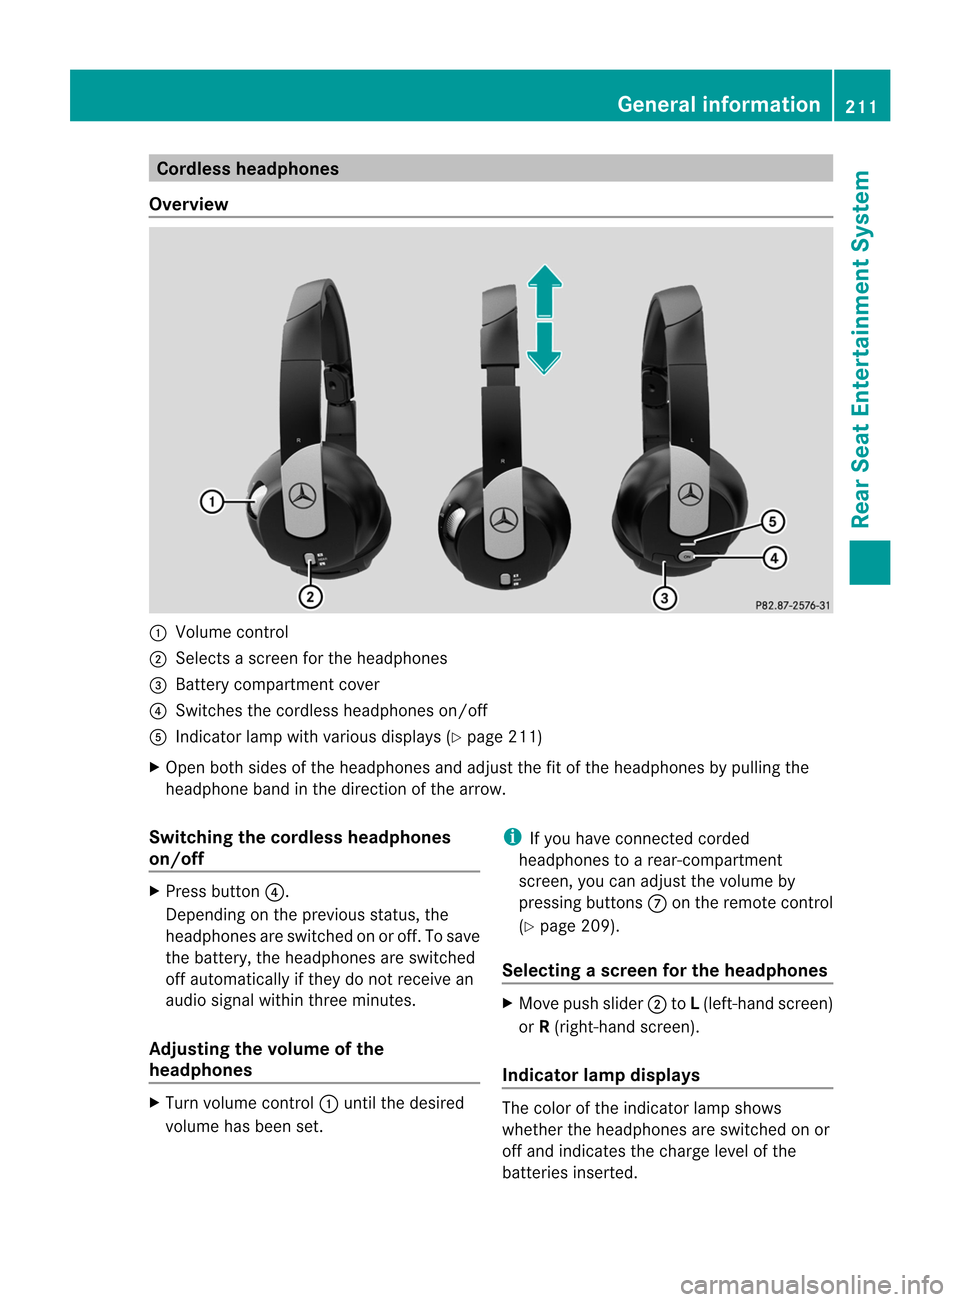
Over view :
Volum econtro l
; Select sas cree nf or the headphones
= Batt erycompart mentcover
? Switches thecordless headphones on/off
A Indicat orlamp withvarious displays(Ypage 211)
X Open bothsides ofthe headphones andadjust thefitofthe headphones bypulling the
headphone bandinthe direction ofthe arrow.
Switching thecordless headphones
on/off X
Press button ?.
Dependin gonthe previous status,the
headphones areswitched onoroff. Tosave
the battery, theheadphones areswitched
off automatically ifthey donot receive an
audio signal within threeminutes.
Adjust ingthe volume ofthe
headp hones X
Turn volume control: until thedesired
volume hasbeen set. i
Ifyou have connected corded
headphones toarear-com partmen t
screen ,you can adjust thevolume by
pressing buttonsC onthe remote control
(Y page 209).
Selecting ascree nfor theh eadp hones X
Mov epush slide r; toL(lef t-han dscree n)
or R(rig ht-hand scree n).
Ind icat orlam pdispla ys The
color ofthei nd icat orlamp shows
whet hertheh eadp honesare swit ched on or
off and indicat esthec harge leve lofthe
bat teries inserted. Gener
alinfor mation
211RearS
eatE
nter
tai nme
nt
Syste m Z
Page 214 of 234
LED
disp lay St
atus Green The
batteries arefine. Red The
batteries arealmos t
disc harge d. Lit
con tinuous
ly The
headph onesareswit ched
on and connected toas cree n. Fla
shing The
headph ones are
sea rchi ngfor the connecti on
to as cree n. No
displ ay
(d ark) The
headph ones areswitched
off orthe batterie sare
di scha rged. Co
nne cting additi onalheadpho nes You
canconnect oneadditiona lset ofcord ed
hea dph ones toeach ofthe two rearscree ns
(Y page 209). Thesocke tisd esigned for
headphones witha3.5mm stereo jackplug
and animpedance of32 ohms. Changing
batteries
Notes Batteries
arerequired forthe remote control
and forthe two sets ofcordless headphones. G
WARNING
Keep thebatteries outofthe reach of
children. Consultadoctor immediately ifa
child should swallowabattery.
Do not dismantle, short-circuitorburn a
battery. H
Environmental
note
Dispose ofdischarged batteriesinan
environment allyresponsible manner. On
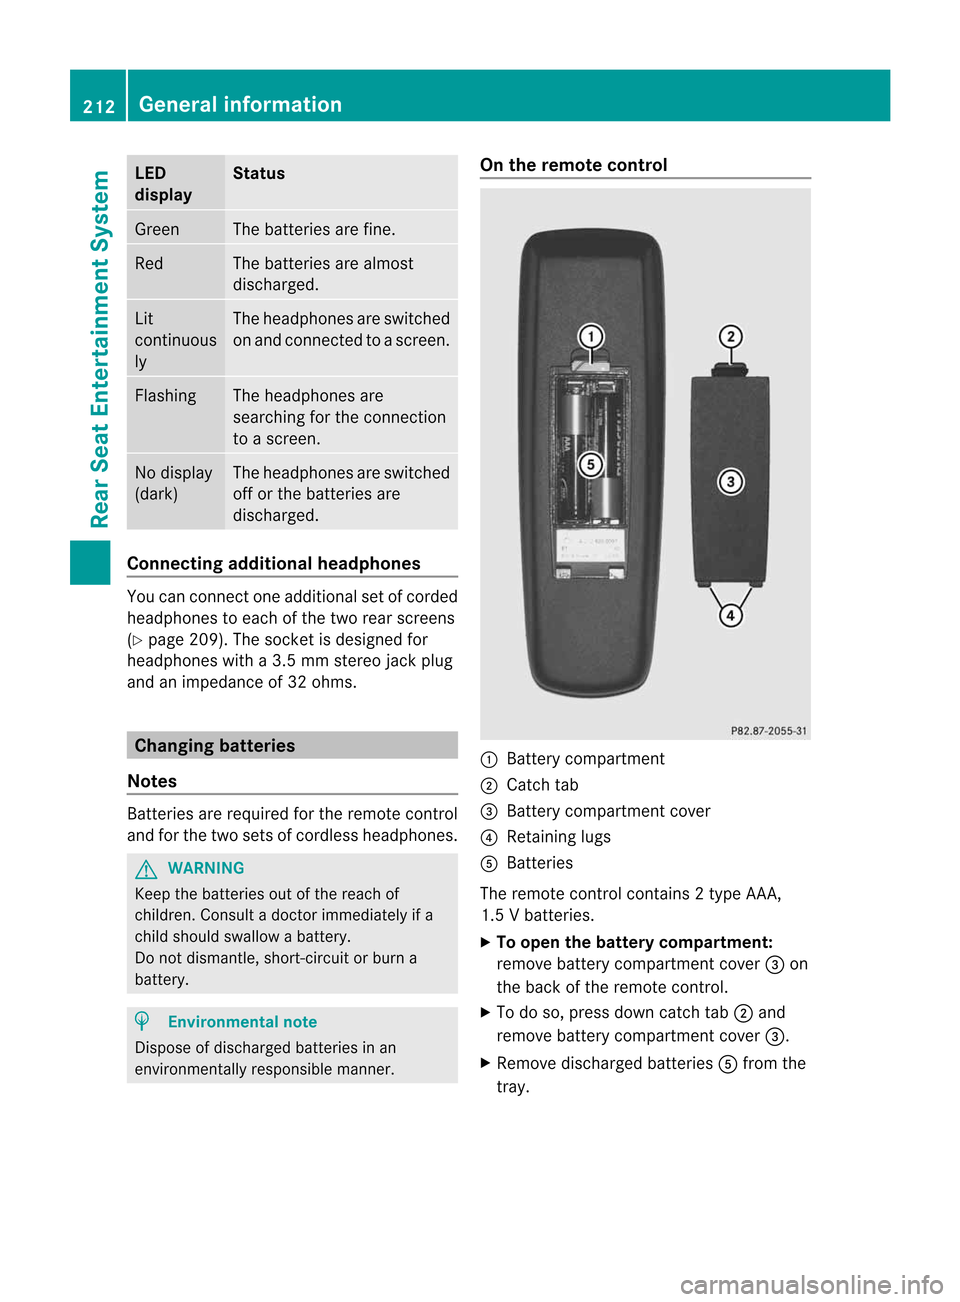
the remote control :
Battery compartment
; Catch tab
= Battery compartment cover
? Retaining lugs
A Batteries
The remote controlcont ains 2type AAA ,
1.5 Vbatteries.
X To open thebatter ycompart ment:
remove batterycompartment cover=on
the back ofthe remote control.
X To do so, press downcatch tab;and
remove batterycompartment cover=.
X Remove discharged batteriesAfrom the
tray. 212
General
informat ionRear
Seat
Entertainment System
Page 215 of 234

X
Insert thenew batteries. Observethe
pola ritymarkings onthe batteries and
battery compartment whendoing so.
Left-hand battery:thepositive pole(+)
must faceupwards.
Rig ht-hand battery: thepositive pole(+)
must facedownwa rds.
X To clo sethe battery compartment:
insert battery compartment cover=
starting withretaining lugs? into the
battery compartment andallow catch
tab ;toengage inpla ce.
On the cordle ssheadphones The
battery compartment coverislocated on
the left head phone. :
Battery compartment cover
The cordless headphones contain 2type AAA,
1. 5Vb atte rie s.
X To ope nthe bat tery com partme nt:fli p
bat tery compar tmentc over : upwar ds.
As you doso, holdthe left-han dside ofthe
head phonesa sshown topre ven tthe
batteries fromfalling out.
X Remove thedischarged batteriesfromthe
tray.
X Insert thenew batteries. Observethe
polarity markings onthe batteries and
battery compartmen twhen doing so.
Left- hand battery: thepositive pole(+)
must faceupwa rds. Right-hand
battery:thepositive pole(+)
must facedownwards.
X To close thebatt erycompart ment:
press battery compartmen tcover
downwards untilitengages intoplace.
If the batteries havebeen inserted
correct ly,the indicator lampwilllight up
green whentheheadphones areswitched
on. Basic
functions Using
headph ones
You canusethecordless headphones
suppli edand/or uptotwo sets ofcorded
headphones connected tothe corresponding
jack ofthe rear-compart mentscreens
(Y page 209).
Inform ationon:
R switching thecordless headphones on/off
R adjusting thevolume ofthe headphones
R selecting ascreen forthe headphones
can befound inthe Cordless headphones
section (Ypage 211). Using
themain loudspeakers
This funct ionisavaila bleinconj unction with
COMAND.
You canusethevehicle loudspea kersto
listen toad isc inserted inthe rear-
compartmen tdrive. Todo so, atlea stone of
the rear-compa rtmentscreens mustbeset to
disc mode.
X To set using COMA ND:press, for
exampl e,the $ function buttonto
swi tch onanaudio mode.
X Select Audio by
sliding ZVtheCOMAND
controller andpress Wtoconfirm.
The Audi omenu appears.
X Select RearAudio by
turning cVdthe
COMAND controller andpress Wto
confirm. Basic
functio ns
213Rear SeatEntertainment System Z
Page 216 of 234
i
The headphones' volumesettingdoes not
affect themain loudspeakers. Adjust
ingthe sound settings
You canselect thesound settings inthe audio
CD/D VD/MP3, video DVDandAUX modes.
X Switc honano perating mode(e.g.audio
CD mode) (Ypage 217).
X Select Treble or
Bass using
the :=; buttonsonthe remote
cont roland press the9button toconf irm.
An adjustmen tscal ea ppears.
X Sel ect asetti ngusing the 9:
bu ttons andpressthe 9button toconfi rm. Multi
pleusers
Simul taneoususeofthe rear-
co mpartment discdrive The
two rear-comp artmentscree nscan be
ope rate dalmost entir elyi nd epe ndentl yfrom
one another. However,there canbeaconfl ict
in some menusifthe two scree nsare used
sim ultaneo usly.
If the rear-comp artmentdisc drive isbei ng
us ed for both scree nssim ultaneo usly,
sel ecting certainmenu sorsetti ngs onone of
the scree nsalso affe ctsthe othe rscree n.
The followi ng functi onsaffectboth scree ns:
R cha nging play ba ck opti ons
R sel ecting atrack (fromat rack list or folder)
R us ing the play ,p ause and stopfunctio ns
R fast for wa rding/r ewind ing orscro lling
R cal ling up the DVD menu andnavigati ng
wi thi nit
R setting thelangua ge,subtitles andcamera
angle
R calling upinteract iveDVD content The
followi ngfunction saffect onlyone
screen:
R audi oand video function sasw ellaspicture
settings
R switching betweenfullscreen andthe
menu
Switching betweenoperating modes When
youexit anoperating mode(e.g.audio
CD mode), thecurrent settingissaved. Ifyou
call upthis operating modeagainlate r,th ere
are two poss ibilities:
R theo per atin gmodeh asbeen chang edon
th eo ther scree n.
R theo per atin gmodeh asnotb een changed.
In the first case, theoperatin gmode appears
as itis on the other screen .
In the secon dcase, thesett ingappears onthe
screen asitwas when youlast exitedthe
operatin gmode. Pictur
esettings
Overview You
canselect thesesettings invideo DVD
and AUX mode. Instruct ions forAUX mode
are detailed later(Y page 228).
Adju sting thebright ness,contra stand
color X
Switc honvideo DVD mode (Ypage 221).
X To show themenu: pressthe9button
on the remot econtrol.
or
X Select (Ypage 188)Menu while
the
navigation menuisshown andpress the
9 button tocon firm.
X Select DVD-Vid eo using
the :=; buttonsand press the
9 button tocon firm. 214
Ba
sic functionsRear
Seat
Entert ainment System
Page 217 of 234

Exam
ple: TV mod e
: Brightne ss,contra stand color
; Pictur eform ats
X Sel ect Bright ness ,
Con trast or
Col or us
ing the 9: buttons andpressthe
9 button toconfi rm.
An adjus tment scaleap pe ars.
X Sel ect asetti ngusing the 9:
bu ttons andpressthe 9button toconfi rm.
Ch ang ingt he picture format X
To sho wthemen u:pre ssthe 9button
on the rem otecontro l.
or
X Sel ect (Ypage 188)Me nu wh
ilet he
nav igati on menu issho wnand pressthe
9 button toconfi rm.
X Sel ect DVD-Video us
ing
the :=; buttons andpressthe
9 button toconfi rm.
The dotinf ront ofone ofthe menu items
16: 9Optimi zed ,
4:3 or
Wid escreen ind
icates the form atcur rentl yselecte d.
X Sel ect aform atusing the 9:
bu ttons andpressthe 9button toconfi rm. Sys
tem settin gs Note
Yo uc an adjus talmost allsyst emsettings
indiv idually foreach screen witho utaffec ting the
otherscr een. Youmakethese set tings
using theremo tecon trol (Y page 209). Selecting
thed isplay langu age
X Selec tSyst em using
the9=;
butt onon the remo tecon trol and press
9 tocon firm .
You seethesyst emmen uonthe selec ted
rear screen.
X Selec tSett ings with
the: buttonand
press the9butt ontocon firm .
X Selec tLang uage using
the9:
butt onsand press the9butt ontocon firm .
The listoflanguages appears.The#dot
indic ates thecurr entsetting.
X Selec talanguage usingthe9:
butt onsand press the9butt ontocon firm .
The Rear SeatEnter tain men tSyst em
act ivat esthe selec tedlanguage. Switch
ingthed isplay design
X Selec tSett ings with
the: buttonand
press the9butt ontocon firm .
X Selec tDay Mode ,
Nigh tMode or
Auto matic using
the9: buttons
and press the9butt ontocon firm .
The dotindic ates thecurr entsetting. Design Expla
nation Day
Mode The
display isset
perm anentlytoday
design . Nigh
tMode The
display isset
perm anentlytonigh t
design . Auto
matic The
display design
chan gesdepen dingon
the vehic leinst rumen t
clust erilluminat ion. Syst
emsett ings
215RearS
eat Enter tainment
System Z
Page 218 of 234
Setting
thebrightness
X Select Settings with
the: button and
press the9button toconf irm.
X Select Brightness using
the9:
buttons andpress the9button toconf irm.
As calea ppears.
X Adju stthe brightne ssusing the 9:
bu ttons andpressthe 9button toconfi rm.
The brightne ssbarm oves upordown. The
picture becomes lighterordarker in
accordanc ewiththe scale. Showing/hiding
thepictur e
X To hide thepictur e:select Display Off in
the system menuusingthe:;
button sonthe remote controland press
the 9button toconf irm.
The picture ishidden.
X To display thepictur e:press the9
button . Audio
CD/DVDand MP3 mode Safety
note G
WARNIN
G
The RSE CD/D VDplayer isaC lass 1laser
prod uct.There isad anger ofinvisible laser
radiation whenyouopen ordamage thecover.
Do not remove thecover. TheRSE CD/DVD
play erdoes notcont ainany parts which can
be serviced bythe user. Forsafety reasons,
have anynecessary serviceworkperformed
by qual ified personnel. General
informat ion
You willfind information onthe following
topics inthe Audio section:
R notes onCDs/DV Ds(Ypage 165)
R notes onMP3 mode (Ypage 164)
R notes oncopyright (Ypage 165) Inserting
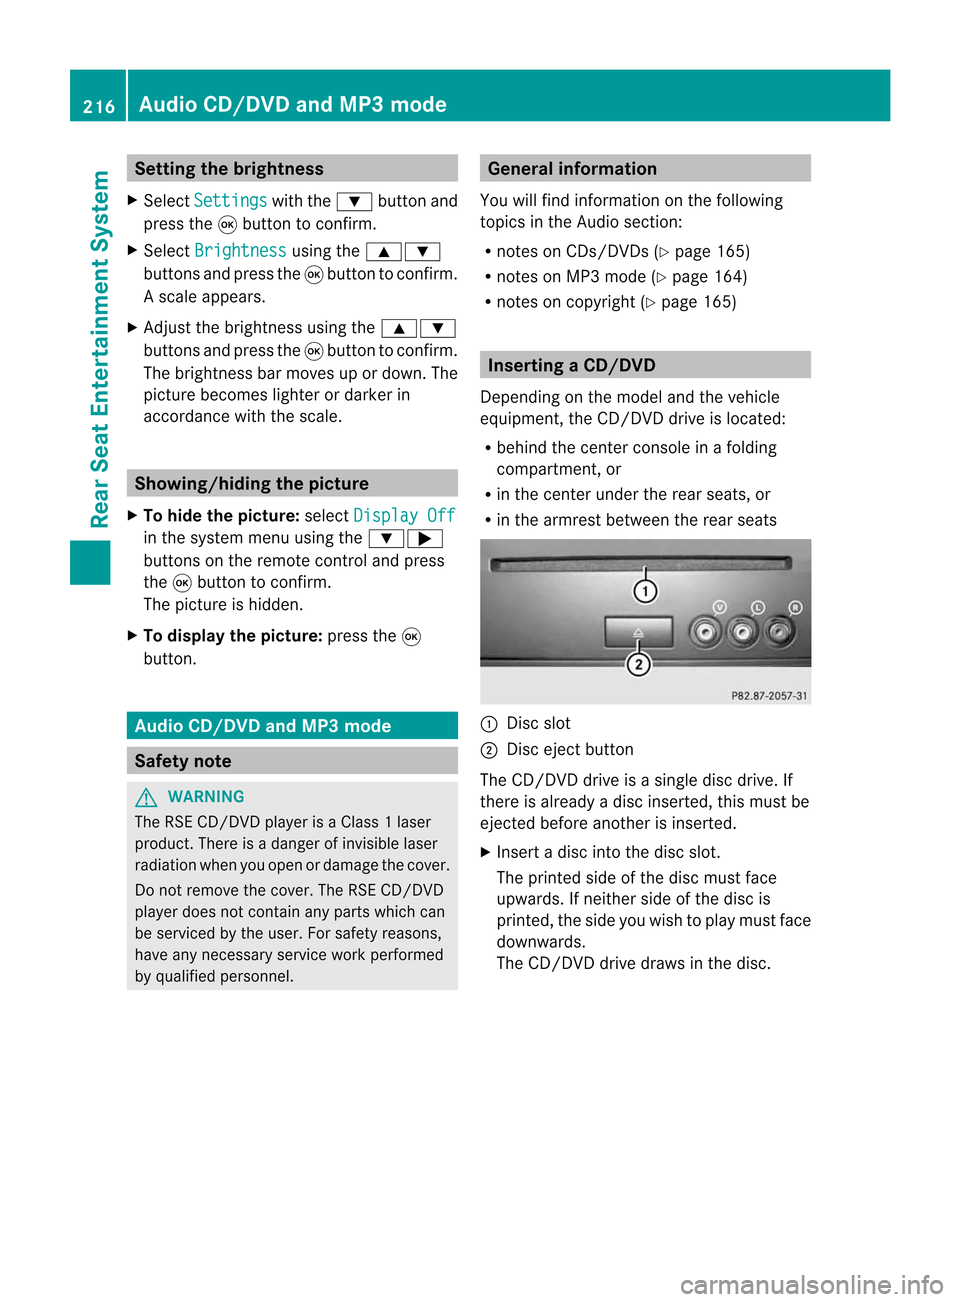
aCD/DVD
De pen dingo nthe mo del and thev ehicle
equip ment,th eC D/DVD drive isloc ated:
R beh indt he center console inaf oldin g
co mpa rtmen t,or
R in thec enter und erther ears eat s,or
R in thea rmres tbetween therear seats :
Disc slot
; Disc ejectbutton
The CD/D VDdrive isas ingle discdrive. If
ther eisa lready adisc insert ed,this must be
ejec tedbefore anotherisinsert ed.
X Inser tadiscintot he disc slot.
The print edside ofthe disc must face
upwards. Ifneit her side ofthe disc is
print ed,the side youwish toplay must face
downwards.
The CD/D VDdrive draws inthe disc. 216
Audio
CD/DVDand MP3 modeRear
Seat
Entert ainment
Syst em
Page 219 of 234

The
CD/D VDdrive plays thedisc:
R ifit has been insert edcorrec tlyand isa
permissible disc,and
R after youhave switched ondisc mode
(audio CD/audio DVD/MP3 mode)
(Y page 217).
Data onanMP3 CDfirst needs tobe loaded
by the drive. Loading maytake some time,
depending onthe number offolders and
track s. Removing
aCD/DV D
X Press theþ button.
The drive ejec ts thed isc.
X Tak ethe disco utofthes lot.
If you donot takethe disc outofthe slot,
the drive willdraw itin again autom atically
aft eras hor twhile. Switching
toaudio CD,audio DVDor
MP3 mode
X Insert aCD/DV D(Ypage 216).
The Rear SeatEntertainment Systemloads
the inserted disc.
X Select Disc in
the menu usingthe
9=; buttonsonthe remote
cont roland confirm bypressing the9
button.
The corresponding modeisswitched on.
The Rear SeatEntertainment Systemplays
the disc. Example:
audioCDmode
: Type ofdata medium _
; Track number
= Track name (onlyifstored onthe disc as
CD text )
? Track time
A Graphic timeandtrack displa y
B Current playback settin gs(no symbol for
"Normal tracksequence")
C Toset the bass
D Toset the treble
E Disc name (ifstored onthe disc asCD
text )
F Tocall upthe track list
G Play back options Example:
audioDVDmode
: Type ofdata medium ü
; Track number
= Track name (ifstored onthe disc)
? Track time
A Graphic timeandtrack displa y
B Current playback settin gs(no symbol for
"Normal tracksequence") Audio
CD/DVD andMP3 mode
217RearSeatEntertainment System Z
Page 220 of 234
C
Toset the bass
D Toset the treble
E Disc name (ifstored onthe disc)
F Tocall upthe track list
G Stop funct ion
H Pause function
I Playba ckoptions Example:
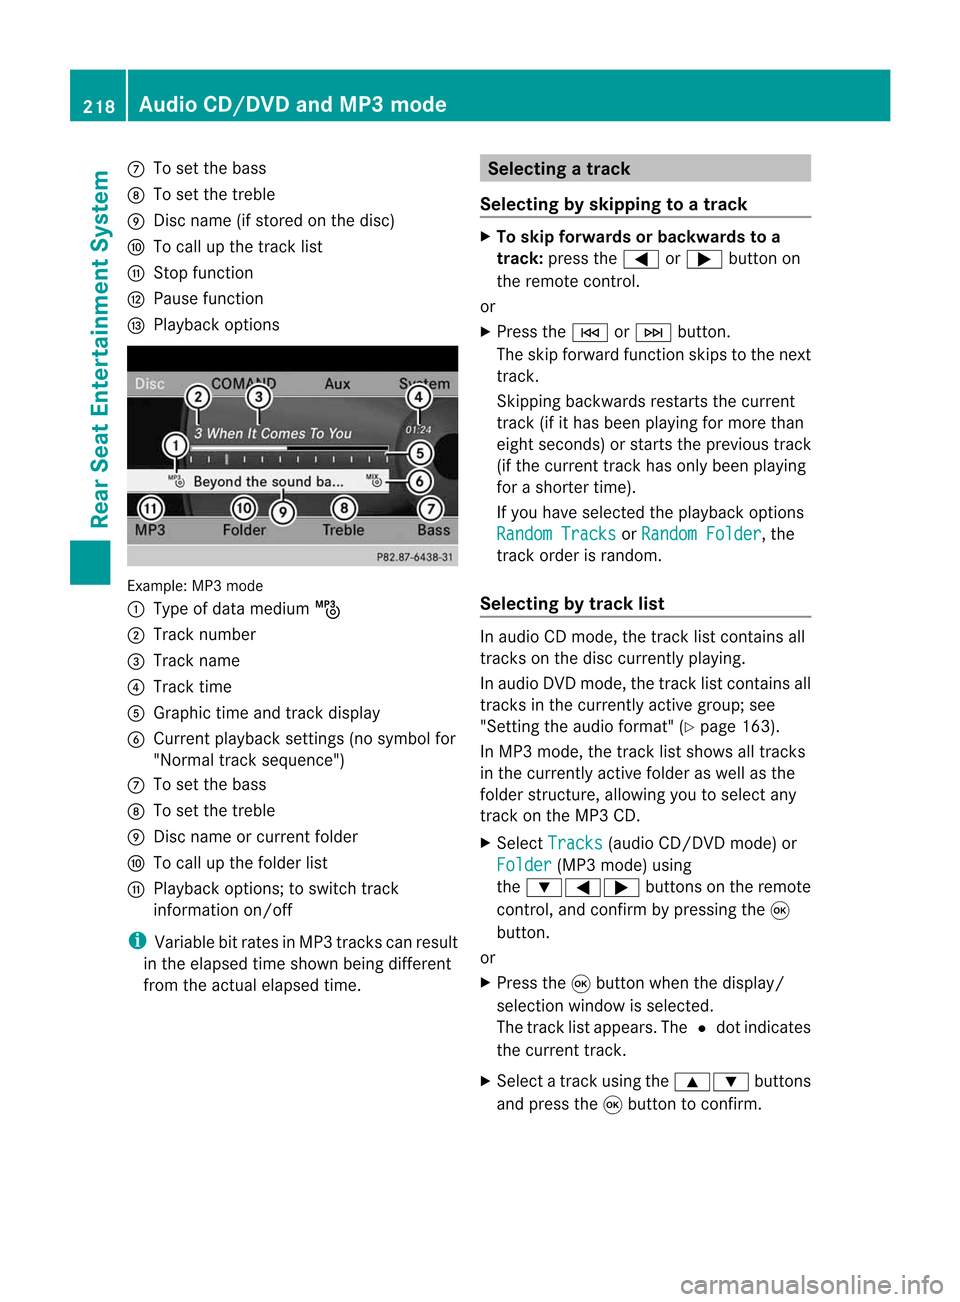
MP3mode
: Type ofdata medium þ
; Track number
= Track name
? Track time
A Graphic timeandtrack display
B Current playbacksett ings (nosymbol for
"Normal tracksequence")
C Toset the bass
D Toset the treble
E Disc name orcurren tfolder
F Tocall upthe folder list
G Playba ckoptions; toswitch track
inform ationon/of f
i Variable bitrates inMP3 track scan result
in the elapsed timeshown beingdifferent
from theactual elapsed time. Selecting
atrac k
Se lecti ng byskippin gtoat rack X
To skipforwa rds orbac kwards toa
trac k:pre ssthe = or; button on
the rem otecontr ol.
or
X Pre ssthe E orF button.
Th es kipf orwa rdfunctio nskip stot he next
tra ck.
Skip ping backwa rdsrestartsthe current
tra ck (ifi th as been playin gfor mor ethan
eigh tsecon ds)orstart sthe previous track
(if the curren ttrack hasonly been playing
for ashorter time).
If you have selected theplayba ckoptions
Random Tracks or
Random Folder ,t
he
track order israndom.
Sel ecting bytrack list In
audio CDmode, thetrack listcontains all
tracks onthe disc currently playing.
In au dio DVD mode, thetrack listcontains all
tracks inthe currently activegroup;see
"Setting theaudio format" (Ypag e163).
In MP3 mode, thetrack listshow salltracks
in the currently activefolderasw ellasthe
folder structure,allow ingyou toselect any
track onthe MP3 CD.
X Select Tracks (au
dio CD/DVD mode)or
Folder (MP3
mode) using
the :=; buttonsonthe remote
cont rol,and confirm bypressing the9
button.
or
X Press the9button whenthedispla y/
selection windowisselected.
The track listappea rs.The #dot indicates
the current track.
X Select atrack using the9: buttons
and press the9button toconfirm. 218
Audio
CD/DVD andMP3 modeRear
Seat
Entertainment System