key MERCEDES-BENZ E-Class WAGON 2016 W213 User Guide
[x] Cancel search | Manufacturer: MERCEDES-BENZ, Model Year: 2016, Model line: E-Class WAGON, Model: MERCEDES-BENZ E-Class WAGON 2016 W213Pages: 350, PDF Size: 6.71 MB
Page 21 of 350
Setting the timesee also Digital Operator's Man-
ual .................................................. 214
Settings
Factory (on-board computer) ......... 190
On-board computer ....................... 190
SETUP (on-board computer) .............190
Side impact air bag .............................5 6
Side marker lamp (display mes-
sage) ................................................... 191
Side windows
Cleaning ......................................... 268
Important safety information ......... 104
Opening/closing (all) ..................... 105
Opening/closing (front) ................. 105
Problem (malfunction) ................... 106
Resetting ....................................... 105
SIRIUS services
see also Digital Operator's Man-
ual .................................................. 214
Sliding sunroof
Important safety notes .................. 106
Opening/closing ............................ 107
Problem (malfunction) ................... 111
Resetting ....................................... 108
see Panorama roof with power
tilt/sliding panel
SmartKey
Changing the battery ....................... 93
Changing the programming ............. 92
Checking the battery ....................... 93
Display message ............................ 191
Door central locking/unlocking ....... 90
Important safety notes .................... 90
Loss ................................................. 94
Mechanical key ................................ 92
Overview .......................................... 90
Positions (ignition lock) ................. 137
Problem (malfunction) ..................... 94
Starting the engine ........................ 140
SMS
see also Digital Operator's Man-
ual .................................................. 214
Snow chains ...................................... 291
Sockets
Center console .............................. 251
General notes ................................ 251
Luggage compartment ................... 251 Rear compartment ......................... 251
Spare wheel
Stowing .......................................... 330
Special seat belt retractor .................. 69
Specialist workshop ............................ 31
Speed, controlling
see Cru ise co
ntrol
Speedometer
In the Instrument cluster ................. 37
Segments ...................................... 188
Selecting the unit of measure-
ment .............................................. 190
see Instrument cluster
SPORT handling mode
Activating/deactivating (AMG
vehicles) .......................................... 82
Warning lamp ................................. 207
Standing lamps
Display message ............................ 191
Switching on/off ........................... 121
Start/stop function
see ECO start/stop function
Starting (engine) ................................ 139
STEER CONTROL .................................. 86
Steering (display message) .............. 201
Steering Assist and Stop&Go Pilot
(DISTRONIC PLUS)
Activating/deactivating ................. 190
Display message ............................ 191
Steering assistant STEER CON-
TROL
see STEER CONTROL
Steering wheel
Adjusting (electrically) ................... 117
Button overview ............................... 39
Buttons (on-board computer) ......... 189
Important safety notes .................. 117
Paddle shifters ............................... 144
Steering wheel heating .................. 117
Storing settings (memory func-
tion) ............................................... 117
Steering wheel (cleaning instruc-
tions) .................................................. 268
Steering wheel heating
Switching on/off ........................... 117
Steering wheel paddle shifters ........ 144
Stopwatch (RACETIMER) ................... 190
Index19
Page 24 of 350
Towing a trailerCleaning the trailer tow hitch ......... 268
ESP
®(Electronic Stability Pro-
gram) ...............................................8 4
Towing away
Important safety guidelines ........... 281
Installing the towing eye ................ 282
Removing the towing eye ............... 283
With both axles on the ground ....... 283
With the rear axle raised ................ 283
Towing eye ......................................... 270
Traffic reports
see also Digital Operator's Man-
ual .................................................. 214
Traffic Sign Assist
Activating/deactivating the warn-
ing function .................................... 190
Function/notes ............................. 176
Important safety notes .................. 177
Instrument cluster display ............. 177
Transfer case ..................................... 145
Transmission
see Automatic transmission
Transmission position display ......... 143
Transmission position display
(DIRECT SELECT lever) ...................... 143
Transporting the vehicle .................. 283
Trim pieces (cleaning instruc-
tions) .................................................. 268
Trip computer (on-board com-
puter) .................................................. 190
Trip odometer
Calling up ....................................... 190
Resetting (on-board computer) ...... 190
Trunk
Emergency release ........................ 103
Important safety notes .................... 96
Locking separately ......................... 102
Opening/closing (automatically
from inside) ................................... 101
Opening/closing (automatically
from outside) ................................... 98
Opening/closing (from outside,
HANDS-FREE ACCESS) .................... 99
Opening/closing (manually from
outside) ............................................ 97 Trunk lid
Display message ............................ 191
Opening dimensions ...................... 344
Trunk load (maximum) ...................... 344
Turn signals
Changing bulbs (front) ................... 125
Display mes sage ............................ 191
Sw
itching on/off ........................... 121
Two-way radio
Frequencies ................................... 334
Installation ..................................... 334
Transmission output (maximum) .... 334
Type identification plate
see Vehicle identification plate
U
UnlockingEmergency unlocking ....................... 96
From inside the vehicle (central
unlocking button) ............................. 95
V
Vanity mirror (in the sun visor) ........ 252
Vehicle
Correct use ...................................... 32
Data acquisition ............................... 33
Display message ............................ 201
Equipment ....................................... 28
Individual settings .......................... 190
Limited Warranty ............................. 32
Loading .......................................... 298
Locking (in an emergency) ............... 96
Locking (SmartKey) .......................... 90
Lowering ........................................ 313
Maintenance .................................... 29
Parking for a long period ................ 153
Pulling away ................................... 140
Raising ........................................... 310
Reporting problems ......................... 32
Securing from rolling away ............ 310
Towing away .................................. 281
Transporting .................................. 283
Unlocking (in an emergency) ........... 96
Unlocking (SmartKey) ...................... 90
Vehicle data ................................... 344
Vehicle data ....................................... 344
22Index
Page 27 of 350
Introduction
Theprinted Operator's Manual provides infor-
mation about the safe operation of your veh i-
cle. The Digital Operator's Manual addition-
ally describe s further functions and equip-
ment installed inyour vehicle. The vehicle
functions and functions of Audio 20 or
COMAND are describe d in the Digital Opera-
tor's Manual. You can call up the Digital Oper-
ator's Manual via Audio 20 or COMAND.
iYou willnot incur any costs when calling
up the Digital Operator's Manual. The Dig-
it al Operator's Manual works without con-
necting to the Internet.
There are three ways to access the topics of
the Digital Operator's Manual:
RVisual search
The visual search allowsyou to explore your
vehicle "virtually". Starting from either the
vehicle exterior view or interior view, you
can access many of the different topics
covered bythe Digital Operator's Manual.
To access the vehicle interior section,
select the "Vehicle interior" view.
RKeyword search
The keyword search allows you to search
for a keyword byentering characters. Fur-
ther information can be found in the Digital
Operator's Manual inthe "Aud io20" or
"COMAND" section under the "Character
entry (telephony)" keyword.
RContents
You can select individ ual sect
ionsinthe
contents.
iThe Digital Operator's Manual is deacti-
vated for safety reasons while driving.
Operation
Calling up the Digital Operator's Man-
ual
XPress the Øbutton inthe center con-
sole.
The overview relating to the vehicle
appears.
XSe lect the "Operator's Manual" menu item
by turning 3or pressing 7the con-
troller.
XConfirm 7the message about the warning
and safety notes.
The basic menu for the Digital Operator's
Manual appears.
Operating the Digital Operator's Man-
ual
General notes
Please observe the information about the
operation of the controller (
Ypage 222).
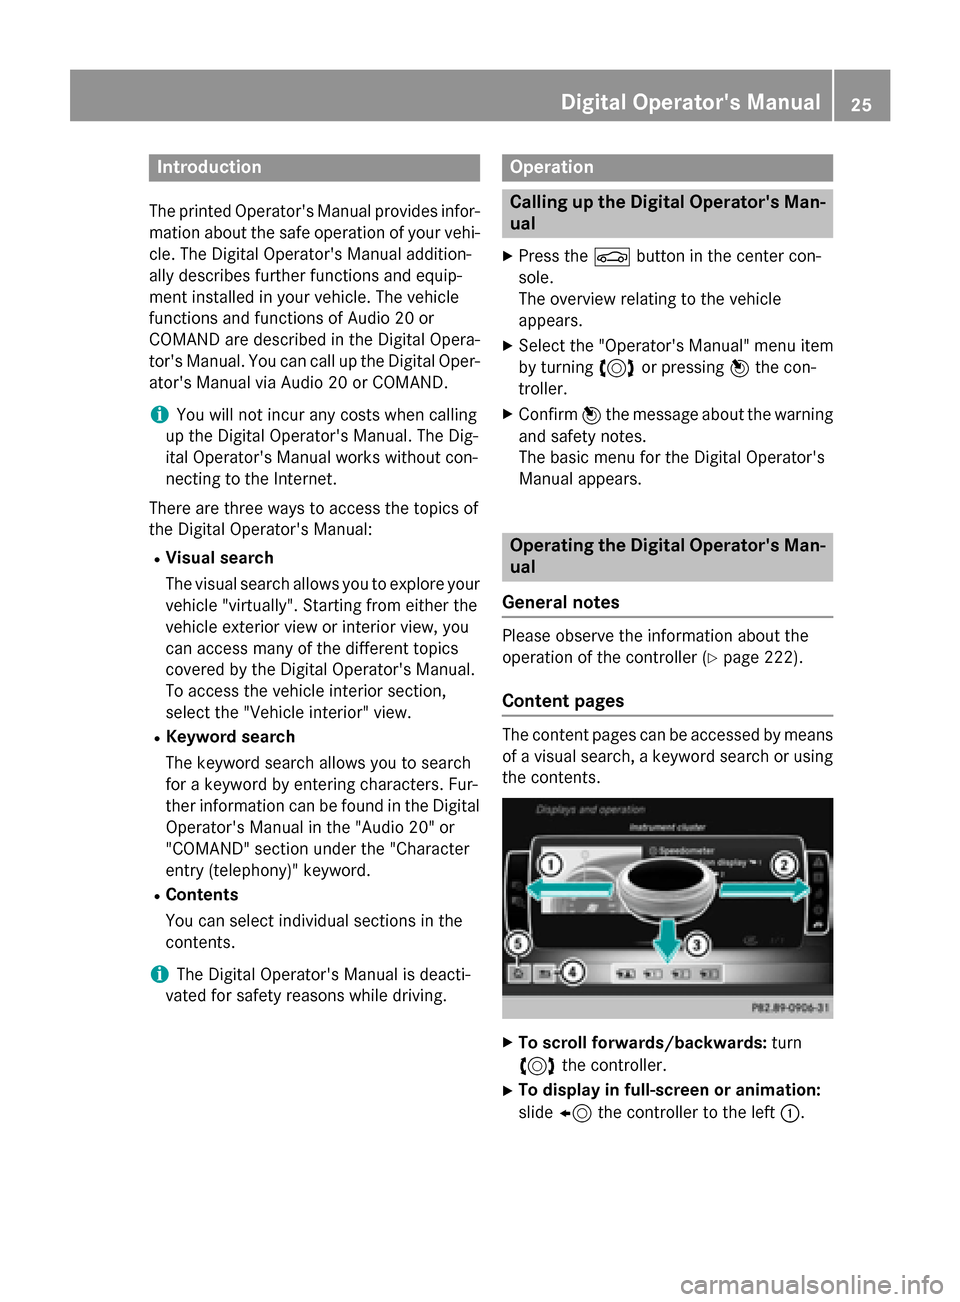
Content pages
The content pages can beaccessed bymeans
of a visual search, a keyword search or using
the contents.
XTo scroll forwards/backwa rds: turn
3 the controller.
XTo display in full-screen orani mati on:
slide 8 the controller to the left :.
Digital Operator's Manual25
Page 50 of 350
Useful information
i
This Operator's Manual describes all
models and all standard and optional equip-
ment of your vehicle available at the time of
publication of the Operator's Manual.
Country-specific differences are possible.
Please note that your vehicle may not be
equipped with all features described. This
also applies to safety-related systems and
functions.
iRead the information on qualified special-
ist workshops (
Ypage 31).
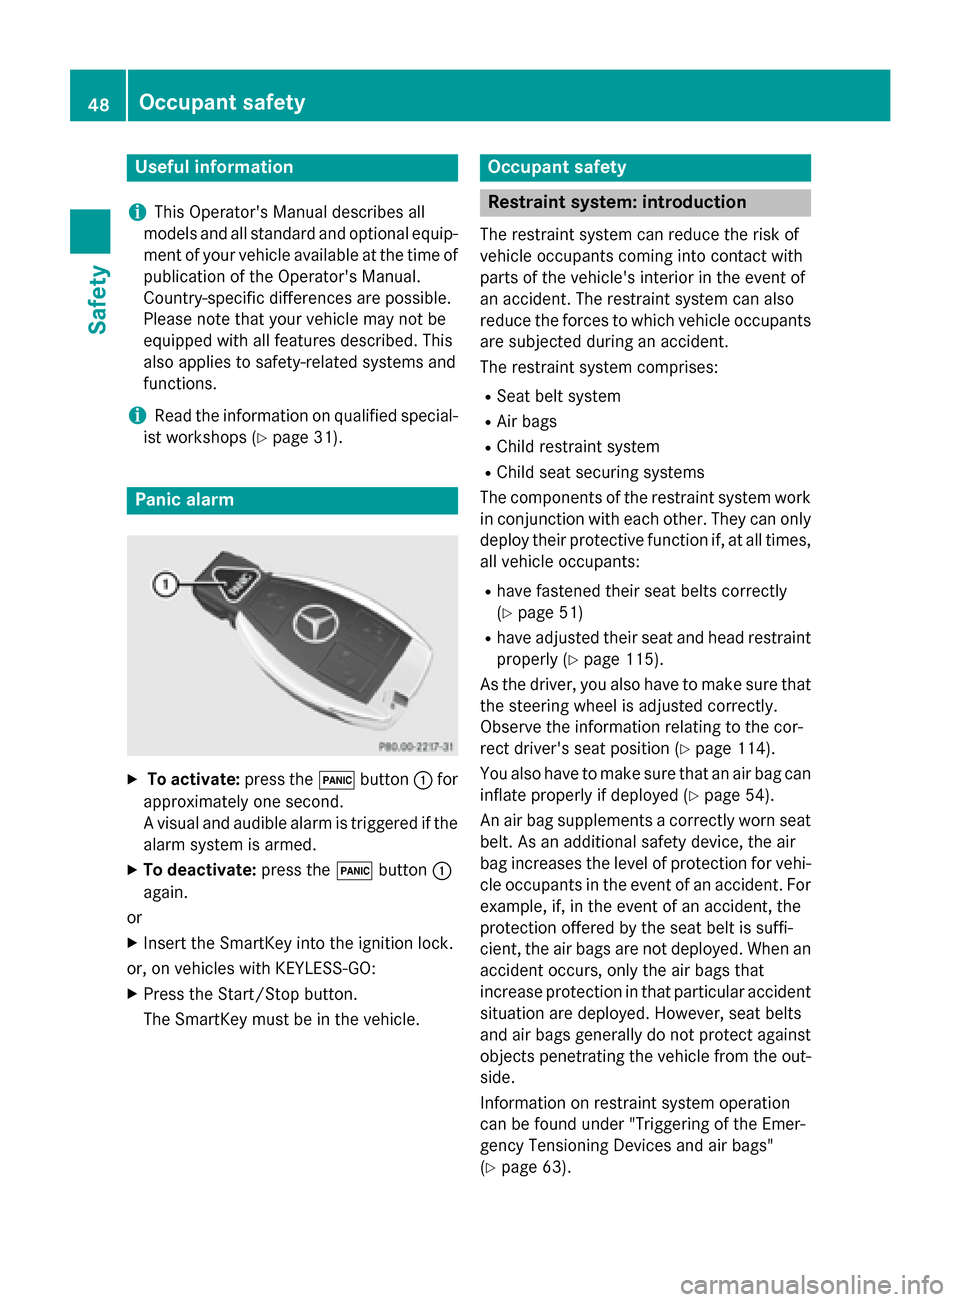
Panic alarm
XTo activate: press the!button :for
approximately one second.
A visual and audible alarm is triggered if the
alarm system is armed.
XTo deactivate: press the!button :
again.
or
XInsert the SmartKey into the ignition lock.
or, on vehicles with KEYLESS ‑GO:
XPress the Start/Stop button.
The SmartKey must be in the vehicle.
Occupant safety
Restraint system: introduction
The restraint system can reduce the risk of
vehicle occupants coming into contact with
parts of the vehicle's interior in the event of
an accident. The restraint system can also
reduce the forces to which vehicle occupants
are subjected during an accident.
The restraint system comprises:
RSeat belt system
RAir bags
RChild restraint system
RChild seat securing systems
The components of the restraint system work
in conjunction with each other. They can only
deploy their protective function if, at all times,
all vehicle occupants:
Rhave fastened their seat belts correctly
(
Ypage 51)
Rhave adjusted their seat and head restraint
properly (
Ypage 115).
As the driver, you also have to make sure that
the steering wheel is adjusted correctly.
Observe the information relating to the cor-
rect driver's seat position (
Ypage 114).
You also have to make sure that an air bag can inflate properly if deployed (
Ypage 54).
An air bag supplements a correctly worn seat
belt. As an additional safety device, the air
bag increases the level of protection for vehi-
cle occupants in the event of an accident. For
example, if, in the event of an accident, the
protection offered by the seat belt is suffi-
cient, the air bags are not deployed. When an
accident occurs, only the air bags that
increase protection in that particular accident
situation are deployed. However, seat belts
and air bags generally do not protect against objects penetrating the vehicle from the out-
side.
Information on restraint system operation
can be found under "Triggering of the Emer-
gency Tensioning Devices and air bags"
(
Ypage 63).
48Occupant safety
Safety
Page 54 of 350
When fastening the seat belt, always make
sure that:
Rthe seat belt tongue is only inserted to thebelt buckle belonging to that seat.
Rthe seat belt is tight across your body.
Avoid wearing bulky clothing, e.g. a winter
coat.
Rthe seat belt is not twisted.
Only then can the forces which occur be
distributed over the area of the belt.
Rthe shoulder section of the belt is always
routed across the center of your shoulder.
The shoulder section of the belt must not
come into contact with your neck or be
routed under your arm. Where possible,
adjust the seat belt to the appropriate
height.
Rthe lap belt passes tightly and as low down
as possible across your lap.
The lap belt must always be routed across
your hip joints and not across your abdo-
men. This applies particularly to pregnant
women. If necessary, push the lap belt
down to your hip joint and pull it tight using
the shoulder section of the belt.
Rthe seat belt is not routed across sharp,
pointed or fragile objects.
If you have such items located on or in yourclothing, e.g. pens, keys or eyeglasses,
store these in a suitable place.
Ronly one person is using a seat belt at a
time.
Infants and children must never travel sit-
ting on the lap of a vehicle occupant. In the
event of an accident, they could be crushed
between the vehicle occupant and seat
belt.
Robjects are never secured with a seat belt if the seat belt is also being used by one of the
vehicle's occupants.
Seat belts are only intended to secure and
restrain vehicle occupants. Always observe
the "Loading guidelines" for securing objects,
luggage or loads (
Ypage 238).
Fastening and adjusting the seat belts
Observe the safety notes on the seat belt
(
Ypage 50) and the notes on correct use of
seat belts (
Ypage 51).
If the center rear seat belt is being used, also
observe the information about the seat belt
for the center rear seat (
Ypage 53).
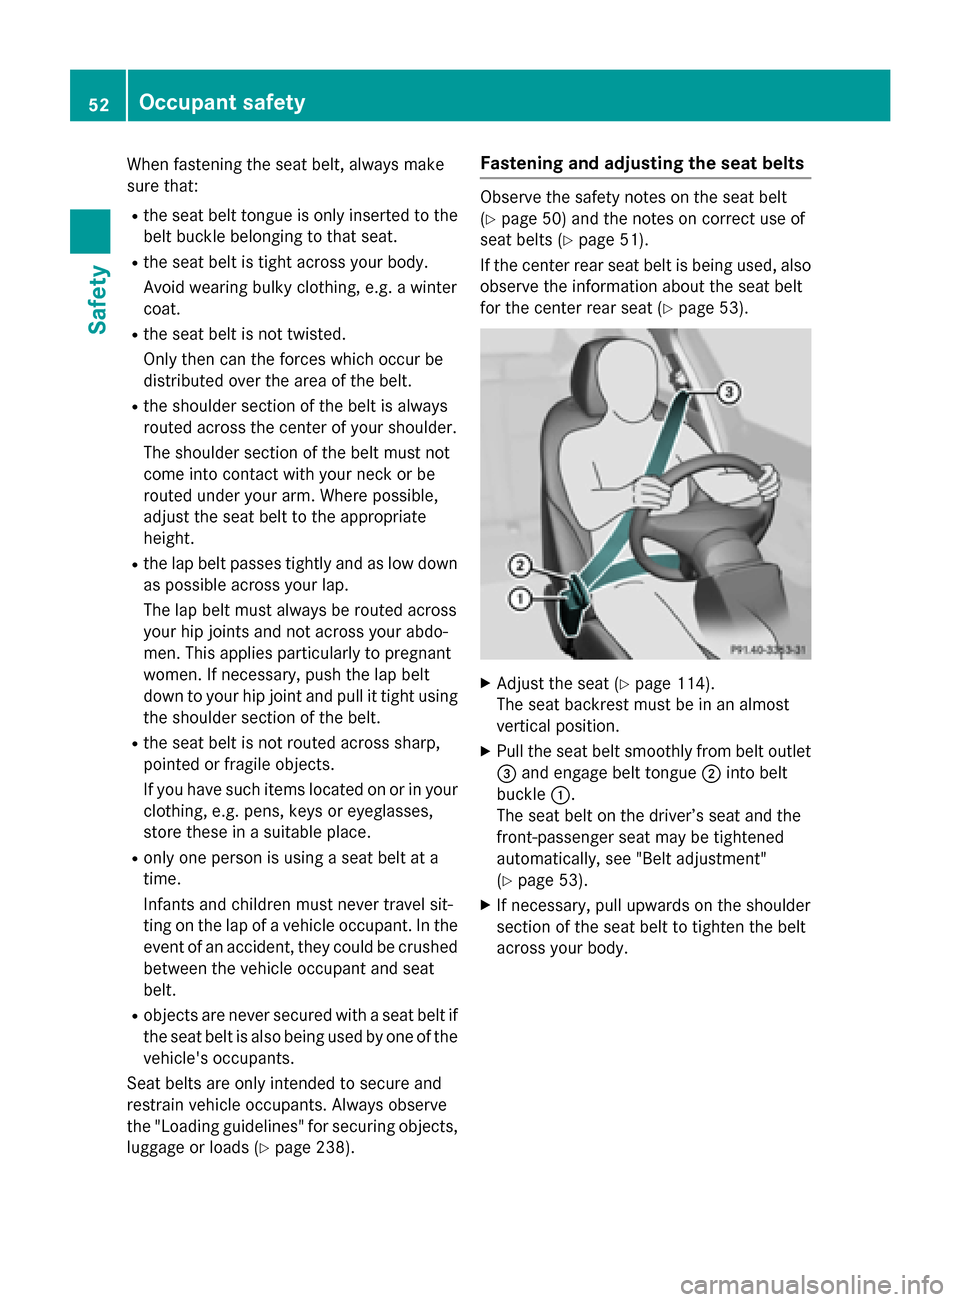
XAdjust the seat (Ypage 114).
The seat backrest must be in an almost
vertical position.
XPull the seat belt smoothly from belt outlet
= and engage belt tongue ;into belt
buckle :.
The seat belt on the driver’s seat and the
front-passenger seat may be tightened
automatically, see "Belt adjustment"
(
Ypage 53).
XIf necessary, pull upwards on the shoulder
section of the seat belt to tighten the belt
across your body.
52Occupant safety
Safety
Page 60 of 350
Occupant Classification System
(OCS)
Introduction
The Occupant Classification System (OCS)
categorizes the person in the front-passenger
seat. Depending on that result, the front-
passenger front air bag is either enabled or
deactivated.
The system does not deactivate:
Rthe side impact air bag
Rthe pelvis air bag
Rthe window curtain air bag
Rthe Emergency Tensioning Devices
Prerequisites
To be classified correctly, the front passenger
must sit:
Rwith the seat belt fastened correctly
Rin an almost upright position with their
back against the seat backrest
Rwith their feet resting on the floor, if possi-
ble
If the front passenger does not observe these
conditions, OCS may produce a false classi-
fication, e.g. because the front passenger:
Rtransfers their weight by supporting them-
selves on a vehicle armrest
Rsits in such a way that their weight is raised
from the seat cushion
If it is absolutely necessary to install a child
restraint system on the front-passenger seat,
be sure to observe the correct positioning of
the child restraint system. Never place
objects under or behind the child restraint
system, e.g. cushions. The entire base of the
child restraint system must always rest on the seat cushion of the front-passenger seat. The
backrest of the forward-facing child restraint
system must lie as flat as possible against the
backrest of the front-passenger seat.
The child restraint system must not touch theroof or be subjected to a load by the head
restraint. Adjust the angle of the seat back- rest and the head restraint position accord-
ingly.
Only then can OCS be guaranteed to function
correctly. Always observe the child restraint
system manufacturer's installation instruc-
tions.
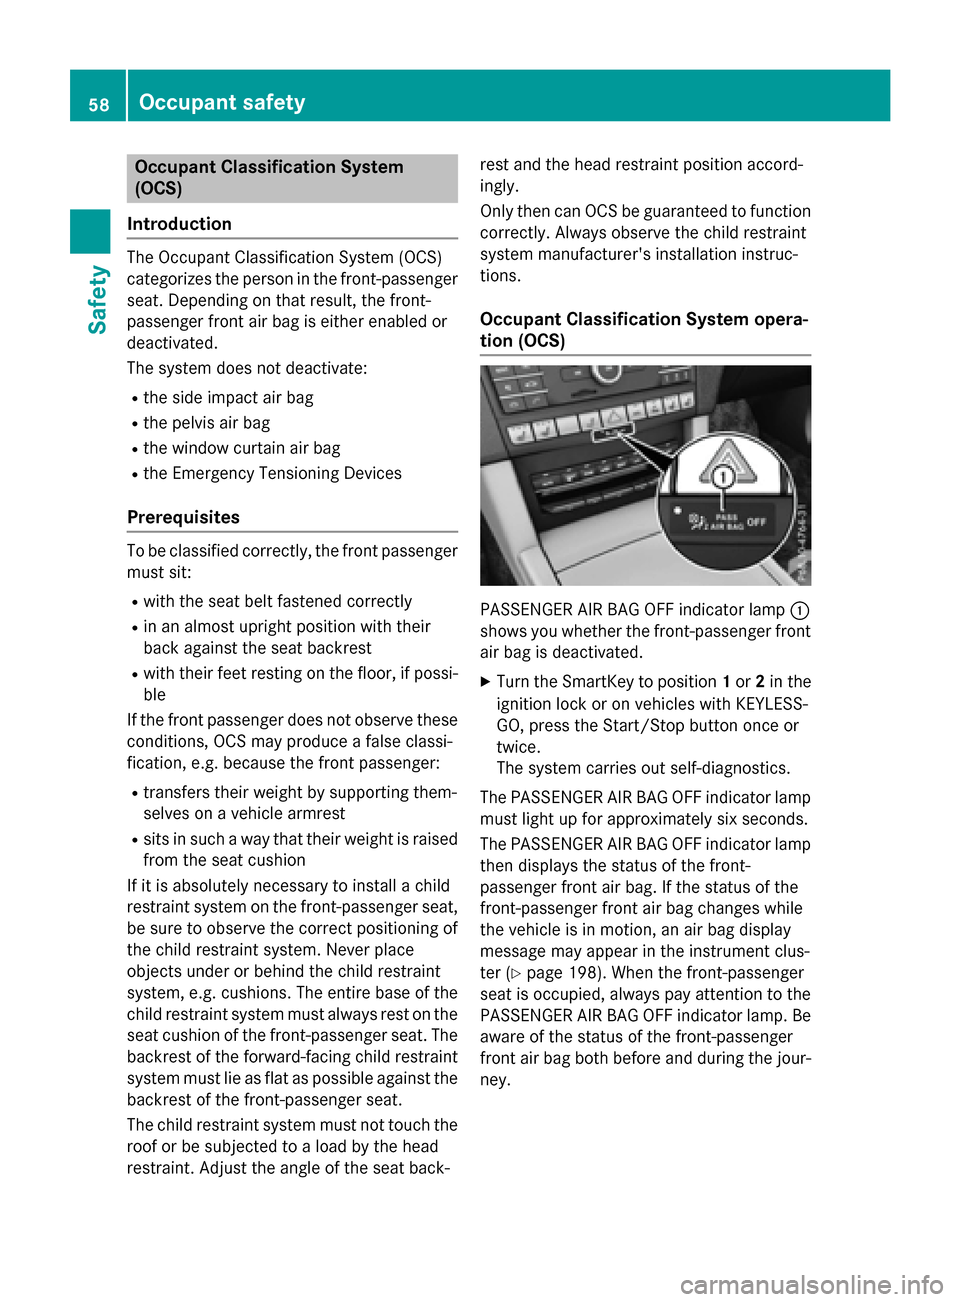
Occupant Classification System opera-
tion (OCS)
PASSENGER AIR BAG OFF indicator lamp :
shows you whether the front-passenger front
air bag is deactivated.
XTurn the SmartKey to position 1or 2in the
ignition lock or on vehicles with KEYLESS-
GO, press the Start/Stop button once or
twice.
The system carries out self-diagnostics.
The PASSENGER AIR BAG OFF indicator lamp
must light up for approximately six seconds.
The PASSENGER AIR BAG OFF indicator lamp
then displays the status of the front-
passenger front air bag. If the status of the
front-passenger front air bag changes while
the vehicle is in motion, an air bag display
message may appear in the instrument clus-
ter (
Ypage 198). When the front-passenger
seat is occupied, always pay attention to the
PASSENGER AIR BAG OFF indicator lamp. Be
aware of the status of the front-passenger
front air bag both before and during the jour-
ney.
58Occupant safety
Safety
Page 70 of 350
Rvehicles with a memory function: the elec-
trically adjustable steering wheel is raised
Rthe engine is switched off and the fuel sup-ply is cut off
Rvehicles with mbrace: automatic emer-
gency call
Rvehicles with the hybrid drive system: the
hybrid system and the high-voltage electri-
cal system are deactivated
Children in the vehicle
Important safety notes
Accident statistics show that children
secured in the rear seats are safer than chil-
dren secured in the front-passenger seat. For
this reason, Mercedes-Benz strongly advises
that you install a child restraint system on a
rear seat. Children are generally better pro-
tected there.
If a child under 12 years of age and under 5 ft(1.50 m) in height is traveling in the vehicle:
Ralways secure the child in a child restraint
system suitable for Mercedes-Benz vehi-
cles. The child restraint system must be
appropriate to the age, weight and size of
the child
Rbe sure to observe the instructions and
safety notes in this section in addition to
the child restraint system manufacturer's
installation instructions
Rbe sure to observe the instructions and
safety notes on the "Occupant classifica-
tion system (OCS)" (
Ypage 58)
Do not install a rearward-facing child restraint system on the center rear seat.
GWARNING
If you leave children unsupervised in the vehi-
cle, they could set it in motion by, for example:
Rrelease the parking brake.
Rshift the automatic transmission out of the
parking position P.
Rstart the engine.
In addition, they may operate vehicle equip-
ment and become trapped. There is a risk of
an accident and injury.
When leaving the vehicle, always take the
SmartKey with you and lock the vehicle. Never
leave children unsupervised in the vehicle.
GWARNING
If persons, particularly children are subjected to prolonged exposure to extreme heat or
cold, there is a risk of injury, possibly even
fatal. Never leave children unattended in the
vehicle.
GWARNING
If the child restraint system is subjected to
direct sunlight, parts may get very hot. Chil-
dren may burn themselves on these parts,
particularly on the metal parts of the child
restraint system. There is a risk of injury.
If you leave the vehicle, taking the child with
you, always ensure that the child restraint
system is not exposed to direct sunlight. Pro- tect it with a blanket, for example. If the child
restraint system has been exposed to direct
sunlight, let it cool down before securing the
child in it. Never leave children unattended in
the vehicle.
Always ensure that all vehicle occupants have
their seat belts fastened correctly and are sit- ting properly. Particular attention must be
paid to children.
Observe the safety notes on the seat belt
(
Ypage 50) and the notes on correct use of
seat belts (
Ypage 51).
A booster seat may be necessary to achieve
proper seat belt positioning for children over
41 lbs (18 kg) until they reach a height where a three-point seat belt fits properly without a
booster seat.
68Children in the vehicle
Safety
Page 75 of 350
sure that you do not interfere with the cor-
rect routing of Top Tether beltB.
XInstall combined cargo cover and net =
(
Ypage 243).
Child restraint system on the front-
passenger seat
General notes
Accident statistics show that children
secured in the rear seats are safer than chil-
dren secured in the front-passenger seat. For
this reason, Mercedes-Benz strongly advises
that you install the child restraint system on a
rear seat.
If it is absolutely necessary to install a child
restraint system on the front-passenger seat,
be sure to observe the instructions and safety
notes on the "Occupant Classification System (OCS)" (
Ypage 58).
You can thus avoid the risks that could arise
as a result of:
Ran incorrectly categorized person in the
front-passenger seat
Rthe unintentional deactivation of the front-
passenger front air bag
Rthe unsuitable positioning of the child
restraint system, e.g. too close to the dash-
board
Rearward-facing child restraint system
If it is absolutely necessary to install a rear-
ward-facing child restraint system on the
front-passenger seat, always make sure that
the front-passenger front air bag is deactiva-
ted. Only if the PASSENGER AIR BAG OFF
indicator lamp is permanently lit (
Ypage 49)
is the front-passenger front air bag deactiva-
ted.
Always observe the child restraint system
manufacturer's installation and operating
instructions.
Forward-facing child restraint system
If it is absolutely necessary to install a
forward-facing child restraint system on the
front-passenger seat, always move the front-
passenger seat as far back as possible. The
entire base of the child restraint system must
always rest on the seat cushion of the front-
passenger seat. The backrest of the child
restraint system must lie as flat as possible
against the backrest of the front-passenger
seat. The child restraint system must not
touch the roof or be subjected to a load by the
head restraint. Adjust the angle of the seat
backrest and the head restraint position
accordingly. Always make sure that the shoul-
der belt strap is correctly routed from the
vehicle belt outlet to the shoulder belt guide
on the child restraint system. The shoulder
belt strap must be routed forwards and down-
wards from the vehicle belt outlet. If neces-
sary, adjust the vehicle belt outlet and the
front-passenger seat accordingly.
Always observe the child restraint system
manufacturer's installation and operating
instructions.
Child-proof locks
Important safety notes
GWARNING
If children are traveling in the vehicle, they
could:
Ropen doors, thus endangering other people
or road users
Rexit the vehicle and be caught by oncoming
traffic
Roperate vehicle equipment and become
trapped
There is a risk of an accident and injury.
Always activate the child-proof locks and
override feature if children are traveling in the vehicle. When leaving the vehicle, always take
the key with you and lock the vehicle. Never
leave children unattended in the vehicle.
Children in the vehicle73
Safety
Z
Page 76 of 350
Override feature for:
Rthe rear doors (Ypage 74)
Rthe rear side windows (Ypage 74)
GWARNING
If you leave children unsupervised in the vehi-
cle, they could set it in motion by, for example:
Rrelease the parking brake.
Rshift the automatic transmission out of the
parking position P.
Rstart the engine.
In addition, they may operate vehicle equip-
ment and become trapped. There is a risk of
an accident and injury.
When leaving the vehicle, always take the
SmartKey with you and lock the vehicle. Never
leave children unsupervised in the vehicle.
GWARNING
If persons, particularly children are subjected to prolonged exposure to extreme heat or
cold, there is a risk of injury, possibly even
fatal. Never leave children unattended in the
vehicle.
GWARNING
If the child restraint system is subjected to
direct sunlight, parts may get very hot. Chil-
dren may burn themselves on these parts,
particularly on the metal parts of the child
restraint system. There is a risk of injury.
If you leave the vehicle, taking the child with
you, always ensure that the child restraint
system is not exposed to direct sunlight. Pro- tect it with a blanket, for example. If the child
restraint system has been exposed to direct
sunlight, let it cool down before securing the
child in it. Never leave children unattended in
the vehicle.
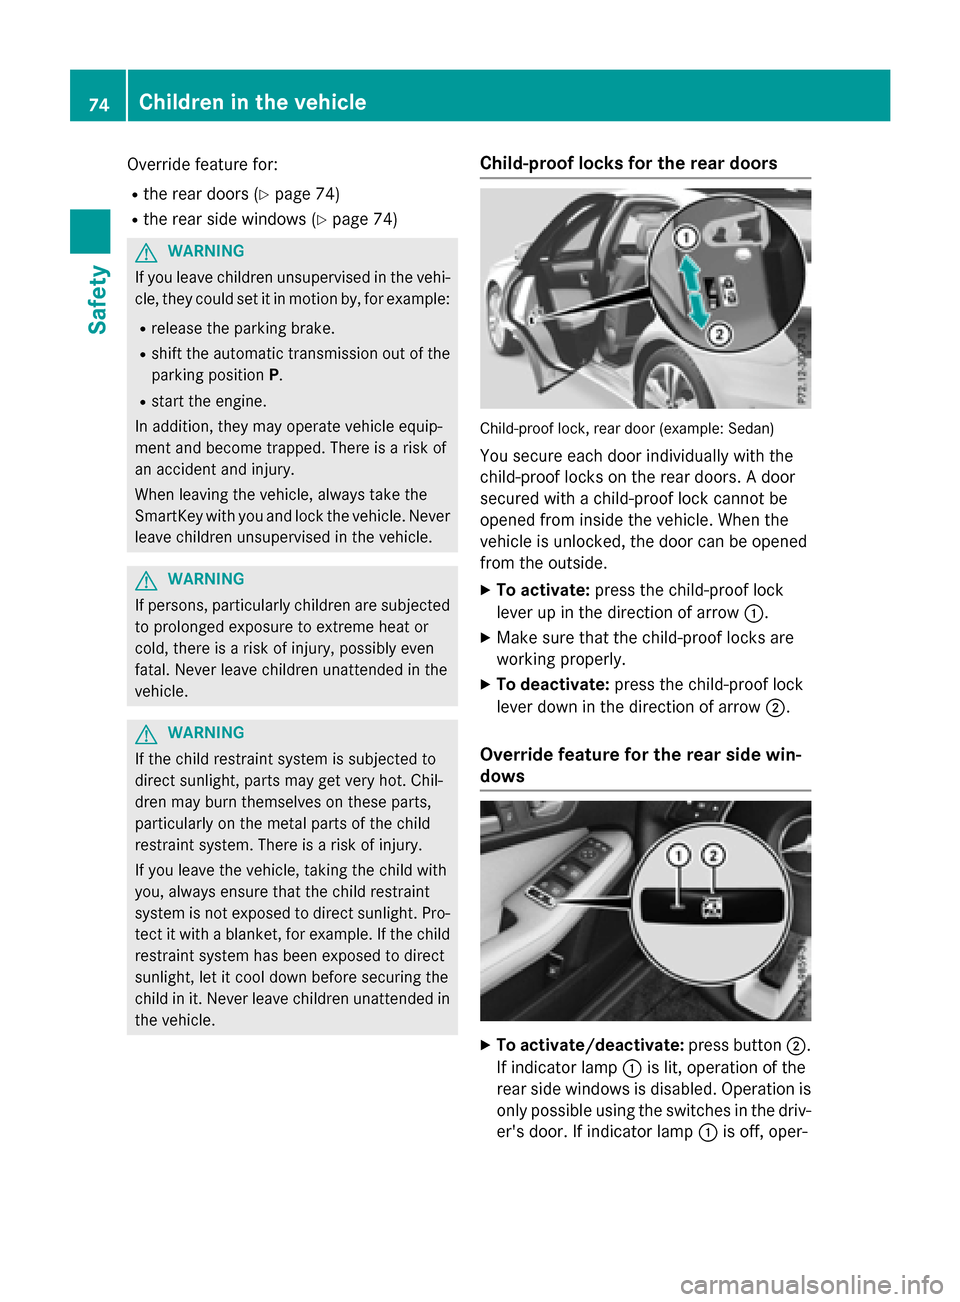
Child-proof locks for the rear doors
Child-proof lock, rear door (example: Sedan)
You secure each door individually with the
child-proof locks on the rear doors. A door
secured with a child-proof lock cannot be
opened from inside the vehicle. When the
vehicle is unlocked, the door can be opened
from the outside.
XTo activate: press the child-proof lock
lever up in the direction of arrow :.
XMake sure that the child-proof locks are
working properly.
XTo deactivate:press the child-proof lock
lever down in the direction of arrow ;.
Override feature for the rear side win-
dows
XTo activate/deactivate:press button;.
If indicator lamp :is lit, operation of the
rear side windows is disabled. Operation is
only possible using the switches in the driv-
er's door. If indicator lamp :is off, oper-
74Children in the vehicle
Safety
Page 89 of 350
Important safety notes
iObserve the "Important safety notes" sec-
tion (
Ypage 75).
No steering support isprovided by STEER
CONTROL, if:
RESP®is malfunctioning.
Rthe lighting isfaulty.
Power steering will, however, continue to
function.
Protection against theft
Immobilizer
The immobili zer prevents your vehicle from
bein g started without the correct SmartKey.
XTo activate with the SmartKey: remove
the SmartKey from the ignition lock.
XTo activate with KEYLESS-GO: switch the
ignit ion off and open the driver's door.
XTo deactivate: switch on the ignition.
When leaving the vehicle, always take the
Sm artKey with you and lock the vehicle. Any-
one can start the engine ifa valid SmartKey
has been left inside the vehicle.
iThe immobilizer is always deactivated
when you start the engine.
In the event that the engine cannot be star-
ted (yet the vehicle's battery is charged),
the system isnot operational. Contact an
authorized Mercedes-Benz Center or call
1-800-FOR-M ERCedes (in the USA) or
1-800-387-0100 (in Canada).
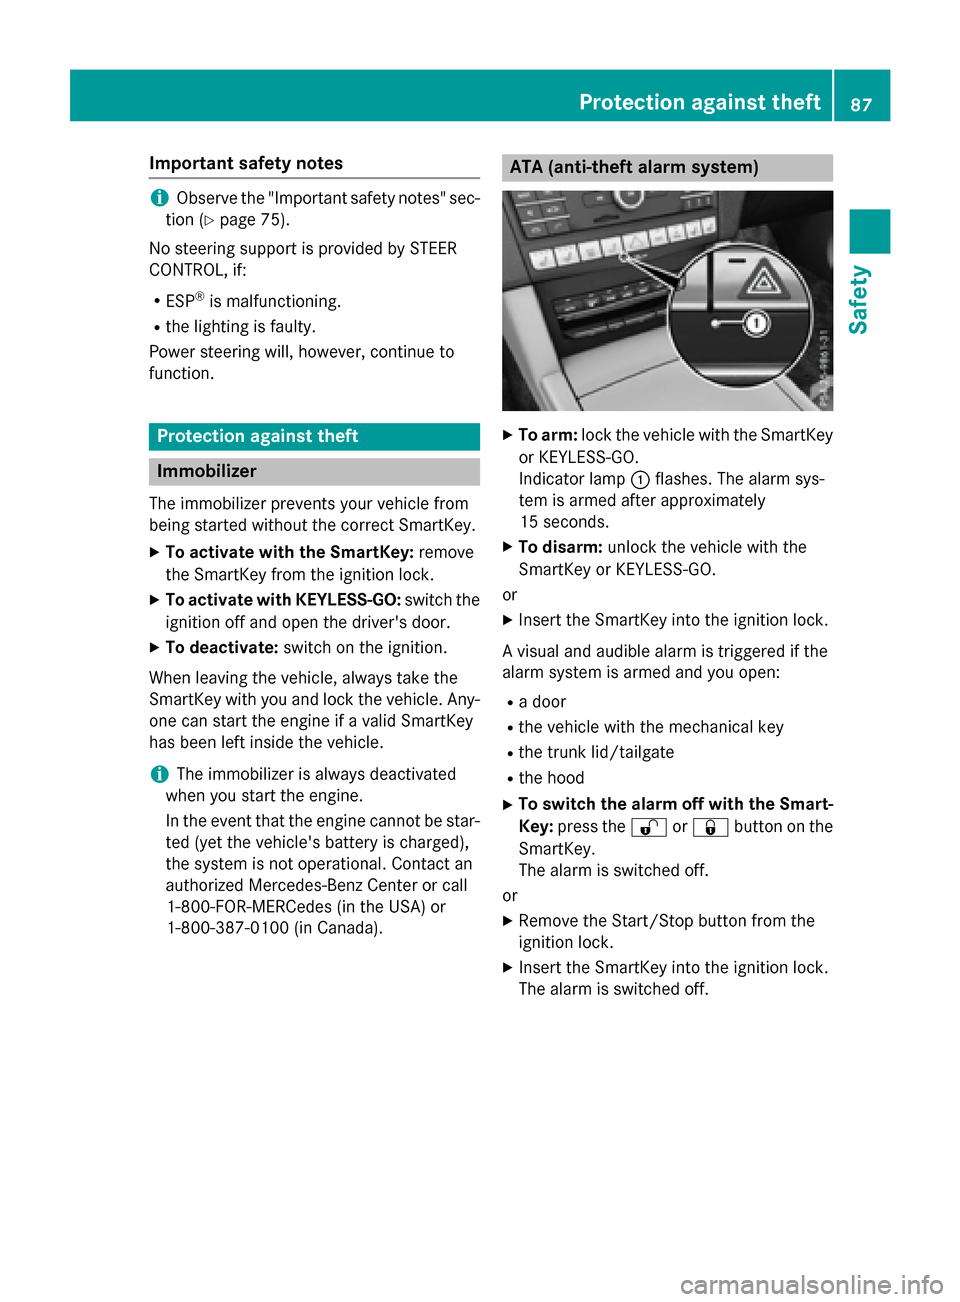
ATA (anti-theft alarm system)
XTo ar m:lock the vehicle with the SmartKey
or KEYLESS -GO.
In dicator lamp :flashes. The alarm sys-
tem isarmed after approximately
15 seconds.
XTo disar m:unlock the vehicle with the
Sm artKey or KEYLESS -GO.
or
XIn sert the SmartKey into the ignit ion lock.
A visual and audiblealarmistriggered ifthe
alarm system isarmed and you open:
Ra door
Rthe vehicle with the mechanical key
Rthe trunk lid/tailgate
Rthe hood
XTo switch the ala rmoff with the Smar t-
Key: press the %or& button on the
Sm artKey.
The alarm isswitched off.
or
XRemo vethe Start /S top button from the
ignit ion lock.
XInsert the SmartKey into the ignit ion lock.
The alarm isswitched off.
Protection against theft87
Safety
Z