spare tire MERCEDES-BENZ E-SEDAN 2014 Owners Manual
[x] Cancel search | Manufacturer: MERCEDES-BENZ, Model Year: 2014, Model line: E-SEDAN, Model: MERCEDES-BENZ E-SEDAN 2014Pages: 430, PDF Size: 5.8 MB
Page 20 of 430
Paddle shifter
s............................... 172
Steering wheel heating ..................120
Storing settings (memory function) 125
Steering wheel heating
Problem (malfunction) ...................121
Switching on/off ........................... 120
Steering wheel paddle shifters ........172
Stopwatch (RACETIMER) ................... 254
Stowage areas ................................... 298
Stowage compartments Armrest (under) ............................. 300
Center console .............................. 299
Cup holders ................................... 316
Eyeglasses compartment ...............299
Glove box ...................................... .299
Important safety information .........298
Rear ............................................... 300
Stowage net ................................... 301
Under driver's seat/front-
passenger seat .............................. 300
Stowage net ....................................... 301
Stowage well beneath the trunk
floor .................................................... 312
Summer tires ..................................... 374
Sun visor ............................................ 317
Surround lighting (on-board
computer) .......................................... 251
Suspension tuning AIRMATIC ...................................... 205
AMG adaptive sport suspension
system ........................................... 206
SETUP (on-board computer) ..........254
Switching air-recirculation mode
on/off ................................................. 154
Switching off the alarm (ATA) ............78 T
Tachometer ........................................ 238
Tailgate Display message ............................ 282
Emergency unlocking .......................97
Important safety notes ....................90
Limiting the opening angle ...............96
Opening/closing (automatically
from inside) ...................................... 95
Opening/closing (automatically
from outside) ................................... 92Opening/closing (from outside)
.......92
Opening dimensions ......................426
Tail lamps
Display message ............................ 267
Tank content
Fuel gauge ....................................... 31
Technical data
Capacities ...................................... 418
Emergency spare wheel .................414
Information .................................... 416
Tires/wheels ................................. 400
Vehicle data ................................... 426
TELEAID
Call priority .................................... 326
Downloading destinations
(COMAND) ..................................... 326
Downloading routes .......................330
Emergency call .............................. 323
Geo fencing ................................... 330
Locating a stolen vehicle ...............328
MB info call button ........................325
Remote vehicle locking ..................328
Roadside Assistance button ..........325
Search & Send ............................... 327
Self-test ......................................... 323
Speed alert .................................... 330
System .......................................... 323
Triggering the vehicle alarm ........... 330
Vehicle remote malfunction
diagnosis ....................................... 329
Vehicle remote unlocking ..............328
Tele Aid
General notes ................................ 322
Telephone
Accepting a call ............................. 245
Display message ............................ 283
Menu (on-board computer) ............245
Number from the phone book ....... .245
Redialing ........................................ 246
Rejecting/ending a call .................245
Telescopic rod (EASY-PACK load-
securing kit) ....................................... 312
Temperature Coolant .......................................... 238
Coolant (on-board computer) ......... 253
Engine oil (on-board computer) ...... 253
Outside temperature ..................... .239
Setting (climate control) ................15118
IndexProCarManuals.com
Page 23 of 430
W
Warning and indicator lamps ABS ................................................ 288
Brakes ........................................... 287
Check Engine ................................. 292
Coolant .......................................... 293
Distance warning ........................... 295
DISTRONIC PLUS ........................... 295
ESP ®
.............................................. 289
ESP ®
OFF ....................................... 290
Fuel tank ........................................ 292
Overview .......................................... 32
PASSENGER AIRBAG OFF ................48
Reserve fuel ................................... 292
Seat belt ........................................ 285
SPORT handling mode ...................290
SRS ................................................ 291
Tire pressure monitor ....................296
Warranty ............................................ 416
Washer fluid Display message ............................ 283
Wheel bolt tightening torque ...........400
Wheel chock ...................................... 396
Wheels Changing a wheel .......................... 395
Checking ........................................ 373
Cleaning ......................................... 344
Cleaning (warning) .........................395
Emergency spare wheel .................410
Important safety notes ..................372
Interchanging/changing ................395
Mounting a new wheel ...................399
Mounting a wheel .......................... 396
Removing a wheel ..........................399
Storing ........................................... 395
Tightening torque ........................... 400
Wheel size/tire size .......................400
Window curtain air bag
Operation ........................................ .47
Windows
see Side windows
Windshield
Defrosting ...................................... 152
Windshield washer fluid
see Windshield washer system Windshield washer system
Adding washer fluid .......................340
Notes ............................................. 424
Windshield wipers
Problem (malfunction) ...................142
Rear window wiper ........................139
Replacing the wiper blades ............139
Switching on/off ........................... 138
Winter driving
Important safety notes ..................374
Slippery road surfaces ...................189
Snow chains .................................. 375
Winter operation
Radiator cover ............................... 337
Winter tires
M+S tires ....................................... 374
Wiper blades
Cleaning ......................................... 345
Important safety notes ..................139
Replacing (rear window) ................141
Replacing (windshield )................... 140
Wooden trim (cleaning instructions) 348
Workshops see Qualified specialist workshop Z
ZONE function Switching on/off ........................... 152 Index
21ProCarManuals.com
Page 315 of 430
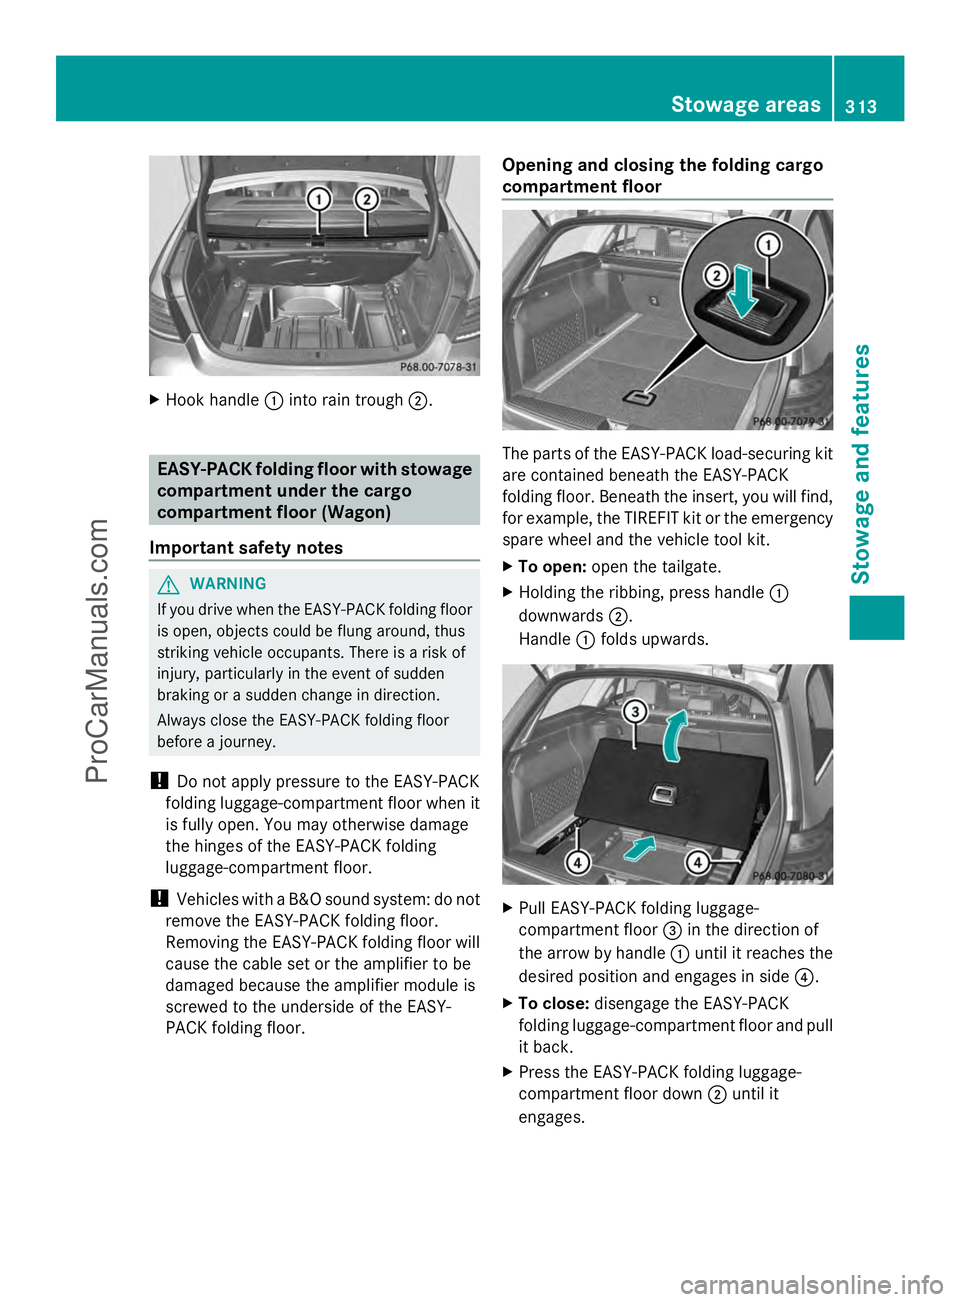
X
Hook handle :into rain trough ;. EASY-PACK folding floor with stowage
compartment under the cargo
compartment floor (Wagon)
Important safety notes G
WARNING
If you drive when the EASY-PACK folding floor
is open, objects could be flung around, thus
striking vehicle occupants. There is a risk of
injury, particularly in the event of sudden
braking or a sudden change in direction.
Always close the EASY-PACK folding floor
before a journey.
! Do not apply pressure to the EASY-PACK
folding luggage-compartment floor when it
is fully open. You may otherwise damage
the hinges of the EASY-PACK folding
luggage-compartment floor.
! Vehicles with a B&O sound system: do not
remove the EASY-PACK folding floor.
Removing the EASY-PACK folding floor will
cause the cable set or the amplifier to be
damaged because the amplifier module is
screwed to the underside of the EASY-
PACK folding floor. Opening and closing the folding cargo
compartment floor
The parts of the EASY-PACK load-securing kit
are contained beneath the EASY-PACK
folding floor. Beneath the insert, you will find,
for example, the TIREFIT kit or the emergency
spare wheel and the vehicle tool kit.
X
To open: open the tailgate.
X Holding the ribbing, press handle :
downwards ;.
Handle :folds upwards. X
Pull EASY-PACK folding luggage-
compartment floor =in the direction of
the arrow by handle :until it reaches the
desired position and engages in side ?.
X To close: disengage the EASY-PACK
folding luggage-compartment floor and pull
it back.
X Press the EASY-PACK folding luggage-
compartment floor down ;until it
engages. Stowage areas
313Stowage and features Z
ProCarManuals.com
Page 355 of 430
stowage well under the trunk floor/cargo
compartment floor.
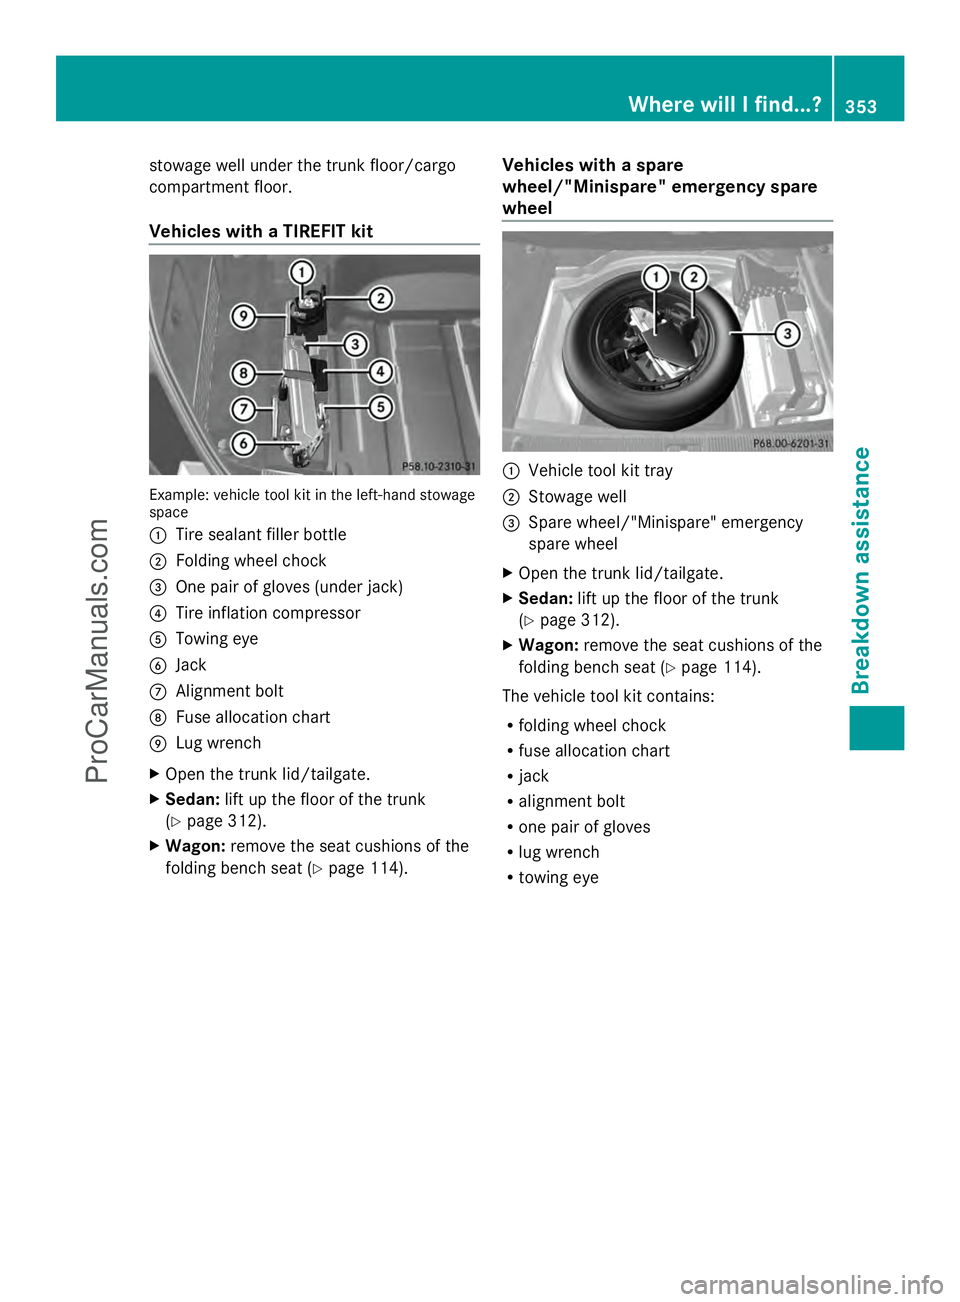
Vehicles with a TIREFIT kit
Example: vehicle tool kit in the left-hand stowage
space
: Tire sealant filler bottle
; Folding wheel chock
= One pair of gloves (under jack)
? Tire inflation compressor
A Towing eye
B Jack
C Alignment bolt
D Fuse allocation chart
E Lug wrench
X Open the trunk lid/tailgate.
X Sedan: lift up the floor of the trunk
(Y page 312).
X Wagon: remove the seat cushions of the
folding bench seat (Y page 114). Vehicles with a spare
wheel/"Minispare" emergency spare
wheel :
Vehicle tool kit tray
; Stowage well
= Spare wheel/"Minispare" emergency
spare wheel
X Open the trunk lid/tailgate.
X Sedan: lift up the floor of the trunk
(Y page 312).
X Wagon: remove the seat cushions of the
folding bench seat (Y page 114).
The vehicle tool kit contains:
R folding wheel chock
R fuse allocation chart
R jack
R alignment bolt
R one pair of gloves
R lug wrench
R towing eye Where will I find...?
353Breakdown assistance
ProCarManuals.com
Page 356 of 430
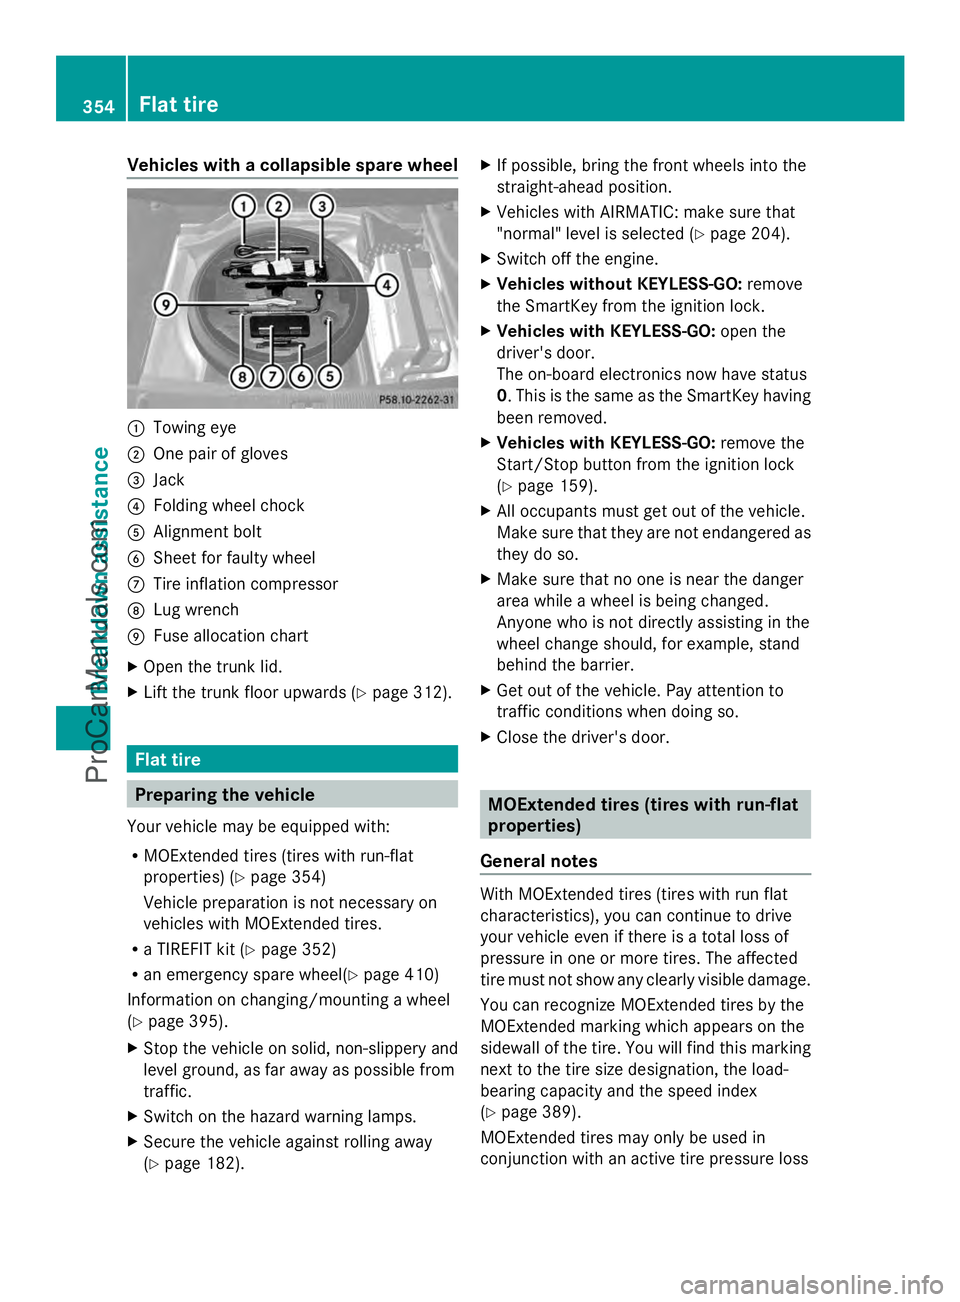
Vehicles with a collapsible spare wheel
:
Towing eye
; One pair of gloves
= Jack
? Folding wheel chock
A Alignment bolt
B Sheet for faulty wheel
C Tire inflation compressor
D Lug wrench
E Fuse allocation chart
X Open the trunk lid.
X Lift the trunk floor upwards (Y page 312).Flat tire
Preparing the vehicle
Your vehicle may be equipped with:
R MOExtended tires (tires with run-flat
properties) (Y page 354)
Vehicle preparation is not necessary on
vehicles with MOExtended tires.
R a TIREFIT kit (Y page 352)
R an emergency spare wheel(Y page 410)
Information on changing/mounting a wheel
(Y page 395).
X Stop the vehicle on solid, non-slippery and
level ground, as far away as possible from
traffic.
X Switch on the hazard warning lamps.
X Secure the vehicle against rolling away
(Y page 182). X
If possible, bring the front wheels into the
straight-ahead position.
X Vehicles with AIRMATIC: make sure that
"normal" level is selected (Y page 204).
X Switch off the engine.
X Vehicles without KEYLESS-GO: remove
the SmartKey from the ignition lock.
X Vehicles with KEYLESS-GO: open the
driver's door.
The on-board electronics now have status
0. This is the same as the SmartKey having
been removed.
X Vehicles with KEYLESS-GO: remove the
Start/Stop button from the ignition lock
(Y page 159).
X All occupants must get out of the vehicle.
Make sure that they are not endangered as
they do so.
X Make sure that no one is near the danger
area while a wheel is being changed.
Anyone who is not directly assisting in the
wheel change should, for example, stand
behind the barrier.
X Get out of the vehicle. Pay attention to
traffic conditions when doing so.
X Close the driver's door. MOExtended tires (tires with run-flat
properties)
General notes With MOExtended tires (tires with run flat
characteristics), you can continue to drive
your vehicle even if there is a total loss of
pressure in one or more tires. The affected
tire must not show any clearly visible damage.
You can recognize MOExtended tires by the
MOExtended marking which appears on the
sidewall of the tire. You will find this marking
next to the tire size designation, the load-
bearing capacity and the speed index
(Y page 389).
MOExtended tires may only be used in
conjunction with an active tire pressure loss 354
Flat tireBreakdo
wn assis tance
ProCarManuals.com
Page 373 of 430
Useful information
............................372
Important safety notes ....................372
Operation ........................................... 372
Winter operation ............................... 374
Tire pressure ..................................... 376
Loading the vehicle ..........................383
All about wheels and tires ...............387
Changing a wheel ............................. 395
Wheel and tire combinations ...........400
Emergency spare wheel ...................410 371Wheels and tires
ProCarManuals.com
Page 374 of 430
Useful information
i This Operator's Manual describes all
models and all standard and optional
equipment of your vehicle available at the
time of publication of the Operator's
Manual. Country-specific differences are
possible. Please note that your vehicle may
not be equipped with all features
described. This also applies to safety-
related systems and functions.
i Read the information on qualified
specialist workshops: (Y page 26).Important safety notes
G
WARNING
If wheels and tires of the wrong size are used,
the wheel brakes or suspension components
may be damaged. There is a risk of an
accident.
Always replace wheels and tires with those
that fulfill the specifications of the original
part.
When replacing wheels, make sure to use the
correct:
R designation
R model
When replacing tires, make sure to use the
correct:
R designation
R manufacturer
R model G
WARNING
A flat tire severely impairs the driving,
steering and braking characteristics of the
vehicle. There is a risk of accident.
Tires without run-flat characteristics:
R do not drive with a flat tire.
R immediately replace the flat tire with your
emergency spare wheel or spare wheel, or
consult a qualified specialist workshop. Tires with run-flat characteristics:
R
pay attention to the information and
warning notices on MOExtended tires (tires
with run-flat characteristics).
Accessories that are not approved for your
vehicle by Mercedes-Benz or are not being
used correctly can impair the operating
safety.
Before purchasing and using non-approved
accessories, visit a qualified specialist
workshop and ask about:
R suitability
R legal stipulations
R factory recommendations
Information on the dimensions and types of
wheels and tires for your vehicle can be found
in the "Wheel/tire combinations" section
(Y page 400).
Information on air pressure for the tires on
your vehicle can be found:
R on the vehicle's Tire and Loading
Information placard on the B-pillar
(Y page 383)
R on the tire pressure label on the fuel filler
flap (Y page 176)
R under "Tire pressure" (Y page 376) Operation
Information on driving
If the vehicle is heavily loaded, check the tire
pressures and correct them if necessary.
While driving, pay attention to vibrations,
noises and unusual handling characteristics,
e.g. pulling to one side. This may indicate that
the wheels or tires are damaged. If you
suspect that a tire is defective, reduce your
speed immediately. Stop the vehicle as soon
as possible to check the wheels and tires for
damage. Hidden tire damage could also be
causing the unusual handling characteristics.
If you find no signs of damage, have the tires 372
OperationWheels and tires
ProCarManuals.com
Page 375 of 430
and wheels checked at a qualified specialist
workshop.
When parking your vehicle, make sure that
the tires do not get deformed by the curb or
other obstacles. If it is necessary to drive over
curbs, speed humps or similar elevations, try
to do so slowly and at an obtuse angle.
Otherwise, the tires, particularly the
sidewalls, may be damaged. Regular checking of wheels and tires
G
WARNING
Damaged tires can cause tire inflation
pressure loss. As a result, you could lose
control of your vehicle. There is a risk of
accident.
Check the tires regularly for signs of damage
and replace any damaged tires immediately.
Regularly check the wheels and tires of your
vehicle for damage at least once a month, as
well as after driving off-road or on rough
roads. Damaged wheels can cause a loss of
tire pressure. Pay particular attention to
damage such as:
R cuts in the tires
R punctures
R tears in the tires
R bulges on tires
R deformation or severe corrosion on wheels
Regularly check the tire tread depth and the
condition of the tread across the whole width
of the tire (Y page 373). If necessary, turn
the front wheels to full lock in order to inspect
the inner side of the tire surface.
All wheels must have a valve cap to protect
the valve against dirt and moisture. Do not
mount anything onto the valve other than the
standard valve cap or other valve caps
approved by Mercedes-Benz for your vehicle.
Do not use any other valve caps or systems,
e.g. tire pressure monitoring systems. Regularly check the pressure of all the tires
particularly prior to long trips. Adjust the tire
pressure as necessary (Y
page 376).
Observe the notes on the emergency spare
wheel (Y page 410).
The service life of tires depends, among other
things, on the following factors:
R driving style
R tire pressure
R distance covered Important safety notes on the tire
tread
G
WARNING
Insufficient tire tread will reduce tire traction.
The tire is no longer able to dissipate water.
This means that on wet road surfaces, the risk
of hydroplaning increases, in particular where
speed is not adapted to suit the driving
conditions. There is a risk of accident.
If the tire pressure is too high or too low, tires
may exhibit different levels of wear at
different locations on the tire tread. Thus, you
should regularly check the tread depth and
the condition of the tread across the entire
width of all tires.
Minimum tire tread depth for:
R Summer tires: âin (3 mm)
R M+S tires: ãin (4 mm)
For safety reasons, replace the tires before
the legally prescribed limit for the minimum
tire tread depth is reached. Operation
373Wheels and tires Z
ProCarManuals.com
Page 376 of 430
Bar indicator
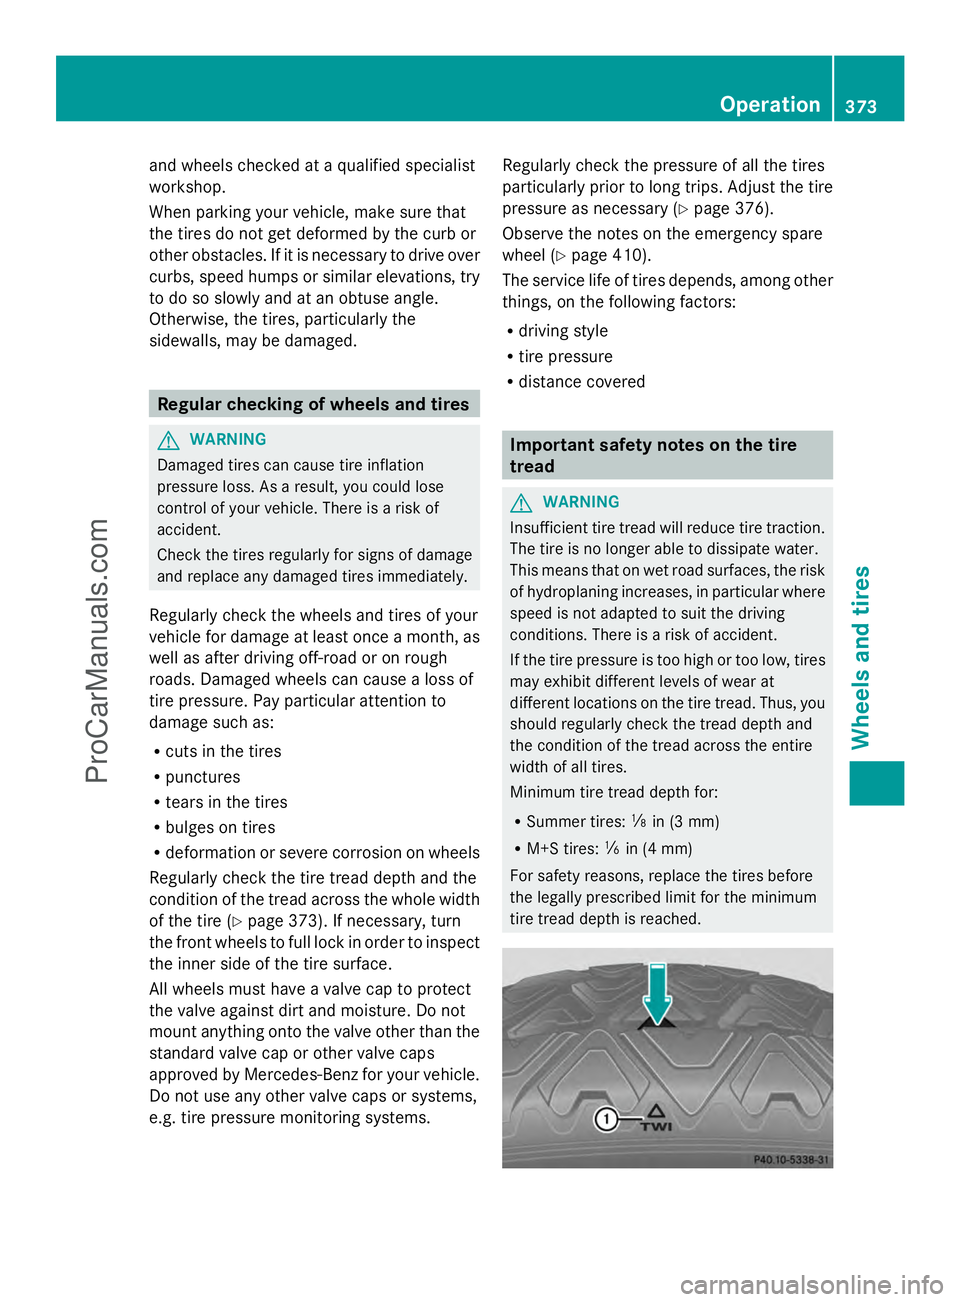
:for tread wear is integrated
into the tire tread.
Treadwear indicators (TWI) are required by
law. Six indicators are positioned on the tire
tread. They are visible once a tread depth of
approximately áin (1.6 mm) has been
reached. If this is the case, the tire is so worn
that it must be replaced. Selecting, mounting and replacing
tires
R Only mount tires and wheels of the same
type and make.
Exception: it is permissible to install a
different type or make in the event of a flat
tire. Observe the "MOExtended tires (tires
with run-flat characteristics" section
(Y page 354).
R Only mount tires of the correct size onto
the wheels.
R Break in new tires at moderate speeds for
the first 60 miles (100 km). They only reach
their full performance after this distance.
R Do not drive with tires which have too little
tread depth, as this significantly reduces
the traction on wet roads (hydroplaning).
R Replace the tires after six years at the
latest, regardless of wear.
Observe the notes on the emergency spare
wheel (Y page 410). MOExtended tires (tires with run-flat
properties)
With MOExtended tires (tires with run flat
characteristics), you can continue to drive
your vehicle even if there is a total loss of
pressure in one or more tires.
MOExtended tires may only be used in
conjunction with an active tire pressure loss
warning system or with an active tire pressure
monitor and on wheels specifically tested by
Mercedes-Benz. Notes on driving with MOExtended tires with
a flat tire (Y
page 354).
i Vehicles equipped with MOExtended tires
are not equipped with a TIREFIT kit at the
factory. It is therefore recommended that
you additionally equip your vehicle with a
TIREFIT kit if you mount tires that do not
feature run-flat properties, e.g. winter tires.
A TIREFIT kit can be obtained from a
qualified specialist workshop. Winter operation
General notes
Have your vehicle winterproofed at a qualified
specialist workshop at the onset of winter.
Observe the notes in the "Changing a wheel"
section (Y page 395). Driving with summer tires
At temperatures below 45 ‡(+7 †), summer
tires lose elasticity significantly, and
therefore traction and braking power as well.
Change the tires on your vehicle to
M+S tires. Using summer tires at very cold
temperatures could cause cracks to form,
thereby damaging the tires permanently.
Mercedes-Benz cannot accept responsibility
for this type of damage. M+S tires
G
WARNING
M+S tires with a tire tread depth of less than
ã in (4 mm) are not suitable for use in winter
and do not provide sufficient traction. There
is a risk of an accident.
M+S tires with a tread depth of less than ã
in (4 mm) must be replaced immediately.
At temperatures below 45 ‡ (+7 †), use
winter tires or all-weather tires. Both types of
tire are identified by the M+S marking. 374
Winter operationWheels and tires
ProCarManuals.com
Page 377 of 430
Only winter tires bearing the
isnowflake
symbol in addition to the M+S marking
provide the best possible grip in wintry road
conditions.
Only these tires will allow driving safety
systems such as ABS and ESP ®
to function
optimally in winter. These tires have been
developed specifically for driving in snow.
Use M+S tires of the same make and tread on
all wheels to maintain safe handling
characteristics.
Always observe the maximum permissible
speed specified for the M+S tires you have
mounted.
Once the winter tires are mounted:
X Check the tire pressures (Y page 379).
X Vehicles for Canada: restart the tire
pressure loss warning system
(Y page 380).
X Restart the tire pressure monitor
(Y page 380).
For more information on driving with the
emergency spare wheel, see (Y page 410).Snow chains
G
WARNING
If snow chains are installed to the front
wheels, they may drag against the vehicle
body or chassis components. This could
cause damage to the vehicle or the tires.
There is a risk of an accident.
To avoid hazardous situations:
R never install snow chains to the front
wheels
R always install snow chains in pairs to the
rear wheels.
! On vehicles with AIRMATIC, you must
drive at raised vehicle level if snow chains
have been mounted. The vehicle may
otherwise be damaged.
! On some tire sizes there is not enough
space for snow chains. To avoid damage to the vehicle or tires, observe the "Wheel and
tire combinations" section under "Tires and
wheels".
! Vehicles with steel wheels: if you wish
to mount snow chains on steel wheels,
make sure that you remove the respective
wheels' hubcaps first. The hubcaps may
otherwise be damaged.
For safety reasons, Mercedes-Benz
recommends that you only use snow chains
that have been specially approved for your
vehicle by Mercedes-Benz, or are of a
corresponding standard of quality.
If you intend to mount snow chains, please
bear the following points in mind:
R Snow chains may not be mounted on all
wheel/tire combinations. Permissible
wheel-tire combinations (Y page 400).
R Only use snow chains when driving on
roads completely covered by snow.
Remove the snow chains as soon as
possible when you come to a road that is
not snow-covered.
R Local regulations may restrict the use of
snow chains. Observe the appropriate
regulations if you wish to mount snow
chains.
R Do not exceed the maximum permissible
speed of 30 mph (50 km/h).
i You may wish to deactivate ESP ®
when
pulling away with snow chains installed
(Y page 73). This way you can allow the
wheels to spin in a controlled manner,
achieving an increased driving force
(cutting action).
For more information on driving with the
emergency spare wheel, see (Y page 410). Winter operation
375Wheels and tires Z
ProCarManuals.com