fuel MERCEDES-BENZ E-SEDAN 2016 User Guide
[x] Cancel search | Manufacturer: MERCEDES-BENZ, Model Year: 2016, Model line: E-SEDAN, Model: MERCEDES-BENZ E-SEDAN 2016Pages: 350, PDF Size: 6.71 MB
Page 39 of 350
Instrument cluster
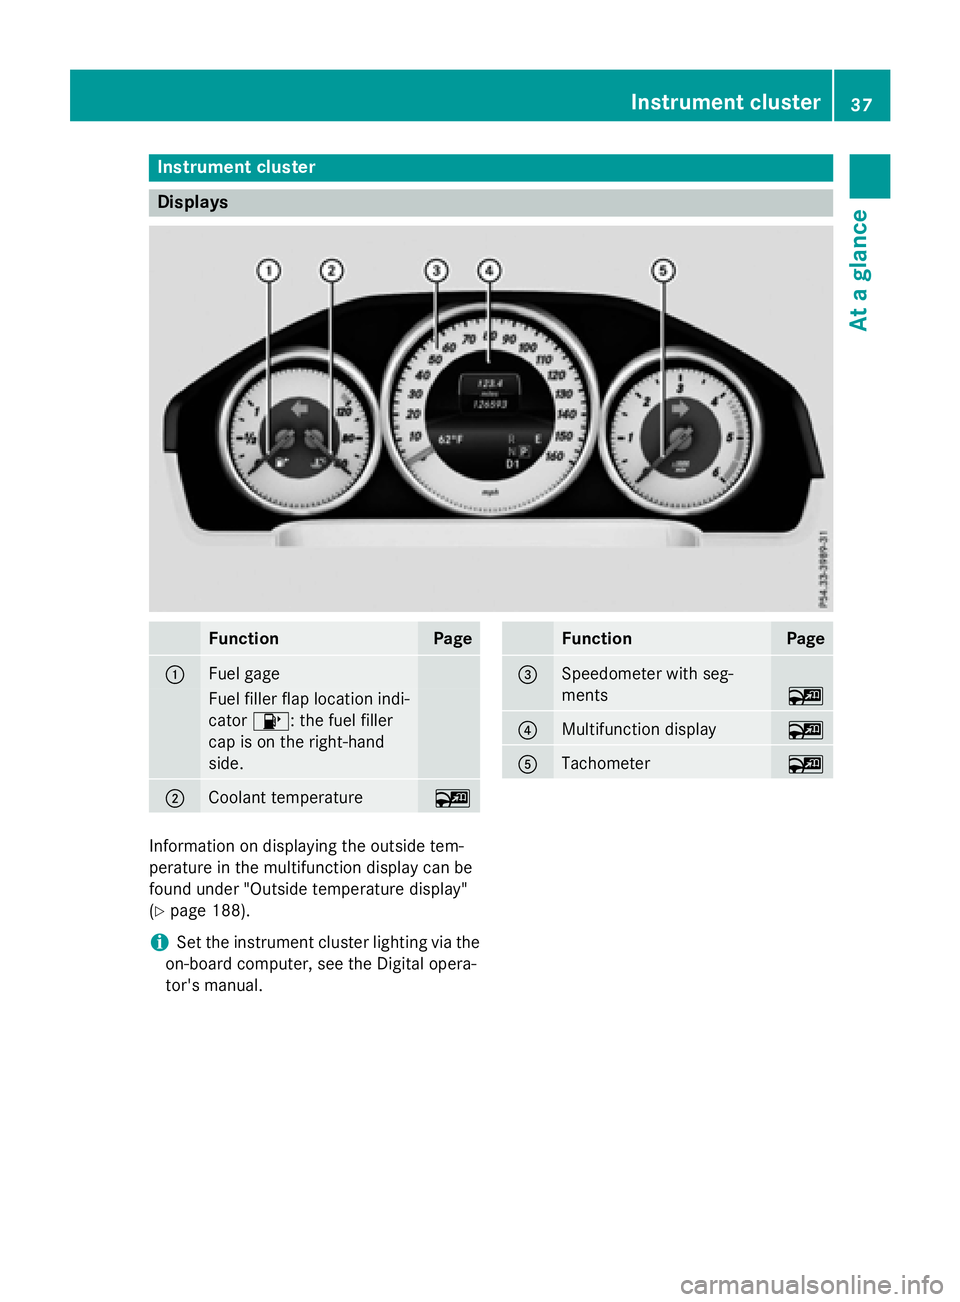
Displays
FunctionPage
:Fuel gage
Fuelfiller flap location ind i-
cator 8: the fuel filler
cap ison the right-hand
side .
;Coolant temperature~
FunctionPage
=Speedometer with seg-
ments
~
?Multifunction display~
ATachometer~
In formation on displaying the outside tem-
perature inthe multifunction display can be
found under "Outside temperature display"
(
Ypage 188).
iSe t the instrument cluster lighting via the
on-board computer, see the Digital opera-
tor's manual.
Instrument cluster37
At a glance
Page 40 of 350
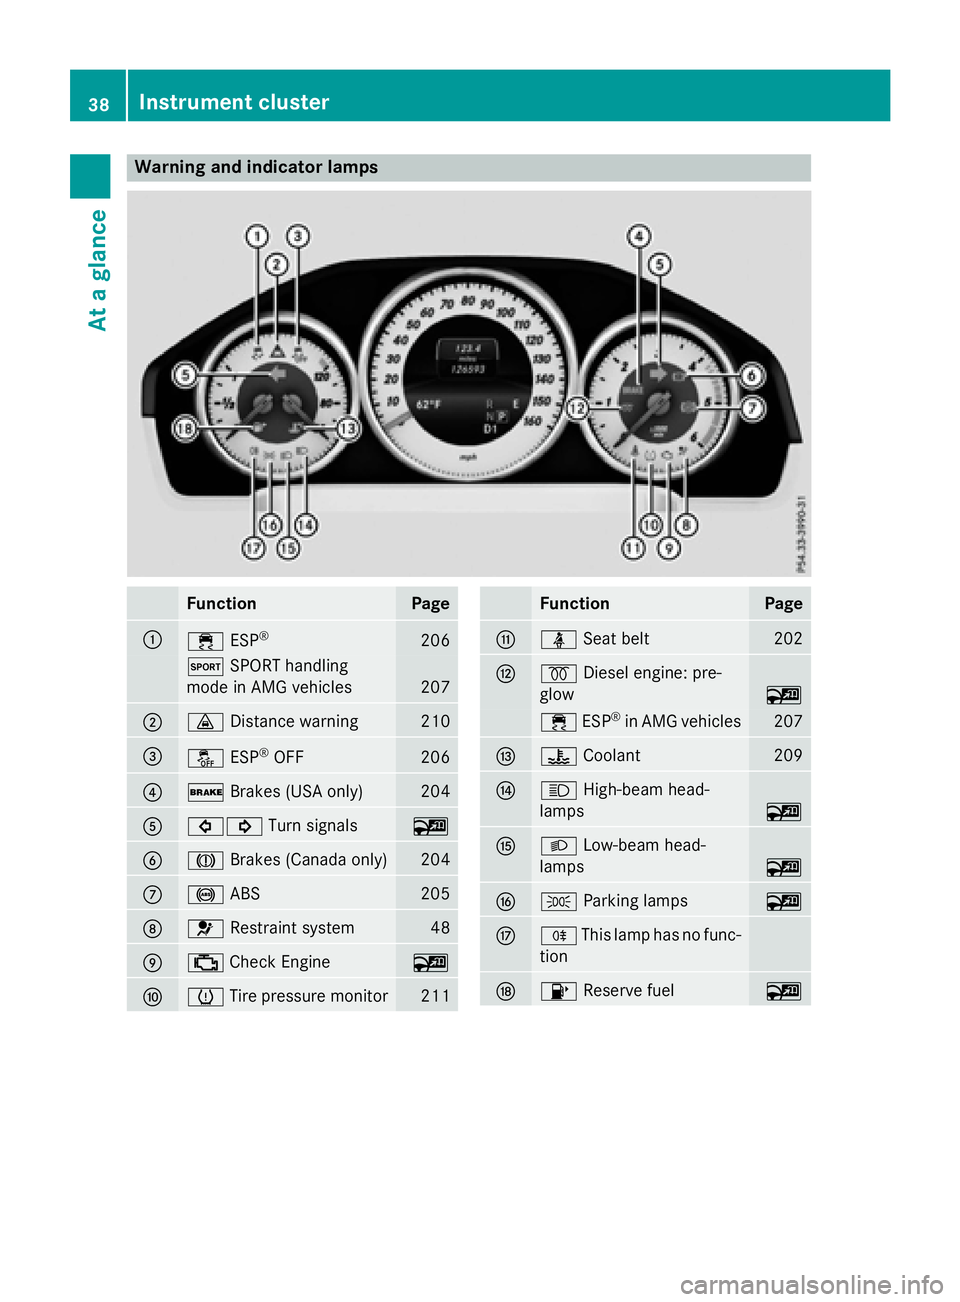
Warning and indicator lamps
FunctionPage
:÷ESP®206
MSPORT handling
mode in AMG vehicles
207
;· Distance warning210
=åESP®OFF206
?$Brakes (USA only)204
A#! Turn signals~
BJBrakes (Canada only)204
C!ABS205
D6Restraint system48
E;Check Engine~
Fh Tire pressure monitor211
FunctionPage
Gü Seat belt202
H%Diesel engine: pre-
glow
~
÷ ESP®in AMG vehicles207
I? Coolant209
JKHigh-beam head-
lamps
~
KL Low-beam head-
lamps
~
LT Parking lamps~
MRThis lamp has no func-
tion
N8 Reserve fuel~
38Instrument cluster
At a glance
Page 70 of 350
Rvehicles with a memory function: the elec-
trically adjustable steering wheel is raised
Rthe engine is switched off and the fuel sup-ply is cut off
Rvehicles with mbrace: automatic emer-
gency call
Rvehicles with the hybrid drive system: the
hybrid system and the high-voltage electri-
cal system are deactivated
Children in the vehicle
Important safety notes
Accident statistics show that children
secured in the rear seats are safer than chil-
dren secured in the front-passenger seat. For
this reason, Mercedes-Benz strongly advises
that you install a child restraint system on a
rear seat. Children are generally better pro-
tected there.
If a child under 12 years of age and under 5 ft(1.50 m) in height is traveling in the vehicle:
Ralways secure the child in a child restraint
system suitable for Mercedes-Benz vehi-
cles. The child restraint system must be
appropriate to the age, weight and size of
the child
Rbe sure to observe the instructions and
safety notes in this section in addition to
the child restraint system manufacturer's
installation instructions
Rbe sure to observe the instructions and
safety notes on the "Occupant classifica-
tion system (OCS)" (
Ypage 58)
Do not install a rearward-facing child restraint system on the center rear seat.
GWARNING
If you leave children unsupervised in the vehi-
cle, they could set it in motion by, for example:
Rrelease the parking brake.
Rshift the automatic transmission out of the
parking position P.
Rstart the engine.
In addition, they may operate vehicle equip-
ment and become trapped. There is a risk of
an accident and injury.
When leaving the vehicle, always take the
SmartKey with you and lock the vehicle. Never
leave children unsupervised in the vehicle.
GWARNING
If persons, particularly children are subjected to prolonged exposure to extreme heat or
cold, there is a risk of injury, possibly even
fatal. Never leave children unattended in the
vehicle.
GWARNING
If the child restraint system is subjected to
direct sunlight, parts may get very hot. Chil-
dren may burn themselves on these parts,
particularly on the metal parts of the child
restraint system. There is a risk of injury.
If you leave the vehicle, taking the child with
you, always ensure that the child restraint
system is not exposed to direct sunlight. Pro- tect it with a blanket, for example. If the child
restraint system has been exposed to direct
sunlight, let it cool down before securing the
child in it. Never leave children unattended in
the vehicle.
Always ensure that all vehicle occupants have
their seat belts fastened correctly and are sit- ting properly. Particular attention must be
paid to children.
Observe the safety notes on the seat belt
(
Ypage 50) and the notes on correct use of
seat belts (
Ypage 51).
A booster seat may be necessary to achieve
proper seat belt positioning for children over
41 lbs (18 kg) until they reach a height where a three-point seat belt fits properly without a
booster seat.
68Children in the vehicle
Safety
Page 92 of 350
Useful information
i
This Operator's Manual describes all
models and all standard and optional equip-
ment of your vehicle available at the time of
publication of the Operator's Manual.
Country-specific differences are possible.
Please note that your vehicle may not be
equipped with all features described. This
also applies to safety-related systems and
functions.
iRead the information on qualified special-
ist workshops (
Ypage 31).
SmartKey
Important safety notes
GWARNING
If children are left unsupervised in the vehicle,
they could:
Ropen the doors, thus endangering other
people or road users.
Rget out and disrupt traffic.
Roperate the vehicle's equipment.
Additionally, children could set the vehicle in
motion if, for example, they:
Rrelease the parking brake.
Rshifting the automatic transmission out of
park position P
RStart the engine.
There is a risk of an accident and injury.
When leaving the vehicle, always take the
SmartKey with you and lock the vehicle. Never
leave children or animals unattended in the
vehicle. Always keep the SmartKey out of
reach of children.
GWARNING
If you attach heavy or large objects to the
SmartKey, the SmartKey could be uninten-
tionally turned in the ignition lock. This could
cause the engine to be switched off. There is a risk of an accident.
Do not attach any heavy or large objects to theSmartKey. Remove any bulky key rings before
inserting the SmartKey into the ignition lock.
!Keep the SmartKey away from strong
magnetic fields. Otherwise, the remote
control function could be affected.
Strong magnetic fields can occur in the
vicinity of powerful electrical installations.
Do not keep the SmartKey:
Rwith electronic devices, e.g. a mobile
phone or another SmartKey.
Rwith metallic objects, e.g. coins or metal
foil.
Rinside metallic objects, e.g. a metal case.
This can affect the functionality of the
SmartKey.
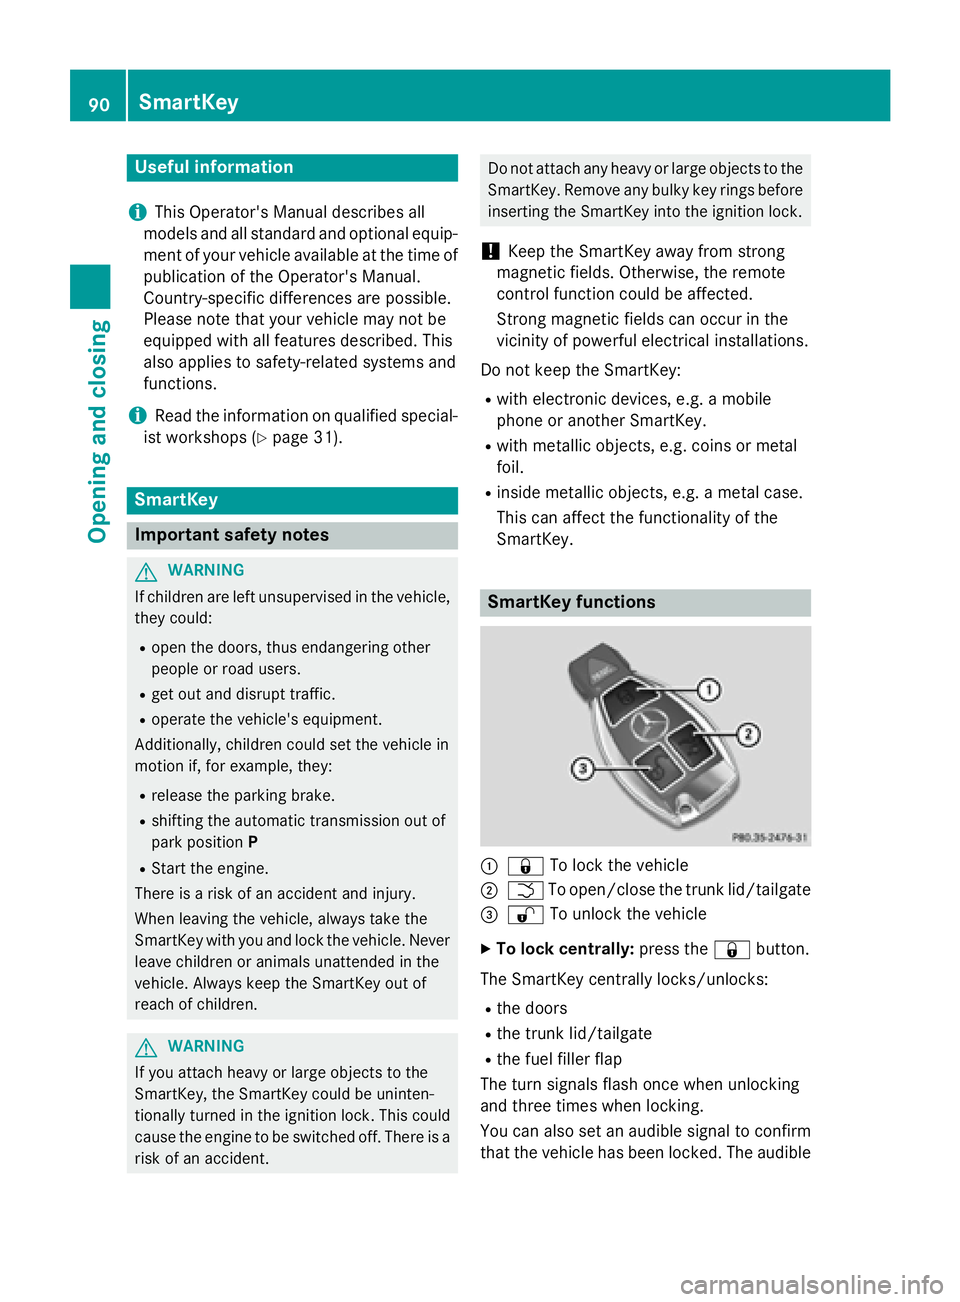
SmartKey functions
:& To lock the vehicle
;FTo open/close the trunk lid/tailgate
=% To unlock the vehicle
XTo lock centrally: press the&button.
The SmartKey centrally locks/unlocks:
Rthe doors
Rthe trunk lid/tailgate
Rthe fuel filler flap
The turn signals flash once when unlocking
and three times when locking.
You can also set an audible signal to confirm
that the vehicle has been locked. The audible
90SmartKey
Opening and closing
Page 94 of 350
lights up once, then KEYLESS-GO is deac-
tivated.
XTo activate:press any button on the
SmartKey or insert the SmartKey into the
ignition lock.
KEYLESS-GO and all of its associated fea-
tures are available again.
Changing the settings of the locking
system
You can find information about this in the
Digital Operator's Manual.
Mechanical key
General notes
If the vehicle can no longer be locked or
unlocked with the SmartKey, use the
mechanical key.
If you use the mechanical key to unlock and
open the driver's door or the trunk lid/tail-
gate, the anti-theft alarm system will be trig-
gered (
Ypage 87).
There are several ways to turn off the alarm:
XTo deactivate the alarm with the Smart-
Key: press the %or& button on the
SmartKey.
or
XInsert the SmartKey into the ignition lock.
or
XTo deactivate the alarm with KEYLESS-
GO: press the Start/Stop button in the igni-
tion lock. The SmartKey must be in the
vehicle.
or
XLock or unlock the vehicle using KEYLESS-
GO. The SmartKey must be outside the
vehicle. If you unlock the vehicle using the mechanical
key, the fuel filler flap will not be unlocked
automatically.
XTo unlock the fuel filler flap:
insert the
SmartKey into the ignition lock.
Removing the mechanical key
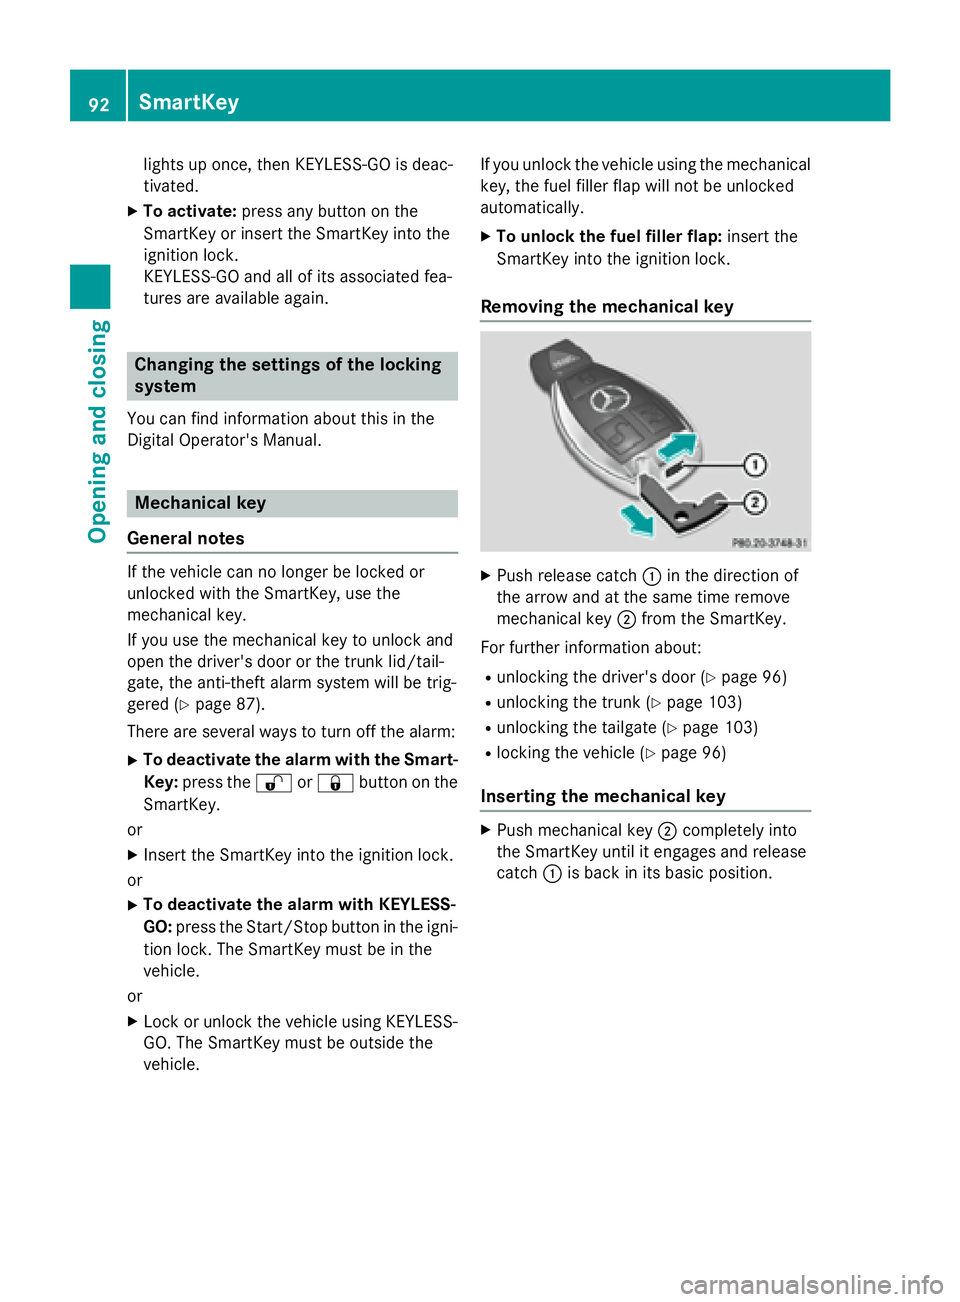
XPush release catch :in the direction of
the arrow and at the same time remove
mechanical key ;from the SmartKey.
For further information about:
Runlocking the driver's door (Ypage 96)
Runlocking the trunk (Ypage 103)
Runlocking the tailgate (Ypage 103)
Rlocking the vehicle (Ypage 96)
Inserting the mechanical key
XPush mechanical key ;completely into
the SmartKey until it engages and release
catch :is back in its basic position.
92SmartKey
Opening and closing
Page 137 of 350
Useful information............................136
Notes on breaking-in a new vehi-
cle ....................................................... 136
Driving ............................................... 137
Automatic transmission ...................142
Refueling ............................................ 145
Parking ............................................... 151
Driving tips ........................................ 153
Driving systems ................................ 155
135
Driving and parking
Page 143 of 350
catalytic converter to reach its operating
temperature more quickly.
Hill start assist
Hill start assist helps you when pulling away
forwards or in reverse on an uphill gradient. It
holds the vehicle for a short time after you
have removed your foot from the brake pedal.
This gives you enough time to move your foot
from the brake pedal to the accelerator pedal
and to depress it before the vehicle begins toroll.
GWARNING
After a short time, hill start assist will no lon-
ger brake your vehicle and it could roll away.
There is a risk of an accident and injury.
Therefore, quickly move your foot from the
brake pedal to the accelerator pedal. Never
leave the vehicle when it is held by hill start
assist.
Hill start assist is not active if:
Ryou are pulling away on a level road or on a downhill gradient.
Rthe transmission is in position N.
Rthe parking brake is applied.
RESP®is malfunctioning.
ECO start/stop function
Introduction
The ECO start/stop function switches the
engine off automatically if the vehicle is stop-
ped under certain conditions.
The engine starts automatically when the
driver wants to pull away again. The ECO
start/stop function thereby helps you to
reduce the fuel consumption and emissions
of your vehicle.
Important safety notes
GWARNING
If the engine is switched off automatically and
you exit the vehicle, the engine is restarted
automatically. The vehicle may begin moving.
There is a risk of accident and injury.
If you wish to exit the vehicle, always turn off
the ignition and secure the vehicle against
rolling away.
General notes
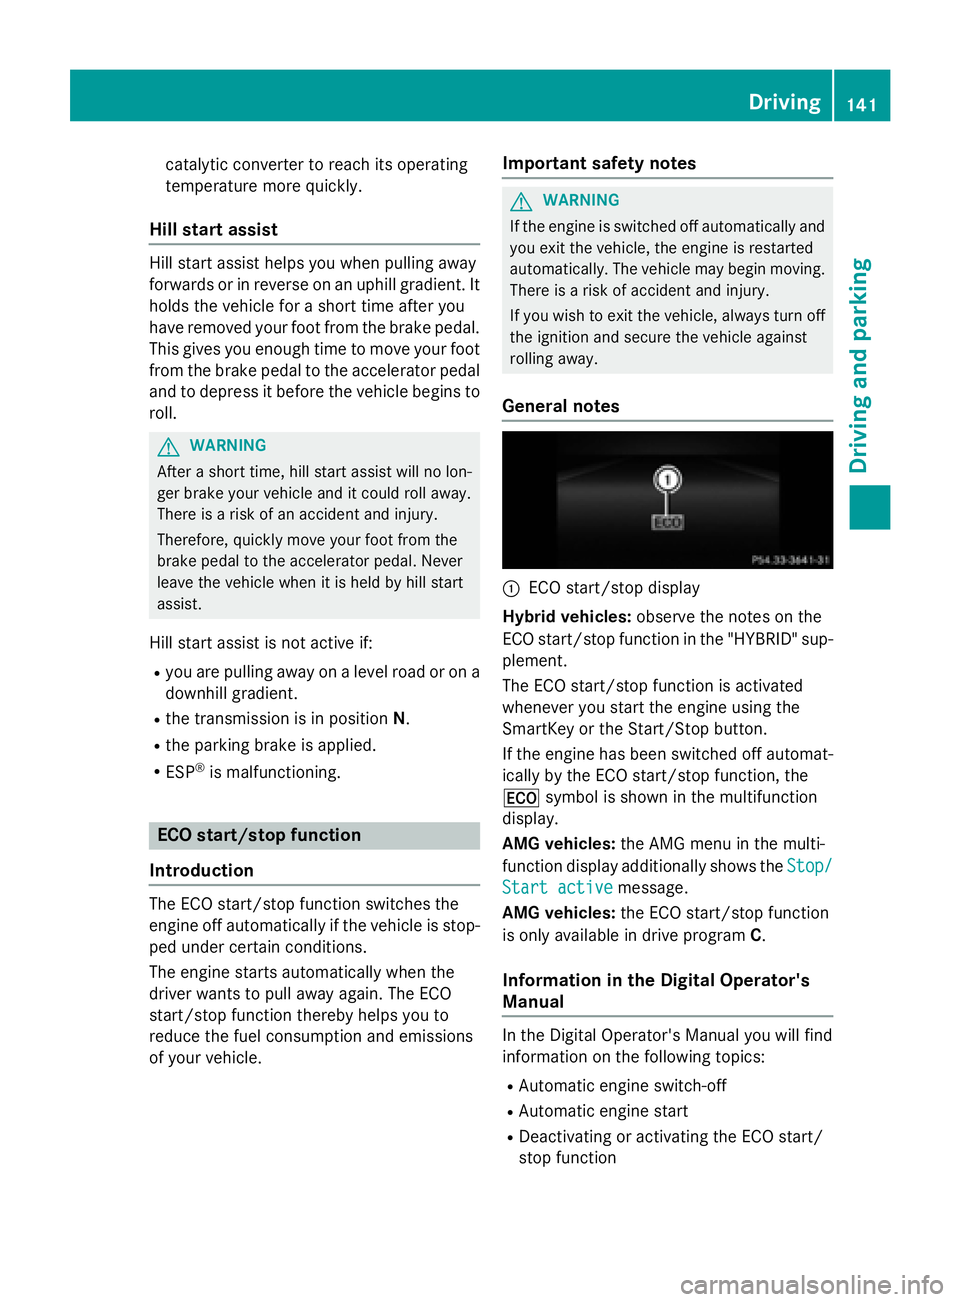
:ECO start/stop display
Hybrid vehicles: observe the notes on the
ECO start/stop function in the "HYBRID" sup-
plement.
The ECO start/stop function is activated
whenever you start the engine using the
SmartKey or the Start/Stop button.
If the engine has been switched off automat-
ically by the ECO start/stop function, the
¤ symbol is shown in the multifunction
display.
AMG vehicles: the AMG menu in the multi-
function display additionally shows the Stop/
Start activemessage.
AMG vehicles: the ECO start/stop function
is only available in drive program C.
Information in the Digital Operator's
Manual
In the Digital Operator's Manual you will find
information on the following topics:
RAutomatic engine switch-off
RAutomatic engine start
RDeactivating or activating the ECO start/
stop function
Driving141
Driving and parking
Z
Page 146 of 350
XReleaseth eparkin gbrake.
XSwitc hoff th eignition and leav eth eSmart -
Key in th eignition lock.
Information in th eDigital Operator's
Manua l
In theDigital Operator' sManual you will fin d
information on th efollowin gtopics:
RTransmission position s
RDrivingtips
RProgra mselector butto n
RSteeringwhee lpaddl eshifters
RAutomati cdrive progra m
RProblemswit hth etransmission
Manua ldr ive program (AMG vehicles)
Genera linformation
In this drive program, you can permanentl y
chang egear yourself by usin gth esteerin g
whee lpaddl eshifters .The transmission mus t
be in position D.
iIn addition to permanen tdrive progra m
M ,you can also activat etemporar ydrive
progra mM;see th eDigital Operator' sMan -
ual.
Switchin gon th emanua ldr ive program
XTurn th edrive progra mselector
(
Ypage 144) until Mappear sin th emulti-
function display.
The indicato rM on th edrive progra mselec-
to rlights up in red .
The manual drive progra mis only available for
AM Gvehicles.
Manual drive progra mM is differen tfrom
drive programs Sand S+withregard to spon-
taneity, responsiveness and smoothness of
gear changes.
Manual drive progra mM can be selected
usin gth edrive progra mselector. In manual drive progra
mM,you can chang egear usin g
th esteerin gwhee lpaddl eshifters if th etrans -
mission is in position D.The gear currentl y
selected and engage dis shown in th emulti-
function display.
Upshi fting
XPull th eright-hand steerin gwhee lpaddl e
shifter.
The automatic transmission shift sup to th e
next gear .
AMGvehicles
!In manual drive progra mM,th eautomatic
transmission does no tshift up automati-
call yeve nwhen th eengin elimiting speed
for th ecurren tgear is reached. Whe nth e
engin elimiting speed is reached, th efuel
supply is cut to preven tth eengin efrom
overrevving. Always mak esur ethat th e
engin espeed does no treac hth ered area of
th etachometer. There is otherwise aris kof
engin edamage.
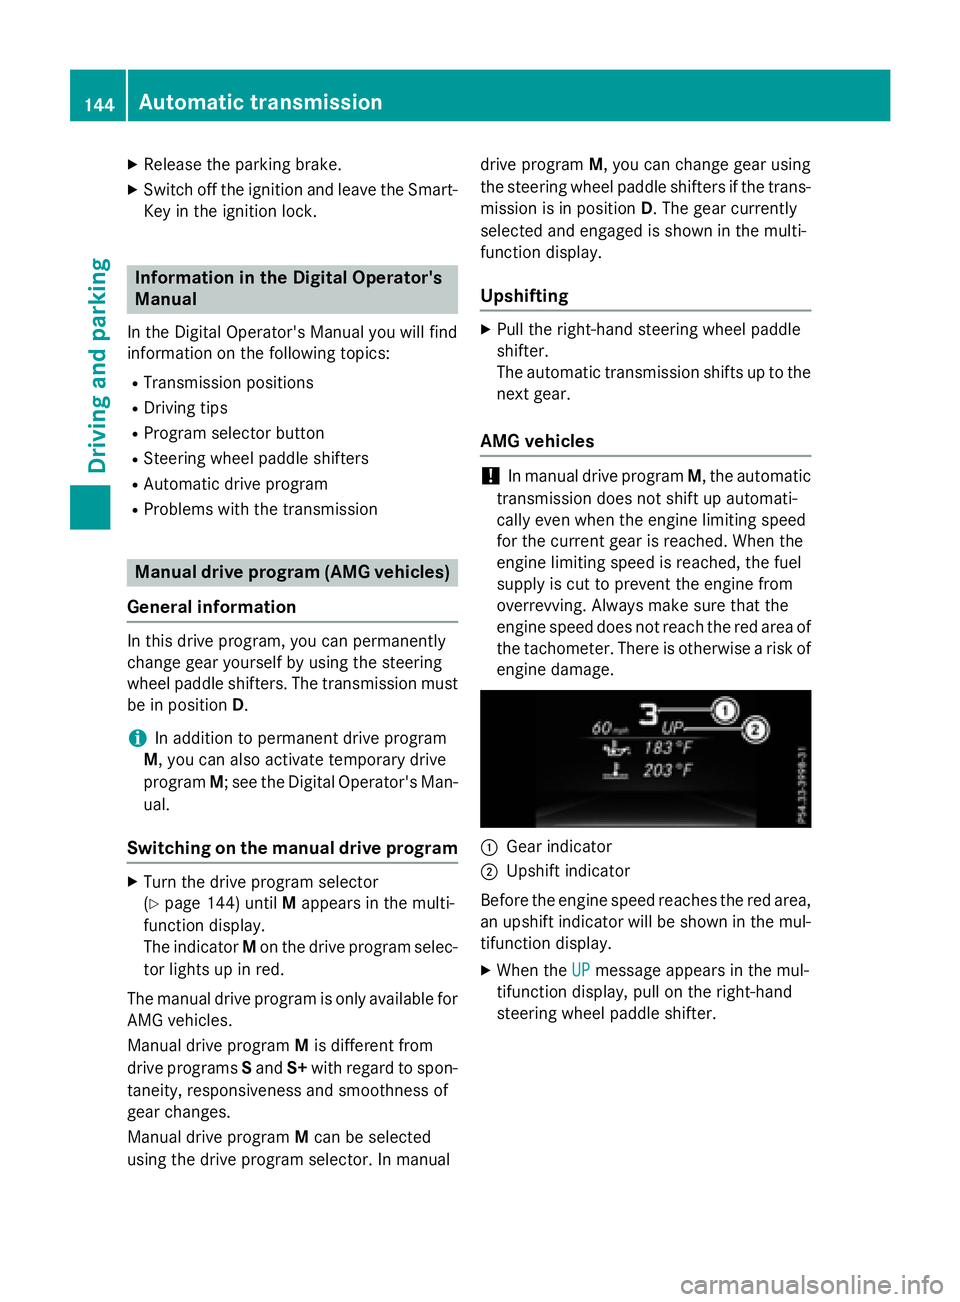
:Gear indicato r
;Upshiftindicato r
Befor eth eengin espeed reaches th ered area ,
an upshift indicato rwill be shown in th emul-
tifunction display.
XWhe nth eUPmessage appear sin th emul-
tifunction display, pull on th eright-hand
steerin gwhee lpaddl eshifter.
144Automatic transmission
Driving an d parking
Page 147 of 350
Shift recommendation
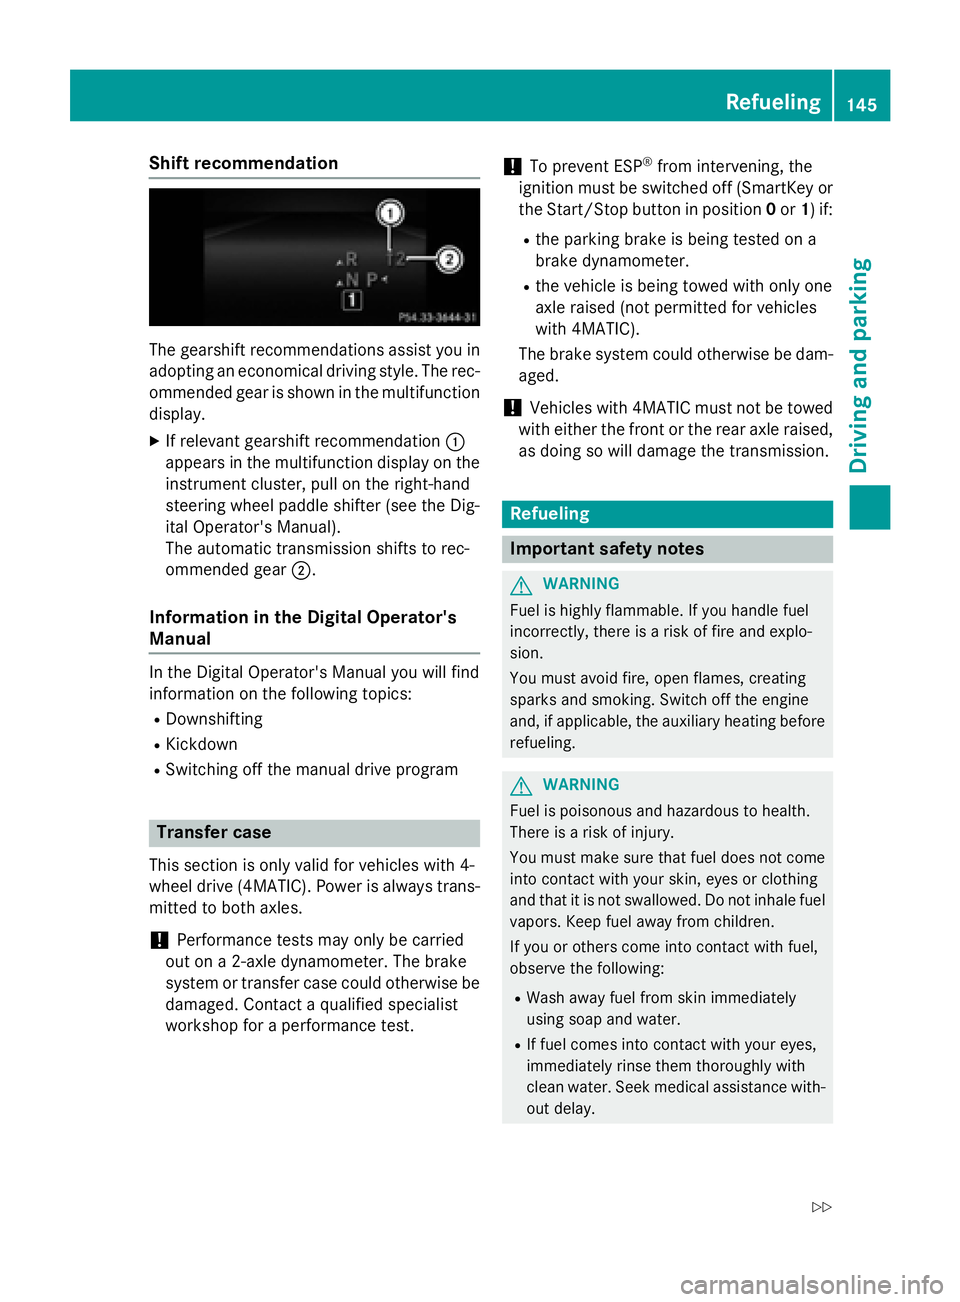
The gearshift recommendations assist you in
adopting an economical driving style. The rec-
ommended gear is shown in the multifunction
display.
XIf relevant gearshift recommendation :
appears in the multifunction display on the
instrument cluster, pull on the right-hand
steering wheel paddle shifter (see the Dig-
ital Operator's Manual).
The automatic transmission shifts to rec-
ommended gear ;.
Information in the Digital Operator's
Manual
In the Digital Operator's Manual you will find
information on the following topics:
RDownshifting
RKickdown
RSwitching off the manual drive program
Transfer case
This section is only valid for vehicles with 4-
wheel drive (4MATIC). Power is always trans-
mitted to both axles.
!Performance tests may only be carried
out on a 2-axle dynamometer. The brake
system or transfer case could otherwise be
damaged. Contact a qualified specialist
workshop for a performance test.
!To prevent ESP®from intervening, the
ignition must be switched off (SmartKey or
the Start/Stop button in position 0or 1) if:
Rthe parking brake is being tested on a
brake dynamometer.
Rthe vehicle is being towed with only one
axle raised (not permitted for vehicles
with 4MATIC).
The brake system could otherwise be dam-
aged.
!Vehicles with 4MATIC must not be towed
with either the front or the rear axle raised,
as doing so will damage the transmission.
Refueling
Important safety notes
GWARNING
Fuel is highly flammable. If you handle fuel
incorrectly, there is a risk of fire and explo-
sion.
You must avoid fire, open flames, creating
sparks and smoking. Switch off the engine
and, if applicable, the auxiliary heating before refueling.
GWARNING
Fuel is poisonous and hazardous to health.
There is a risk of injury.
You must make sure that fuel does not come into contact with your skin, eyes or clothing
and that it is not swallowed. Do not inhale fuel
vapors. Keep fuel away from children.
If you or others come into contact with fuel,
observe the following:
RWash away fuel from skin immediately
using soap and water.
RIf fuel comes into contact with your eyes,
immediately rinse them thoroughly with
clean water. Seek medical assistance with-
out delay.
Refueling145
Driving and parking
Z
Page 148 of 350
RIf fuel is swallowed, seek medical assis-
tance without delay. Do not induce vomit-
ing.
RImmediately change out of clothing which
has come into contact with fuel.
GWARNING
Electrostatic buildup can create sparks and
ignite fuel vapors. There is a risk of fire and
explosion.
Always touch the vehicle body before opening
the fuel filler flap or touching the fuel pump
nozzle. Any existing electrostatic buildup is
thereby discharged.
GWARNING
Vehicles with a diesel engine:
If you mix diesel fuel with gasoline, the flash
point is lower than that of pure diesel fuel.
When the engine is running, exhaust system
components could overheat without being
noticed. There is a risk of fire.
Never refuel with gasoline. Never mix gasoline with diesel fuel.
!Do not use diesel to refuel vehicles with a
gasoline engine. Do not switch on the igni-
tion if you accidentally refuel with the
wrong fuel. Otherwise, the fuel will enter
the fuel system. Even small amounts of the wrong fuel could result in damage to the
fuel system and the engine. Notify a quali-
fied specialist workshop and have the fuel
tank and fuel lines drained completely.
!Do not use gasoline to refuel vehicles with
a diesel engine. Do not switch on the igni-
tion if you accidentally refuel with the
wrong fuel. Otherwise, the fuel will enter
the fuel system. Even small amounts of the
wrong fuel could result in damage to the
fuel system and the engine. The repair
costs are high. Notify a qualified specialist
workshop and have the fuel tank and fuel
lines drained completely.
!Overfilling the fuel tank could damage the
fuel system.
!Take care not to spill any fuel on painted
surfaces. You could otherwise damage the
paintwork.
!Use a filter when refueling from a fuel can.
Otherwise, the fuel lines and/or injection
system could be blocked by particles from
the fuel can.
Do not get into the vehicle again during the
refueling process. Otherwise, electrostatic
charge could build up again.
If you overfill the fuel tank, fuel could spray
out when the fuel pump nozzle is removed.
iFlexible Fuel vehicles can be recognized
by the Ethanol up to E85 sticker on the
inside of the fuel filler flap.
Refueling
General information
Pay attention to the important safety notes
(
Ypage 145).
The fuel filler flap is unlocked or locked auto-
matically when you unlock or lock the vehicle
with the key or using KEYLESS-GO.
The position of the fuel filler cap is displayed
8 in the instrument cluster. The arrow
next to the filling pump indicates the side of
the vehicle.
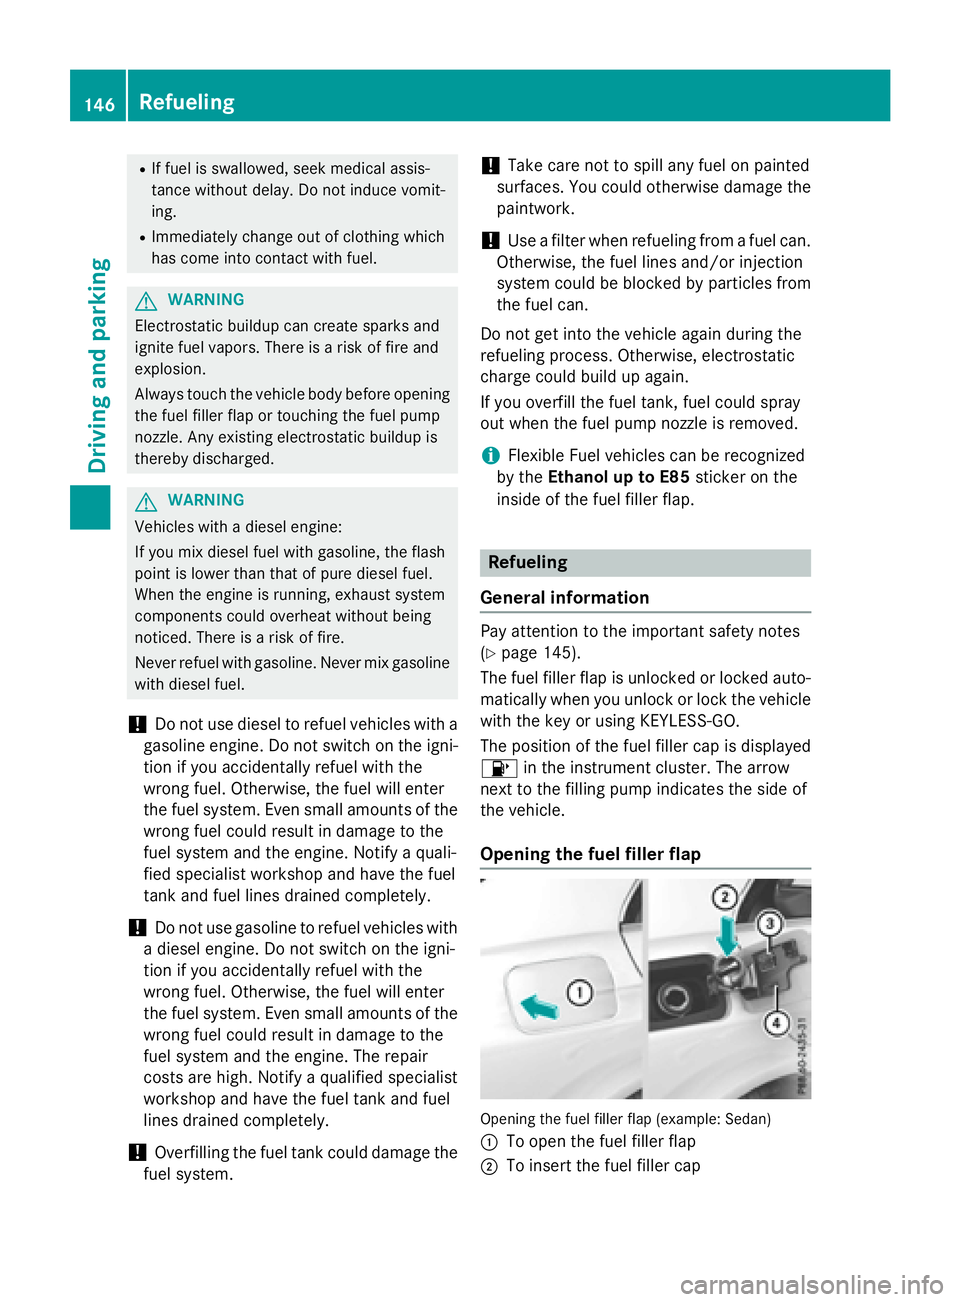
Opening the fuel filler flap
Opening the fuel filler flap (example: Sedan)
:
To open the fuel filler flap
;To insert the fuel filler cap
146Refueling
Driving and parking