warning lights MERCEDES-BENZ E300 BLUETEC 2011 W212 User Guide
[x] Cancel search | Manufacturer: MERCEDES-BENZ, Model Year: 2011, Model line: E300 BLUETEC, Model: MERCEDES-BENZ E300 BLUETEC 2011 W212Pages: 400, PDF Size: 16.3 MB
Page 82 of 400

XTo unlock the fuel filler flap: insert the
SmartKey in the ignition lock.
Removing the mechanical key
XPush release catch : in the direction of
the arrow and at the same time remove
mechanical key ; from the SmartKey.
SmartKey battery
Important safety notes
It is advisable to have batteries replaced at a
qualified specialist workshop, e.g. at an
authorized Mercedes-Benz Center.
GWarning!
Batteries are toxic and contain caustic
substances. For this reason, keep batteries
out of the reach of children.
If a battery has been swallowed, visit a doctor
immediately.
GWarning
SmartKey batteries contain perchlorate
material, which may require special handling
and regard for the environment. Check with
your local government's disposal guidelines.
California residents, see www.dtsc.ca.gov/
HazardousWaste/Perchlorate/
index.cfm .
Checking the batteryXPress the & or % button.
The battery is working properly if battery
charge indicator lamp : lights up briefly.
If battery charge indicator lamp : does not
light up briefly during the test, the key
batteries are discharged.
XChange the key battery ( Y page 80).
i
Consult any authorized Mercedes-Benz
Center for a key battery.
i If the battery is tested within the signal
range of the vehicle, you can open or close
the vehicle by pressing & or %
respectively.
Changing the battery
You require a CR 2025 3 V cell battery.
XTake the mechanical key out of the
SmartKey ( Y page 79).XPress mechanical key ; into the opening
in the SmartKey in the direction of the80SmartKeyOpening and closing
BA 212 USA, CA Edition B 2011; 1; 5, en-USdimargiVersion: 3.0.3.62010-05-20T13:33:46+02:00 - Seite 80
Page 115 of 400
iThe steering wheel only moves upwards if
it has not already reached the upper end
stop.
The steering wheel is moved to the last
selected position when:
Rthe driver's door is closed, and
Ryou insert the key into the ignition lock.
or
Rin vehicles with KEYLESS-GO, you press the
Start/Stop button once.
When you close the driver's door with the
ignition switched on, the steering wheel is
also automatically moved to the previously
set position.
The last position of the steering wheel is
stored after each manual setting or when you
store the setting with the memory function
(Y page 115).
You can activate and deactivate the EASY-
ENTRY/EXIT feature in the on-board
computer (Y page 232).
GWarning
Let the system complete the adjustment
procedure before setting the vehicle in
motion. All steering wheel adjustment must
be completed before setting the vehicle in
motion. Driving off with the steering wheel
still adjusting could cause the driver to lose
control of the vehicle.
iIf the crash-responsive EASY-EXIT feature
is triggered in an accident, the steering
column will move upwards when the
driver's door is opened. This occurs
irrespective of the position of the key in the
ignition lock. This makes it easier to exit the
vehicle and rescue the occupants.
The crash-responsive EASY-EXIT feature is
only operational after an accident if the
EASY-EXIT/ENTRY feature is activated in
the on-board computer.
Mirrors
Rear-view mirror
Rear-view mirror (manual anti-glare)
XAnti-glare mode: flick anti-glare
switch : forwards or back.
Exterior mirrors
Adjusting the exterior mirrors
GWarning
Exercise care when using the passenger-side
exterior rear view mirror. The mirror surface
is convex (outwardly curved surface for a
wider field of view). Objects in mirror are
closer than they appear. Check your interior
rear view mirror and glance over your
shoulder before changing lanes.
The exterior mirrors are automatically heated
if the rear window heating is switched on and
the outside temperature is low.
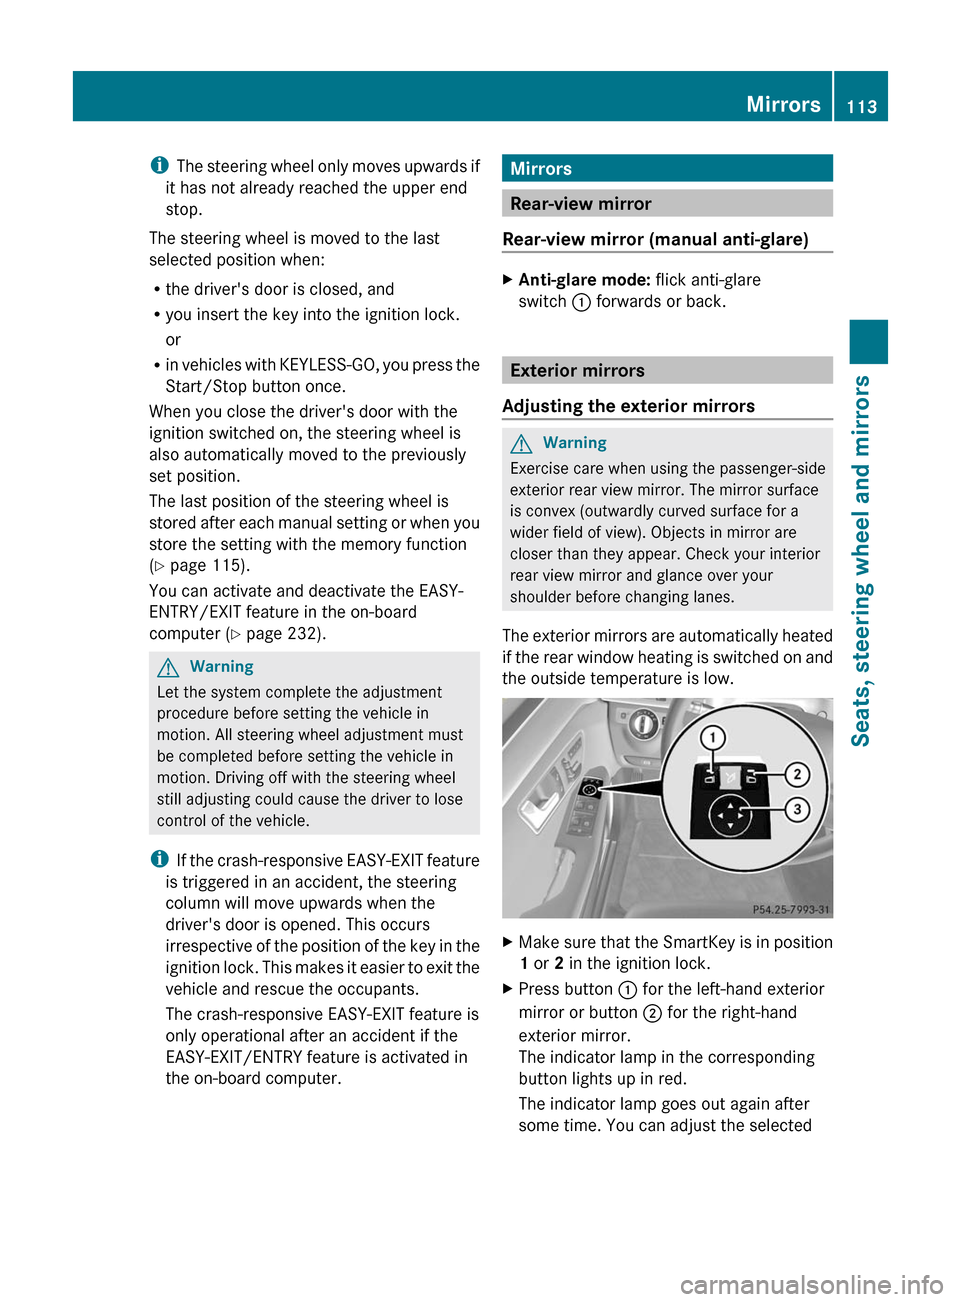
XMake sure that the SmartKey is in position
1 or 2 in the ignition lock.
XPress button : for the left-hand exterior
mirror or button ; for the right-hand
exterior mirror.
The indicator lamp in the corresponding
button lights up in red.
The indicator lamp goes out again after
some time. You can adjust the selected
Mirrors113Seats, steering wheel and mirrorsBA 212 USA, CA Edition B 2011; 1; 5, en-USdimargiVersion: 3.0.3.62010-05-20T13:33:46+02:00 - Seite 113Z
Page 120 of 400
Vehicle equipment
i This manual describes all the standard
and optional equipment of your vehicle
which was available at the time of
purchase. Country-specific differences are
possible. Bear in mind that your vehicle
may not feature all functions described
here. This also refers to safety-related
systems and functions.
Exterior lighting
Important safety notes
For reasons of safety, Mercedes-Benz
recommends that you drive with the lights
switched on even during the daytime. In some
countries, operation of the headlamps varies
due to legal requirements and self-imposed
obligations. In these countries, the daytime
running lamps are automatically switched on
when the engine is started.
Notes on driving abroad
Converting to symmetrical low beam
when driving abroad: switch the headlamps
to symmetrical low beam in countries in
which traffic drives on the opposite side of the
road to the country where the vehicle is
registered. This prevents oncoming traffic
from being dazzled. Symmetrical lights do not
illuminate as large an area of the edge of the
road.
Have the headlamps converted at a qualified
specialist workshop, e.g. an authorized
Mercedes-Benz Center, as close to the border
as possible before driving in these countries.
Converting to asymmetrical low beam
after returning: have the headlamps
converted back to asymmetrical low beam at
a qualified specialist workshop, e.g. an
authorized Mercedes-Benz Center, as soon as
possible after crossing the border when
returning.
Light switch
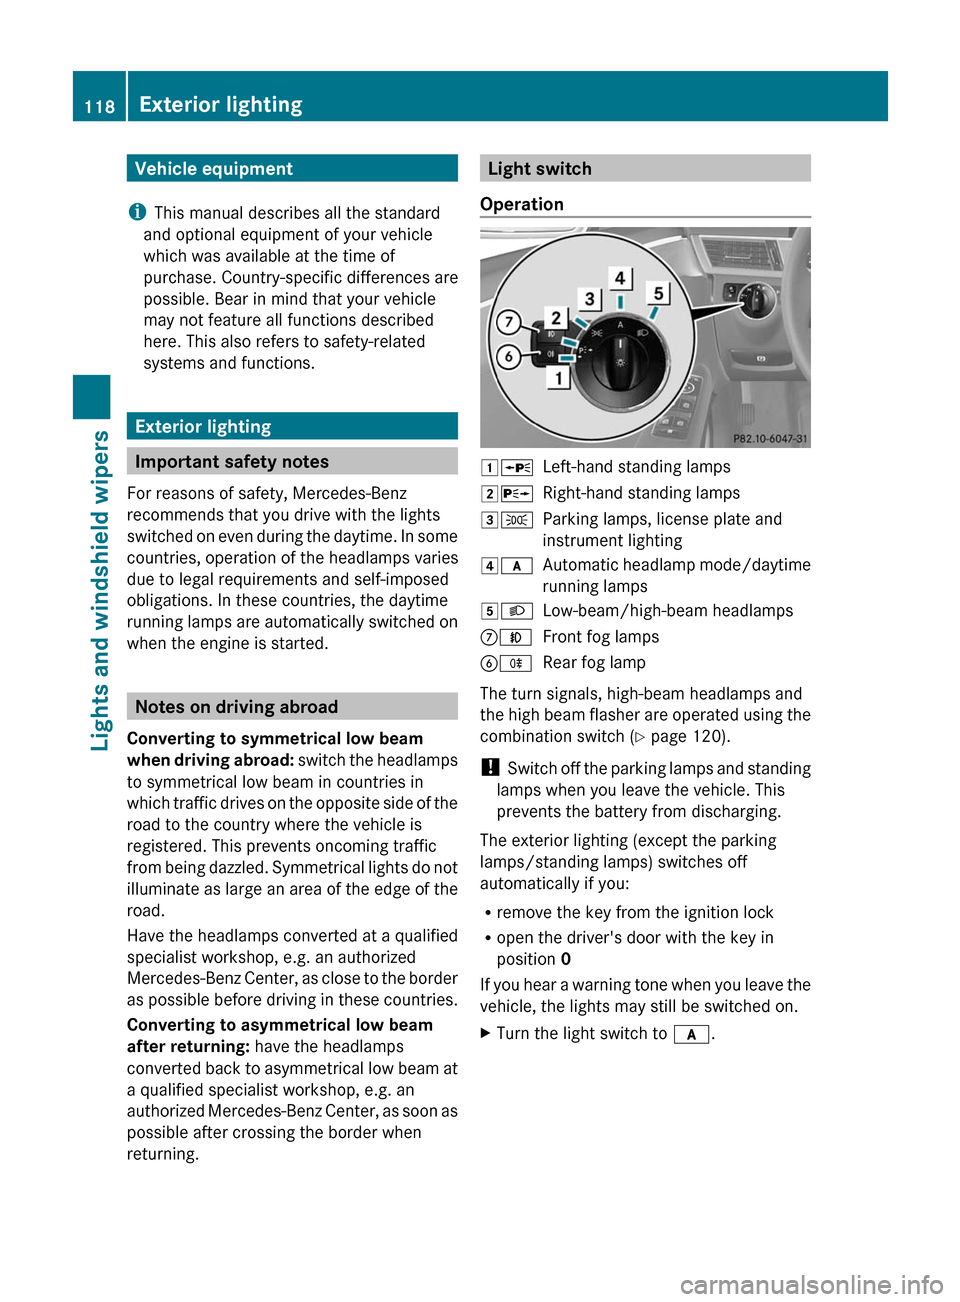
Operation1 WLeft-hand standing lamps2XRight-hand standing lamps3TParking lamps, license plate and
instrument lighting4 cAutomatic headlamp mode/daytime
running lamps5 LLow-beam/high-beam headlampsCNFront fog lampsBRRear fog lamp
The turn signals, high-beam headlamps and
the high beam flasher are operated using the
combination switch ( Y page 120).
! Switch off the parking lamps and standing
lamps when you leave the vehicle. This
prevents the battery from discharging.
The exterior lighting (except the parking
lamps/standing lamps) switches off
automatically if you:
R remove the key from the ignition lock
R open the driver's door with the key in
position 0
If you hear a warning tone when you leave the
vehicle, the lights may still be switched on.
XTurn the light switch to c.118Exterior lightingLights and windshield wipers
BA 212 USA, CA Edition B 2011; 1; 5, en-USdimargiVersion: 3.0.3.62010-05-20T13:33:46+02:00 - Seite 118
Page 122 of 400
Fog lamps and rear fog lamps
Front fog lamps
Only vehicles with front fog lamps have the
"fog lamps" function.
GWarning!
If you suspect that driving conditions will be
foggy, turn the light switch to L before you
start your journey. Otherwise, your vehicle
may not be visible and you could endanger
yourself and others.
XTo switch on the front fog lamps: turn
the key in the ignition lock to position 2 or
start the engine.
XTurn the light switch to L or c.XPress the N button.
The green N indicator lamp in the
instrument cluster lights up.
XTo switch off the front fog lamps: press
the N button.
The green N indicator lamp in the
instrument cluster goes out.
iIf you switch the engine off (key in
position 1 in the ignition lock) and then
restart it, the previous fog lamp settings are
restored.
Rear fog lamp
XTo switch on the rear fog lamp: turn the
key in the ignition lock to position 2 or start
the engine.
XTurn the light switch to L or c.
When the light switch is set to c, the
rear fog lamp only lights up if the low-beam
headlamps are switched on.
XPress the R button.
The yellow R indicator lamp in the
instrument cluster lights up.
XTo switch off the rear fog lamp: press the
R button.
The yellow R indicator lamp in the
instrument cluster goes out.
iIf you switch the engine off (key in
position 1 in the ignition lock) and then
restart it, the previous rear fog lamp
settings are restored.
Combination switch
Turn signals
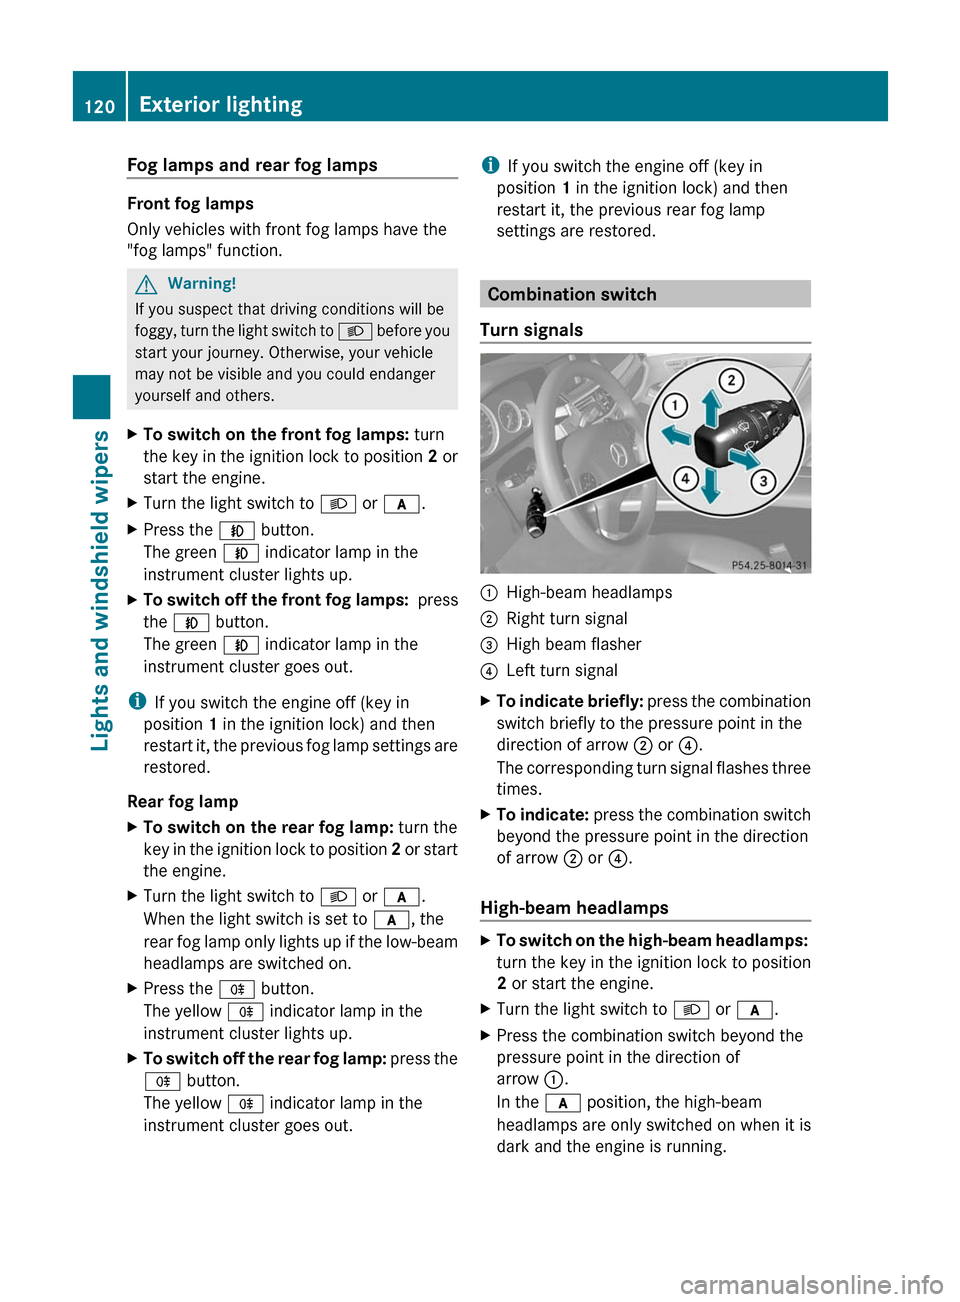
:High-beam headlamps;Right turn signal=High beam flasher?Left turn signalXTo indicate briefly: press the combination
switch briefly to the pressure point in the
direction of arrow ; or ?.
The corresponding turn signal flashes three
times.
XTo indicate: press the combination switch
beyond the pressure point in the direction
of arrow ; or ?.
High-beam headlamps
XTo switch on the high-beam headlamps:
turn the key in the ignition lock to position
2 or start the engine.
XTurn the light switch to L or c.XPress the combination switch beyond the
pressure point in the direction of
arrow :.
In the c position, the high-beam
headlamps are only switched on when it is
dark and the engine is running.
120Exterior lightingLights and windshield wipers
BA 212 USA, CA Edition B 2011; 1; 5, en-USdimargiVersion: 3.0.3.62010-05-20T13:33:46+02:00 - Seite 120
Page 123 of 400
The K indicator lamp in the instrument
cluster lights up when the high-beam
headlamps are switched on.XTo switch off the high-beam
headlamps: move the combination switch
back to its normal position.
The K indicator lamp in the instrument
cluster goes out.
Adaptive Highbeam Assist
GWarning!
The Adaptive Highbeam Assist is only an aid
intended to support you while driving. The
driver is and remains responsible for proper
vehicle lighting in accordance with the
prevailing light, sight and traffic conditions.
The system may be impaired or unavailable
when
R visibility is poor, e.g. due to snow, rain, fog,
or heavy spray
R the optical sensor area of the windshield is
dirty, fogged up, or covered by a sticker for
example
The system cannot recognize the following
road users:
R Road users without a lighting system of
their own, e.g. pedestrians
R Road users with dim lighting of their own,
e.g. cyclists
R Road users whose lighting is obstructed,
e.g. road users behind a guardrail
R In some seldom cases, even road users with
a lighting system of their own may be
recognized too late or not at all.
The automatic high-beam headlamps will then
not be deactivated or it will be activated in
spite of preceding or oncoming road users.
This could endanger you and/or others and
cause an accident. Always pay close attention
to the traffic situation and switch off the high
beam manually if necessary.
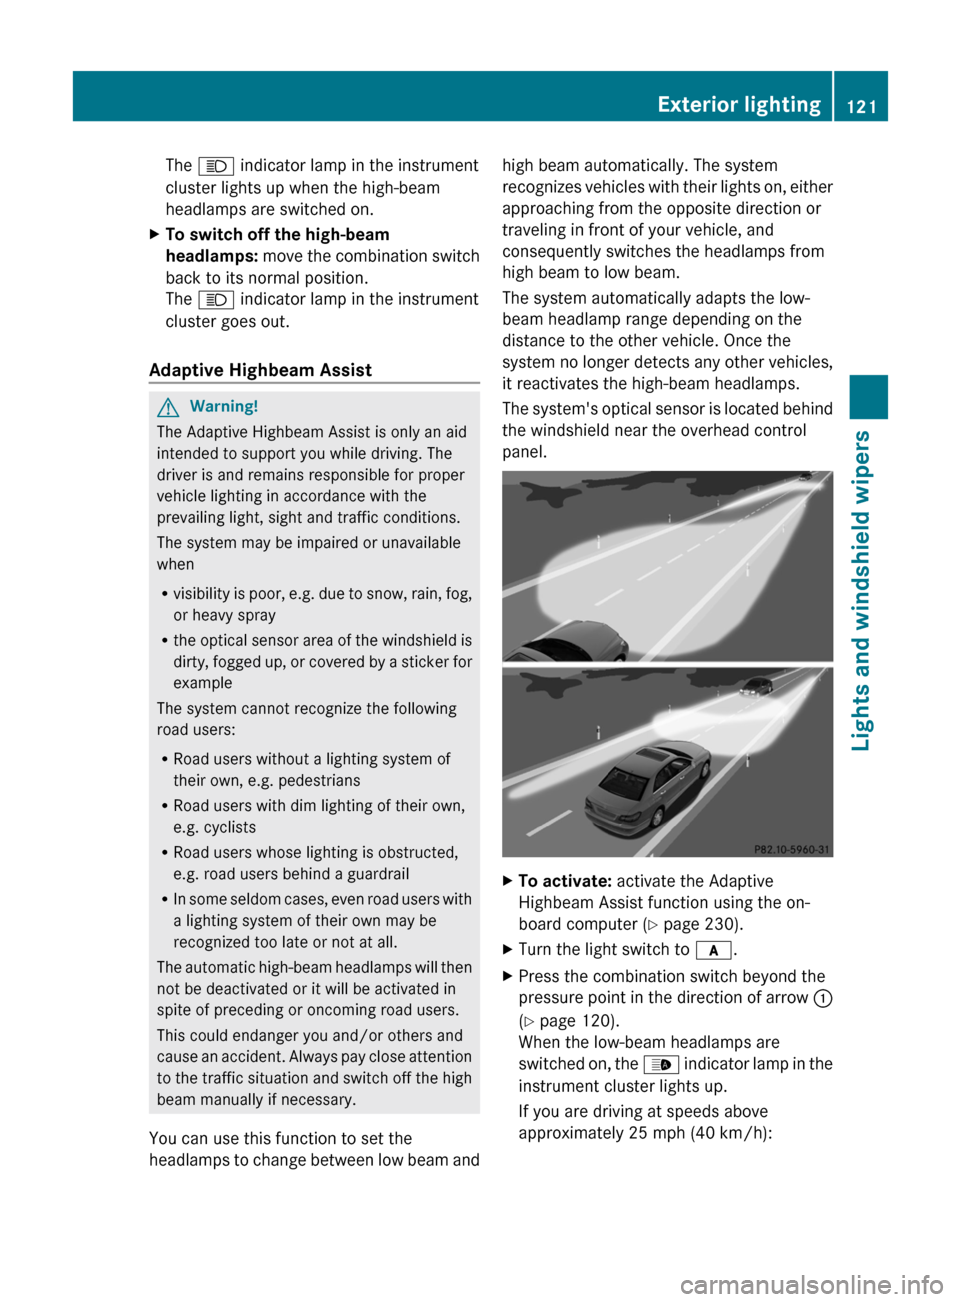
You can use this function to set the
headlamps to change between low beam and
high beam automatically. The system
recognizes vehicles with their lights on, either
approaching from the opposite direction or
traveling in front of your vehicle, and
consequently switches the headlamps from
high beam to low beam.
The system automatically adapts the low-
beam headlamp range depending on the
distance to the other vehicle. Once the
system no longer detects any other vehicles,
it reactivates the high-beam headlamps.
The system's optical sensor is located behind
the windshield near the overhead control
panel.XTo activate: activate the Adaptive
Highbeam Assist function using the on-
board computer ( Y page 230).XTurn the light switch to c.XPress the combination switch beyond the
pressure point in the direction of arrow :
( Y page 120).
When the low-beam headlamps are
switched on, the _ indicator lamp in the
instrument cluster lights up.
If you are driving at speeds above
approximately 25 mph (40 km/h):Exterior lighting121Lights and windshield wipersBA 212 USA, CA Edition B 2011; 1; 5, en-USdimargiVersion: 3.0.3.62010-05-20T13:33:46+02:00 - Seite 121Z
Page 124 of 400
the headlamp range is set automatically
depending on the distance between the
vehicle and other road users.
if you are driving at speeds above
approximately 35 mph (55 km/h) and no
other road users have been detected:
the high-beam headlamps are switched on
automatically. The K indicator lamp in
the instrument cluster also lights up.
if you are driving at speeds below
approximately 30 mph (45 km/h) and other
road users have been detected or the roads
are illuminated sufficiently:
the high-beam headlamps are switched off
automatically. The K indicator lamp in
the instrument cluster goes out. The _
indicator lamp in the instrument cluster
stays on.
XTo deactivate: move the combination
switch back to its normal position.
The _ indicator lamp in the instrument
cluster goes out.
High-beam flasher
XTo switch on: turn the key in the ignition
lock to position 1 or 2 or start the engine.
XPull the combination switch briefly in the
direction of arrow =.
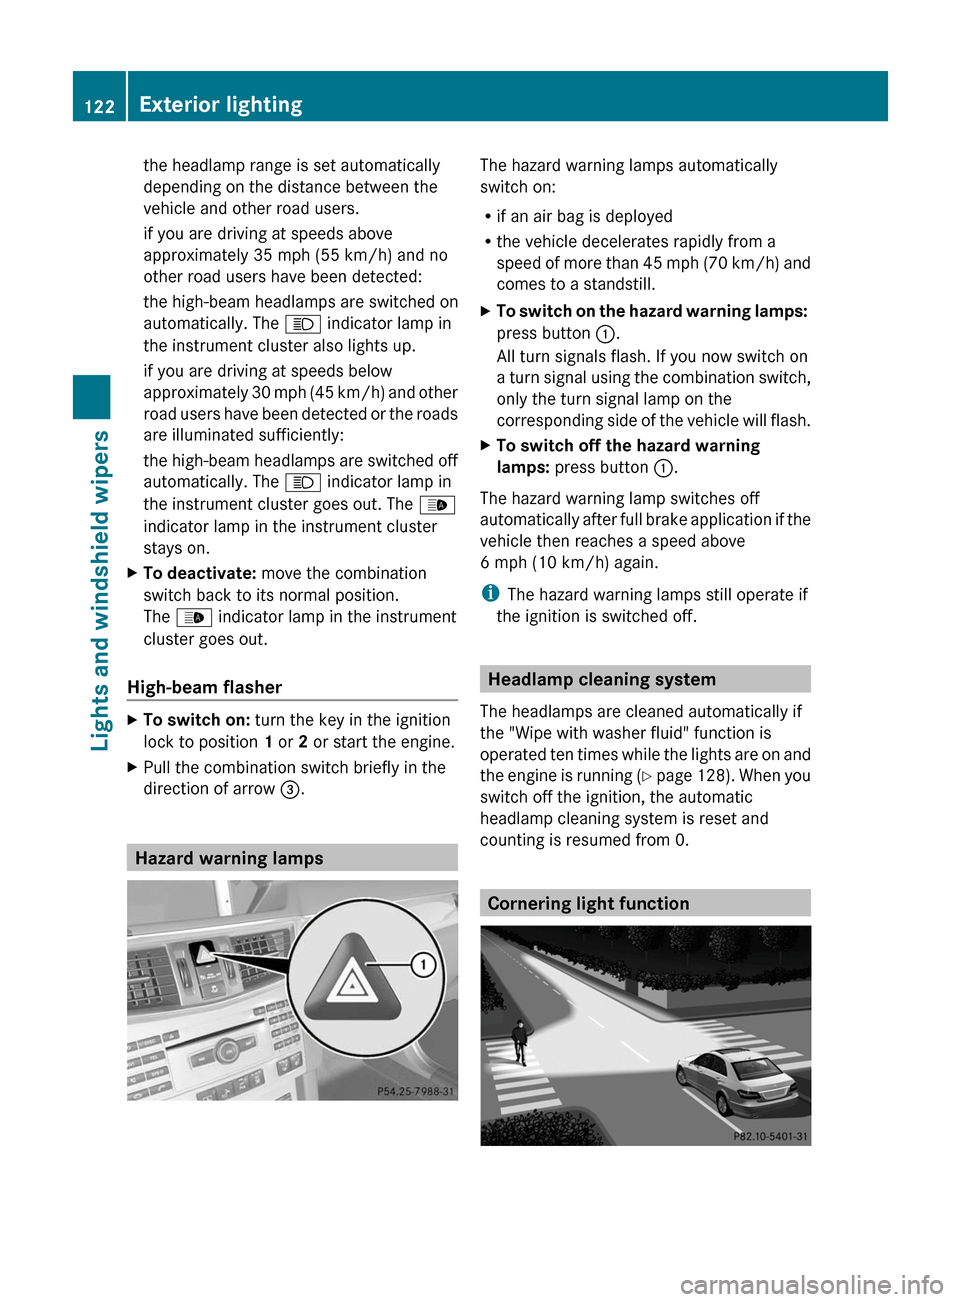
Hazard warning lamps
The hazard warning lamps automatically
switch on:
Rif an air bag is deployed
Rthe vehicle decelerates rapidly from a
speed of more than 45 mph (70 km/h) and
comes to a standstill.
XTo switch on the hazard warning lamps:
press button :.
All turn signals flash. If you now switch on
a turn signal using the combination switch,
only the turn signal lamp on the
corresponding side of the vehicle will flash.
XTo switch off the hazard warning
lamps: press button :.
The hazard warning lamp switches off
automatically after full brake application if the
vehicle then reaches a speed above
6 mph (10 km/h) again.
iThe hazard warning lamps still operate if
the ignition is switched off.
Headlamp cleaning system
The headlamps are cleaned automatically if
the "Wipe with washer fluid" function is
operated ten times while the lights are on and
the engine is running (Y page 128). When you
switch off the ignition, the automatic
headlamp cleaning system is reset and
counting is resumed from 0.
Cornering light function
122Exterior lightingLights and windshield wipers
BA 212 USA, CA Edition B 2011; 1; 5, en-USdimargiVersion: 3.0.3.62010-05-20T13:33:46+02:00 - Seite 122
Page 126 of 400
Interior lighting control
Important notes
In order to prevent the vehicle's battery from
discharging, the interior lighting functions are
automatically deactivated after some time
except for when the key is in position 2 in the
ignition lock.
Automatic interior lighting control
XTo switch on/off: press the | button.
When the automatic interior lighting
control is activated, the button is flush with
the overhead control panel.
The interior lighting automatically switches
on if you:
R unlock the vehicle
R open a door
R remove the key from the ignition lock
The interior light is activated for a short while
when the key is removed from the ignition
lock. You can activate this delayed switch-off
using the on-board computer ( Y page 231).
Manual interior lighting control
XTo switch the front interior lighting on/
off: press the c button.XTo switch the rear interior lighting on/
off: press the u button.XTo switch the reading lamps on/off:
press the p button.
Crash-responsive emergency lighting
If the interior lighting is set to automatic, the
interior lighting is activated automatically if
the vehicle is involved in an accident.
XTo switch off the crash-responsive
emergency lighting: press the hazard
warning lamp button.
or
XLock and then unlock the vehicle using the
key.Changing bulbs
Important safety notes
Xenon bulbs
If your vehicle is equipped with Xenon bulbs,
you can recognize this by the following: the
cone of light from the Xenon bulbs moves
from the top to the bottom and back again
when you start the engine. For this to be
observed, the lights must be switched on
before starting the engine.
GWarning!
Xenon bulbs carry a high voltage. You could
get an electric shock and be seriously or even
fatally injured if you touch the electric
contacts on Xenon bulbs. Therefore, never
remove the cover from Xenon bulbs.
Do not change Xenon bulbs yourself, but have
them replaced at a qualified specialist
workshop which has the necessary specialist
knowledge and tools to carry out the work
required.
Mercedes-Benz recommends that you use an
authorized Mercedes-Benz Center for this
purpose. In particular, work relevant to safety
or on safety-related systems must be carried
out at a qualified specialist workshop.
Bulbs and lamps are an important aspect of
vehicle safety. You must therefore make sure
that these function correctly at all times.
Have the headlamp setting checked regularly.
Other bulbs
GWarning!
Bulbs and lamps can be very hot. You should
therefore allow them to cool down before you
change them. Otherwise, you could be burned
if you touch them.
Keep bulbs out of the reach of children.
Otherwise, they could damage the bulbs, for
example, and injure themselves.
124Changing bulbsLights and windshield wipers
BA 212 USA, CA Edition B 2011; 1; 5, en-USdimargiVersion: 3.0.3.62010-05-20T13:33:46+02:00 - Seite 124
Page 129 of 400
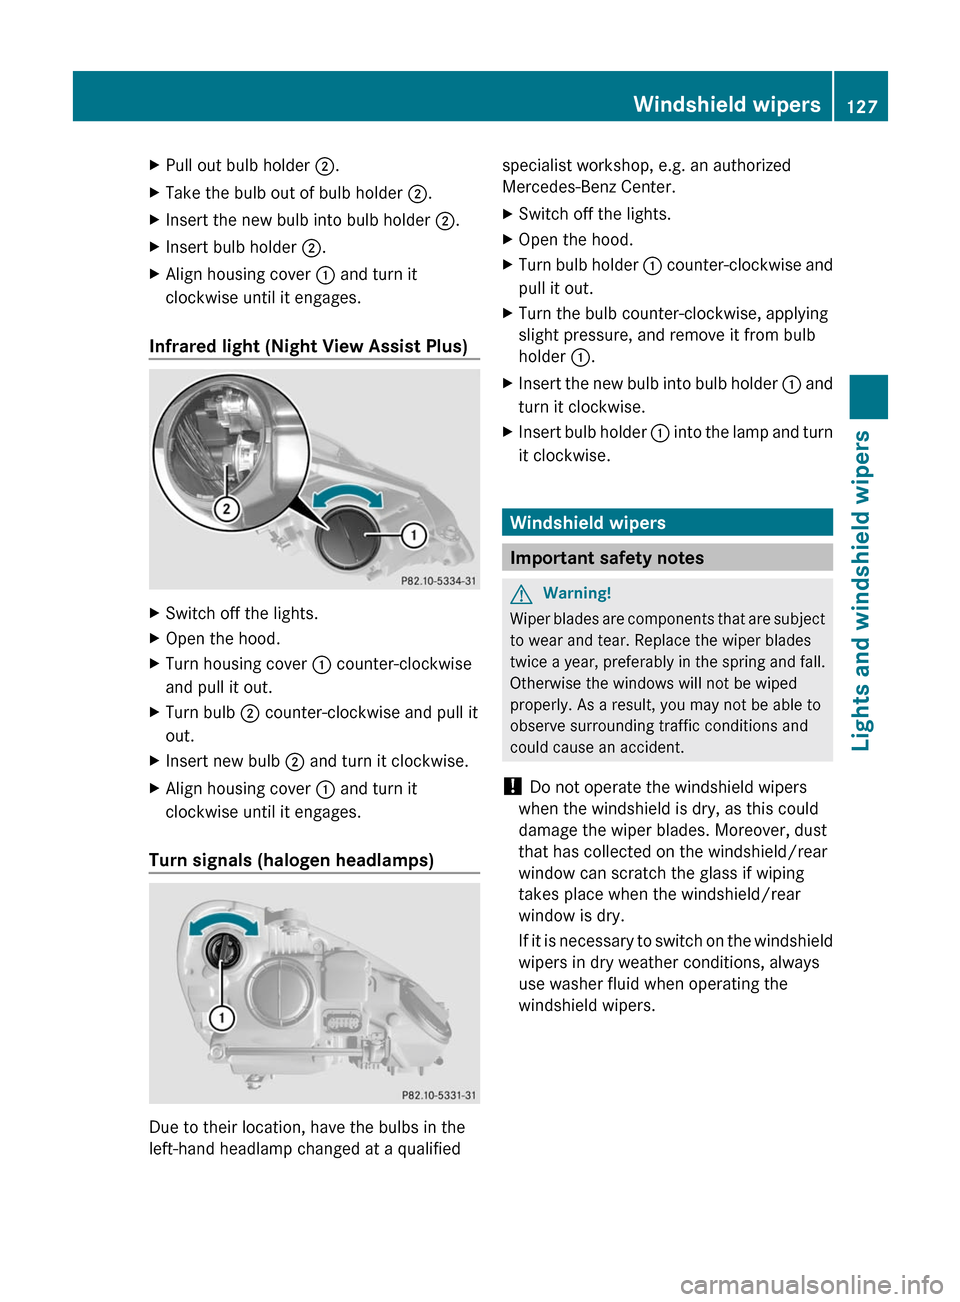
XPull out bulb holder ;.XTake the bulb out of bulb holder ;.XInsert the new bulb into bulb holder ;.XInsert bulb holder ;.XAlign housing cover : and turn it
clockwise until it engages.
Infrared light (Night View Assist Plus)
XSwitch off the lights.XOpen the hood.XTurn housing cover : counter-clockwise
and pull it out.
XTurn bulb ; counter-clockwise and pull it
out.
XInsert new bulb ; and turn it clockwise.XAlign housing cover : and turn it
clockwise until it engages.
Turn signals (halogen headlamps)
Due to their location, have the bulbs in the
left-hand headlamp changed at a qualified
specialist workshop, e.g. an authorized
Mercedes-Benz Center.
XSwitch off the lights.XOpen the hood.XTurn bulb holder : counter-clockwise and
pull it out.
XTurn the bulb counter-clockwise, applying
slight pressure, and remove it from bulb
holder :.
XInsert the new bulb into bulb holder : and
turn it clockwise.
XInsert bulb holder : into the lamp and turn
it clockwise.
Windshield wipers
Important safety notes
GWarning!
Wiper blades are components that are subject
to wear and tear. Replace the wiper blades
twice a year, preferably in the spring and fall.
Otherwise the windows will not be wiped
properly. As a result, you may not be able to
observe surrounding traffic conditions and
could cause an accident.
! Do not operate the windshield wipers
when the windshield is dry, as this could
damage the wiper blades. Moreover, dust
that has collected on the windshield/rear
window can scratch the glass if wiping
takes place when the windshield/rear
window is dry.
If it is necessary to switch on the windshield
wipers in dry weather conditions, always
use washer fluid when operating the
windshield wipers.
Windshield wipers127Lights and windshield wipersBA 212 USA, CA Edition B 2011; 1; 5, en-USdimargiVersion: 3.0.3.62010-05-20T13:33:46+02:00 - Seite 127Z
Page 131 of 400
Replacing the wiper blades
Important safety notes
GWarning
For safety reasons, switch off the windshield
wipers and remove the key from the ignition
lock before changing the wiper blades
(vehicles with KEYLESS-GO: make sure that
the on-board electronics are in state 0).
Otherwise, the wiper motor could be switched
on suddenly and cause injury.
! To avoid damaging the wiper blades,
make sure that you touch only the wiper
arm of the wiper.
! Never open the hood if a windshield wiper
arm has been folded away from the
windshield.
Never fold a windshield wiper arm without
a wiper blade back onto the windshield/
rear window.
Hold the windshield wiper arm firmly when
you change the wiper blade. If you release
the windshield wiper arm without a wiper
blade and it falls onto the windshield, the
windshield may be damaged by the force of
the impact.
Mercedes-Benz recommends that you have
the wiper blades replaced by a qualified
specialist workshop, e.g. at an authorized
Mercedes-Benz Center.
Replacing the windshield wiper blades
Removing the wiper blades
XRemove the key from the ignition lock or
turn the key to position 0 (KEYLESS-GO).
XFold the wiper arm away from the
windshield until it engages.
XSet the wiper blade at right angles to the
wiper arm.
XRemove the wiper blade from the retainer
on the wiper arm in the direction of the
arrow.
Installing the wiper blade
XSlide the new wiper blade into the retainer
on the wiper arm in the opposite direction
to the arrow.
Make sure that the wiper blade slides fully
into the retainer on the wiper arm.
XTurn the wiper blade parallel to the wiper
arm.
XFold the wiper arm back onto the
windshield.
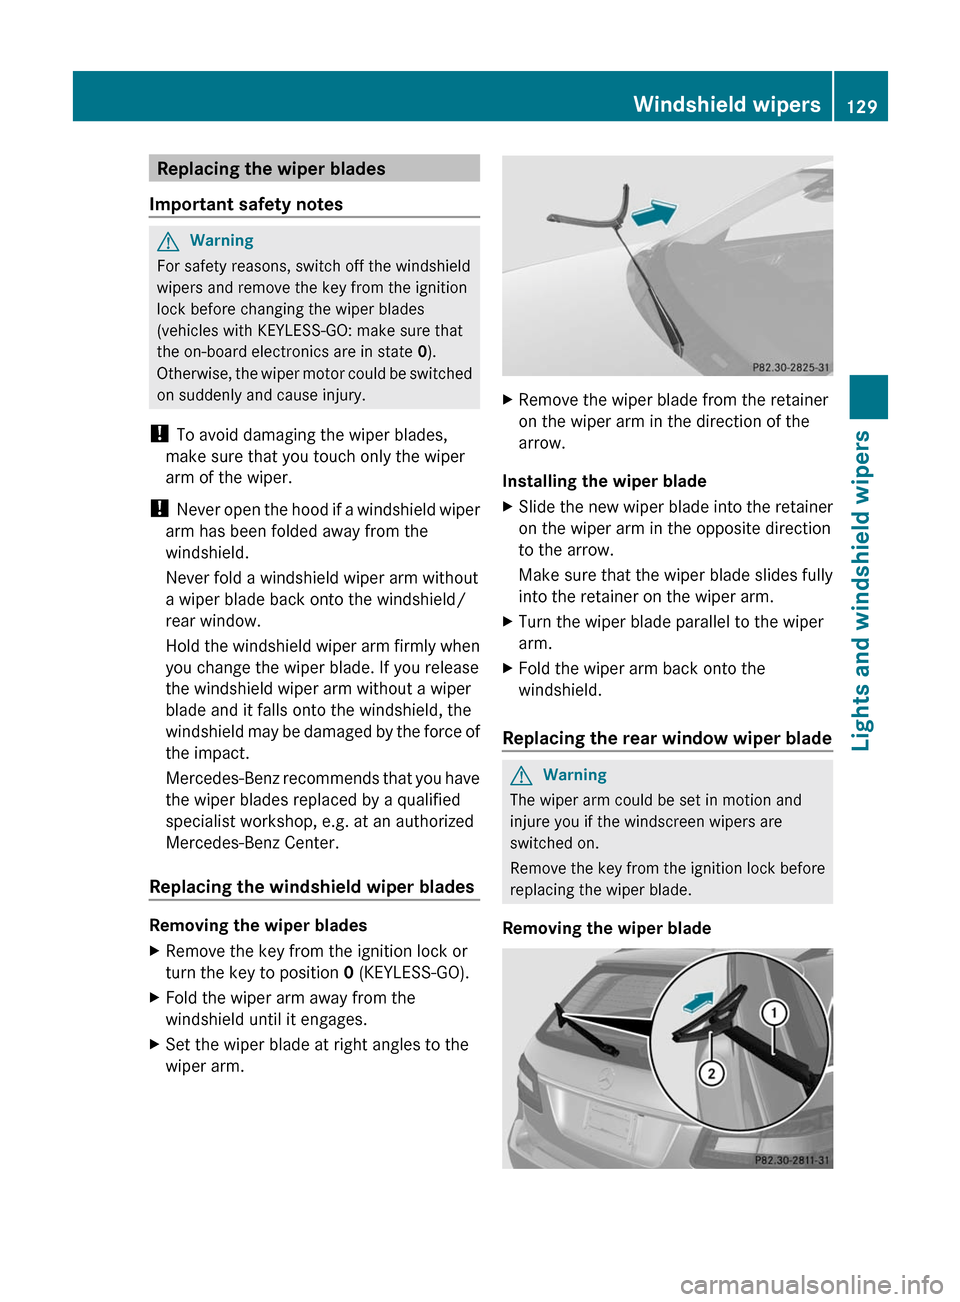
Replacing the rear window wiper blade
GWarning
The wiper arm could be set in motion and
injure you if the windscreen wipers are
switched on.
Remove the key from the ignition lock before
replacing the wiper blade.
Removing the wiper blade
Windshield wipers129Lights and windshield wipersBA 212 USA, CA Edition B 2011; 1; 5, en-USdimargiVersion: 3.0.3.62010-05-20T13:33:46+02:00 - Seite 129Z
Page 140 of 400

FunctioniNotes/tipsNReduces the airflowOReduces the temperatureSet the temperature to 72 ‡ (22 †).Operating the control systems
Switching the control on/off
Important information
GWarning!
When the climate control system is
deactivated, the outside air supply and
circulation are also deactivated. Only choose
this setting for a short time. Otherwise the
windows could fog up, impairing visibility and
endangering you and others.
i Activate climate control primarily using
the à button ( Y page 139).
Activating/deactivating
XTurn the SmartKey to position 2 in the
ignition lock.XTo activate: press the à button.
The indicator lamp above the à button
lights up. Airflow and air distribution are set
to automatic mode.
or
XPress the ^ button.
The indicator lamp above the ^ button
goes out. The previously selected settings
come into effect again.XTo deactivate: press the ^ button.
The indicator lamp above the ^ button
lights up.Switching cooling with air
dehumidification on/off
Important information
The cooling with air dehumidification function
is only available when the engine is running.
The air inside the vehicle is cooled and
dehumidified according to the temperature
selected.
GWarning
If you switch off the cooling function, the
vehicle will not be cooled when weather
conditions are warm. The windows can fog up
more quickly. Window fogging may impair
visibility and endanger you and others.
Condensation may drip from the underside of
the vehicle when automatic climate control is
in cooling mode. This is normal and not a sign
that there is a malfunction.
i The cooling with air dehumidification
function uses refrigerant R134a. This
coolant does not contain
chlorofluorocarbons, and therefore does
not damage the ozone layer.
Activating/deactivating
XTo switch on: press the ¿ button.
The indicator lamp above the ¿ button
lights up.XTo switch off: press the ¿ button.
The indicator lamp above the ¿ button
goes out. The cooling with air
dehumidification function has a delayed
switch-off feature.138Operating the control systemsClimate control
BA 212 USA, CA Edition B 2011; 1; 5, en-USdimargiVersion: 3.0.3.62010-05-20T13:33:46+02:00 - Seite 138