ECO mode MERCEDES-BENZ E300 BLUETEC 2011 W212 Owner's Manual
[x] Cancel search | Manufacturer: MERCEDES-BENZ, Model Year: 2011, Model line: E300 BLUETEC, Model: MERCEDES-BENZ E300 BLUETEC 2011 W212Pages: 400, PDF Size: 16.3 MB
Page 7 of 400
Ashtray ............................................... 291
Assistance menu (on-board
computer) .......................................... 227
ATA (Anti-Theft Alarm system) Activating/deactivating ...................74
Function ........................................... 74
Switching off the alarm ....................74
ATTENTION ASSIST
Activating/deactivating (on-
board computer) ............................ 228
Display message ............................ 250
Function/notes ............................. 201
Audio menu (on-board computer) .... 225
AUTO lights see Light sensor
Automatic car wash .......................... 314
Automatic lane recognition
system see Lane Keeping Assist ................229
Automatic transmission
DIRECT SELECT lever .....................155
Display message ............................ 258
Driving tips .................................... 157
Emergency running mode ..............162
Kickdown ....................................... 158
Malfunction .................................... 162
Program selector button ................158
Pulling away ................................... 151
Selector lever ................................ 154
Starting .......................................... 151
B
Backrest (display message) ............. 259
Bag hook ............................................ 281
BAS (Brake Assist System) ................. 66
BAS PLUS (Brake Assist System
Plus*) .................................................... 66
Battery Charging ........................................ 340
Checking (SmartKey) .......................80
Display message ............................ 248
Important safety guidelines
(SmartKey) ....................................... 80
Jump-starting ................................. 341
Replacing (SmartKey) ......................80
Safety notes .................................. 338
Belt
see Seat belts
Blind Spot Assist
Activating/deactivating (on-
board computer) ............................ 228
Display message ............................ 252
Function/notes ............................. 205
BlueTEC
AdBlue ®
......................................... 390
Adding AdBlue ®
............................. 167
Bottle holder ...................................... 289
Brake fluid Notes ............................................. 392
Brake fluid level ................................ 312
Brake lamp (display message) ......... 244
Brakes ABS .................................................. 65
BAS .................................................. 66
BAS PLUS ........................................ 66
Brake fluid (notes) .........................392
Display message ............................ 242
High-performance brake system ....174
Important safety notes ..................173
Maintenance .................................. 174
Parking brake ................................ 170
Warning lamp ................................. 263
Breakdown
see Accident (notes)
see Flat tire
Bulb
Infrared light .................................. 127
Bulbs
High-beam headlamps ...................126
Low-beam headlamps ....................126
Overview ........................................ 125
Parking lamps ................................ 126
Standing lamps (front) ...................126
Turn signals (front) ......................... 127
C
CAC (Customer Assistance Center) .........23
California
Important notice for retail
customers and lessees ....................21
Calling up a malfunction
see Display messages
Index5BA 212 USA, CA Edition B 2011; 1; 5, en-USdimargiVersion: 3.0.3.62010-05-20T13:33:46+02:00 - Seite 5
Page 8 of 400
Capacitiessee Technical data
Care
Carpets .......................................... 320
Car wash ........................................ 314
Display ........................................... 318
Gear or selector lever ....................319
Headlamps ..................................... 317
Matte finish ................................... 316
Night View Assist Plus ...................318
Notes ............................................. 313
Paint .............................................. 316
Plastic trim .................................... 319
Power washer ................................ 315
Rear view camera .......................... 318
Roof lining ...................................... 320
Seat belt ........................................ 320
Seat covers .................................... 319
Sensors ......................................... 317
Steering wheel ............................... 319
Tail pipes ....................................... 318
Trim strips ..................................... 319
Washing by hand ........................... 315
Wheels ........................................... 315
Windows ........................................ 316
Wiper blades .................................. 317
Wooden trim .................................. 319
Cargo compartment cover ............... 281
Cargo compartment enlargement ... 279
Cargo compartment floor Stowage well (under) .....................285
Cargo net
Important safety information .........283
Cargo tie down rings ......................... 280
CD player/CD changer (on-board
computer) .......................................... 225
Center console ..................................... 31
Central locking Automatic locking (on-board
computer) ...................................... 231
SmartKey ......................................... 76
Changing bulbs
Headlamps ..................................... 124
Changing gears .................................. 157
Changing the programming SmartKey ......................................... 79
Child-proof locks
Rear doors ....................................... 63Children
In the vehicle ................................... 58
Restraint systems ............................ 59
Child seat
Automatic recognition .....................48
Automatic recognition/air bag
deactivation, self-test ......................50
Display message ............................ 236
LATCH-type (ISOFIX ) child seat
anchors ............................................ 61
Special seat belt retractor ...............61
Top Tether ....................................... 62
Troubleshooting ............................... 51
Cigarette lighter ................................ 292
Classification system for
occupants (OCS) Faults ............................................... 47
Operation ......................................... 43
System self-test ............................... 46
Climate control
3-zone automatic climate control ..135
Activating/deactivating .................138
Activating/deactivating air-
recirculation mode .........................143
Controlling automatically ...............139
Cooling with air dehumidification ..138
Defrosting the windshield ..............141
Demisting the windows .................. 142
Dual-zone automatic climate
control ........................................... 133
Important safety information .........132
Indicator lamp ................................ 139
Maximum cooling .......................... 142
Problems with "cooling with air
dehumidification" ........................... 139
Problems with the rear window
heating .......................................... 142
Rear control panel .........................137
Refrigerant ..................................... 392
Setting the air distribution .............140
Setting the airflow .........................141
Setting the air vents ......................144
Setting the temperature ................139
Setting the temperature (rear
compartment) ................................ 140
Switching the rear window
heating on/off ............................... 1426IndexBA 212 USA, CA Edition B 2011; 1; 5, en-USdimargiVersion: 3.0.3.62010-05-20T13:33:46+02:00 - Seite 6
Page 22 of 400
Product information
We recommend using genuine Mercedes-
Benz parts as well as conversion parts and
accessories explicitly approved by us for your
vehicle model.
We have tested these parts to determine their
reliability, safety and special suitability for
Mercedes-Benz vehicles. Despite ongoing
market research, Mercedes-Benz is unable to
assess other parts. We cannot therefore be
held responsible for them, even if in individual
cases an official approval or authorization by
governmental or other agencies should exist.
The use of non-approved parts could affect
your vehicle's operating safety. Mercedes-
Benz therefore recommends that you use
genuine Mercedes-Benz parts, conversion
parts and accessories that have been
approved for the type of vehicle. Genuine
Mercedes-Benz parts, approved conversion
parts and accessories are available from any
authorized Mercedes-Benz Center. In
addition, you will receive advice about
permissible technical modifications, and the
parts will be professionally installed.
Operator's Manual
Notes on the Operator's Manual
This Operator's Manual contains a great deal
of helpful information. We urge you to read it
carefully and familiarize yourself with the
vehicle before driving.
For your own safety and longer service life of
the vehicle, we urge you to follow the
instructions and warnings contained in this
Operator's Manual. Ignoring them could
result in damage to the vehicle or personal
injury to you or others. Vehicle damage
caused by failure to follow instructions is not
covered by the Mercedes-Benz Limited
Warranty.
Vehicle equipment
This manual describes all the standard and
optional equipment of your vehicle available
at the time of publication of the Operator's
Manual. Country-specific differences are
possible. Note that your vehicle may not be
equipped with all functions described. This
also refers to safety-related systems and
functions. The equipment in your vehicle may
therefore differ from that shown in the
descriptions and illustrations. All the systems
found in your vehicle are listed in the original
purchase agreement of your vehicle. Should
you have any questions concerning
equipment and operation, please consult an
authorized Mercedes-Benz Center.
The Operating Instructions and the
Maintenance Booklet are important
documents and should be kept in the vehicle.
Service and vehicle operation
Service and literature
The Service and Warranty Information
booklet contains detailed information about
the warranties covering your vehicle. Your
authorized Mercedes-Benz Center will
replace and repair any factory-fitted parts
based on the terms and conditions of the
following warranties:
R New Vehicle Limited Warranty
R Emission System Warranty
R Emission Performance Warranty
R California, Connecticut, Maine,
Massachusetts, New York, Pennsylvania,
Rhode Island and Vermont
R State Warranty Enforcement Laws (Lemon
Laws)
20IntroductionBA 212 USA, CA Edition B 2011; 1; 5, en-USdimargiVersion: 3.0.3.62010-05-20T13:33:46+02:00 - Seite 20
Page 54 of 400
situations (on vehicles with DISTRONIC
PLUS)
R in critical driving situations, e.g. when
physical limits are exceeded and the
vehicle understeers or oversteers severely
or when having to swerve to avoid an
obstacle at a speed above 85 mph
(140 km/h).
PRE-SAFE ®
takes the following measures
depending on the hazardous situation
detected:
R the front seat belts are pre-tensioned.
R under accident conditions, the front-
passenger seat is adjusted if it is in an
unfavorable position.
R increases the air pressure in the side
bolsters of the seat cushion and seat
backrest of the active multicontour seats in
the front.
R if the vehicle skids, the sliding roof with
power tilt/sliding panel and the side
windows are closed so that only a small gap
remains.
If the hazardous situation passes without
resulting in an accident, PRE-SAFE ®
slackens
the belt pretensioning. The air pressure in the
side bolsters on the active multicontour seat
is reduced again. All settings made by PRE-
SAFE ®
can then be reversed.
If the seat belts are not released:XWhen the vehicle is stationary, move the
backrest or seat back slightly.
The belt pretensioning is reduced and the
locking mechanism is released.GWarning
Make sure that nobody can become trapped
as you adjust the seat.
! Make sure that there are no objects in the
footwell or behind the seats when resetting
the seats. There is a risk that the seats
and/or the objects could be damaged.
More information about belt adjustment, a
convenience function integrated into PRE-
SAFE ®
, can be found in the "Belt adjustment"
section ( Y page 56).
NECK-PRO head restraints
The NECK-PRO head restraints increase
protection for the driver's and front-
passenger's head and neck. In the event of a
rear collision of a certain severity, the NECK-
PRO head restraints on the driver's and front-
passenger seats are moved forwards and
upwards. This provides better head support.
GWarning
Do not secure any objects (e.g. coat hangers)
on the NECK-PRO head restraints. Otherwise,
the NECK-PRO head restraints may not
function properly, or in the event of a rear-end
collision may not be able offer the level of
protection they are designed to provide.
GWarning
Only use seat covers/head restraint covers
that have been tested and approved by
Mercedes-Benz for your model.
Using seat covers and head restraint covers
other than those recommended may cause a
malfunction when NECK-PRO head restraints
are triggered or front side impact air bags/
pelvis air bags may be prevented from
deploying.
Contact an authorized Mercedes-Benz Center
for availability.
If the NECK-PRO head restraints have been
triggered in an accident, you must reset the
NECK-PRO head restraints on the driver's and
front-passenger seat ( Y page 53).
Otherwise, the additional protection will not
be available in the event of another rear-end
collision. You can recognize that NECK-PRO
head restraints have been triggered by the
fact that they have moved forwards and can
no longer be adjusted.
52Occupant safetySafety
BA 212 USA, CA Edition B 2011; 1; 5, en-USdimargiVersion: 3.0.3.62010-05-20T13:33:46+02:00 - Seite 52
Page 120 of 400
Vehicle equipment
i This manual describes all the standard
and optional equipment of your vehicle
which was available at the time of
purchase. Country-specific differences are
possible. Bear in mind that your vehicle
may not feature all functions described
here. This also refers to safety-related
systems and functions.
Exterior lighting
Important safety notes
For reasons of safety, Mercedes-Benz
recommends that you drive with the lights
switched on even during the daytime. In some
countries, operation of the headlamps varies
due to legal requirements and self-imposed
obligations. In these countries, the daytime
running lamps are automatically switched on
when the engine is started.
Notes on driving abroad
Converting to symmetrical low beam
when driving abroad: switch the headlamps
to symmetrical low beam in countries in
which traffic drives on the opposite side of the
road to the country where the vehicle is
registered. This prevents oncoming traffic
from being dazzled. Symmetrical lights do not
illuminate as large an area of the edge of the
road.
Have the headlamps converted at a qualified
specialist workshop, e.g. an authorized
Mercedes-Benz Center, as close to the border
as possible before driving in these countries.
Converting to asymmetrical low beam
after returning: have the headlamps
converted back to asymmetrical low beam at
a qualified specialist workshop, e.g. an
authorized Mercedes-Benz Center, as soon as
possible after crossing the border when
returning.
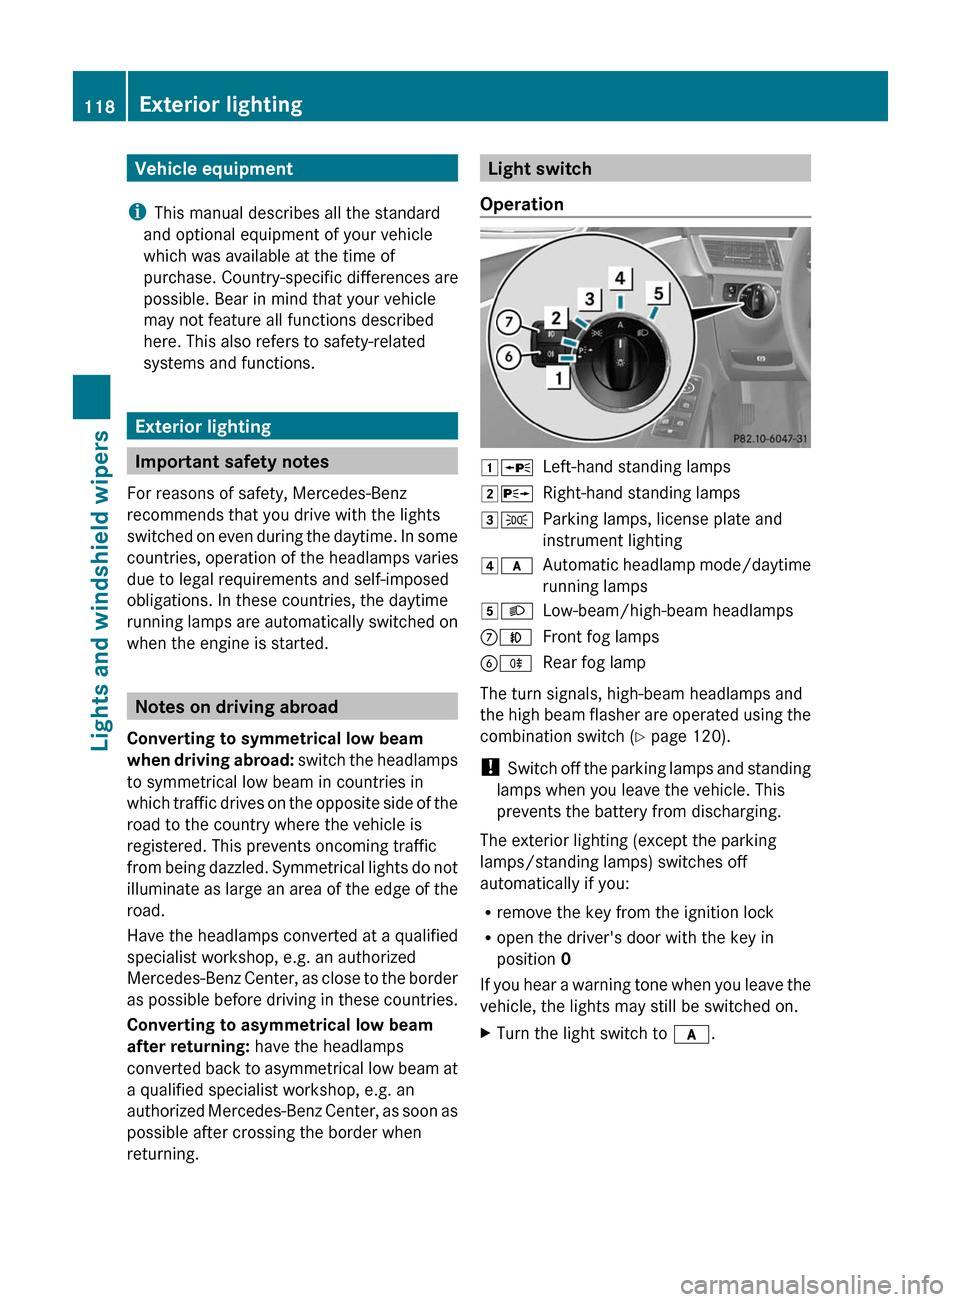
Light switch
Operation1 WLeft-hand standing lamps2XRight-hand standing lamps3TParking lamps, license plate and
instrument lighting4 cAutomatic headlamp mode/daytime
running lamps5 LLow-beam/high-beam headlampsCNFront fog lampsBRRear fog lamp
The turn signals, high-beam headlamps and
the high beam flasher are operated using the
combination switch ( Y page 120).
! Switch off the parking lamps and standing
lamps when you leave the vehicle. This
prevents the battery from discharging.
The exterior lighting (except the parking
lamps/standing lamps) switches off
automatically if you:
R remove the key from the ignition lock
R open the driver's door with the key in
position 0
If you hear a warning tone when you leave the
vehicle, the lights may still be switched on.
XTurn the light switch to c.118Exterior lightingLights and windshield wipers
BA 212 USA, CA Edition B 2011; 1; 5, en-USdimargiVersion: 3.0.3.62010-05-20T13:33:46+02:00 - Seite 118
Page 138 of 400
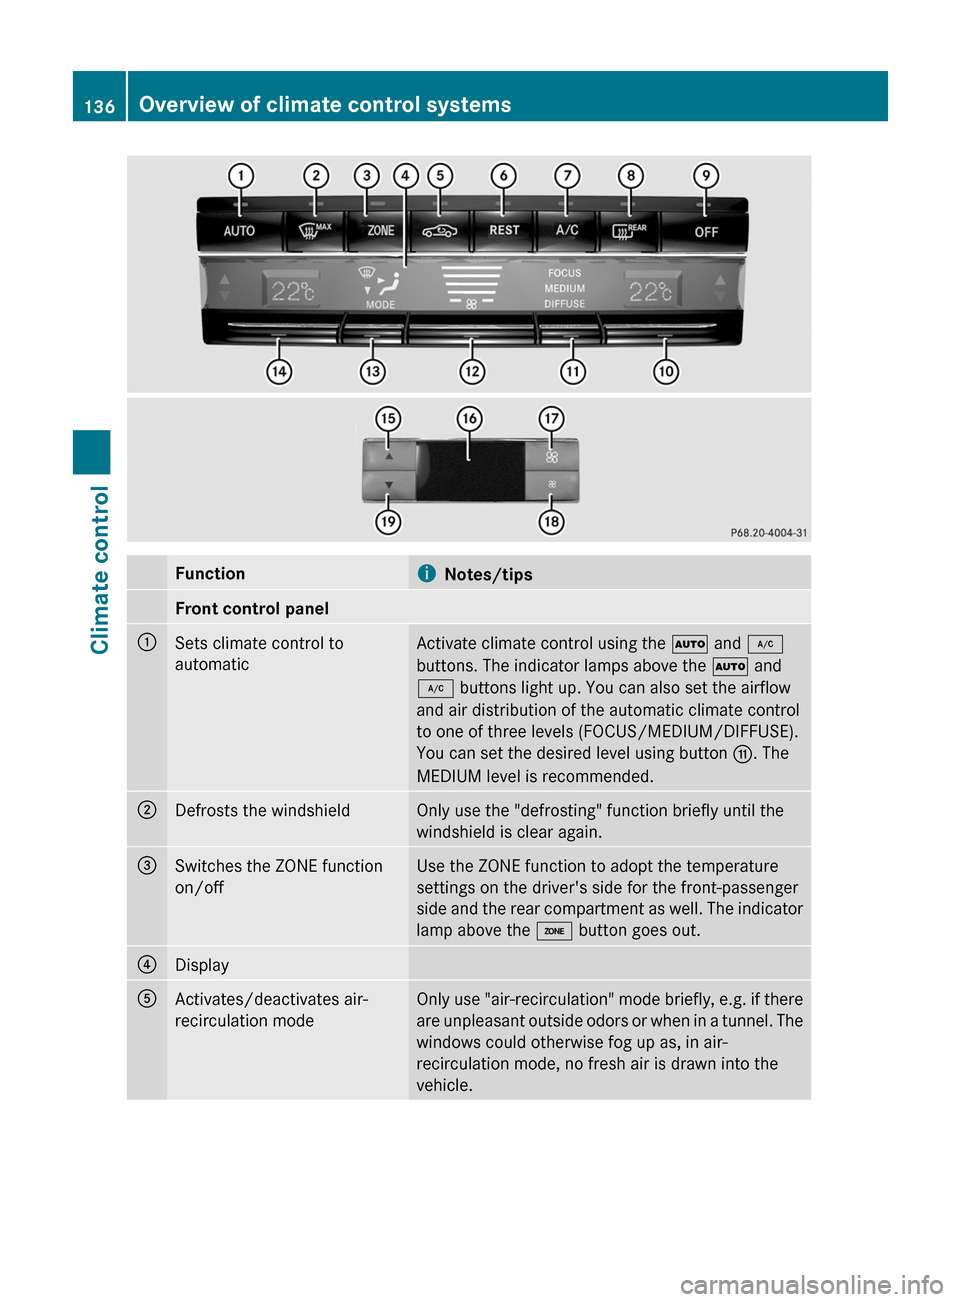
FunctioniNotes/tipsFront control panel:Sets climate control to
automatic
Activate climate control using the à and ¿
buttons. The indicator lamps above the à and
¿ buttons light up. You can also set the airflow
and air distribution of the automatic climate control
to one of three levels (FOCUS/MEDIUM/DIFFUSE).
You can set the desired level using button G. The
MEDIUM level is recommended.
;Defrosts the windshieldOnly use the "defrosting" function briefly until the
windshield is clear again.
=Switches the ZONE function
on/off
Use the ZONE function to adopt the temperature
settings on the driver's side for the front-passenger
side and the rear compartment as well. The indicator
lamp above the á button goes out.
?DisplayAActivates/deactivates air-
recirculation mode
Only use "air-recirculation" mode briefly, e.g. if there
are unpleasant outside odors or when in a tunnel. The
windows could otherwise fog up as, in air-
recirculation mode, no fresh air is drawn into the
vehicle.
136Overview of climate control systemsClimate control
BA 212 USA, CA Edition B 2011; 1; 5, en-USdimargiVersion: 3.0.3.62010-05-20T13:33:46+02:00 - Seite 136
Page 160 of 400
function depends on the drive program
selected.
Kickdown
Use kickdown for maximum acceleration.
XVehicles for USA except AMG vehicles:
fully depress the accelerator pedal.
The transmission shifts to a lower gear
depending on the engine speed.XVehicles for Canada except AMG
vehicles: depress the accelerator pedal
beyond the pressure point.
The transmission shifts to a lower gear
depending on the engine speed.
Rocking the vehicle free
Rocking the vehicle free by repeatedly
shifting back and forth between transmission
positions D and R can help to free a vehicle
that has become stuck in mud or snow. The
engine management system of the vehicle
limits shifting back and forth between
transmission positions D and R to a maximum
speed of 5 mph (9 km/h). To shift back and
forth between transmission positions D and
R , move the selector lever up and down
beyond the pressure point.
Working on the vehicle
GWarning
When working on the vehicle, engage the
parking brake and shift the automatic
transmission into park position P. Otherwise
the vehicle could roll away which could result
in an accident and/or serious personal injury.
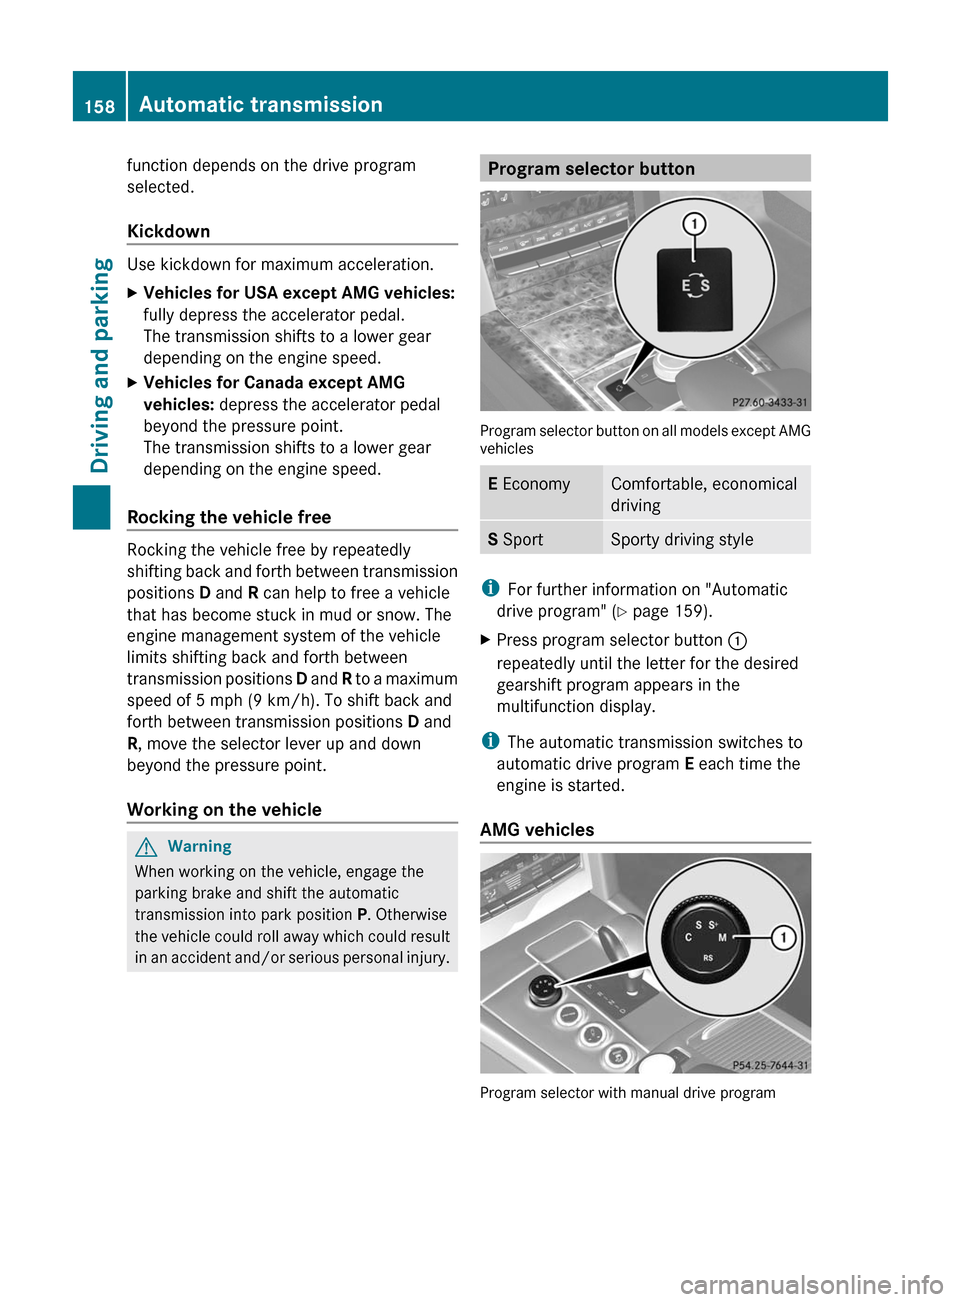
Program selector button
Program selector button on all models except AMG
vehicles
E EconomyComfortable, economical
drivingS SportSporty driving style
i
For further information on "Automatic
drive program" ( Y page 159).
XPress program selector button :
repeatedly until the letter for the desired
gearshift program appears in the
multifunction display.
i The automatic transmission switches to
automatic drive program E each time the
engine is started.
AMG vehicles
Program selector with manual drive program
158Automatic transmissionDriving and parking
BA 212 USA, CA Edition B 2011; 1; 5, en-USdimargiVersion: 3.0.3.62010-05-20T13:33:46+02:00 - Seite 158
Page 164 of 400
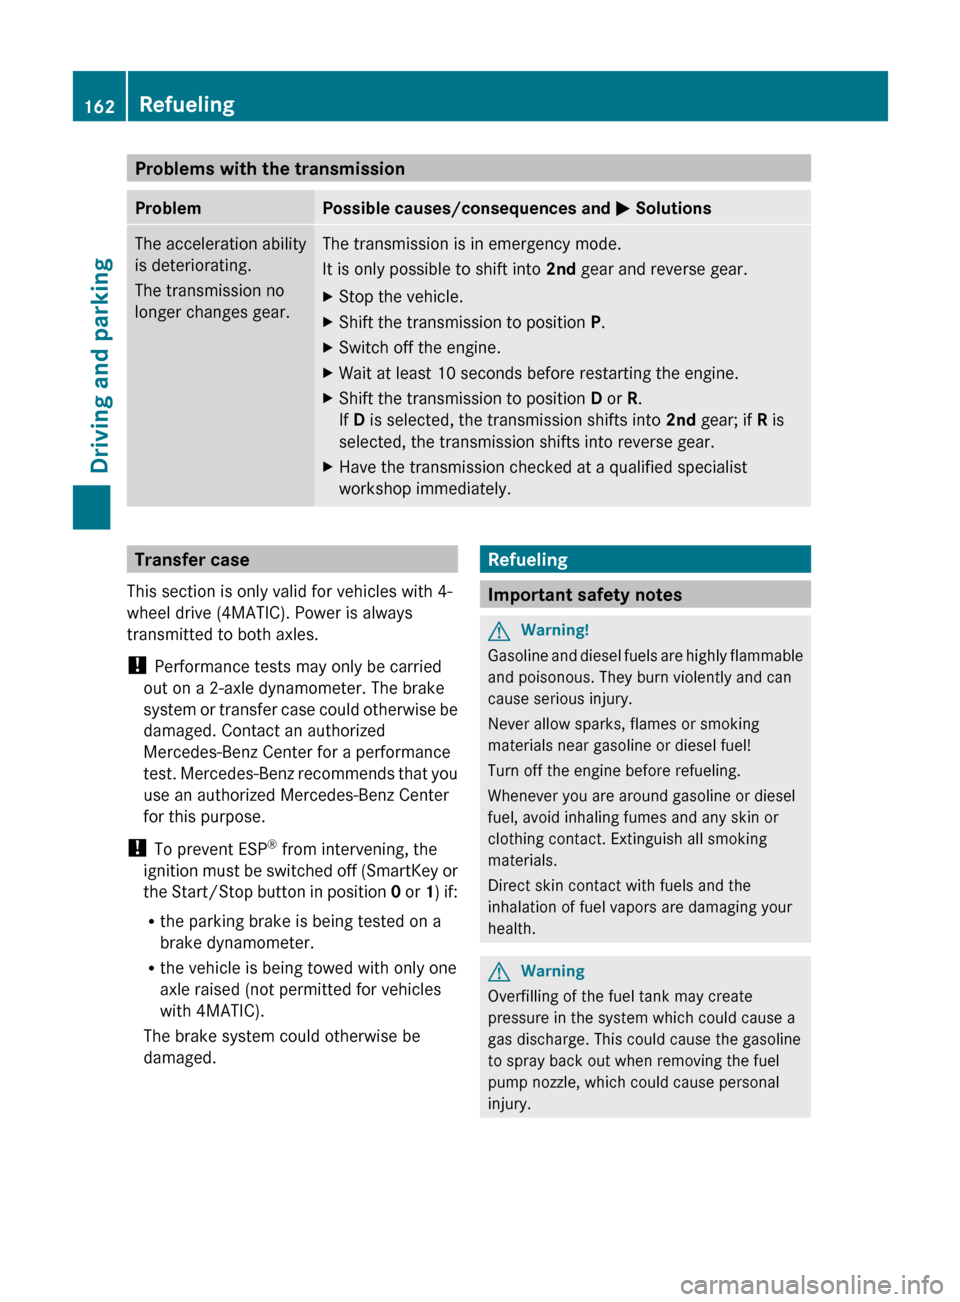
Problems with the transmissionProblemPossible causes/consequences and M SolutionsThe acceleration ability
is deteriorating.
The transmission no
longer changes gear.The transmission is in emergency mode.
It is only possible to shift into 2nd gear and reverse gear.XStop the vehicle.XShift the transmission to position P.XSwitch off the engine.XWait at least 10 seconds before restarting the engine.XShift the transmission to position D or R.
If D is selected, the transmission shifts into 2nd gear; if R is
selected, the transmission shifts into reverse gear.XHave the transmission checked at a qualified specialist
workshop immediately.Transfer case
This section is only valid for vehicles with 4-
wheel drive (4MATIC). Power is always
transmitted to both axles.
! Performance tests may only be carried
out on a 2-axle dynamometer. The brake
system or transfer case could otherwise be
damaged. Contact an authorized
Mercedes-Benz Center for a performance
test. Mercedes-Benz recommends that you
use an authorized Mercedes-Benz Center
for this purpose.
! To prevent ESP ®
from intervening, the
ignition must be switched off (SmartKey or
the Start/Stop button in position 0 or 1) if:
R the parking brake is being tested on a
brake dynamometer.
R the vehicle is being towed with only one
axle raised (not permitted for vehicles
with 4MATIC).
The brake system could otherwise be
damaged.Refueling
Important safety notes
GWarning!
Gasoline and diesel fuels are highly flammable
and poisonous. They burn violently and can
cause serious injury.
Never allow sparks, flames or smoking
materials near gasoline or diesel fuel!
Turn off the engine before refueling.
Whenever you are around gasoline or diesel
fuel, avoid inhaling fumes and any skin or
clothing contact. Extinguish all smoking
materials.
Direct skin contact with fuels and the
inhalation of fuel vapors are damaging your
health.
GWarning
Overfilling of the fuel tank may create
pressure in the system which could cause a
gas discharge. This could cause the gasoline
to spray back out when removing the fuel
pump nozzle, which could cause personal
injury.
162RefuelingDriving and parking
BA 212 USA, CA Edition B 2011; 1; 5, en-USdimargiVersion: 3.0.3.62010-05-20T13:33:46+02:00 - Seite 162
Page 176 of 400
remove any salt that may have started to
build up on the brake discs and the brake
pads/linings.
R maintain a greater distance to the vehicle
ahead and drive with particular care.
R carefully apply the brakes at the end of a
trip and immediately after commencing a
new trip, so that salt residues are removed
from the brake discs.
Servicing the brakes
! If the red brake warning lamp lights up in
the instrument cluster and you hear a
warning tone while the engine is running,
the brake fluid level may be too low.
Observe additional warning messages in
the multifunction display.
The brake fluid level may be too low due to
brake pad wear or leaking brake lines.
Have the brake system checked
immediately. This work should be carried
out at an authorized Mercedes-Benz
Center.
All checks and maintenance work on the
brake system must be carried out at a
qualified specialist workshop. This work
should be carried out at an authorized
Mercedes-Benz Center.
Only install brake pads and use brake fluid
recommended by Mercedes-Benz.
GWarning
If other than recommended brake pads are
installed, or other than recommended brake
fluid is used, the braking properties of the
vehicle can be degraded to an extent that safe
braking is substantially impaired. This could
result in an accident.
! Vehicles with 4MATIC: a function or
performance test may only be carried out
on a two-axle dynamometer. If you are
planning to have the vehicle tested on such
a dynamometer, contact an authorized
Mercedes-Benz Center to obtain further
information first. Otherwise, the drive train
or the brake system may suffer damage.
! Vehicles with 4MATIC: as the ESP®
system operates automatically, the engine
and the ignition must be switched off
(SmartKey in position 0 or 1 in the ignition
lock or Start/Stop button in position 0 or
1 ) while the parking brake is being tested
on a brake dynamometer.
Braking maneuvers triggered automatically
by ESP ®
may seriously damage the brake
system.
! Vehicles with 4MATIC: as the ESP®
system operates automatically, the engine
and the ignition system must be switched
off (SmartKey in position 0 or 1 in the
ignition lock or Start/Stop button in
position 0 or 1) when:
R testing the parking brake on a brake
dynamometer.
R you intend to have the vehicle towed with
one of the axles raised.
Braking maneuvers triggered automatically
by ESP ®
may seriously damage the brake
system.
If your brake system is only subjected to
moderate loads, you should regularly test
your brake system's function by forcefully
depressing the brake pedal when driving at
high speed. This will give the brake pads
better grip.GWarning
Make sure that you do not endanger other
road users when you apply the brakes.
A description of Brake Assist (BAS) can be
found on ( Y page 66) or of BAS PLUS on
( Y page 66).
AMG high-performance brake system
and ceramic brake system
The high-performance and ceramic brake
system is only installed on the E 63 AMG.
174Driving tipsDriving and parking
BA 212 USA, CA Edition B 2011; 1; 5, en-USdimargiVersion: 3.0.3.62010-05-20T13:33:46+02:00 - Seite 174
Page 192 of 400
RACE START
Important safety guidelines
i RACE START is only available in AMG
vehicles.
RACE START enables optimal acceleration
from a standing start under suitable high-grip
road surface conditions.
GRisk of accident
RACE START is only available when SPORT
handling mode is activated. SPORT handling
mode only stabilizes the vehicle to a certain
extent if it is swerving or the wheels are
spinning.
RACE START may only be used on closed
roads. Always adapt your speed and driving
style to suit the current road and weather
conditions.
Conditions for activation
RACE START can be activated when:
R the doors are closed
R the engine is running and it has reached an
operating temperature of approximately
80 †. This is the case when the engine oil
temperature in the multifunction display
stops flashing.
R SPORT handling mode is activated
( Y page 69)
R the steering wheel is in the straight-ahead
position
R the vehicle is at rest and the brake pedal is
depressed (left foot)
R the transmission is in position D
Activating RACE STARTXDepress the brake pedal with your left foot,
and keep it depressed.XTurn the program selector switch
clockwise ( Y page 158) until the RS lamp
lights up.
The multifunction display shows the RACE
START Confirm: Paddle UP Cancel:
Paddle DOWN message.
i
If the conditions for activation are no
longer fulfilled, RACE START is canceled.
The multifunction display shows the RACE
START Canceled message.
XTo cancel: pull the left steering wheel shift
paddle ( Y page 159).
or
XTo confirm: pull the right steering wheel
shift paddle ( Y page 159).
The multifunction display shows the RACE
START Available Depress gas pedal
message.
i If you do not depress the accelerator
pedal fully within two seconds, RACE
START is canceled. The multifunction
display shows the RACE START Not
Possible See Operator's Manual
message.
XDepress the accelerator pedal fully.
The engine speed increases to
approximately 4000 rpm.
The multifunction display shows the RACE
START Release brake to start
message.
i If you do not release the brake pedal
within seven seconds, RACE START is
canceled. The multifunction display shows
the RACE START Canceled message.
XTake your foot off the brake, but keep the
accelerator pedal depressed.
The vehicle pulls away at maximum
acceleration.
The multifunction display shows the RACE
START Active message.190Driving systemsDriving and parking
BA 212 USA, CA Edition B 2011; 1; 5, en-USdimargiVersion: 3.0.3.62010-05-20T13:33:46+02:00 - Seite 190