MERCEDES-BENZ E63AMG 2011 W212 Owner's Manual
Manufacturer: MERCEDES-BENZ, Model Year: 2011, Model line: E63AMG, Model: MERCEDES-BENZ E63AMG 2011 W212Pages: 400, PDF Size: 16.3 MB
Page 321 of 400
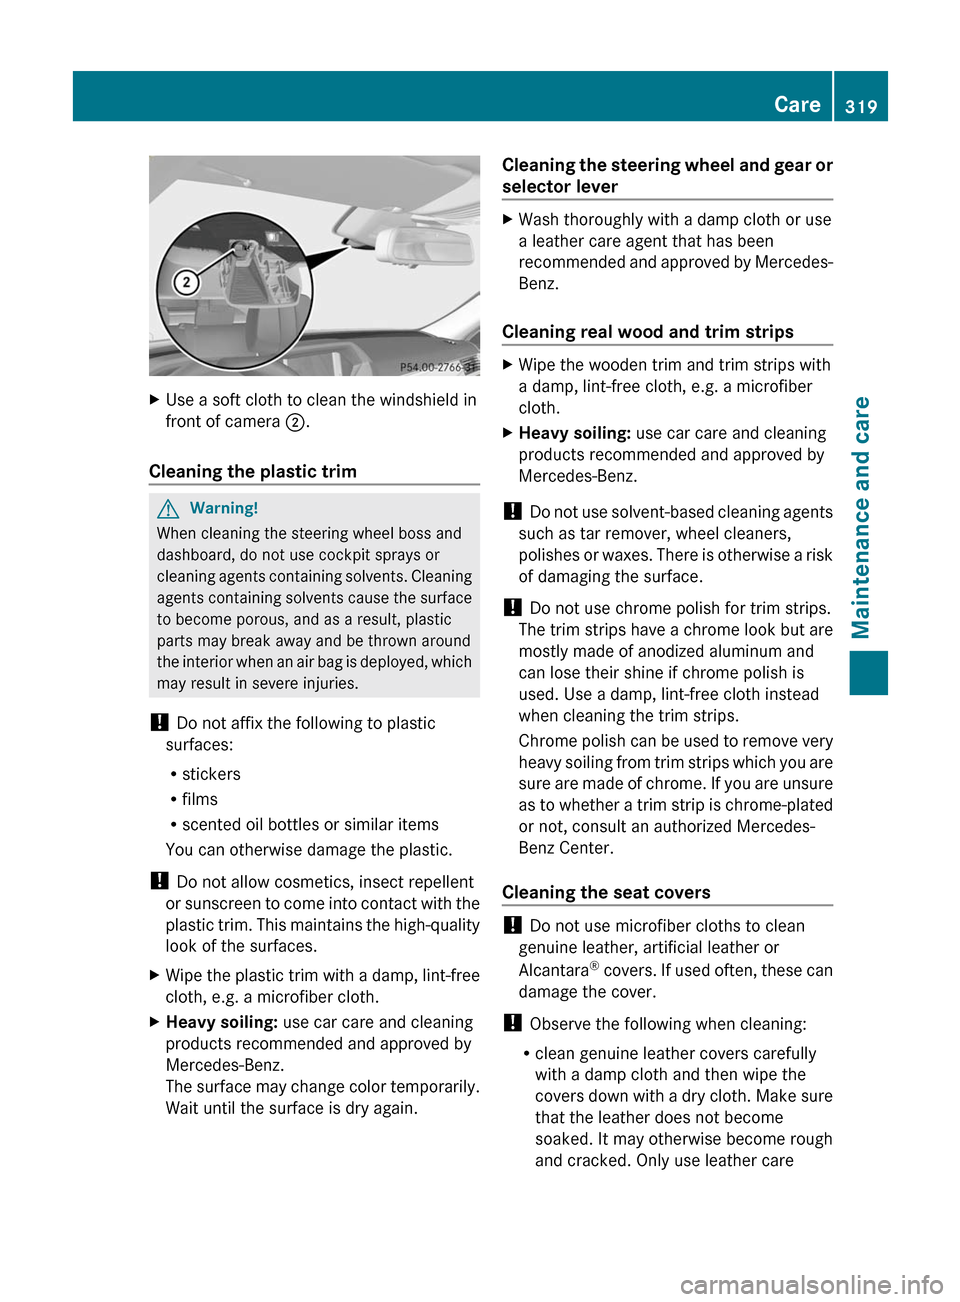
XUse a soft cloth to clean the windshield in
front of camera ;.
Cleaning the plastic trim
GWarning!
When cleaning the steering wheel boss and
dashboard, do not use cockpit sprays or
cleaning agents containing solvents. Cleaning
agents containing solvents cause the surface
to become porous, and as a result, plastic
parts may break away and be thrown around
the interior when an air bag is deployed, which
may result in severe injuries.
! Do not affix the following to plastic
surfaces:
Rstickers
Rfilms
Rscented oil bottles or similar items
You can otherwise damage the plastic.
! Do not allow cosmetics, insect repellent
or sunscreen to come into contact with the
plastic trim. This maintains the high-quality
look of the surfaces.
XWipe the plastic trim with a damp, lint-free
cloth, e.g. a microfiber cloth.
XHeavy soiling: use car care and cleaning
products recommended and approved by
Mercedes-Benz.
The surface may change color temporarily.
Wait until the surface is dry again.
Cleaning the steering wheel and gear or
selector lever
XWash thoroughly with a damp cloth or use
a leather care agent that has been
recommended and approved by Mercedes-
Benz.
Cleaning real wood and trim strips
XWipe the wooden trim and trim strips with
a damp, lint-free cloth, e.g. a microfiber
cloth.
XHeavy soiling: use car care and cleaning
products recommended and approved by
Mercedes-Benz.
! Do not use solvent-based cleaning agents
such as tar remover, wheel cleaners,
polishes or waxes. There is otherwise a risk
of damaging the surface.
! Do not use chrome polish for trim strips.
The trim strips have a chrome look but are
mostly made of anodized aluminum and
can lose their shine if chrome polish is
used. Use a damp, lint-free cloth instead
when cleaning the trim strips.
Chrome polish can be used to remove very
heavy soiling from trim strips which you are
sure are made of chrome. If you are unsure
as to whether a trim strip is chrome-plated
or not, consult an authorized Mercedes-
Benz Center.
Cleaning the seat covers
! Do not use microfiber cloths to clean
genuine leather, artificial leather or
Alcantara® covers. If used often, these can
damage the cover.
! Observe the following when cleaning:
Rclean genuine leather covers carefully
with a damp cloth and then wipe the
covers down with a dry cloth. Make sure
that the leather does not become
soaked. It may otherwise become rough
and cracked. Only use leather care
Care319Maintenance and careBA 212 USA, CA Edition B 2011; 1; 5, en-USdimargiVersion: 3.0.3.62010-05-20T13:33:46+02:00 - Seite 319Z
Page 322 of 400
agents that have been tested and
approved by Mercedes-Benz. You can
obtain these from a qualified specialist
workshop, e.g. an authorized Mercedes-
Benz Center.
R clean artificial leather covers with a cloth
moistened with a solution containing 1%
detergent (e.g. dish washing liquid).
R clean cloth covers with a microfiber cloth
moistened with a solution containing 1%
detergent (e.g. dish washing liquid). Rub
carefully and always wipe entire seat
sections to avoid leaving visible lines.
Leave the seat to dry afterwards.
Cleaning results depend on the type of
dirt and how long it has been there.
R clean Alcantara ®
covers with a damp
cloth. Make sure you wipe entire seat
sections to avoid leaving visible lines.
i Note that regular care is essential to
ensure that the appearance and comfort of
the covers is retained over time.
Cleaning the seat beltsXUse clean, luke-warm water and soap
solution.
! Do not clean the seat belts using chemical
cleaning agents. Do not dry the seat belts
by warming them above 176 ‡ (80 †) or
placing them in direct sunlight.
GWarning
Do not bleach or dye seat belts as this may
severely weaken them. In a crash, they may
not be able to provide adequate protection.
Cleaning the roof lining and carpets
XRoof lining: use soft brushes or dry
shampoo if it is particularly dirty.XCarpets: use carpet and textile cleaners
that have been approved and
recommended by Mercedes-Benz.320CareMaintenance and care
BA 212 USA, CA Edition B 2011; 1; 5, en-USdimargiVersion: 3.0.3.62010-05-20T13:33:46+02:00 - Seite 320
Page 323 of 400
Vehicle equipment ............................322
After an accident .............................. 323
Where will I find...? ...........................323
Flat tire .............................................. 326
Battery ............................................... 338
Jump-starting .................................... 341
Towing and tow-starting ..................343
Fuses .................................................. 345321Roadside AssistanceBA 212 USA, CA Edition B 2011; 1; 5, en-USdimargiVersion: 3.0.3.62010-05-20T13:33:46+02:00 - Seite 321
Page 324 of 400
Vehicle equipment
i This manual describes all the standard
and optional equipment of your vehicle
which was available at the time of
purchase. Country-specific differences are
possible. Bear in mind that your vehicle
may not feature all functions described
here. This also refers to safety-related
systems and functions.322Vehicle equipmentRoadside Assistance
BA 212 USA, CA Edition B 2011; 1; 5, en-USdimargiVersion: 3.0.3.62010-05-20T13:33:46+02:00 - Seite 322
Page 325 of 400
After an accidentProblemPossible causes/consequences and M SolutionsFuel is leaking from the
vehicle.GRisk of explosion or fire
The fuel line or the fuel tank is faulty.
XImmediately turn the key to position 0(Y page 149)in the ignition
lock and remove it.XDo not restart the engine under any circumstances.XConsult a qualified specialist workshop.You are unable to
determine the extent of
the damage.XConsult a qualified specialist workshop.You cannot detect any
damage.XStart the engine as normal.The NECK-PRO head
restraints on the
driver's and front-
passenger seats have
been triggered.Your vehicle has been involved in a rear-end collision.XReset the triggered NECK-PRO head restraints ( Y page 53).Where will I find...?
First-aid kit
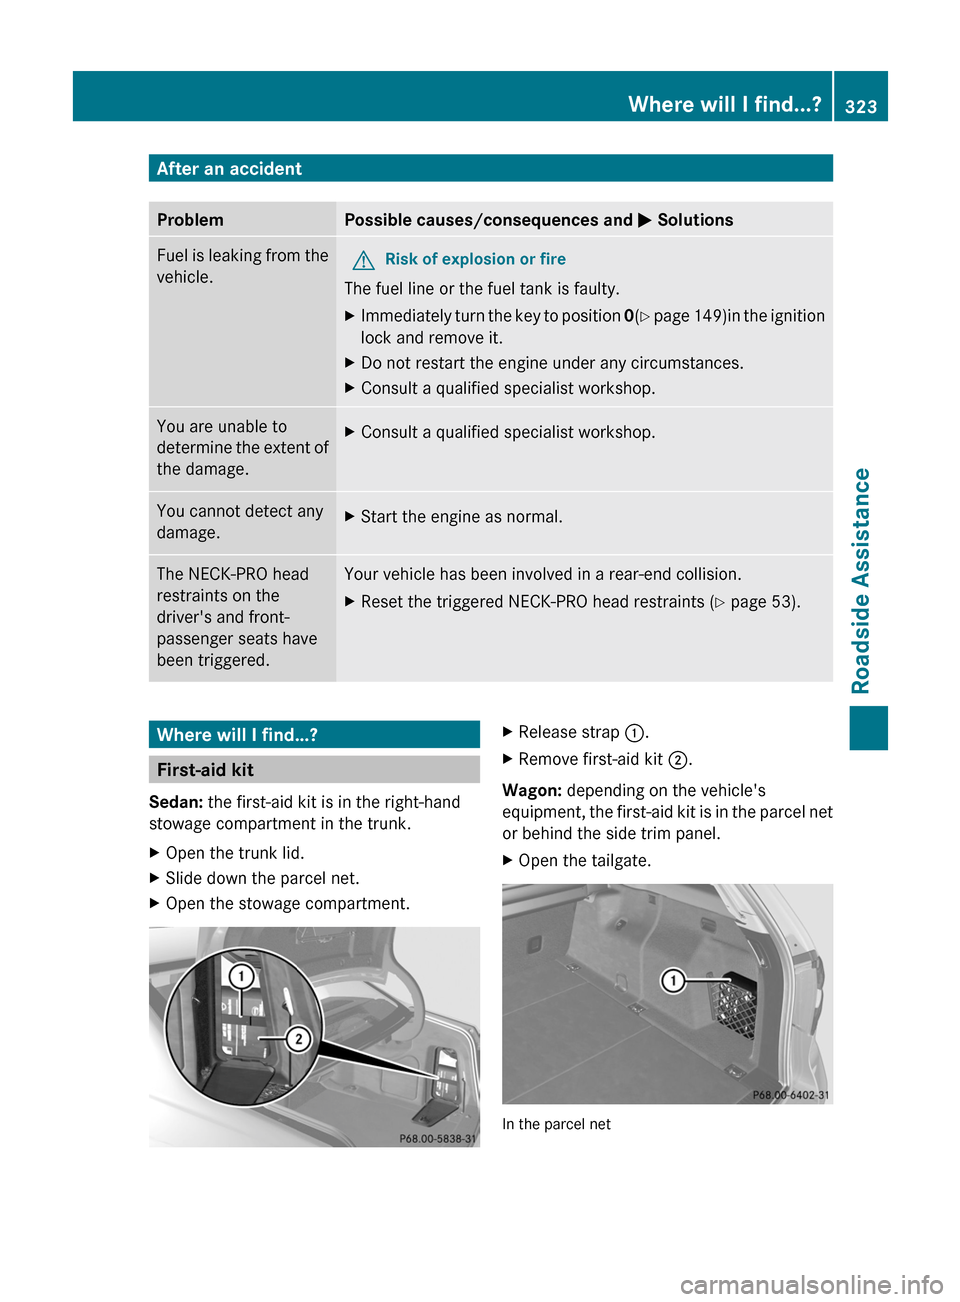
Sedan: the first-aid kit is in the right-hand
stowage compartment in the trunk.
XOpen the trunk lid.XSlide down the parcel net.XOpen the stowage compartment.XRelease strap :.XRemove first-aid kit ;.
Wagon: depending on the vehicle's
equipment, the first-aid kit is in the parcel net
or behind the side trim panel.
XOpen the tailgate.
In the parcel net
Where will I find...?323Roadside AssistanceBA 212 USA, CA Edition B 2011; 1; 5, en-USdimargiVersion: 3.0.3.62010-05-20T13:33:46+02:00 - Seite 323Z
Page 326 of 400
Behind the side trim panel
XOpen the right-hand side trim panel if the
first-aid kit is in the side trim panel.
XRemove first-aid kit :.
iCheck the expiration date on the first-aid
kit at least once a year. Replace the
contents if necessary, and replace missing
contents.
Vehicle tool kit
The vehicle tool kit can be found in the
stowage well under the trunk floor/cargo
compartment floor.
iVehicles without a spare wheel are not
equipped with the tools needed to change
a wheel when they leave the factory, e.g.
jack or lug wrench. Some tools for changing
a wheel are specific to the vehicle. To
obtain tools approved for your vehicle, visit
a qualified specialist workshop, e.g. an
authorized Mercedes-Benz Center.
XSedan with TIREFIT kit32: swing the trunk
floor upwards (Y page 285).
XWagon with TIREFIT kit: remove the seat
cushions of the folding bench seat
(Y page 108).
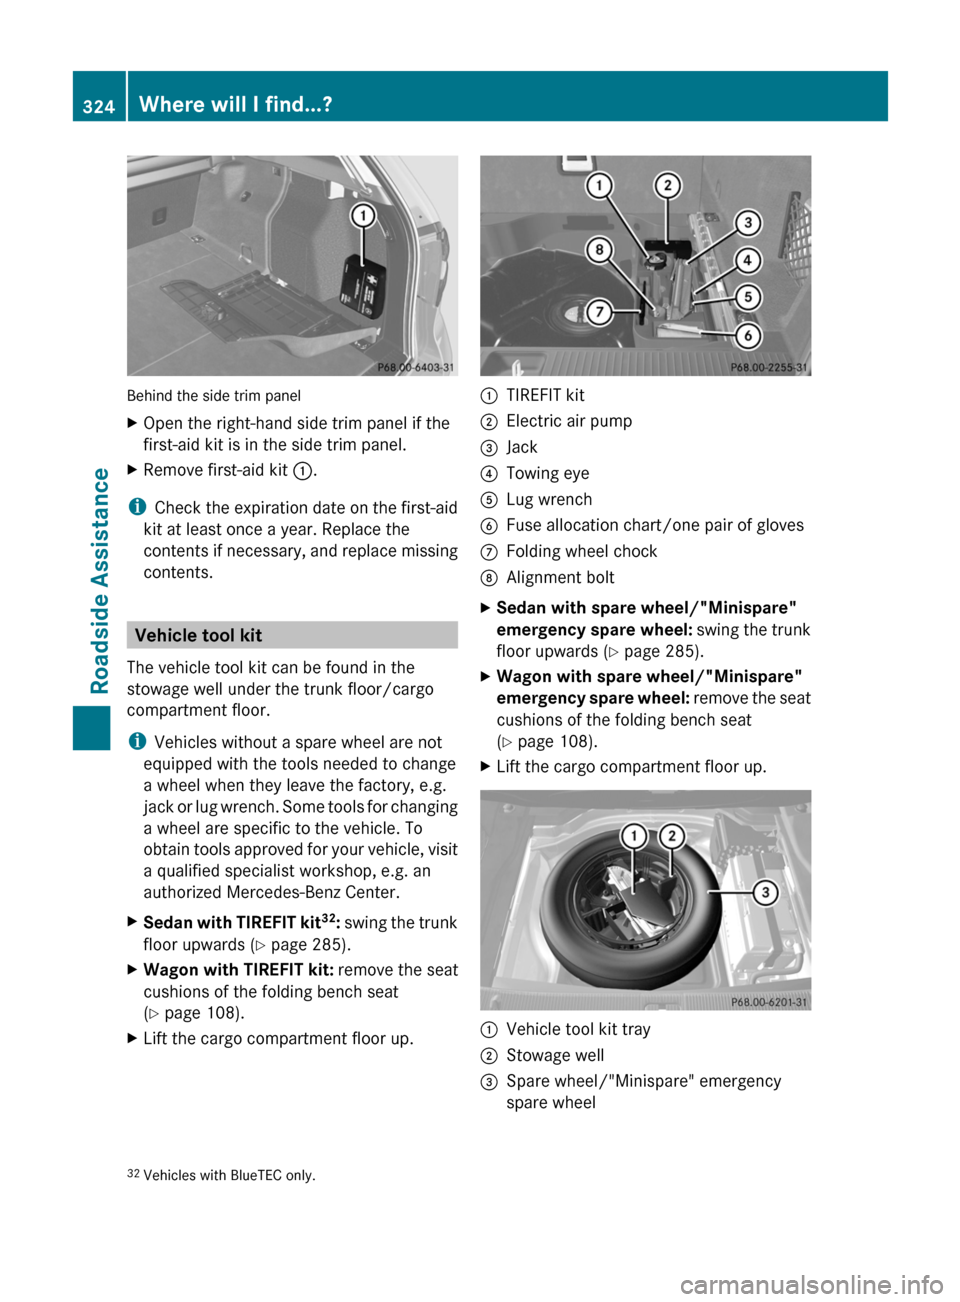
XLift the cargo compartment floor up.:TIREFIT kit;Electric air pump=Jack?Towing eyeALug wrenchBFuse allocation chart/one pair of glovesCFolding wheel chockDAlignment boltXSedan with spare wheel/"Minispare"
emergency spare wheel: swing the trunk
floor upwards (Y page 285).
XWagon with spare wheel/"Minispare"
emergency spare wheel: remove the seat
cushions of the folding bench seat
(Y page 108).
XLift the cargo compartment floor up.:Vehicle tool kit tray;Stowage well=Spare wheel/"Minispare" emergency
spare wheel32Vehicles with BlueTEC only.324Where will I find...?Roadside Assistance
BA 212 USA, CA Edition B 2011; 1; 5, en-USdimargiVersion: 3.0.3.62010-05-20T13:33:46+02:00 - Seite 324
Page 327 of 400
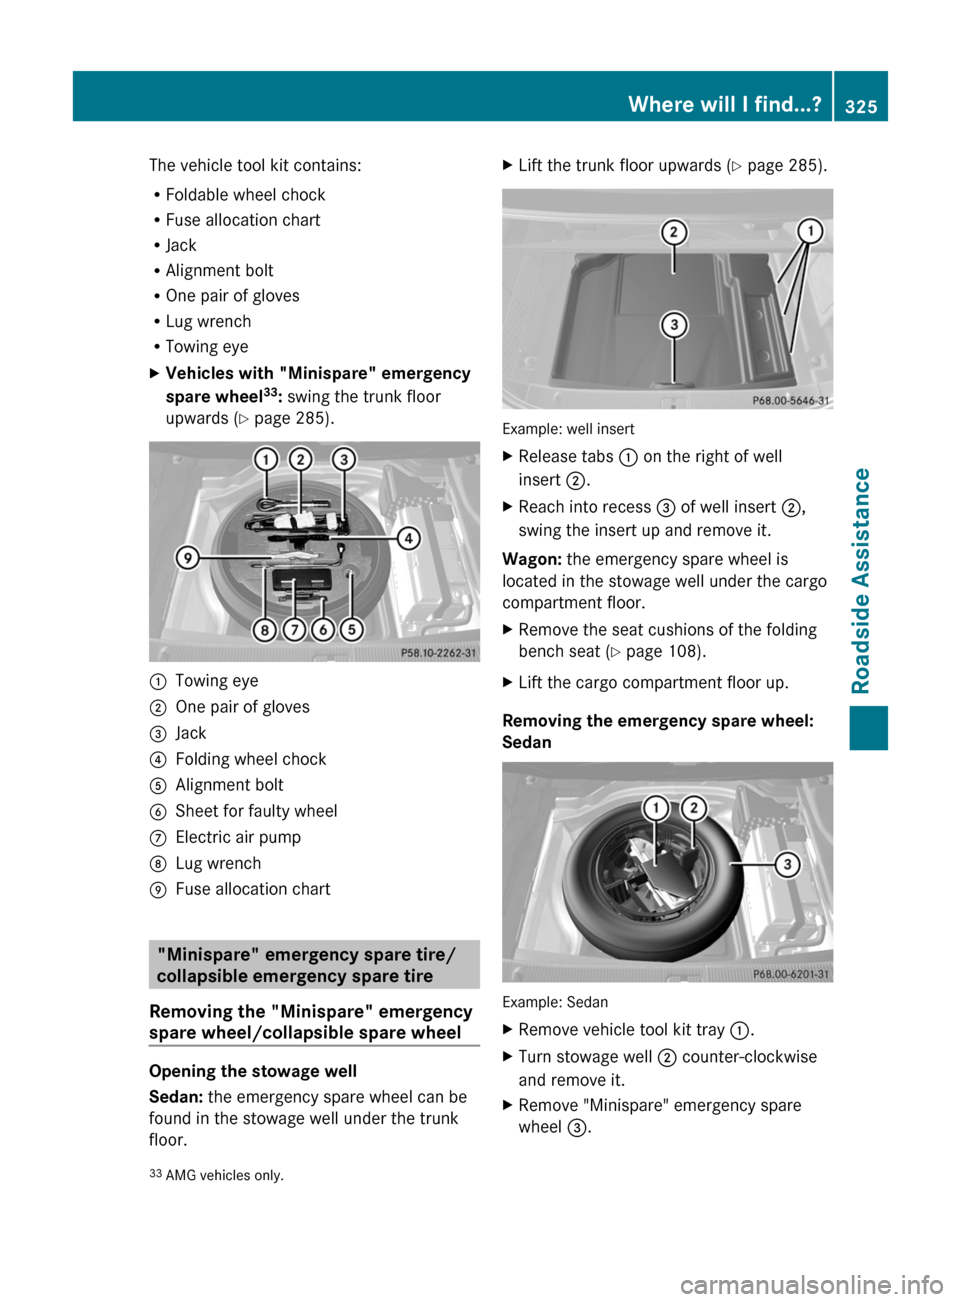
The vehicle tool kit contains:
RFoldable wheel chock
RFuse allocation chart
RJack
RAlignment bolt
ROne pair of gloves
RLug wrench
RTowing eye
XVehicles with "Minispare" emergency
spare wheel33: swing the trunk floor
upwards (Y page 285).
:Towing eye;One pair of gloves=Jack?Folding wheel chockAAlignment boltBSheet for faulty wheelCElectric air pumpDLug wrenchEFuse allocation chart
"Minispare" emergency spare tire/
collapsible emergency spare tire
Removing the "Minispare" emergency
spare wheel/collapsible spare wheel
Opening the stowage well
Sedan: the emergency spare wheel can be
found in the stowage well under the trunk
floor.
XLift the trunk floor upwards (Y page 285).
Example: well insert
XRelease tabs : on the right of well
insert ;.
XReach into recess = of well insert ;,
swing the insert up and remove it.
Wagon: the emergency spare wheel is
located in the stowage well under the cargo
compartment floor.
XRemove the seat cushions of the folding
bench seat (Y page 108).
XLift the cargo compartment floor up.
Removing the emergency spare wheel:
Sedan
Example: Sedan
XRemove vehicle tool kit tray :.XTurn stowage well ; counter-clockwise
and remove it.
XRemove "Minispare" emergency spare
wheel =.33AMG vehicles only.Where will I find...?325Roadside AssistanceBA 212 USA, CA Edition B 2011; 1; 5, en-USdimargiVersion: 3.0.3.62010-05-20T13:33:46+02:00 - Seite 325Z
Page 328 of 400
For further information on changing a wheel
and mounting the spare wheel, see
( Y page 331).
Removing the emergency spare wheel:
Wagon
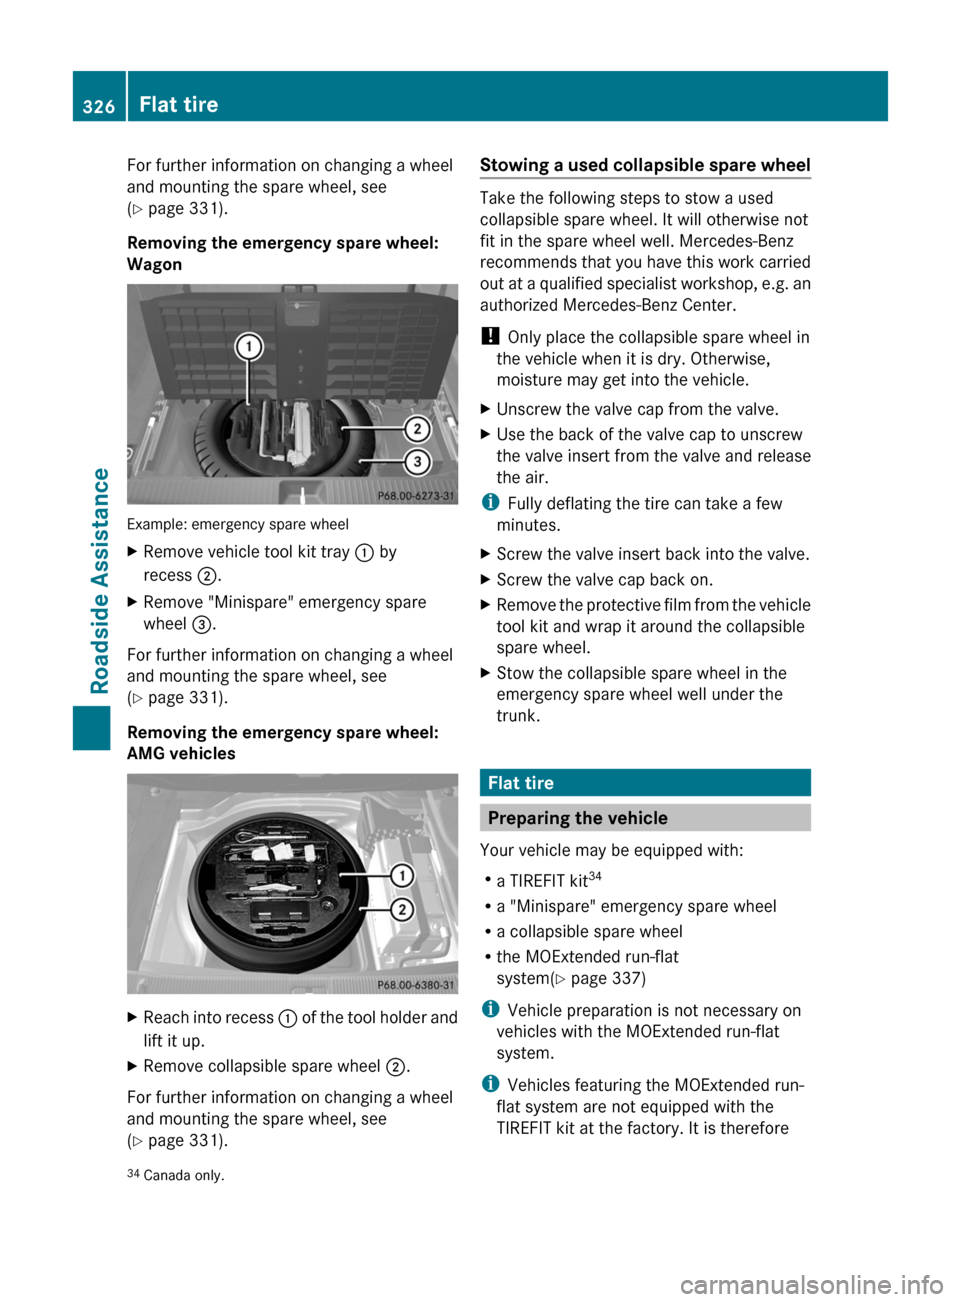
Example: emergency spare wheel
XRemove vehicle tool kit tray : by
recess ;.XRemove "Minispare" emergency spare
wheel =.
For further information on changing a wheel
and mounting the spare wheel, see
( Y page 331).
Removing the emergency spare wheel:
AMG vehicles
XReach into recess : of the tool holder and
lift it up.XRemove collapsible spare wheel ;.
For further information on changing a wheel
and mounting the spare wheel, see
( Y page 331).
Stowing a used collapsible spare wheel
Take the following steps to stow a used
collapsible spare wheel. It will otherwise not
fit in the spare wheel well. Mercedes-Benz
recommends that you have this work carried
out at a qualified specialist workshop, e.g. an
authorized Mercedes-Benz Center.
! Only place the collapsible spare wheel in
the vehicle when it is dry. Otherwise,
moisture may get into the vehicle.
XUnscrew the valve cap from the valve.XUse the back of the valve cap to unscrew
the valve insert from the valve and release
the air.
i Fully deflating the tire can take a few
minutes.
XScrew the valve insert back into the valve.XScrew the valve cap back on.XRemove the protective film from the vehicle
tool kit and wrap it around the collapsible
spare wheel.XStow the collapsible spare wheel in the
emergency spare wheel well under the
trunk.
Flat tire
Preparing the vehicle
Your vehicle may be equipped with:
R a TIREFIT kit 34
R a "Minispare" emergency spare wheel
R a collapsible spare wheel
R the MOExtended run-flat
system( Y page 337)
i Vehicle preparation is not necessary on
vehicles with the MOExtended run-flat
system.
i Vehicles featuring the MOExtended run-
flat system are not equipped with the
TIREFIT kit at the factory. It is therefore
34 Canada only.326Flat tireRoadside Assistance
BA 212 USA, CA Edition B 2011; 1; 5, en-USdimargiVersion: 3.0.3.62010-05-20T13:33:46+02:00 - Seite 326
Page 329 of 400
recommended that you additionally equip
your vehicle with the TIREFIT kit if you
mount tires that do not feature run-flat
properties, e.g. winter tires. You can obtain
a TIREFIT kit from an authorized Mercedes-
Benz Center, for example.
XVehicles with AIRMATIC: make sure that
"normal" level is selected (Y page 191).
XStop the vehicle as far away as possible
from traffic on solid, non-slippery and level
ground.
XSwitch on the hazard warning lamps.XFirmly depress the parking brake.XBring the front wheels into the straight-
ahead position.
XMove the selector lever/DIRECT SELECT
lever to P.
XSwitch off the engine.XVehicles without KEYLESS-GO: remove
the key from the ignition lock.
XVehicles with KEYLESS-GO: open the
driver's door.
The on-board electronics have status 0,
which is the same as the key having been
removed.
XVehicles with KEYLESS-GO: remove the
Start/Stop button from the ignition lock
(Y page 150).
XAll occupants must get out of the vehicle.
Make sure that they are not endangered as
they get out of the vehicle.
XMake sure that no one is near the danger
area whilst a wheel is being changed.
Anyone who is not directly assisting in the
wheel change should, for example, stand
behind the barrier.
XGet out of the vehicle. Pay attention to
traffic conditions when doing so.
XClose the driver's door.TIREFIT kit
Using the TIREFIT kit
You can use the TIREFIT kit to seal small
punctures, particularly those in the tire tread.
You can use TIREFIT at outside temperatures
down to -4 ‡ (-20 †).
GWarning
TIREFIT is a limited repair device. TIREFIT
cannot be used for cuts or punctures larger
than approximately 0.16 in (4 mm) and tire
damage caused by driving with extremely low
tire inflation pressure, or on a flat tire, or a
damaged wheel.
Do not drive the vehicle under such
circumstances.
Contact the nearest authorized Mercedes-
Benz Center for assistance or call roadside
assistance.
XDo not remove any foreign objects which
have penetrated the tire, e.g. screws or
nails.
XRemove the TIREFIT kit, the accompanying
"max. 80 km/h" sticker and the electric air
pump from the stowage well underneath
the trunk/trunk floor (Y page 324).
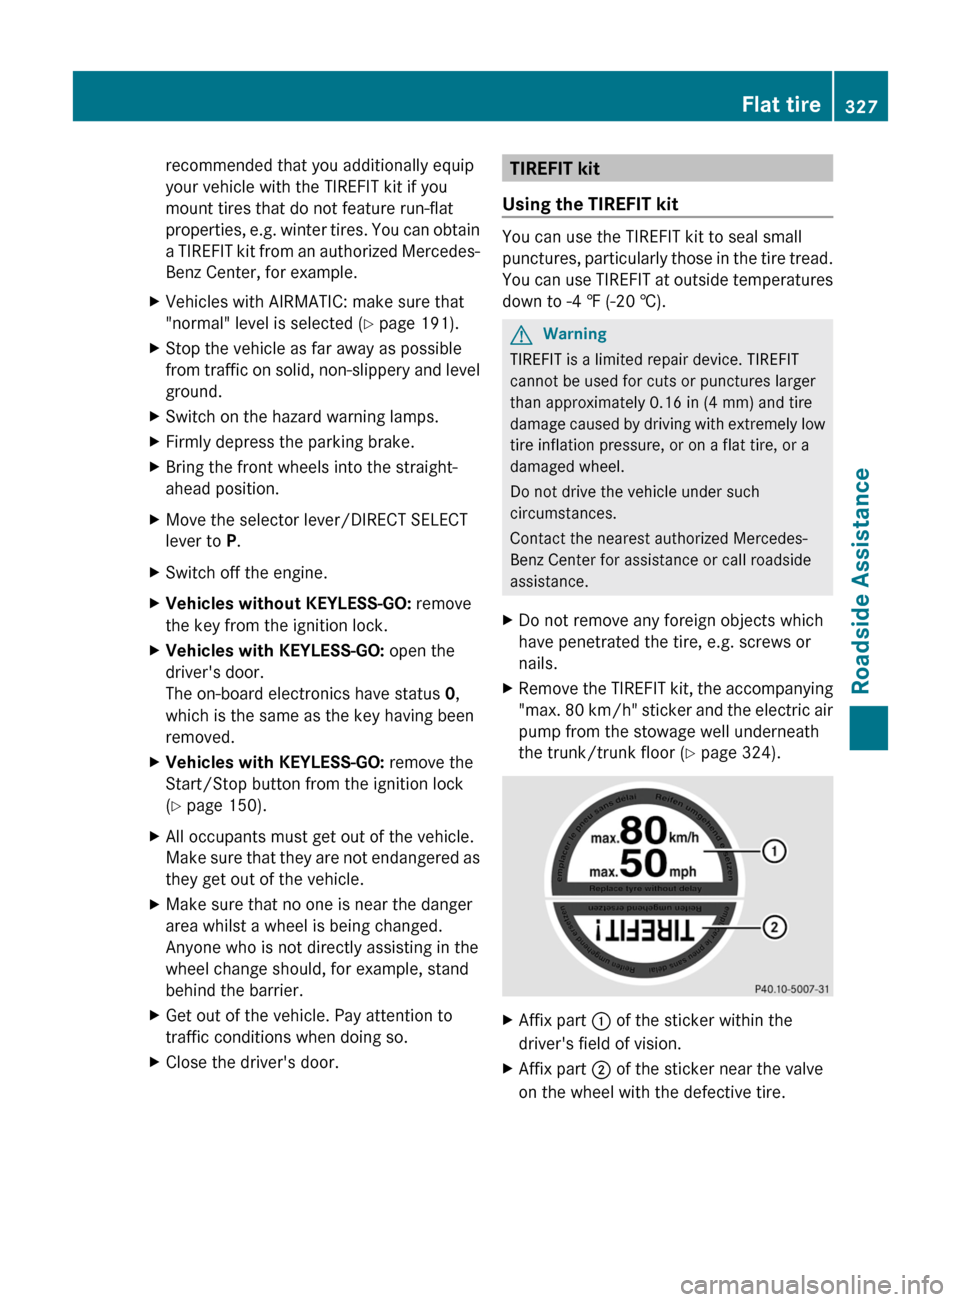
XAffix part : of the sticker within the
driver's field of vision.
XAffix part ; of the sticker near the valve
on the wheel with the defective tire.
Flat tire327Roadside AssistanceBA 212 USA, CA Edition B 2011; 1; 5, en-USdimargiVersion: 3.0.3.62010-05-20T13:33:46+02:00 - Seite 327Z
Page 330 of 400
GWarning
Take care not to allow the contents of TIREFIT
to come in contact with hair, eyes or clothing.
TIREFIT is harmful if inhaled, swallowed or
absorbed through the skin - causes skin, eye
and respiratory irritation.
Any contact with eyes or skin should be
flushed immediately with plenty of water.
If clothing comes in contact with TIREFIT,
change clothing as soon as possible.
In case of allergic reaction or rash, consult a
physician immediately.
GWarning
Keep TIREFIT away from children. If
swallowed, rinse mouth immediately with
plenty of water and drink plenty of water.
Do not induce vomiting.
Consult a doctor immediately.
Keep away from open flame or heat source.
iIf TIREFIT leaks out, allow it to dry. It can
then be removed like a layer of film.
If you get TIREFIT on your clothing, have it
cleaned as soon as possible with
perchloroethylene.
GWarning
Comply with the manufacturer’s safety
instructions on the sticker on the electric air
pump.
Your vehicle is provided with one of two
different electric air pumps:
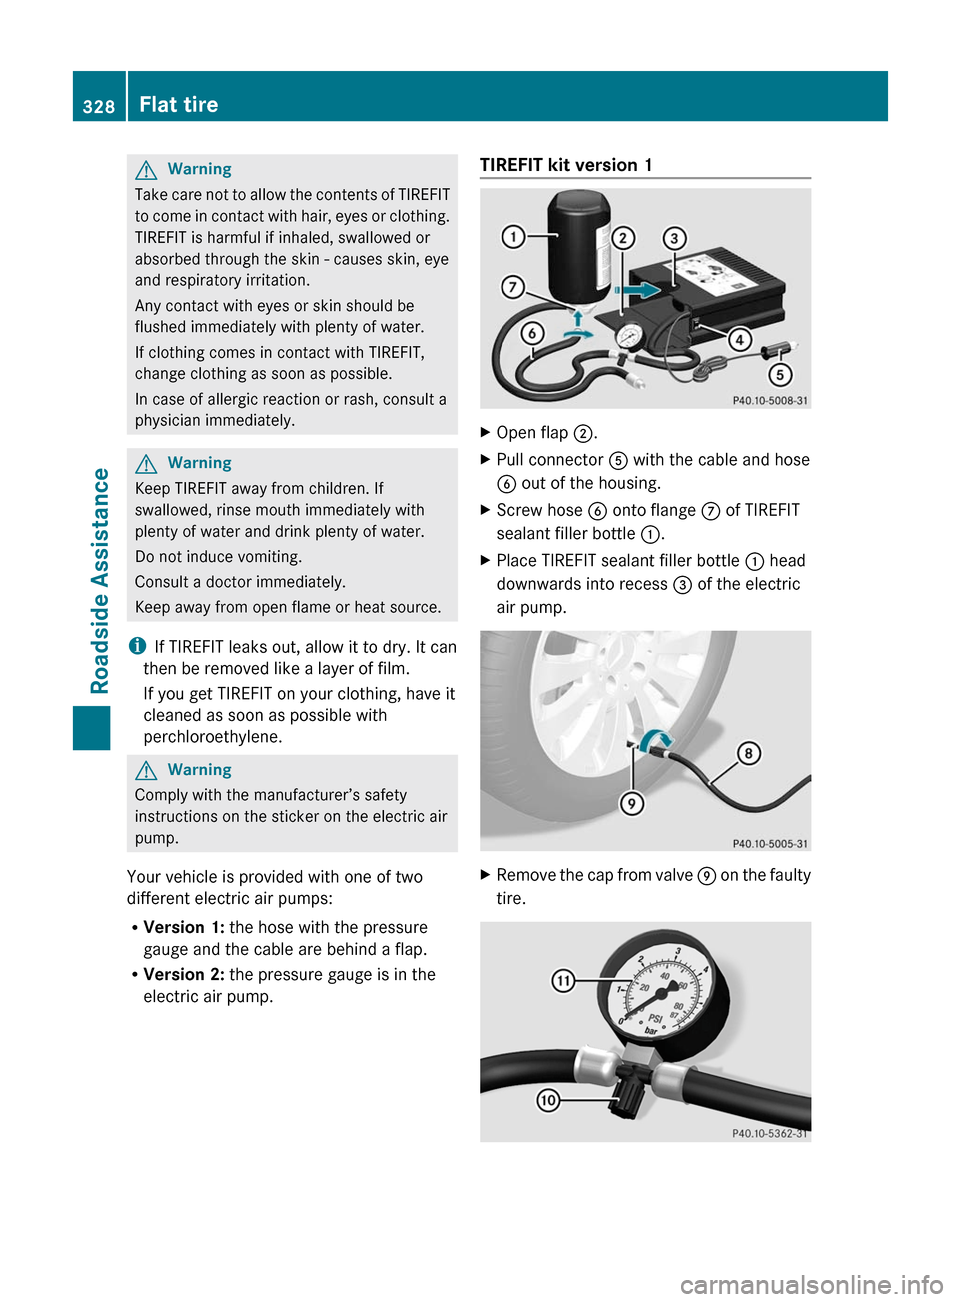
RVersion 1: the hose with the pressure
gauge and the cable are behind a flap.
RVersion 2: the pressure gauge is in the
electric air pump.
TIREFIT kit version 1XOpen flap ;.XPull connector A with the cable and hose
B out of the housing.
XScrew hose B onto flange C of TIREFIT
sealant filler bottle :.
XPlace TIREFIT sealant filler bottle : head
downwards into recess = of the electric
air pump.
XRemove the cap from valve E on the faulty
tire.
328Flat tireRoadside Assistance
BA 212 USA, CA Edition B 2011; 1; 5, en-USdimargiVersion: 3.0.3.62010-05-20T13:33:46+02:00 - Seite 328