MERCEDES-BENZ E63AMG 2011 W212 Owner's Manual
Manufacturer: MERCEDES-BENZ, Model Year: 2011, Model line: E63AMG, Model: MERCEDES-BENZ E63AMG 2011 W212Pages: 400, PDF Size: 16.3 MB
Page 281 of 400
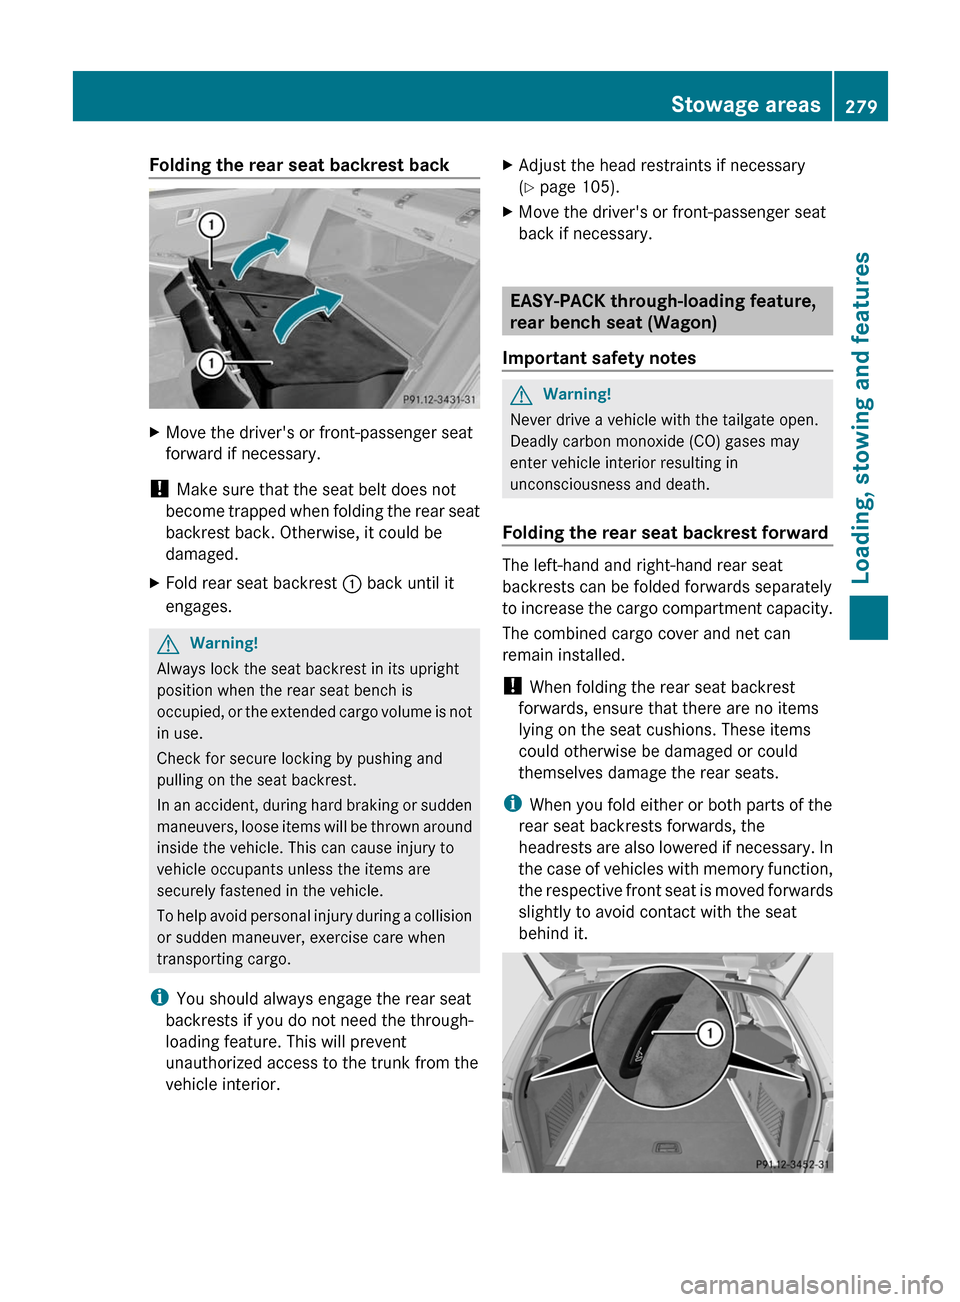
Folding the rear seat backrest backXMove the driver's or front-passenger seat
forward if necessary.
! Make sure that the seat belt does not
become trapped when folding the rear seat
backrest back. Otherwise, it could be
damaged.
XFold rear seat backrest : back until it
engages.
GWarning!
Always lock the seat backrest in its upright
position when the rear seat bench is
occupied, or the extended cargo volume is not
in use.
Check for secure locking by pushing and
pulling on the seat backrest.
In an accident, during hard braking or sudden
maneuvers, loose items will be thrown around
inside the vehicle. This can cause injury to
vehicle occupants unless the items are
securely fastened in the vehicle.
To help avoid personal injury during a collision
or sudden maneuver, exercise care when
transporting cargo.
iYou should always engage the rear seat
backrests if you do not need the through-
loading feature. This will prevent
unauthorized access to the trunk from the
vehicle interior.
XAdjust the head restraints if necessary
(Y page 105).
XMove the driver's or front-passenger seat
back if necessary.
EASY-PACK through-loading feature,
rear bench seat (Wagon)
Important safety notes
GWarning!
Never drive a vehicle with the tailgate open.
Deadly carbon monoxide (CO) gases may
enter vehicle interior resulting in
unconsciousness and death.
Folding the rear seat backrest forward
The left-hand and right-hand rear seat
backrests can be folded forwards separately
to increase the cargo compartment capacity.
The combined cargo cover and net can
remain installed.
! When folding the rear seat backrest
forwards, ensure that there are no items
lying on the seat cushions. These items
could otherwise be damaged or could
themselves damage the rear seats.
iWhen you fold either or both parts of the
rear seat backrests forwards, the
headrests are also lowered if necessary. In
the case of vehicles with memory function,
the respective front seat is moved forwards
slightly to avoid contact with the seat
behind it.
Stowage areas279Loading, stowing and featuresBA 212 USA, CA Edition B 2011; 1; 5, en-USdimargiVersion: 3.0.3.62010-05-20T13:33:46+02:00 - Seite 279Z
Page 282 of 400
XVehicles without memory function: if
necessary, move the driver's or front-
passenger seat forwards.
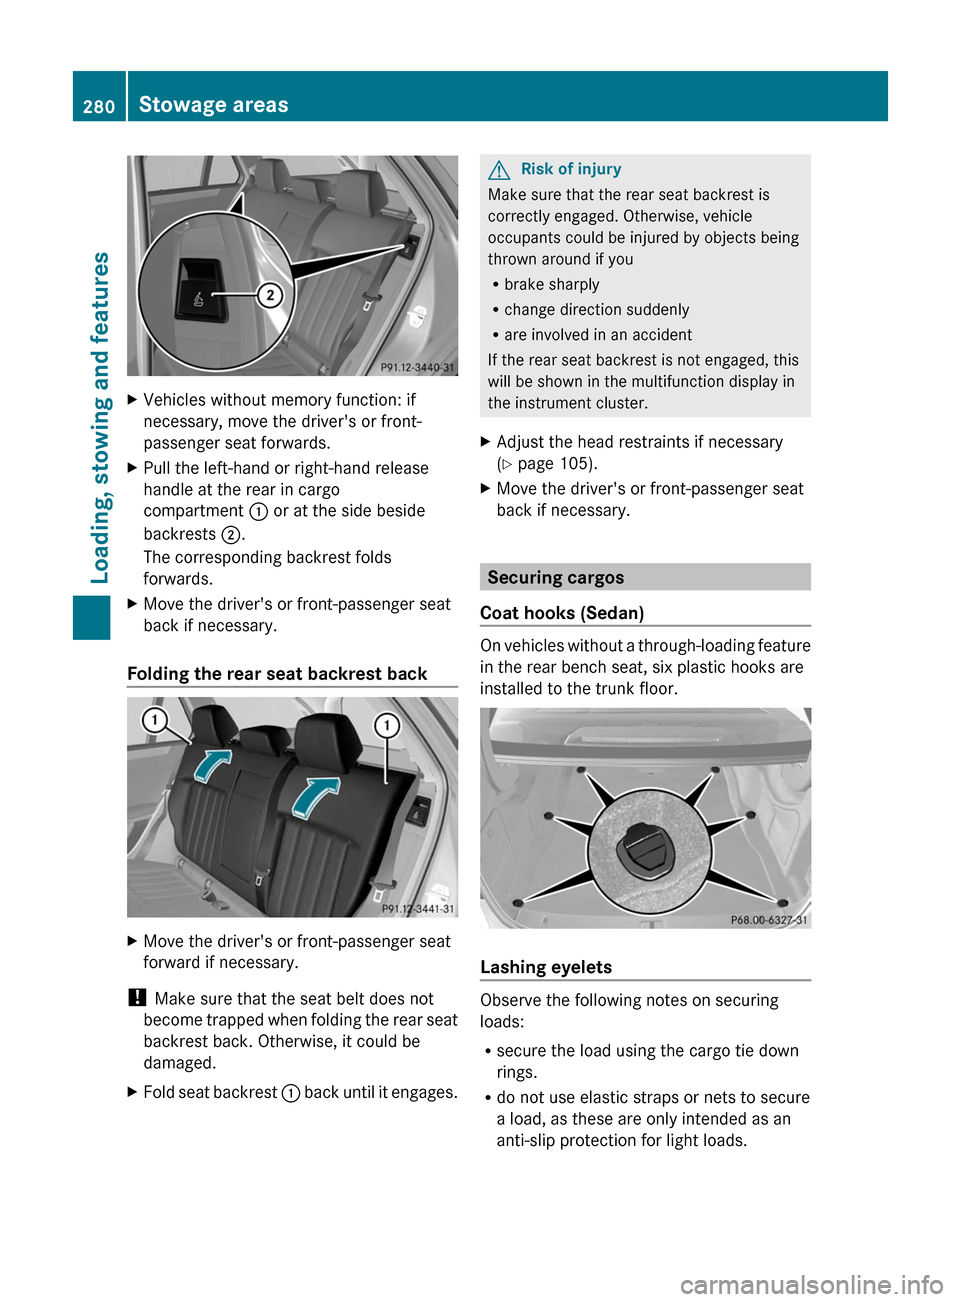
XPull the left-hand or right-hand release
handle at the rear in cargo
compartment : or at the side beside
backrests ;.
The corresponding backrest folds
forwards.
XMove the driver's or front-passenger seat
back if necessary.
Folding the rear seat backrest back
XMove the driver's or front-passenger seat
forward if necessary.
! Make sure that the seat belt does not
become trapped when folding the rear seat
backrest back. Otherwise, it could be
damaged.
XFold seat backrest : back until it engages.GRisk of injury
Make sure that the rear seat backrest is
correctly engaged. Otherwise, vehicle
occupants could be injured by objects being
thrown around if you
Rbrake sharply
Rchange direction suddenly
Rare involved in an accident
If the rear seat backrest is not engaged, this
will be shown in the multifunction display in
the instrument cluster.
XAdjust the head restraints if necessary
(Y page 105).
XMove the driver's or front-passenger seat
back if necessary.
Securing cargos
Coat hooks (Sedan)
On vehicles without a through-loading feature
in the rear bench seat, six plastic hooks are
installed to the trunk floor.
Lashing eyelets
Observe the following notes on securing
loads:
Rsecure the load using the cargo tie down
rings.
Rdo not use elastic straps or nets to secure
a load, as these are only intended as an
anti-slip protection for light loads.
280Stowage areasLoading, stowing and features
BA 212 USA, CA Edition B 2011; 1; 5, en-USdimargiVersion: 3.0.3.62010-05-20T13:33:46+02:00 - Seite 280
Page 283 of 400
Rdo not route tie downs across sharp edges
or corners.
Rpad sharp edges for protection.
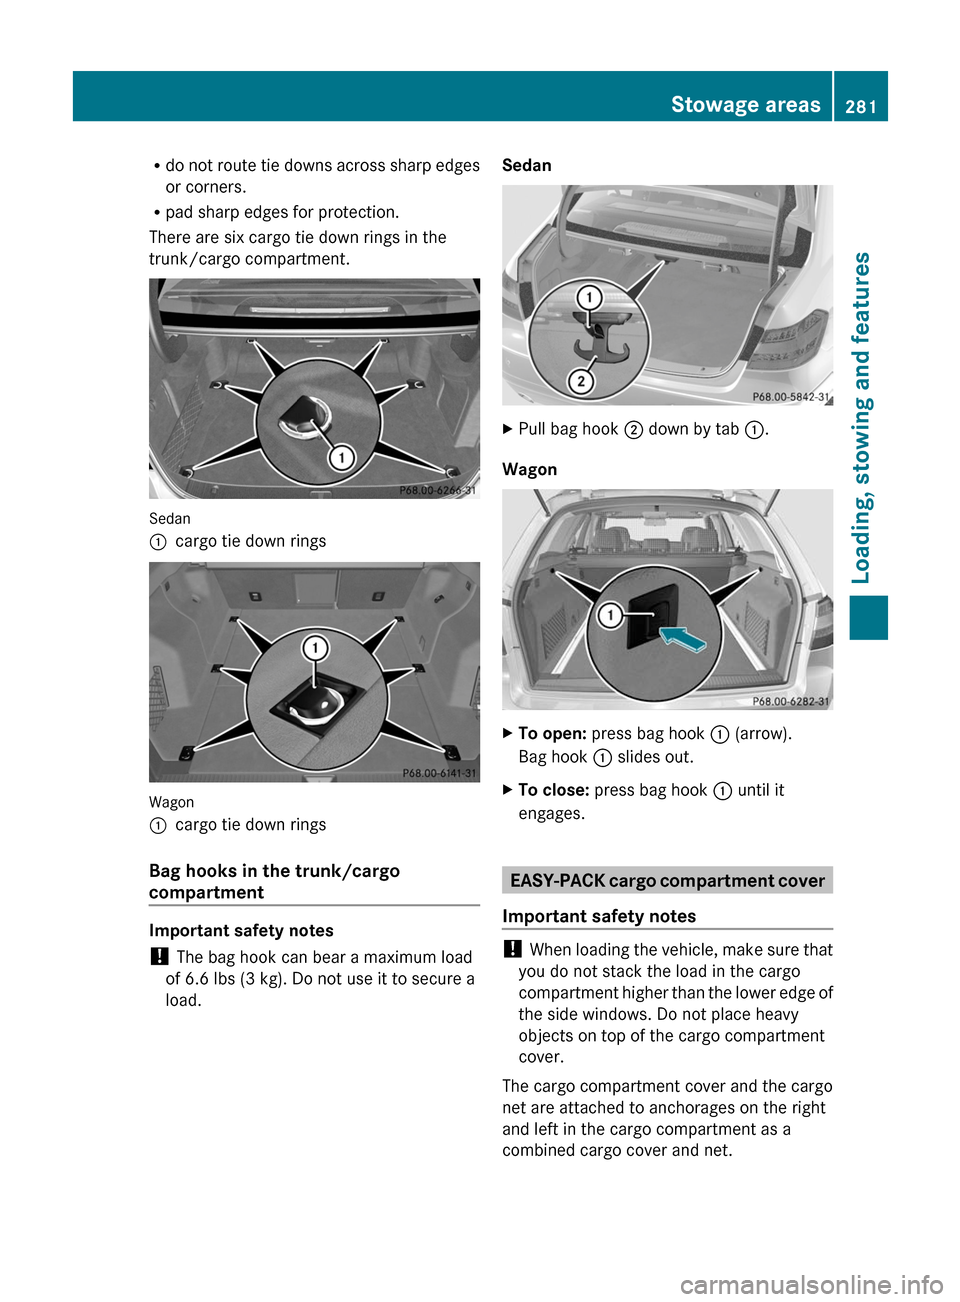
There are six cargo tie down rings in the
trunk/cargo compartment.
Sedan
:cargo tie down rings
Wagon
:cargo tie down rings
Bag hooks in the trunk/cargo
compartment
Important safety notes
! The bag hook can bear a maximum load
of 6.6 lbs (3 kg). Do not use it to secure a
load.
SedanXPull bag hook ; down by tab :.
Wagon
XTo open: press bag hook : (arrow).
Bag hook : slides out.
XTo close: press bag hook : until it
engages.
EASY-PACK cargo compartment cover
Important safety notes
! When loading the vehicle, make sure that
you do not stack the load in the cargo
compartment higher than the lower edge of
the side windows. Do not place heavy
objects on top of the cargo compartment
cover.
The cargo compartment cover and the cargo
net are attached to anchorages on the right
and left in the cargo compartment as a
combined cargo cover and net.
Stowage areas281Loading, stowing and featuresBA 212 USA, CA Edition B 2011; 1; 5, en-USdimargiVersion: 3.0.3.62010-05-20T13:33:46+02:00 - Seite 281Z
Page 284 of 400
When the tailgate is opened, the cargo
compartment cover is automatically raised to
make loading easier. It is automatically
lowered again when the tailgate is closed.
When the cargo compartment cover is
clipped in, there should be no objects
obstructing the downwards movement of the
cover in the cargo compartment when the
tailgate is closed. The cargo compartment
cover will otherwise be raised again.
Extending/retracting the luggage
compartment cover
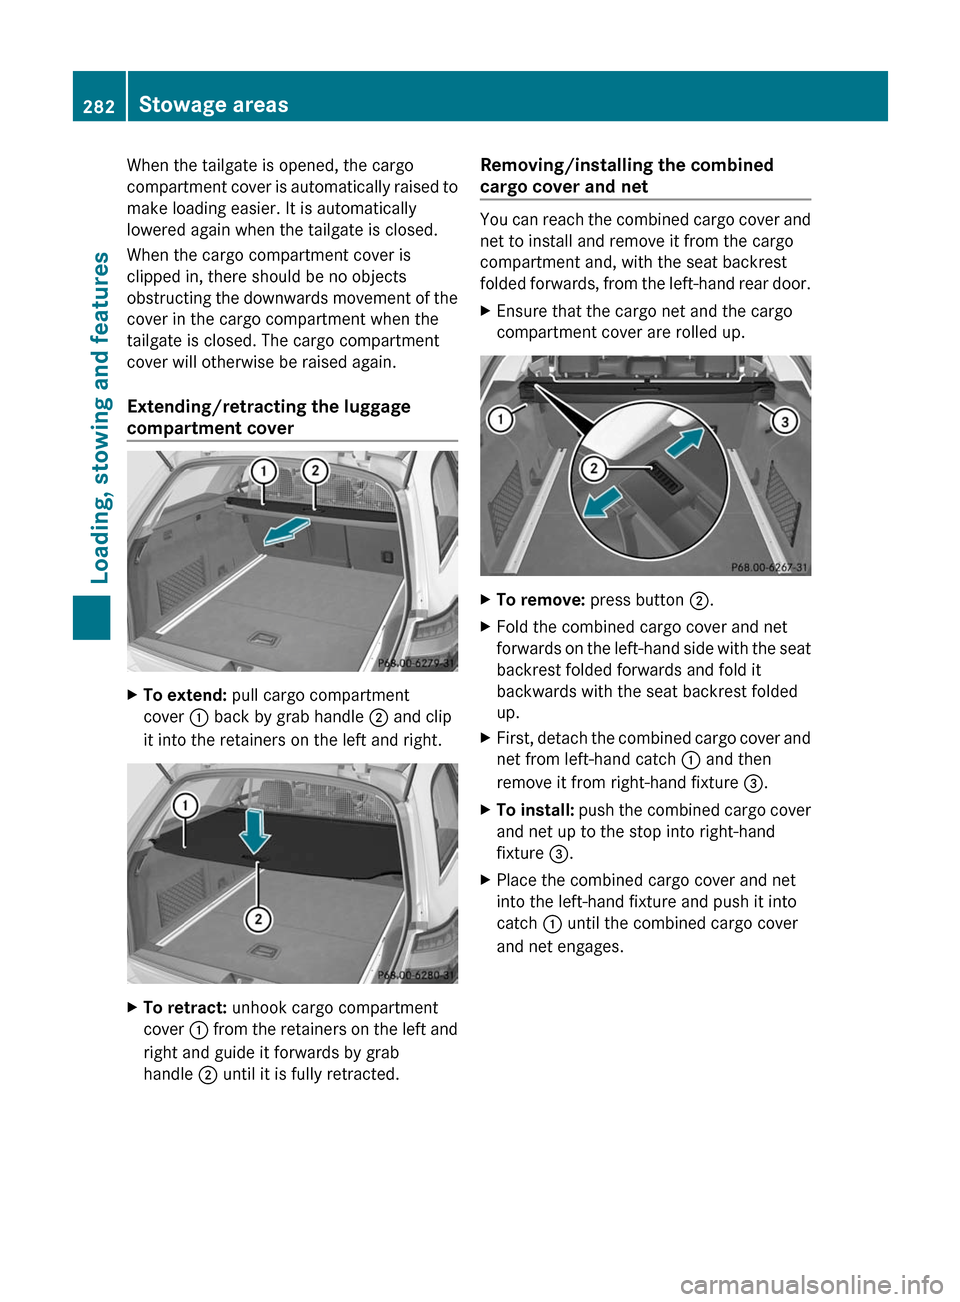
XTo extend: pull cargo compartment
cover : back by grab handle ; and clip
it into the retainers on the left and right.
XTo retract: unhook cargo compartment
cover : from the retainers on the left and
right and guide it forwards by grab
handle ; until it is fully retracted.
Removing/installing the combined
cargo cover and net
You can reach the combined cargo cover and
net to install and remove it from the cargo
compartment and, with the seat backrest
folded forwards, from the left-hand rear door.
XEnsure that the cargo net and the cargo
compartment cover are rolled up.
XTo remove: press button ;.XFold the combined cargo cover and net
forwards on the left-hand side with the seat
backrest folded forwards and fold it
backwards with the seat backrest folded
up.
XFirst, detach the combined cargo cover and
net from left-hand catch : and then
remove it from right-hand fixture =.
XTo install: push the combined cargo cover
and net up to the stop into right-hand
fixture =.
XPlace the combined cargo cover and net
into the left-hand fixture and push it into
catch : until the combined cargo cover
and net engages.
282Stowage areasLoading, stowing and features
BA 212 USA, CA Edition B 2011; 1; 5, en-USdimargiVersion: 3.0.3.62010-05-20T13:33:46+02:00 - Seite 282
Page 285 of 400
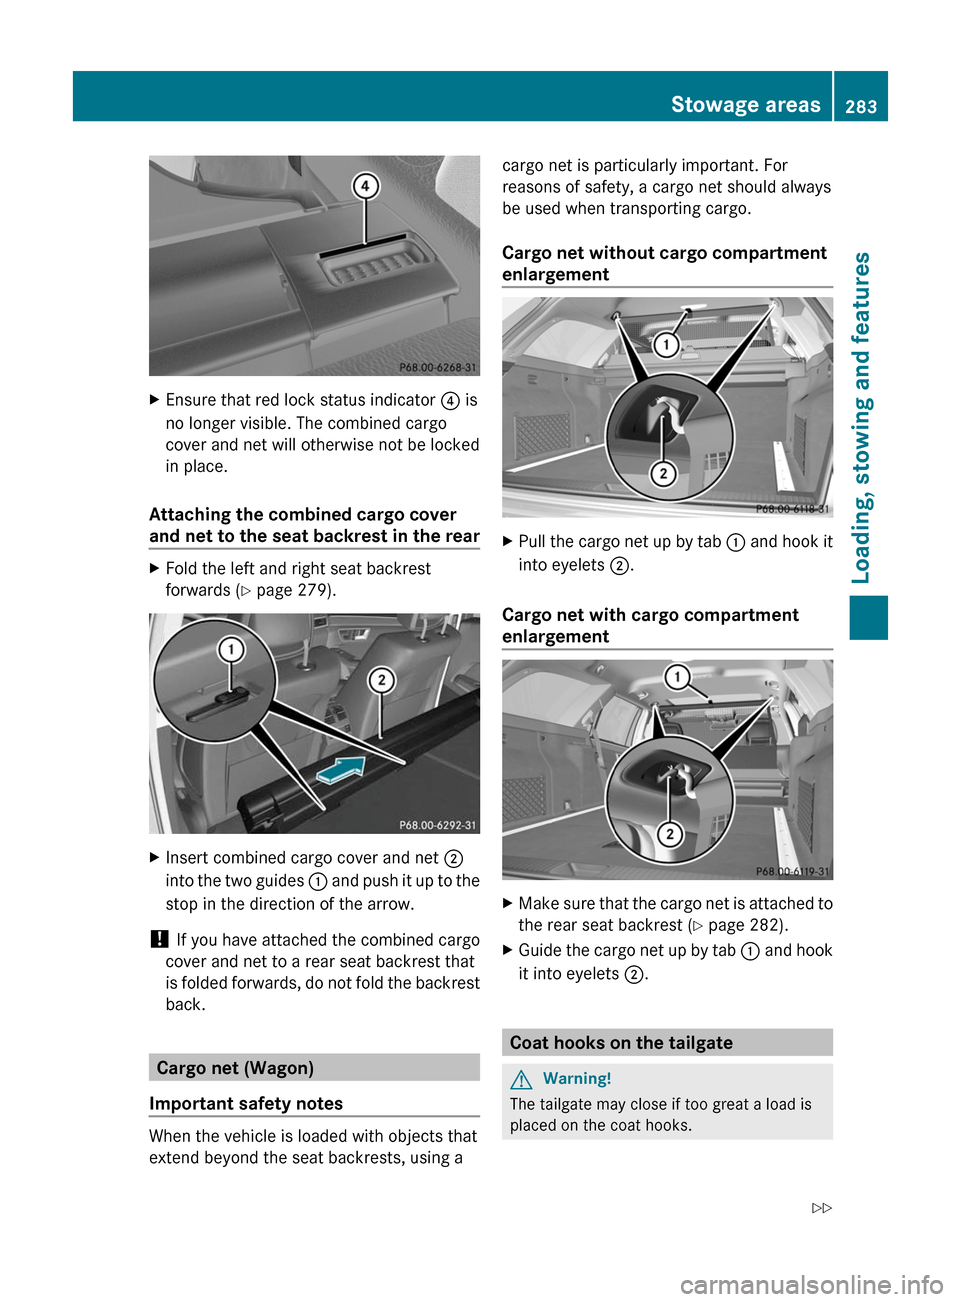
XEnsure that red lock status indicator ? is
no longer visible. The combined cargo
cover and net will otherwise not be locked
in place.
Attaching the combined cargo cover
and net to the seat backrest in the rear
XFold the left and right seat backrest
forwards (Y page 279).
XInsert combined cargo cover and net ;
into the two guides : and push it up to the
stop in the direction of the arrow.
! If you have attached the combined cargo
cover and net to a rear seat backrest that
is folded forwards, do not fold the backrest
back.
Cargo net (Wagon)
Important safety notes
When the vehicle is loaded with objects that
extend beyond the seat backrests, using a
cargo net is particularly important. For
reasons of safety, a cargo net should always
be used when transporting cargo.
Cargo net without cargo compartment
enlargement
XPull the cargo net up by tab : and hook it
into eyelets ;.
Cargo net with cargo compartment
enlargement
XMake sure that the cargo net is attached to
the rear seat backrest (Y page 282).
XGuide the cargo net up by tab : and hook
it into eyelets ;.
Coat hooks on the tailgate
GWarning!
The tailgate may close if too great a load is
placed on the coat hooks.
Stowage areas283Loading, stowing and featuresBA 212 USA, CA Edition B 2011; 1; 5, en-USdimargiVersion: 3.0.3.62010-05-20T13:33:46+02:00 - Seite 283Z
Page 286 of 400
You and/or others could be trapped and
injured.
Only use the coat hooks for light clothing.
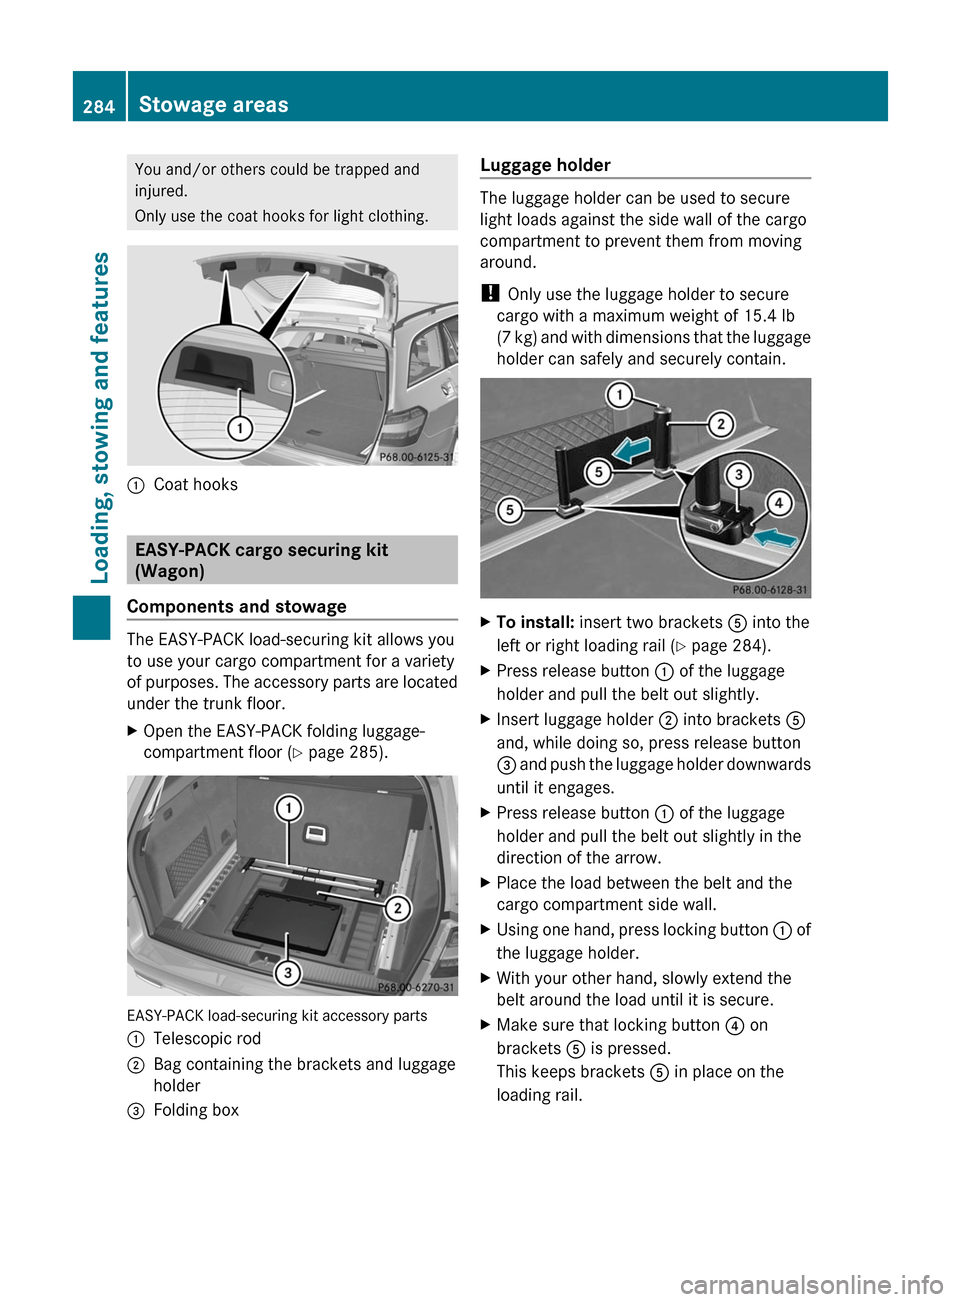
:Coat hooks
EASY-PACK cargo securing kit
(Wagon)
Components and stowage
The EASY-PACK load-securing kit allows you
to use your cargo compartment for a variety
of purposes. The accessory parts are located
under the trunk floor.
XOpen the EASY-PACK folding luggage-
compartment floor (Y page 285).
EASY-PACK load-securing kit accessory parts
:Telescopic rod;Bag containing the brackets and luggage
holder
=Folding boxLuggage holder
The luggage holder can be used to secure
light loads against the side wall of the cargo
compartment to prevent them from moving
around.
! Only use the luggage holder to secure
cargo with a maximum weight of 15.4 lb
(7 kg) and with dimensions that the luggage
holder can safely and securely contain.
XTo install: insert two brackets A into the
left or right loading rail (Y page 284).
XPress release button : of the luggage
holder and pull the belt out slightly.
XInsert luggage holder ; into brackets A
and, while doing so, press release button
= and push the luggage holder downwards
until it engages.
XPress release button : of the luggage
holder and pull the belt out slightly in the
direction of the arrow.
XPlace the load between the belt and the
cargo compartment side wall.
XUsing one hand, press locking button : of
the luggage holder.
XWith your other hand, slowly extend the
belt around the load until it is secure.
XMake sure that locking button ? on
brackets A is pressed.
This keeps brackets A in place on the
loading rail.
284Stowage areasLoading, stowing and features
BA 212 USA, CA Edition B 2011; 1; 5, en-USdimargiVersion: 3.0.3.62010-05-20T13:33:46+02:00 - Seite 284
Page 287 of 400
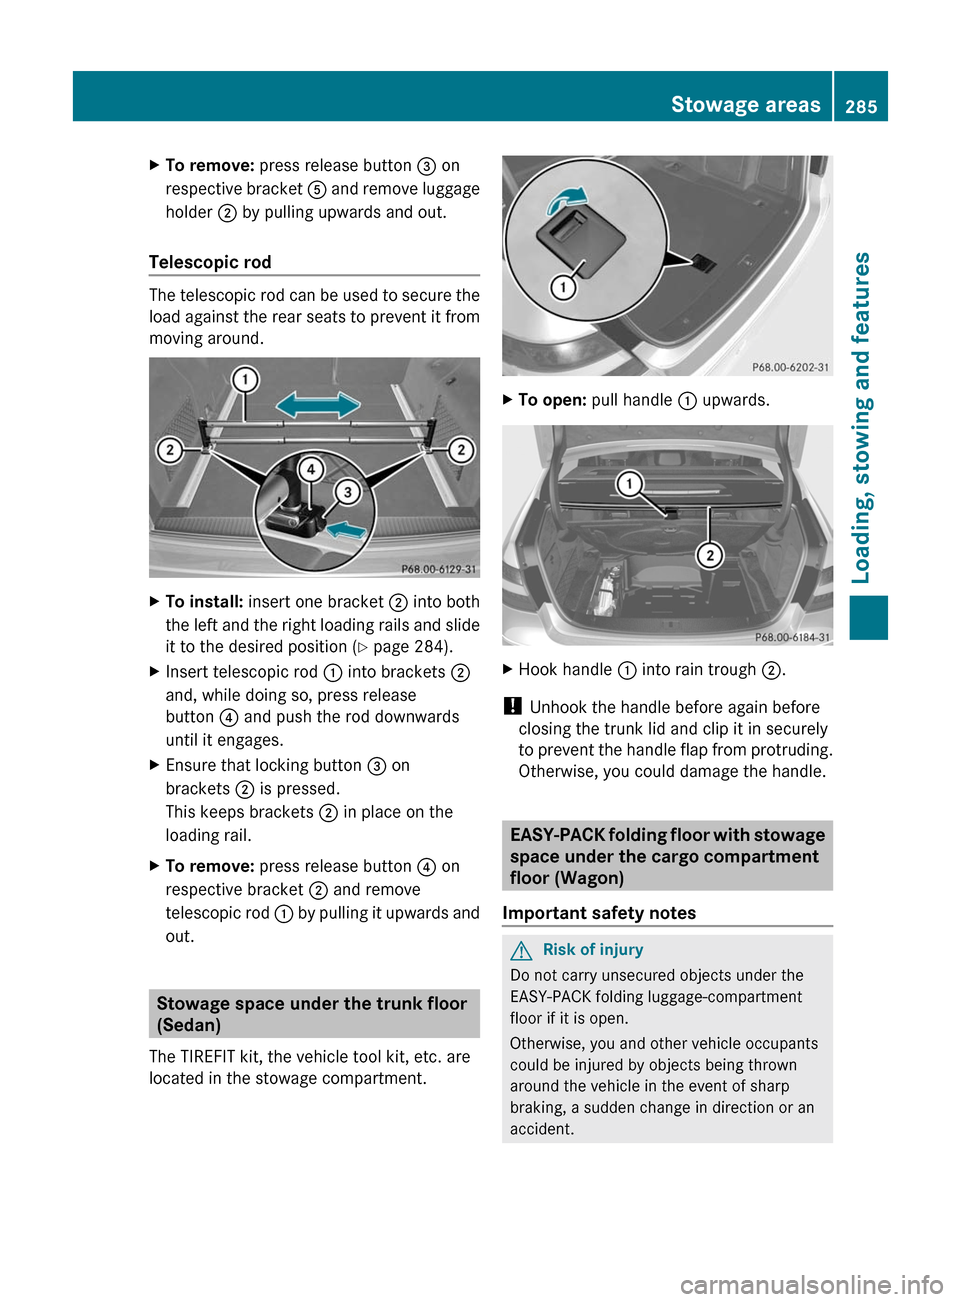
XTo remove: press release button = on
respective bracket A and remove luggage
holder ; by pulling upwards and out.
Telescopic rod
The telescopic rod can be used to secure the
load against the rear seats to prevent it from
moving around.
XTo install: insert one bracket ; into both
the left and the right loading rails and slide
it to the desired position (Y page 284).
XInsert telescopic rod : into brackets ;
and, while doing so, press release
button ? and push the rod downwards
until it engages.
XEnsure that locking button = on
brackets ; is pressed.
This keeps brackets ; in place on the
loading rail.
XTo remove: press release button ? on
respective bracket ; and remove
telescopic rod : by pulling it upwards and
out.
Stowage space under the trunk floor
(Sedan)
The TIREFIT kit, the vehicle tool kit, etc. are
located in the stowage compartment.
XTo open: pull handle : upwards.XHook handle : into rain trough ;.
! Unhook the handle before again before
closing the trunk lid and clip it in securely
to prevent the handle flap from protruding.
Otherwise, you could damage the handle.
EASY-PACK folding floor with stowage
space under the cargo compartment
floor (Wagon)
Important safety notes
GRisk of injury
Do not carry unsecured objects under the
EASY-PACK folding luggage-compartment
floor if it is open.
Otherwise, you and other vehicle occupants
could be injured by objects being thrown
around the vehicle in the event of sharp
braking, a sudden change in direction or an
accident.
Stowage areas285Loading, stowing and featuresBA 212 USA, CA Edition B 2011; 1; 5, en-USdimargiVersion: 3.0.3.62010-05-20T13:33:46+02:00 - Seite 285Z
Page 288 of 400
! Do not apply pressure to the EASY-PACK
folding luggage-compartment floor when it
is fully open. You may otherwise damage
the hinges of the EASY-PACK folding
luggage-compartment floor.
Opening and closing the folding cargo
compartment floor
A removable insert under the EASY-PACK
folding luggage-compartment floor contains
the parts of the EASY-PACK load-securing kit
and a folding box. Beneath the insert, you will
find the TIREFIT kit, the "Minispare"
emergency spare wheel, the vehicle tool kit,
etc.
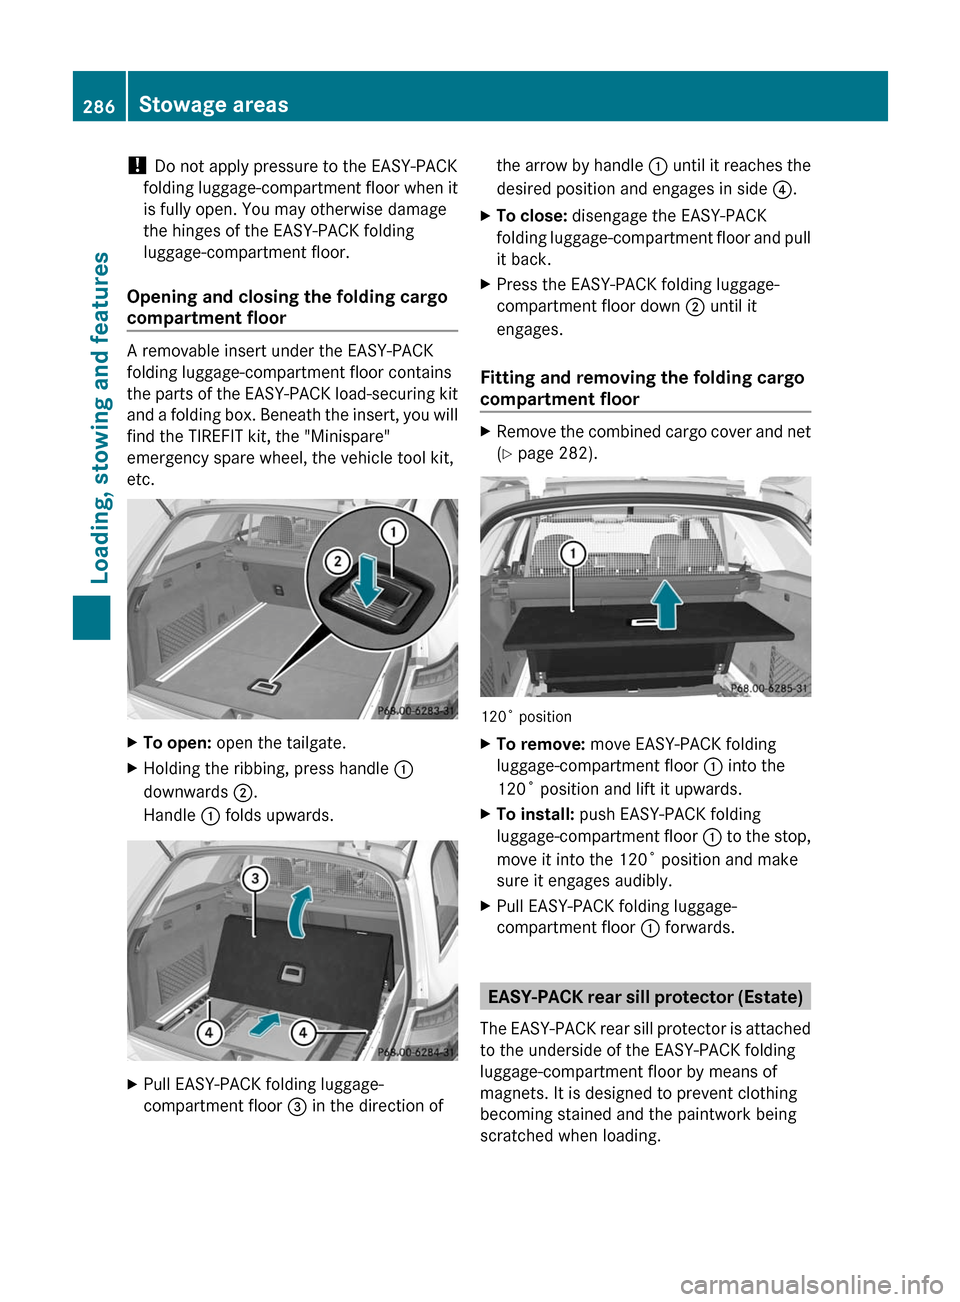
XTo open: open the tailgate.XHolding the ribbing, press handle :
downwards ;.
Handle : folds upwards.XPull EASY-PACK folding luggage-
compartment floor = in the direction ofthe arrow by handle : until it reaches the
desired position and engages in side ?.XTo close: disengage the EASY-PACK
folding luggage-compartment floor and pull
it back.XPress the EASY-PACK folding luggage-
compartment floor down ; until it
engages.
Fitting and removing the folding cargo
compartment floor
XRemove the combined cargo cover and net
( Y page 282).
120˚ position
XTo remove: move EASY-PACK folding
luggage-compartment floor : into the
120˚ position and lift it upwards.XTo install: push EASY-PACK folding
luggage-compartment floor : to the stop,
move it into the 120˚ position and make
sure it engages audibly.XPull EASY-PACK folding luggage-
compartment floor : forwards.
EASY-PACK rear sill protector (Estate)
The EASY-PACK rear sill protector is attached
to the underside of the EASY-PACK folding
luggage-compartment floor by means of
magnets. It is designed to prevent clothing
becoming stained and the paintwork being
scratched when loading.
286Stowage areasLoading, stowing and features
BA 212 USA, CA Edition B 2011; 1; 5, en-USdimargiVersion: 3.0.3.62010-05-20T13:33:46+02:00 - Seite 286
Page 289 of 400
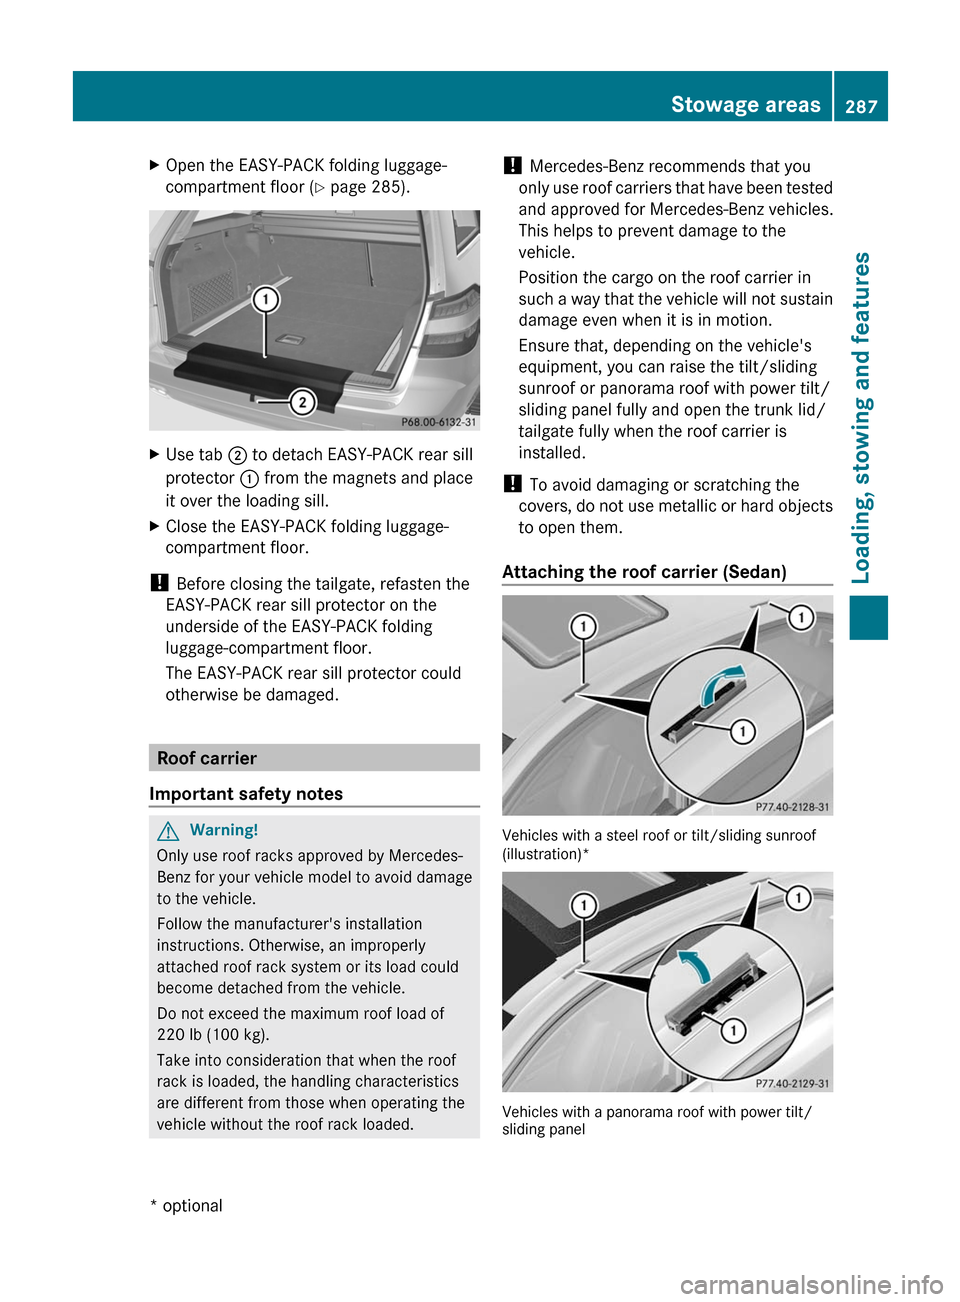
XOpen the EASY-PACK folding luggage-
compartment floor (Y page 285).
XUse tab ; to detach EASY-PACK rear sill
protector : from the magnets and place
it over the loading sill.
XClose the EASY-PACK folding luggage-
compartment floor.
! Before closing the tailgate, refasten the
EASY-PACK rear sill protector on the
underside of the EASY-PACK folding
luggage-compartment floor.
The EASY-PACK rear sill protector could
otherwise be damaged.
Roof carrier
Important safety notes
GWarning!
Only use roof racks approved by Mercedes-
Benz for your vehicle model to avoid damage
to the vehicle.
Follow the manufacturer's installation
instructions. Otherwise, an improperly
attached roof rack system or its load could
become detached from the vehicle.
Do not exceed the maximum roof load of
220 lb (100 kg).
Take into consideration that when the roof
rack is loaded, the handling characteristics
are different from those when operating the
vehicle without the roof rack loaded.
! Mercedes-Benz recommends that you
only use roof carriers that have been tested
and approved for Mercedes-Benz vehicles.
This helps to prevent damage to the
vehicle.
Position the cargo on the roof carrier in
such a way that the vehicle will not sustain
damage even when it is in motion.
Ensure that, depending on the vehicle's
equipment, you can raise the tilt/sliding
sunroof or panorama roof with power tilt/
sliding panel fully and open the trunk lid/
tailgate fully when the roof carrier is
installed.
! To avoid damaging or scratching the
covers, do not use metallic or hard objects
to open them.
Attaching the roof carrier (Sedan)
Vehicles with a steel roof or tilt/sliding sunroof(illustration)*
Vehicles with a panorama roof with power tilt/sliding panel
Stowage areas287Loading, stowing and features* optionalBA 212 USA, CA Edition B 2011; 1; 5, en-USdimargiVersion: 3.0.3.62010-05-20T13:33:46+02:00 - Seite 287Z
Page 290 of 400
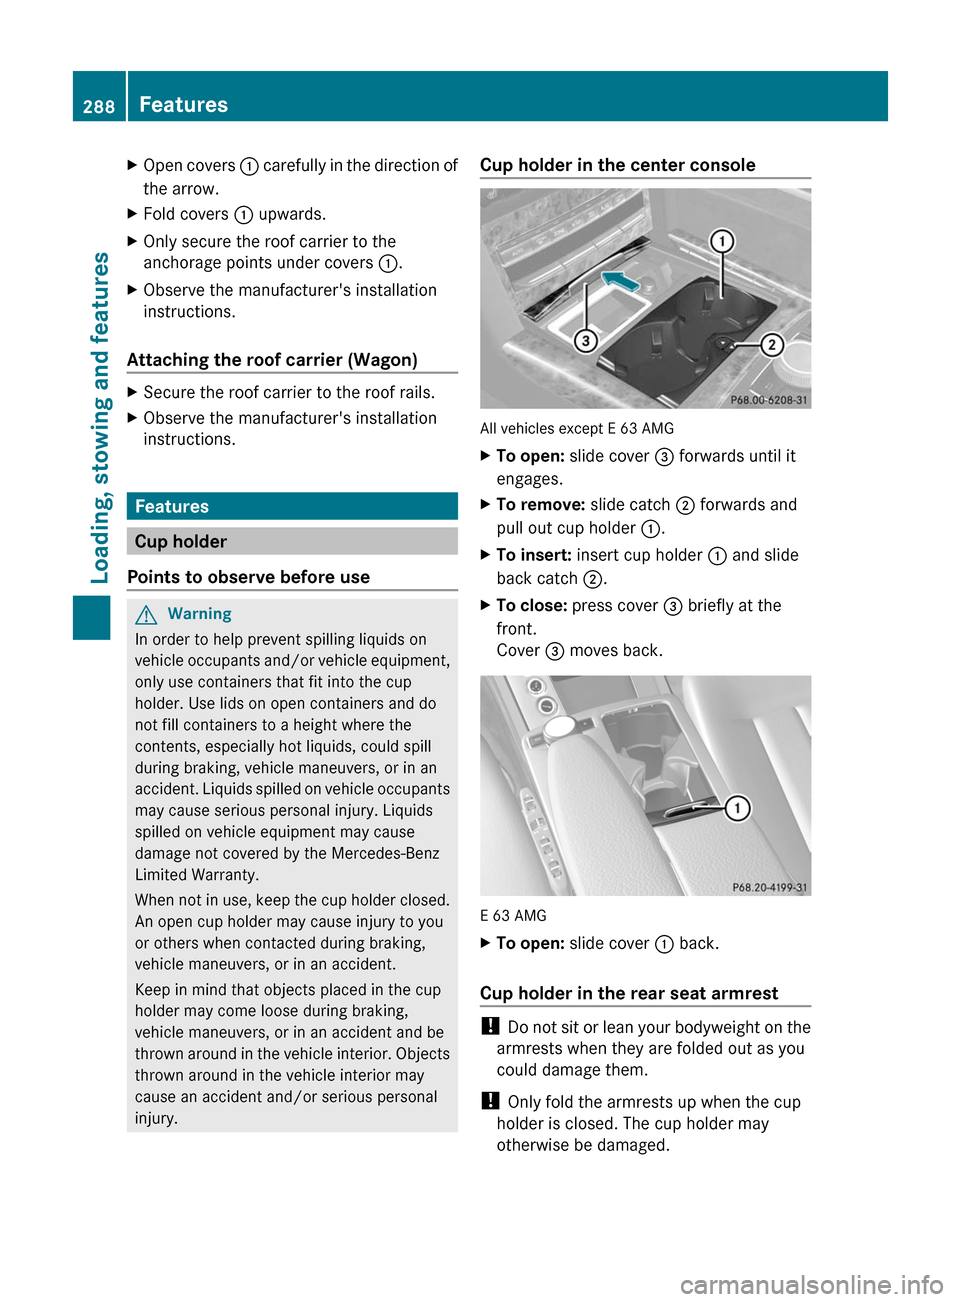
XOpen covers : carefully in the direction of
the arrow.XFold covers : upwards.XOnly secure the roof carrier to the
anchorage points under covers :.XObserve the manufacturer's installation
instructions.
Attaching the roof carrier (Wagon)
XSecure the roof carrier to the roof rails.XObserve the manufacturer's installation
instructions.
Features
Cup holder
Points to observe before use
GWarning
In order to help prevent spilling liquids on
vehicle occupants and/or vehicle equipment,
only use containers that fit into the cup
holder. Use lids on open containers and do
not fill containers to a height where the
contents, especially hot liquids, could spill
during braking, vehicle maneuvers, or in an
accident. Liquids spilled on vehicle occupants
may cause serious personal injury. Liquids
spilled on vehicle equipment may cause
damage not covered by the Mercedes-Benz
Limited Warranty.
When not in use, keep the cup holder closed.
An open cup holder may cause injury to you
or others when contacted during braking,
vehicle maneuvers, or in an accident.
Keep in mind that objects placed in the cup
holder may come loose during braking,
vehicle maneuvers, or in an accident and be
thrown around in the vehicle interior. Objects
thrown around in the vehicle interior may
cause an accident and/or serious personal
injury.
Cup holder in the center console
All vehicles except E 63 AMG
XTo open: slide cover = forwards until it
engages.XTo remove: slide catch ; forwards and
pull out cup holder :.XTo insert: insert cup holder : and slide
back catch ;.XTo close: press cover = briefly at the
front.
Cover = moves back.
E 63 AMG
XTo open: slide cover : back.
Cup holder in the rear seat armrest
!
Do not sit or lean your bodyweight on the
armrests when they are folded out as you
could damage them.
! Only fold the armrests up when the cup
holder is closed. The cup holder may
otherwise be damaged.
288FeaturesLoading, stowing and features
BA 212 USA, CA Edition B 2011; 1; 5, en-USdimargiVersion: 3.0.3.62010-05-20T13:33:46+02:00 - Seite 288