MERCEDES-BENZ EQC SUV 2019 Owners Manual
Manufacturer: MERCEDES-BENZ, Model Year: 2019, Model line: EQC SUV, Model: MERCEDES-BENZ EQC SUV 2019Pages: 629, PDF Size: 11.02 MB
Page 191 of 629
#
Press "cancel charging" button 3.
or #
Unlock theve hicle (only charging with alter‐
nating cur rent mode 2/3).
The charging process is ended. The %
indicator lamp 1lights up white. The vehi‐
cle soc ket is unloc ked. #
Press and hold button 2onthech arging
cable connec tor and remo vethech arging
cable connec tor from theve hicle soc ket.
% Ifyo u cannot remo vethech arging cable con‐
nec tor,re peat the unlocking procedure. If
th ech arging cable connec tor is still bloc ked,
con tact a qualified specialist workshop. #
Close the soc ket co ver and the soc ketflap. #
Remo vethech arging cable connec tor from
th e mains soc ket, or from the soc ket on the
wa llbox/ charging station, and stow theve hi‐
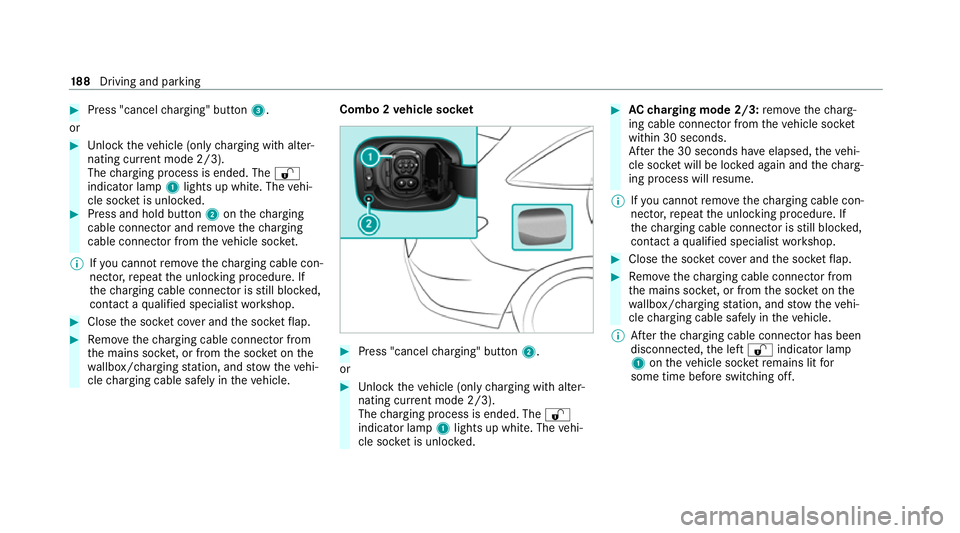
cle charging cable safely in theve hicle. Combo 2
vehicle soc ket #
Press "cancel charging" button 2.
or #
Unlock theve hicle (only charging with alter‐
nating cur rent mode 2/3).
The charging process is ended. The %
indicator lamp 1lights up white. The vehi‐
cle soc ket is unloc ked. #
AC charging mode 2/3: remo vethech arg‐
ing cable connec tor from theve hicle soc ket
within 30 seconds.
Af terth e 30 seconds ha veelapsed, theve hi‐
cle soc ket will be lo cked again and thech arg‐
ing process will resume.
% Ifyo u cannot remo vethech arging cable con‐
nec tor,re peat the unlocking procedure. If
th ech arging cable connec tor is still bloc ked,
con tact a qualified specialist workshop. #
Close the soc ket co ver and the soc ketflap. #
Remo vethech arging cable connec tor from
th e mains soc ket, or from the soc ket on the
wa llbox/ charging station, and stow theve hi‐
cle charging cable safely in theve hicle.
% Afterth ech arging cable connec tor has been
disconnected, the left % indicator lamp
1 ontheve hicle soc ketre mains lit for
some time before switching off. 18 8
Driving and pa rking
Page 192 of 629
Pa
rking Pa
rking theve hicle &
WARNING Risk of accident and inju ry
caused byan insuf ficiently secu redve hi‐
cle rolling away.
If th eve hicle is not securely par ked suf fi‐
ciently, it can rollaw ay in an uncont rolled
wa yev en at a slight downhill gradient. #
Ensure that the par kedve hicle is alw ays
properly secured against rolling away as
fo llo ws:
R on uphill or downhill gradients, turn
the front wheels so that theve hicle
ro lls towa rdsth eke rb if it starts
moving.
R apply the parking brake.
R switch the transmission toposition
j. &
WARNING Risk of accident and inju ry
due tochildren left unat tended in the
ve hicle
If ch ildren are left unat tended in theve hicle,
th ey could:
R Open doo rs,th ereby endangering other
persons or road users.
R Get out and be stru ck byoncoming traf‐
fi c.
R Ope rate ve hicle equipment and become
trapped, forex ample.
In addition, thech ildren could also set the
ve hicle in motion, forex ample by:
R Releasing the parking brake.
R Changing the transmission position.
R Starting theve hicle. #
Never lea vechildren unat tended in the
ve hicle. #
When leaving theve hicle, alw aysta ke
th eke y with you and lock theve hicle. #
Keep theve hicle key out of reach of
ch ildren. This also applies
tothe Digital Vehicle Key if the
"Digital Vehicle Key" function is activated via
Mercedes me connect.
* NO
TEDama getotheve hicle due toit
ro lling away #
Alw ays secure theve hicle against roll‐
ing away. Driving and pa
rking 18 9
Page 193 of 629
#
Bring theve hicle toast andstill byapplying
th e brake pedal. #
On uphill or downhill gradients, turn the front
wheels so that theve hicle rolls towa rdsthe
ke rb if it starts moving. #
App lythe electric parking brake. #
Enga getransmission position jin a station‐
ary vehicle with the brake pedal applied
(/ page 174). #
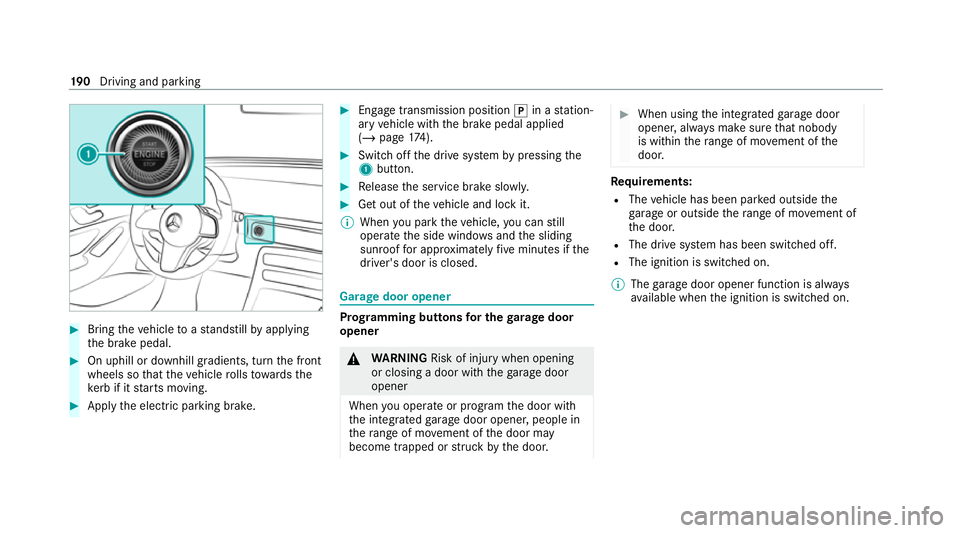
Switch off the drive sy stem bypressing the
1 button. #
Release the service brake slowl y. #
Get out of theve hicle and lock it.
% When you park theve hicle, you can still
opera tethe side windo wsand the sliding
sunroof for appro ximately five minutes if the
driver's door is closed. Garage door opener
Prog
ramming buttons for the garage door
opener &
WARNING Risk of inju rywhen opening
or closing a door with thega rage door
opener
When you operate or program the door with
th e integrated garage door opener, people in
th era nge of mo vement of the door may
become trapped or stru ck bythe door. #
When using the integrated garage door
opener, alw ays make sure that nobody
is within thera nge of mo vement of the
door. Re
quirements:
R The vehicle has been par ked outside the
ga rage or outside thera nge of mo vement of
th e door.
R The drive sy stem has been switched off.
R The ignition is switched on.
% The garage door opener function is alw ays
av ailable when the ignition is switched on. 19 0
Driving and pa rking
Page 194 of 629
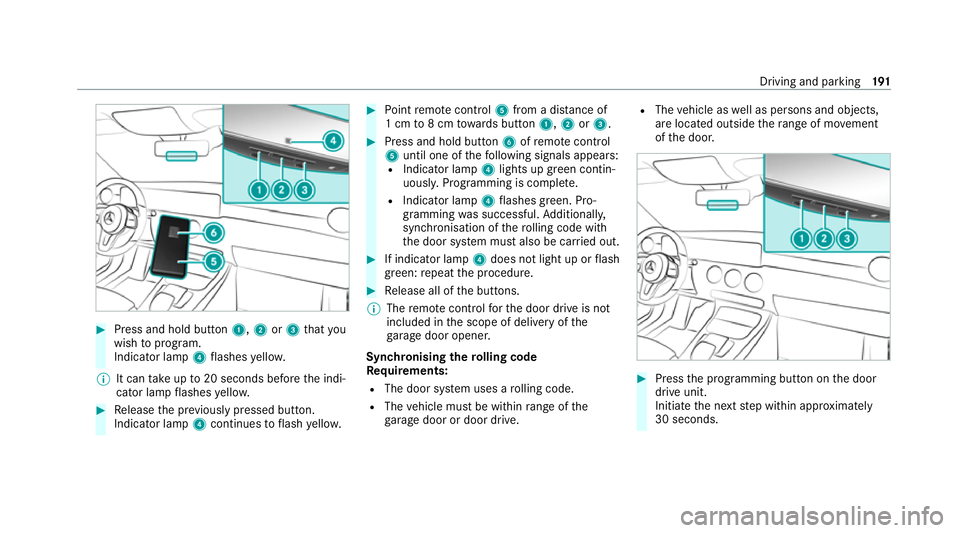
#
Press and hold button 1,2or3 that you
wish toprog ram.
Indicator lamp 4flashes yello w.
% It can take up to20 seconds before the indi‐
cator lamp flashes yello w. #
Release the pr eviously pressed button.
Indicator lamp 4continues toflash yello w. #
Point remo tecontrol 5from a di stance of
1 cm to8 cm towa rds button 1,2or3. #
Press and hold button 6ofremo tecontrol
5 until one of thefo llowing signals appears:
R Indicator lamp 4lights up green contin‐
uousl y.Programming is comple te.
R Indicator lamp 4flashes green. Pro‐
gramming was successful. Additionall y,
synchronisation of thero lling code with
th e door sy stem must also be car ried out. #
If indicator lamp 4does not light up or flash
green: repeat the procedure. #
Release all of the buttons.
% The remo tecontrol forth e door drive is not
included in the scope of delivery of the
ga rage door opener.
Synchronising thero lling code
Re quirements:
R The door sy stem uses a rolling code.
R The vehicle must be within range of the
ga rage door or door drive. R
The vehicle as well as persons and objects,
are located outside thera nge of mo vement
of the door. #
Press the programming button on the door
drive unit.
Initiate the next step within appr oximately
30 seconds. Driving and parking
191
Page 195 of 629
#
Press pr eviously prog rammed button 1,2
or 3 repeatedly until the door closes.
When the door closes, programming is com‐
ple ted.
% Please also read the operating instructions
fo rth e door drive.
Tr oubleshooting when prog ramming the
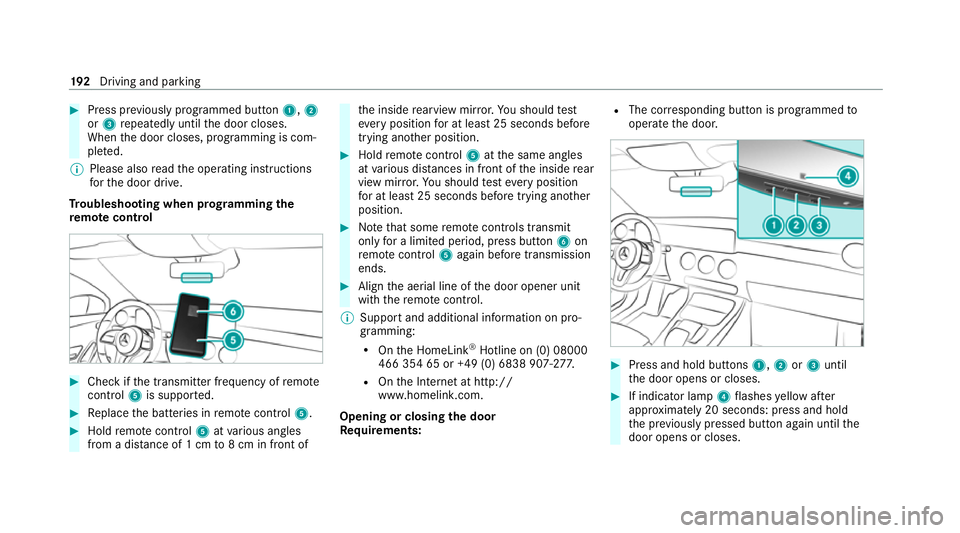
re mo tecont rol #
Check if the transmit ter frequency of remo te
control 5is suppo rted. #
Replace the batteries in remo tecontrol 5. #
Hold remo tecontrol 5atvarious angles
from a dis tance of 1 cm to8 cm in front of th
e inside rearview mir ror.Yo u should test
eve ryposition for at least 25 seconds before
trying ano ther position. #
Hold remo tecontrol 5atthe same angles
at various dis tances in front of the inside rear
view mir ror.Yo u should test eve ryposition
fo r at least 25 seconds before trying ano ther
position. #
Notethat some remo tecontrols transmit
only for a limi ted period, press button 6on
re mo tecontrol 5again before transmission
ends. #
Align the aerial line of the door opener unit
with there mo tecontrol.
% Support and additional information on pro‐
gramming:
R Onthe HomeLink ®
Hotline on (0) 08000
466 354 65 or +49 (0) 6838 907-2 77.
R Onthe Internet at http://
www.homelin k.com.
Opening or closing the door
Requ irements: R
The cor responding button is programmed to
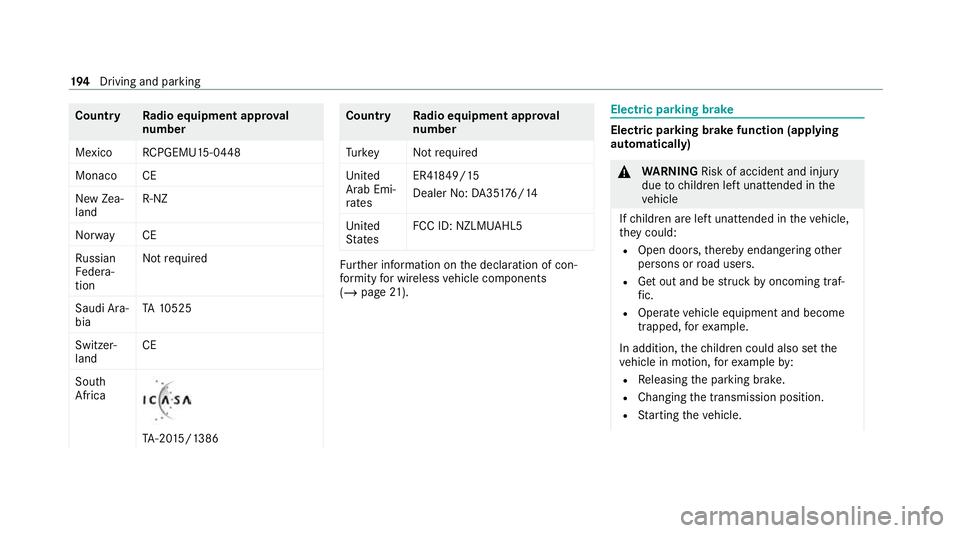
operate the door. #
Press and hold buttons 1,2or3 until
th e door opens or closes. #
If indicator lamp 4flashes yellow af ter
appr oximately 20 seconds: press and hold
th e pr eviously pressed button again until the
door opens or closes. 19 2
Driving and pa rking
Page 196 of 629
Clearing
thega rage door opener memo ry#
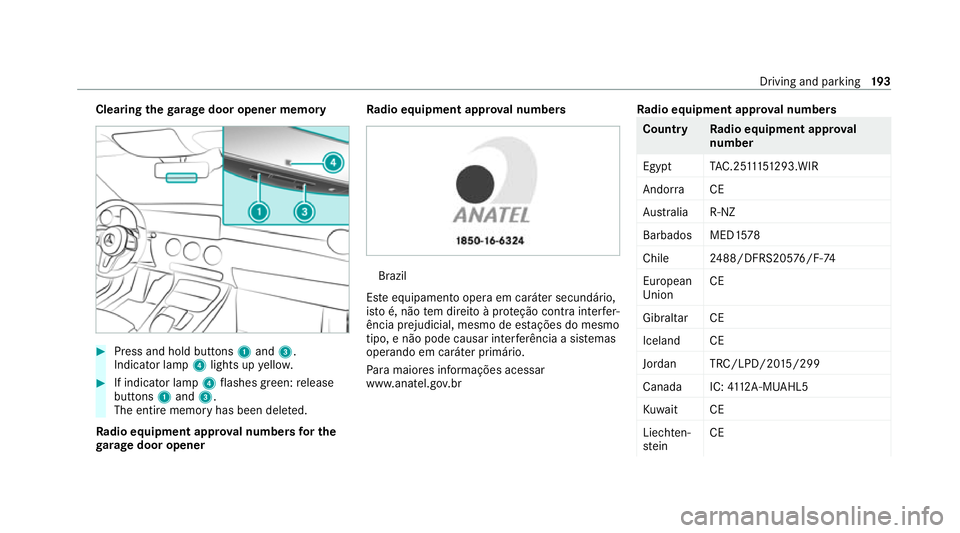
Press and hold buttons 1and 3.
Indicator lamp 4lights up yello w. #
If indicator lamp 4flashes green: release
buttons 1and 3.
The entire memo ryhas been dele ted.
Ra dio equipment appr oval numbers for the
ga rage door opener Ra
dio equipment appr oval numbers Brazil
Es te equipamento opera em caráter secundário,
is to é, não tem direito à pr oteção contra inter fer‐
ência prejudicial, mesmo de es tações do mesmo
tipo, e não pode causar inter ferê ncia a si stemas
operando em caráter primário.
Pa ra maio res informações acessar
www.anatel.go v.br Ra
dio equipment appr oval numbers Countr
yRadio equipment appr oval
number
Egyp tT AC.25 111 51293.WIR
Andor ra CE
Au stra lia R-NZ
Barbados MED1 578
Chile 2488/DFRS205 76/F-74
European
Union CE
Gibral tarCE
Iceland CE
Jordan TRC/LPD/20 15/299
Canad aI C:4112 A-MUAHL5
Ku wa it CE
Liechten‐
st ein CE Driving and parking
19 3
Page 197 of 629
Count
ryRadio equipment appr oval
number
Mexico RCPGEMU15-0448
Monaco CE
New Zea‐
land R-
NZ
Nor wayCE
Ru ssian
Fe dera‐
tion Not
requ ired
Saudi Ara‐
bia TA
10525
Switzer‐
land CE
South
Africa TA
-20 15/1386 Countr
yRadio equipment appr oval
number
Tu rkey Notrequ ired
Uni ted
Arab Emi‐
ra tes ER4
1849/15
Dealer No: DA35176/14
United
St ates FCC ID: NZLM
UAHL5 Fu
rther information on the declaration of con‐
fo rm ity for wireless vehicle components
(/ page 21). Electric pa
rking brake Electric parking brake function (app
lying
automatically) &
WARNING Risk of accident and inju ry
due tochildren left unat tended in the
ve hicle
If ch ildren are left unat tended in theve hicle,
th ey could:
R Open doo rs,th ereby endangering other
persons or road users.
R Get out and be stru ck byoncoming traf‐
fi c.
R Ope rate ve hicle equipment and become
trapped, forex ample.
In addition, thech ildren could also set the
ve hicle in motion, forex ample by:
R Releasing the parking brake.
R Changing the transmission position.
R Starting theve hicle. 194
Driving and pa rking
Page 198 of 629
#
Never lea vechildren unat tended in the
ve hicle. #
When leaving theve hicle, alw aysta ke
th eke y with you and lock theve hicle. #
Keep theve hicle key out of reach of
ch ildren. This also applies
tothe Digital Vehicle Key if the
"Digital Vehicle Key" function is activated via
Mercedes me connect.
The electric parking brake is applied if the trans‐
mission is in position jand one of thefo llow‐
ing conditions is fulfilled:
R The drive sy stem is switched off.
R The seat belt tongue is not inser ted in the
seat belt buckle of the driver's seat and the
driver's door is opened.
% Toprev ent application: pull the handle of the
electric parking brake.
In thefo llowing situations, the electric parking
brake is also applied:
R Active Dis tance Assi stDISTRONIC is bringing
th eve hicle toast andstill. R
The HOLD function is keeping theve hicle sta‐
tionar y.
R Active Parking Assist is keeping theve hicle
st ationar y.
In addition, one of thefo llowing conditions must
be fulfilled:
R The drive sy stem is switched off.
R The seat belt tongue is not inser ted in the
seat belt buckle of the driver's seat and the
driver's door is opened.
R There is a sy stem malfunction.
R The po wer supp lyis insuf ficient.
R The vehicle is stationary for a lengt hyperiod.
When the electric parking brake is released, the
re d! indicator lamp in the instrument clus‐
te r goes out.
Electric parking brake function (releasing
automatical ly)
The electric parking brake is released when the
fo llowing conditions are fulfilled:
R The driver's door is closed. R
The drive sy stem has been star ted.
R The transmission is in position hork and
yo u depress the accelera tor pedal or you
shift from transmission position jtoh or
k when on le velground withthe driver's
door closed.
R Ifth e transmission is in position k,theta il‐
gate must be closed.
R The seat belt tongue is inser ted into the seat
belt buckle of the driver's seat.
If th e seat belt tongue is not inser ted into the
seat belt buckle of the driver's seat, thefo llow‐
ing conditions must be fulfilled:
R You mo vethe transmission out of transmis‐
sion position joryou ha veprev iously
driven fasterthan 3 km/h.
R Ifth e transmission is in position k,theta il‐
gate must be closed.
When the electric parking brake is released, the
re d! indicator lamp in the instrument clus‐
te r goes out. Driving and parking
19 5
Page 199 of 629
App
lying/releasing the electric pa rking
brake manually
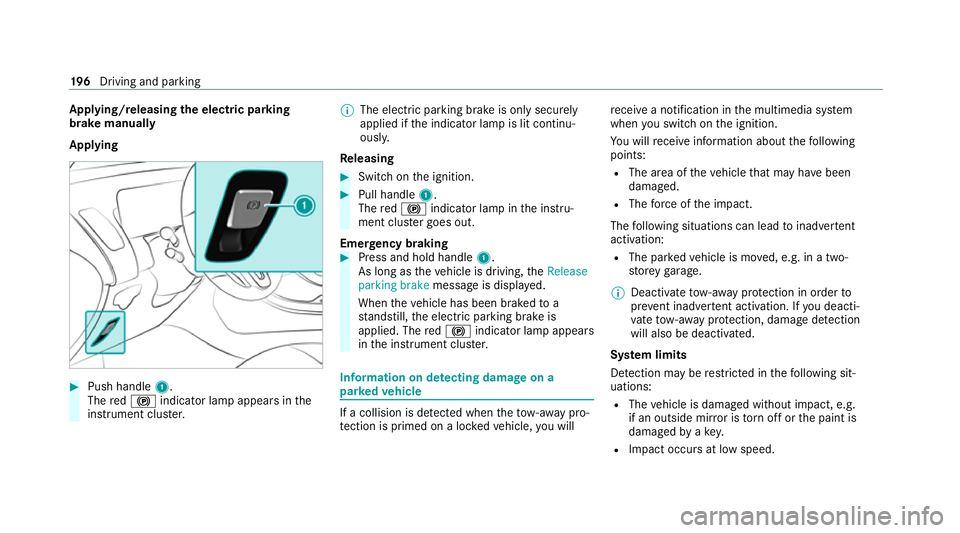
Applying #
Push handle 1.
The red! indicator lamp appears in the
instrument clus ter. %
The electric parking brake is only securely
applied if the indicator lamp is lit continu‐
ously.
Re leasing #
Swit chon the ignition. #
Pull handle 1.
The red! indicator lamp in the instru‐
ment clus ter goes out.
Emer gency braking #
Press and hold handle 1.
As long as theve hicle is driving, theRelease
parking brake message is displa yed.
When theve hicle has been braked to a
st andstill, the electric parking brake is
applied. The red! indicator lamp appears
in the instrument clus ter. Information on de
tecting dama geon a
pa rked vehicle If a collision is de
tected when theto w- aw ay pro‐
te ction is primed on a loc kedve hicle, you will re
cei vea notification in the multimedia sy stem
when you swit chon the ignition.
Yo u will recei veinformation about thefo llowing
points:
R The area of theve hicle that may ha vebeen
damaged.
R The forc e of the impact.
The following situations can lead toinadver tent
acti vation:
R The pa rked vehicle is mo ved, e.g. in a two-
st or ey garage.
% Deactivate tow- aw ay protection in order to
pr eve nt inadver tent acti vation. If you deacti‐
va te tow- aw ay protection, damage de tection
will also be deactivated.
Sy stem limits
De tection may be restricted in thefo llowing sit‐
uations:
R The vehicle is damaged without impact, e.g.
if an outside mir ror is torn off or the paint is
damaged byakey.
R Impact occurs at low speed. 19 6
Driving and pa rking
Page 200 of 629
R
The electric parking brake is not applied. Driving and driving saf
ety sy stems Driving sy
stems and your responsibility Yo
ur vehicle is equipped with driving sy stems
which assist you in driving, parking and manoeu‐
vring theve hicle. The driving sy stems are aids
and do not relie ve you of your responsibility per‐
ta ining toroad traf fic la w.Pay attention tothe
traf fic conditions at all times and inter vene
when necessa ry. Be aware of the limitations
re ga rding the safe use of these sy stems. Information on
radar and ultrasonic senso rsSome driving and driving sa
fety sy stems use
ra dar or ultrasonic sensors tomonitor the area
in front of, behind or next totheve hicle (depend‐
ing on theve hicle's equipment).
Depending on theve hicle's equipment, thera dar
sensors are integ rated behind the bumpers
and/or behind the Mercedes star. The ultrasonic
sensors are located in the front and rear bump‐
ers. Keep these parts free of dirt, ice and slush (/
page 469). The sensors must not be cov‐
ered, forex ample bybicycle rack s, overhanging
loads, sticke rs,fo il or foils toprotect against
st one chipping. Additional license plate brac kets
can li kewise impair the function of the ultrasonic
sensors. In theeve nt of dama getothe bumpers
or radiator grille, or following a collision impact‐
ing the bumpers or radiator grille, ha vethe func‐
tion of the sensors checked at a qualified spe‐
cialist workshop. If the sensors are damaged,
some driving sy stems and driving saf ety sy stems
may no longer function properly. Overview of driving sy
stems and driving
saf ety sy stems In
this section, you will find information about
th efo llowing driving sy stems and driving saf ety
sy stems:
R 360° Camera (/ page 235)
R ABS (Anti-lock Braking System)
(/ page 198)
R Active Dis tance Assi stDISTRONIC
(/ page 212) R
Adaptive Brake Lights (/ page 208)
R Active Brake Assi st (/ page 202)
R Active Lane Keeping Assist (/ page 253)
R ATTENTION ASSIST (/ page245)
R BAS (Bra keAssist System) (/ page198)
R Hill Start Assist (/ page 224)
R EBD (Elect ronic Brakeforc eDistribution)
(/ page 201)
R ESP ®
(Elect ronic Stability Program)
(/ page 198)
R ESP ®
Crosswind Assist (/ page 201)
R ESP ®
trailer stabilisation (/ page 201)
R Speed Limit Assist (/ page246)
R Active Speed Limit Assi st (/ page 216)
R HOLD fu nction (/ page 225)
R STEER CONTROL (/ page 202)
R Active Steering Assist with rescue lane func‐
tion (/ page219)
R Limi ter (/ page 209)
R Active Emergency Stop Assist (/ page 222) Driving and parking
197