MERCEDES-BENZ EQC SUV 2021 Owners Manual
Manufacturer: MERCEDES-BENZ, Model Year: 2021, Model line: EQC SUV, Model: MERCEDES-BENZ EQC SUV 2021Pages: 453, PDF Size: 8.68 MB
Page 111 of 453
#
Alw ays make sure that the cigar ette
lighter is out of reach of children. #
Never lea vechildren unat tended in the
ve hicle. The driving
characteristics of your vehicle are
dependent on the distribution of the load within
th eve hicle. You should bear thefo llowing in
mind when loading theve hicle:
R neverex ceed the permissible gross mass or
th e permissible axle loads forth eve hicle
(including occupants).
Information can be found on theve hicle iden‐
tification plate (/ page 346).
R the load must not pr otru de abo vethe upper
edge of the seat backrests.
R when transporting objects in the load com‐
partment, alw ays ins tallth e combined lug‐
ga ge cover and net (load compartment co ver
and partitioning net).
R always place the load behind unoccupied
seats if possible. R
secure the load using the tie-down eyes and
distribute the load evenly. St
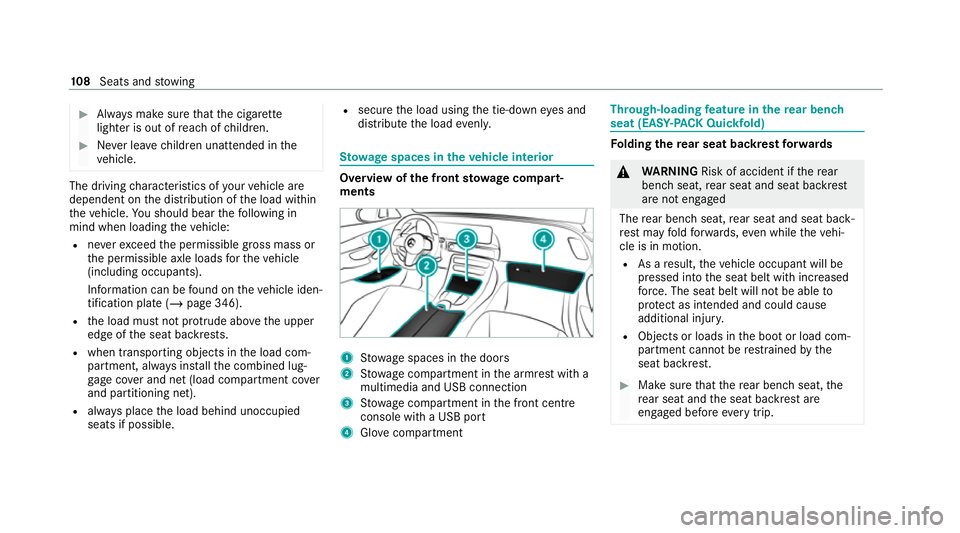
ow age spaces in theve hicle interior Overview of
the front stowage compa rt‐
ments 1
Stow age spaces in the doors
2 Stow age compartment in the armrest with a
multimedia and USB connection
3 Stow age compartment in the front cent re
console wi tha USB port
4 Glovecompa rtment Through-loading
feature in there ar ben ch
seat (EAS Y-PA CK Quickfold) Fo
lding there ar seat backrest forw ards &
WARNING Risk of accident if there ar
ben chseat, rear seat and seat backrest
are not engaged
The rear ben chseat, rear seat and seat back‐
re st may fold forw ards, even while theve hi‐
cle is in motion.
R As a result, theve hicle occupant will be
pressed into the seat belt with increased
fo rc e. The seat belt will not be able to
pr otect as intended and could cause
additional injur y.
R Objects or loads in the boot or load com‐
partment cann otbe restra ined bythe
seat backrest. #
Make sure that there ar ben chseat, the
re ar seat and the seat backrest are
engaged before everytrip. 108
Seats and stowing
Page 112 of 453
If
th e left and right seat backrests are not
engaged and loc ked in place, this will be shown
on the multifunction display on the instrument
clus ter.A wa rning tone will also sound.
If th e cent reseat backrest is not engaged and
loc ked in place, the lock verification indicator
will be red.
Re quirements:
R Tofold the cent reseat backrest forw ards:
th e cent reseat backrest has been unloc ked.
Yo u can fold the cent reand outer seat backrests
fo rw ards separatel y.
Yo u can unlo ckthe outer seat backrests electri‐
cally. The buttons for unlocking are located in
th e load compartment. #
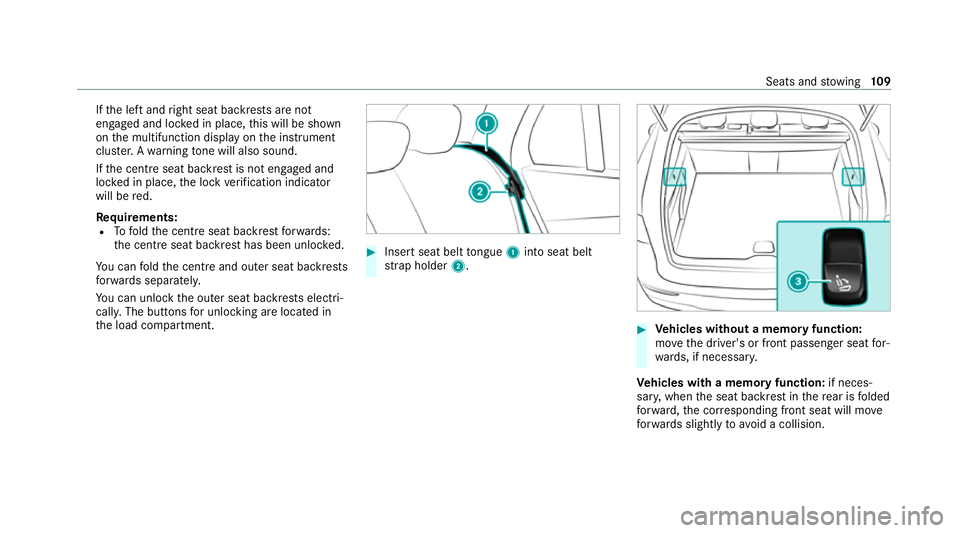
Insert seat belt tongue 1into seat belt
st ra p holder 2. #
Vehicles without a memory function:
mo vethe driver's or front passenger seat for‐
wa rds, if necessar y.
Ve hicles with a memory function: if neces‐
sar y,when the seat backrest in there ar is folded
fo rw ard, the cor responding front seat will mo ve
fo rw ards slightly to avoid a collision. Seats and
stowing 109
Page 113 of 453
#
If necessar y,fully insert the head restra ints
in there ar seat backrest. #
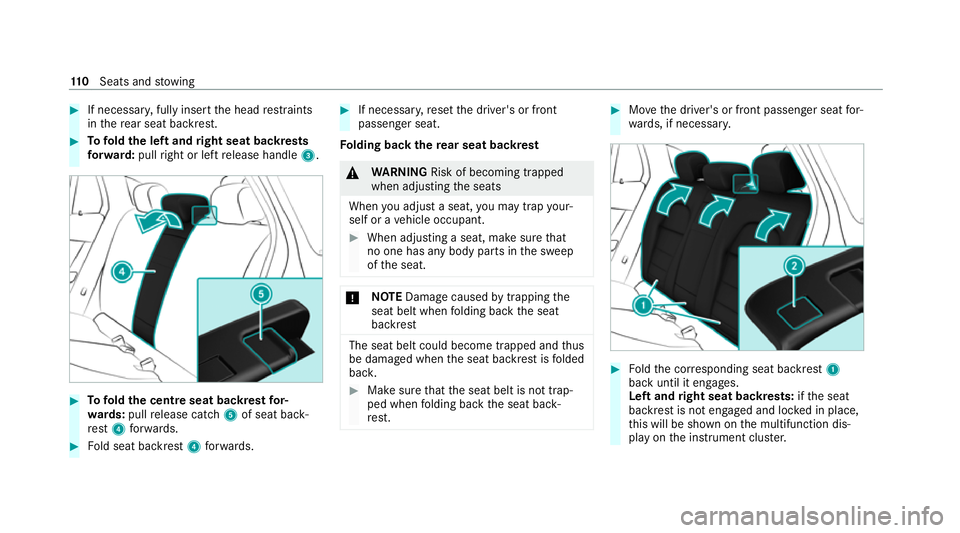
Tofold the left and right seat backrests
fo rw ard: pullright or left release handle 3. #
Tofold the centre seat backrest for‐
wa rds: pull release cat ch5 of seat back‐
re st 4 forw ards. #
Fold seat backrest 4forw ards. #
If necessar y,reset the driver's or front
passenger seat.
Fo lding back there ar seat backrest &
WARNING Risk of becoming trapped
when adjusting the seats
When you adjust a seat, you may trap your‐
self or a vehicle occupant. #
When adjusting a seat, make sure that
no one has any body parts in the sweep
of the seat. *
NO
TEDama gecaused bytrapping the
seat belt when folding back the seat
backrest The seat belt could become trapped and
thus
be damaged when the seat backrest is folded
bac k. #
Make sure that the seat belt is not trap‐
ped when folding back the seat back‐
re st. #
Movethe driver's or front passenger seat for‐
wa rds, if necessar y. #
Foldthe cor responding seat backrest 1
back until it engages.
Left and right seat backrests: ifth e seat
backrest is not engaged and loc ked in place,
th is will be shown on the multifunction dis‐
play on the instrument clus ter. 11 0
Seats and stowing
Page 114 of 453
A
wa rning tone will also sound.
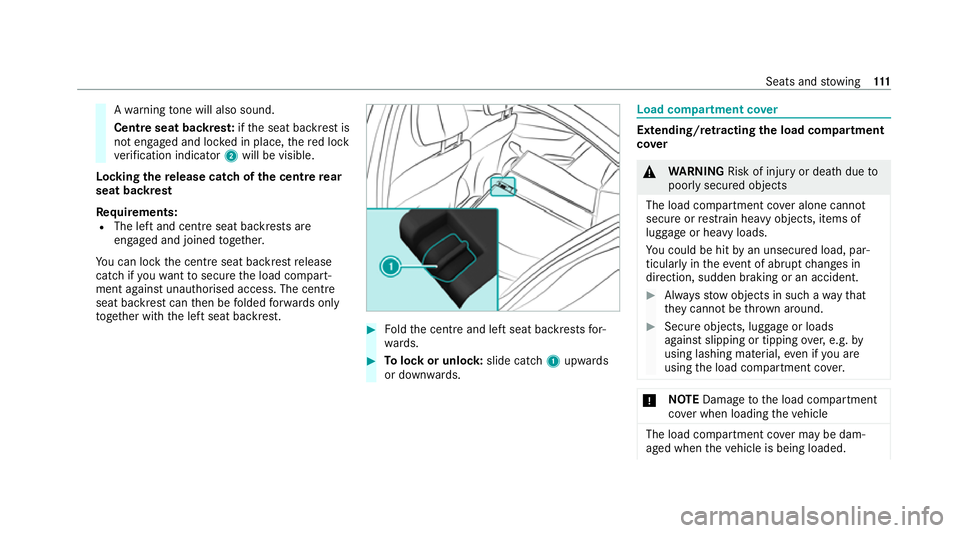
Centre seat backres t:ifth e seat backrest is
not engaged and loc ked in place, there d lock
ve rification indicator 2will be visible.
Lo cking there lease catch of the centre rear
seat backrest
Re quirements:
R The left and centre seat backrests are
engaged and joined toge ther.
Yo u can lock the cent reseat backrest release
cat chifyo uwa nttosecure the load compart‐
ment against unauthorised access. The cent re
seat backrest can then be folded forw ards on ly
to get her with the left seat backrest. #
Foldthe cent reand left seat backrests for‐
wa rds. #
Tolock or unlock: slide catch1 upwards
or down wards. Load compartment co
ver Extending/r
etra cting the load compa rtment
co ver &
WARNING Risk of inju ryor death due to
poorly secured objects
The load compartment co ver alone cannot
secure or restra in heavy objects, items of
luggage or heavy loads.
Yo u could be hit byan unsecured load, par‐
ticular lyin theev ent of abrupt changes in
direction, sudden braking or an accident. #
Alw aysstow objects in such a wayth at
th ey cannot be thro wn around. #
Secure objects, luggage or loads
against slipping or tipping over,e.g. by
using lashing material, even if you are
using the load compartment co ver. *
NO
TEDama getothe load compartment
co ver when loading theve hicle The load compartment co
ver may be dam‐
aged when theve hicle is being loaded. Seats and
stowing 111
Page 115 of 453
#
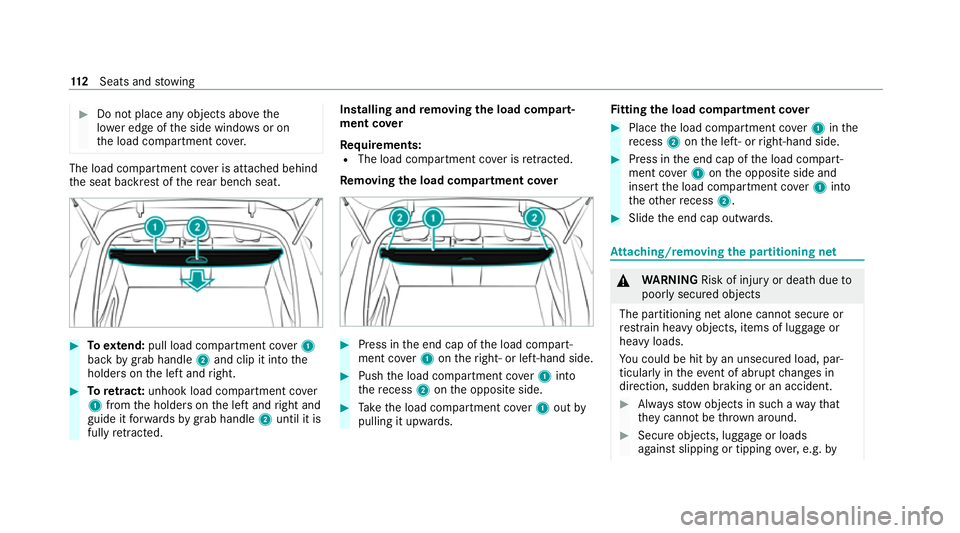
Do not place any objects ab ovethe
lo we r edge of the side windo wsor on
th e load compartment co ver. The load compartment co
ver is attached behind
th e seat backrest of there ar ben chseat. #
Toextend: pull load compartment co ver1
back bygrab handle 2and clip it into the
holders on the left and right. #
Toretract: unhook load compa rtment co ver
1 from the holders on the left and right and
guide it forw ards bygrab handle 2until it is
fully retracted. In
stalling and removing the load co mpart‐
ment co ver
Re quirements:
R The load compartment co ver is retracted.
Re moving the load co mpartment co ver #
Press in the end cap of the load compart‐
ment co ver1 ontheright- or left-hand side. #
Push the load compartment co ver1 into
th ere cess 2onthe opposite side. #
Take the load compartment co ver1 out by
pulling it upwards. Fi
tting the load co mpartment co ver #
Place the load compartment co ver1 inthe
re cess 2onthe left- or right-hand side. #
Press in the end cap of the load compart‐
ment co ver1 onthe opposite side and
insert the load compartment co ver1 into
th eot her recess 2. #
Slide the end cap outwards. At
taching/rem oving the pa rtitioning net &
WARNING Risk of inju ryor death due to
poorly secured objects
The partitioning net alone cann otsecure or
re stra in heavy objects, items of luggage or
heavy loads.
Yo u could be hit byan unsecured load, par‐
ticular lyin theev ent of abrupt changes in
direction, sudden braking or an accident. #
Alw aysstow objects in such a wayth at
th ey cannot be thro wn around. #
Secure objects, luggage or loads
against slipping or tipping over,e.g. by 11 2
Seats and stowing
Page 116 of 453
using lashing material,
even if you are
using the partitioning net. Fo
r saf etyre asons, alw ays use a partitioning net
when transporting a load.
Damaged partitioning nets can no longer fulfil
th eir pr otective functions. Replace damaged par‐
titioning nets. Visit a qualified specialist work‐
shop.
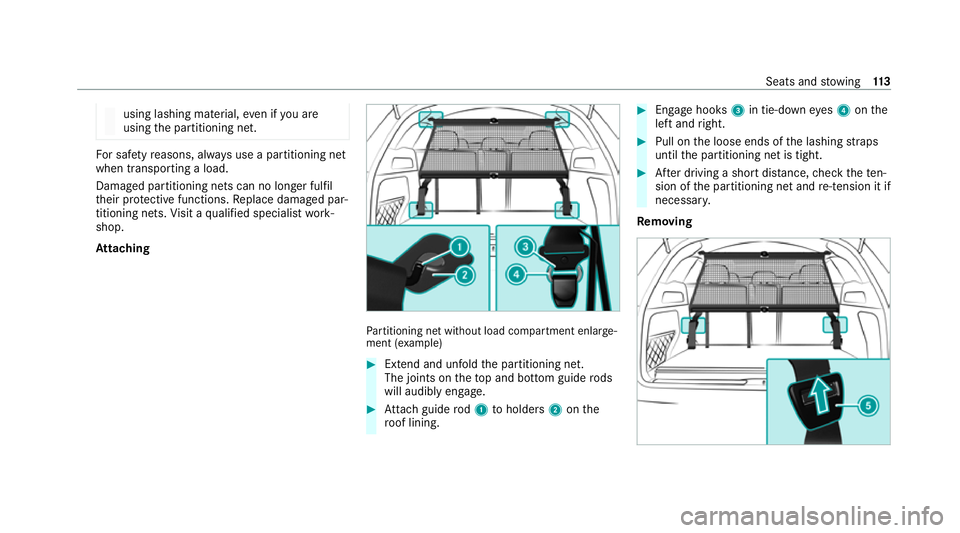
At taching Pa
rtitioning net without load compartment enlar ge‐
ment (e xamp le) #
Extend and unfold the partitioning net.
The joints on theto p and bottom guide rods
will audibly engage. #
Attach guide rod1 toholders 2onthe
ro of lining. #
Engage hooks 3in tie-down eyes 4 onthe
left and right. #
Pull on the loose ends of the lashing stra ps
until the partitioning net is tight. #
After driving a short dis tance, check thete n‐
sion of the partitioning net and re-tension it if
necessa ry.
Re moving Seats and
stowing 11 3
Page 117 of 453
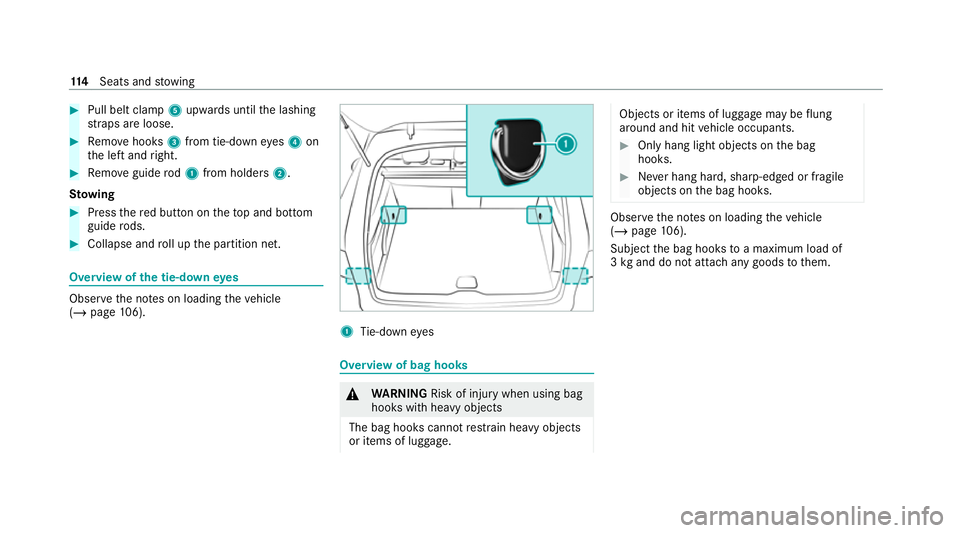
#
Pull belt clamp 5upwards until the lashing
st ra ps are loose. #
Remo vehooks 3from tie-down eyes4 on
th e left and right. #
Remo veguide rod1 from holders 2.
St ow ing #
Press there d button on theto p and bottom
guide rods. #
Collapse and roll up the partition net. Overview of
the tie-down eyes Obser
vethe no tes on loading theve hicle
(/ page 106). 1
Tie-down eyes Overview of bag hooks
&
WARNING Risk of inju rywhen using bag
hooks with heavy objects
The bag hooks cannot restra in heavy objects
or items of luggage. Objects or items of luggage may be
flung
around and hit vehicle occupants. #
Only hang light objects on the bag
hooks. #
Never hang hard, sharp-edged or fragile
objects on the bag hooks. Obser
vethe no tes on loading theve hicle
(/ page 106).
Subject the bag hooks toa maximum load of
3 kg and do not attach any goods tothem. 11 4
Seats and stowing
Page 118 of 453
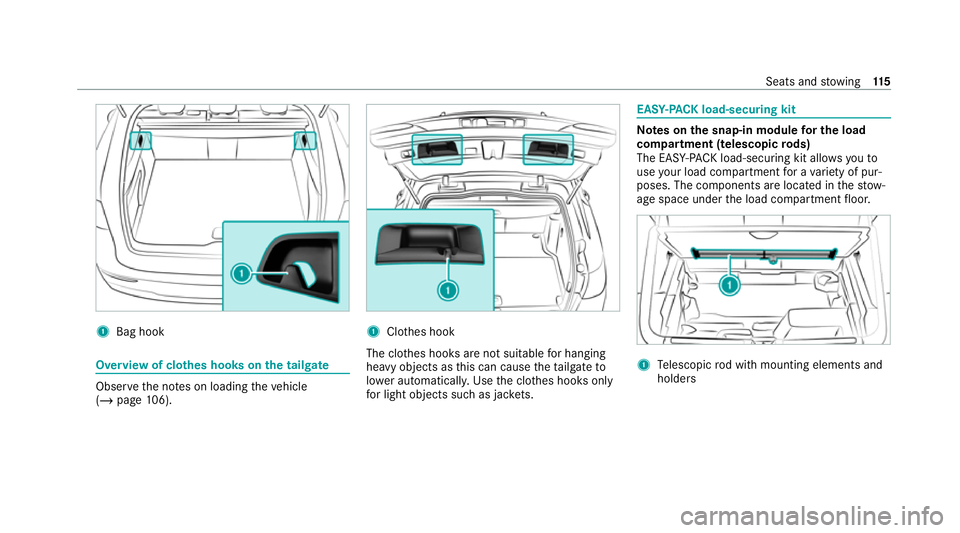
1
Bag hook Overview of cl
othes hooks on the tailgate Obser
vethe no tes on loading theve hicle
(/ page 106). 1
Clot hes hook
The clo thes hooks are not suitable for hanging
heavy objects as this can cause theta ilgate to
lo we r auto matical ly. Use the clo thes hooks only
fo r light objects such as jac kets. EA
SY-PAC K load-secu ring kit Note
s onthe snap-in module for the load
co mp artment (telescopic rods)
The EAS Y-PA CK load-securing kit allo wsyouto
use your load co mpartment for a variet y of pur‐
poses. The co mponents are located in thestow‐
age space under the load compartment floor. 1
Telescopic rod with mounting elements and
holders Seats and
stowing 11 5
Page 119 of 453
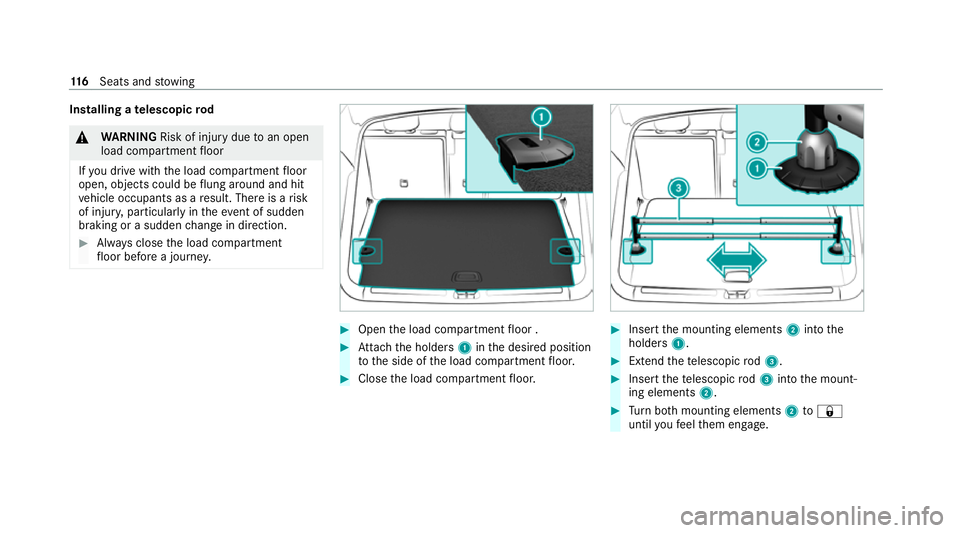
Installing a
telescopic rod &
WARNING Risk of inju rydue toan open
load compartment floor
If yo u drive with the load compartment floor
open, objects could be flung around and hit
ve hicle occupants as a result. There is a risk
of injur y,particularly in theeve nt of sudden
braking or a sudden change in direction. #
Alw ays close the load compartment
fl oor before a journe y. #
Open the load compartment floor . #
Attach the holders 1inthe desired position
to the side of the load compartment floor. #
Close the load compartment floor. #
Insert the mounting elements 2into the
holders 1. #
Extend thete lescopic rod3. #
Insert thete lescopic rod3 into the mount‐
ing elements 2. #
Turn both mounting elements 2to&
until youfe el them engage. 11 6
Seats and stowing
Page 120 of 453
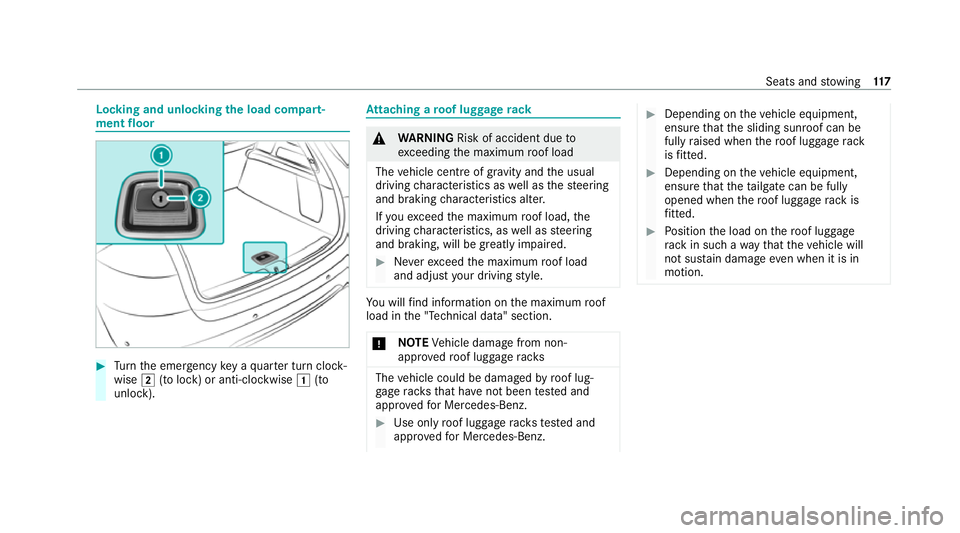
Locking and unlocking
the load compa rt‐
ment floor #
Turn the emer gency key a quarter turn clock‐
wise 2(to lock) or anti-clockwise 1(to
unlock). At
taching a roof luggage rack &
WARNING Risk of accident due to
exc eeding the maximum roof load
The vehicle centre of gravity and the usual
driving characteristics as well as thesteering
and braking characteristics alter.
If yo uexc eed the maximum roof load, the
driving characteristics, as well as steering
and braking, will be greatly impaired. #
Neverexc eed the maximum roof load
and adjust your driving style. Yo
u will find information on the maximum roof
load in the "Technical data" section.
* NO
TEVehicle damage from non-
appr ovedro of luggage racks The
vehicle could be damaged byroof lug‐
ga ge rack sth at ha venot been tested and
appr ovedfo r Mercedes-Benz. #
Use only roof luggage rack ste sted and
appr ovedfo r Mercedes-Benz. #
Depending on theve hicle equipment,
ensure that the sliding sunroof can be
fully raised when thero of luggage rack
is fitted. #
Depending on theve hicle equipment,
ensure that theta ilgate can be fully
opened when thero of luggage rack is
fi tted. #
Position the load on thero of luggage
ra ck in such a wayth at theve hicle will
not sus tain damage even when it is in
motion. Seats and
stowing 117