MERCEDES-BENZ G-Class 2012 W463 Owner's Manual
Manufacturer: MERCEDES-BENZ, Model Year: 2012, Model line: G-Class, Model: MERCEDES-BENZ G-Class 2012 W463Pages: 284, PDF Size: 9.4 MB
Page 121 of 284
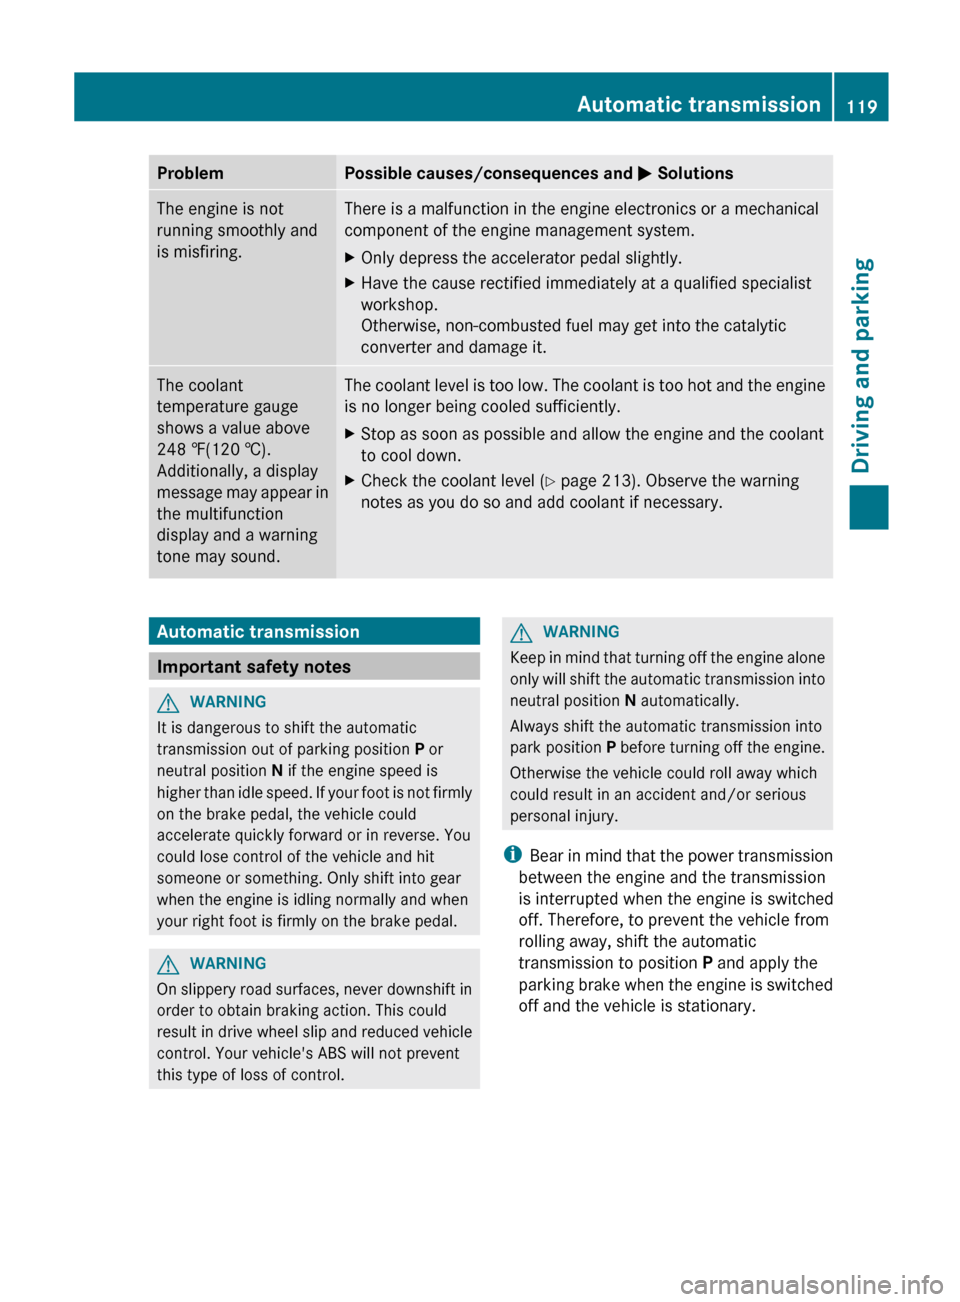
Problem Possible causes/consequences and
M SolutionsThe engine is not
running smoothly and
is misfiring. There is a malfunction in the engine electronics or a mechanical
component of the engine management system.
X
Only depress the accelerator pedal slightly.
X Have the cause rectified immediately at a qualified specialist
workshop.
Otherwise, non-combusted fuel may get into the catalytic
converter and damage it. The coolant
temperature gauge
shows a value above
248 ‡
(120 †).
Additionally, a display
message
may appear in
the multifunction
display and a warning
tone may sound. The coolant level is too low. The coolant is too hot and the engine
is no longer being cooled sufficiently.
X
Stop as soon as possible and allow the engine and the coolant
to cool down.
X Check the coolant level (Y page 213). Observe the warning
notes as you do so and add coolant if necessary. Automatic transmission
Important safety notes
G
WARNING
It is dangerous to shift the automatic
transmission out of parking position P or
neutral position N if the engine speed is
higher than
idle speed. If your foot is not firmly
on the brake pedal, the vehicle could
accelerate quickly forward or in reverse. You
could lose control of the vehicle and hit
someone or something. Only shift into gear
when the engine is idling normally and when
your right foot is firmly on the brake pedal. G
WARNING
On slippery road surfaces, never downshift in
order to obtain braking action. This could
result in
drive wheel slip and reduced vehicle
control. Your vehicle's ABS will not prevent
this type of loss of control. G
WARNING
Keep in mind that turning off the engine alone
only will
shift the automatic transmission into
neutral position N automatically.
Always shift the automatic transmission into
park position P before turning off the engine.
Otherwise the vehicle could roll away which
could result in an accident and/or serious
personal injury.
i Bear in mind that the power transmission
between the engine and the transmission
is interrupted when the engine is switched
off. Therefore, to prevent the vehicle from
rolling away, shift the automatic
transmission to position P and apply the
parking brake when the engine is switched
off and the vehicle is stationary. Automatic transmission
119
Driving and parking Z
Page 122 of 284
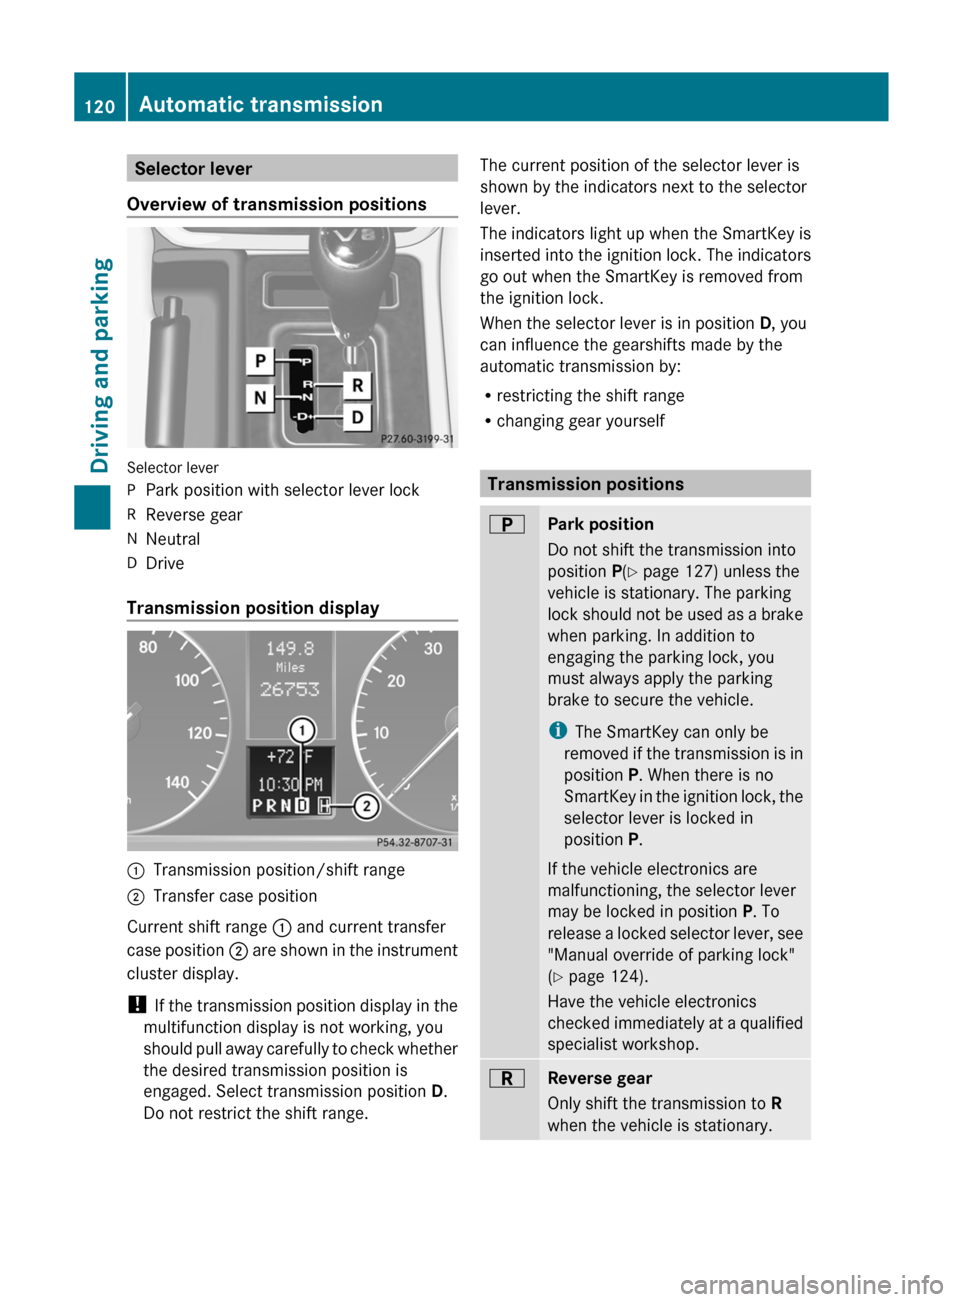
Selector lever
Overview of transmission positions Selector lever
P
Park position with selector lever lock
R Reverse gear
N Neutral
D Drive
Transmission position display :
Transmission position/shift range
; Transfer case position
Current shift range : and current transfer
case position ;
are shown in the instrument
cluster display.
! If the transmission position display in the
multifunction display is not working, you
should pull away carefully to check whether
the desired transmission position is
engaged. Select transmission position D.
Do not restrict the shift range. The current position of the selector lever is
shown by the indicators next to the selector
lever.
The
indicators
light up when the SmartKey is
inserted into the ignition lock. The indicators
go out when the SmartKey is removed from
the ignition lock.
When the selector lever is in position D, you
can influence the gearshifts made by the
automatic transmission by:
R restricting the shift range
R changing gear yourself Transmission positions
B
Park position
Do not shift the transmission into
position
P(Y page 127) unless the
vehicle is stationary. The parking
lock should
not be used as a brake
when parking. In addition to
engaging the parking lock, you
must always apply the parking
brake to secure the vehicle.
i The SmartKey can only be
removed if the transmission is in
position P. When there is no
SmartKey in the ignition lock, the
selector lever is locked in
position P.
If the vehicle electronics are
malfunctioning, the selector lever
may be locked in position P. To
release a locked selector lever, see
"Manual override of parking lock"
(Y page 124).
Have the vehicle electronics
checked immediately at a qualified
specialist workshop. C
Reverse gear
Only shift the transmission to
R
when the vehicle is stationary. 120
Automatic transmission
Driving and parking
Page 123 of 284
A
Neutral
No power is transmitted from the
engine to the drive wheels.
Releasing
the
brakes will allow you
to move the vehicle freely, e.g. to
push it or tow it.
Do not shift the transmission to N
while driving. Otherwise, the
automatic transmission could be
damaged.
If ESP ®
is deactivated or faulty:
only shift the transmission to
position N if the vehicle is in danger
of skidding, e.g. on icy roads.
If you want to engage the transfer
case, shift briefly into N
(Y page 145).
! Rolling in neutral N can damage
the drive train. 7
Drive
The automatic transmission
changes gear automatically. All
forward gears are available.
Changing gear
The automatic transmission shifts to the
individual gears automatically when it is in
transmission position D. This automatic
gearshifting behavior is determined by:
R a shift range restriction, if selected
R the position of the transfer case ( HIGH or
LOW)
R the position of the accelerator pedal
R the road speed Driving tips
Accelerator pedal position Your style of driving influences how the
automatic transmission shifts gear:
R
little throttle: early upshifts
R more throttle: late upshifts
Kickdown Use kickdown for maximum acceleration.
X
Depress the accelerator pedal beyond the
pressure point.
The transmission shifts to a lower gear
depending on the engine speed.
X Ease off the accelerator pedal once the
desired speed is reached.
The automatic
transmission shifts back up.
Working on the vehicle G
WARNING
When working on the vehicle, engage the
parking brake and shift the automatic
transmission into park position P. Otherwise
the vehicle
could roll away which could result
in an accident and/or serious personal injury. Shift ranges
Introduction When the automatic transmission is in
position D, it is possible to restrict or
derestrict the shift range
(
Y page 121). Automatic transmission
121
Driving and parking Z
Page 124 of 284
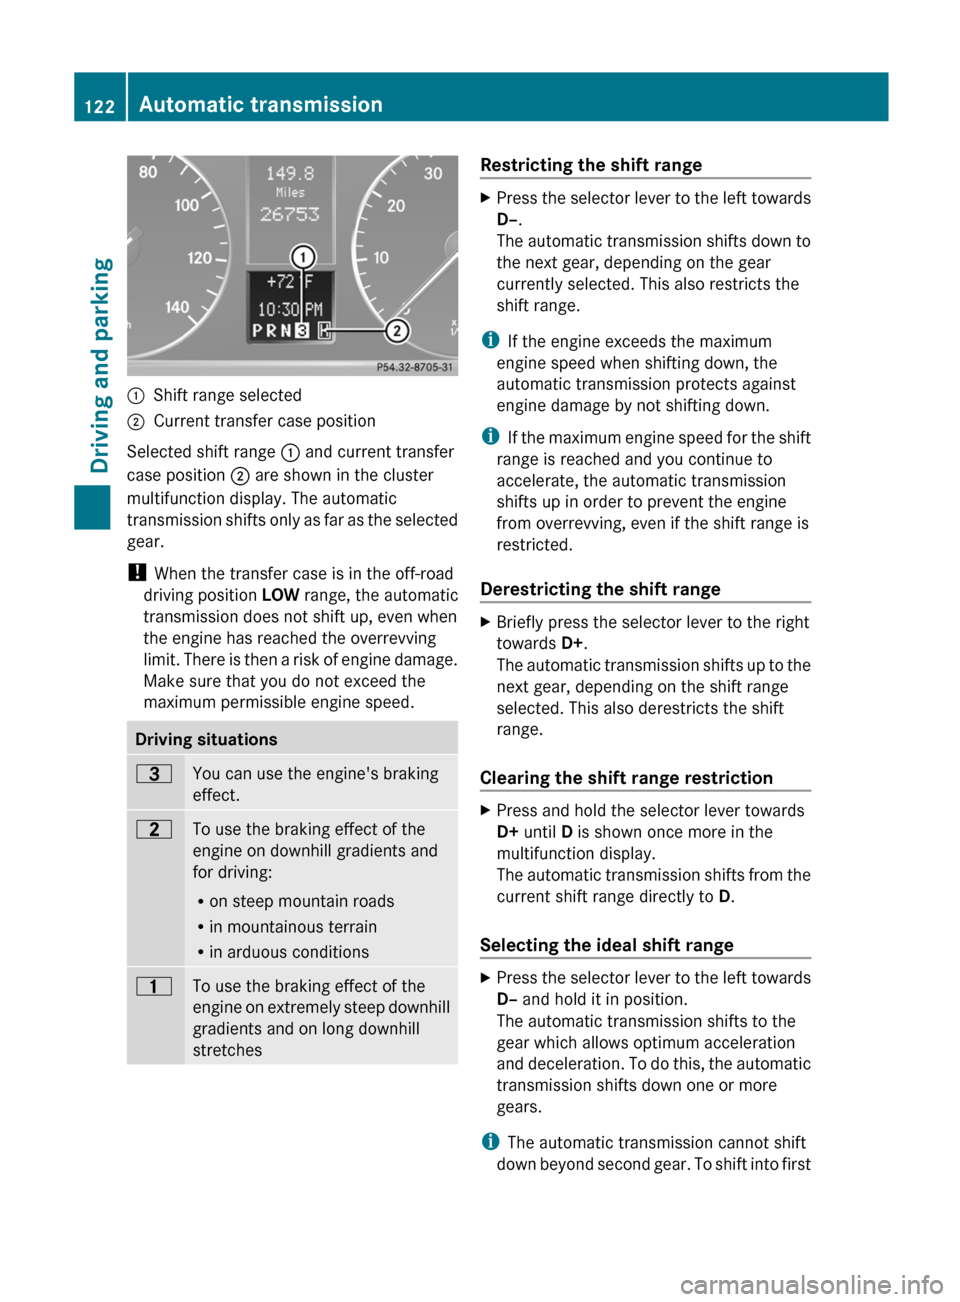
:
Shift range selected
; Current transfer case position
Selected shift range : and current transfer
case position ; are shown in the cluster
multifunction display. The automatic
transmission shifts
only as far as the selected
gear.
! When the transfer case is in the off-road
driving position LOW range, the automatic
transmission does not shift up, even when
the engine has reached the overrevving
limit. There is then a risk of engine damage.
Make sure that you do not exceed the
maximum permissible engine speed. Driving situations
=
You can use the engine's braking
effect.
5
To use the braking effect of the
engine on downhill gradients and
for driving:
R
on steep mountain roads
R in mountainous terrain
R in arduous conditions 4
To use the braking effect of the
engine on
extremely steep downhill
gradients and on long downhill
stretches Restricting the shift range
X
Press the selector lever to the left towards
D–.
The automatic
transmission shifts down to
the next gear, depending on the gear
currently selected. This also restricts the
shift range.
i If the engine exceeds the maximum
engine speed when shifting down, the
automatic transmission protects against
engine damage by not shifting down.
i If the
maximum engine speed for the shift
range is reached and you continue to
accelerate, the automatic transmission
shifts up in order to prevent the engine
from overrevving, even if the shift range is
restricted.
Derestricting the shift range X
Briefly press the selector lever to the right
towards D+ .
The automatic
transmission shifts up to the
next gear, depending on the shift range
selected. This also derestricts the shift
range.
Clearing the shift range restriction X
Press and hold the selector lever towards
D+ until D is shown once more in the
multifunction display.
The automatic
transmission shifts from the
current shift range directly to D.
Selecting the ideal shift range X
Press the selector lever to the left towards
D– and hold it in position.
The automatic transmission shifts to the
gear which allows optimum acceleration
and deceleration.
To do this, the automatic
transmission shifts down one or more
gears.
i The automatic transmission cannot shift
down beyond
second gear. To shift into first122
Automatic transmission
Driving and parking
Page 125 of 284
gear, the selector lever must be moved
towards D– again. Automatic transmission
123Driving and parking Z
Page 126 of 284
Problems with the automatic transmission
Problem Possible causes/consequences and
M Solutions
The acceleration ability
is deteriorating.
The transmission no
longer changes gear. The transmission is in emergency mode.
It is only possible to shift into
second
gear and reverse gear.
X Stop the vehicle.
X Shift the transmission to position P.
X Turn the SmartKey to position 0 in the ignition lock.
X Wait at least ten seconds before restarting the engine.
X Shift the transmission to position D or R.
If D
is
selected, the transmission shifts into second gear; if R is
selected, the transmission shifts into reverse gear.
X Have the transmission checked at a qualified specialist
workshop immediately. You hear a warning
tone. You have:
R
switched off the engine
R opened the driver's door
R not moved the selector lever to position P
X Move the selector lever to
P.
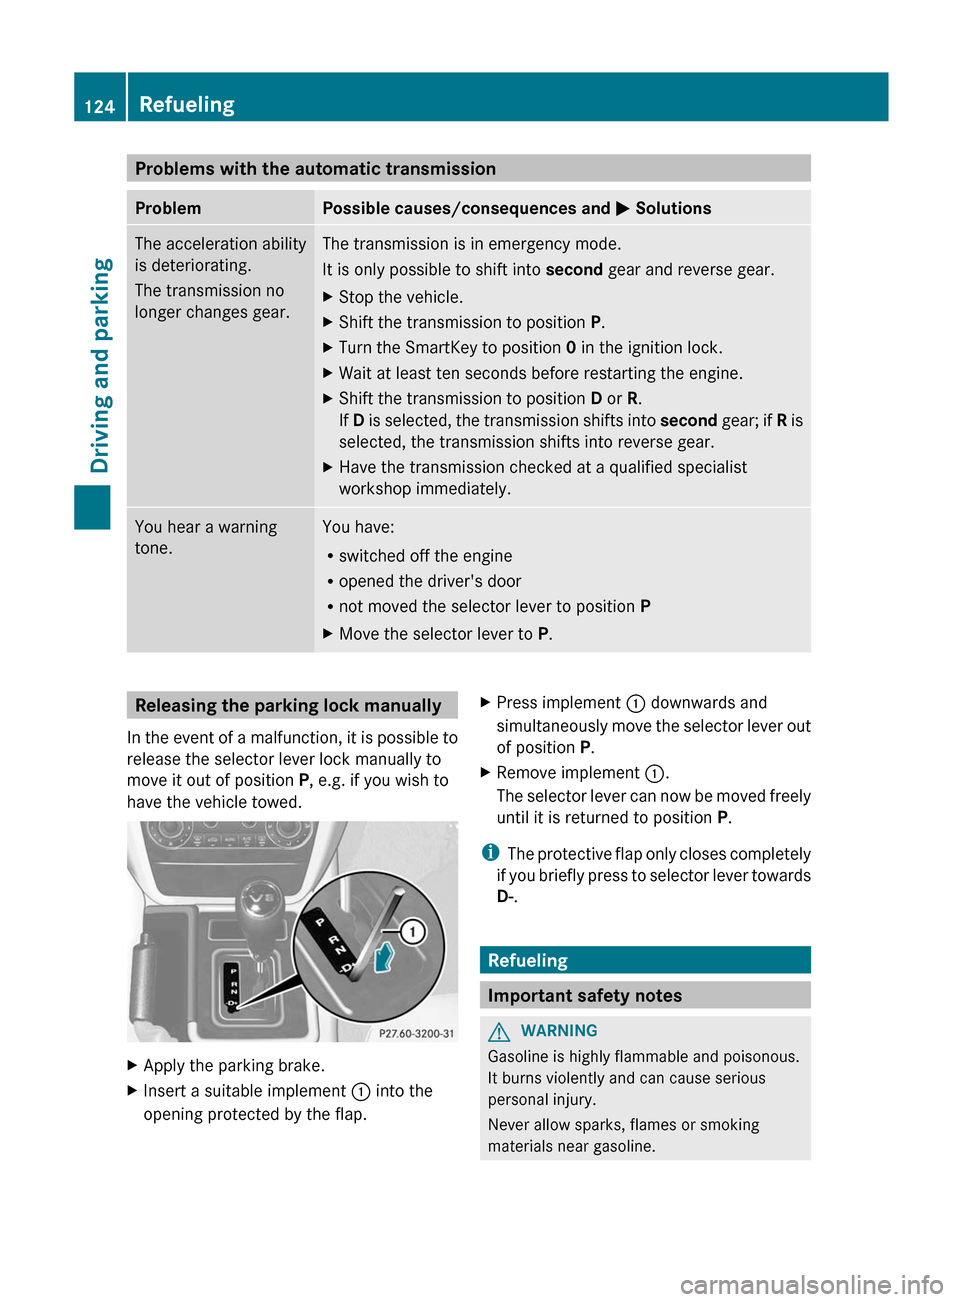
Releasing the parking lock manually
In the
event of a malfunction, it is possible to
release the selector lever lock manually to
move it out of position P, e.g. if you wish to
have the vehicle towed. X
Apply the parking brake.
X Insert a suitable implement :
into the
opening protected by the flap. X
Press implement : downwards and
simultaneously move
the selector lever out
of position P.
X Remove implement :.
The selector
lever can now be moved freely
until it is returned to position P.
i The protective
flap only closes completely
if you briefly press to selector lever towards
D-. Refueling
Important safety notes
G
WARNING
Gasoline is highly flammable and poisonous.
It burns violently and can cause serious
personal injury.
Never allow sparks, flames or smoking
materials near gasoline. 124
Refueling
Driving and parking
Page 127 of 284
Turn off the engine before refueling.
Whenever you are around gasoline, avoid
inhaling fumes and any skin or clothing
contact.
Direct skin contact with fuels and the
inhalation
of
fuel vapors are damaging to your
health. G
WARNING
Overfilling of the fuel tank may create
pressure in the system which could cause a
gas discharge. This could cause the gasoline
to spray back out when removing the fuel
pump nozzle, which could cause personal
injury.
! Do not
use diesel to refuel vehicles with a
gasoline engine. Even small amounts of the
wrong fuel result in damage to the fuel
system and engine.
! Do not switch on the ignition if you
accidentally refuel with the wrong fuel.
Otherwise, the fuel will enter the fuel lines.
Notify a qualified specialist workshop and
have the fuel tank and fuel lines drained
completely. Gasoline
Fuel grade !
You should only refuel with unleaded
premium-grade gasoline as this avoids
damaging the catalytic converter.
If engine running problems are apparent,
have the cause checked immediately and
repaired. Excess unburned fuel can
otherwise enter the catalytic converter,
leading to overheating and possibly
causing a fire.
i Only refuel
with premium-grade unleaded
gasoline with a specified minimum octane
number of 91 (average value of 96 RON/
86 MON).
You will usually find information about the
fuel grade on the pump. If you cannot find the label on the gasoline pump, ask the gas
station staff.
You
can
find more information under "Fuel"
(Y page 273), by contacting an authorized
Mercedes-Benz Service Center or by
visiting http://bevo.mercedes-
benz.com.
! Use a filter when refueling from a fuel can.
Otherwise, the fuel lines and/or injection
system could be blocked by particles from
the fuel can. Refueling
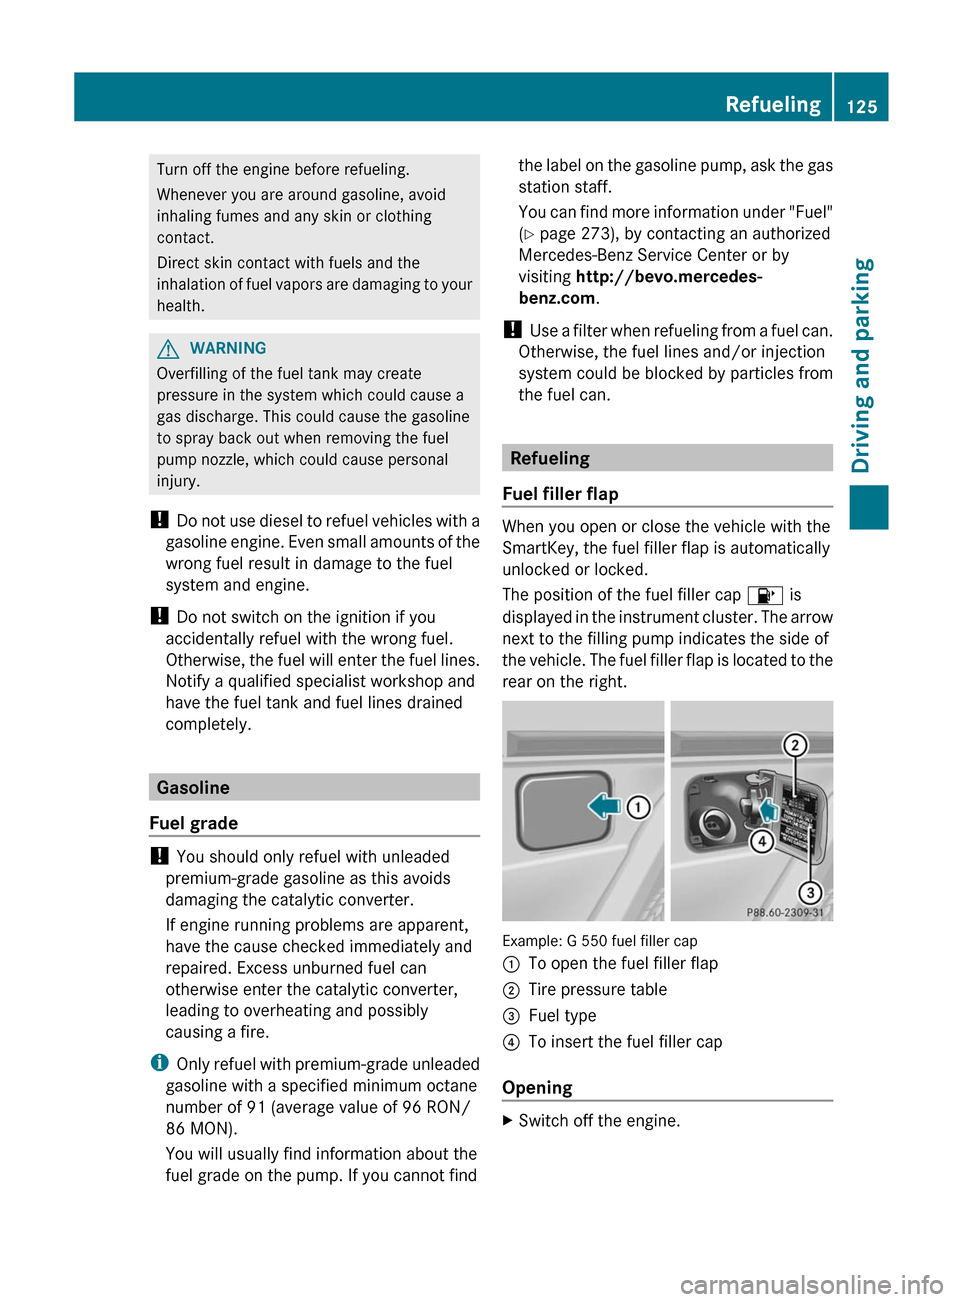
Fuel filler flap When you open or close the vehicle with the
SmartKey, the fuel filler flap is automatically
unlocked or locked.
The position of the fuel filler cap
8
is
displayed in
the instrument cluster. The arrow
next to the filling pump indicates the side of
the vehicle. The fuel filler flap is located to the
rear on the right. Example: G 550 fuel filler cap
:
To open the fuel filler flap
; Tire pressure table
= Fuel type
? To insert the fuel filler cap
Opening X
Switch off the engine. Refueling
125
Driving and parking Z
Page 128 of 284
i
When the engine is running and the fuel
filler flap is open, the yellow reserve fuel
warning lamp and the = (USA only)
or ; (Canada only) Check Engine
warning lamp may light up.
For further information on warning and
indicator lamps in the instrument cluster,
see ( Y page 184).
X Remove the SmartKey from the ignition
lock.
X Press the fuel filler flap in the direction of
arrow :.
The fuel filler flap opens slightly.
X Open the fuel filler flap.
X Turn the fuel filler cap counterclockwise
and remove it.
X Insert the fuel filler cap into the holder
bracket on the inside of filler flap ?.
X Completely insert the fuel pump nozzle into
the filler neck and refuel.
X Only fill the tank until the pump nozzle
switches off.
! Overfilling the
fuel tank could damage the
fuel system.
Closing X
Replace the fuel filler cap and turn it
clockwise. The fuel filler cap audibly
engages.
X Close the fuel filler flap.
i Close the
fuel filler flap before locking the
vehicle. A locking pin otherwise prevents
the fuel filler flap from closing after the
vehicle has been locked. Fuel filler flap emergency release
G
WARNING
Avoid contact with the vehicle walls as they
may contain sharp edges. Otherwise, you
could injure yourself while releasing the fuel
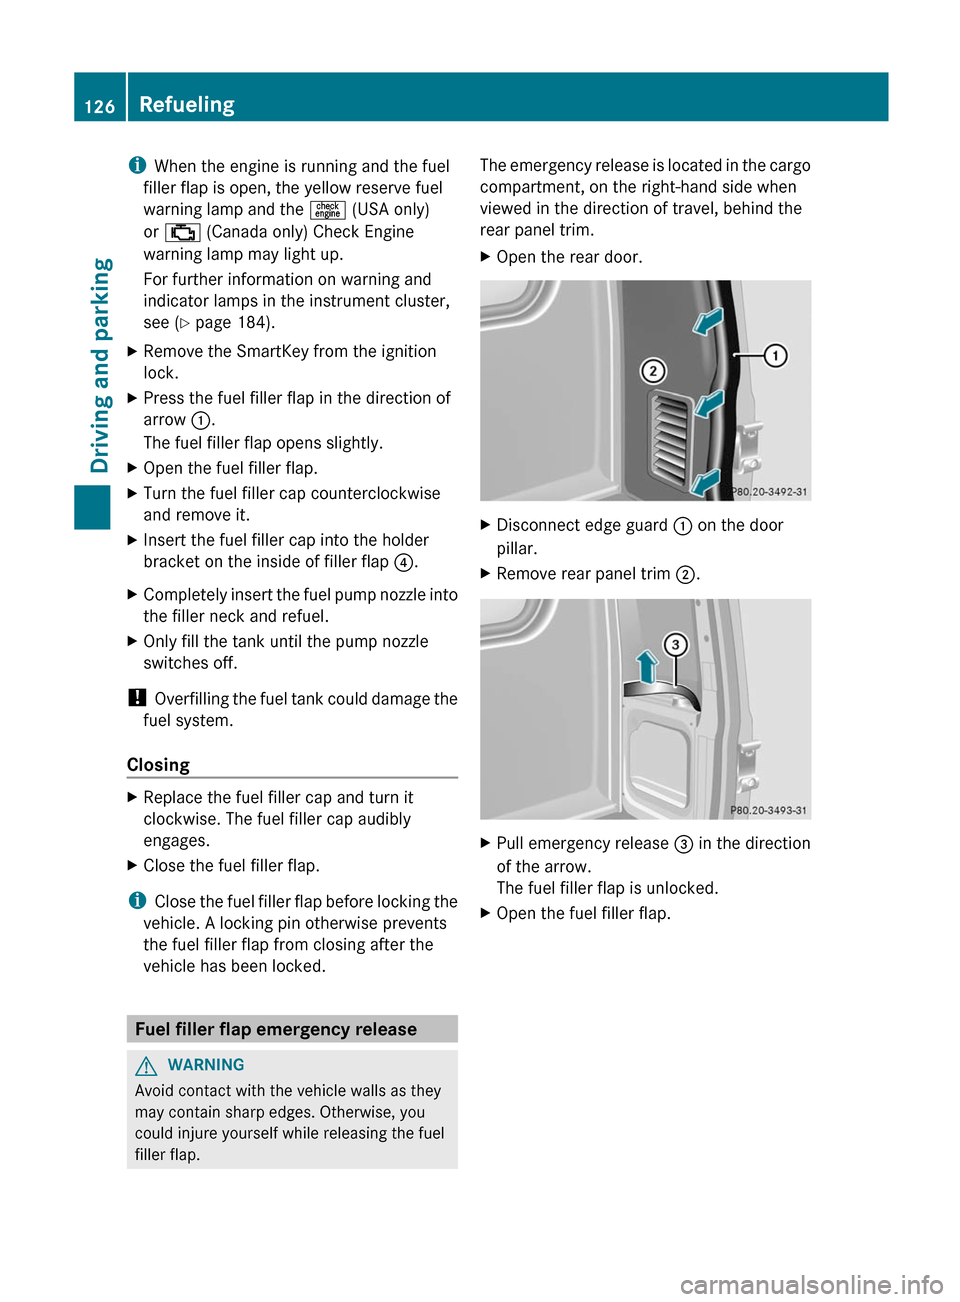
filler flap. The emergency release is located in the cargo
compartment, on the right-hand side when
viewed in the direction of travel, behind the
rear panel trim.
X
Open the rear door. X
Disconnect edge guard : on the door
pillar.
X Remove rear panel trim ;. X
Pull emergency release = in the direction
of the arrow.
The fuel filler flap is unlocked.
X Open the fuel filler flap.126
Refueling
Driving and parking
Page 129 of 284
Problems with the fuel and fuel tank
Problem Possible causes/consequences and
M Solutions
Fuel is leaking from the
vehicle. G
Risk of explosion or fire
The fuel line or the fuel tank is defective.
X Turn the SmartKey to position
0 (Y
page
115) in the ignition lock
immediately and remove it.
X Do not restart the engine under any circumstances.
X Consult a qualified specialist workshop. The fuel filler flap
cannot be opened. The fuel filler flap is not unlocked.
or
The SmartKey batteries are discharged.
X
Unlock the vehicle (
Y page 60).
or
X Unlock the vehicle using the mechanical key ( Y page 61).
X Open the rear door.
X Manually unlock the fuel filler flap using the emergency release
(Y page 126). The fuel filler flap is unlocked, but the opening mechanism is
jammed.
X
Manually unlock the fuel filler flap using the emergency release
(Y page 126).
X Consult a qualified specialist workshop. Parking
Important safety notes
G
WARNING
Do not park this vehicle in areas where
combustible materials
can come into contact
with the hot exhaust system. Do not park the
vehicle on dry grassland or harvested grain
fields. Combustible materials, such as grass,
hay or leaves could be ignited by the hot
exhaust system and cause a vehicle fire. Unintended vehicle movement can cause
serious personal injury or damage to the
vehicle or the vehicle drivetrain. To reduce
such risks, always do the following before
turning
off
the engine and leaving the vehicle:
R keep your right foot on the brake pedal.
R engage the parking brake.
R shift the automatic transmission into park
position P.
R slowly release the brake pedal.
R when parked on an incline, always turn the
front wheels towards the road curb. Parking
127
Driving and parking
Z
Page 130 of 284
R
turn the SmartKey in the ignition lock to
position 0 and remove the SmartKey from
the ignition lock.
R take the SmartKey with you and lock the
vehicle when leaving. Switching off the engine
G
WARNING
Do not turn off the engine before the vehicle
has come
to a complete stop. With the engine
not running, there is no power assistance for
the brake and steering systems. In this case,
it is important to keep in mind that a
considerably higher degree of effort is
necessary to brake and steer the vehicle. G
WARNING
Keep
in mind that turning off the engine alone
only will
shift the automatic transmission into
neutral position N automatically.
Always shift the automatic transmission into
park position P before turning off the engine.
Otherwise the vehicle could roll away which
could result in an accident and/or serious
personal injury.
X Shift the transmission to position P.
X Turn the SmartKey to position 0 in the
ignition lock and remove it.
The immobilizer is activated.
X Apply the parking brake firmly.
i The SmartKey
can only be removed if the
automatic transmission is in position P. Parking brake
G
WARNING
Engaging the parking brake while the vehicle
is in
motion can cause the rear wheels to lock
up. You could lose control of the vehicle and
cause an accident. In addition, the vehicle's
brake lights do not light up when the parking
brake is engaged. G
WARNING
When leaving the vehicle, always remove the
SmartKey from
the starter switch, take it with
you, and lock the vehicle. Do not leave
children unattended in the vehicle, or with
access to an unlocked vehicle. Children could
release the parking brake and/or shift the
automatic transmission out of park position
P, either of which could result in an accident
and/or serious personal injury. X
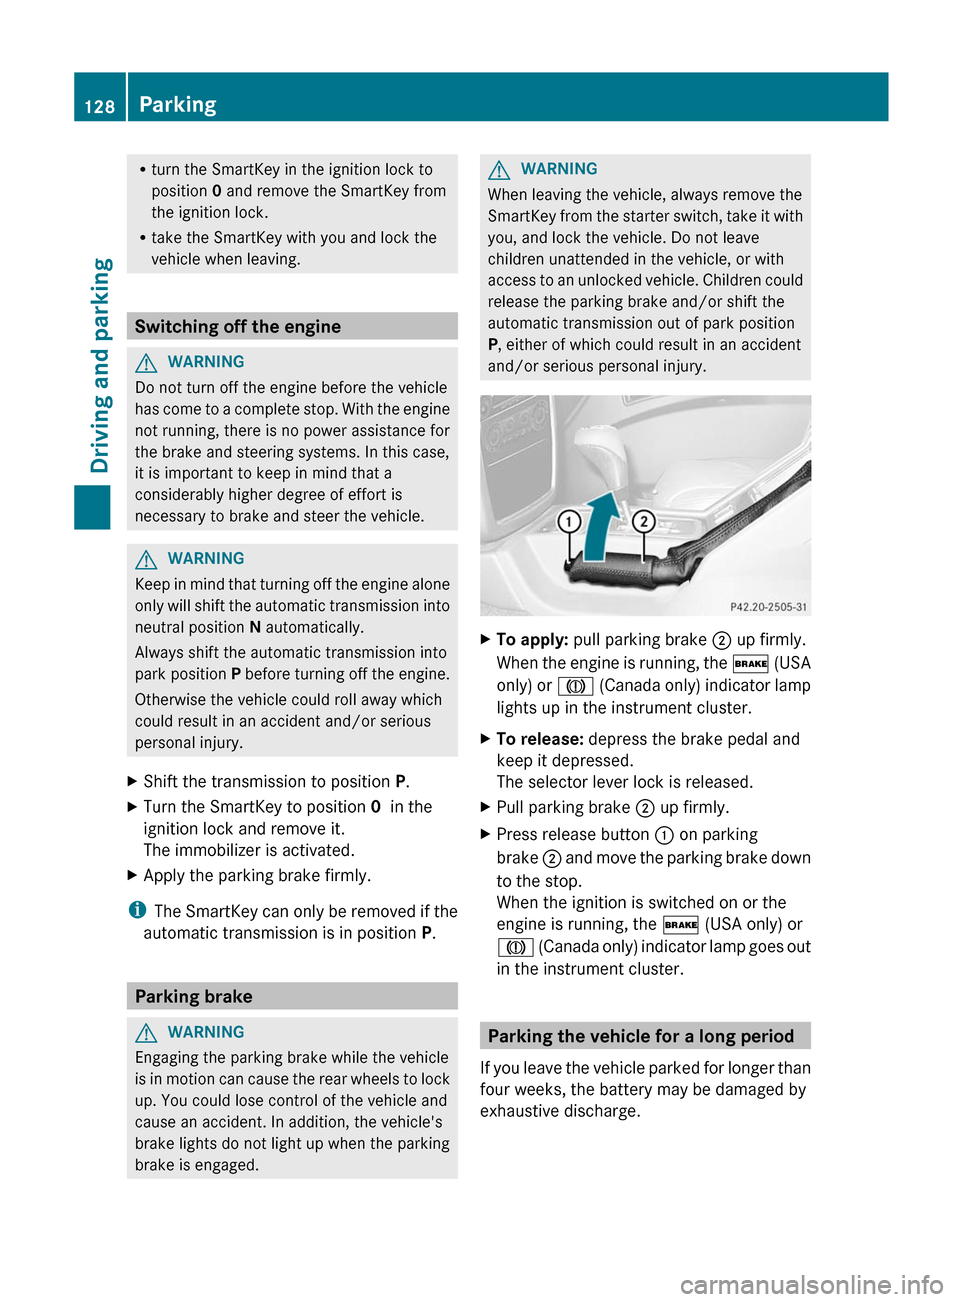
To apply: pull parking brake ;
up firmly.
When the
engine is running, the $ (USA
only) or J (Canada only) indicator lamp
lights up in the instrument cluster.
X To release: depress the brake pedal and
keep it depressed.
The selector lever lock is released.
X Pull parking brake ; up firmly.
X Press release button : on parking
brake ;
and
move the parking brake down
to the stop.
When the ignition is switched on or the
engine is running, the $ (USA only) or
J (Canada only) indicator lamp goes out
in the instrument cluster. Parking the vehicle for a long period
If you
leave the vehicle parked for longer than
four weeks, the battery may be damaged by
exhaustive discharge. 128
Parking
Driving and parking