headlamp MERCEDES-BENZ G-Class 2012 W463 User Guide
[x] Cancel search | Manufacturer: MERCEDES-BENZ, Model Year: 2012, Model line: G-Class, Model: MERCEDES-BENZ G-Class 2012 W463Pages: 284, PDF Size: 9.4 MB
Page 94 of 284
X
To switch on manually: turn the
SmartKey to position 2 in the ignition lock
or start the engine.
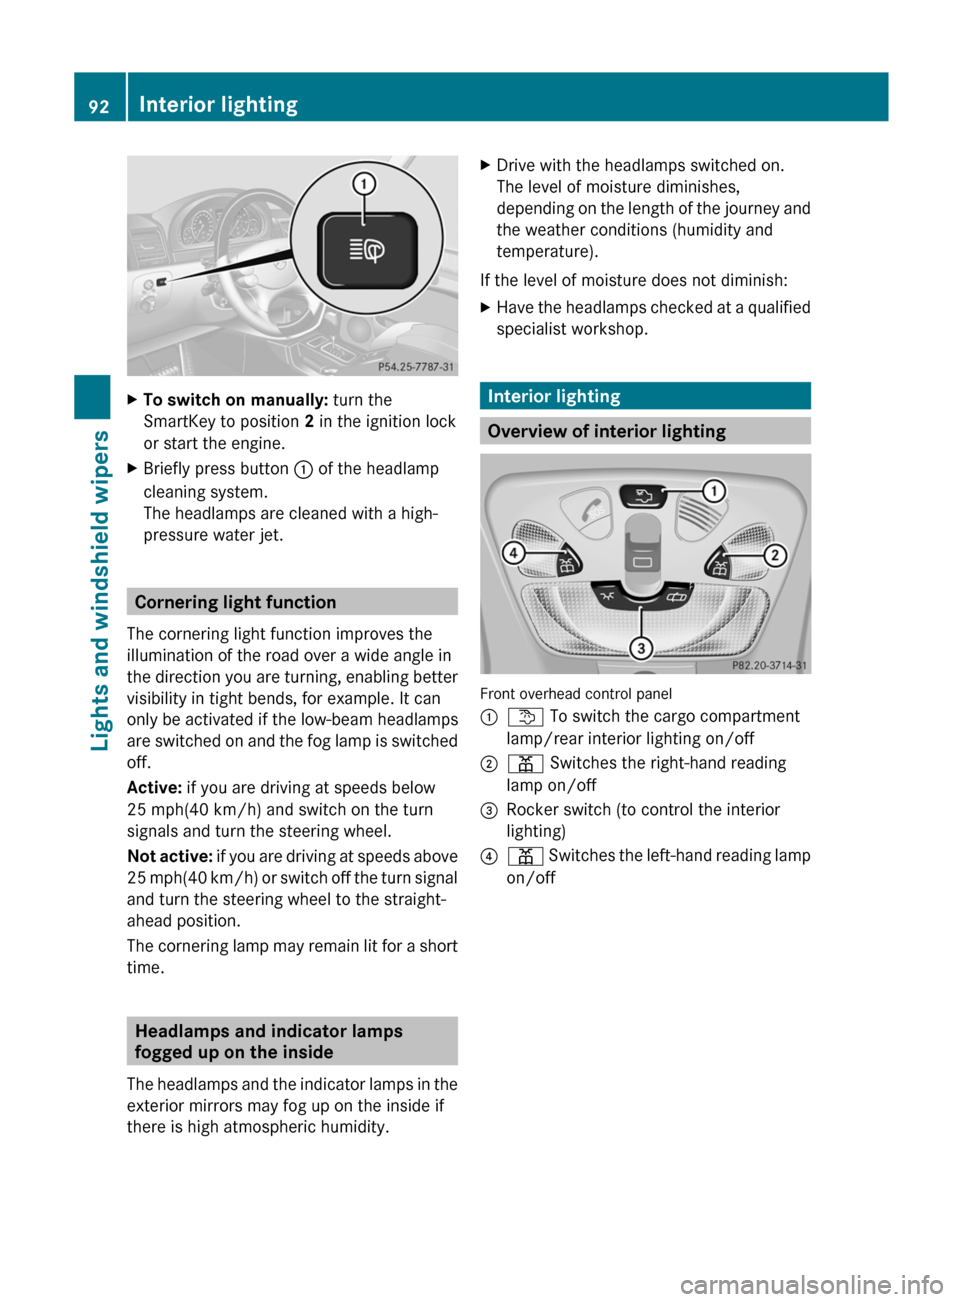
X Briefly press button : of the headlamp
cleaning system.
The headlamps are cleaned with a high-
pressure water jet. Cornering light function
The cornering light function improves the
illumination of the road over a wide angle in
the direction
you are turning, enabling better
visibility in tight bends, for example. It can
only be activated if the low-beam headlamps
are switched on and the fog lamp is switched
off.
Active: if you are driving at speeds below
25 mph(40 km/h) and switch on the turn
signals and turn the steering wheel.
Not active: if you are driving at speeds above
25 mph(40 km/h) or switch off the turn signal
and turn the steering wheel to the straight-
ahead position.
The cornering lamp may remain lit for a short
time. Headlamps and indicator lamps
fogged up on the inside
The headlamps
and the indicator lamps in the
exterior mirrors may fog up on the inside if
there is high atmospheric humidity. X
Drive with the headlamps switched on.
The level of moisture diminishes,
depending on
the length of the journey and
the weather conditions (humidity and
temperature).
If the level of moisture does not diminish:
X Have the headlamps checked at a qualified
specialist workshop. Interior lighting
Overview of interior lighting
Front overhead control panel
:
t To switch the cargo compartment
lamp/rear interior lighting on/off
; p Switches the right-hand reading
lamp on/off
= Rocker switch (to control the interior
lighting)
? p Switches the left-hand reading lamp
on/off 92
Interior lighting
Lights and windshield wipers
Page 96 of 284
!
Switch off
the cargo compartment lamp if
you wish to leave the rear door open for a
longer period. The battery may otherwise
discharge.
X To switch on/off: press the t button.
i If you open the rear door, the cargo
compartment lamp comes on. Then, you
cannot switch
it off using the t button.
Switch off the cargo compartment lamp if
you wish to leave the rear door open for a
longer period. This prevents the battery
from discharging. X
Open the rear door.
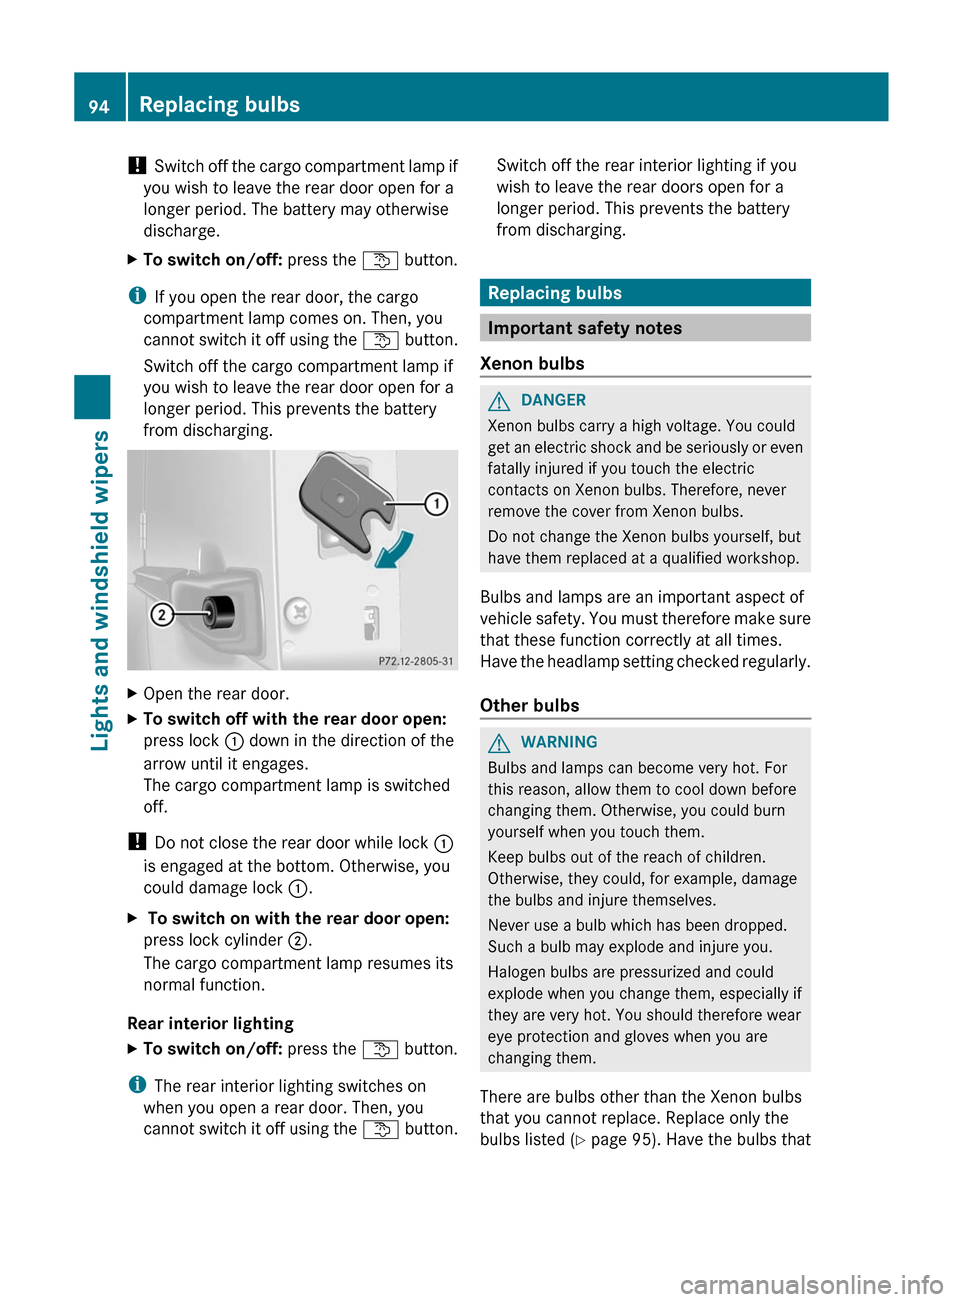
X To switch off with the rear door open:
press lock : down in the direction of the
arrow until it engages.
The cargo compartment lamp is switched
off.
! Do not close the rear door while lock :
is engaged at the bottom. Otherwise, you
could damage lock :.
X To switch on with the rear door open:
press lock cylinder ;.
The cargo compartment lamp resumes its
normal function.
Rear interior lighting
X To switch on/off: press the t button.
i The rear interior lighting switches on
when you open a rear door. Then, you
cannot switch
it off using the t button. Switch off the rear interior lighting if you
wish to leave the rear doors open for a
longer period. This prevents the battery
from discharging.
Replacing bulbs
Important safety notes
Xenon bulbs G
DANGER
Xenon bulbs carry a high voltage. You could
get an
electric shock and be seriously or even
fatally injured if you touch the electric
contacts on Xenon bulbs. Therefore, never
remove the cover from Xenon bulbs.
Do not change the Xenon bulbs yourself, but
have them replaced at a qualified workshop.
Bulbs and lamps are an important aspect of
vehicle safety. You must therefore make sure
that these function correctly at all times.
Have the headlamp setting checked regularly.
Other bulbs G
WARNING
Bulbs and lamps can become very hot. For
this reason, allow them to cool down before
changing them. Otherwise, you could burn
yourself when you touch them.
Keep bulbs out of the reach of children.
Otherwise, they could, for example, damage
the bulbs and injure themselves.
Never use a bulb which has been dropped.
Such a bulb may explode and injure you.
Halogen bulbs are pressurized and could
explode when you change them, especially if
they are very hot. You should therefore wear
eye protection and gloves when you are
changing them.
There are bulbs other than the Xenon bulbs
that you cannot replace. Replace only the
bulbs listed (
Y page 95). Have the bulbs that94
Replacing bulbs
Lights and windshield wipers
Page 97 of 284
you cannot replace yourself changed at a
qualified specialist workshop.
If you require assistance changing bulbs,
consult a qualified specialist workshop.
Do
not
touch the glass tube of new bulbs with
your bare hands. Even minor contamination
can burn into the glass surface and reduce
the service life of the bulbs. Always use a lint-
free cloth or only touch the base of the bulb
when installing.
Only use bulbs of the correct type.
If the new bulb still does not light up, consult
a qualified specialist workshop.
Bulbs and lamps are an important aspect of
vehicle safety. You must therefore make sure
that these function correctly at all times.
Have the headlamp setting checked regularly.
Before changing bulbs Have the following bulbs changed at a
qualified specialist workshop.
R
additional turn signals in the exterior
mirrors
R high-mounted brake lamp
R high-beam/low-beam headlamps (Xenon
bulbs)
R parking lamp/standing lamp
R license plate lamp
i Individual segments of the license plate
lamp LEDs may fail without a display
message appearing in the multifunction
display. Check the license plate lamp
regularly. Consult a qualified specialist
workshop if necessary.
You can replace the following bulbs:
R fog lamp/cornering light with fog lamp
function
R turn signal lamp (front)
R brake/tail lamp
R turn signal lamp (rear)
R tail lamp/standing lamp R
backup lamp
R rear fog lamp
R side marker lamp Overview: changing bulbs/bulb types
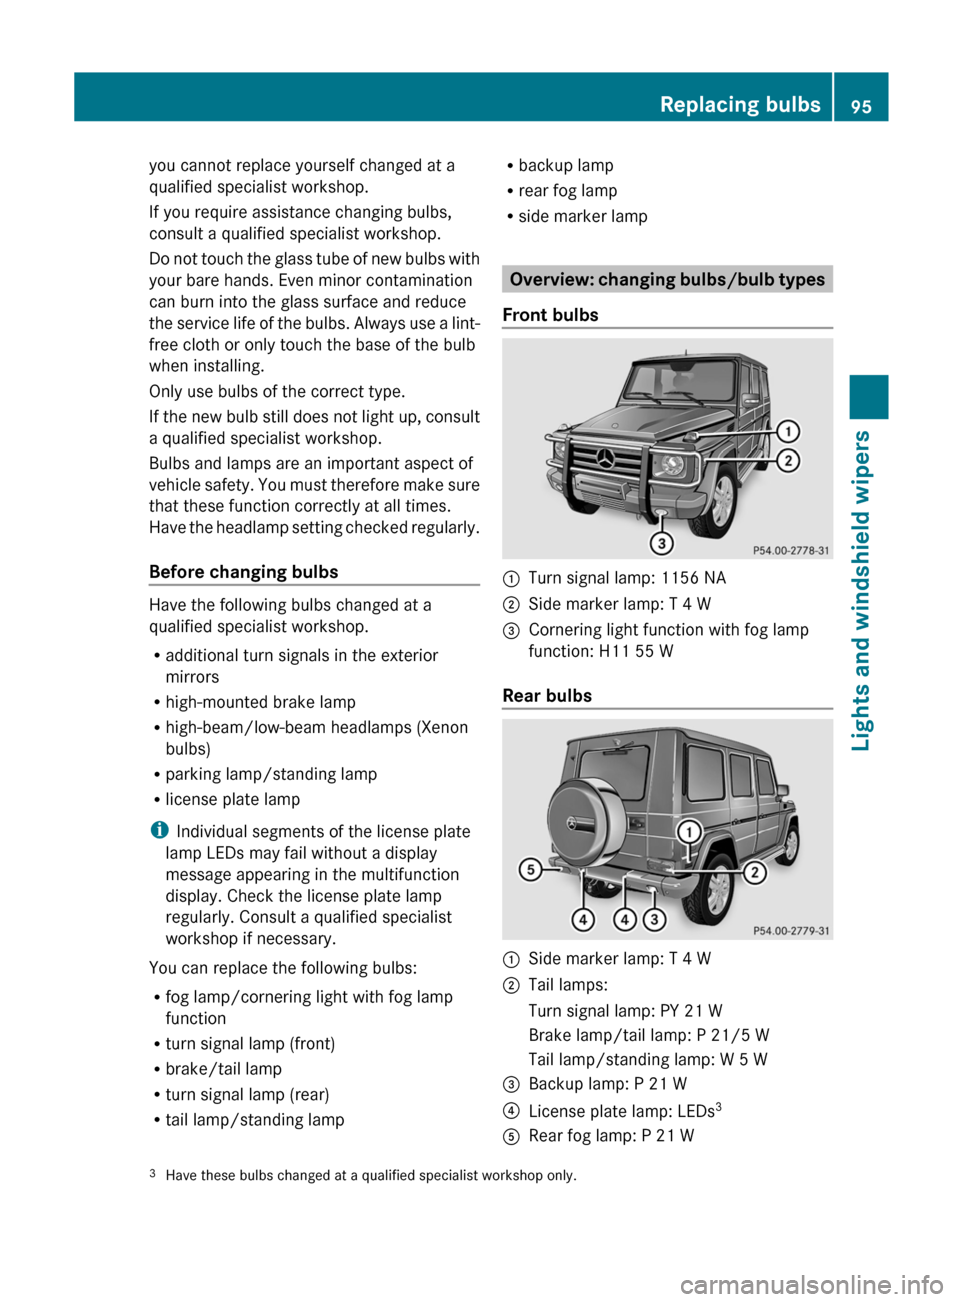
Front bulbs :
Turn signal lamp: 1156 NA
; Side marker lamp: T 4 W
= Cornering light function with fog lamp
function: H11 55 W
Rear bulbs :
Side marker lamp: T 4 W
; Tail lamps:
Turn signal lamp: PY 21 W
Brake lamp/tail lamp: P 21/5 W
Tail lamp/standing lamp: W 5 W
= Backup lamp: P 21 W
? License plate lamp: LEDs 3
A Rear fog lamp: P 21 W
3 Have these bulbs changed at a qualified specialist workshop only. Replacing bulbs
95
Lights and windshield wipers Z
Page 98 of 284
Changing the front bulbs
Front fog lamps/cornering lamps with
fog lamp function X
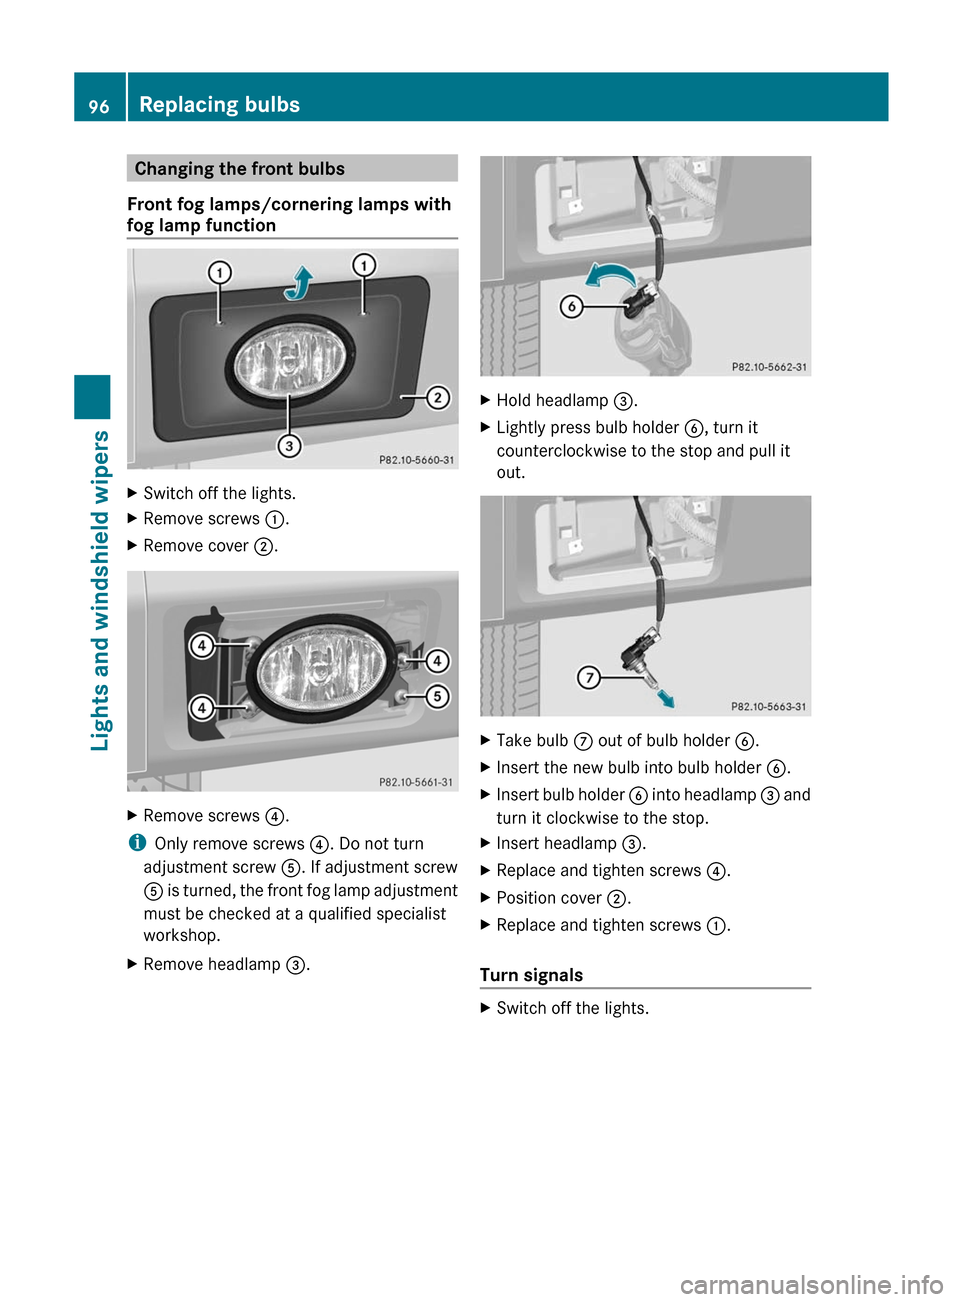
Switch off the lights.
X Remove screws : .
X Remove cover ;. X
Remove screws ? .
i Only remove screws ?. Do not turn
adjustment screw A. If adjustment screw
A is
turned, the front fog lamp adjustment
must be checked at a qualified specialist
workshop.
X Remove headlamp =. X
Hold headlamp =
.
X Lightly press bulb holder B, turn it
counterclockwise to the stop and pull it
out. X
Take bulb C out of bulb holder
B.
X Insert the new bulb into bulb holder B.
X Insert bulb holder B
into
headlamp = and
turn it clockwise to the stop.
X Insert headlamp =.
X Replace and tighten screws ?.
X Position cover ;.
X Replace and tighten screws :.
Turn signals X
Switch off the lights.96
Replacing bulbs
Lights and windshield wipers
Page 100 of 284
X
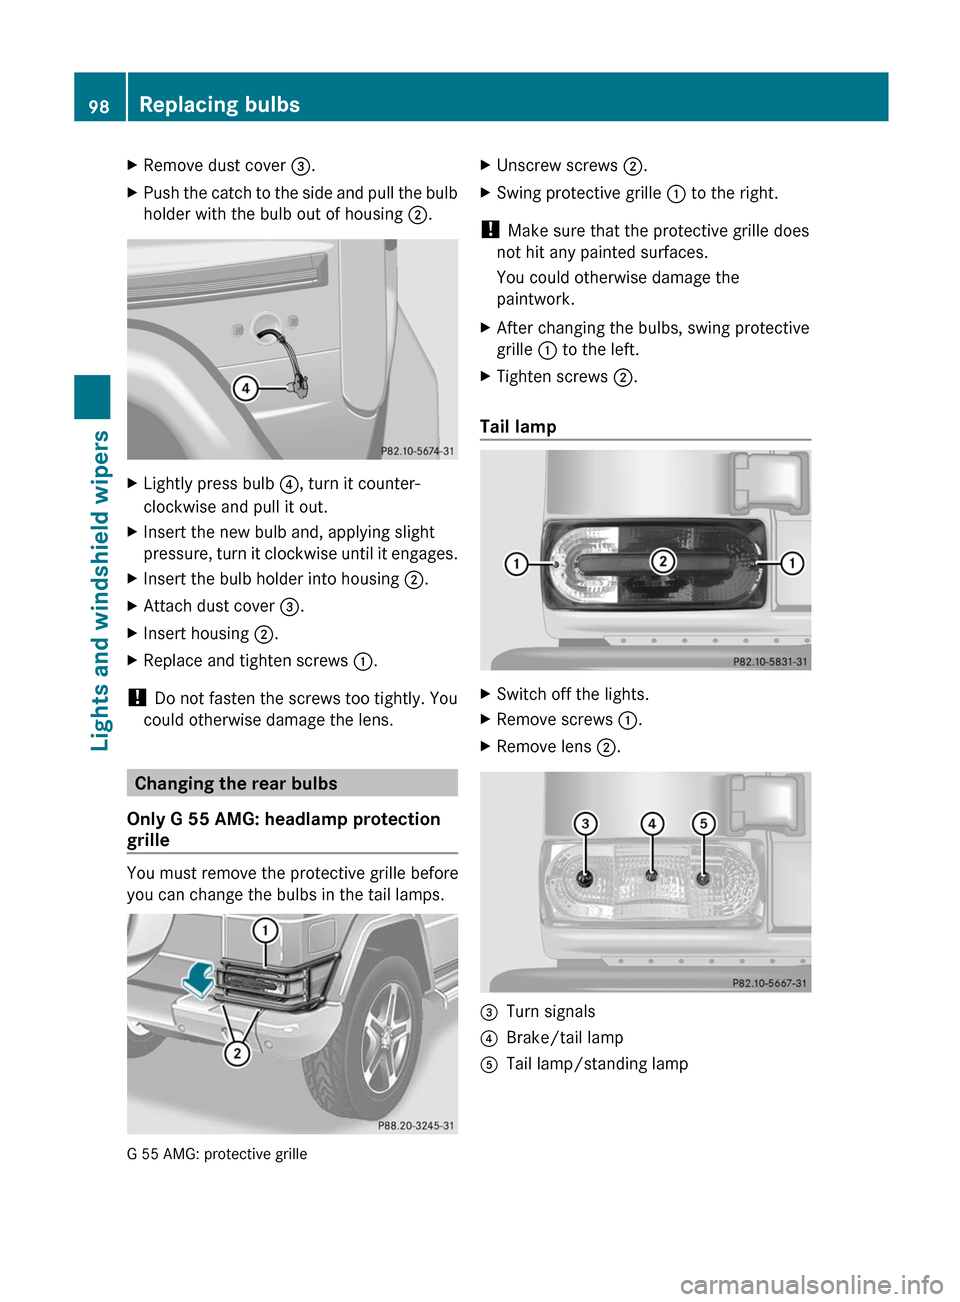
Remove dust cover =.
X Push the catch to the side and pull the bulb
holder with the bulb out of housing ;.X
Lightly press bulb ?, turn it counter-
clockwise and pull it out.
X Insert the new bulb and, applying slight
pressure, turn
it clockwise until it engages.
X Insert the bulb holder into housing ;.
X Attach dust cover =.
X Insert housing ;.
X Replace and tighten screws :.
! Do not fasten the screws too tightly. You
could otherwise damage the lens. Changing the rear bulbs
Only G 55 AMG: headlamp protection
grille You must remove the protective grille before
you can change the bulbs in the tail lamps.
G 55 AMG: protective grille X
Unscrew screws ;.
X Swing protective grille : to the right.
! Make sure that the protective grille does
not hit any painted surfaces.
You could otherwise damage the
paintwork.
X After changing the bulbs, swing protective
grille : to the left.
X Tighten screws ;.
Tail lamp X
Switch off the lights.
X Remove screws :.
X Remove lens ;. =
Turn signals
? Brake/tail lamp
A Tail lamp/standing lamp98
Replacing bulbs
Lights and windshield wipers
Page 138 of 284
R
Avoid high engine speeds. Drive at
appropriate engine speeds (maximum
3000 rpm).
R Do not shift the automatic transmission to
transmission position N.
R Always check the vehicle for damage after
off-road driving.
i Information about retrofitting special all-
terrain tires is available from any
authorized Mercedes-Benz Center. H
Environmental note
Protection of the environment is of primary
importance. Treat nature with respect.
Observe all prohibiting signs.
Checklist before driving off-road X
Engine oil level: check the engine oil level
and add oil if necessary.
Only then does the engine receive enough
oil when the vehicle is standing on a steep
incline.
! If the engine oil warning lamp lights up
while the vehicle is in motion, stop the
vehicle in
a safe place as soon as possible.
Check the engine oil level. The engine oil
warning lamp warning must not be ignored.
Continuing the journey while the symbol is
displayed could lead to engine damage.
X Wheel-changing tool kit: check that the
jack is
working and make sure you have the
lug wrench, a robust tow cable and a folding
spade in the vehicle.
X Wheels and tires: check the tire tread
depth and tire pressure.
X Check for damage and remove any foreign
objects, e.g. small stones, from the
wheels/tires.
X Replace any missing valve caps.
X Replace dented or damaged wheels.
X Carry a sound spare wheel. Checklist after driving off-road G
WARNING
If you notice sudden significant vibrations or
unusual handling performance or if you
suspect that damage has occurred to the
vehicle, you should activate the hazard
warning lamps, gently reduce speed and
carefully head for an area that is located at a
safe distance from the road.
Check the tires and the underside of the
vehicle for damage. If the vehicle seems
unsafe, have the vehicle towed away to the
nearest Mercedes-Benz Center or tire dealer
to be repaired.
Driving over rough terrain places greater
demands on your vehicle than driving on
normal roads. After driving off-road, check
the vehicle.
This allows you to detect damage
promptly and reduce the risk of an accident
to yourself and other road users.
X Shift the transfer case to HIGH
(Y page 145).
X Disengage the differential locks
(Y page 148).
X Clean the headlamps and rear lights and
check for damage.
X Clean the front and rear license plates.
X Clean the wheels and tires with a water jet
and remove any foreign objects.
X Clean the wheels, tires, wheel arches and
the vehicle underside with a water jet;
check for
any foreign objects and damage.
X Check whether twigs or other parts of
plants have become trapped. These
increase the risk of fire and can damage
fuel pipes, brake hoses or the rubber
bellows of the axle joints and propeller
shafts.
X After the trip, examine without fail the
entire undercarriage,
wheels, tires, brakes,
bodywork structure, steering, chassis and
exhaust system for damage. 136
Driving tips
Driving and parking
Page 160 of 284
X
Press the & or * button to select a
scene. Navigation system menu
Displaying navigation instructions In the
Navigation menu: the instructions
from the navigation system appear in the
multifunction display. For more information,
see the separate operating instructions.
X Switch on COMAND (see the separate
operating instructions).
X Press the V or U button on the
steering wheel to select the Navigation
menu.
Route guidance inactive The direction of travel appears in the
multifunction display. If the name of the
street is part of the navigation system data,
this will also be displayed.
Route guidance active
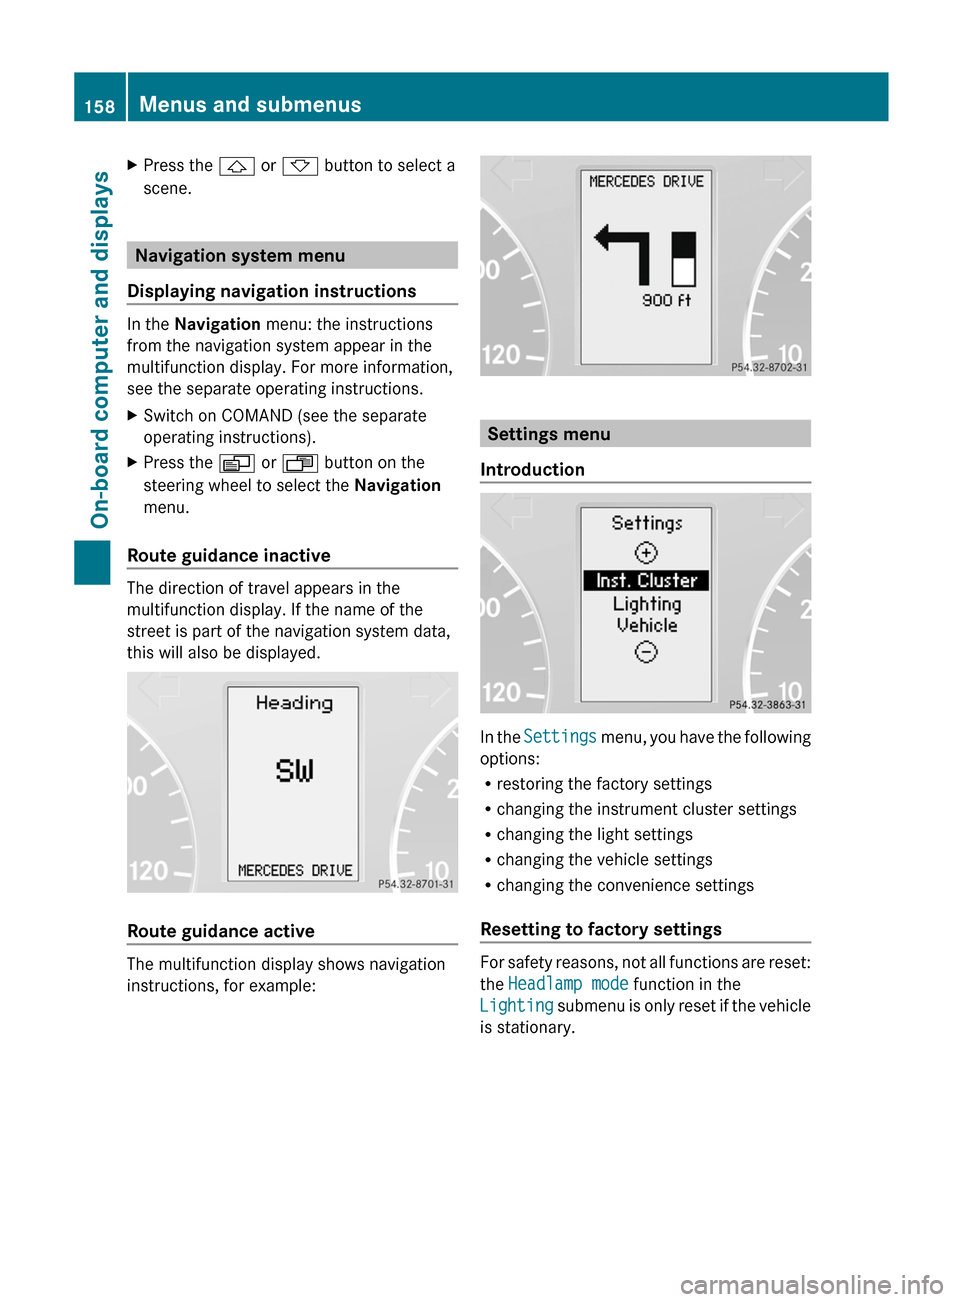
The multifunction display shows navigation
instructions, for example: Settings menu
Introduction In the
Settings menu, you have the following
options:
R restoring the factory settings
R changing the instrument cluster settings
R changing the light settings
R changing the vehicle settings
R changing the convenience settings
Resetting to factory settings For safety reasons, not all functions are reset:
the Headlamp mode function in the
Lighting
submenu
is only reset if the vehicle
is stationary. 158
Menus and submenus
On-board computer and displays
Page 162 of 284
Switching the daytime running lamps on/
off
This function is not available in Canada.
If you have activated the daytime running
lamps function and the light switch is in the
$ or à position, the low-beam
headlamps are switched on automatically
when the engine is running.
In the dark, the following also light up:
R
the low-beam headlamps
R the standing lamps
R the tail lamps
R the license plate lamp
R the side marker lamp
In countries
where daytime running lamps are
legally required, Constant is the factory
setting.
X Press the V or U button on the
steering wheel to select the Settings
menu.
X Press the & button
to select submenus.
X Press the W or X
button to select the
Lighting submenu.
X Press the & button
to select Headlamp
mode.
X Press the W or X button to set the
mode for the headlamps to Manual or
Constant (daytime running lamps).
X Press the &, V or U button to
select a different display.
Switching the surround lighting on or off
If you activate the surround lighting function
and the light switch is set to Ã, the
following will light up if it is dark and you
unlock the vehicle using the SmartKey:
R the standing lamps
R the license plate lamp
R the tail lamps
R the fog lamps
R the side marker lamp The surround lighting switches off
automatically after 40 seconds or when the
driver's door is opened.
X
Press the V or U button on the
steering wheel to select the Settings
menu.
X Press the & button
to select submenus.
X Press the W or X
button to select the
Lighting submenu.
X Press the & button
to select Surround
lighting.
X Press the W or X button to switch
the Surround lighting on or off.
X When leaving the vehicle, turn the light
switch to position Ã.
The surround lighting is activated.
X Press the &, V or U button to
select a different display.
Activating/deactivating the exterior
lighting delayed switch-off
If you have activated the delayed switch-off
function, the light switch is set to à and
you switch off the engine, the following
remain lit:
R the standing lamps
R the license plate lamp
R the tail lamps
R the fog lamps
R the side marker lamp
If the
engine is switched off and then none of
the doors are opened, or if an open door is
not closed, the exterior lighting goes out after
60 seconds.
X Press the V or U button on the
steering wheel to select the Settings
menu.
X Press the & button
to select submenus.
X Press the W or X
button to select the
Lighting submenu.
X Press the & button to select Headl.
Delayed Switch Off. 160
Menus and submenus
On-board computer and displays
Page 170 of 284
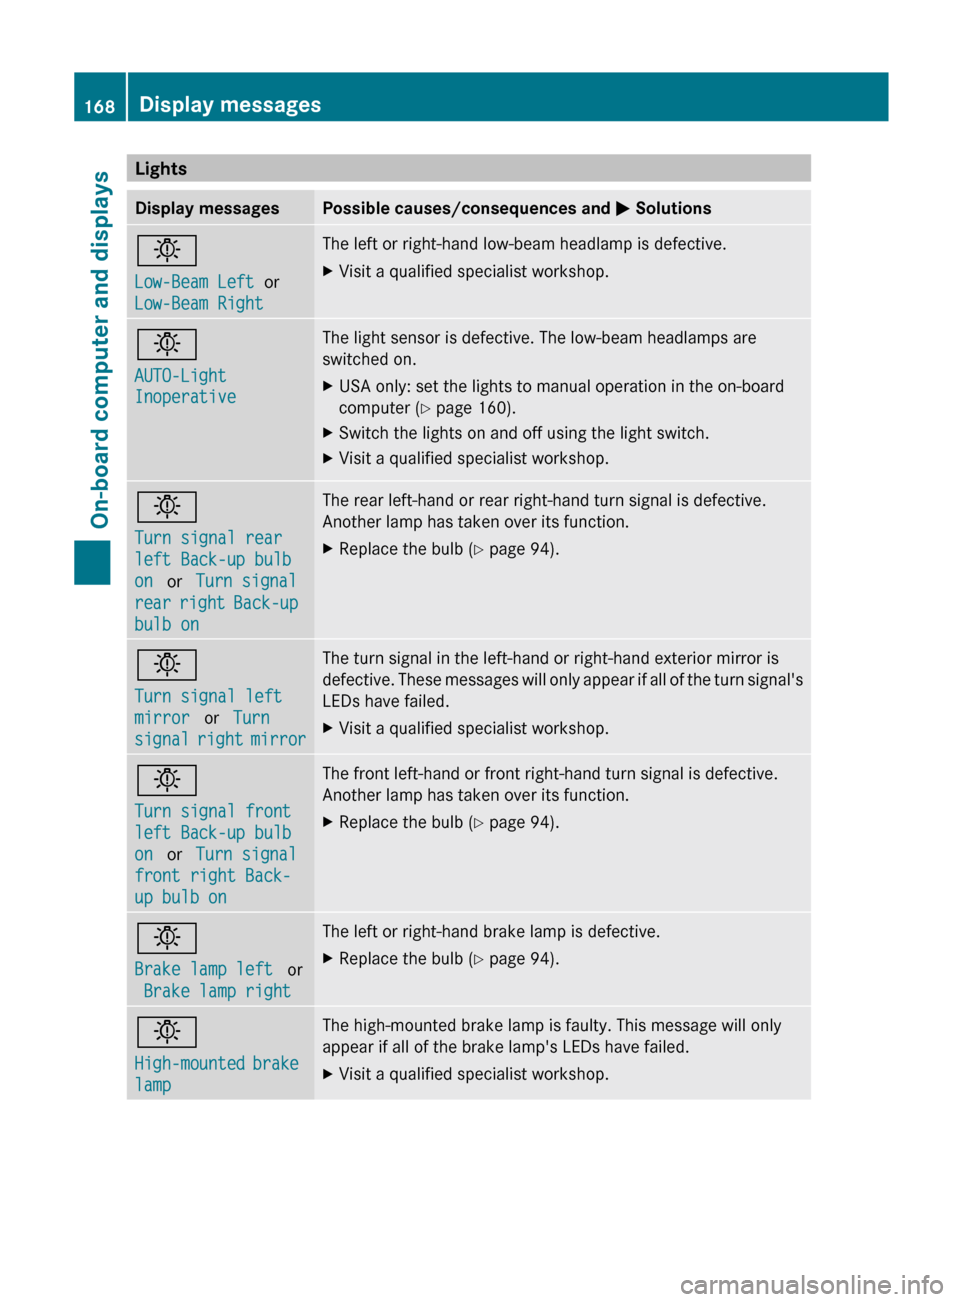
Lights
Display messages Possible causes/consequences and
M Solutions
b
Low-Beam Left
or
Low-Beam Right The left or right-hand low-beam headlamp is defective.
X
Visit a qualified specialist workshop. b
AUTO-Light
Inoperative The light sensor is defective. The low-beam headlamps are
switched on.
X
USA only: set the lights to manual operation in the on-board
computer ( Y page 160).
X Switch the lights on and off using the light switch.
X Visit a qualified specialist workshop. b
Turn signal rear
left Back-up bulb
on
or
Turn signal
rear right Back-up
bulb on The rear left-hand or rear right-hand turn signal is defective.
Another lamp has taken over its function.
X
Replace the bulb
(
Y page 94). b
Turn signal left
mirror
or Turn
signal right
mirror The turn signal in the left-hand or right-hand exterior mirror is
defective.
These
messages will only appear if all of the turn signal's
LEDs have failed.
X Visit a qualified specialist workshop. b
Turn signal front
left Back-up bulb
on
or
Turn signal
front right Back-
up bulb on The front left-hand or front right-hand turn signal is defective.
Another lamp has taken over its function.
X
Replace the bulb
(
Y page 94). b
Brake lamp left
or
Brake lamp right The left or right-hand brake lamp is defective.
X
Replace the bulb (
Y page 94). b
High-mounted
brake
lamp The high-mounted brake lamp is faulty. This message will only
appear if all of the brake lamp's LEDs have failed.
X
Visit a qualified specialist workshop.168
Display messages
On-board computer and displays
Page 205 of 284
R
USA: Response Center at
1-888-990-9007
R Canada: Customer Service at
1-888-923-8367
You will be asked for your password.
X Return to your vehicle at the time arranged
with the Response Center.
X Press and hold the release button on the
rear door handle for at least 20 seconds
until the indicator lamp in the SOS button
(Y page 199) begins flashing.
The Connecting Call message appears
on the multifunction display.
Alternatively, the vehicle can also be opened
via the Internet in the "Owners Online"
section using your ID number and
password 17
.
i Vehicle remote
unlocking is only possible
if the corresponding mobile phone network
is accessible.
The SOS button flashes and the
Connecting Call message appears in the
multifunction display to confirm that the
command for vehicle remote unlocking has
been received.
If you press the rear door's locking cylinder
for more than 20 seconds before receiving
authorization for remote unlocking, you
must wait 15 minutes before you can press
the rear door's locking cylinder again.
Service for recovering a stolen vehicle If your vehicle has been stolen:
X
Contact the police.
The police
will issue an incident report. This
report has a number.
X Forward this number to the Response
Center together with your PIN.
The Response Center will then attempt to
covertly contact the mbrace system. The
Response Center contacts you and the
local law enforcement authority if the
vehicle is located. However, only the law enforcement is informed of the location of
the vehicle.
i If the anti-theft alarm system remains
activated for longer than thirty seconds,
mbrace is automatically connected to the
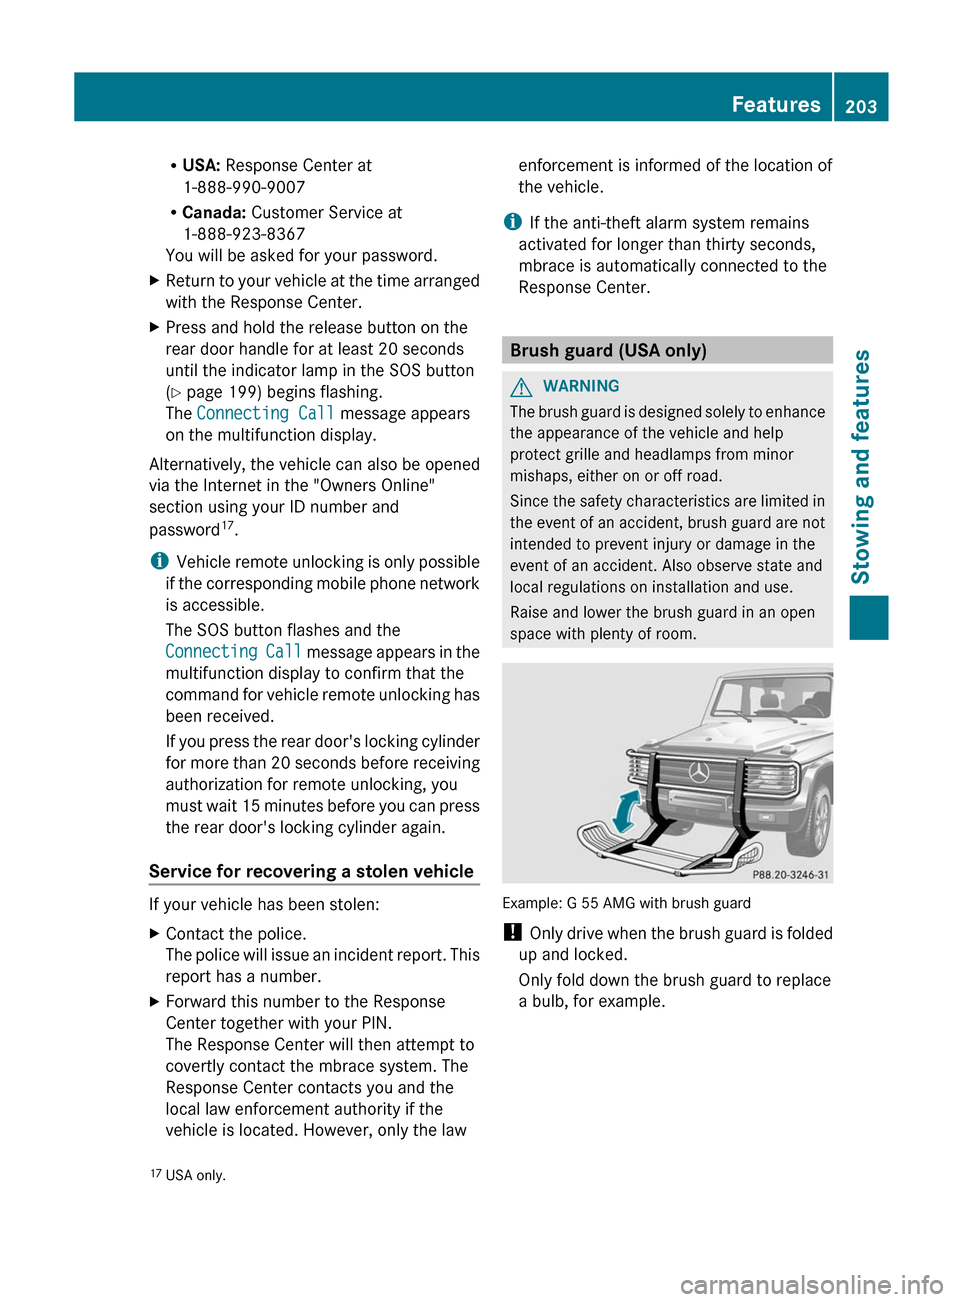
Response Center. Brush guard (USA only)
G
WARNING
The brush guard is designed solely to enhance
the appearance of the vehicle and help
protect grille and headlamps from minor
mishaps, either on or off road.
Since the
safety characteristics are limited in
the event of an accident, brush guard are not
intended to prevent injury or damage in the
event of an accident. Also observe state and
local regulations on installation and use.
Raise and lower the brush guard in an open
space with plenty of room. Example: G 55 AMG with brush guard
!
Only drive
when the brush guard is folded
up and locked.
Only fold down the brush guard to replace
a bulb, for example.
17 USA only. Features
203
Stowing and features Z