sunroof MERCEDES-BENZ G-Class 2013 W463 Owner's Manual
[x] Cancel search | Manufacturer: MERCEDES-BENZ, Model Year: 2013, Model line: G-Class, Model: MERCEDES-BENZ G-Class 2013 W463Pages: 364, PDF Size: 11.52 MB
Page 17 of 364
Side windows
Convenience opening feature .......... 78
Important safety information
...........78
Opening/closing .............................. 78
Overview .......................................... 78
Troubleshooting ............................... 79
Ski rack .............................................. 267
Sliding sunroof Important safety notes .................... 79
Opening/closing .............................. 80
Operating manually ..........................80
Problem (malfunction) .....................81
SmartKey
Changing the battery ....................... 71
Changing the programming ............. 69
Checking the battery ....................... 70
Convenience opening feature .......... 78
Display message ............................ 247
Door central locking/unlocking ....... 68
Important safety notes .................... 68
Loss ................................................. 72
Malfunction ...................................... 72
Mechanical key ................................ 70
Overview .......................................... 68
Problem (malfunction) .....................72
Starting the engine ........................ 140
Snow chains ...................................... 321
Sockets Front-passenger footwell ...............271
Luggage compartment ................... 271
Rear compartment ......................... 271
SOS
see mbrace
Spare fuses ........................................ 313
Spare wheel Mounting ....................................... 340
Notes/data .................................... 346
Spare wheel bracket at the rear ....303
Stainless-steel spare hub cap ........ 304
Specialist workshop ............................ 23
Special seat belt retractor .................. 52
Speed, controlling see Cruise control
Speedometer
Digital ............................................ 213
In the Instrument cluster ............... 209Segments
...................................... 210
Selecting the unit of
measurement ................................ 219
see Instrument cluster
SPEEDTRONIC
Display message ............................ 241
Selecting ........................................ 175
Variable ......................................... 174
SRS
see SRS (Supplemental Restraint
System)
SRS (Supplemental Restraint
System)
Display message ............................ 229
Introduction ..................................... 39
Warning lamp ................................. 255
Warning lamp (function) ................... 39
Standing lamps
Display message ............................ 233
Switching on/off ........................... 102
Starting the engine
Important safety notes .................. 140
Steering (display message) ..............246
Steering wheel Adjusting (electrically) .....................91
Buttons (on-board computer) ......... 210
Cleaning ......................................... 299
Important safety notes .................... 90
Paddle shifters ............................... 150
Steering wheel heating .................... 91
Storing settings (memory
function) .......................................... 95
Steering wheel heating
Indicator lamp (malfunction) ............ 91
Steering wheel paddle shifters ........150
Stopwatch (RACETIMER) ................... 222
Stowage areas ................................... 263
Stowage compartments Armrest (under) ............................. 263
Cup holders ................................... 268
Glove box ....................................... 263
Important safety information ......... 263
Stowage pockets ........................... 264
Summer tires ..................................... 320
Sun visor ............................................ 268 Index
15
Page 18 of 364
Supplemental Restraint System
see SRS (Supplemental Restraint
System)
Surround lighting (on-board
computer) .......................................... 219
Suspension tuning SETUP (on-board computer) .......... 222
SUV
(Sport Utility Vehicle) .......................22
Switching air-recirculation mode
on/off ................................................. 134
Switching off the alarm (ATA) ............65T
Tachometer ........................................ 210
Tailgate Opening dimensions ...................... 357
Tail lamps
Display message
............................ 233
see Lights
Tank content
Fuel gauge ..................................... 209
Technical data
Capacities ...................................... 350
Tires ............................................... 344
Tires/wheels ................................. 344
Trailer Loads .................................. 358
Vehicle data ................................... 357
Wheels ........................................... 344
TELEAID
Call priority .................................... 276
Downloading destinations
(COMAND) ..................................... 277
Downloading routes .......................279
Emergency call .............................. 274
Geo fencing ................................... 280
Important safety notes .................. 272
Locating a stolen vehicle ............... 278
MB info call button ........................ 276
Remote vehicle locking .................. 277
Roadside Assistance button .......... 275
Self-test ......................................... 273
Speed alert .................................... 279
System .......................................... 273
Triggering the vehicle alarm ........... 280 Vehicle remote malfunction
diagnosis
....................................... 278
Vehicle remote unlocking .............. 277
Telephone
Accepting a call ............................. 217
Display message
............................ 246
Menu (on-board computer) ............ 216
Number from the phone book ........ 217
Redialing ........................................ 217
Rejecting/ending a call ................. 217
Telephone compartment ..................263
Temperature Coolant .......................................... 209
Coolant (on-board computer) ......... 222
Engine oil (on-board computer) ...... 222
Outside temperature ...................... 210
Setting (climate control) ................ 131
Theft deterrent systems
ATA (Anti-Theft Alarm system) .........65
Immobilizer ...................................... 64
Tilt/sliding sunroof
see Sliding sunroof
Time
see Separate Operator's Manual
Timing (RACETIMER) .........................222
Tire pressure Calling up (on-board computer) ..... 325
Checking manually ........................325
Display message ............................ 242
Maximum ....................................... 324
Notes ............................................. 323
Recommended ............................... 322
Table (single tires) .........................322
Tire pressure monitor
Checking the tire pressure
electronically ................................. 327
Warning message .......................... 327
Tire pressure monitoring system
Function/notes ............................. 325
Restarting ...................................... 327
Warning lamp ................................. 259
Tires
Aspect ratio (definition) ................. 339
Average weight of the vehicle
occupants (definition) .................... 338
Bar (definition) ............................... 338
Changing a wheel .......................... 340
Characteristics .............................. 33716
Index
Page 36 of 364
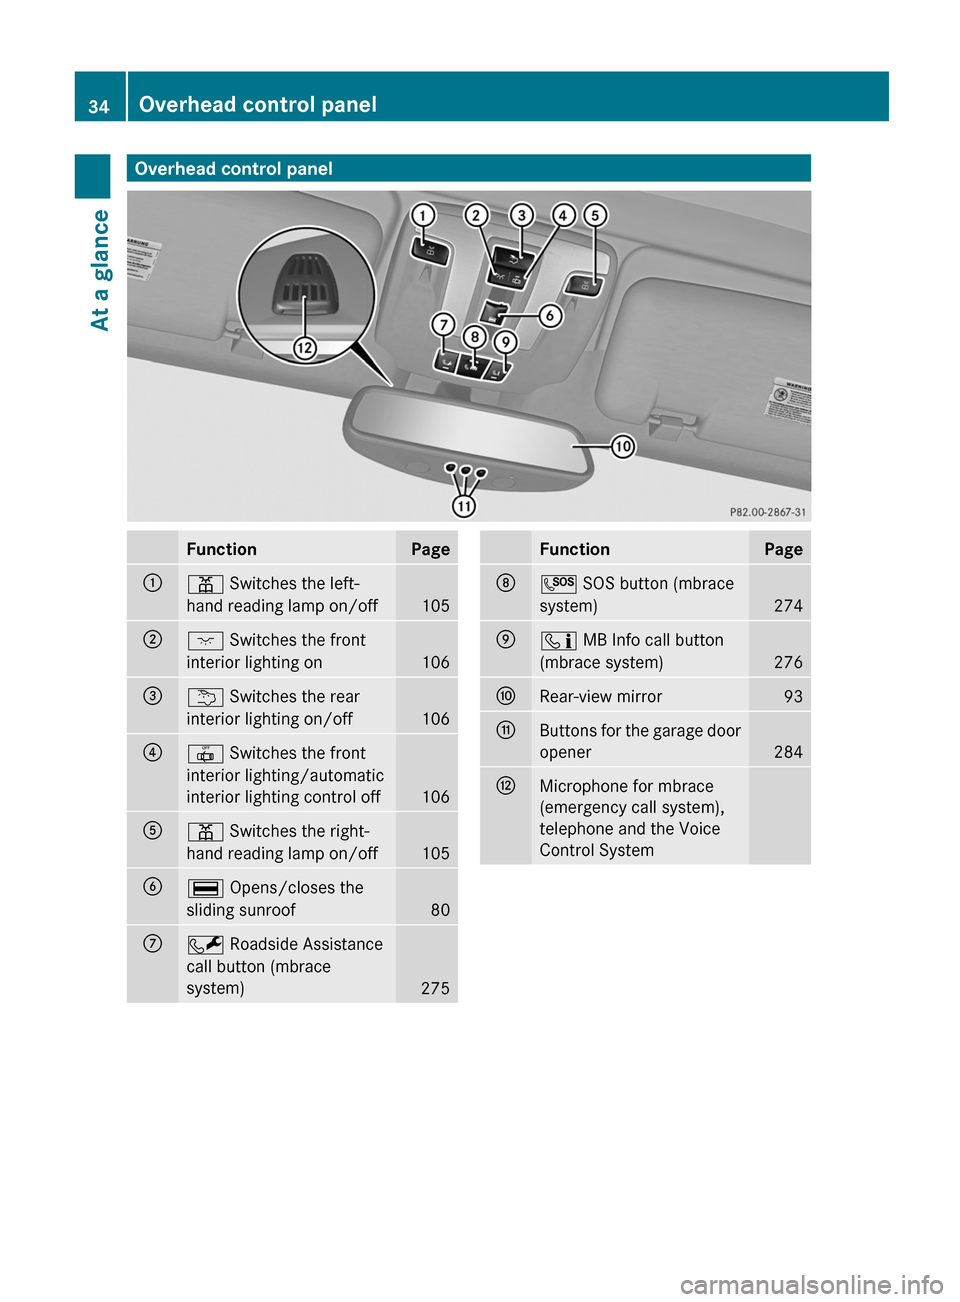
Overhead control panel
Function Page
:
p Switches the left-
hand reading lamp on/off
105
;
c Switches the front
interior lighting on
106
=
u Switches the rear
interior lighting on/off
106
?
| Switches the front
interior lighting/automatic
interior lighting control off
106
A
p Switches the right-
hand reading lamp on/off
105
B
¡ Opens/closes the
sliding sunroof
80
C
F Roadside Assistance
call button (mbrace
system)
275 Function Page
D
G SOS button (mbrace
system)
274
E
ï MB Info call button
(mbrace system)
276
F
Rear-view mirror 93
G
Buttons for the garage door
opener
284
H
Microphone for mbrace
(emergency call system),
telephone and the Voice
Control System34
Overhead control panelAt a glance
Page 69 of 364

Useful information ..............................
68
SmartKey ............................................. 68
Doors .................................................... 73
Rear door ............................................. 77
Side windows ...................................... 78
Sliding sunroof .................................... 79 67Opening/closing
Page 81 of 364

You can ventilate the vehicle before you start
driving. To do this, the SmartKey is used to
carry out the following functions
simultaneously:
R
unlock the vehicle
R open the side windows
R open the sliding sunroof
R switch on the seat ventilation for the
driver's seat and front-passenger seat
X Point the tip of the SmartKey at the driver's
door handle.
X Press and hold the % button until the
side windows and the sliding sunroof are in
the desired position.
X To interrupt convenience opening:
release the % button.Problems with the side windows
G
WARNING
Closing the side windows with increased force
or without the anti-entrapment feature could
lead
to serious or even fatal injury. Make sure
that nobody can become trapped when
closing the side windows.
Problem: a side window cannot be closed
because objects are trapped between the
side window and the door frame.
X Remove the objects.
X Close the side window.
Problem: a side window cannot be closed
and you cannot see the cause.
If a side window is obstructed during closing
and reopens again slightly:
X Immediately after the window blocks, pull
the corresponding switch again until the
side window has closed. If a side window is obstructed again during
closing and reopens again slightly:
X
Immediately after the window blocks, pull
the corresponding switch again until the
side window has closed.
i If
a side window no longer opens or closes
due to a malfunction, contact a qualified
specialist workshop. Sliding sunroof
Important safety notes
! Only open the sliding sunroof if it is free
of snow and ice. Otherwise, malfunctions
may occur.
Do
not allow anything to protrude from the
sliding sunroof. Otherwise, the seals could
be damaged.
! If the sliding sunroof still cannot be
opened or closed as a result of a
malfunction, contact a qualified specialist
workshop.
! The weather can change abruptly. It could
start to rain or snow. Make sure that the
sliding sunroof is closed when you leave the
vehicle. The vehicle electronics can be
damaged if water enters the vehicle
interior.
i Resonance noises can occur in addition
to the usual airflow noises when the sliding
sunroof is open. They are caused by minor
pressure fluctuations in the vehicle interior.
Change the position of the sliding sunroof
or open a side window slightly to reduce or
eliminate these noises. Sliding sunroof
79
Opening/closing Z
Page 82 of 364
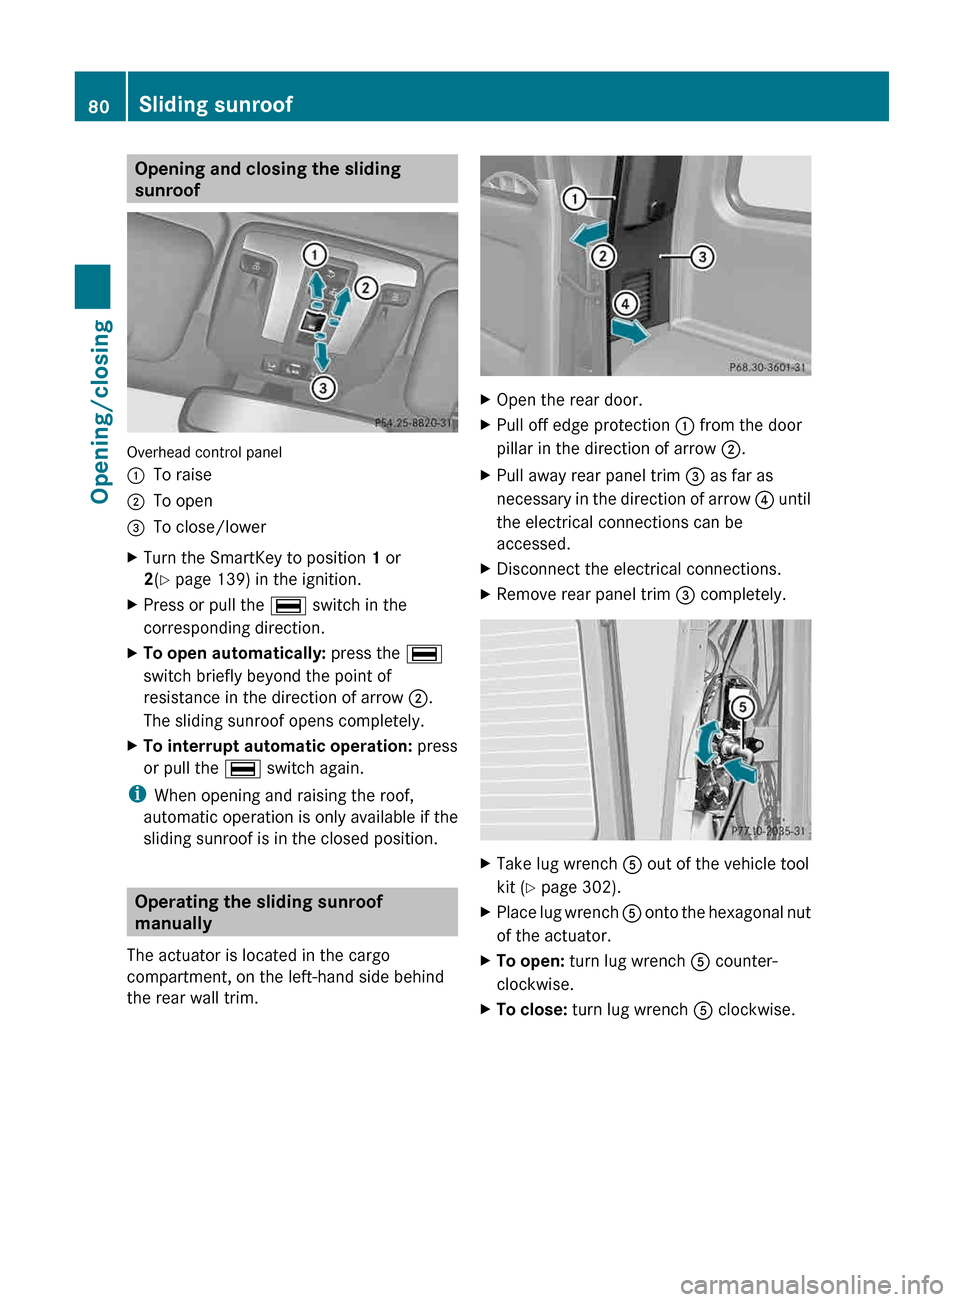
Opening and closing the sliding
sunroof
Overhead control panel
:
To raise
; To open
= To close/lower
X Turn the SmartKey to position 1 or
2(Y page 139) in the ignition.
X Press or pull the ¡ switch in the
corresponding direction.
X To open automatically: press the ¡
switch briefly beyond the point of
resistance in the direction of arrow ;.
The sliding sunroof opens completely.
X To interrupt automatic operation: press
or pull the ¡ switch again.
i When opening and raising the roof,
automatic operation is only available if the
sliding sunroof is in the closed position. Operating the sliding sunroof
manually
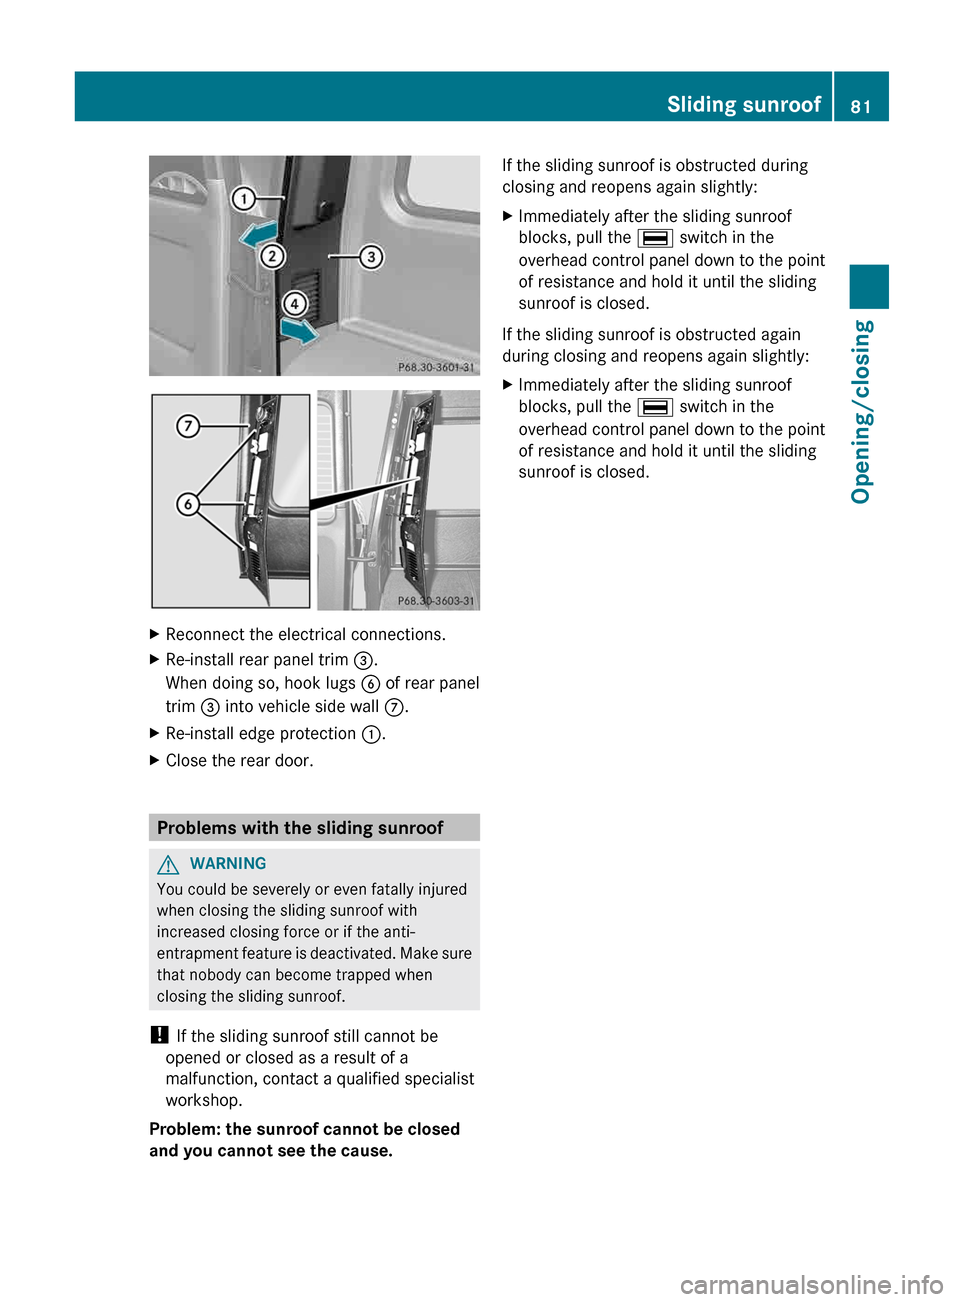
The actuator is located in the cargo
compartment, on the left-hand side behind
the rear wall trim. X
Open the rear door.
X Pull off edge protection : from the door
pillar in the direction of arrow ;.
X Pull away rear panel trim = as far as
necessary in the direction of arrow ? until
the electrical connections can be
accessed.
X Disconnect the electrical connections.
X Remove rear panel trim = completely. X
Take lug wrench A out of the vehicle tool
kit ( Y page 302).
X Place lug wrench A
onto the hexagonal nut
of the actuator.
X To open: turn lug wrench A counter-
clockwise.
X To close: turn lug wrench A clockwise.80
Sliding sunroof
Opening/closing
Page 83 of 364
X
Reconnect the electrical connections.
X Re-install rear panel trim =.
When doing so, hook lugs B of rear panel
trim = into vehicle side wall C.
X Re-install edge protection :.
X Close the rear door. Problems with the sliding sunroof
G
WARNING
You could be severely or even fatally injured
when closing the sliding sunroof with
increased closing force or if the anti-
entrapment
feature is deactivated. Make sure
that nobody can become trapped when
closing the sliding sunroof.
! If the sliding sunroof still cannot be
opened or closed as a result of a
malfunction, contact a qualified specialist
workshop.
Problem: the sunroof cannot be closed
and you cannot see the cause. If the sliding sunroof is obstructed during
closing and reopens again slightly:
X
Immediately after the sliding sunroof
blocks, pull the ¡ switch in the
overhead control panel down to the point
of resistance and hold it until the sliding
sunroof is closed.
If the sliding sunroof is obstructed again
during closing and reopens again slightly:
X Immediately after the sliding sunroof
blocks, pull the ¡ switch in the
overhead control panel down to the point
of resistance and hold it until the sliding
sunroof is closed. Sliding sunroof
81
Opening/closing Z
Page 92 of 364
The system automatically switches down
from level 2to level1 after approximately
10 minutes.
The system automatically switches off
approximately
35 minutes after it is set to
level 1.
Problems with the seat heating If the on-board voltage is too low, the seat
heating is switched off automatically.
X
Switch off electrical consumers which you
do not need, such as the rear window
defroster or interior lighting.
If the on-board voltage is only interrupted
briefly,
the seat heating will switch back on
automatically. If the seat heating is not
switched on automatically:
X Switch the seat heating on manually
(Y page 89) Switching the seat ventilation on/off
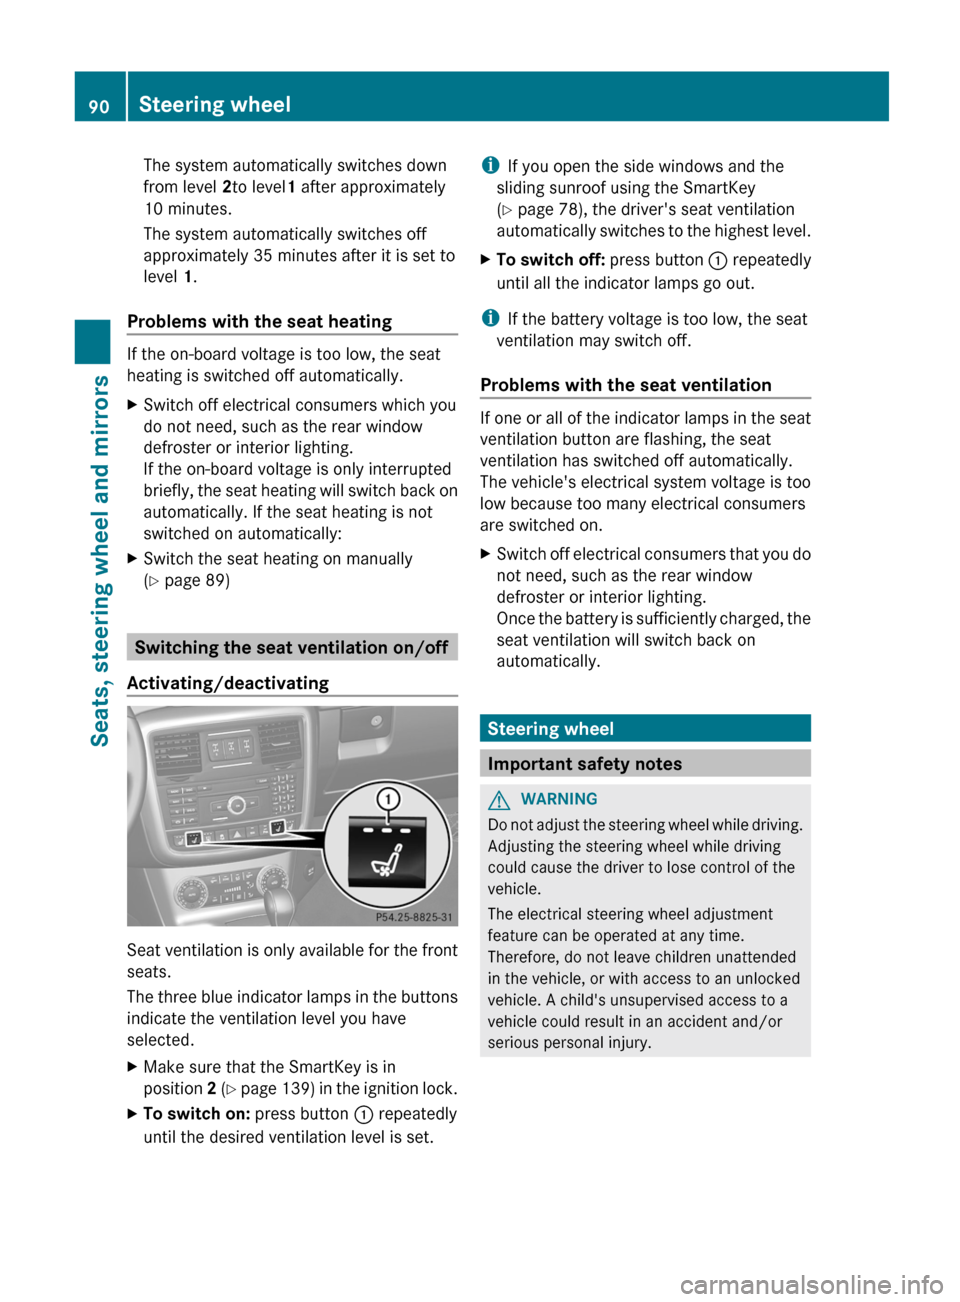
Activating/deactivating Seat ventilation is only available for the front
seats.
The
three blue indicator lamps in the buttons
indicate the ventilation level you have
selected.
X Make sure that the SmartKey is in
position 2 (Y
page 139) in the ignition lock.
X To switch on: press button : repeatedly
until the desired ventilation level is set. i
If you open the side windows and the
sliding sunroof using the SmartKey
(Y page 78), the driver's seat ventilation
automatically
switches to the highest level.
X To switch off: press button : repeatedly
until all the indicator lamps go out.
i If the battery voltage is too low, the seat
ventilation may switch off.
Problems with the seat ventilation If one or all of the indicator lamps in the seat
ventilation button are flashing, the seat
ventilation has switched off automatically.
The vehicle's electrical system voltage is too
low because too many electrical consumers
are switched on.
X
Switch off electrical consumers that you do
not need, such as the rear window
defroster or interior lighting.
Once
the battery is sufficiently charged, the
seat ventilation will switch back on
automatically. Steering wheel
Important safety notes
G
WARNING
Do not adjust the steering wheel while driving.
Adjusting the steering wheel while driving
could cause the driver to lose control of the
vehicle.
The electrical steering wheel adjustment
feature can be operated at any time.
Therefore, do not leave children unattended
in the vehicle, or with access to an unlocked
vehicle. A child's unsupervised access to a
vehicle could result in an accident and/or
serious personal injury. 90
Steering wheel
Seats, steering wheel and mirrors
Page 120 of 364
Useful information
i This Operator's Manual describes all
models and all standard and optional
equipment of your vehicle available at the
time of publication of the Operator's
Manual. Country-specific differences are
possible.
Please note that your vehicle may
not be equipped with all features
described. This also applies to safety-
related systems and functions.
i Read the information on qualified
specialist workshops: ( Y page 23).Overview of climate control systems
Important safety notes
G
WARNING
Severe conditions (e.g. strong air pollution)
may require replacement of the filter before
its
scheduled replacement interval. A clogged
filter will reduce the air volume to the interior
and the windows could fog up, impairing
visibility and endangering you and others.
Have a blocked filter replaced at a Mercedes-
Benz Center as soon as possible. G
WARNING
Follow the recommended settings for heating
and cooling given on the following pages.
Otherwise, the windows could fog up,
impairing visibility and endangering you and
others.
Automatic climate control controls the
temperature and the humidity in the vehicle
interior and filters undesirable substances
from the air.
Automatic
climate control is only operational
when the engine is running. Optimum
operation is only achieved if you drive with the
side windows and sliding sunroof closed.
The climatic comfort deteriorates whilst the
sliding sunroof is open. The automatic climate
control cannot maintain the set temperature with the sliding sunroof open. You have to
adjust the climate control manually.
i
The "residual heat" function can only be
activated or deactivated with the ignition
switched off.
i The residual heat function can only be
activated or deactivated with the ignition
switched off (Y page 134).
i Ventilate the vehicle for a brief period
during warm weather, e.g. using the
convenience opening feature ( Y page 78).
This will speed up the cooling process and
the desired vehicle interior temperature
will be reached more quickly.
i The integrated filter can filter out most
particles
of dust, and completely filters out
pollen. A clogged filter reduces the amount
of air supplied to the vehicle interior. For
this reason, you should always observe the
interval for replacing the filter, which is
specified in the Maintenance Booklet.
Since the replacement interval depends on
environmental conditions, e.g. heavy air
pollution, the interval may be shorter than
stated in the Maintenance Booklet. 118
Overview of climate control systems
Climate control
Page 167 of 364
The following driving systems are specially
adapted to off-road driving:
R
4ETS ( Y page 62)
R Transfer case (Y page 198)
R Differential locks ( Y page 201)
Observe the following notes:
R stop
your vehicle and, if necessary, shift the
transfer case to LOW
RANGE(Y page 199) before driving off-
road.
R AMG vehicles: to shift the transfer case to
LOW RANGE, deactivate the ECO start/
stop function (Y page 142).
R engage the differential locks, if necessary
(Y page 201)
i ABS, 4ETS, ESP ®
and BAS are deactivated
when the differential locks are activated.
This allows the front wheels to lock briefly,
so that these can dig into a loose surface.
However, please note that locked wheels
skid and can no longer steer.
R Check that items of luggage and loads are
stowed safely and are well secured
(Y page 267).
R To avoid damaging the vehicle, make sure
there is always sufficient ground clearance.
R Always keep the engine running and in gear
when driving on a downhill gradient.
R Always keep the engine running and in gear
when driving on a slope.
R Drive slowly and evenly, if necessary at a
walking pace.
R Ensure that the wheels are in contact with
the ground at all times.
R Drive with extreme care on unknown off-
road routes where visibility is poor. For
safety reasons, get out of the vehicle first
and survey the off-road route.
R Check the depth of water before fording
rivers and streams.
R When fording, do not stop and do not
switch off the engine. R
Look out for obstacles such as rocks, holes,
tree stumps and furrows.
R Always keep the doors, rear door, side
windows and the sliding sunroof closed
while the vehicle is in motion.
R Switch off cruise control.
R Do not stray from marked routes or paths.
R Adapt your speed to the terrain. The
rougher, steeper or more ruts on the
terrain, the slower your speed should be.
R Drive slowly and at an even speed through
the water. Ensure that a bow wave does not
form as you drive.
R On sand, drive quickly to overcome the
rolling resistance. Otherwise, the vehicle
could dig itself into the sand.
R Do not jump with the vehicle as this will
interrupt the vehicle's propulsion.
R Avoid high engine speeds. Drive at
appropriate engine speeds (maximum
3,000 rpm).
R Do not shift the automatic transmission to
transmission position N.
R Always check the vehicle for damage after
off-road driving.
i Information about retrofitting special all-
terrain tires is available from any qualified
specialist workshop.
i Do not use the HOLD function when
driving off-road, on steep uphill or downhill
gradients or on slippery or loose surfaces.
The HOLD function cannot hold the vehicle
on such surfaces.
Checklist before driving off-road !
If the engine oil warning lamp lights up
while the vehicle is in motion, stop the
vehicle
in a safe place as soon as possible.
Check the engine oil level. The engine oil
warning lamp warning must not be ignored.
Continuing the journey while the symbol is
displayed could lead to engine damage. Driving tips
165
Driving and parking Z