transmission MERCEDES-BENZ G-Class 2015 W463 Workshop Manual
[x] Cancel search | Manufacturer: MERCEDES-BENZ, Model Year: 2015, Model line: G-Class, Model: MERCEDES-BENZ G-Class 2015 W463Pages: 350, PDF Size: 6.44 MB
Page 234 of 350
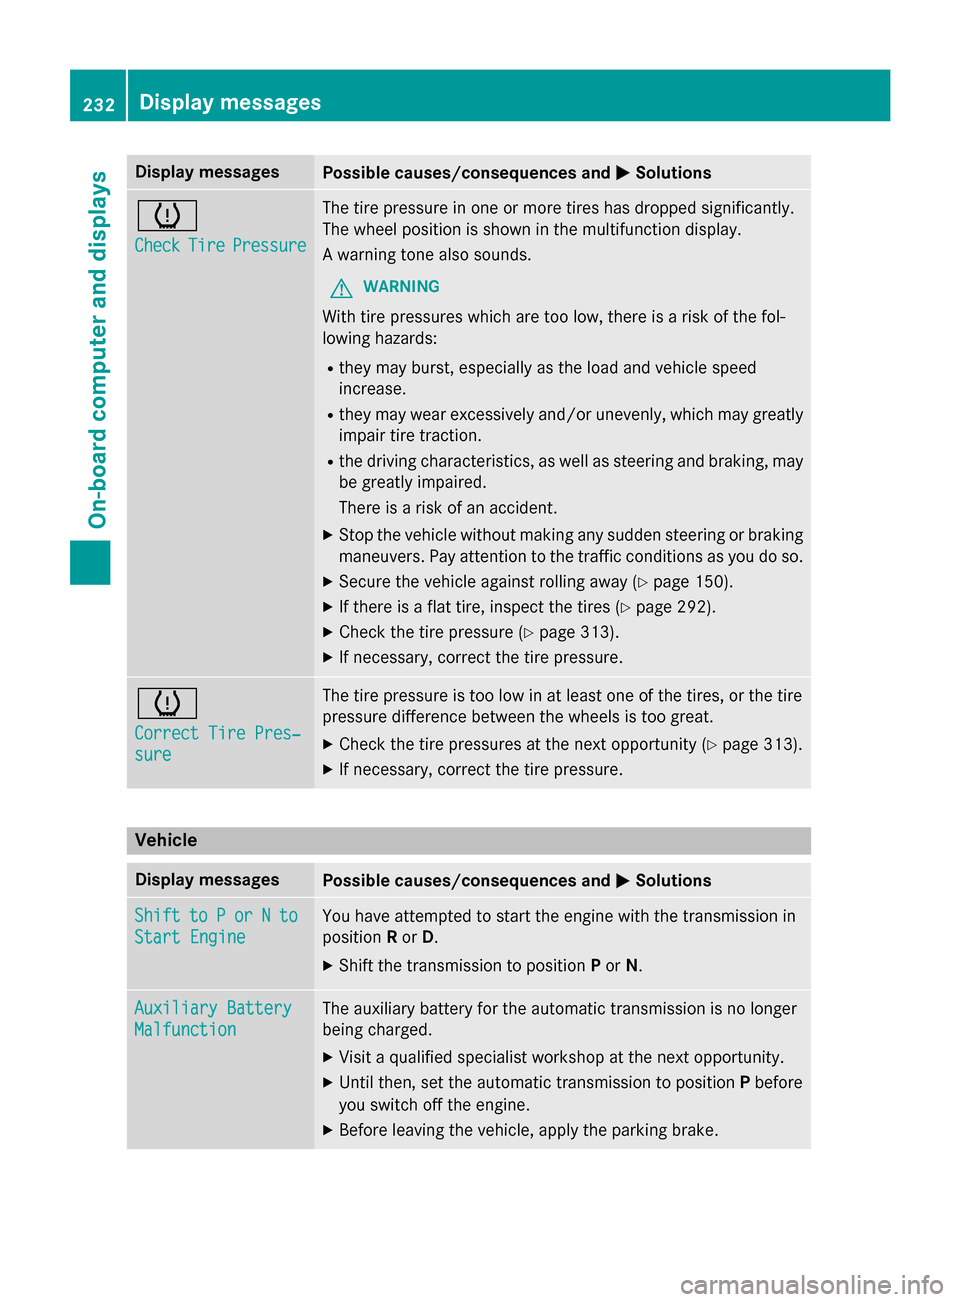
Display messages
Possible causes/consequences and
M
MSolutions h
Check Check
Tire
TirePressure
Pressure The tire pressure in one or more tires has dropped significantly.
The wheel position is shown in the multifunction display.
A warning tone also sounds.
G WARNING
With tire pressures which are too low, there is a risk of the fol-
lowing hazards:
R they may burst, especially as the load and vehicle speed
increase.
R they may wear excessively and/or unevenly, which may greatly
impair tire traction.
R the driving characteristics, as well as steering and braking, may
be greatly impaired.
There is a risk of an accident.
X Stop the vehicle without making any sudden steering or braking
maneuvers. Pay attention to the traffic conditions as you do so.
X Secure the vehicle against rolling away (Y page 150).
X If there is a flat tire, inspect the tires (Y page 292).
X Check the tire pressure (Y page 313).
X If necessary, correct the tire pressure. h
Correct Tire Pres‐ Correct Tire Pres‐
sure sure The tire pressure is too low in at least one of the tires, or the tire
pressure difference between the wheels is too great.
X Check the tire pressures at the next opportunity (Y page 313).
X If necessary, correct the tire pressure. Vehicle
Display messages
Possible causes/consequences and
M
MSolutions Shift
Shift
to
toP
Por
or N
Nto
to
Start Engine
Start Engine You have attempted to start the engine with the transmission in
position
Ror D.
X Shift the transmission to position Por N. Auxiliary Battery Auxiliary Battery
Malfunction Malfunction The auxiliary battery for the automatic transmission is no longer
being charged.
X Visit a qualified specialist workshop at the next opportunity.
X Until then, set the automatic transmission to position Pbefore
you switch off the engine.
X Before leaving the vehicle, apply the parking brake. 232
Display
messagesOn-board computer and displays
Page 235 of 350
Display messages
Possible causes/consequences and
M
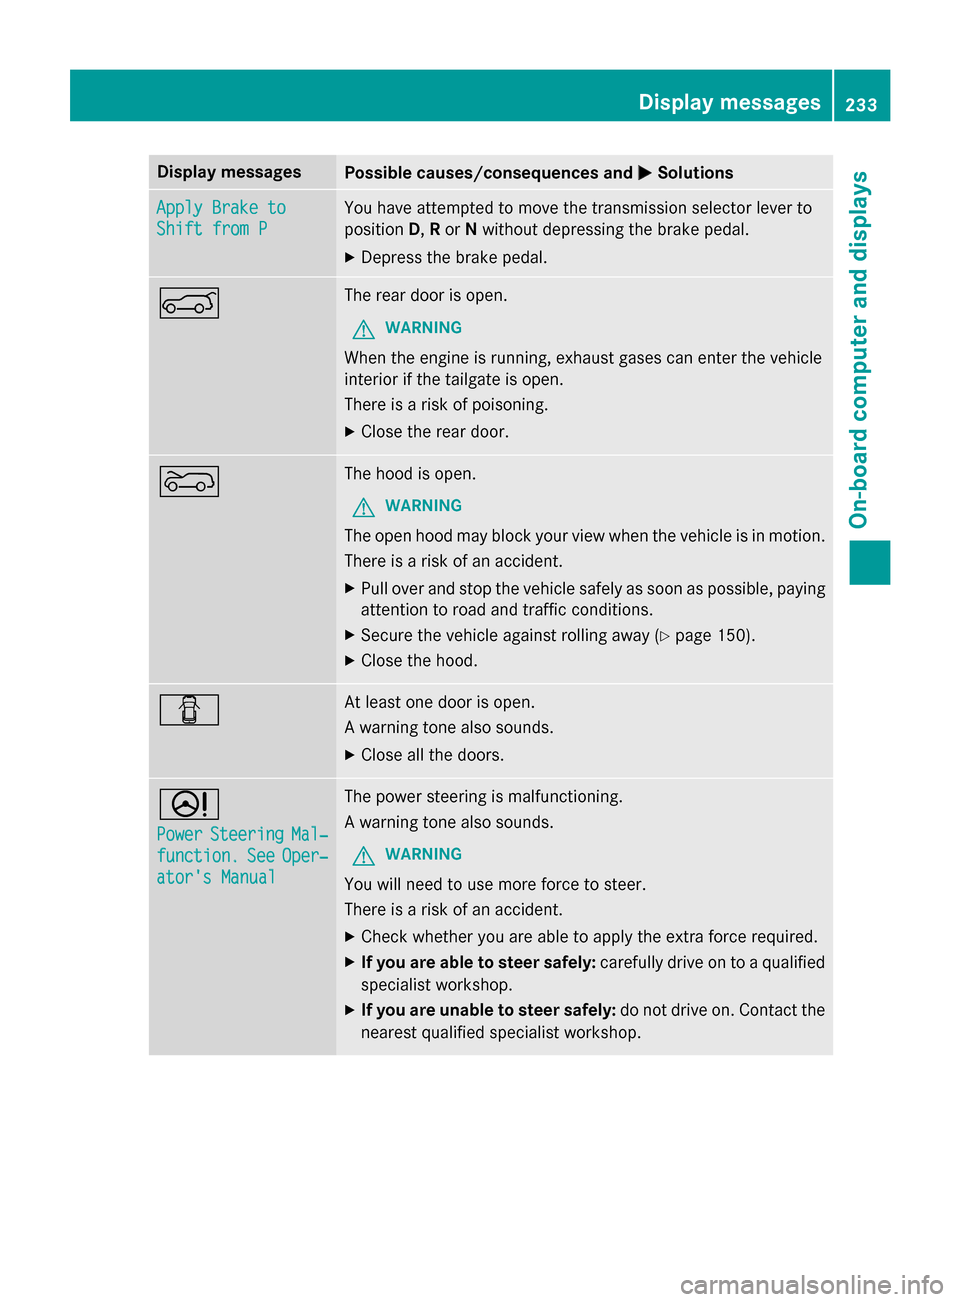
MSolutions Apply Brake to
Apply Brake to
Shift from P Shift from P You have attempted to move the transmission selector lever to
position
D,Ror Nwithout depressing the brake pedal.
X Depress the brake pedal. A The rear door is open.
G WARNING
When the engine is running, exhaust gases can enter the vehicle
interior if the tailgate is open.
There is a risk of poisoning.
X Close the rear door. ? The hood is open.
G WARNING
The open hood may block your view when the vehicle is in motion.
There is a risk of an accident.
X Pull over and stop the vehicle safely as soon as possible, paying
attention to road and traffic conditions.
X Secure the vehicle against rolling away (Y page 150).
X Close the hood. C At least one door is open.
A warning tone also sounds.
X Close all the doors. D
Power Power
Steering
Steering Mal‐
Mal‐
function.
function. See
SeeOper‐
Oper‐
ator's Manual
ator's Manual The power steering is malfunctioning.
A warning tone also sounds.
G WARNING
You will need to use more force to steer.
There is a risk of an accident. X Check whether you are able to apply the extra force required.
X If you are able to steer safely: carefully drive on to a qualified
specialist workshop.
X If you are unable to steer safely: do not drive on. Contact the
nearest qualified specialist workshop. Display
messages
233On-board computer and displays Z
Page 257 of 350
blinded by incident light. There is a risk of an
accident.
Always keep the mirror cover folded down
while driving. :
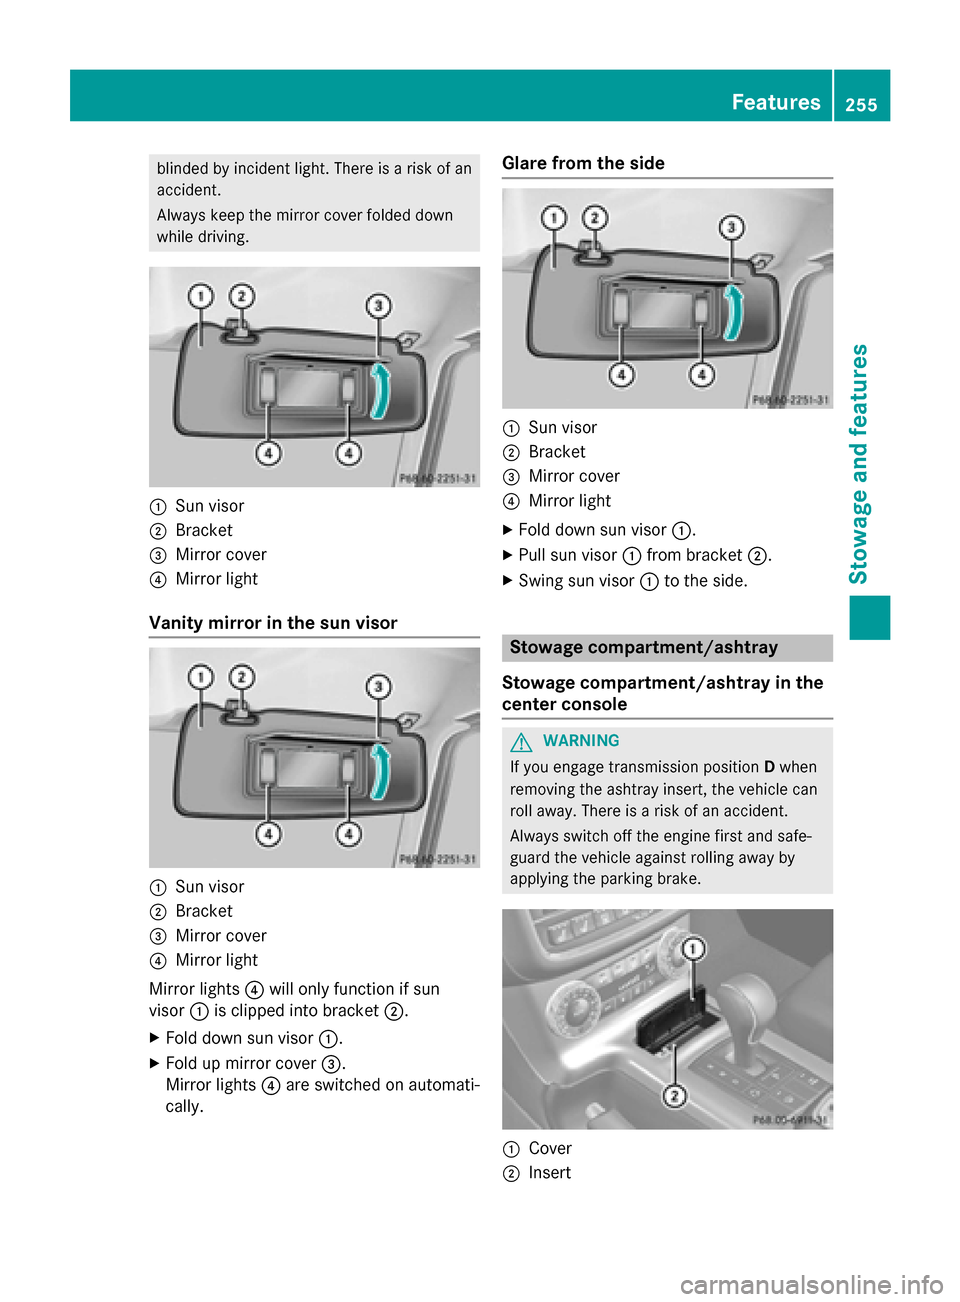
Sun visor
; Bracket
= Mirror cover
? Mirror light
Vanity mirror in the sun visor :
Sun visor
; Bracket
= Mirror cover
? Mirror light
Mirror lights ?will only function if sun
visor :is clipped into bracket ;.
X Fold down sun visor :.
X Fold up mirror cover =.
Mirror lights ?are switched on automati-
cally. Glare from the side
:
Sun visor
; Bracket
= Mirror cover
? Mirror light
X Fold down sun visor :.
X Pull sun visor :from bracket ;.
X Swing sun visor :to the side. Stowage compartment/ashtray
Stowage compartment/ashtray in the
center console G
WARNING
If you engage transmission position Dwhen
removing the ashtray insert, the vehicle can
roll away. There is a risk of an accident.
Always switch off the engine first and safe-
guard the vehicle against rolling away by
applying the parking brake. :
Cover
; Insert Features
255Stowage and features Z
Page 270 of 350
If indicator lamp
:goes out after approx-
imately 20 seconds and has not flashed rap-
idly:
X Release transmitter buttons ;,=or?
on the integrated remote control and trans-
mitter button Bon the garage door remote
control.
X Repeat the procedure for the other trans-
mitter buttons. When doing so, vary the
distance between the garage door's
remote control and the transmitter buttons
in the rear-view mirror.
i If the garage door system works with a
rolling code, you must synchronize the
remote control integrated in the rear-view
mirror with the garage door system
receiver after programming.
You will find further information in the
garage door opening system's operating
instructions, e.g. the sections on "Synchro- nizing the transmitter" or "Registering a
new transmitter". You can also call the hot-
line mentioned above.
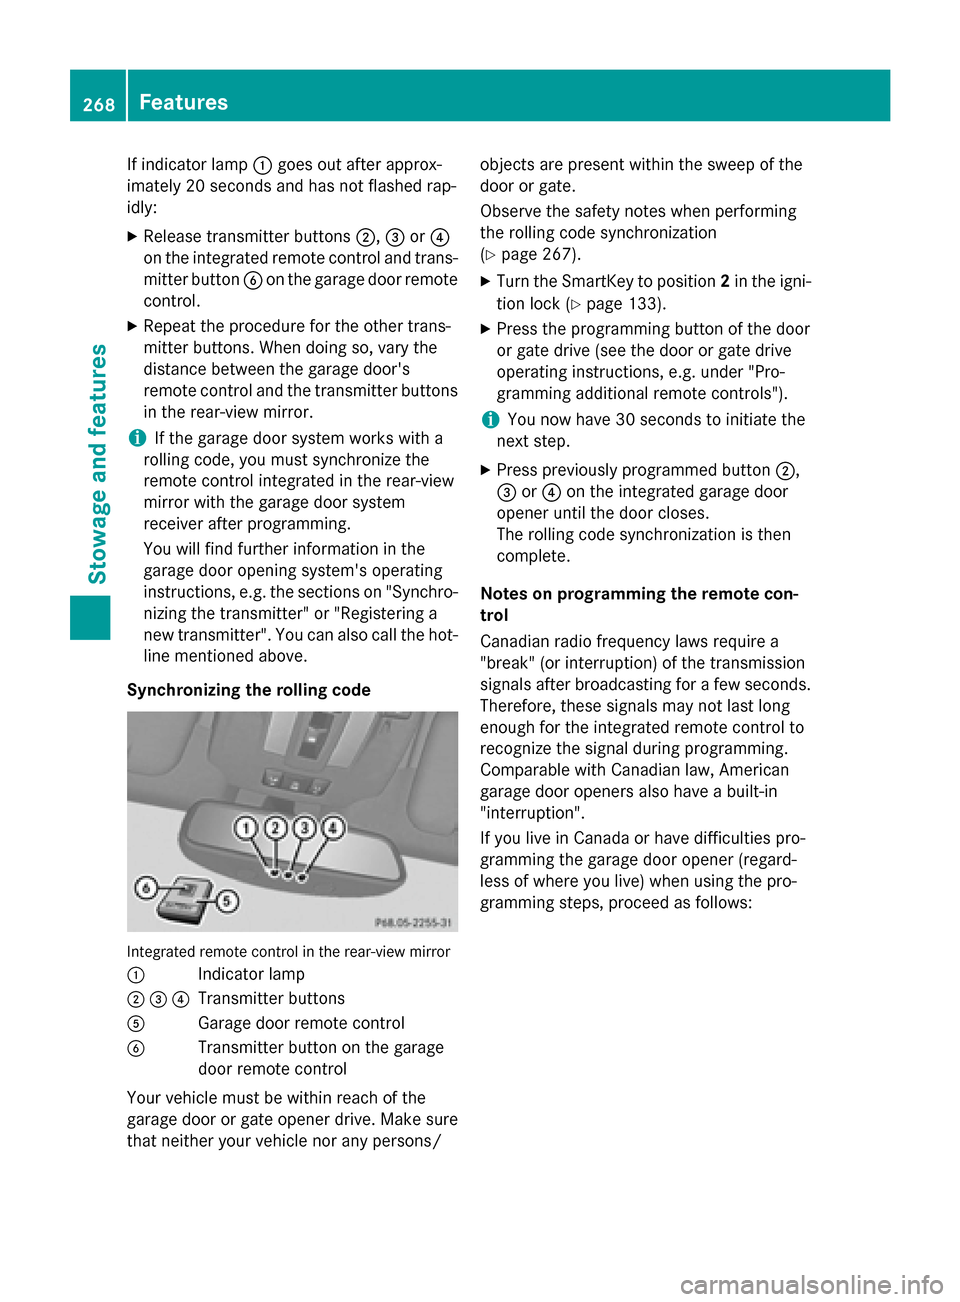
Synchronizing the rolling code Integrated remote control in the rear-view mirror
: Indicator lamp
;=? Transmitter buttons
A Garage door remote control
B Transmitter button on the garage
door remote control
Your vehicle must be within reach of the
garage door or gate opener drive. Make sure
that neither your vehicle nor any persons/ objects are present within the sweep of the
door or gate.
Observe the safety notes when performing
the rolling code synchronization
(Y page 267).
X Turn the SmartKey to position 2in the igni-
tion lock (Y page 133).
X Press the programming button of the door
or gate drive (see the door or gate drive
operating instructions, e.g. under "Pro-
gramming additional remote controls").
i You now have 30 seconds to initiate the
next step.
X Press previously programmed button ;,
= or? on the integrated garage door
opener until the door closes.
The rolling code synchronization is then
complete.
Notes on programming the remote con-
trol
Canadian radio frequency laws require a
"break" (or interruption) of the transmission
signals after broadcasting for a few seconds.
Therefore, these signals may not last long
enough for the integrated remote control to
recognize the signal during programming.
Comparable with Canadian law, American
garage door openers also have a built-in
"interruption".
If you live in Canada or have difficulties pro-
gramming the garage door opener (regard-
less of where you live) when using the pro-
gramming steps, proceed as follows: 268
FeaturesStowage and features
Page 272 of 350
been installed in the garage door remote
control.
R Align the antenna cable of the garage door
opener unit. This can improve signal trans- mission.
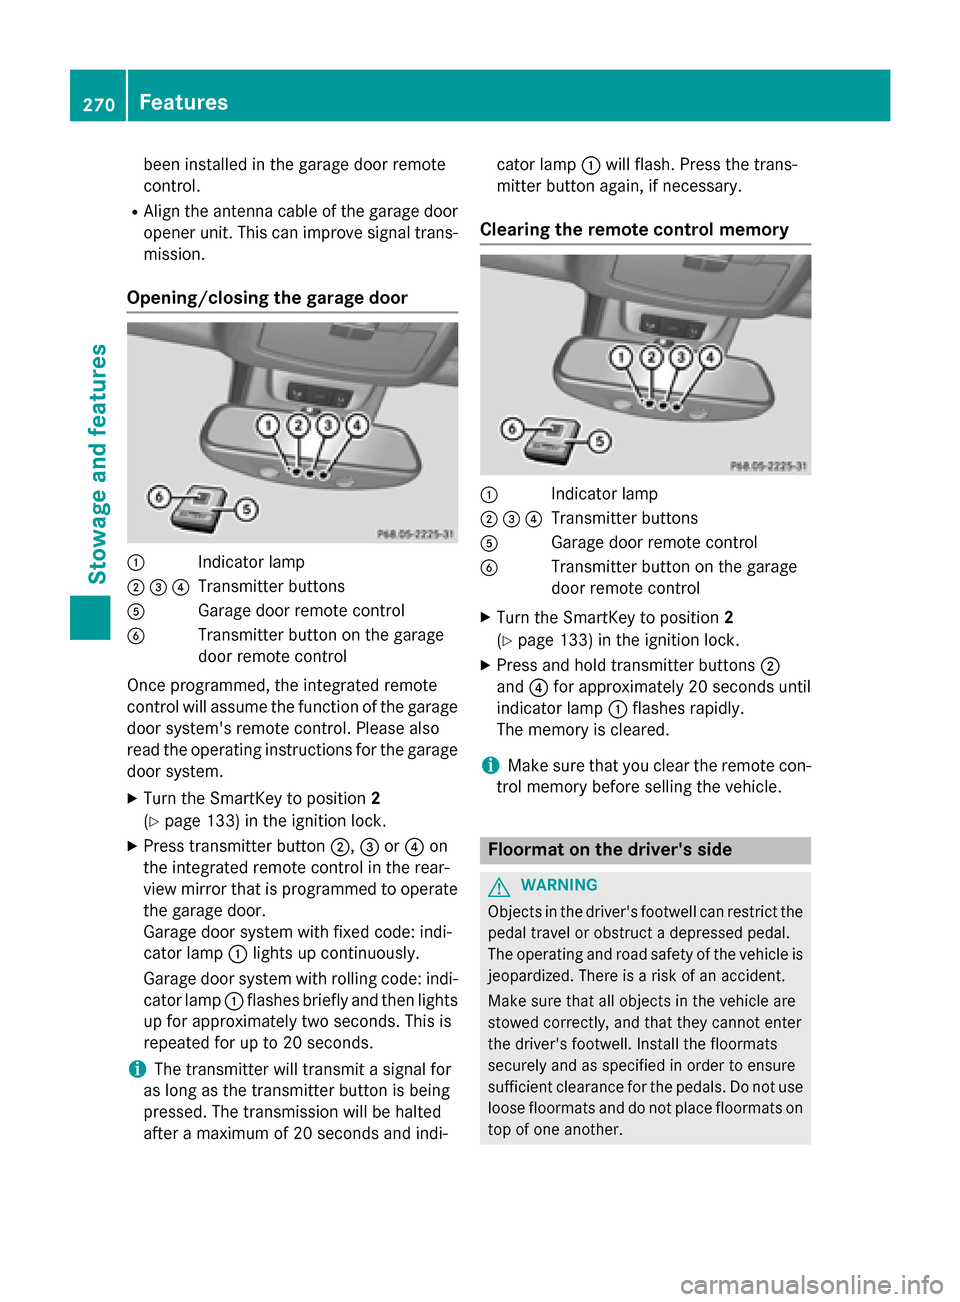
Opening/closing the garage door :
Indicator lamp
;=? Transmitter buttons
A Garage door remote control
B Transmitter button on the garage
door remote control
Once programmed, the integrated remote
control will assume the function of the garage door system's remote control. Please also
read the operating instructions for the garage
door system.
X Turn the SmartKey to position 2
(Y page 133) in the ignition lock.
X Press transmitter button ;,=or? on
the integrated remote control in the rear-
view mirror that is programmed to operate
the garage door.
Garage door system with fixed code: indi-
cator lamp :lights up continuously.
Garage door system with rolling code: indi-
cator lamp :flashes briefly and then lights
up for approximately two seconds. This is
repeated for up to 20 seconds.
i The transmitter will transmit a signal for
as long as the transmitter button is being
pressed. The transmission will be halted
after a maximum of 20 seconds and indi- cator lamp
:will flash. Press the trans-
mitter button again, if necessary.
Clearing the remote control memory :
Indicator lamp
;=? Transmitter buttons
A Garage door remote control
B Transmitter button on the garage
door remote control
X Turn the SmartKey to position 2
(Y page 133) in the ignition lock.
X Press and hold transmitter buttons ;
and ?for approximately 20 seconds until
indicator lamp :flashes rapidly.
The memory is cleared.
i Make sure that you clear the remote con-
trol memory before selling the vehicle. Floormat on the driver's side
G
WARNING
Objects in the driver's footwell can restrict the pedal travel or obstruct a depressed pedal.
The operating and road safety of the vehicle is
jeopardized. There is a risk of an accident.
Make sure that all objects in the vehicle are
stowed correctly, and that they cannot enter
the driver's footwell. Install the floormats
securely and as specified in order to ensure
sufficient clearance for the pedals. Do not use loose floormats and do not place floormats on
top of one another. 270
FeaturesStowage and features
Page 283 of 350
X
Visit a qualified specialist workshop as
soon as possible. Care
General notes
G
WARNING
Many cleaning products can be hazardous.
Some are poisonous, others are flammable.
Always follow the instructions on the particu- lar container. Always open your vehicle's
doors or windows when cleaning the inside.
Never use fluids or solvents that are not
designed for cleaning your vehicle.
Always lock away cleaning products and keep
them out of reach of children.
! For cleaning your vehicle, do not use any
of the following:
R dry, rough or hard cloths
R abrasive cleaning agents
R solvents
R cleaning agents containing solvents
Do not scrub.
Do not touch the surfaces or protective
films with hard objects, e.g. a ring or ice
scraper. You could otherwise scratch or
damage the surfaces and protective film.
! Do not park the vehicle for an extended
period straight after cleaning it, particularly after having cleaned the wheels with wheel
cleaner. Wheel cleaners could cause
increased corrosion of the brake discs and
brake pads/linings. For this reason, you
should drive for a few minutes after clean-
ing. Braking heats the brake discs and the
brake pads/linings, thus drying them. The
vehicle can then be parked. H
Environmental note
Dispose of empty packaging and cleaning
cloths in an environmentally responsible man-
ner. Regular care of your vehicle is a condition for
retaining the quality in the long term.
Use care products and cleaning agents rec-
ommended and approved by Mercedes-Benz. Exterior care
Automatic car wash G
WARNING
Braking efficiency is reduced after washing
the vehicle. There is a risk of an accident.
After the vehicle has been washed, brake
carefully while paying attention to the traffic
conditions until full braking power is restored.
! Never clean your vehicle in a Touchless
Automatic Car Wash as these use special
cleaning agents. These cleaning agents can damage the paintwork or plastic parts.
! Make sure that the automatic car wash is
suitable for the size of the vehicle. Fold in
the exterior mirrors before the vehicle is
washed. The exterior mirrors could other-
wise be damaged.
! Make sure that the automatic transmis-
sion is in position Nwhen washing your
vehicle in a tow-through car wash. The vehi-
cle could be damaged if the transmission is
in another position.
! Make sure that:
R the side windows and sliding sunroof are
closed completely.
R the blower for the ventilation/heating is
switched off (airflow control is turned to
position 0/theÃandÁ buttons
are switched off).
R the windshield wiper switch is at position
0.
The vehicle could otherwise be damaged.
You can wash the vehicle in an automatic car
wash from the very start.
If the vehicle is very dirty, pre-wash it before
cleaning it in an automatic car wash. Care
281Maintenance and care Z
Page 296 of 350
!
You should have all work involving the
battery carried out at a qualified specialist
workshop. In the exceptional case that it is
necessary for you to disconnect the battery yourself, make sure that:
R you switch off the engine and remove the
SmartKey. Check that all the indicator
lamps in the instrument cluster are off.
Otherwise, electronic components, such
as the alternator, may be damaged.
R you first remove the negative terminal
clamp and then the positive terminal
clamp. Never swap the terminal clamps.
Otherwise, the vehicle's electronic sys-
tem may be damaged.
R on vehicles with automatic transmission,
the transmission is locked in position P
after disconnecting the battery. The vehi-
cle is secured against rolling away. You
can then no longer move the vehicle.
The battery and the cover of the positive
terminal clamp must be installed securely
during operation. H
Environmental note Batteries contain dangerous
substances. It is against the
law to dispose of them with
the household rubbish. They
must be collected separately
and recycled to protect the
environment. Dispose of batteries in an
environmentally friendly
manner. Take discharged
batteries to a qualified spe-
cialist workshop or a special
collection point for used bat-
teries.
In order for the battery to achieve the maxi-
mum possible service life, it must always be
sufficiently charged.
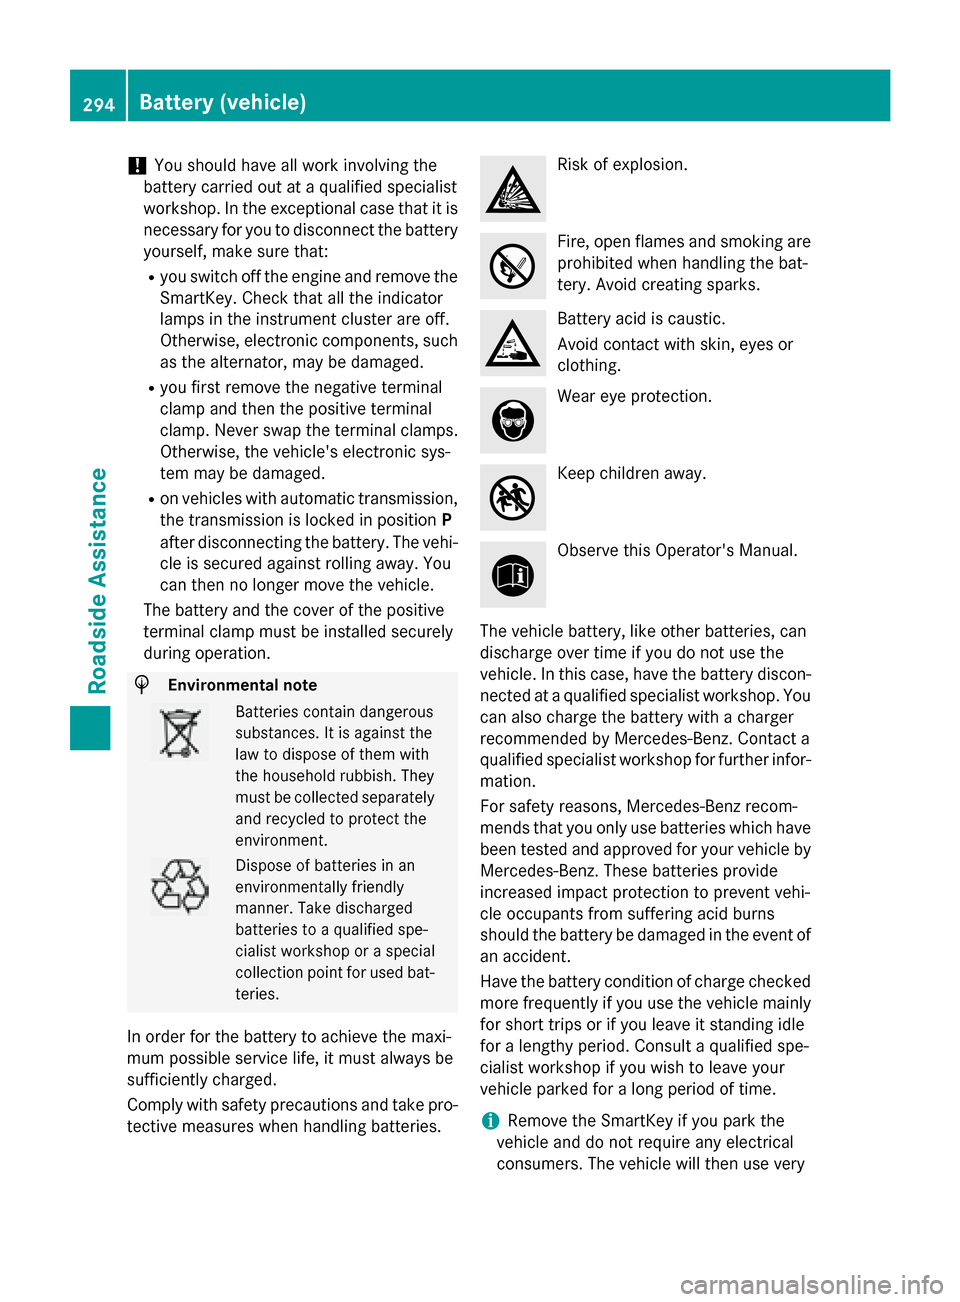
Comply with safety precautions and take pro-
tective measures when handling batteries. Risk of explosion.
Fire, open flames and smoking are
prohibited when handling the bat-
tery. Avoid creating sparks. Battery acid is caustic.
Avoid contact with skin, eyes or
clothing.
Wear eye protection.
Keep children away.
Observe this Operator's Manual.
The vehicle battery, like other batteries, can
discharge over time if you do not use the
vehicle. In this case, have the battery discon-
nected at a qualified specialist workshop. You can also charge the battery with a charger
recommended by Mercedes-Benz. Contact a
qualified specialist workshop for further infor-
mation.
For safety reasons, Mercedes-Benz recom-
mends that you only use batteries which have been tested and approved for your vehicle by
Mercedes-Benz. These batteries provide
increased impact protection to prevent vehi-
cle occupants from suffering acid burns
should the battery be damaged in the event of an accident.
Have the battery condition of charge checked
more frequently if you use the vehicle mainly
for short trips or if you leave it standing idle
for a lengthy period. Consult a qualified spe-
cialist workshop if you wish to leave your
vehicle parked for a long period of time.
i Remove the SmartKey if you park the
vehicle and do not require any electrical
consumers. The vehicle will then use very 294
Battery (vehicle)Roadside Assistance
Page 301 of 350
!
When towing, pull away slowly and
smoothly. If the tractive power is too high,
the vehicles could be damaged.
! Your vehicles is equipped with an auto-
matic transmission. Therefore, you must
not have the vehicle tow-started. The trans-
mission may otherwise be damaged.
i Details on the permissible gross vehicle
weight of your vehicle can be found on the
vehicle identification plate (Y page 336).
It is better to have the vehicle transported
than to have it towed away.
If the transfer case can be shifted into neutral N, you can tow the vehicle.
If the transfer case cannot be shifted into
neutral N, you can tow the vehicle with one
axle raised. Please bear the following in mind:
R remove the propeller shaft between the
transfer case and the rolling axle.
R turn the SmartKey to position 1in the igni-
tion lock (Y page 133).
The battery must be connected and charged.
Otherwise, you:
R cannot turn the SmartKey to position 2in
the ignition lock (Y page 133).
R cannot shift the automatic transmission to
position N.
i Disarm the automatic locking feature
before the vehicle is towed (Y page 75). You
could otherwise be locked out when push-
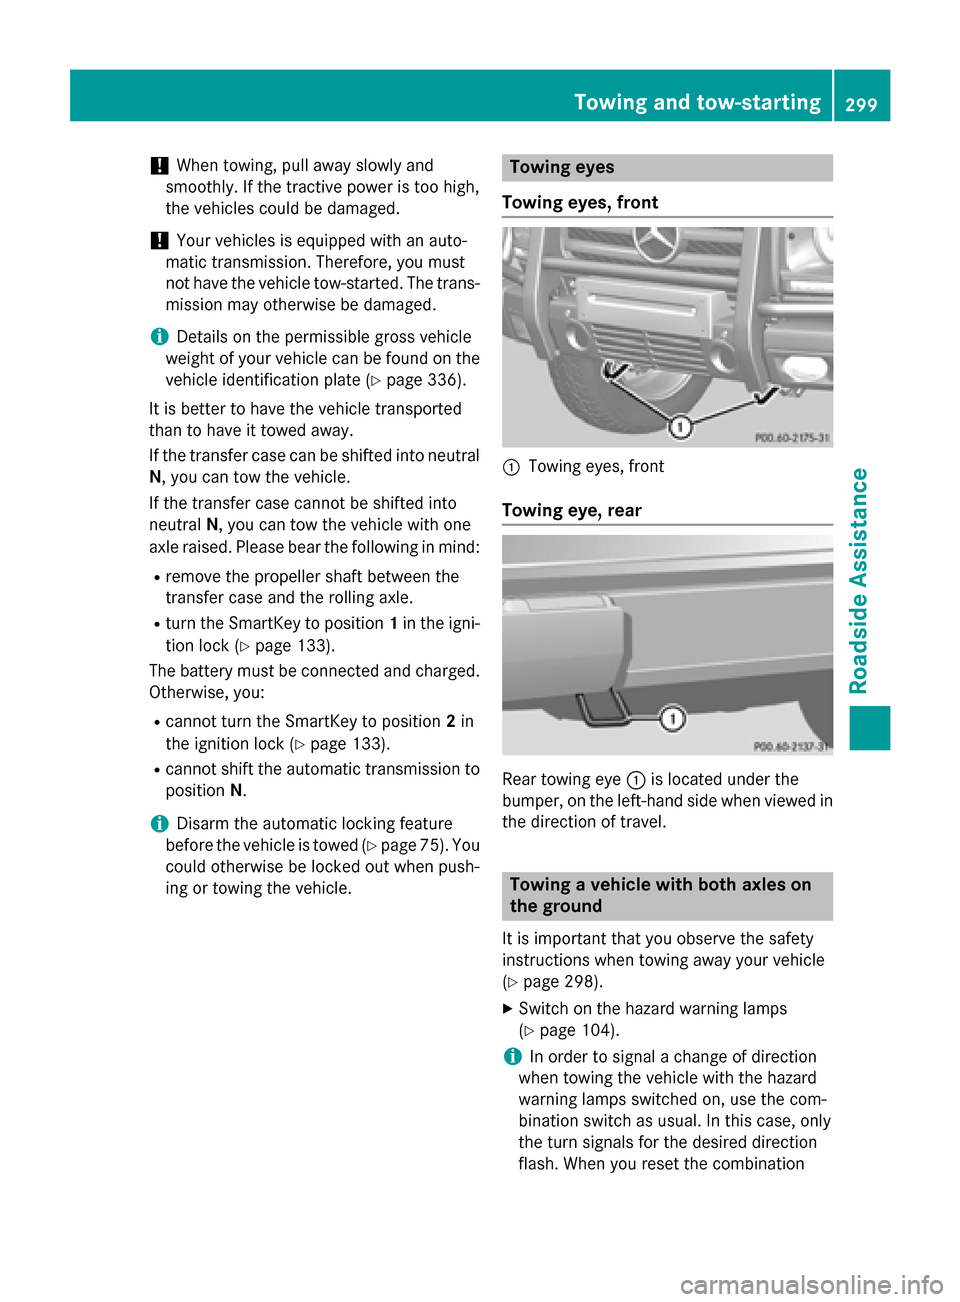
ing or towing the vehicle. Towing eyes
Towing eyes, front :
Towing eyes, front
Towing eye, rear Rear towing eye
:is located under the
bumper, on the left-hand side when viewed in
the direction of travel. Towing a vehicle with both axles on
the ground
It is important that you observe the safety
instructions when towing away your vehicle
(Y page 298).
X Switch on the hazard warning lamps
(Y page 104).
i In order to signal a change of direction
when towing the vehicle with the hazard
warning lamps switched on, use the com-
bination switch as usual. In this case, only
the turn signals for the desired direction
flash. When you reset the combination Towing and tow-starting
299Roadside Assistance Z
Page 302 of 350
switch, the hazard warning lamps start
flashing again.
X Turn the SmartKey to position 2in the igni-
tion lock (Y page 133).
X When the vehicle is stationary, depress the
brake pedal and keep it depressed.
X Shift the transfer case to neu-
tral(Y page 188).
X Shift the automatic transmission to posi-
tion N.
X Release the brake pedal.
X Release the parking brake (Y page 151).
i The transmission can only change gear if
the battery has sufficient charge.
If you cannot move the selector lever to N,
the propeller shafts to the driven axles
must be removed. Transporting the vehicle
! You may only secure the vehicle by the
wheels, not by parts of the vehicle such as
axle or steering components. Otherwise,
the vehicle could be damaged.
Use the towing eyes to pull the vehicle if it
needs to be transported on a trailer or trans-
porter (Y page 299).
X Apply the parking brake.
X Turn the SmartKey to position 2in the igni-
tion lock (Y page 133).
X Move the selector lever to N.
X Shift the transfer case to neutral
(Y page 188).
X Secure the towing cable to the towing eyes
(Y page 299).
X Make sure that the vehicle cannot roll
away.
X Release the parking brake.
X Load the vehicle onto the transporter. As soon as the vehicle has been loaded:
X Apply the parking brake.
X Shift the automatic transmission to posi-
tion P.
X Turn the SmartKey to position 0in the igni-
tion lock (Y page 133) and remove it.
X Secure the vehicle. Recovering a vehicle that has become
stuck
! When recovering a vehicle that has
become stuck, pull it as smoothly and
evenly as possible. Excessive tractive
power could damage the vehicles.
If the drive wheels have become stuck in
loose or muddy ground, pull the vehicle out
with extreme caution, especially so if the vehi-
cle is loaded.
Never attempt to recover a stuck vehicle with
a trailer attached.
Pull out the vehicle backwards, if possible
using the tracks it made when it became
stuck. Towing in the event of malfunctions
General notes !
If you are removing the propeller shaft,
use M10 nuts as spacers on the M8 bolts
and secure them with M8 nuts.
New self-locking nuts must be used when
the propeller shafts are refitted.
X Observe the safety notes as you do so
(Y page 298).
i Consult an authorized Mercedes-Benz
Center. 300
Towing and tow-startingRoadside Assistance
Page 303 of 350
Engine damage, gear damage or electri-
cal malfunctions X
Move the selector lever to posi-
tion N(Y page 139).
X Shift the transfer case to neu-
tral(Y page 188).
In the event of damage to the transfer
case Have the propeller shafts between the axles
and the transfer case removed.
In the event of damage to the front axle Have the propeller shaft between the rear
axle and the transfer case removed.
Have the vehicle towed with the front axle
raised.
In the event of damage to the rear axle Have the propeller shaft between the front
axle and the transfer case removed.
Have the vehicle towed with the rear axle
raised and with wheel rollers under the front
axle. Tow-starting (emergency engine
starting)
! Vehicles with automatic transmission
must not be tow-started. You could other-
wise damage the automatic transmission.
You can find information on "Jump-starting"
under (Y page 296). Fuses
Important safety notes
G
WARNING
If you manipulate or bridge a faulty fuse or if
you replace it with a fuse with a higher amper- age, the electric cables could be overloaded. This could result in a fire. There is a risk of an
accident and injury.
Always replace faulty fuses with the specified
new fuses having the correct amperage.
! Only use fuses that have been approved
for Mercedes-Benz vehicles and which
have the correct fuse rating for the system
concerned. Otherwise, components or sys-
tems could be damaged.
The fuses in your vehicle serve to close down faulty circuits. If a fuse blows, all the compo- nents on the circuit and their functions stop
operating.
Blown fuses must be replaced with fuses of
the same rating, which you can recognize by
the color and value. The fuse ratings are listed
in the fuse allocation chart.
i If a fuse has blown, contact a breakdown
service or an authorized Mercedes-Benz
Center.
If a newly inserted fuse also blows, have the
cause traced and rectified at a qualified spe-
cialist workshop, e.g. an authorized
Mercedes-Benz Center. Before changing a fuse
X Park the vehicle and apply the parking
brake.
X Switch off all electrical consumers.
X Remove the SmartKey from the ignition
lock.
All indicator lamps in the instrument cluster must be off.
The fuses are located in various fuse boxes:
R Main fuse box on the driver's side of the
dashboard
R Fuse box in the front-passenger footwell
R Fuse box in the transmission tunnel
R Fuse box in the battery case
R Fuse box in the cargo compartment Fuses
301Roadside Assistance Z