oil temperature MERCEDES-BENZ G-Class 2017 W463 Owner's Manual
[x] Cancel search | Manufacturer: MERCEDES-BENZ, Model Year: 2017, Model line: G-Class, Model: MERCEDES-BENZ G-Class 2017 W463Pages: 286, PDF Size: 4.91 MB
Page 11 of 286
Hydroplaning ................................. 125
Icy roadsurfaces........................... 126
Important safety notes .................. 103
Limited braking efficiency on sal-
ted roads ....................................... 124
Off-roadd riving .............................. 127
Off-roadf ording ............................. 126
Pulling away on slippery surface s..1 25
Snow chains .................................. 253
Subjecting brakes to aloa d. .......... 124
The first 1500 km .......................... 103
Tire ruts ......................................... 129
Towing atraile r.............................. 151
Traveling uphill ............................... 130
Wet roads urface ........................... 124
DVD audio
Operating (on-board computer) ..... 162
DVD video
Operating (on-board computer) ..... 162
see also Digital Operator's Man-
ual.................................................. 198
E
EASY-ENTRY feature
Activating/deactivating ................. 166
Function/note s................................ 80
EASY-EXIT feature
Function/note s................................ 80
Switching on/off. .......................... 166
EBD (electronicb rake forcedistri-
bution)
Displa ymessage ............................ 172
Function/note s................................ 61
EC Os tart/stopf unction
Deactivating/activating ................. 106
Generali nformation ....................... 106
Electronic Stability Program
see ESP
®(Electronic Stability Program)
Emergency
Automati cmeasures afte ranacci-
dent ................................................. 49
Emergencyr elease
Driver's doo r.................................... 68
Vehicl e............................................. 68
EmergencyT ensioningDevices
Activation ......................................... 46 Emission
scontrol
Service and warranty information .... 24
Engine
Check Engine warning lamp ........... 194
Displa ymessage ............................ 176
ECO start/stop function ................ 106
Engine number ............................... 276
Irregula rrunning ............................ 108
Jump-starting ................................. 243
Starting problems .......................... 108
Starting the engine with the
SmartKey ....................................... 105
Switching off .................................. 121
Tow-starting (vehicle )..................... 248
Engine electronics
Problem (malfunction) ................... 108
Engine oil
Adding ........................................... 228
Additives ........................................ 279
Checking the oill evel ..................... 227
Checking the oill evel using the
dipstick .......................................... 227
Checking the oill evel using the
on-board compute r........................ 227
Displa ymessage ............................ 178
Filling capacity ............................... 279
Generaln otes ................................ 278
Notesa boutoilgrade s................... 278
Notesono illevel/consumption .... 227
Temperature (on-board com-
puter) ............................................. 167
Entering an address
see also Digital Operator's Man-
u
a l. ................................................. 198
ESP
®(ElectronicS tability Pro-
gram)
AMG menu (on-board computer) ... 168
Characteristics ................................. 59
Deactivating/activating ................... 59
Displa ymessage ............................ 171
Function/note s................................ 58
Generaln otes .................................. 58
Important safety information ........... 59
Trailer stabilization ........................... 60
Warning lamp ................................. 191
ETS/4ETS (ElectronicT raction Sys-
tem) ...................................................... 59
Index9
Page 20 of 286
Connectingamobile phone( gen-
eral information). ...........................201
Dis play message ............................ 187
Menu( on-board computer) ............ 163
Number from th ephoneb ook ........ 163
Redialin g........................................ 164
Rejecting/ending acall. ................ 163
see also Digital Operator's Man-
ua l.................................................. 198
Switching between mobile
phones ........................................... 203
see Mobil ephone
Temperature
Coolant .......................................... 158
Coolant (on-board computer) ......... 167
Engine oil( on-board computer) ...... 167
Outsid etemperature ...................... 157
Setting (climate control ).................. 98
Tilt/slidin gsunroof
see Sliding sunroof
Time
see separate operating instructions
Timing (RACETIMER) ......................... 168
Tire pressure
Calling up (on-board computer) ..... 257
Checking manually ........................ 257
Displa ymessage ............................ 183
Maximu m....................................... 256
Notes. ............................................ 255
Recommended ............................... 254
Tire pressure monitor
Checking the tire pressure elec-
tronically ........................................ 258
Function/note s............................. 257
Generaln otes ................................ 257
Important safety notes .................. 257
Radi otypea pproval for the tire
pressure monitor ........................... 260
Restarting ...................................... 259
Warning lamp ................................. 197
Warning message .......................... 259
Tires
Aspect rati o(definition) ................. 269
Average weight of the vehicle
occupants (definition) .................... 267
Bar (definition) ............................... 267
Changing awheel .......................... 269
Characteristics .............................. 267 Checking ........................................ 251
Curb weight (definition) ................. 268
Definition of
terms ......................... 267
Di
rectio nofrotation ...................... 270
Displa ymessage ............................ 183
Distribution of the vehicl eoccu-
pants (definition) ............................ 269
DOT (Department of Transporta-
tion) (definition) ............................. 267
DOT, Tire Identification Number
(TIN) ............................................... 266
GAW R(GrossA xle Weight Rating)
(definition) ..................................... 268
GT W( GrossT railer Weight) (defi-
nition) ............................................ 268
GV W( GrossV ehicleWeight) (def-
inition) ........................................... 268
GVWR (GrossV ehicleWeight Rat-
ing )(de finition) .............................. 268
Important safety notes .................. 251
Increased vehicl eweigh tdue to
optionale quipment (definition) ...... 268
Information on driving .................... 251
Kilopascal( kPa)(de finition) ........... 268
Labeling (overview) ........................ 264
Loadb earing index (definition) ...... 269
Loadi ndex ..................................... 266
Loadi ndex (definition) ................... 268
Maximu mloadona tire (defini-
tion) ............................................... 268
Maximu mloaded vehicleweigh t
(definition) ..................................... 268
Maximu mpermissibl etire pres-
sure (definition) ............................. 268
Maximu mtire load ......................... 266
Maximu mtire load (definition) ....... 268
Optionale quipmentweight (defi-
nition) ............................................ 269
PSI (pounds pe rsquare inch )(de f-
inition) ........................................... 269
Replacing ....................................... 269
Service life ..................................... 252
Sidewal l(de finition) ....................... 269
Snow chains .................................. 253
Speed rating (definition) ................ 268
Storing ........................................... 270
Structure and characteristics
(definition) ..................................... 267
18Index
Page 106 of 286
Do not switch off the ignition whiledriving.
GWARNING
If the parkin gbrake hasn ot been fully
released when driving, the parkin gbrake can:
Roverheat and cause afire
Rlose its hol dfunction.
There is ariskoff irea nd an accident. Release
the parkin gbrake full ybefor ed rivin goff.
!Warm up the engine quickly. Do not us ethe
engine's full performance unti lithasreached
operating temperature.
Onlys hift the automatic transmission to the
desired drive positio nwhent he vehicl eissta-
tionary.
Where possible, avoi dspinning the drive
wheels when pulling away on slippery roads.
Yo uc ould otherwis edamag ethe drive train.
!Avoi dhighe ngine speeds when the engine
is cold. The engine's servic elifec ould other-
wise be significantl yshortened. Do not use
the engine's full performance unti lithas
reachedo perating temperature.
!Mercedes-AMG vehicles: at lowengine oil
temperatures belo w68‡ (+20† ),the max-
imu me ngine spee disrestricted in order to
protect the engine .Toprotect the engine and
maintain smooth engine operation, avoi ddriv-
ing at full throttle when the engine is cold.
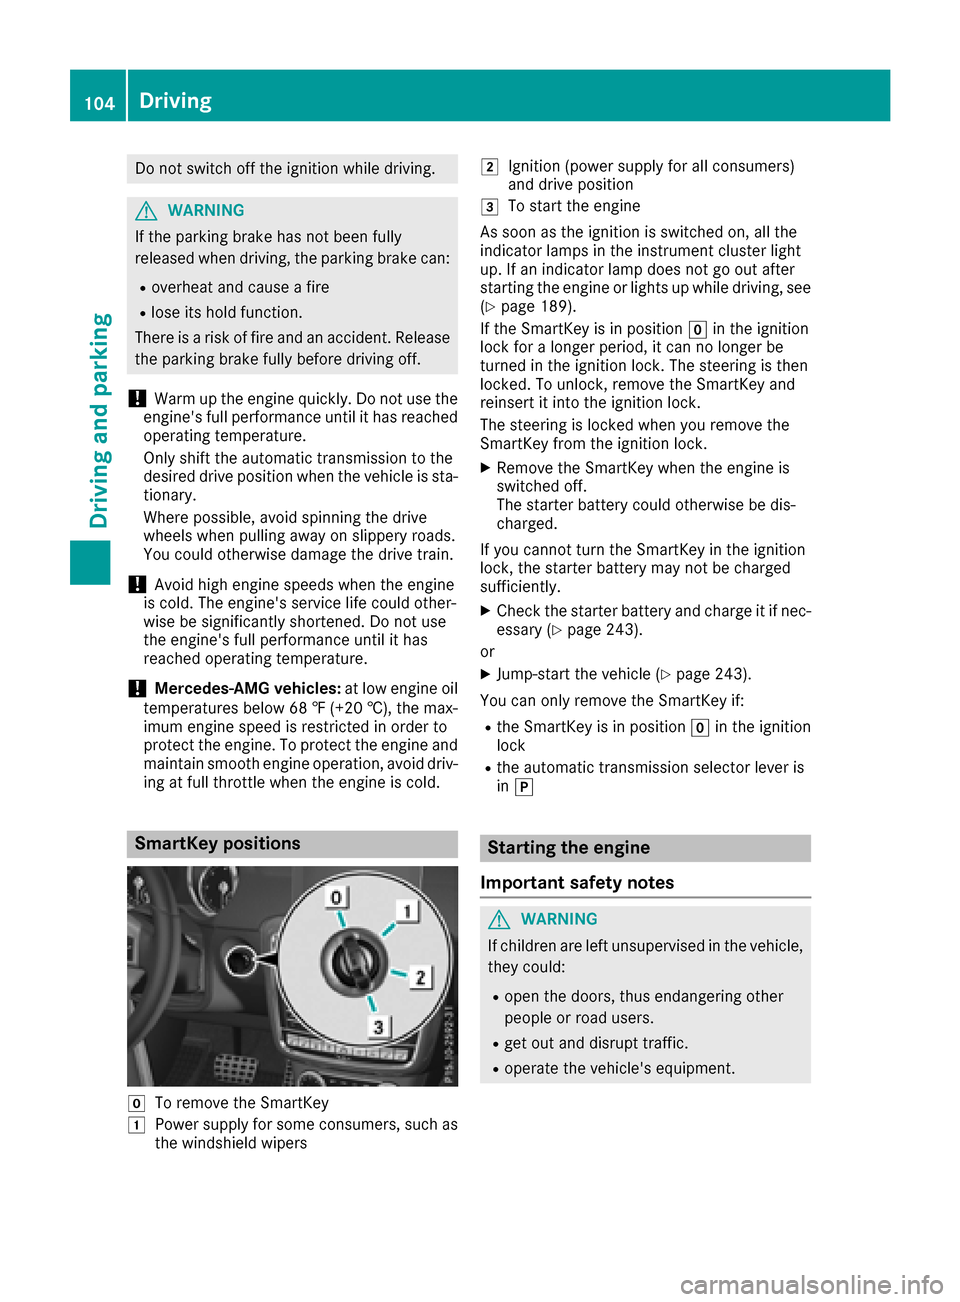
SmartKey positions
gTo remove the SmartKey
1Powe rsuppl yfor som econsumers ,suc ha s
the windshiel dwiper s
2Ignitio n(powe rsuppl yfor al lconsumers)
and drive position
3To start the engine
As soo nasthe ignition is switched on, al lthe
indicator lamps in the instrument cluster light
up .Ifani ndicator lamp does not go ou tafter
startin gthe engine or lights up whil edriving, see
(
Ypage 189).
If the SmartKeyisinp osition gin the ignition
lock for alon gerp eriod, it can no longe rbe
turned in the ignition lock. The steerin gisthen
locked .Tounlock, remove the SmartKeya nd
reinsert it into the ignition lock.
The steerin gislocked when yo uremove the
SmartKeyf romthe ignition lock.
XRemov ethe SmartKeyw hent he engine is
switched off.
The starter battery could otherwis ebedis-
charged.
If yo ucanno tturnt he SmartKeyint he ignition
lock, the starter battery mayn ot be charged
sufficiently.
XCheck the starter battery and charge it if nec-
essar y(Ypage 243).
or
XJump-star tthe vehicl e(Ypage 243).
Yo uc an onl yremove the SmartKeyi f:
Rthe SmartKeyisinpositiongin the ignition
lock
Rthe automatic transmission selecto rlev er is
in j
Starting the engine
Important safety notes
GWARNING
If children ar eleftu nsupervised in the vehicle,
theyc ould:
Ropen the doors ,thuse ndangering other
people or roa dusers.
Rgeto utand disrupt traffic.
Roperate the vehicle's equipment.
104Driving
Driving an dparking
Page 129 of 286
adapt your driving style and driveataspeedto
suit th eprevailingw eather conditions.
You shouldp ay special attention to road condi-
tions when temperatures are aroun dfreezing
point.
For morei nformationondriving with snow
chains ,see (
Ypage 253).
For morei nformationondriving with summer
tires, see (
Ypage 253).
Observ ethe note sint he"Winte roperation" sec-
tio n(
Ypage 252).
Off-road driving
Important safety notes
GWARNING
If you driv eonasteep incline at an angle or
tur nw hen driving on an incline ,the vehicle
coul dslip sideways,t ip and rollover. Thereisa
risk of an accident.
Always driv eonasteep incline in th eline of
fall (straigh tupordown)and do no tturnt he
vehicle.
GWARNING
Flammable material suchasl eaves, grassor
twig smay ignite if they com eintoc ontac twith
hot part softheexhaust system. Thereisar isk
of fire.
When driving off road or on unpaved roads,
check th evehicle's undersid eregularly. In
particular ,remove part sofplants or other
flammable materials whichh ave become
trapped. In th ecaseofd amage,c ontacta
qualified specialist workshop.
!Thereisar isk of damage to th evehicle if:
Rthev ehicle become sstuck ,e .g.onah igh
cur boranu npaved road
Ryou drivetoo fast ove ranobstacle ,e.g.a
curb, aspeedb ump or apothole in th eroad
Rah eavyo bject strikes th eunderbod yor
part soft hechassis
In situations like this, th ebody, th eunder-
body, chassis parts, wheels or tires coul dbe
damage dwithout th edamage beingv isible.
Components damage dinthisw ay can unex- pectedly fail or, in th
ecaseofana ccident, no
longer withstand th eloads they are designed
to.
If th eunderbod ypaneling is damaged, com-
bustible materials suchasl eaves, grassor
twig scan gather between th eunderbod yand
th eu nderbod ypaneling .Ifthese materials
com einc ontac twith hot part softheexhaust
system, they can catch fire.
In suchs ituations,have th evehicle checked
and repaired immediately at aqualified spe-
cialis tworkshop.Ifonc ontinuing your jour-
ney you notic ethatd riving safet
y is impaired,
pull ove rand stop th evehicle immediately,
paying attention to road and traffic condi-
tions .Insuchc ases, consult aqualified spe-
cialis tworkshop.
When driving off-road, substances suchass and,
mud and wate rorwaterm ixed with oil may get
int ot he brakes. This may lead to areductio nin
braking performanc eortotal brak efailur easa
result of increased wear. The braking charac-
teristics chang edependingont hematerial
enteringt hebrakes. Clean th ebrakes after driv-
ing off-road. If you detect areduced braking
effect or grindingn oises,h ave th ebrak esystem
checked in aqualified specialist workshop as
soon as possible. Adap tyour driving style to the
differentb raking characteristics.
Drivin goff-road increases th elikelihoodofd am-
age to th evehicle ,which, in turn, can lead to
failur eoft hemechanical assembly or systems.
Adap tyour driving style to suit th eterra in con-
ditions. Drive carefully. Hav edamage to the
vehicle rectified immediately at aqualified spe-
cialis tworkshop.
Do no tswitch to transmission position Nwhen
driving off-road. If you tr ytob rak ethe vehicle
usingt heservic ebrake, you coul dlose control
of th evehicle .Ifthegradientist oosteep for your
vehicle ,driveb ack down in reverseg ear.
General notes
HEnvironmental note
Protection of th eenvironmentisofp rimary
importance. Treat nature with respect.
Observ eall prohibiting signs.
Read this sectio ncarefully before driving your
vehicle off-road. Practic ebydriving ove rmore
gentle off-road terrain first.
Driving tips127
Driving and parking
Z
Page 169 of 286
XPress the=or; button on the steering
wheel to select the Sett.menu.
XPress the:or9 button to select the
Conveniencesubmenu.
XPress ato confirm.
XPress the :or9 button to select the
Easy Entry/Exitfunction.
If the EasyEntry/Exitfunction is activated,
the vehicle steerin gwheel appears in red in
the multifunction display.
XPress the abutton to save the setting.
Further information on the EASY-ENTRY/EXIT
feature (
Ypage 80).
Switching the fold-in mirrors when lock-
ing feature on/off
When you activat ethe Auto.MirrorFoldingfunction, the exterior mirrors are folded in when
the vehicle is locked. If you unlock the vehicle
and then open adoor, the exterior mirrors fold
out again.
XPress the =or; button on the steering
wheel to select the Sett.menu.
XPress the:or9 button to select the
Conveniencesubmenu.
XPress ato confirm.
XPress the :or9 button to select the
Auto. Mirror Foldingfunction.
If the Auto. Mirror Foldingfunction is
activated, the vehicle's exterior mirror is dis-
played in red in the multifunction display.
XPress the abutton to save the setting.
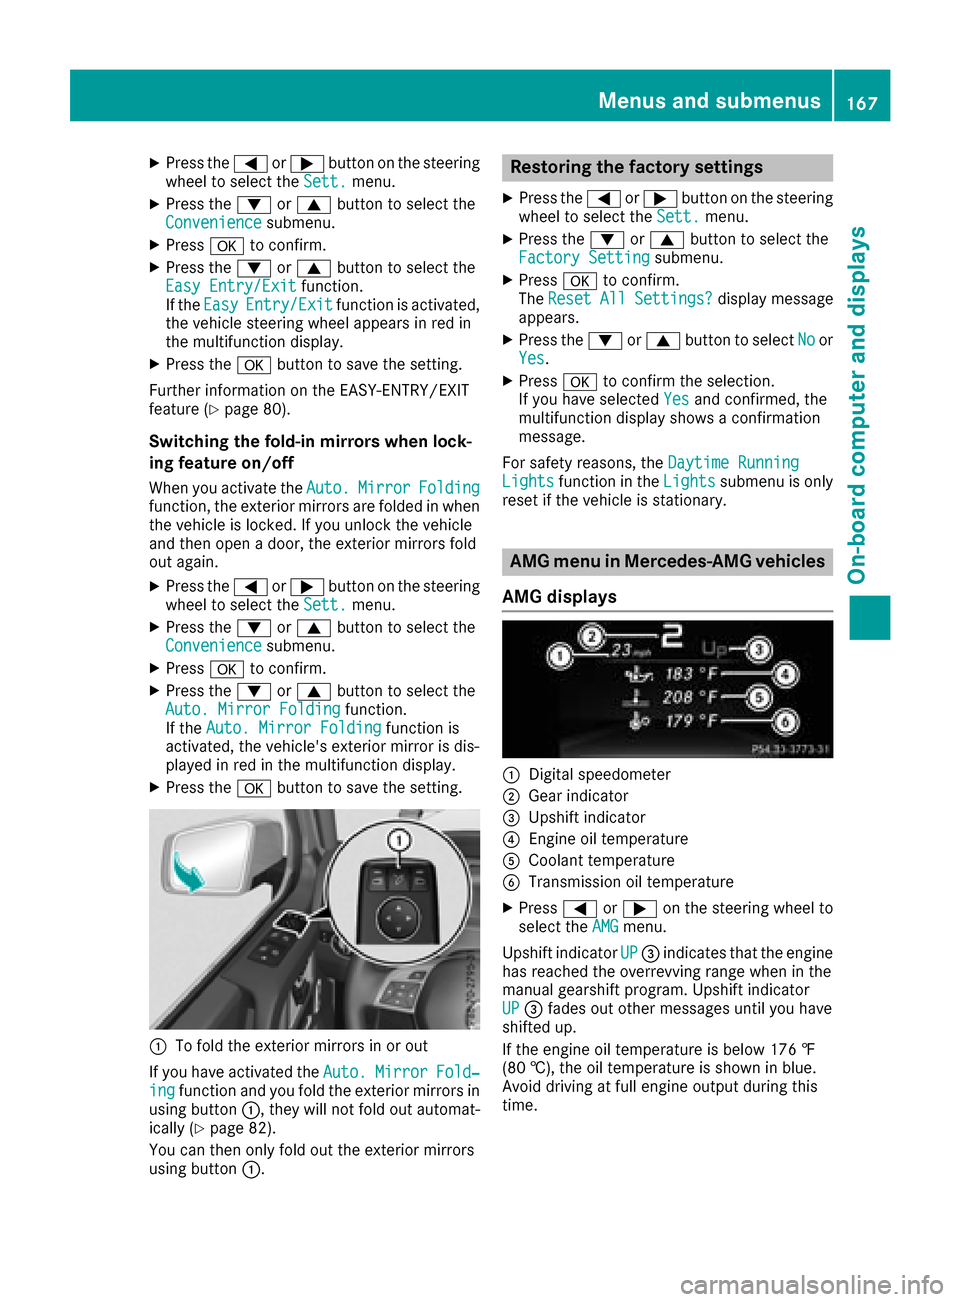
:To fold the exterior mirrors in or out
If you have activated the Auto.
MirrorFold‐ingfunction and you fold the exterior mirrors in
using button :,they will not fold out automat-
ically (
Ypage 82).
You can then only fold out the exterior mirrors
using button :.
Restoring the factor ysettings
XPress the =or; button on the steering
wheel to select the Sett.menu.
XPress the:or9 button to select the
Factory Settingsubmenu.
XPress ato confirm.
The ResetAllSettings?display message
appears.
XPress the :or9 button to select Noor
Yes.
XPress ato confirm the selection.
If you have selected Yesand confirmed, the
multifunction display shows aconfirmation
message.
For safety reasons, the Daytime Running
Lightsfunction in theLightssubmenu is only
reset if the vehicle is stationary.
AMG menu in Mercedes-AMG vehicles
AMG displays
:Digital speedometer
;Gear indicator
=Upshift indicator
?Engine oil temperature
ACoolant temperature
BTransmission oil temperature
XPress =or; on the steerin gwheel to
select the AMGmenu.
Upshift indicator UP
=indicates that the engine
has reached the overrevving range when in the
manual gearshift program. Upshift indicator
UP
= fades out other messages until you have
shifted up.
If the engine oil temperature is below 176 ‡
(80 †), the oil temperature is shown in blue.
Avoid driving at full engine output during this
time.
Menus and submenus167
On-board computer and displays
Z
Page 229 of 286
GWARNING
Opening the hood when the engine is over-
heated or when there is afire in the engine
compartment coul dexpose you to hot gases
or other service products. There is arisk of
injury.
Let an overheated engine cool downb efore
opening the hood. If there is afire in the
engine compartment, keep the hood closed
and contact the fire department.
Notes on the oil level
Depending on you rdriving style ,the vehicle
consumes up to 0.9 US qt (0.8 liters )ofoil per
600 mile s(1000 km). The oil consumption may
be higher than this whe nthe vehicle is new or if
you frequently drive at high engine speeds.
Depending on the engine, the oil dipstick may be
in ad ifferent location.
When checking the oil level:
Rpark the vehicle on alevels urface
Rthe engine should be switched off for approx-
imately five minutes if the engine is at normal
operating temperature
Rif the engine is not at normal operating tem-
perature, e.g. if the engine wa sonly started
briefly,w aita pproximately 30 minutes before
carrying out the measurement
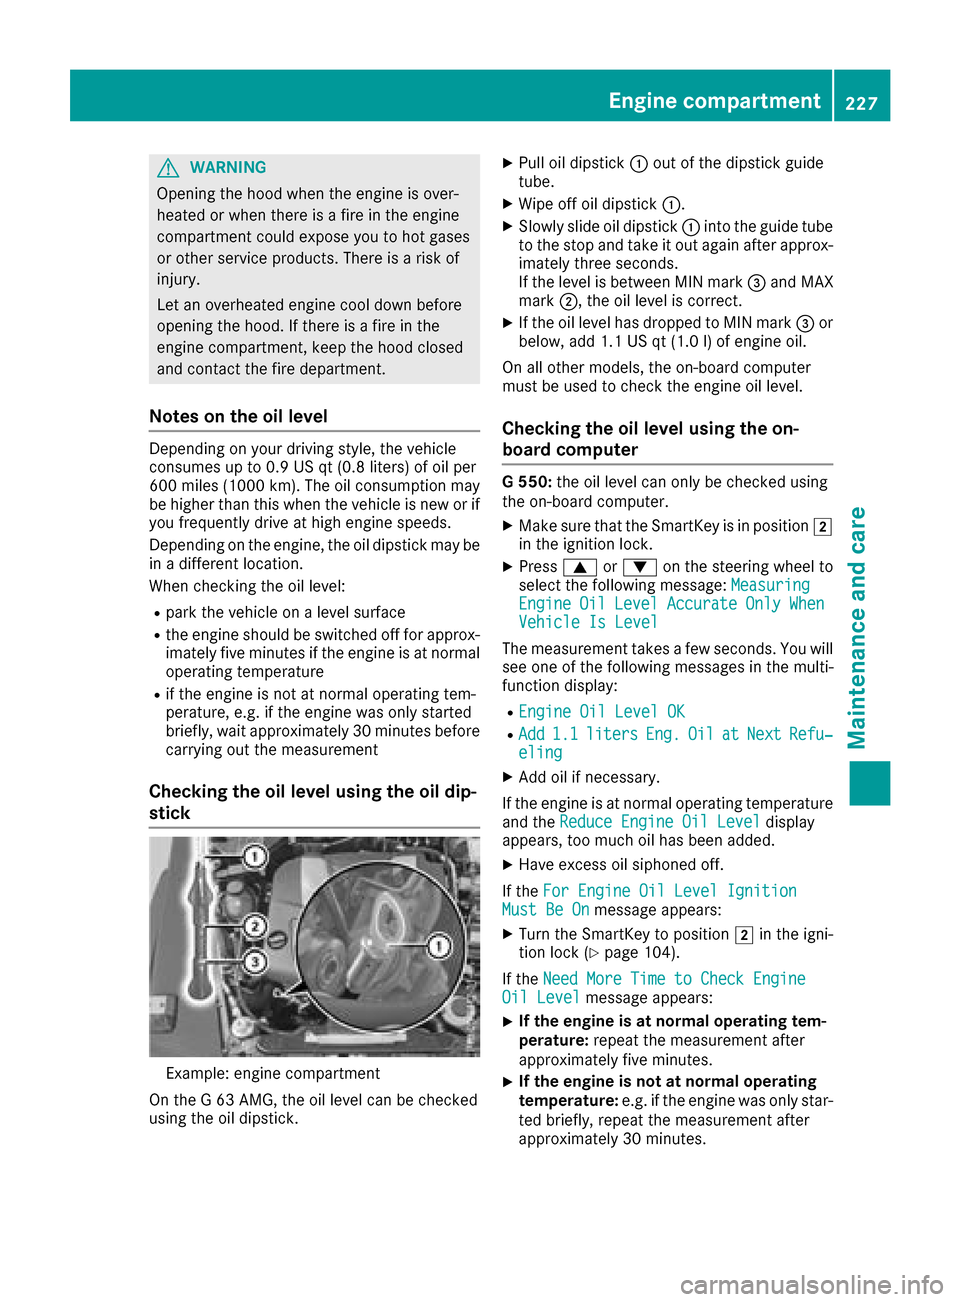
Checking the oil level usingt he oil dip-
stick
Example: engine compartment
On the G63AMG, the oil levelc an be checked
using the oil dipstick.
XPul loil dipstick :out of the dipstick guide
tube.
XWipeo ff oil dipstick :.
XSlowly slide oil dipstick :into the guide tube
to the stop and take it out again after approx-
imately three seconds.
If the levelisb etween MIN mark =and MAX
mark ;,the oil levelisc orrect.
XIf the oil levelh as dropped to MIN mark =or
below, add 1.1 US qt (1.0 l)of engine oil.
On all other models, the on-board computer
must be used to check the engine oil level.
Checking the oil level using the on-
board computer
G5 50: the oil level can only be checked using
the on-board computer.
XMake sure that the SmartKey is in position 2
in the ignition lock.
XPress 9or: on the steering wheel to
select the following message: Measuring
EngineOilLevelAccurateOnlyWhenVehicle Is Level
The measurement takesafew seconds. You will
see one of the following messages in the multi-
function display:
REngine Oil Level OK
RAdd1.1litersEng.OilatNextRefu‐eling
XAdd oil if necessary.
If the engine is at normal operating temperature and the Reduce Engine Oil Level
display
appears, too much oil has been added.
XHave excess oil siphoned off.
If the For Engine Oil Level Ignition
Must Be Onmessage appears:
XTurn the SmartKey to position 2in the igni-
tion lock (Ypage 104).
If the Need More Time to Check Engine
Oil Levelmessage appears:
XIf the engine is at norma loperating tem-
perature: repeat the measurement after
approximately five minutes.
XIf the engine is not at norma loperating
temperature: e.g. if the engine was only star-
ted briefly, repeat the measurement after
approximately 30 minutes.
Engine compartment227
Maintenance and care
Z
Page 230 of 286
If theEngine Oil Level Not Measurablewith Running Enginemessage appears:
XSwitch off the engine.
XIf the engine is at normal operating tem-
perature: waitabou tfive minutes before car-
rying out the measurement.
XIf the engine is not at normal operating
temperature: e.g. if the engine was only star-
ted briefly, wai tapproximately 30 minutes
before carrying out the measurement.
If you wish to cancel the measurement, press
the 9 or: button on the multifunction
steering wheel.
Adding engine oil
!Use only engine oils and oil filters that are
approved for vehiclesw ithaservice system. A
list of the engine oils and oil filters that have
been tested and approved in accordance with
Mercedes-Benz Specifications for Service
Products is available at any authorized
Mercedes-Benz Center.
The following cause engine failure or damage
to the exhaust system:
RUse of engine oils and oil filters that have
not been expressly approved for the service
system
RReplacement of engine oil and oil filter after
the replacement interval specifiedbyt he
service system has expired
RUse of engine oil additives
!Do not add too much oil. If the oil level is
above the "max" mark on the dipstick, too
much oil has been added. This can leadt o
damage to the engine or the catalytic con-
verter. Have excess oil siphoned off.
HEnvironmental note
When adding oil, take care not to spilla ny. If
oil enters the soil or waterways ,itisharmful to
the environment.
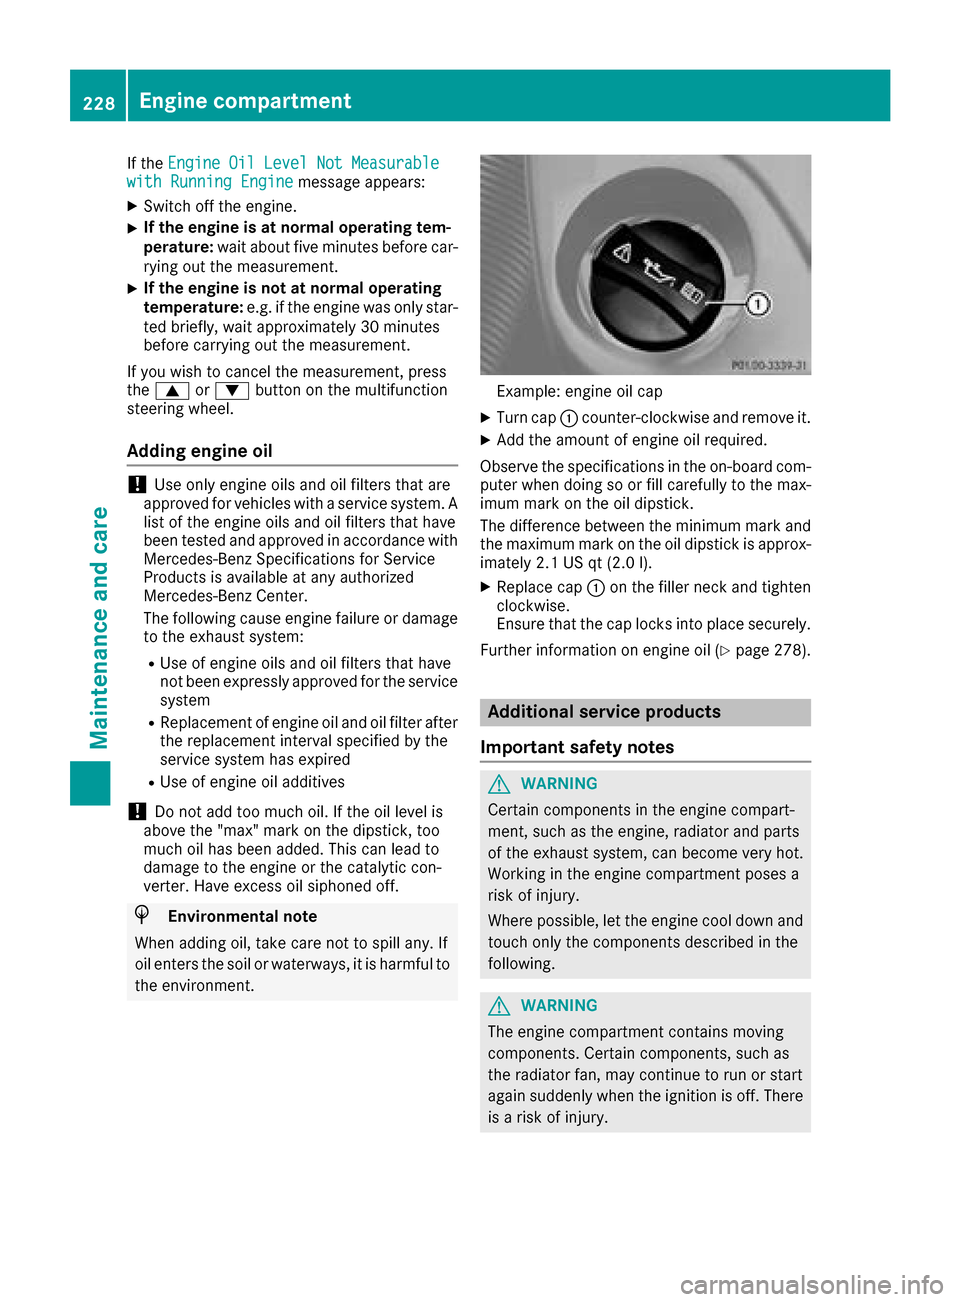
Example: engine oil cap
XTurn cap :counter-clockwise and remove it.
XAdd the amount of engine oil required.
Observe the specifications in the on-board com-
puter when doing so or fill carefully to the max-
imum mark on the oil dipstick.
The difference betweent he minimum mark and
the maximum mark on the oil dipstick is approx-
imatel y2.1 US qt (2.0 l).
XReplace cap :on the fille rneck and tighten
clockwise.
Ensur ethat the cap locks into place securely.
Further information on engine oil(
Ypage 278).
Additional servic eproducts
Important safety notes
GWARNING
Certai ncomponents in the engine compart-
ment, such as the engine, radiator and parts
of the exhaus tsystem, can become very hot.
Working in the engine compartment poses a
ris kofi njury.
Where possible ,let the engine cool dow nand
touch only the components described in the
following.
GWARNING
The engine compartment contains moving
components .Certai nc omponents ,suc ha s
the radiator fan, may continu etorun or start
agai nsudde nlyw hent he ignition is off. There
is ar iskofi njury.
228Engine compartment
Maintenancea nd care
Page 281 of 286
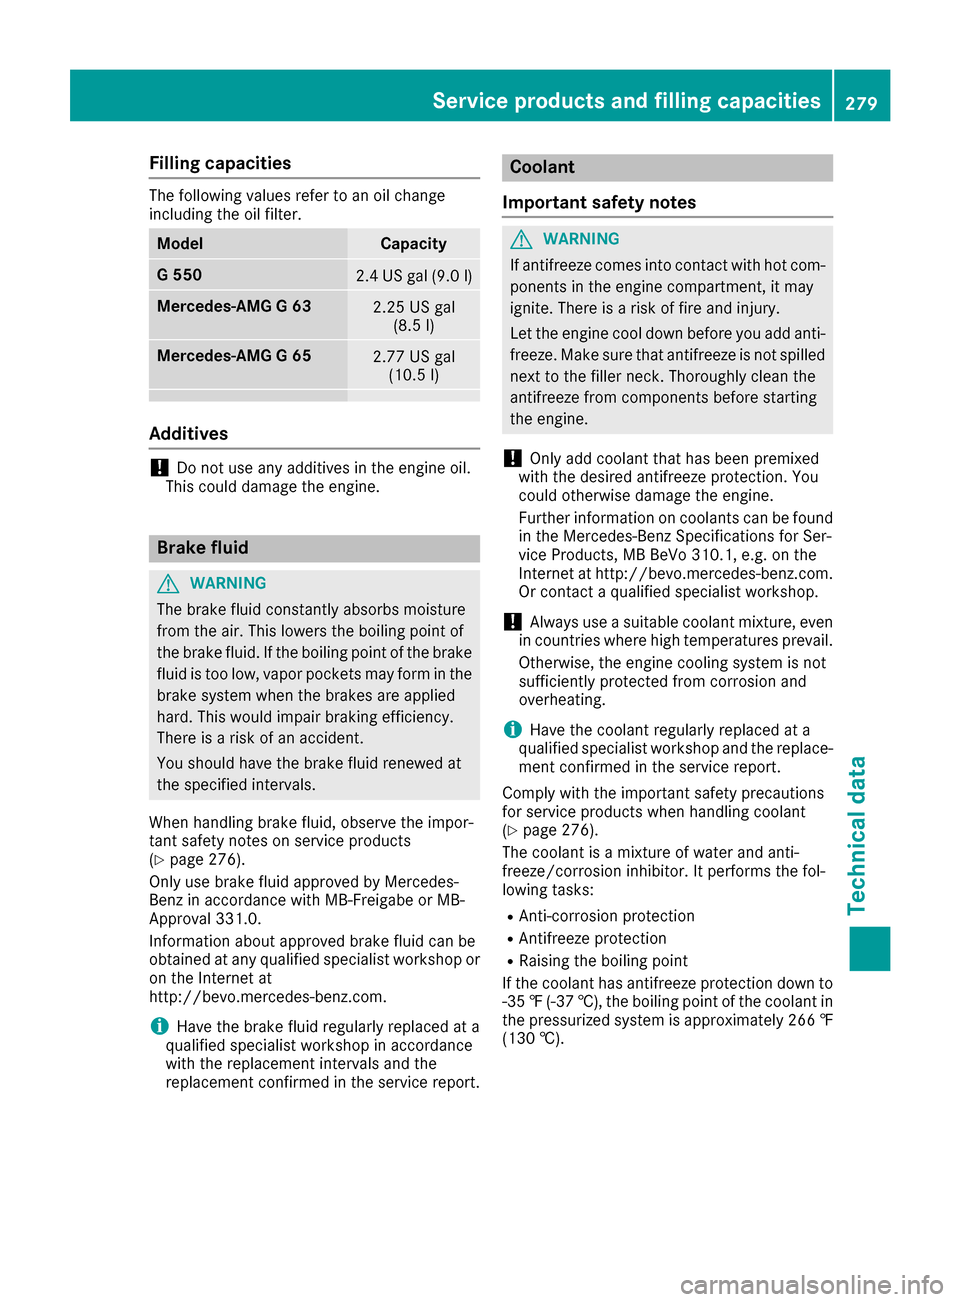
Filling capacities
The followingvalue srefer to an oil chang e
includin gthe oil filter.
ModelCapacit y
G5502.4USg al(9.0 l)
Mercedes-AMG G632.25 US gal
(8.5 l)
Mercedes-AMG G652.77 US gal
(10.5 l)
Additives
!Do not us eany additive sinthe engine oil.
Thisc ould damag ethe engine.
Brake fluid
GWARNING
The brake fluid constantly absorbsm oisture
from the air. Thisl owersthe boiling point of
the brake fluid .Ifthe boiling point of the brake
fluid is too low, vapor pockets may form in the
brake system when the brakes are applied
hard. Thisw ouldimpai rbraking efficiency.
There is ariskofana ccident.
Yo us houl dhavet he brake fluid renewe dat
the specified intervals.
Whe nhandling brake fluid ,observe the impor-
tant safety notes on service products
(
Ypage 276).
Only us ebrake fluid approved by Mercedes-
Benz in accordance with MB-Freigab eorMB-
Approval3 31.0.
Information abouta pproved brake fluid can be
obtaine datany qualified specialist workshopo r
on the Interneta t
http://bevo.mercedes-benz.co m.
iHave the brake fluid regularly replaced at a
qualified specialist workshop in accordance
with the replacement intervals and the
replacement confirmed in the service report.
Coolant
Importan tsafety notes
GWARNING
If antifreeze comes into contact with hot com- ponents in the engine compartment, it may
ignite. There is arisk of fire and injury.
Let the engine cool downb efore youadd anti-
freeze.M ake surethat antifreeze is not spilled
next to the filler neck. Thoroughly clea nthe
antifreeze from components before starting
the engine.
!Only ad dcoolant that has beenp remixed
with the desire dantifreeze protection. You
coul dotherwise damag ethe engine.
Furthe rinformatio noncoolants can be found
in the Mercedes-Benz Specifications for Ser-
vice Products, MB BeVo 310.1, e.g. on the
Internet at http://bevo.mercedes-benz.com.
Or contact aqualifie dspecialist workshop.
!Always use asuitabl ecoolant mixture, even
in countries where hig htemperatures prevail.
Otherwise ,the engine cooling system is not
sufficiently protected from corrosion and
overheating.
iHave the coolant regularly replaced at a
qualified specialist workshop and the replace-
ment confirmed in the service report.
Comply with the important safety precautions
for service products whe nhandling coolant
(
Ypage 276).
The coolant is amixture of water and anti-
freeze/corrosion inhibitor. It performs the fol-
lowing tasks:
RAnti-corrosion protection
RAntifreeze protection
RRaising the boiling point
If the coolant has antifreeze protection downt o
-35 ‡(-37 †), th eboilin gpoint of th ecoolan tin
th ep ressurize dsyste misa pproximately 26 6‡
(130 †).
Service pr oduct sand filling capacities279
Technical data
Z
Page 282 of 286
The antifreeze/corrosion inhibitor concentra-
tion in the engine cooling system should:
Rbe at least 50%. This will protectthe engine
cooling system against freezin gdown to
approximately -35 ‡(-37 †).
Rnot exceed 55% (antifreez eprotection down
to -49 ‡[-45 †]). Otherwise, heat will not be
dissipated as effectively.
Mercedes-Benz recommends an antifreeze/
corrosion inhibitor in accordanc ewith MB Spec-
ifications for ServiceP roducts 310.1.
iWhen the vehicle is first delivered, it is filled
with acoolant mixture that ensures adequate
antifreeze and anti-corrosion protection.
iThe coolant is checked at specified intervals
at aq ualified specialist workshop.
The engine cooling system is filled with coolant
at the factor ywhich contains antifreeze/corro-
sion inhibitor that ensures protection down to
approximately -35 ‡(-37 †).
Capacity
Missing values were not availableatt ime of
going to print.
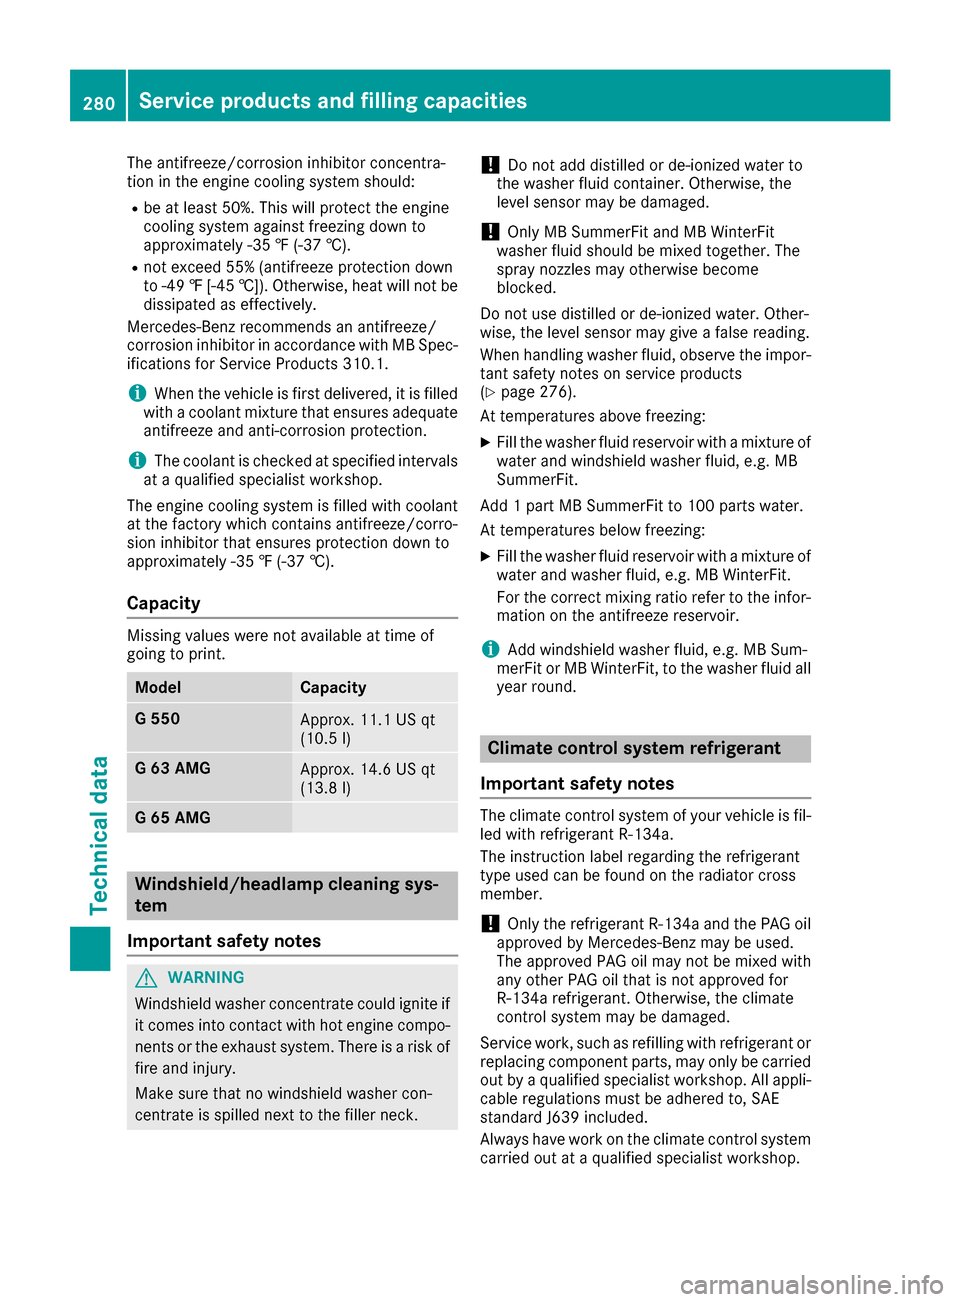
ModelCapacity
G5 50Approx.1 1.1 US qt
(10.5 l)
G63A MGApprox.1 4.6 US qt
(13.8 l)
G65A MG
Windshield/headlamp cleaning sys-
tem
Important safety notes
GWARNING
Windshield washer concentrate could ignite if it comes into contact with hot engine compo-
nentsort he exhaust system. There is arisk of
fire and injury.
Make sure that no windshield washer con-
centrate is spilled next to the filler neck.
!Do not add distilled or de-ionized water to
the washer fluid container. Otherwise, the
level sensor may be damaged.
!Only MB SummerFit and MB WinterFit
washer fluid should be mixed together. The
spray nozzles may otherwise become
blocked.
Do not use distilled or de-ionized water. Other-
wise, the level sensor may give afalse reading.
When handling washer fluid, observe the impor-
tant safety notes on service products
(
Ypage 276).
At temperatures above freezing:
XFill the washer fluid reservoir with amixture of
water and windshield washer fluid, e.g. MB
SummerFit.
Add 1part MB SummerFit to 100 parts water.
At temperatures below freezing:
XFill the washer fluid reservoir with amixture of
water and washer fluid, e.g. MB WinterFit.
For the correctm ixing ratio refer to the infor-
mation on the antifreeze reservoir.
iAdd windshield washer fluid, e.g. MB Sum-
merFit or MB WinterFit, to the washer fluid all
year round.
Climate control system refrigerant
Important safety notes
The climate control system of your vehicle is fil-
led with refrigerant R‑ 134a.
The instruction label regarding the refrigerant
type used can be found on the radiator cross
member.
!Only the refrigerant R‑134a and the PAG oil
approved by Mercedes-Benz may be used.
The approved PAG oil may not be mixed with
any other PAG oil that is not approved for
R-134a refrigerant.O therwise, the climate
control system may be damaged.
Servicew ork, such as refilling with refrigerant or
replacing component parts, may only be carried
out by aqualified specialist workshop. All appli-
cable regulations must be adhered to, SAE
standard J639 included.
Always have work on the climate control system carried out at aqualified specialist workshop.
280Service products and filling capacities
Technical data