MERCEDES-BENZ G-CLASS 2018 Owners Manual
Manufacturer: MERCEDES-BENZ, Model Year: 2018, Model line: G-CLASS, Model: MERCEDES-BENZ G-CLASS 2018Pages: 294, PDF Size: 4.86 MB
Page 91 of 294
Interior lighting
Overview of interior lighting
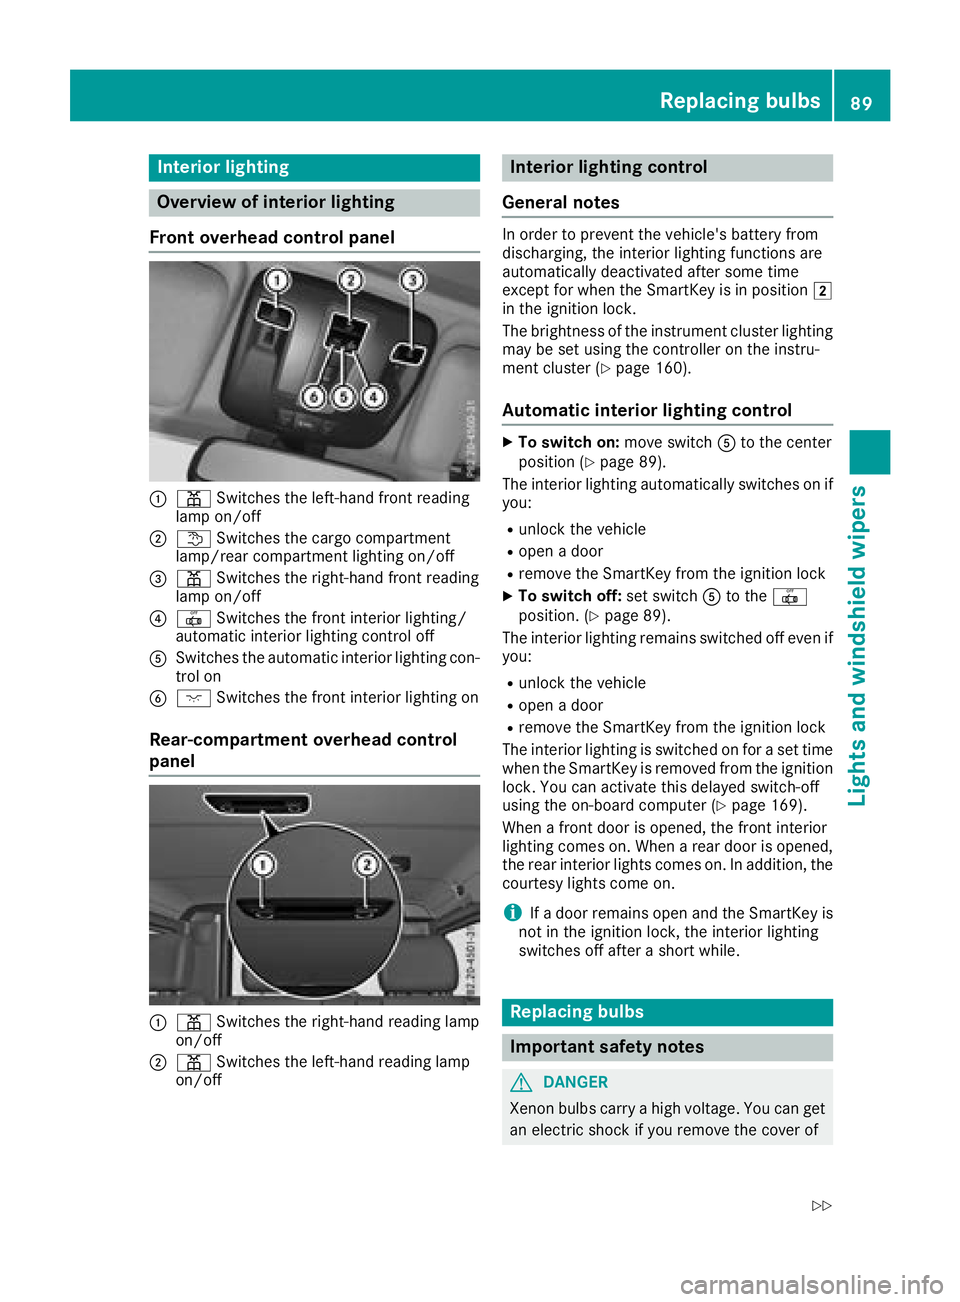
Front overhead control panel
:p Switches th eleft-han dfron treading
lamp on/off
;t Switches th ecargo compartmen t
lamp/rear compartmen tlighting on/off
=p Switches th eright-hand fron treading
lamp on/off
?| Switches th efron tinterio rlighting /
automatic interio rlighting control off
ASwitches th eautomatic interio rlighting con-
trol on
Bc Switches th efron tinterio rlighting on
Rear-compartment overhead control
panel
:p Switches th eright-hand reading lamp
on/off
;p Switches th eleft-han dreading lamp
on/off
Interior lighting control
General notes
In order to preven tth evehicle's battery from
discharging, th einterior lighting function sare
automatically deactivated after som etime
except for when th eSmartKey is in position 2
in th eignition lock.
The brightness of th einstrumen tcluste rlighting
may be set usin gth econtroller on th einstru-
men tcluste r (
Ypage 160).
Automatic interior lighting control
XTo switch on: moveswitch Ato th ecenter
position (Ypage 89) .
The interior lighting automatically switches on if
you:
Runlock th evehicl e
Ropenadoor
Rremove th eSmartKey from th eignition loc k
XTo switch off :set switch Ato th e|
position . (Ypage 89).
The interior lighting remain sswitched off eve nif
you:
Runlock th evehicl e
Ropenadoor
Rremove th eSmartKey from th eignition loc k
The interior lighting is switched on for aset time
when th eSmartKey is remove dfrom th eignition
lock. You can activat ethis delaye dswitch-off
usin gth eon-board computer (
Ypage 169).
When afron tdoor is opened, th efron tinterior
lighting comes on .When arear door is opened,
th erear interior lights comes on .In addition ,th e
courtesy lights come on .
iIfadoor remain sopen and th eSmartKey is
no tin th eignition lock, th einterior lighting
switches off after ashort while .
Replacing bulbs
Important safety notes
GDANGER
Xenon bulbs carry ahigh voltage. You can get
an electric shock if you remove th ecover of
Replacing bulbs89
Lights and windshield wipers
Z
Page 92 of 294
the Xenon bulb and touch the electrical con-
tacts. There is a risk of fatal injury.
Never touch the parts or the electrical con-
tacts of the Xenon bulb. Always have work onthe Xenon bulbs carried out at a qualified spe-
cialist workshop.
GWARNING
Bulbs, lamps and connectors can get very hot
when operating. If you change a bulb, you
could burn yourself on these components.
There is a risk of injury.
Allow these components to cool down before
changing a bulb.
Do not use a bulb if it has been dropped or if its glass tube has been scratched.
The bulb may explode if:
Ryou touch it
Rit is hot
Ryou drop it
Ryou scratch it
Use bulbs only in closed lamps that have been
designed for this purpose. Only install spare
bulbs of the same type and the specified volt-
age.
Marks on the glass tube reduce the service life
of the bulbs. Do not touch the glass tube with
your bare hands. If necessary, clean the glass
tube when cold with alcohol or spirit and rub it
off with a lint-free cloth.
Protect bulbs from moisture during operation.
Do not allow bulbs to come into contact with
liquids.
Xenon bulbs and LED modules: in addition to
the Xenon bulbs, there are LED modules which
you cannot change yourself.
Have the following bulbs replaced at a qualified
specialist workshop:
RHigh-mounted brake lamp
RAdditional turn signals in the exterior mirrors
RParking lamps/standing lamps (front)
RHigh-beam/low-beam headlamps (Xenon
headlamps)
RDaytime running lamps
RLicense plate lamp
RSide marker lamps
iIndividual segments of the license plate
lamp LEDs may fail without a display message
appearing in the multifunction display. Regu-
larly check the license plate lamp. If neces-
sary, visit a qualified specialist workshop.
You can replace the following bulbs:
RTurn signal lamp (front)
RBrake/tail lamp
RTurn signal lamp (rear)
RTail lamps/standing lamps
RBackup lamp
RRear fog lamp
Replace only the bulbs listed (
Ypage 90).
Have the bulbs that you cannot change yourself
replaced at a qualified specialist workshop.
If you require assistance replacing bulbs, con-
sult a qualified specialist workshop.
If the new bulb still does not light up, consult a
qualified specialist workshop.
Headlamps and lights are an important aspect of
vehicle safety. You must therefore make sure
that these function correctly at all times. Have
the headlamp setting checked regularly.
Overview of bulb types
Front bulbs
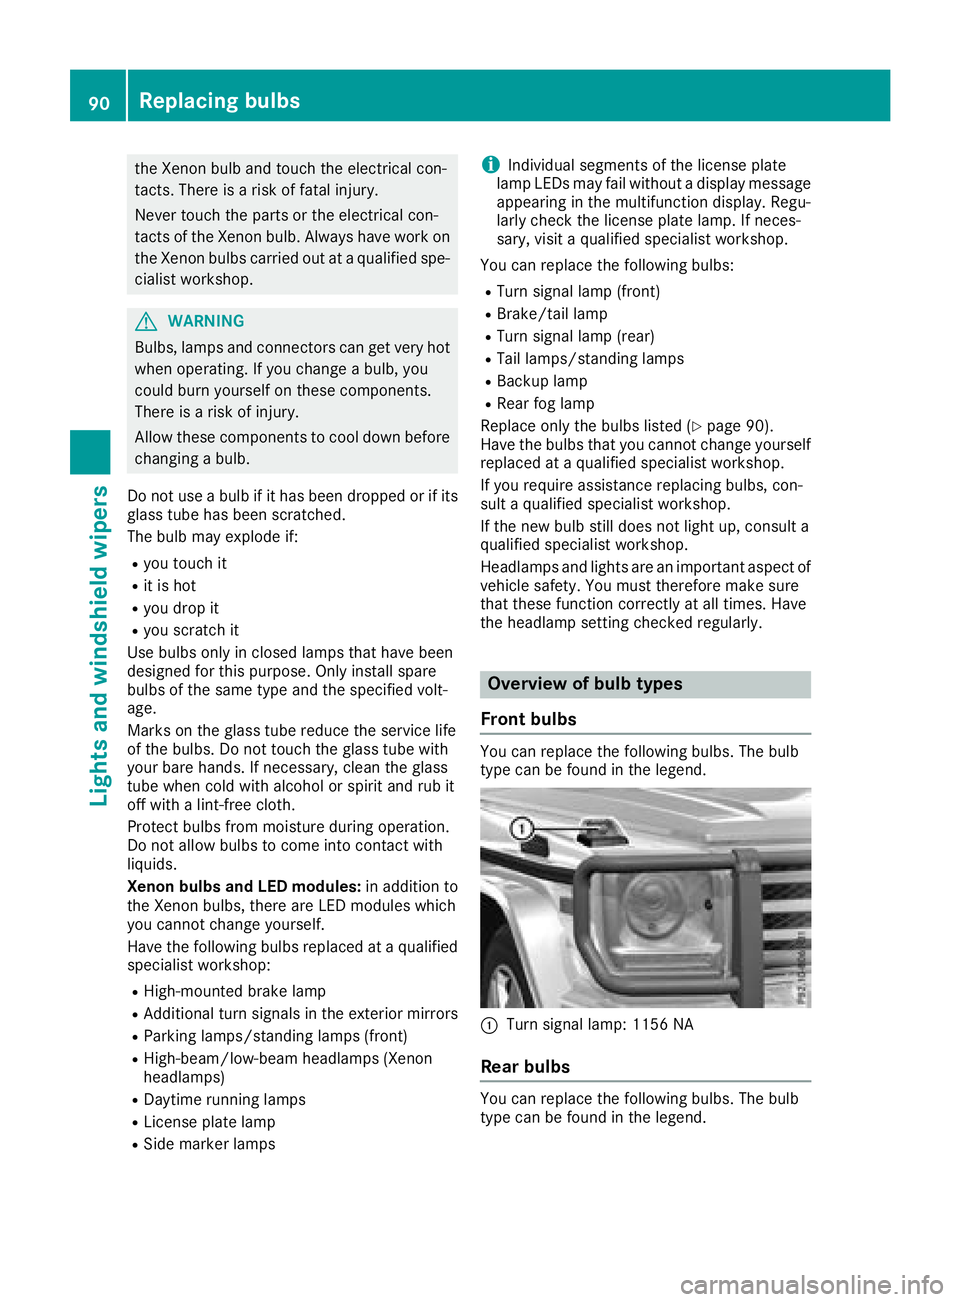
You can replace the following bulbs. The bulb
type can be found in the legend.
:Turn signal lamp: 1156 NA
Rear bulbs
You can replace the following bulbs. The bulb
type can be found in the legend.
90Replacing bulbs
Lights and windshield wiper s
Page 93 of 294
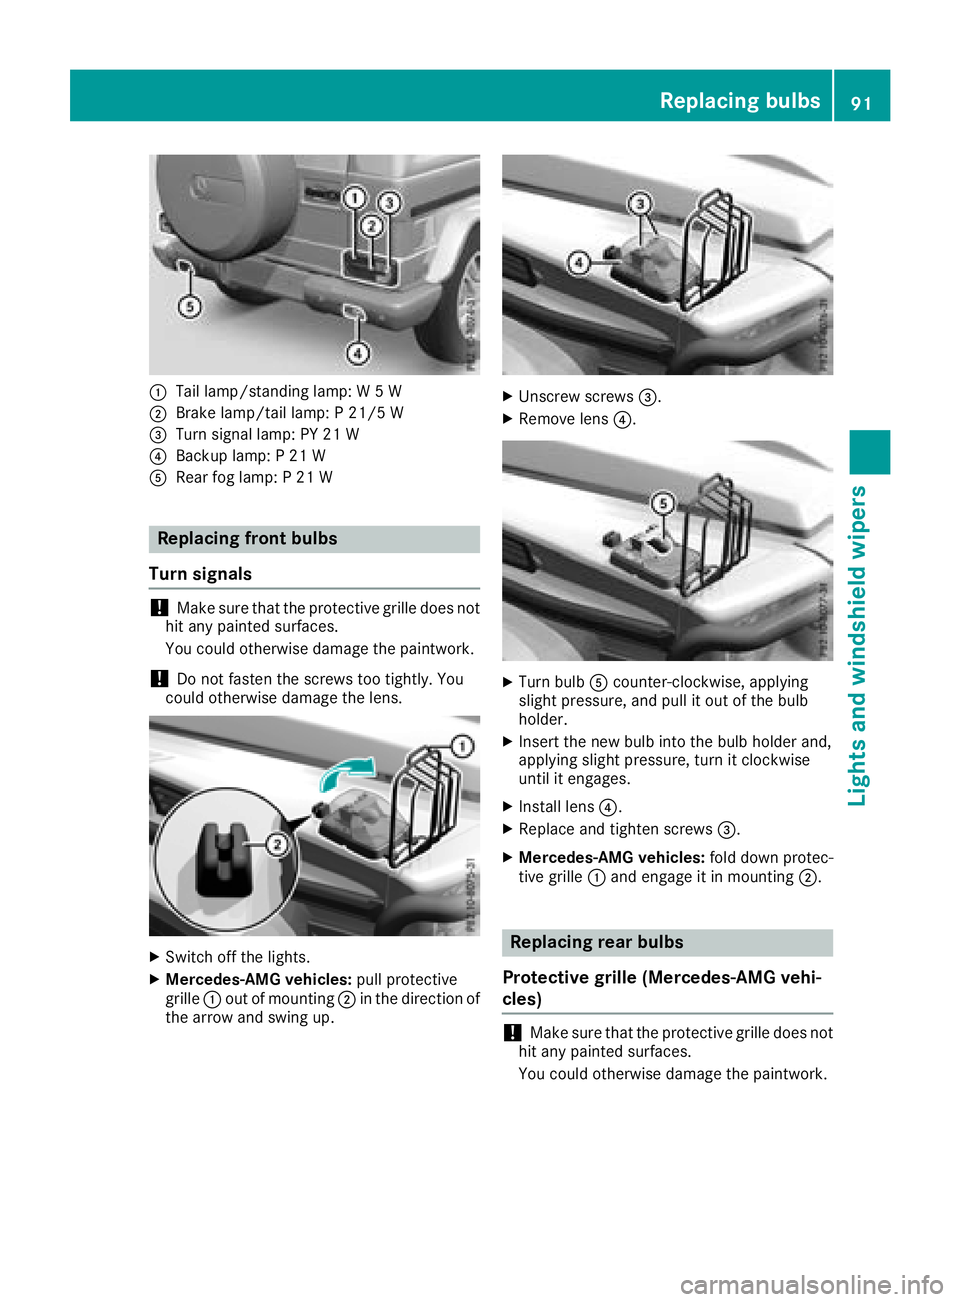
:Tail lamp/standing lamp: W 5 W
;Brake lamp/tail lamp: P 21/5 W
=Turn signal lamp: PY 21 W
?Backup lamp: P 21 W
ARear fog lamp: P 21 W
Replacing front bulbs
Turn signals
!Make sure that the protective grille does not
hit any painted surfaces.
You could otherwise damage the paintwork.
!Do not fasten the screws too tightly. You
could otherwise damage the lens.
XSwitch off the lights.
XMercedes-AMG vehicles: pull protective
grille :out of mounting ;in the direction of
the arrow and swing up.
XUnscrew screws =.
XRemove lens?.
XTurn bulbAcounter-clockwise, applying
slight pressure, and pull it out of the bulb
holder.
XInsert the new bulb into the bulb holder and,
applying slight pressure, turn it clockwise
until it engages.
XInstall lens ?.
XReplace and tighten screws =.
XMercedes-AMG vehicles:fold down protec-
tive grille :and engage it in mounting ;.
Replacing rear bulbs
Protective grille (Mercedes-AMG vehi-
cles)
!Make sure that the protective grille does not
hit any painted surfaces.
You could otherwise damage the paintwork.
Replacing bulbs91
Lights and windshield wipers
Z
Page 94 of 294
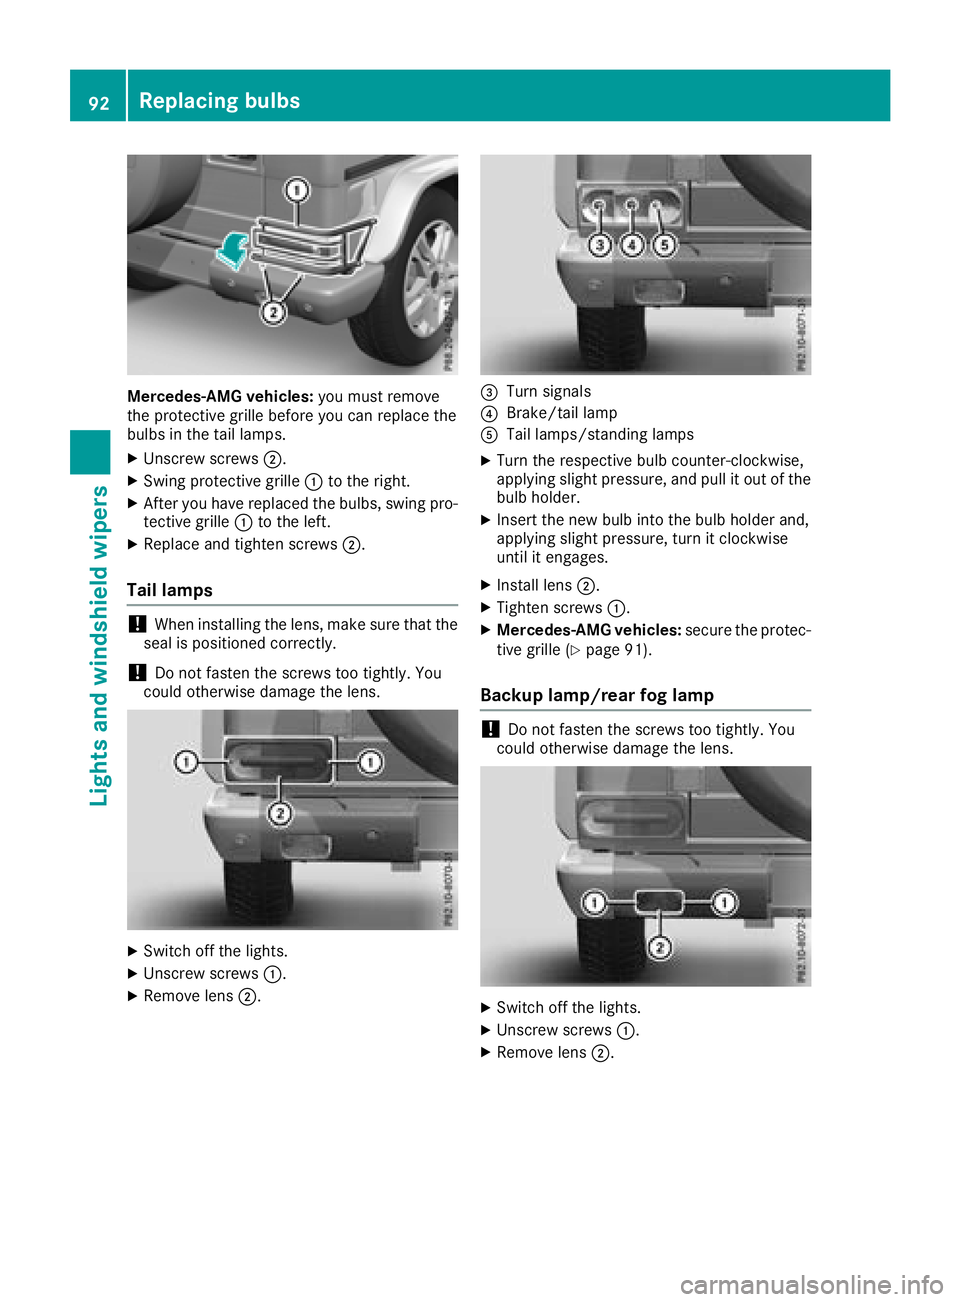
Mercedes-AMG vehicles:you must remove
the protective grille before you can replace the
bulbs in the tail lamps.
XUnscrew screws ;.
XSwing protective grille :to the right.
XAfter you have replaced the bulbs, swing pro-
tective grille :to the left.
XReplace and tighten screws ;.
Tail lamps
!When installing the lens, make sure that the
seal is positioned correctly.
!Do not fasten the screws too tightly. You
could otherwise damage the lens.
XSwitch off the lights.
XUnscrew screws :.
XRemove lens;.
=Turn signals
?Brake/tail lamp
ATail lamps/standing lamps
XTurn the respective bulb counter-clockwise,
applying slight pressure, and pull it out of the
bulb holder.
XInsert the new bulb into the bulb holder and,
applying slight pressure, turn it clockwise
until it engages.
XInstall lens;.
XTighten screws :.
XMercedes-AMG vehicles: secure the protec-
tive grille (Ypage 91).
Backup lamp/rear fog lamp
!Do not fasten the screws too tightly. You
could otherwise damage the lens.
XSwitch off the lights.
XUnscrew screws :.
XRemove lens;.
92Replacing bulbs
Lights and windshield wipers
Page 95 of 294
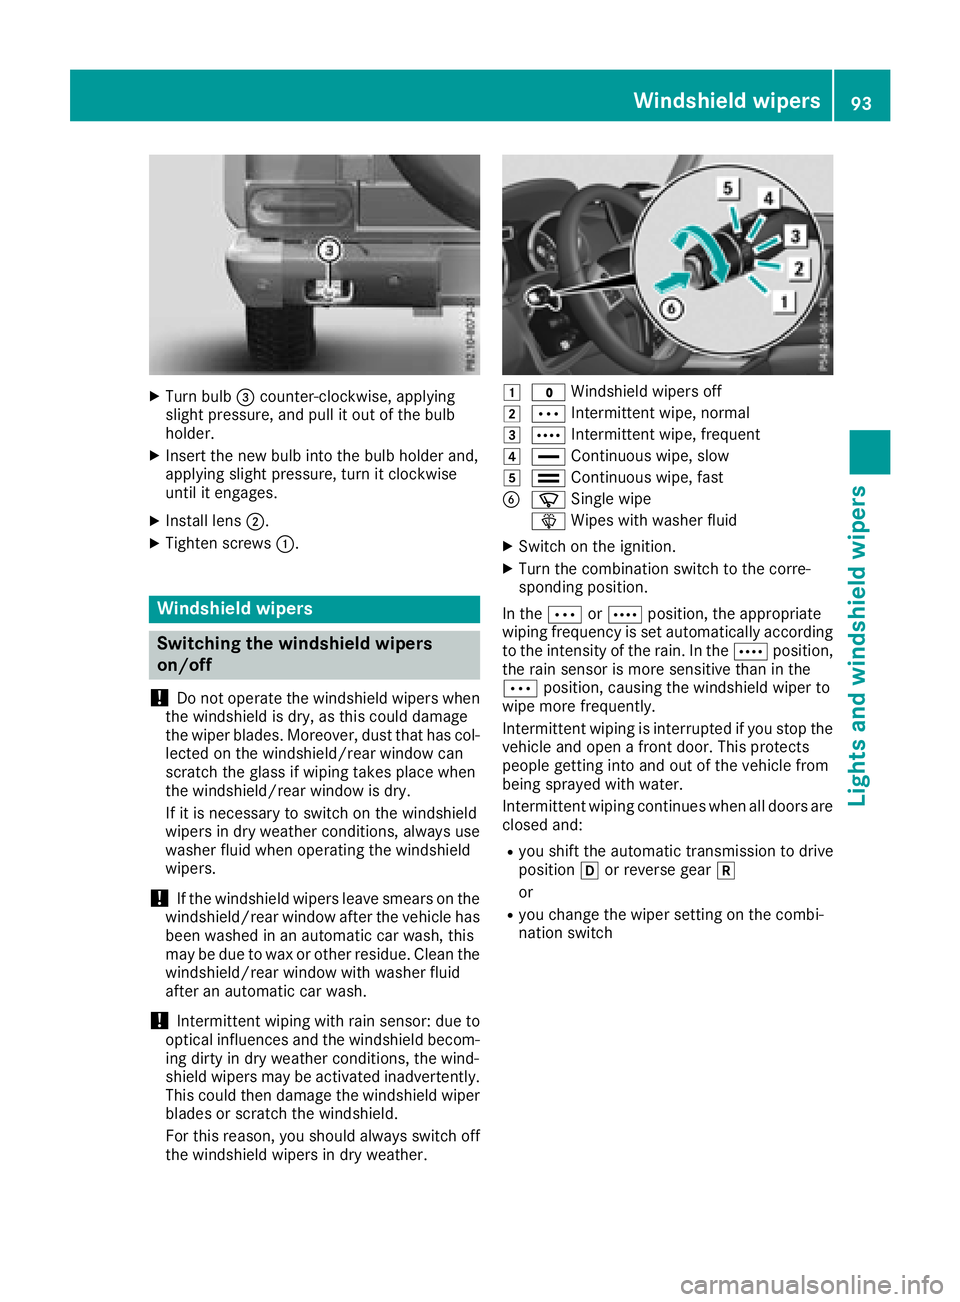
XTurn bulb=counter-clockwise, applying
slight pressure, and pull it out of the bulb
holder.
XInsert the new bulb into the bulb holder and,
applying slight pressure, turn it clockwise
until it engages.
XInstall lens ;.
XTighten screws :.
Windshield wipers
Switching the windshield wipers
on/off
!
Do not operate the windshield wipers when
the windshield is dry, as this could damage
the wiper blades. Moreover, dust that has col-
lected on the windshield/rear window can
scratch the glass if wiping takes place when
the windshield/rear window is dry.
If it is necessary to switch on the windshield
wipers in dry weather conditions, always use
washer fluid when operating the windshield
wipers.
!If the windshield wipers leave smears on the
windshield/rear window after the vehicle has
been washed in an automatic car wash, this
may be due to wax or other residue. Clean the
windshield/rear window with washer fluid
after an automatic car wash.
!Intermittent wiping with rain sensor: due to
optical influences and the windshield becom-
ing dirty in dry weather conditions, the wind-
shield wipers may be activated inadvertently.
This could then damage the windshield wiper
blades or scratch the windshield.
For this reason, you should always switch off
the windshield wipers in dry weather.
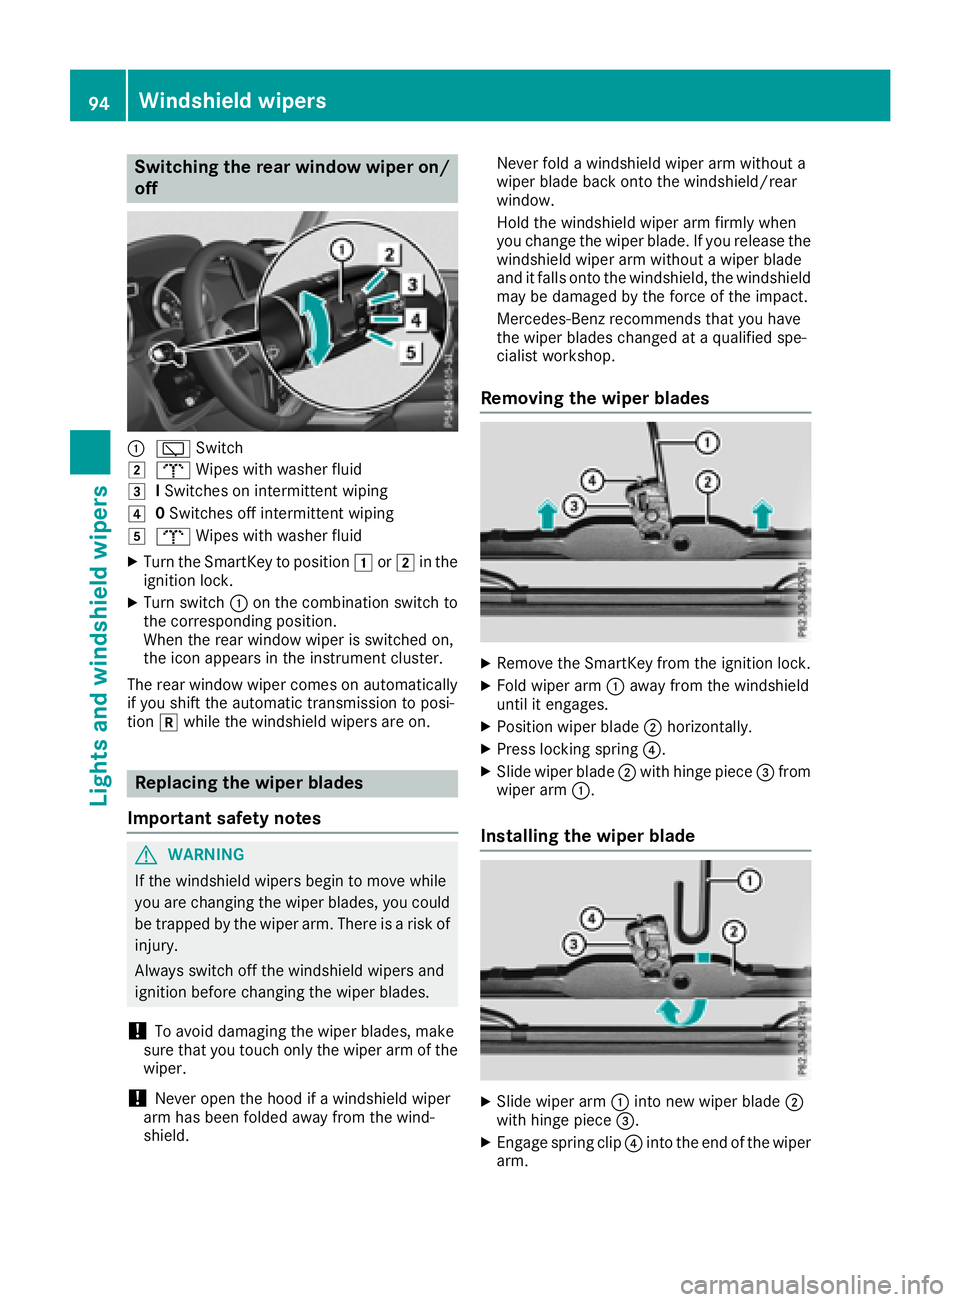
1$ Windshield wipers off
2ÄIntermittent wipe, normal
3ÅIntermittent wipe, frequent
4°Continuous wipe, slow
5¯Continuous wipe, fast
BíSingle wipe
î Wipes with washer fluid
XSwitch on the ignition.
XTurn the combination switch to the corre-
sponding position.
In the ÄorÅ position, the appropriate
wiping frequency is set automatically according
to the intensity of the rain. In the Åposition,
the rain sensor is more sensitive than in the
Ä position, causing the windshield wiper to
wipe more frequently.
Intermittent wiping is interrupted if you stop the vehicle and open a front door. This protects
people getting into and out of the vehicle from
being sprayed with water.
Intermittent wiping continues when all doors are
closed and:
Ryou shift the automatic transmission to drive
position hor reverse gear k
or
Ryou change the wiper setting on the combi-
nation switch
Windshield wipers93
Lights and windshield wipers
Z
Page 96 of 294
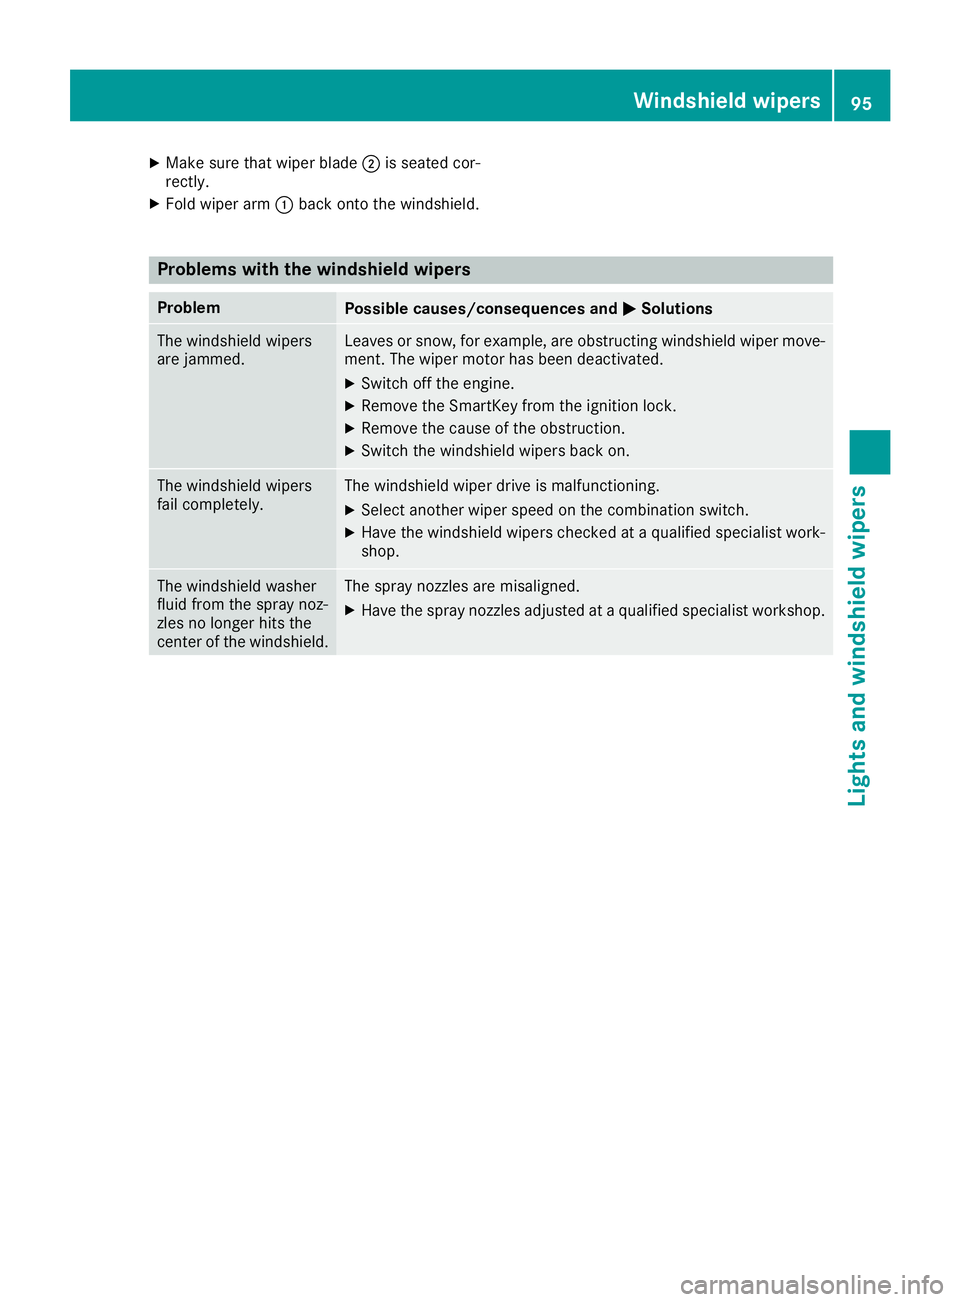
Switching the rear window wiper on/
off
:èSwitch
2bWipes with washer fluid
3ISwitches on intermittent wiping
40 Switches off intermittent wiping
5b Wipes with washer fluid
XTurn the SmartKey to position 1or2 in the
ignition lock.
XTurn switch :on the combination switch to
the corresponding position.
When the rear window wiper is switched on,
the icon appears in the instrument cluster.
The rear window wiper comes on automatically
if you shift the automatic transmission to posi-
tion kwhile the windshield wipers are on.
Replacing the wiper blades
Important safety notes
GWARNING
If the windshield wipers begin to move while
you are changing the wiper blades, you could be trapped by the wiper arm. There is a risk of
injury.
Always switch off the windshield wipers and
ignition before changing the wiper blades.
!To avoid damaging the wiper blades, make
sure that you touch only the wiper arm of the
wiper.
!Never open the hood if a windshield wiper
arm has been folded away from the wind-
shield. Never fold a windshield wiper arm without a
wiper blade back onto the windshield/rear
window.
Hold the windshield wiper arm firmly when
you change the wiper blade. If you release the
windshield wiper arm without a wiper blade
and it falls onto the windshield, the windshield
may be damaged by the force of the impact.
Mercedes-Benz recommends that you have
the wiper blades changed at a qualified spe-
cialist workshop.
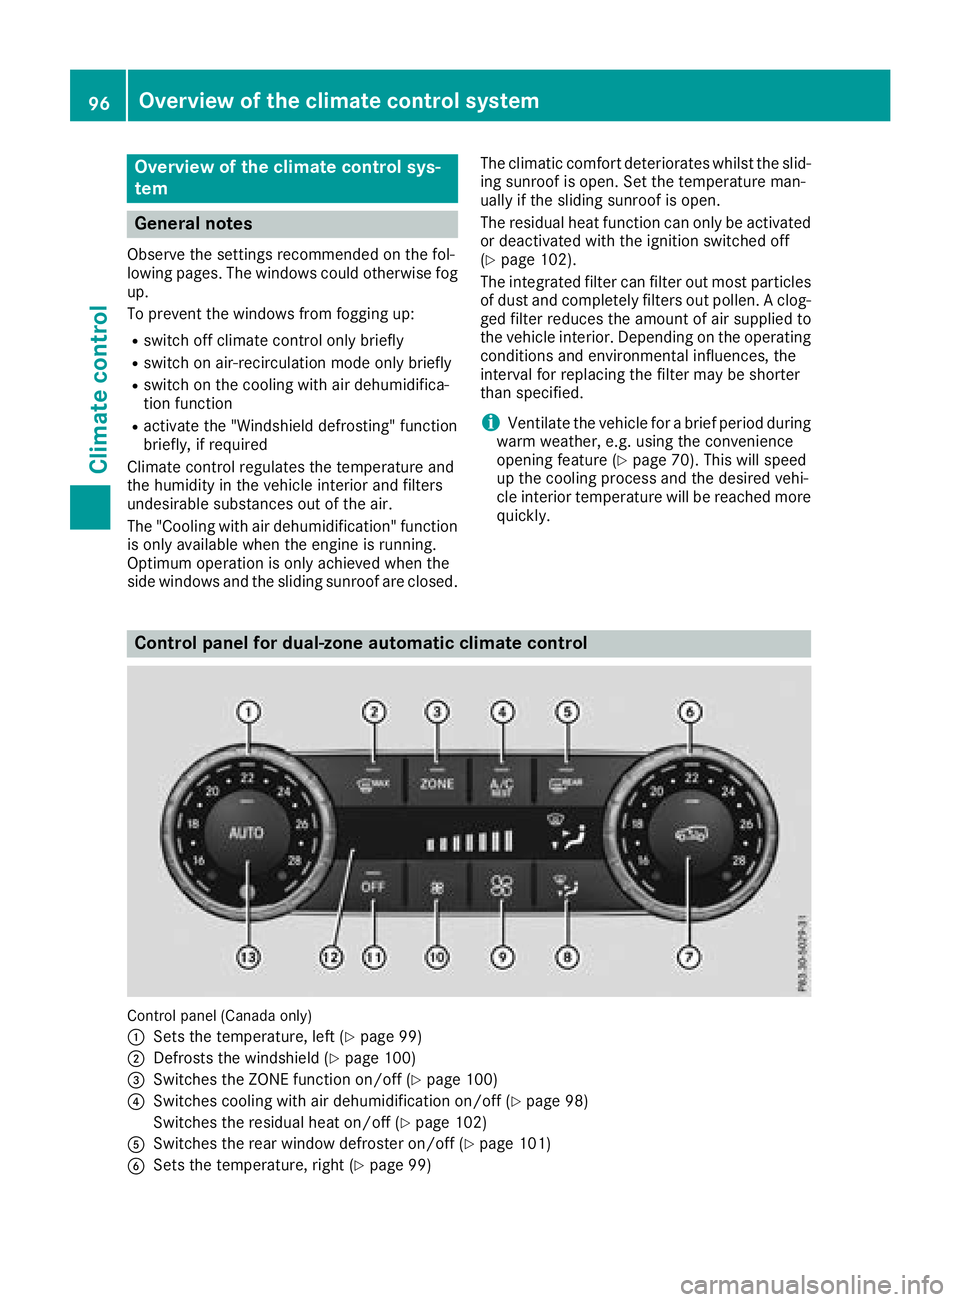
Removing the wiper blades
XRemove the SmartKey from the ignition lock.
XFold wiper arm :away from the windshield
until it engages.
XPosition wiper blade ;horizontally.
XPress locking spring ?.
XSlide wiper blade;with hinge piece =from
wiper arm :.
Installing the wiper blade
XSlide wiper arm :into new wiper blade ;
with hinge piece =.
XEngage spring clip ?into the end of the wiper
arm.
94Windshield wipers
Lights and windshield wipers
Page 97 of 294
XMake sure that wiper blade;is seated cor-
rectly.
XFold wiper arm :back onto the windshield.
Problems with the windshield wipers
ProblemPossible causes/consequences and MSolutions
The windshield wipers
are jammed.Leaves or snow, for example, are obstructing windshield wiper move-
ment. The wiper motor has been deactivated.
XSwitch off the engine.
XRemove the SmartKey from the ignition lock.
XRemove the cause of the obstruction.
XSwitch the windshield wipers back on.
The windshield wipers
fail completely.The windshield wiper drive is malfunctioning.
XSelect another wiper speed on the combination switch.
XHave the windshield wipers checked at a qualified specialist work-
shop.
The windshield washer
fluid from the spray noz-
zles no longer hits the
center of the windshield.The spray nozzles are misaligned.
XHave the spray nozzles adjusted at a qualified specialist workshop.
Windshield wipers95
Lights and windshield wipers
Z
Page 98 of 294
Overview of the climate control sys-
tem
General notes
Observe the settings recommended on the fol-
lowing pages. The windows could otherwise fog
up.
To prevent the windows from fogging up:
Rswitch off climate control only briefly
Rswitch on air-recirculation mode only briefly
Rswitch on the cooling with air dehumidifica-
tion function
Ractivate the "Windshield defrosting" function
briefly, if required
Climate control regulates the temperature and
the humidity in the vehicle interior and filters
undesirable substances out of the air.
The "Cooling with air dehumidification" function
is only available when the engine is running.
Optimum operation is only achieved when the
side windows and the sliding sunroof are closed. The climatic comfort deteriorates whilst the slid-
ing sunroof is open. Set the temperature man-
ually if the sliding sunroof is open.
The residual heat function can only be activated
or deactivated with the ignition switched off
(
Ypage 102).
The integrated filter can filter out most particles
of dust and completely filters out pollen. A clog-
ged filter reduces the amount of air supplied to
the vehicle interior. Depending on the operating
conditions and environmental influences, the
interval for replacing the filter may be shorter
than specified.
iVentilate the vehicle for a brief period during
warm weather, e.g. using the convenience
opening feature (
Ypage 70). This will speed
up the cooling process and the desired vehi-
cle interior temperature will be reached more
quickly.
Control panel for dual-zone automatic climate control
Control panel (Canada only)
:
Sets the temperature, left (Ypage 99)
;Defrosts the windshield (Ypage 100)
=Switches the ZONE function on/off (Ypage 100)
?Switches cooling with air dehumidification on/off (Ypage 98)
Switches the residual heat on/off (
Ypage 102)
ASwitches the rear window defroster on/off (Ypage 101)
BSets the temperature, right (Ypage 99)
96Overview of the climate control system
Climate control
Page 99 of 294
CActivates/deactivates air-recirculation mode (Ypage 102)
DSets the air distribution (Ypage 99)
EIncreases the airflow (Ypage 99)
FReduces the airflow (Ypage 99)
GSwitches the climate control on/off (Ypage 98)
HDisplay
ISets climate control to automatic (Ypage 99)
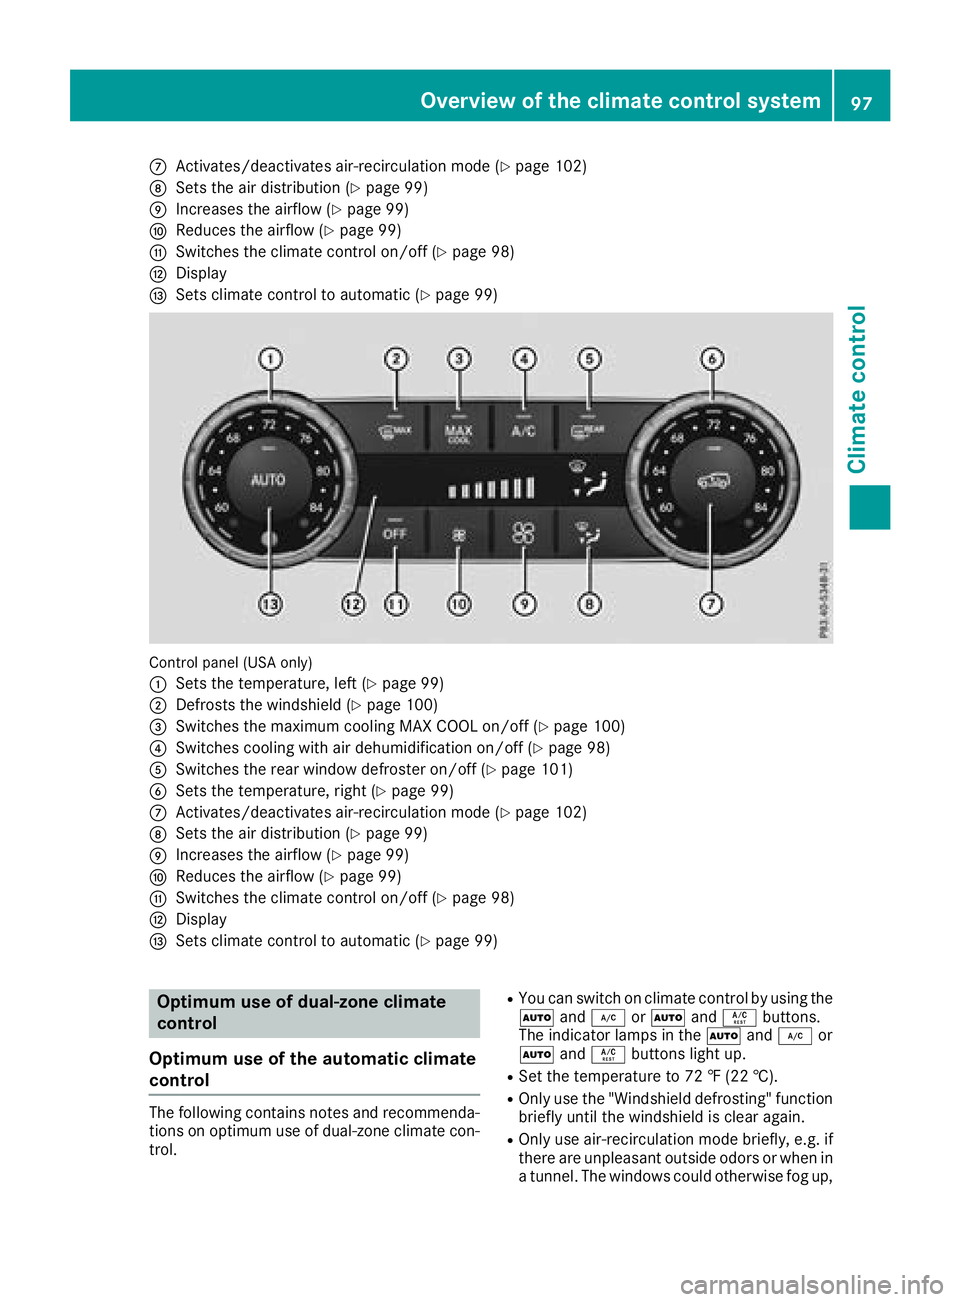
Control panel (USA only)
:
Sets the temperature, left (Ypage 99)
;Defrosts the windshield (Ypage 100)
=Switches the maximum cooling MAX COOL on/off (Ypage 100)
?Switches cooling with air dehumidification on/off (Ypage 98)
ASwitches the rear window defroster on/off (Ypage 101)
BSets the temperature, right (Ypage 99)
CActivates/deactivates air-recirculation mode (Ypage 102)
DSets the air distribution (Ypage 99)
EIncreases the airflow (Ypage 99)
FReduces the airflow (Ypage 99)
GSwitches the climate control on/off (Ypage 98)
HDisplay
ISets climate control to automatic (Ypage 99)
Optimum use of dual-zone climate
control
Optimum use of the automatic climate
control
The following contains notes and recommenda-
tions on optimum use of dual-zone climate con-
trol.
RYou can switch on climate control by using the
à and¿ orà andÁ buttons.
The indicator lamps in the Ãand¿ or
à andÁ buttons light up.
RSet the temperature to 72 ‡ (22 †).
ROnly use the "Windshield defrosting" function
briefly until the windshield is clear again.
ROnly use air-recirculation mode briefly, e.g. if
there are unpleasant outside odors or when in
a tunnel. The windows could otherwise fog up,
Overview of the climate control system97
Climate control
Page 100 of 294
since no fresh air is drawn into the vehicle in
air-recirculation mode.
ECO start/stop function
During automatic engine switch-off, the climate
control system only operates at a reduced capa-
city. If you require the full climate control output,
you can switch off the ECO start/stop function
by pressing the ECO button (
Ypage 108).
Operating the climate control system
Activating/deactivating climate con-
trol
General notes
When the climate control is switched off, the air
supply and air circulation are also switched off. The windows could fog up. Therefore, switch off
climate control only briefly.
Activate climate control primarily using the
Ã
button (
Ypage 99).
Activating/deactivating
XTurn the SmartKey to position 2in the igni-
tion lock (Ypage 105).
XTo activate: press theÃbutton.
The indicator lamp in the Ãbutton lights
up. Airflow and air distribution are set to auto-
matic mode.
XTo deactivate: press the^button.
The indicator lamp in the ^button lights
up.
Switching cooling with air dehumidification on/off
General notes
If you deactivate the "Cooling with air-dehumidification" function, the air inside the vehicle will not
be cooled. The air inside the vehicle will also not be dehumidified. The windows can fog up more
quickly. Therefore, only deactivate the "Cooling with air-dehumidification" function briefly.
The "Cooling with air dehumidification" function is only available when the engine is running.
The air inside the vehicle is cooled and dehumidified according to the temperature selected.
Condensation may drip from the underside of the vehicle when it is in cooling mode. This is normal
and not a sign that there is a malfunction.
Activating/deactivating
XTo activate: press the¿orÁ button.
The indicator lamp in the ¿orÁ button lights up.
XTo deactivate: press the¿orÁ button.
The indicator lamp in the ¿orÁ button goes out. The "Cooling with air dehumidification"
function has a delayed switch-off feature.
Problems with the "Cooling with air dehumidification" function
!If the cooling with air dehumidification does not switch on, it is possible that the climate control
system has lost coolant.
Have the cooling with air dehumidification checked at a qualified specialist workshop.
98Operating the climate control system
Climate control