heating MERCEDES-BENZ G-CLASS 2018 User Guide
[x] Cancel search | Manufacturer: MERCEDES-BENZ, Model Year: 2018, Model line: G-CLASS, Model: MERCEDES-BENZ G-CLASS 2018Pages: 294, PDF Size: 4.86 MB
Page 82 of 294
When leaving the vehicle, always take the
SmartKey with you and lock the vehicle. Never
leave children unsupervised in the vehicle.
The electrically adjustable steering wheel can
still be adjusted when there is no SmartKey in
the ignition lock.
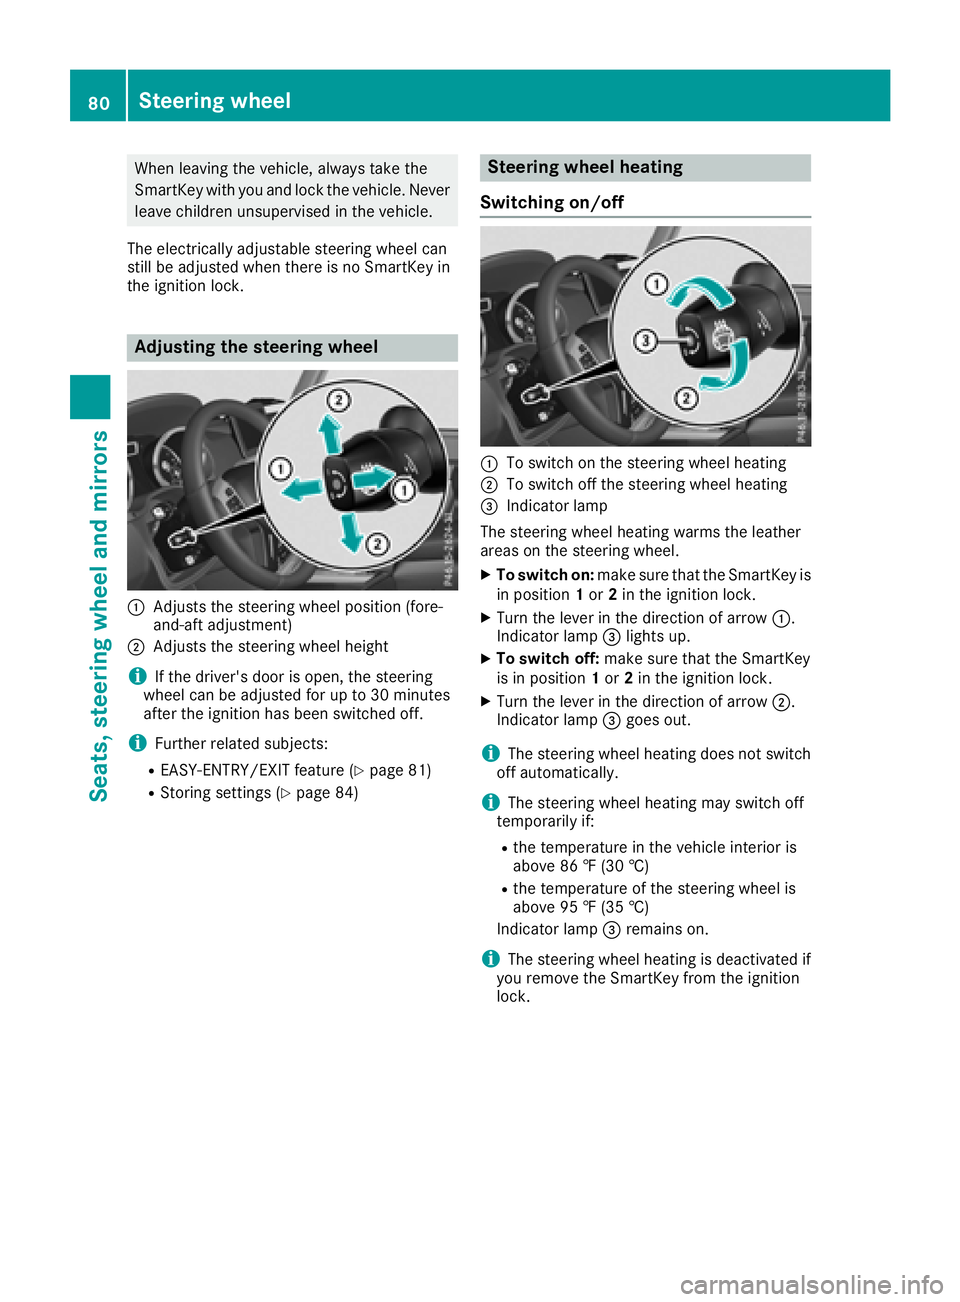
Adjusting the steering wheel
:Adjusts the steering wheel position (fore-
and-aft adjustment)
;Adjusts the steering wheel height
iIf the driver's door is open, the steering
wheel can be adjusted for up to 30 minutes
after the ignition has been switched off.
iFurther related subjects:
REASY-ENTRY/EXIT feature (Ypage 81)
RStoring settings (Ypage 84)
Steering wheel heating
Switching on/off
:To switch on the steering wheel heating
;To switch off the steering wheel heating
=Indicator lamp
The steering wheel heating warms the leather
areas on the steering wheel.
XTo switch on: make sure that the SmartKey is
in position 1or 2in the ignition lock.
XTurn the lever in the direction of arrow :.
Indicator lamp =lights up.
XTo switch off: make sure that the SmartKey
is in position 1or 2in the ignition lock.
XTurn the lever in the direction of arrow ;.
Indicator lamp =goes out.
iThe steering wheel heating does not switch
off automatically.
iThe steering wheel heating may switch off
temporarily if:
Rthe temperature in the vehicle interior is
above 86 ‡ (30 †)
Rthe temperature of the steering wheel is
above 95 ‡ (35 †)
Indicator lamp =remains on.
iThe steering wheel heating is deactivated if
you remove the SmartKey from the ignition
lock.
80Steering wheel
Seats, steering wheel and mirrors
Page 83 of 294
Problems with the steering wheel heat-
ing
If steering wheel heating indicator lamp=is
flashing, the steering wheel heating has
switched off automatically. The vehicle's elec-
trical system voltage is too low because too
many electrical consumers are switched on.
XSwitch off electrical consumers that you do
not need, such as the rear window defroster
or interior lighting.
Once the battery is sufficiently charged, the
steering wheel heating will switch back on
automatically.
Steering wheel EASY-ENTRY/EXIT fea-
ture
Important safety notes
GWARNING
When the EASY-ENTRY/EXIT feature adjusts
the steering wheel and the driver's seat, you
and other vehicle occupants – particularly
children – could become trapped. There is a
risk of injury.
While the EASY-ENTRY/EXIT feature is mak-
ing adjustments, make sure that no one has
any body parts in the sweep of the seat and
the steering wheel.
If somebody becomes trapped:
Rpress one of the memory function position
buttons, or
Rpress one of the memory function memory
buttons, or
Rmove the switch for steering wheel adjust-
ment in the opposite direction to that in
which the steering wheel is moving
The adjustment process is stopped.
GWARNING
If you drive off while the EASY-ENTRY/EXIT
feature is making adjustments, you could lose
control of the vehicle. There is a risk of an
accident.
Always wait until the adjustment process is
complete before driving off.
!Do not activate the EASY-ENTRY/EXIT fea-
ture, if the seat backrest is reclined too far
backwards. This can damage the front or rear
seats. You must first move the backrest to a
vertical position.
The EASY-ENTRY/EXIT feature makes getting in
and out of your vehicle easier.
You can activate and deactivate the EASY-
ENTRY/EXIT feature in the on-board computer
(
Ypage 170).
Position of the steering wheel when the
EASY-ENTRY/EXIT feature is active
The steering wheel moves upwards and towards
the dashboard if:
Ryou remove the SmartKey from the ignition
lock or
Ryou open the driver's door and the SmartKey
is in position 0or 1in the ignition lock
iThe steering wheel only moves upwards and
towards the dashboard if it has not already
reached the upper steering limiter.
Position of the steering wheel for driv-
ing
The steering wheel is moved to the last selected position when:
Rthe driver's door is closed
Ryou insert the SmartKey into the ignition lock
The last position of the steering column is stored
when you switch off the ignition or when you
store the setting with the memory function
(
Ypage 84).
Mirrors
Rear-view mirror
XAdjust the rear-view mirror in such a way that
you have a good view of road and traffic con- ditions behind you.
Mirrors81
Seats, steering wheel and mirrors
Z
Page 103 of 294
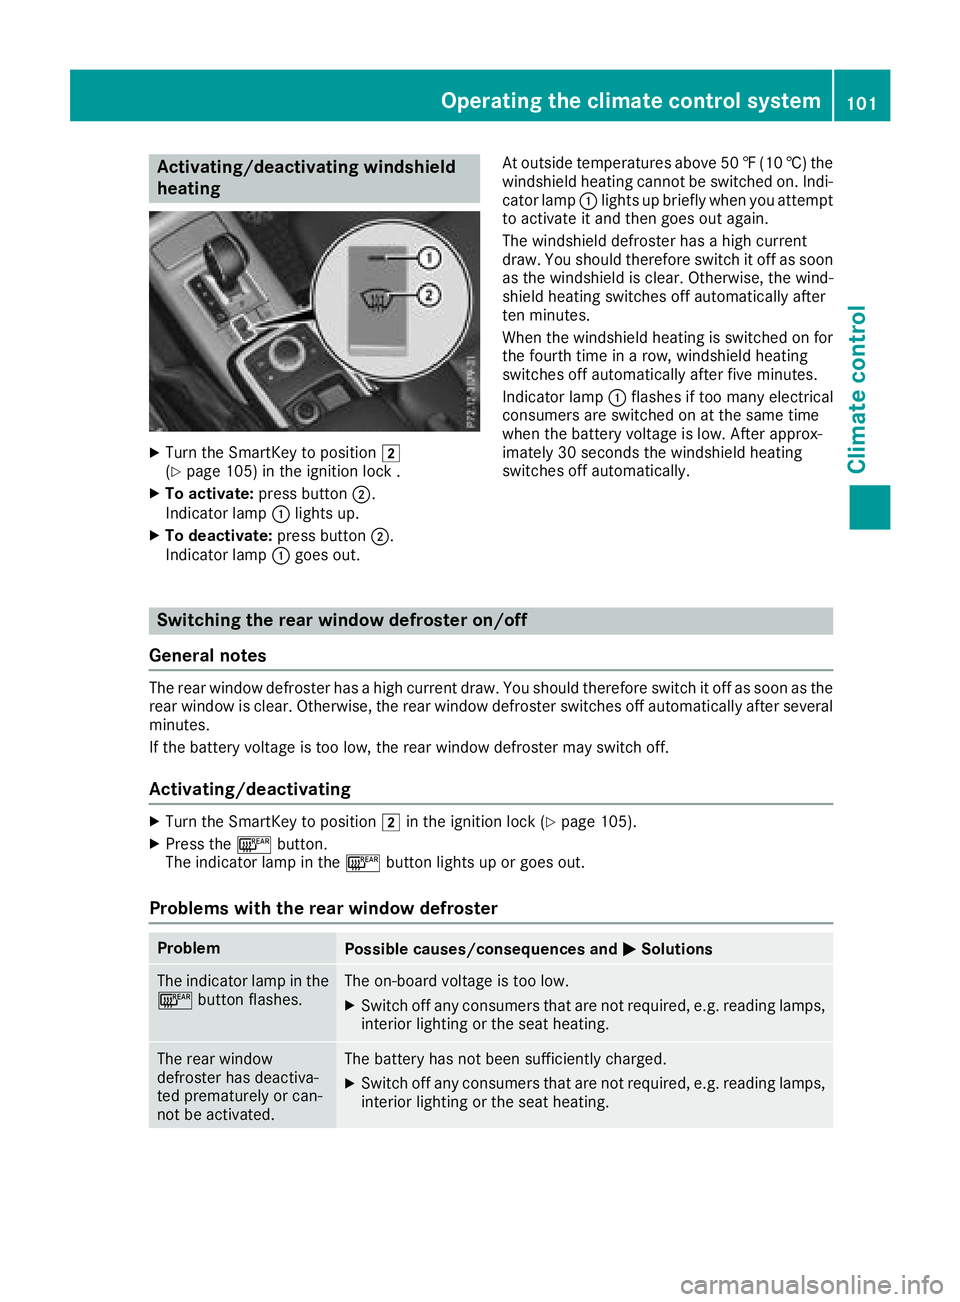
Activating/deactivating windshield
heating
XTurn theSmartKey to position 2
(Ypage 105) in th eignition loc k .
XTo activate: press button;.
Indicato rlamp :lights up.
XTo deactivate: press button;.
Indicato rlamp :goe sout . At outside temperatures abov
e50 ‡(10 †) the
windshield heating cannot be switched on. Indi-
cator lamp :lights up briefly when you attempt
to activate it and then goes out again.
The windshield defroster has a high current
draw. You should therefore switch it off as soon
as the windshield is clear. Otherwise, the wind-
shield heating switches off automatically after
ten minutes.
When the windshield heating is switched on for
the fourth time in a row, windshield heating
switches off automatically after five minutes.
Indicator lamp :flashes if too many electrical
consumers are switched on at the same time
when the battery voltage is low. After approx-
imately 30 seconds the windshield heating
switches off automatically.
Switching the rear window defroster on/off
General notes
The rear window defroster has a high current draw. You should therefore switch it off as soon as the
rear window is clear. Otherwise, the rear window defroster switches off automatically after several
minutes.
If the battery voltage is too low, the rear window defroster may switch off.
Activating/deactivating
XTurn the SmartKey to position 2in the ignition lock (Ypage 105).
XPress the ¤button.
The indicator lamp in the ¤button lights up or goes out.
Problems with the rear window defroster
ProblemPossible causes/consequences and MSolutions
The indicator lamp in the
¤button flashes.The on-board voltage is too low.
XSwitch off any consumers that are not required, e.g. reading lamps,
interior lighting or the seat heating.
The rear window
defroster has deactiva-
ted prematurely or can-
not be activated.The battery has not been sufficiently charged.
XSwitch off any consumers that are not required, e.g. reading lamps,
interior lighting or the seat heating.
Operating the climate control system101
Climate control
Page 104 of 294
Switching air-recirculation mode
on/off
General notes
If you switch on air-recirculation mode, the win-
dows can fog up more quickly, in particular at
low temperatures. Only use air-recirculation
mode briefly to prevent the windows from fog-
ging up.
Activating/deactivating
XTurn the SmartKey to position 2in the igni-
tion lock (Ypage 105).
XTo activate: press thedbutton.
The indicator lamp in the dbutton lights
up.
iAir-recirculation mode is automatically acti-
vated at high levels of pollution or at high out-
side temperatures. When air-recirculation
mode is activated automatically, the indicator
lamp in the dbutton is not lit.
Outside air is added after about 30 minutes.
XTo deactivate: press thedbutton.
The indicator lamp in the dbutton goes
out.
iAir-recirculation mode switches off auto-
matically:
Rafter approximately five minutes at outside
temperatures below approximately 41 ‡
Rafter approximately five minutes if cooling
with air dehumidification is deactivated
Rafter approximately 30 minutes at outside
temperatures above approximately 41 ‡
(5 †)
Switching the residual heat on or off
General notes
The residual heat function is only available on
vehicles for Canada.
It is possible to make use of the residual heat of
the engine to continue heating the stationary
vehicle for up to 30 minutes after the engine has
been switched off. The heating time depends on the set interior temperature.
Activating/deactivating
XTurn the SmartKey to position gin the igni-
tion lock (Ypage 105) or remove it.
XTo activate: press theÁbutton.
The indicator lamp in the Ábutton lights
up.
iThe blower will run at a low speed regardless
of the airflow setting.
iIf you activate the residual heat function at
high temperatures, only the ventilation will be
activated.
XTo deactivate: press theÁbutton.
The indicator lamp in the Ábutton goes
out.
Residual heat is deactivated automatically:
Rafter approximately 30 minutes
Rwhen the ignition is switched on
Rif the battery voltage drops
Rif the coolant temperature is too low
Air vents
Important safety notes
GWARNING
Very hot or very cold air can flow from the air
vents. This could result in burns or frostbite in
the immediate vicinity of the air vents. There
is a risk of injury.
Make sure that all vehicle occupants always
maintain a sufficient distance to the air out-
lets. If necessary, redirect the airflow to
another area of the vehicle interior.
In order to ensure the direct flow of fresh air
through the air vents into the vehicle interior,
please observe the following notes:
Rkeep the air inlet between the windshield and
the hood free of blockages, such as ice, snow or leaves.
Rnever cover the air vents or air intake grilles in
the vehicle interior.
iFor virtually draft-free ventilation, adjust the
sliders of the air vents to the center position.
iIf the automatic climate control constantly
differs from the set temperature or if unde-
102Air vents
Climate control
Page 122 of 294
Refueling
Important safety notes
GWARNING
Fuel is highly flammable. If you handle fuel
incorrectly, there is a risk of fire and explo-
sion.
You must avoid fire, open flames, creating
sparks and smoking. Switch off the engine
and, if applicable, the auxiliary heating before refueling.
GWARNING
Fuel is poisonous and hazardous to health.
There is a risk of injury.
You must make sure that fuel does not come into contact with your skin, eyes or clothing
and that it is not swallowed. Do not inhale fuel
vapors. Keep fuel away from children.
If you or others come into contact with fuel,
observe the following:
RWash away fuel from skin immediately
using soap and water.
RIf fuel comes into contact with your eyes,
immediately rinse them thoroughly with
clean water. Seek medical assistance with-
out delay.
RIf fuel is swallowed, seek medical assis-
tance without delay. Do not induce vomit-
ing.
RImmediately change out of clothing which
has come into contact with fuel.
GWARNING
Electrostatic buildup can create sparks and
ignite fuel vapors. There is a risk of fire and
explosion.
Always touch the vehicle body before opening
the fuel filler flap or touching the fuel pump
nozzle. Any existing electrostatic buildup is
thereby discharged.
Do not get into the vehicle again during the refu-
eling process. otherwise electrostatic charge
could build up again.
!Do not use diesel to refuel vehicles with a
gasoline engine. Do not switch on the ignition
if you accidentally refuel with the wrong fuel.
Otherwise, the fuel will enter the fuel system. Even small amounts of the wrong fuel could
result in damage to the fuel system and the
engine. Notify a qualified specialist workshop
and have the fuel tank and fuel lines drained
completely.
!Overfilling the fuel tank could damage the
fuel system.
!Take care not to spill any fuel on painted
surfaces. You could otherwise damage the
paintwork.
!Use a filter when adding fuel from a fuel can.
The fuel lines and/or the fuel injection system
could otherwise be blocked by particles from
the fuel can.
If you overfill the fuel tank, fuel could spray out
when the fuel pump nozzle is removed.
For further information on fuel and fuel quality
(
Ypage 283).
Refueling
General information
Pay attention to the important safety notes
(Ypage 120).
If you unlock/lock the vehicle from the outside,
the fuel filler flap also unlocks/locks.
The position of the fuel filler cap is displayed in
the instrument cluster 8. The arrow next to
the filling pump indicates the side of the vehicle.
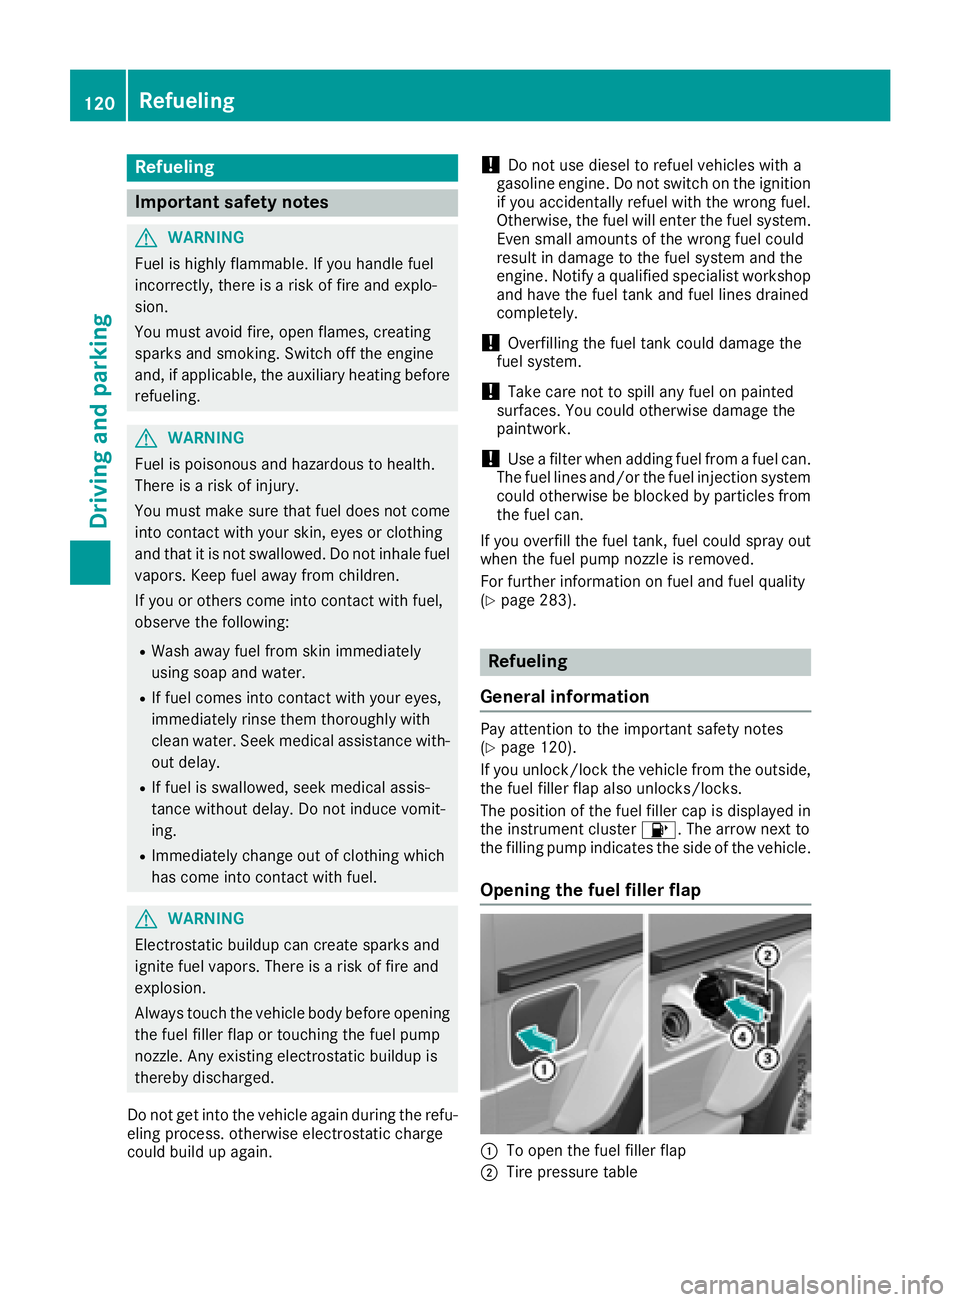
Opening the fuel filler flap
:To open the fuel filler flap
;Tire pressure table
120Refueling
Driving and parking
Page 127 of 294
XAvoid frequent acceleration or braking.
XHave all service and maintenance work car-
ried out at the specified intervals.
Fuel consumption also increases when driving in
cold weather, in stop-start traffic and in hilly ter-
rain.
Drinking and driving
GWARNING
Drinking and driving and/or taking drugs and driving are very dangerous combinations.
Even a small amount of alcohol or drugs can
affect your reflexes, perceptions and judg-
ment.
The possibility of a serious or even fatal acci-
dent is greatly increased when you drink or
take drugs and drive.
Do not drink or take drugs and drive or allow
anyone to drive who has been drinking or tak-
ing drugs.
Emission control
GWARNING
Combustion engines emit poisonous exhaust
gases such as carbon monoxide. Inhaling
these exhaust gases leads to poisoning. There
is a risk of fatal injury. Therefore never leave
the engine running in enclosed spaces with-
out sufficient ventilation.
Certain engine systems are designed to keep
the level of poisonous components in exhaust
fumes within legal limits.
These systems only work at peak efficiency if
they are serviced exactly in accordance with the
manufacturer's specifications. Always have
work on the engine carried out at a qualified
specialist workshop. Mercedes-Benz recom-
mends that you use an authorized Mercedes-
Benz Center for this purpose. In particular, work
relevant to safety or on safety-related systems
must be carried out at a qualified specialist
workshop.
The engine settings must not be changed under any circumstances. Furthermore, all specific
service work must be carried out at regular
intervals and in accordance with the Mercedes-
Benz service requirements. You can obtain cur- rent information concerning the servicing of
your vehicle at any time from a qualified spe-
cialist workshop. This could be an overview of
the
maintena
nce work or any additional main-
tenance work, for example.
Braking
Important safety notes
GWARNING
If you shift down on a slippery road surface in an attempt to increase the engine's braking
effect, the drive wheels could lose their grip.
There is an increased danger of skidding and
accidents.
Do not shift down for additional engine brak-
ing on a slippery road surface.
GWARNING
If you select the LOW RANGE off-road gear on
a slippery road surface, the wheels could lose traction:
Rif you remove your foot from the accelera-
tor pedal when driving
Rif off road ABS intervenes when braking
If the wheels lose traction. the vehicle can no
longer be steered. There is an increased dan-
ger of skidding and accidents.
Never select the LOW RANGE off-road gear
when driving on slippery road surfaces.
Information on the parking brake (
Ypage 123).
Downhill gradients
!On long and steep gradients, you must
reduce the load on the brakes by shifting to a
lower gear in good time. This allows you to
take advantage of the engine's braking effect.
This helps you to avoid overheating the
brakes and wearing them out excessively.
When you take advantage of engine braking, a
drive wheel may not turn for some time, e.g.
on a slippery road surface. This could cause
damage to the drive train. This type of damage
is not covered by the Mercedes-Benz war-
ranty.
Driving tips125
Driving an d parking
Z
Page 135 of 294
RBefore tackling steep downhill gradients, shift
the automatic transmission to a low gear.
By doing so, you will use the braking effect of
the engine to reduce the speed. If this is not
sufficient, brake gently. When doing so, make
sure that the vehicle is facing in the direction
of the line of fall.
RObserve the notes on driving in mountainous
terrain (Ypage 132).
RCheck that the service brake is working nor-
mally after a long downhill stretch.
When driving at speeds below 37 mph
(60 km/h), off-road ABS is activated and the
front wheels lock cyclically during braking. The
digging-in effect achieved in the process
reduces the stopping distance on off-road ter-
rain. This limits steering capability.
Driving systems
Cruise control
General notes
Cruise control maintains a constant road speed
for you. It brakes automatically in order to avoid
exceeding the set speed. Change into a lower
gear in good time on long and steep downhill
gradients.
This is especially important if the vehicle is
laden. By doing so, you will make use of the
braking effect of the engine. This relieves the
load on the brake system and prevents the
brakes from overheating and wearing too
quickly.
Use cruise control only if road and traffic con-
ditions make it appropriate to maintain a steady
speed for a prolonged period. You can store any
road speed above 20 mph (30 km/h).
Do not activate cruise control on off-road jour-
neys.
Important safety notes
Cruise control can neither reduce the risk of an
accident if you fail to adapt your driving style nor override the laws of physics. Cruise control can-
not take into account the road, traffic and
weather conditions. Cruise control is only an
aid. You are responsible for maintaining a safe
distance to the vehicle in front, for vehicle
speed, for braking in good time and for staying in
lane. Do not use cruise control:
Rin road and traffic conditions that do not allow
you to maintain a constant speed, e.g. in
heavy traffic, on winding roads or on rough
terrain
Ron slippery road surfaces. Braking or accel-
erating could cause the drive wheels to lose
traction and the vehicle could then skid
Rin poor visibility, e.g. due to fog, heavy rain or
snow
If there is a change of drivers, advise the new
driver of the speed stored.
iThe speed indicated in the speedometer
may differ slightly from the speed stored.
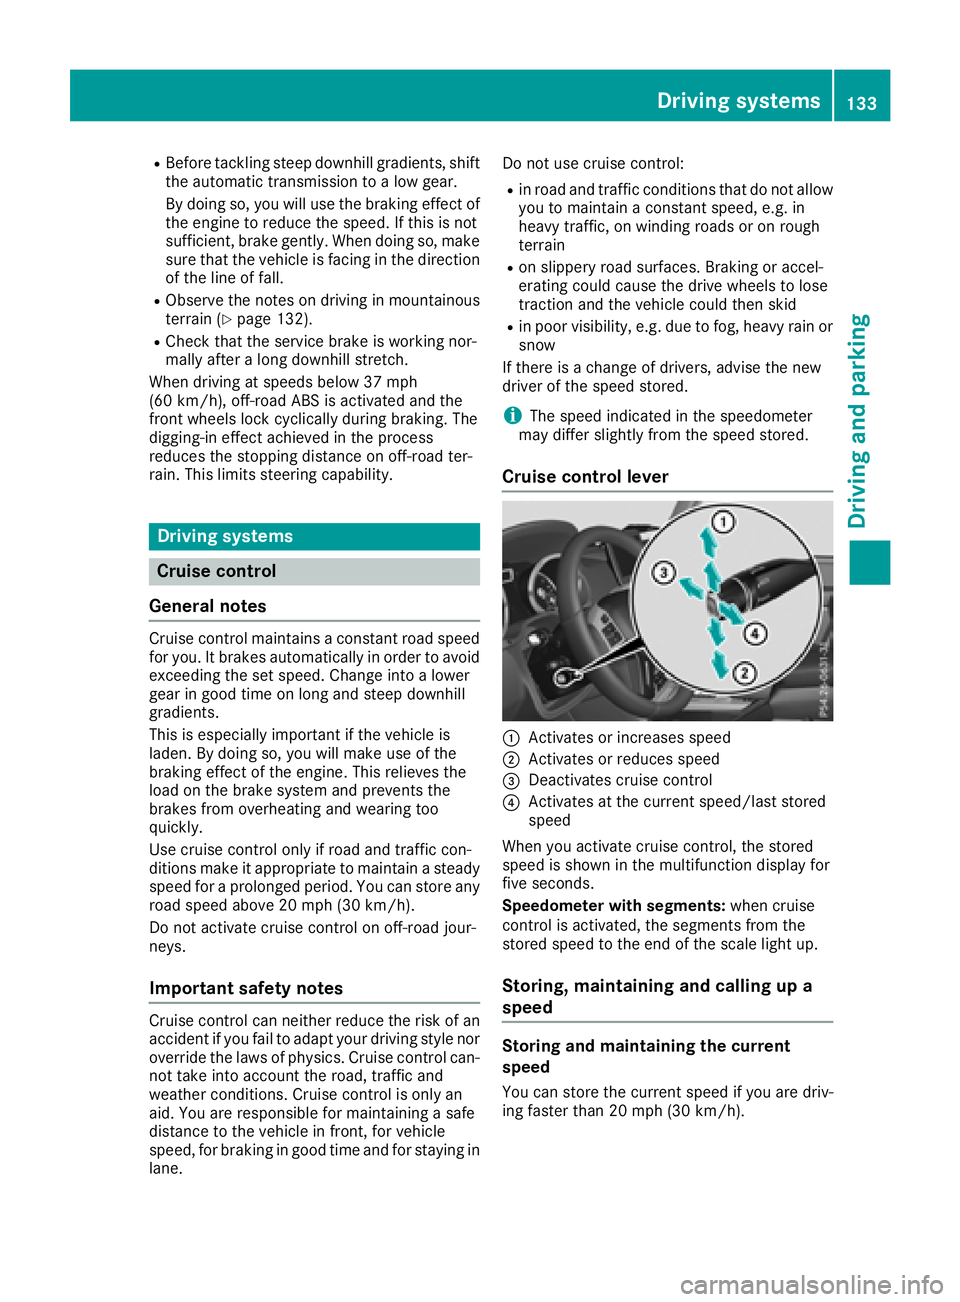
Cruise control lever
:Activates or increases speed
;Activates or reduces speed
=Deactivates cruise control
?Activates at the current speed/last stored
speed
When you activate cruise control, the stored
speed is shown in the multifunction display for
five seconds.
Speedometer with segments: when cruise
control is activated, the segments from the
stored speed to the end of the scale light up.
Storing, maintaining and calling up a
speed
Storing and maintaining the current
speed
You can store the current speed if you are driv-
ing faster than 20 mph (30 km/h).
Driving systems133
Driving and parking
Z
Page 137 of 294
load on the brake system and prevents the
brakes from overheating and wearing too
quickly.
If DISTRONIC PLUS detects a critical risk of col-
lision with the vehicle in front, you will be warned
visually and acoustically. DISTRONIC PLUS can-
not prevent a collision without your intervention.
An intermittent warning tone sounds and the
·distance warning lamp in the instrument
cluster lights up. Brake immediately in order to
increase the distance to the vehicle in front or
take evasive action provided it is safe to do so.
DISTRONIC PLUS operates in the speed range
between 0 mph (0 km/h) and 120 mph
(200 km/h).
Do not use DISTRONIC PLUS while driving on
roads with steep gradients.
As DISTRONIC PLUS transmits radar waves, it
can resemble the radar detectors of the respon-
sible authorities. You can refer to the relevant
chapter in the Operator's Manual if questions
are asked about this.
iUSA only: This device has been approved by
the FCC as a "Vehicular Radar System". The
radar sensor is intended for use in an auto-
motive radar system only. Removal, tamper-
ing, or altering of the device will void any war-
ranties, and is not permitted by the FCC. Do
not tamper with, alter, or use in any non-
approved way.
Any unauthorized modification to this device
could void the user's authority to operate the
equipment.
iCanada only: This device complies with
RSS-210 of Industry Canada. Operation is
subject to the following two conditions:
1. This device may not cause interference,
and
2. This device must accept any interference
received, including interference that may
c
ause undesired operation of the device.
Removal, tampering, or altering of the device
will void any warranties, and is not permitted. Do not tamper with, alter, or use in any non-
approved way.
Any unauthorized modification to this device
could void the user's authority to operate the
equipment.
Important safety notes
GWARNING
DISTRONIC PLUS does not react to:
Rpeople or animals
Rstationary obstacles on the road, e.g. stop- ped or parked vehicles
Roncoming and crossing traffic
As a result, DISTRONIC PLUS may neither give
warnings nor intervene in such situations.
There is a risk of an accident.
Always pay careful attention to the traffic sit- uation and be ready to brake.
GWARNING
DISTRONIC PLUS cannot always clearly iden-
tify other road users and complex traffic sit-
uations.
In such cases, DISTRONIC PLUS may:
Rgive an unnecessary warning and then
brake the vehicle
Rneither give a warning nor intervene
Raccelerate or brake unexpectedly
There is a risk of an accident.
Continue to drive carefully and be ready to
brake, in particular when warned to do so by
DISTRONIC PLUS.
GWARNING
DISTRONIC PLUS brakes your vehicle with up to 40% of the maximum braking force. If this
braking force is insufficient, DISTRONIC PLUS
warns you visually and audibly. There is a risk
of an accident.
In such cases, apply the brakes yourself and
try to take evasive action.
If you fail to adapt your driving style, DISTRONIC
PLUS can neither reduce the risk of an accident
nor override the laws of physics. DISTRONIC
PLUS cannot take account of road, weather and
traffic conditions. DISTRONIC PLUS is only an
aid. You are responsible for maintaining a safe
distance to the vehicle in front, for vehicle
speed, for braking in good time and for staying in lane.
Driving systems135
Driving and parking
Z
Page 157 of 294
This also applies if you have activated cruise
control or the speed limiter.
XIf necessary, shift the transfer case toLOW
RANGE (Ypage 149).
This will use the braking effect of the engine,
so that less braking will be required to main-
tain the speed. This relieves the load on the
brake system and prevents the brakes from
overheating and wearing too quickly. If you
need additional braking, depress the brake
pedal repeatedly rather than continuously.
The maximum permissible speed for vehicle/
trailer combinations depends on the type of
trailer. Before beginning the journey, check the
trailer's documents to see what the maximum
permitted speed is. Observe the maximum per-
missible speed in the relevant country.
For certain Mercedes-Benz vehicles, the maxi-
mum permissible rear axle load is increased
when towing a trailer. See the "Technical data"
section to find out whether this applies to your
vehicle (
Ypage 291). In the event of increased
rear axle load, the car/trailer combination may
not exceed a maximum speed of 60 mph
(100 km/h) for reasons concerning the operat-
ing permit. This also applies in countries in
which the maximum permissible speed for car/ trailer combinations is greater than 60 mph
(100 km/h).
When towing a trailer, your vehicle's handling
characteristics will be different in comparison to
when driving without a trailer and it will con-
sume more fuel.
Driving tips
RMaintain a greater distance from the vehicle
in front than when driving without a trailer.
RAvoid braking abruptly. If possible, brake gen-tly at first to allow the trailer to run on. Then,
increase the braking force rapidly.
RThe values given for gradient-climbing capa-
bilities from a standstill refer to sea level.
When driving in mountainous areas, note that
the power output of the engine and, conse-
quently, the vehicle's gradient-climbing capa-
bility, decreases with increasing altitude.
If the trailer swings from side to side:
XDo not accelerate.
XDo not counter-steer.
XBrake if necessary.
Assembling the ball coupling
GWARNING
The ball coupling can be damaged if the nut on
the ball coupling is tightened using the incor-
rect torque. As a result, the trailer may
detach. There is a risk of an accident.
Immediately after installing, have the tighten-
ing torque checked at a qualified specialist
workshop.
!Mercedes-Benz recommends that you only
use ball couplings tested and approved for
use on Mercedes-Benz vehicles. This helps to avoid damage to the vehicle.
Observe the manufacturer's installation
instructions if you use a ball coupling other
than the one supplied.
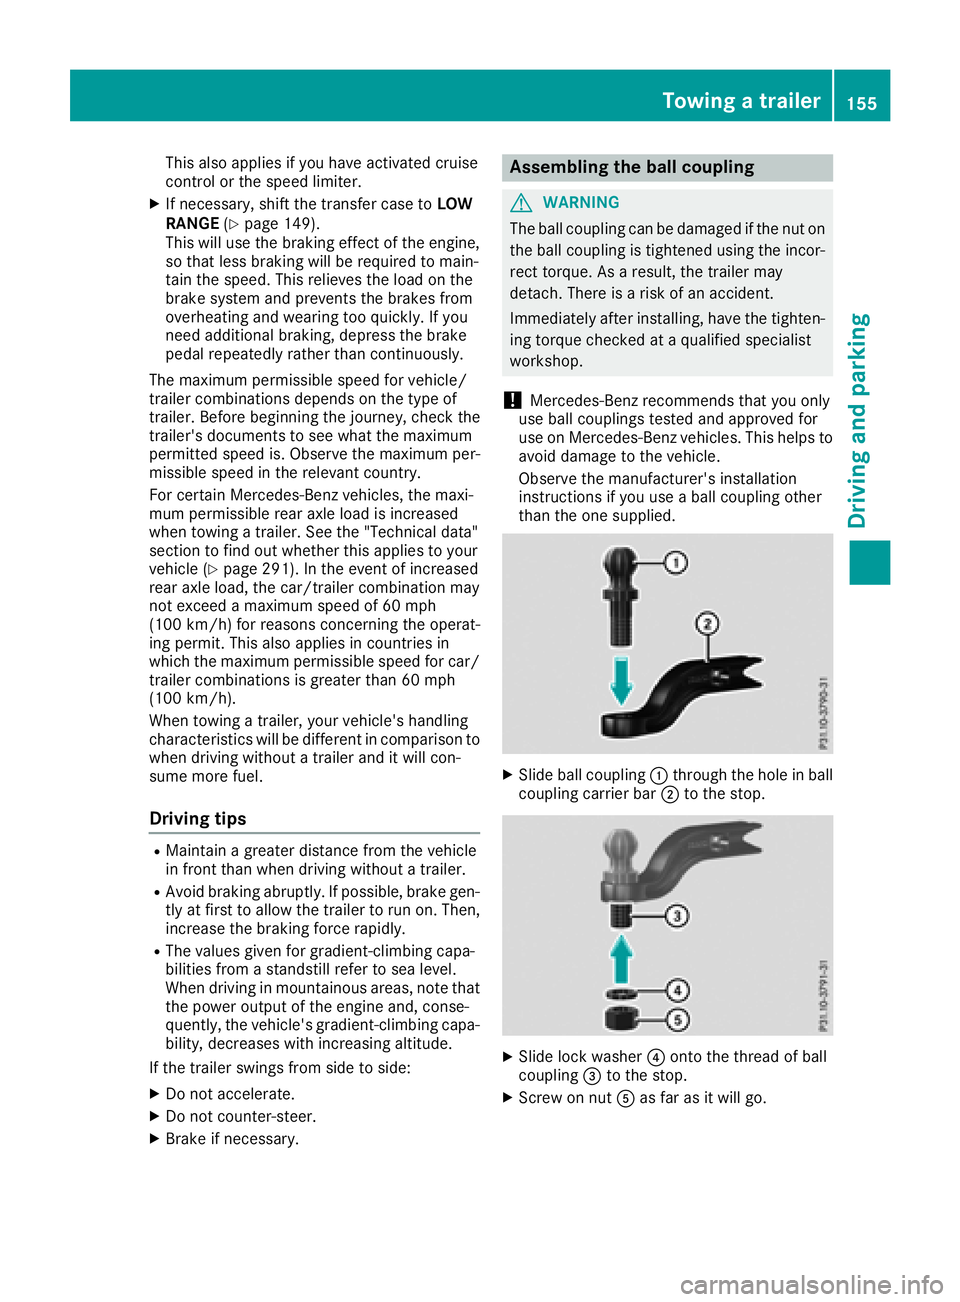
XSlide ball coupling :through the hole in ball
coupling carrier bar ;to the stop.
XSlide lock washer ?onto the thread of ball
coupling =to the stop.
XScrew on nut Aas far as it will go.
Towing a trailer155
Driving and parking
Z
Page 219 of 294
Ashtray in the rear compa rtment
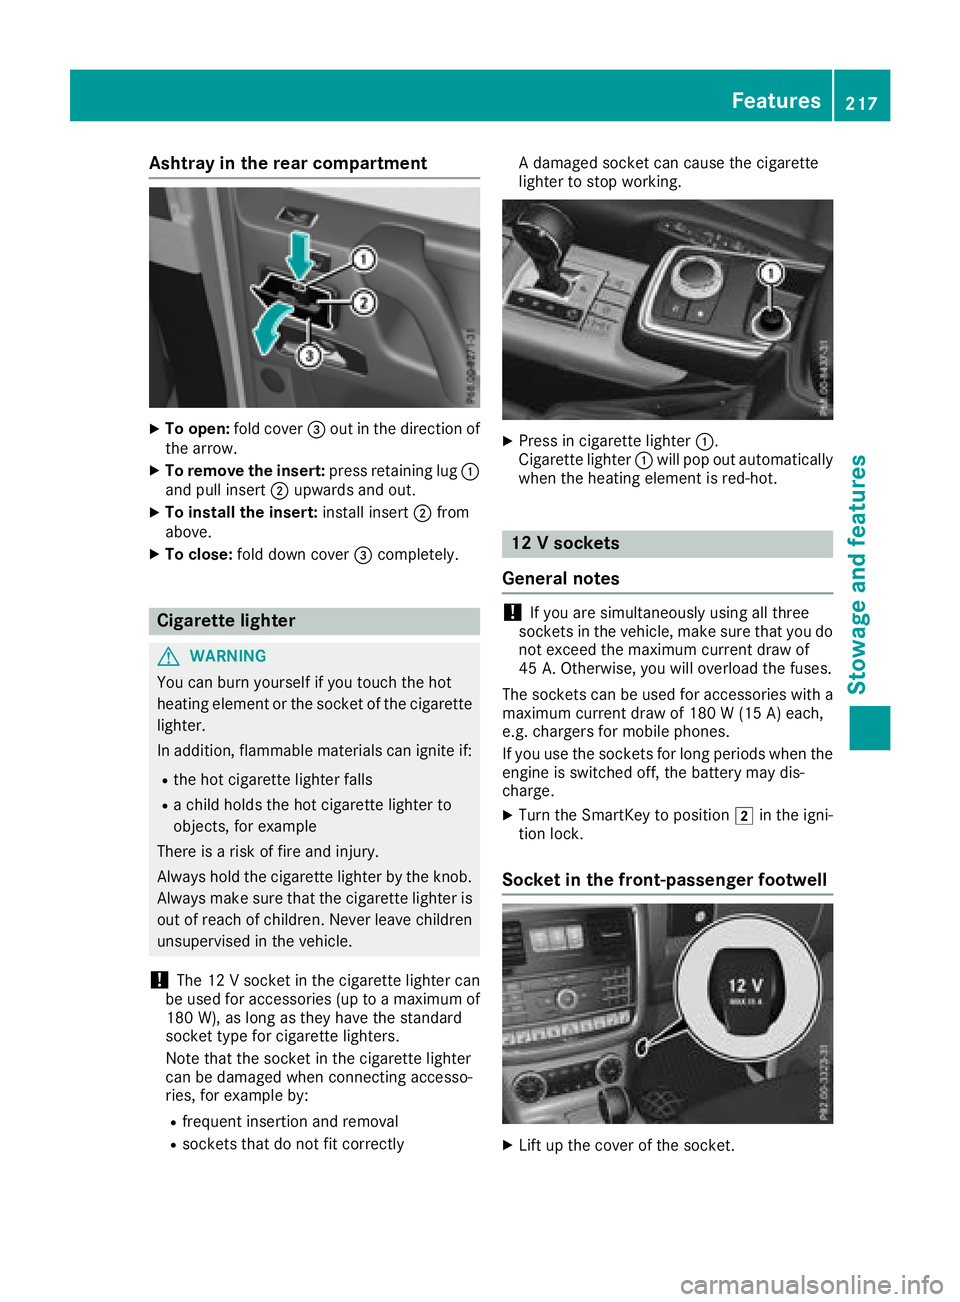
XTo open :fol dcover =out in th edirection of
th earrow.
XTo remove th einsert: press retaining lug :
and pull insert ;upwards and out .
XTo install theinsert: installinsert ;from
above.
XTo close: folddown cover =completely.
Cigarette lighter
GWARNIN G
You can burn yourself if you touch th ehot
heating elemen tor th esocke tof th ecigarette
lighter.
In addition ,flammabl ematerials can ignit eif:
Rth ehot cigarette lighte rfall s
Rachild hold sth ehot cigarette lighte rto
objects ,for exampl e
There is aris kof fir eand injury.
Always hold th ecigarette lighte rby th eknob.
Always mak esur ethat th ecigarette lighte ris
out of reac hof children .Never leav echildren
unsupervised in th evehicle.
!The 12 Vsocke tin th ecigarette lighte rcan
be used for accessories (up to amaximum of
18 0W), as lon gas they hav eth estandard
socke ttyp efor cigarette lighters.
Not ethat th esocke tin th ecigarette lighte r
can be damaged when connecting accesso-
ries, for exampl eby:
Rfrequen tinsertion and removal
Rsockets that do no tfit correctl y A
damaged socke tcan caus eth ecigarette
lighte rto stop working .
XPress in cigarette lighte r:.
Cigarette lighte r: will pop out automatically
when th eheating elemen tis red-hot .
12V sockets
Gene ral notes
!If you are simultaneously usin gall three
sockets in th evehicle, mak esur ethat you do
no texceed th emaximum curren tdraw of
45 A. Otherwise ,you will overload th efuses.
The sockets can be used for accessories wit h a
maximum curren tdraw of 18 0 W(15 A) each,
e.g. chargers for mobile phones.
If you use th esockets for lon gperiods when th e
engin eis switched off ,th ebattery may dis-
charge .
XTurn th eSmartKey to position 2in th eigni-
tion lock.
Socket in the front-passenger footwell
XLiftup th ecover of th esocket.
Features217
Stowage and features
Z