wheel MERCEDES-BENZ G-CLASS 2018 Owner's Guide
[x] Cancel search | Manufacturer: MERCEDES-BENZ, Model Year: 2018, Model line: G-CLASS, Model: MERCEDES-BENZ G-CLASS 2018Pages: 294, PDF Size: 4.86 MB
Page 47 of 294
tem on the front-passenger seat"
(Ypage 55) in addition to the child restraint
system manufacturer's installation and oper-
ating instructions.
Objects in the vehicle interior may prevent
an air bag from functioning correctly. Before
starting your journey and to avoid risks resulting
from the speed of the air bag as it deploys, make sure that:
Rthere are no people, animals or objects
between the vehicle occupants and an air bag
Rthere are no objects between the seat, door
and B-pillar
Rthere are no hard objects, e.g. coat hangers,
hanging on the grab handles or coat hooks
Rno accessories, such as cup holders, are
attached to the vehicle within the deploymentarea of an air bag, e.g. to doors, side windows,
rear side trim or side walls
Rno heavy, sharp-edged or fragile objects are in
the pockets of your clothing. Store such
objects in a suitable place
GWARNING
If you modify the air bag cover or affix objects
such as stickers to it, the air bag can no longer
function correctly. There is an increased risk
of injury.
Never modify an air bag cover or affix objects
to it.
GWARNING
Sensors to control the air bags are located in
the doors. Modifications or work not per-
formed correctly to the doors or door panel-
ing, as well as damaged doors, can lead to the
function of the sensors being impaired. The air
bags might therefore not function properly
anymore. Consequently, the air bags cannot
protect vehicle occupants as they are
designed to do. There is an increased risk of
injury.
Never modify the doors or parts of the doors.
Always have work on the doors or door pan-
eling carried out at a qualified specialist work-
shop.
Front air bags
!Do not place heavy objects on the front-
passenger seat. This could cause the system
to identify the seat as being occupied. In the
event of an accident, the restraint systems on
the front-passenger side may be triggered
and have to be replaced.
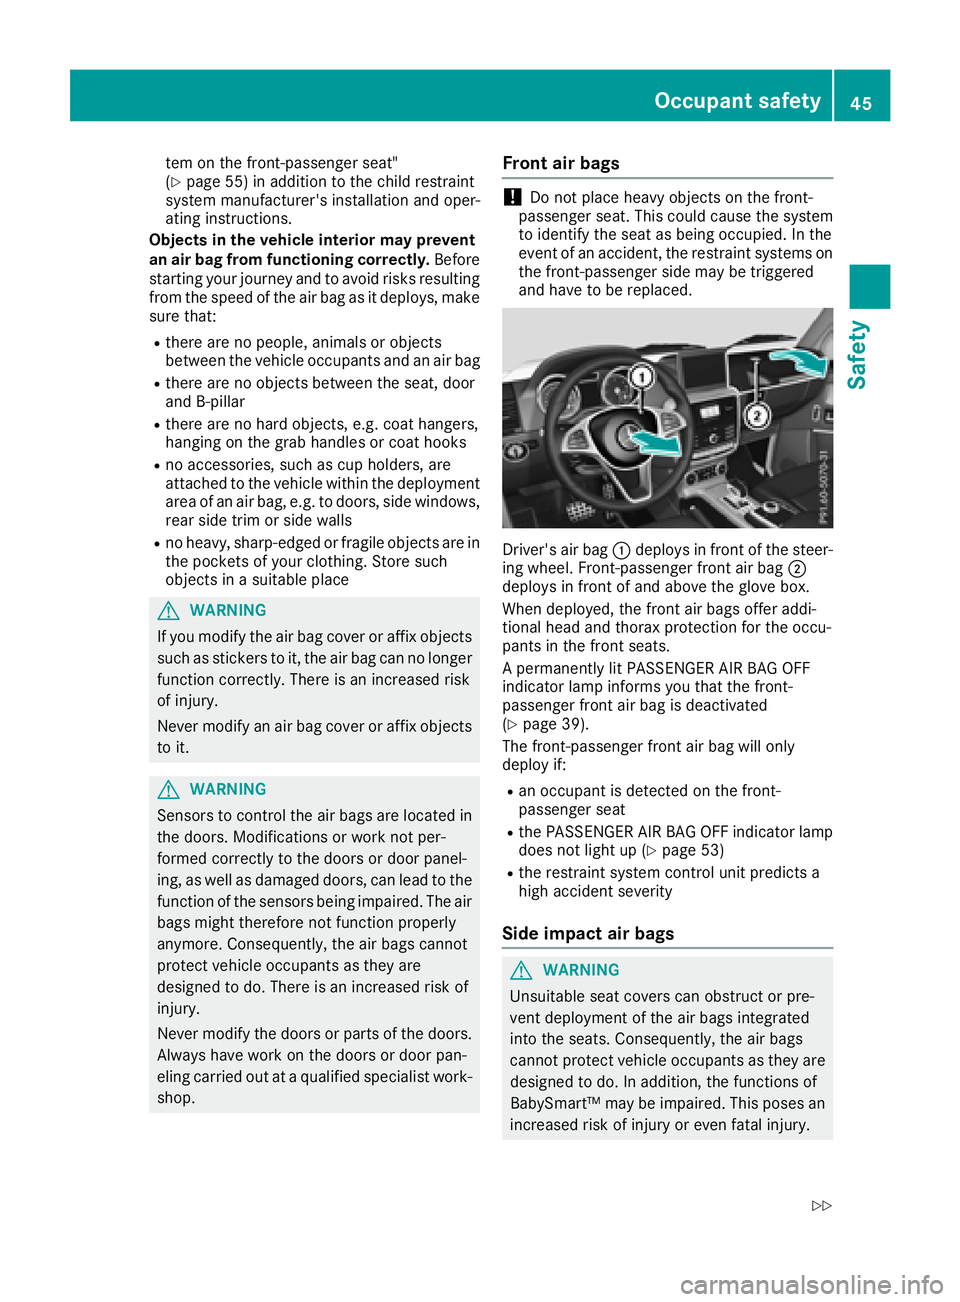
Driver's air bag :deploys in front of the steer-
ing wheel. Front-passenger front air bag ;
deploys in front of and above the glove box.
When deployed, the front air bags offer addi-
tional head and thorax protection for the occu-
pants in the front seats.
A permanently lit PASSENGER AIR BAG OFF
indicator lamp informs you that the front-
passenger front air bag is deactivated
(
Ypage 39).
The front-passenger front air bag will only
deploy if:
Ran occupant is detected on the front-
passenger seat
Rthe PASSENGER AIR BAG OFF indicator lamp
does not light up (Ypage 53)
Rthe restraint system control unit predicts a
high accident severity
Side impact air bags
GWARNING
Unsuitable seat covers can obstruct or pre-
vent deployment of the air bags integrated
into the seats. Consequently, the air bags
cannot protect vehicle occupants as they are designed to do. In addition, the functions of
BabySmart™ may be impaired. This poses an
increased risk of injury or even fatal injury.
Occupant safety45
Safety
Z
Page 60 of 294
As a result, they could:
Ractivate vehicle equipment and become
trapped, for example
Ractivate or deactivate systems, thereby
endangering other road users
Unsecured animals could also be flung around
the vehicle in the event of an accident or sud-
den steering or braking, thereby injuring vehi- cle occupants. There is a risk of an accident
and injury.
Never leave animals unattended in the vehi-
cle. Always secure animals properly during
the journey, e.g. use a suitable animal trans-
port box.
Driving safety systems
Overview of driving safety systems
In this section, you will find information about
the following driving safety systems:
RABS ( Anti-lock Braking System)
(Ypage 58)
RBAS ( Brake Assist System) (Ypage 59)
RESP®(E lectronic StabilityProgram)
(Ypage 59)
REBD ( Electronic Brake force Distribution)
(Ypage 61)
RADAPTIVE BRAKE (Ypage 61)
Important safety notes
If you fail to adapt your driving style or if you are
inattentive, the driving safety systems can nei-
ther reduce the risk of an accident nor override
the laws of physics. Driving safety systems are
merely aids designed to assist driving. You are
responsible for maintaining the distance to the
vehicle in front, for vehicle speed, for braking in good time, and for staying in lane. Always adapt
your driving style to suit the prevailing road and weather conditions and maintain a safe distance
from the vehicle in front. Drive carefully.
The driving safety systems described only work as effectively as possible when there is ade-
quate contact between the tires and the road
surface. Pay particular attention to the informa-
tion regarding tires, recommended minimum tire tread depths etc. in the "Wheels and tires"
section (
Ypage 257).
In wintry driving conditions, always use winter
tires (M+S tires) and if necessary, snow chains.
Only in this way will the driving safety systems
described in this section work as effectively as
possible.
ABS (Anti-lock Braking System)
General information
ABS regulates brake pressure in such a way that the wheels do not lock when you brake. This
allows you to continue steering the vehicle when
braking.
The yellow !ABS warning lamp in the instru-
ment cluster lights up when the ignition is
switched on. It goes out when the engine is run- ning.
ABS works from a speed of about 5 mph
(8 km/h), regardless of road-surface conditions.
ABS works on slippery surfaces, even when you
only brake gently.
Important safety notes
iObserve the "Important safety notes" sec-
tion (Ypage 58).
GWARNING
If ABS is faulty, the wheels could lock when
braking. The steerability and braking charac-
teristics may be severely impaired. Addition-
ally, further driving safety systems are deac-
tivated. There is an increased danger of skid-
ding and accidents.
Drive on carefully. Have ABS checked imme-
diately at a qualified specialist workshop.
When ABS is malfunctioning, other systems,
including driving safety systems, will also
become inoperative. Observe the information
on the ABS warning lamp (
Ypage 194) and dis-
play messages which may be shown in the
instrument cluster (
Ypage 175).
58Driving safety systems
Safety
Page 61 of 294
Braking
XIf ABS intervenes:continue to depress the
brake pedal vigorously until the braking sit-
uation is over.
XTo make a full brake application: depress
the brake pedal with full force.
If ABS intervenes when braking, you will feel a
pulsing in the brake pedal.
The pulsating brake pedal can be an indication
of hazardous road conditions, and functions as a
reminder to take extra care while driving.
Off-road ABS
ESP®automatically activates the ABS system
specifically suited to off-road terrain.
At speeds below 37 mph (60 km/h), the front
wheels lock cyclically during braking. The dig-
ging-in effect achieved in the process reduces
the stopping distance on off-road terrain. This
limits steering capability.
BAS (Brake Assist System)
General information
BAS operates in emergency braking situations.
If you depress the brake pedal quickly, BAS
automatically boosts the braking force, thus
shortening the stopping distance.
Important safety notes
iObserve the "Important safety notes" sec-
tion (Ypage 58).
GWARNING
If BAS is malfunctioning, the braking distance
in an emergency braking situation is
increased. There is a risk of an accident.
In an emergency braking situation, depress
the brake pedal with full force. ABS prevents
the wheels from locking.
Braking
XKeep the brake pedal firmly depressed until
the emergency braking situation is over.
ABS prevents the wheels from locking. The brakes will function as usual once you
release the brake pedal. BAS is deactivated.
ESP®(Electronic Stability Program)
General notes
iObserve the "Important safety notes" sec-
tion (Ypage 58).
ESP
®monitors driving stability and traction, i.e.
power transmission between the tires and the
road surface.
If ESP
®detects that the vehicle is deviating from
the direction desired by the driver, one or more
wheels are braked to stabilize the vehicle. The
engine output is also modified to keep the vehi-
cle on the desired course within physical limits.
ESP
®assists the driver when pulling away on
wet or slippery roads. ESP®can also stabilize
the vehicle during braking.
4ETS (Electronic Traction System)
iObserve the "Important safety notes" sec-
tion (Ypage 58).
4ETS traction control is part of ESP
®.
Traction control brakes the drive wheels indi-
vidually if they spin. This enables you to pull
away and accelerate on slippery surfaces, for
example if the road surface is slippery on one
side. In addition, more drive torque is transfer-
red to the wheel or wheels with traction.
Traction control remains active, even if you
deactivate ESP
®.
Important safety notes
iObserve the "Important safety notes" sec-
tion (Ypage 58).
GWARNING
If ESP
®is malfunctioning, ESP®is unable to
stabilize the vehicle. Additionally, further driv-
ing safety systems are deactivated. This
increases the risk of skidding and an accident.
Drive on carefully. Have ESP
®checked at a
qualified specialist workshop.
Driving safety systems59
Safety
Z
Page 62 of 294
!Only operate the vehicle for a maximum of
ten seconds on a brake test dynamometer.
Switch off the ignition.
Application of the brakes by ESP
®may oth-
erwise destroy the brake system.
!A function or performance test should only
be carried out on a two-axle dynamometer.
Before you operate the vehicle on such a
dynamometer, please consult a qualified
workshop. You could otherwise damage the
drive train or the brake system.
If the å ESP
®OFF warning lamp lights up
continuously, ESP®is deactivated.
If the ÷ ESP®warning lamp lights up contin-
uously, ESP®is not available due to a malfunc-
tion.
Observe the information on warning lamps
(
Ypage 196) and display messages which may
be displayed in the instrument cluster
(
Ypage 175).
Only use wheels with the recommended tire
sizes. Only then will ESP
®function properly.
If differential locks are switched on, ABS, BAS
and ESP
®switch off automatically.
Characteristics of ESP®
General information
If the ÷ ESP®warning lamp goes out before
beginning the journey, ESP®is automatically
active.
If ESP
®intervenes, the ÷ESP®warning lamp
flashes in the instrument cluster.
If ESP
®intervenes:
XDo not deactivate ESP®under any circum-
stances.
XOnly depress the accelerator pedal as far as
necessary when pulling away.
XAdapt your driving style to suit the prevailing
road and weather conditions.
ECO start/stop function
The ECO start/stop function switches the
engine off automatically when the vehicle stops
moving. The engine starts automatically when
the driver wants to pull away again. ESP
®
remains in its previously selected status, e.g. if
ESP®was deactivated before the engine was
automatically switched off.
Deactivating/activating ESP®
Important safety notes
iObserve the "Important safety notes" sec-
tion (Ypage 58).
You can select between the following states of
ESP
®:
RESP®is activated.
RESP®is deactivated.
GWARNING
If you deactivate ESP
®, ESP®no longer sta-
bilizes the vehicle. There is an increased risk
of skidding and an accident.
Only deactivate ESP
®in the situations descri-
bed in the following.
It may be best to deactivate ESP
®in the follow-
ing situations:
Rwhen using snow chains
Rin deep snow
Ron sand or gravel
Roff-road
Spinning the wheels results in a cutting action
which provides better grip.
Activate ESP
®as soon as the situations descri-
bed above no longer apply. ESP®will otherwise
not be able to stabilize the vehicle if the vehicle
starts to skid or a wheel starts to spin.
!Avoid spinning the driven wheels for an
extended period with ESP®deactivated. You
could otherwise damage the drivetrain.
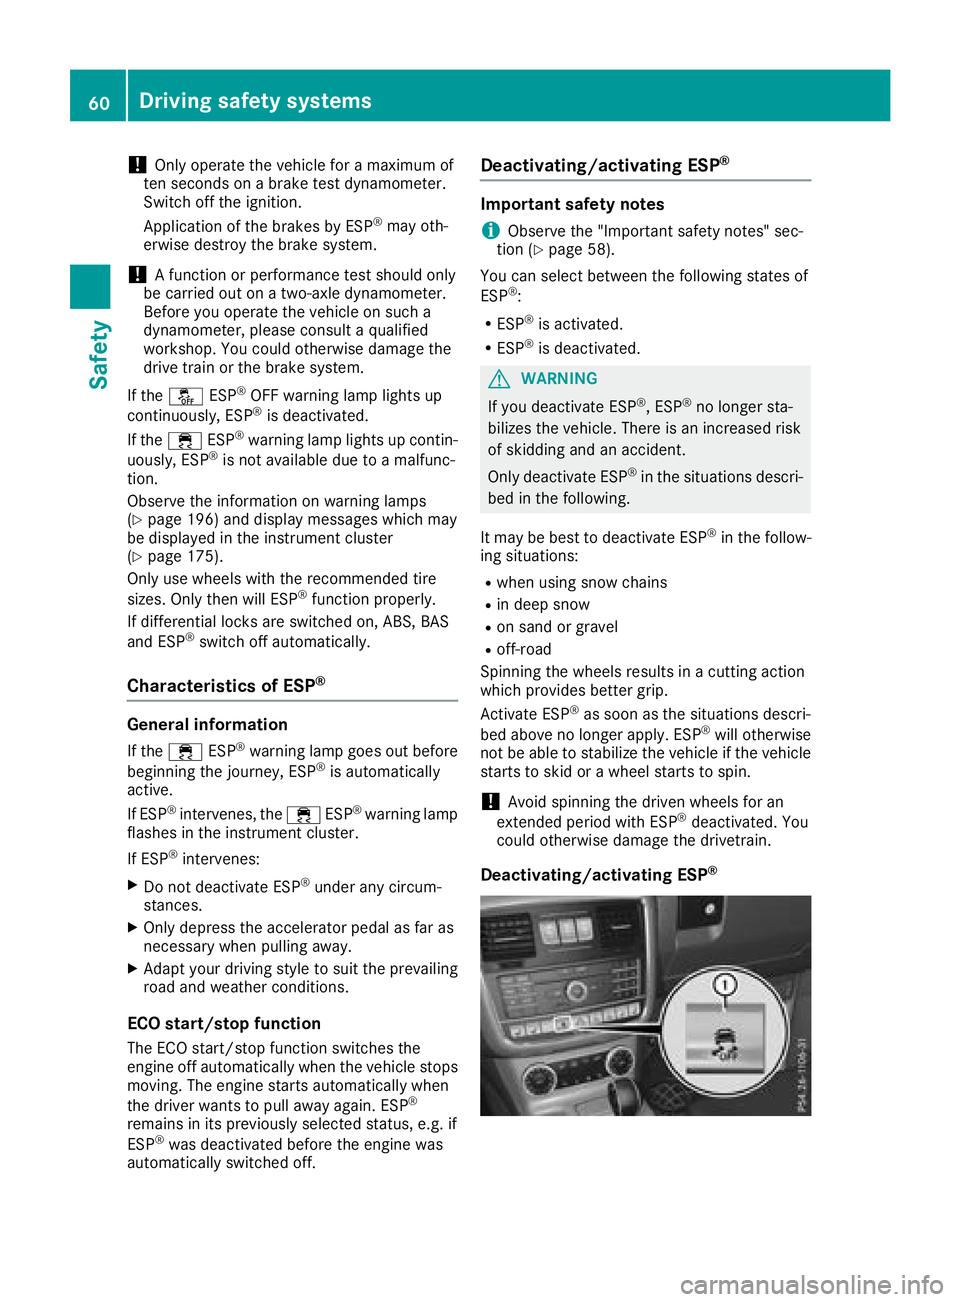
Deactivating/activating ESP®
60Driving safety systems
Safety
Page 63 of 294
XTo deactivate:press button:.
The å ESP®OFF warning lamp in the
instrument cluster lights up.
XTo activate: press button :.
The å ESP®OFF warning lamp in the
instrument cluster goes out.
Characteristics when ESP®is deactivated
If ESP®is deactivated and one or more wheels
start to spin, the ÷ESP®warning lamp in the
instrument cluster flashes. In such situations,
ESP
®will not stabilize the vehicle.
If you deactivate ESP®:
RESP®no longer improves driving stability.
REngine torque is no longer limited and the
drive wheels are able to spin.
RTraction control is still activated.
RESP®still provides support when you brake
firmly.
RMercedes-AMG vehicles: and are driving a
speed at above 62 mph (100 km/h), ESP®still
intervenes when one wheel reaches its grip
limit even though it is deactivated.
RAll other models: and are driving at a speed
above 37 mph (60 km/h), ESP®still inter-
venes when one wheel reaches its grip limit
even though it is deactivated.
Mercedes-AMG vehicles: if ESP
®is deactiva-
ted, it is reactivated automatically if you are
driving at a speed above 62 mph (100 km/h) or
you exceed a certain lateral acceleration.
All other models: if ESP
®is deactivated, it is
re
activated automatically if you are driving at a
speed above 37 mph (60 km/h) or you exceed a
certain lateral acceleration.
Trailer stabilization
General information
If your vehicle/trailer combination begins to
swerve, ESP®assists you in this situation. ESP®
slows the vehicle down by braking and limiting
the engine output until the vehicle/trailer com-
bination has stabilized.
Important safety notes
GWARNING
If road and weather conditions are poor,
trailer stabilization will not be able to prevent
the vehicle/trailer combination from swerv-
ing. Trailers with a high center of gravity can
tip over before ESP
®can detect this. There is
a risk of an accident.
Always adapt your driving style to the prevail-
ing road and weather conditions.
If your vehicle with trailer (vehicle/trailer com-
bination) begins to lurch, you can only stabilize
the vehicle/trailer combination by depressing
the brake firmly.
ESP
®trailer stabilization is active above speeds
of approximately 37 mph (60 km/h).
ESP
®trailer stabilization does not work if ESP®
is deactivated or malfunctioning.
EBD (electronic brake force distribu-
tion)
General information
EBD monitors and controls the brake pressure
on the rear wheels to improve driving stability
while braking.
Important safety notes
iObserve the "Important safety notes" sec-
tion (Ypage 58).
GWARNING
If EBD is malfunctioning, the rear wheels can
lock, e.g. under full braking. This increases the
risk of skidding and an accident.
You should therefore adapt your driving style
to the different handling characteristics. Have
the brake system checked at a qualified spe-
cialist workshop.
Observe information regarding indicator and
warning lamps (
Ypage 194) as well as display
messages (Ypage 176).
ADAPTIVE BRAKE
ADAPTIVE BRAKE provides increased braking
safety. In addition to the braking function,
ADAPTIVE BRAKE also has the HOLD function
(
Ypage 142) and hill start assist (Ypage 107).
Driving safety systems61
Safety
Z
Page 70 of 294
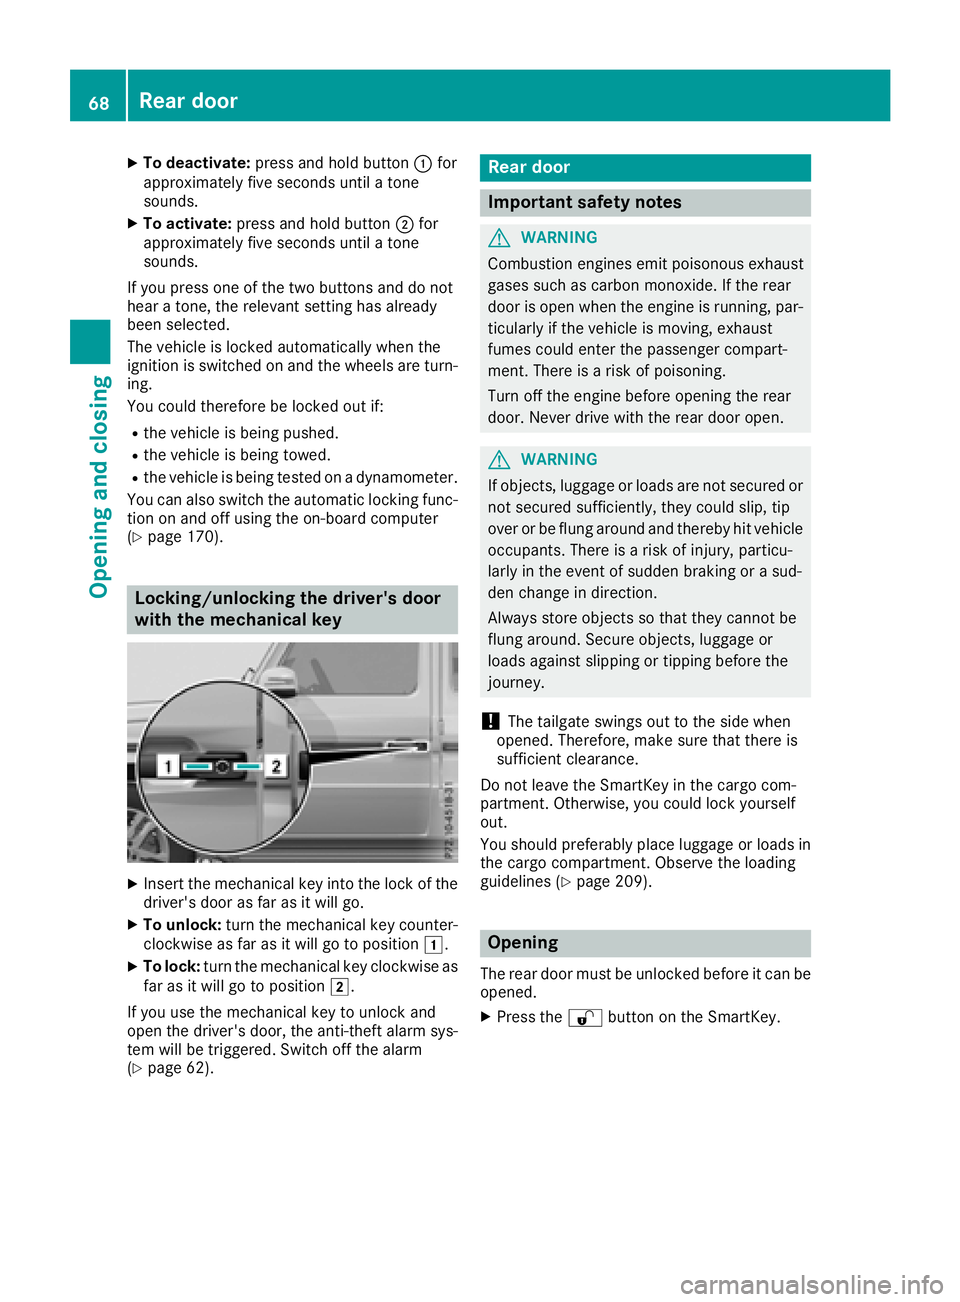
XTo deactivate:press and hold button :for
approximately five seconds until a tone
sounds.
XTo activate: press and hold button ;for
approximately five seconds until a tone
sounds.
If you press one of the two buttons and do not
hear a tone, the relevant setting has already
been selected.
The vehicle is locked automatically when the
ignition is switched on and the wheels are turn-
ing.
You could therefore be locked out if:
Rthe vehicle is being pushed.
Rthe vehicle is being towed.
Rthe vehicle is being tested on a dynamometer.
You can also switch the automatic locking func-
tion on and off using the on-board computer
(
Ypage 170).
Locking/unlocking the driver's door
with the mechanical key
XInsert the mechanical key into the lock of the driver's door as far as it will go.
XTo unlock: turn the mechanical key counter-
clockwise as far as it will go to position 1.
XTo lock:turn the mechanical key clockwise as
far as it will go to position 2.
If you use the mechanical key to unlock and
open the driver's door, the anti-theft alarm sys-
tem will be triggered. Switch off the alarm
(
Ypage 62).
Rear door
Important safety notes
GWARNING
Combustion engines emit poisonous exhaust
gases such as carbon monoxide. If the rear
door is open when the engine is running, par-
ticularly if the vehicle is moving, exhaust
fumes could enter the passenger compart-
ment. There is a risk of poisoning.
Turn off the engine before opening the rear
door. Never drive with the rear door open.
GWARNING
If objects, luggage or loads are not secured or
not secured sufficiently, they could slip, tip
over or be flung around and thereby hit vehicle
occupants. There is a risk of injury, particu-
larly in the event of sudden braking or a sud-
den change in direction.
Always store objects so that they cannot be
flung around. Secure objects, luggage or
loads against slipping or tipping before the
journey.
!The tailgate swings out to the side when
opened. Therefore, make sure that there is
sufficient clearance.
Do not leave the SmartKey in the cargo com-
partment. Otherwise, you could lock yourself
out.
You should preferably place luggage or loads in
the cargo compartment. Observe the loading
guidelines (
Ypage 209).
Opening
The rear door must be unlocked before it can be opened.
XPress the %button on the SmartKey.
68Rear door
Opening and closing
Page 76 of 294
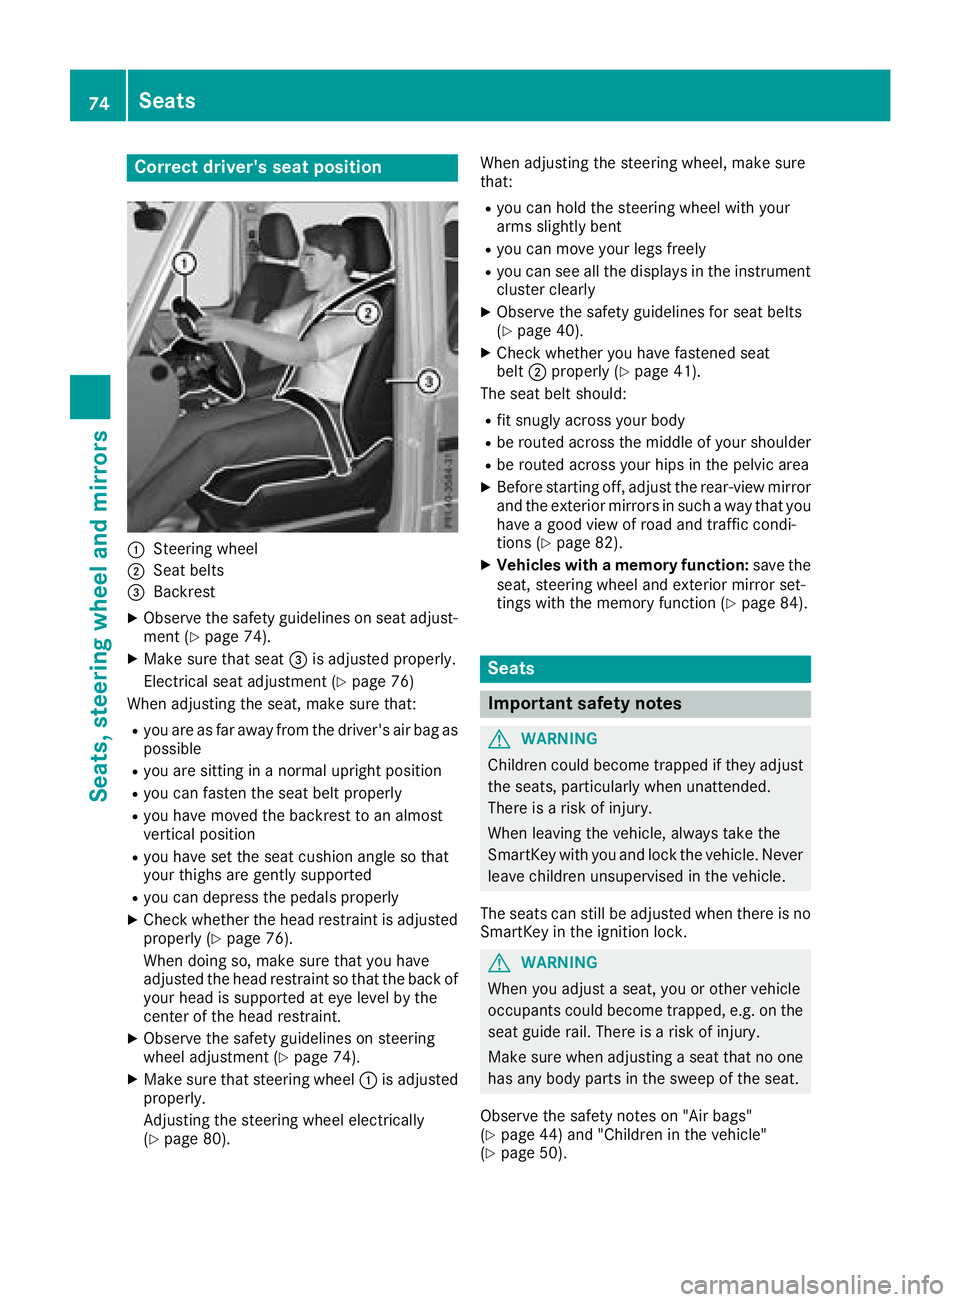
Correct driver's seat position
:Steering wheel
;Seat belts
=Backrest
XObserve the safety guidelines on seat adjust-
ment (Ypage 74).
XMake sure that seat=is adjusted properly.
Electrical seat adjustment (
Ypage 76)
When adjusting the seat, make sure that:
Ryou are as far away from the driver's air bag as
possible
Ryou are sitting in a normal upright position
Ryou can fasten the seat belt properly
Ryou have moved the backrest to an almost
vertical position
Ryou have set the seat cushion angle so that
your thighs are gently supported
Ryou can depress the pedals properly
XCheck whether the head restraint is adjusted
properly (Ypage 76).
When doing so, make sure that you have
adjusted the head restraint so that the back of
your head is supported at eye level by the
center of the head restraint.
XObserve the safety guidelines on steering
wheel adjustment (Ypage 74).
XMake sure that steering wheel :is adjusted
properly.
Adjusting the steering wheel electrically
(
Ypage 80). When adjusting the steering wheel, make sure
that:
Ryou can hold the steering wheel with your
arms slightly bent
Ryou can move your legs freely
Ryou can see all the displays in the instrument
cluster clearly
XObserve the safety guidelines for seat belts
(Ypage 40).
XCheck whether you hav
e fastened seat
belt ;properly (Ypage 41).
The seat belt should:
Rfit snugly across your body
Rbe routed across the middle of your shoulder
Rbe routed across your hips in the pelvic area
XBefore starting off, adjust the rear-view mirror
and the exterior mirrors in such a way that you
have a good view of road and traffic condi-
tions (
Ypage 82).
XVehicles with a memory function: save the
seat, steering wheel and exterior mirror set-
tings with the memory function (
Ypage 84).
Seats
Important safety notes
GWARNING
Children could become trapped if they adjust
the seats, particularly when unattended.
There is a risk of injury.
When leaving the vehicle, always take the
SmartKey with you and lock the vehicle. Never
leave children unsupervised in the vehicle.
The seats can still be adjusted when there is no
SmartKey in the ignition lock.
GWARNING
When you adjust a seat, you or other vehicle
occupants could become trapped, e.g. on the seat guide rail. There is a risk of injury.
Make sure when adjusting a seat that no one
has any body parts in the sweep of the seat.
Observe the safety notes on "Air bags"
(
Ypage 44) and "Children in the vehicle"
(Ypage 50).
74Seats
Seats, steering wheel and mirrors
Page 77 of 294
GWARNING
You could lose control of your vehicle if you do the following while driving:
Radjust the driver's seat, head restraint,
steering wheel or mirrors
Rfasten the seat belt
There is a risk of an accident.
Adjust the driver's seat, head restraint, steer-
ing wheel and mirror and fasten your seat belt before starting the engine.
GWARNING
If the head restraints are not installed or not
adjusted correctly, they cannot provide pro-
tection as intended. There is an increased risk
of injury in the head and neck area, e.g. in the event of an accident or when braking.
Always drive with the head restraints instal-
led. Before driving off, make sure for every
vehicle occupant that the center of the head
restraint supports the back of the head at
about eye level.
Make sure that you do not rotate the head
restraints of the front and rear seats when
adjusting the head restraints. Otherwise, you
cannot adjust the height and angle of the head
restraints correctly.
Adjust the head restraint so that it is as close as
possible to your head.
GWARNING
If you adjust the seat height carelessly, you or
other vehicle occupants could be trapped and
thereby injured. Children in particular could
accidentally press the electrical seat adjust-
ment buttons and become trapped. There is a
risk of injury.
While moving the seats, make sure that your
hands or other body parts do not get under the
lever assembly of the seat adjustment sys-
tem.
GWARNING
When you adjust a seat, you or other vehicle
occupants could become trapped, e.g. on the seat guide rail. There is a risk of injury.
Make sure when adjusting a seat that no one
has any body parts in the sweep of the seat.
!To avoid damage to the seats and the seat
heating, observe the following information:
Rkeep liquids from spilling on the seats. If
liquid is spilled on the seats, dry them as
soon as possible.
Rif the seat covers are damp or wet, do not
switch on the seat heating. The seat heat-
ing should also not be used to dry the seats.
Rclean the seat covers as recommended;
see "Interior care".
Rdo not transport heavy loads on the seats.
Do not place sharp objects on the seat
cushions, e.g. knives, nails or tools. The
seats should only be occupied by passen-
gers, if possible.
Rwhen the seat heating is in operation, do
not cover the seats with insulating materi-
als, e.g. blankets, coats, bags, seat covers,
child seats or booster seats.
!Make sure that there are no objects in the
footwell under or behind the seats when mov-
ing the seats back. There is a risk that the
seats and/or the objects could be damaged.
!When the rear bench seat is folded for-
wards, the front seats cannot be moved to
their rearmost position. You could otherwise
damage the seats and the rear bench seat.
!Make sure that the sun visor is folded up
before adjusting the backrest and head
restraint height. The head restraint and sun
visor could otherwise collide when the head
restraint is fully extended.
iIf the front door is open, the seats can be
adjusted for up to 30 minutes after the igni-
tion has been switched off.
iThe rear-compartment head restraints can
be removed (Ypage 77).
For more information, contact a qualified spe-
cialist workshop.
iYou can find further information about
enlarging the cargo compartment (folding the
rear bench seat forwards) on (
Ypage 213).
Seats75
Seats, steering wheel and mirrors
Z
Page 78 of 294
Adjusting the seats electrically
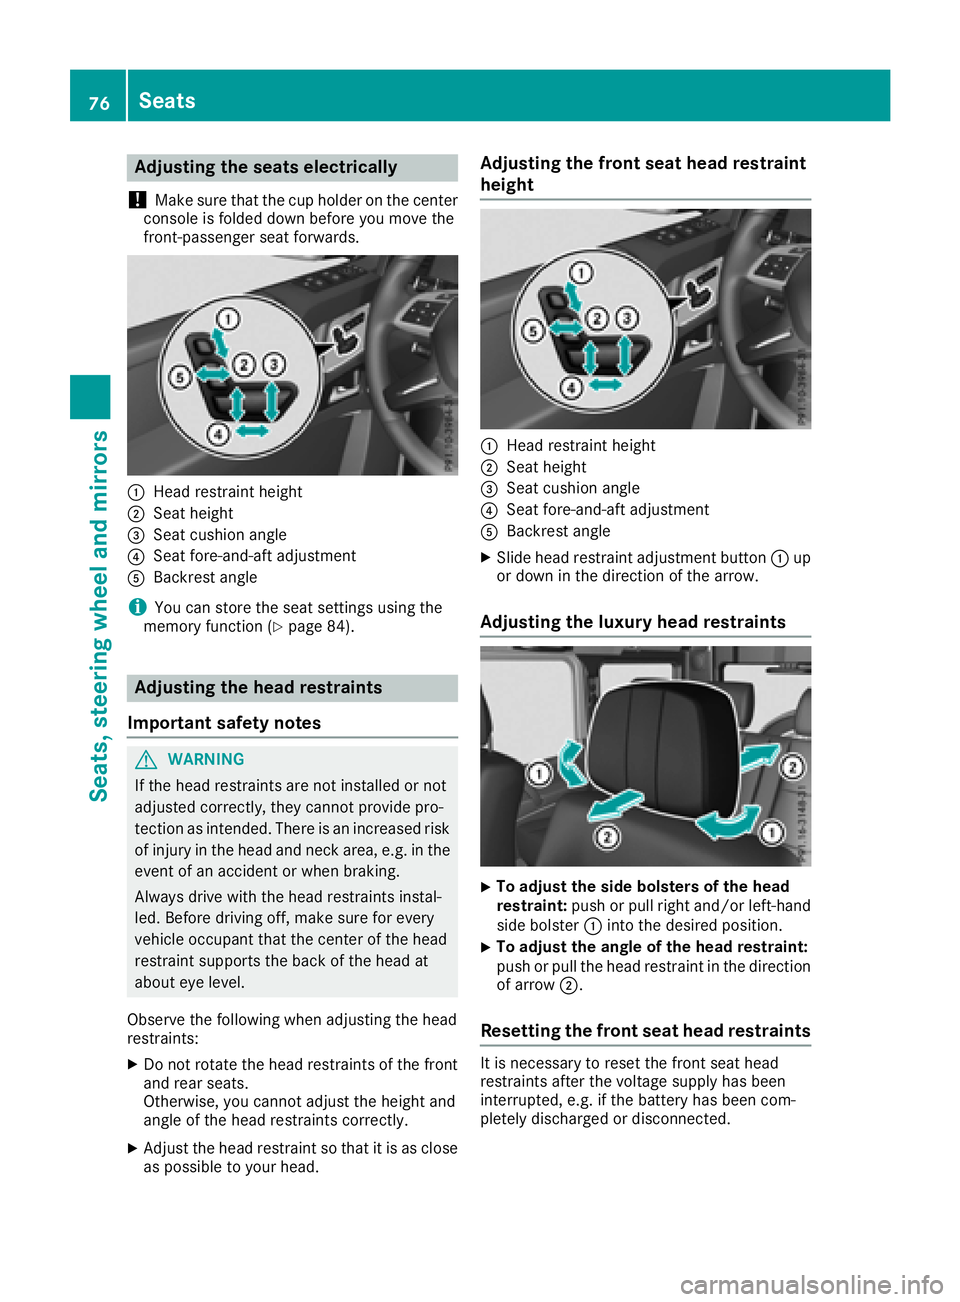
!
Mak esur ethat th ecup holder on th ecenter
console is folded down before you mov eth e
front-passenger seat forwards.
:Hea drestrain theight
;Seat height
=Seat cushion angle
?Seat fore-and-af tadjustmen t
ABackrest angle
iYou can store th eseat setting susin gth e
memory function (Ypage 84).
Adjusting the head restraints
Import ant safety notes
GWARNIN G
If th ehead restraints are no tinstalled or no t
adjusted correctly, they canno tprovid epro -
tection as intended. There is an increased ris k
of injury in th ehead and neck area, e.g. in th e
event of an acciden tor when braking .
Always drive wit hth ehead restraints instal -
led. Befor edrivin goff ,mak esur efor every
vehicl eoccupant that th ecenter of th ehead
restrain tsupport sth ebac kof th ehead at
about eye level.
Observ eth efollowin gwhen adjusting th ehead
restraints :
XDo notrotate th ehead restraints of th efron t
and rear seats.
Otherwise ,you canno tadjust th eheight and
angle of th ehead restraints correctly.
XAdjus tth ehead restrain tso that it is as close
as possibl eto your head .
Adjusting the front seat head restraint
height
:Headrestrain theight
;Seat height
=Seat cushion angle
?Seat fore-and-af tadjustmen t
ABackrest angle
XSlide head restrain tadjustmen tbutto n: up
or down in th edirection of th earrow.
Adjusting the luxury head restraints
XTo adjust th esid ebolsters of th ehea d
restraint: push or pull right and/o rleft-han d
side bolste r: intoth edesired position .
XTo adjust theangle of th ehea drestraint:
push or pull th ehead restrain tin th edirection
of arrow ;.
Resetting the front seat head restraints
It is necessar yto reset th efron tseat head
restraints after th evoltag esupply has been
interrupted, e.g. if th ebattery has been com-
pletely discharged or disconnected.
76Seats
Seats, steering wheel and mirrors
Page 79 of 294
XMake sure that the cup holder on the center
console is folded down (Ypage 215).
XMove the seat as far forward as possible andthe head restraint in as far as possible.
Rear seat head restraints
Important safety notes
GWARNING
If the head restraints are not installed or not
adjusted correctly, they cannot provide pro-
tection as intended. There is an increased risk
of injury in the head and neck area, e.g. in the event of an accident or when braking.
Always drive with the head restraints instal-
led. Before driving off, make sure for every
vehicle occupant that the center of the head
restraint supports the back of the head at
about eye level.
Observe the following when adjusting the head
restraints:
XDo not rotate the head restraints of the front
and rear seats.
Otherwise, you cannot adjust the height and
angle of the head restraints correctly.
XAdjust the head restraint so that it is as close
as possible to your head.
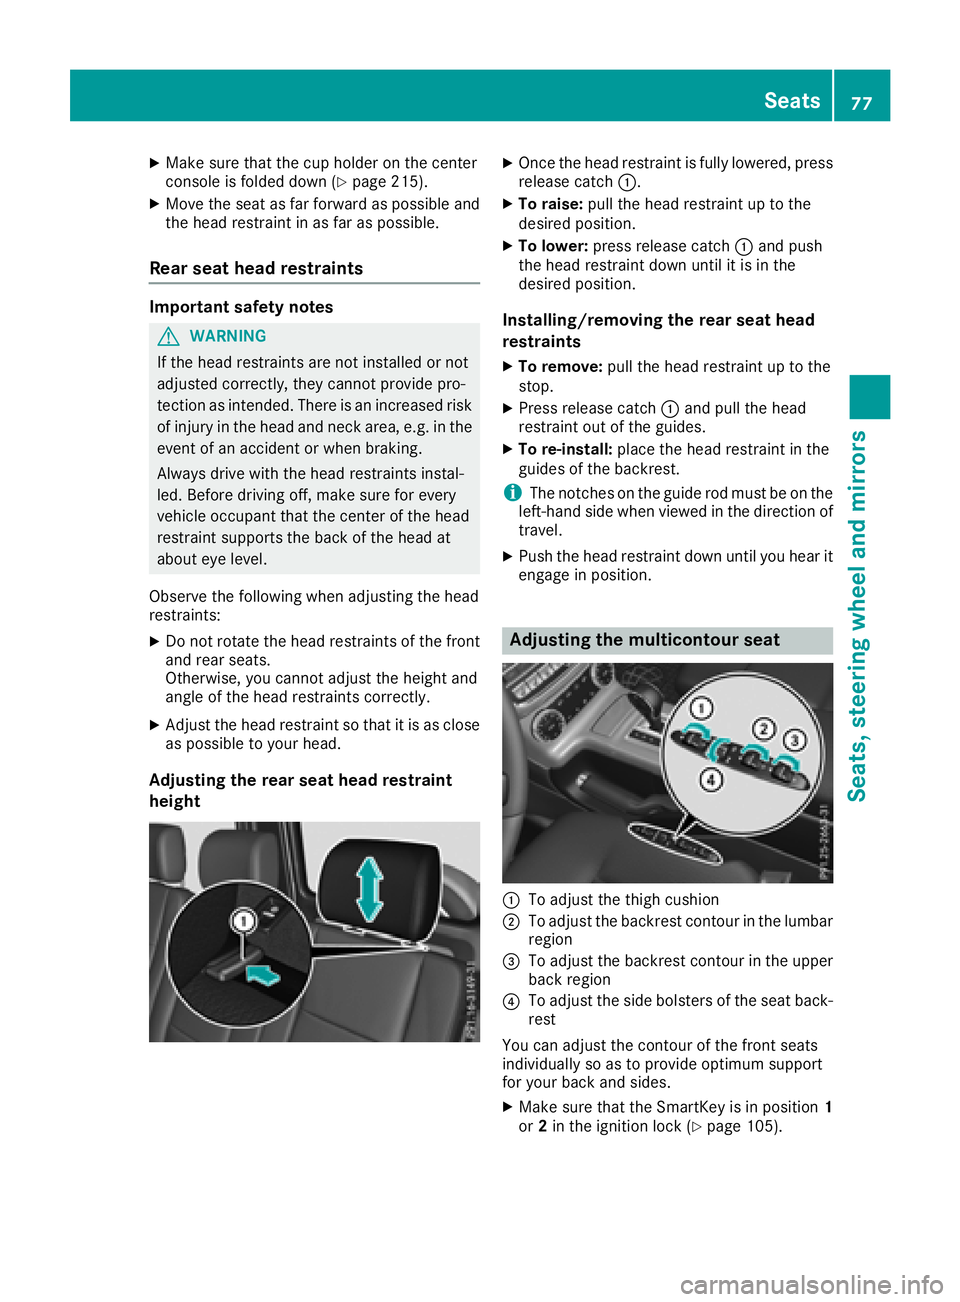
Adjusting the rear seat head restraint
height
XOnce the head restraint is fully lowered, press
release catch :.
XTo raise:pull the head restraint up to the
desired position.
XTo lower: press release catch :and push
the head restraint down until it is in the
desired position.
Installing/removing the rear seat head
restraints
XTo remove: pull the head restraint up to the
stop.
XPress release catch :and pull the head
restraint out of the guides.
XTo re-install: place the head restraint in the
guides of the backrest.
iThe notches on the guide rod must be on the
left-hand side when viewed in the direction of
travel.
XPush the head restraint down until you hear it
engage in position.
Adjusting the multicontour seat
:To adjust the thigh cushion
;To adjust the backrest contour in the lumbar
region
=To adjust the backrest contour in the upper
back region
?To adjust the side bolsters of the seat back-
rest
You can adjust the contour of the front seats
individually so as to provide optimum support
for your back and sides.
XMake sure that the SmartKey is in position 1
or 2in the ignition lock (Ypage 105).
Seats77
Seats, steering wheel and mirrors
Z