parking brake MERCEDES-BENZ G-CLASS 2018 Workshop Manual
[x] Cancel search | Manufacturer: MERCEDES-BENZ, Model Year: 2018, Model line: G-CLASS, Model: MERCEDES-BENZ G-CLASS 2018Pages: 294, PDF Size: 4.86 MB
Page 192 of 294
Vehicle
Display messagesPossible causes/consequences andMSolutions
Shiftto'P'or'N'to Start EngineYou have attempted to start the engine with the transmission in posi-
tionkorh.
XShift the transmission to position jori.
Auxiliary BatteryMalfunctionThe auxiliary battery for the automatic transmission is no longer being
charged.
XVisit a qualified specialist workshop at the next opportunity.
XUntil then, set the automatic transmission to jbefore you switch
off the engine.
XBefore leaving the vehicle, apply the parking brake.
Apply Brake toShift from 'P'You attempted to shift the transmission to position h,kori
without depressing the brake pedal.
XDepress the brake pedal.
Apply Brake toSelect RYou have attempted to shift from position hto position kwithout
applying the brakes.
XDepress the brake pedal.
XShift the transmission to position k.
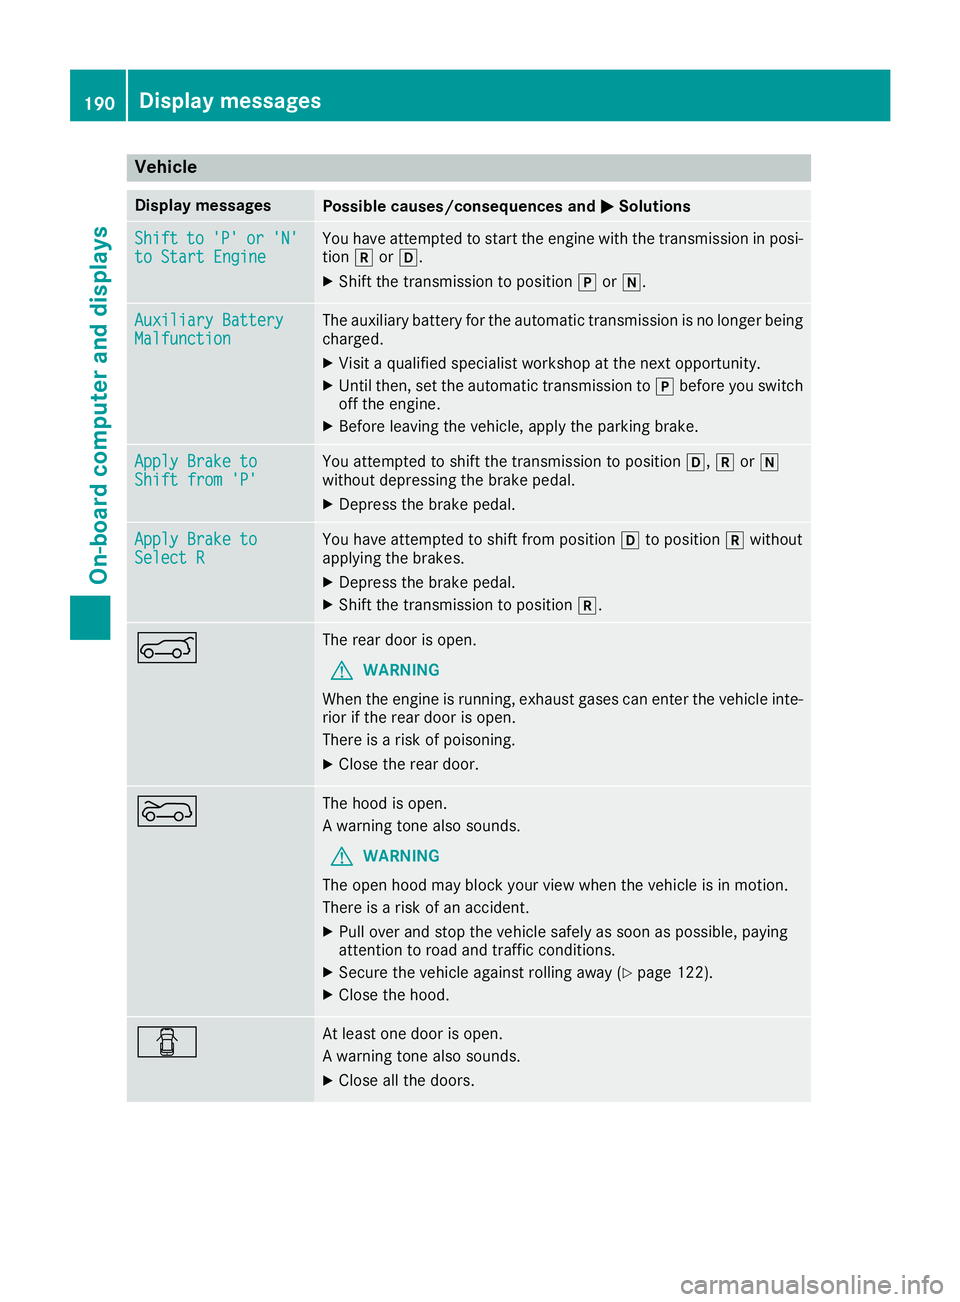
AThe rear door is open.
GWARNING
When the engine is running, exhaust gases can enter the vehicle inte-
rior if the rear door is open.
There is a risk of poisoning.
XClose the rear door.
?The hood is open.
A warning tone also sounds.
GWARNING
The open hood may block your view when the vehicle is in motion.
There is a risk of an accident.
XPull over and stop the vehicle safely as soon as possible, paying
attention to road and traffic conditions.
XSecure the vehicle against rolling away (Ypage 122).
XClose the hood.
CAt least one door is open.
A warning tone also sounds.
XClose all the doors.
190Display messages
On-board computer and displays
Page 196 of 294
Warning/
indicator
lampNSignal type
Possible causes/consequences and M
Solutions
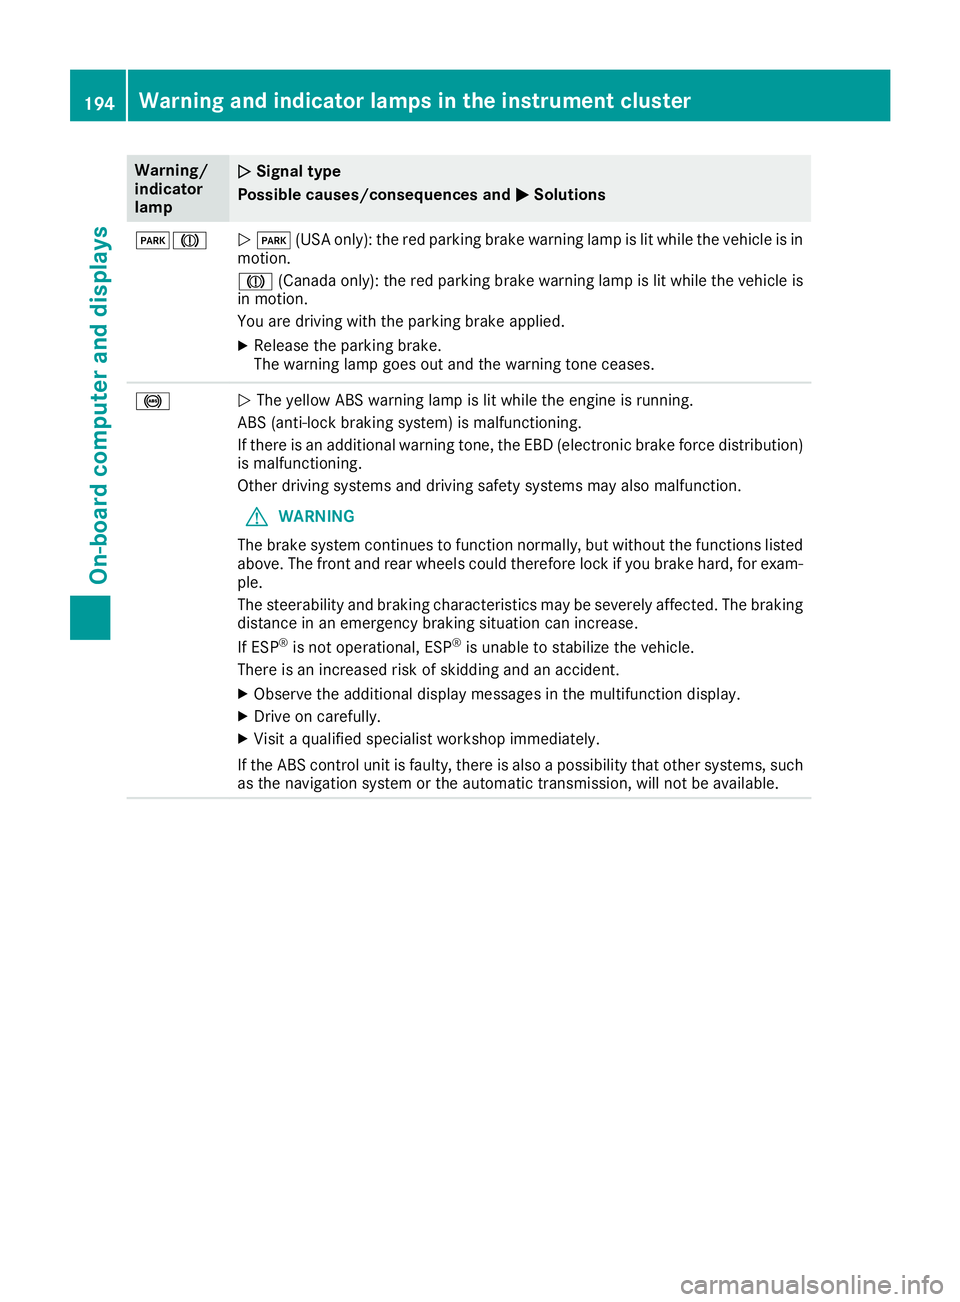
FJNF (USA only): the red parking brake warning lamp is lit while the vehicle is in
motion.
J (Canada only): the red parking brake warning lamp is lit while the vehicle is
in motion.
You are driving with the parking brake applied.
XRelease the parking brake.
The warning lamp goes out and the warning tone ceases.
!N The yellow ABS warning lamp is lit while the engine is running.
ABS (anti-lock braking system) is malfunctioning.
If there is an additional warning tone, the EBD (electronic brake force distribution)
is malfunctioning.
Other driving systems and driving safety systems may also malfunction.
GWARNING
The brake system continues to function normally, but without the functions listed
above. The front and rear wheels could therefore lock if you brake hard, for exam-
ple.
The steerability and braking characteristics may be severely affected. The braking
distance in an emergency braking situation can increase.
If ESP
®is not operational, ESP®is unable to stabilize the vehicle.
There is an increased risk of skidding and an accident.
XObserve the additional display messages in the multifunction display.
XDrive on carefully.
XVisit a qualified specialist workshop immediately.
If the ABS control unit is faulty, there is also a possibility that other systems, such
as the navigation system or the automatic transmission, will not be available.
194Warning and indicator lamps in the instrument cluster
On-board computer and displays
Page 218 of 294
Vanity mirror in the sun visor
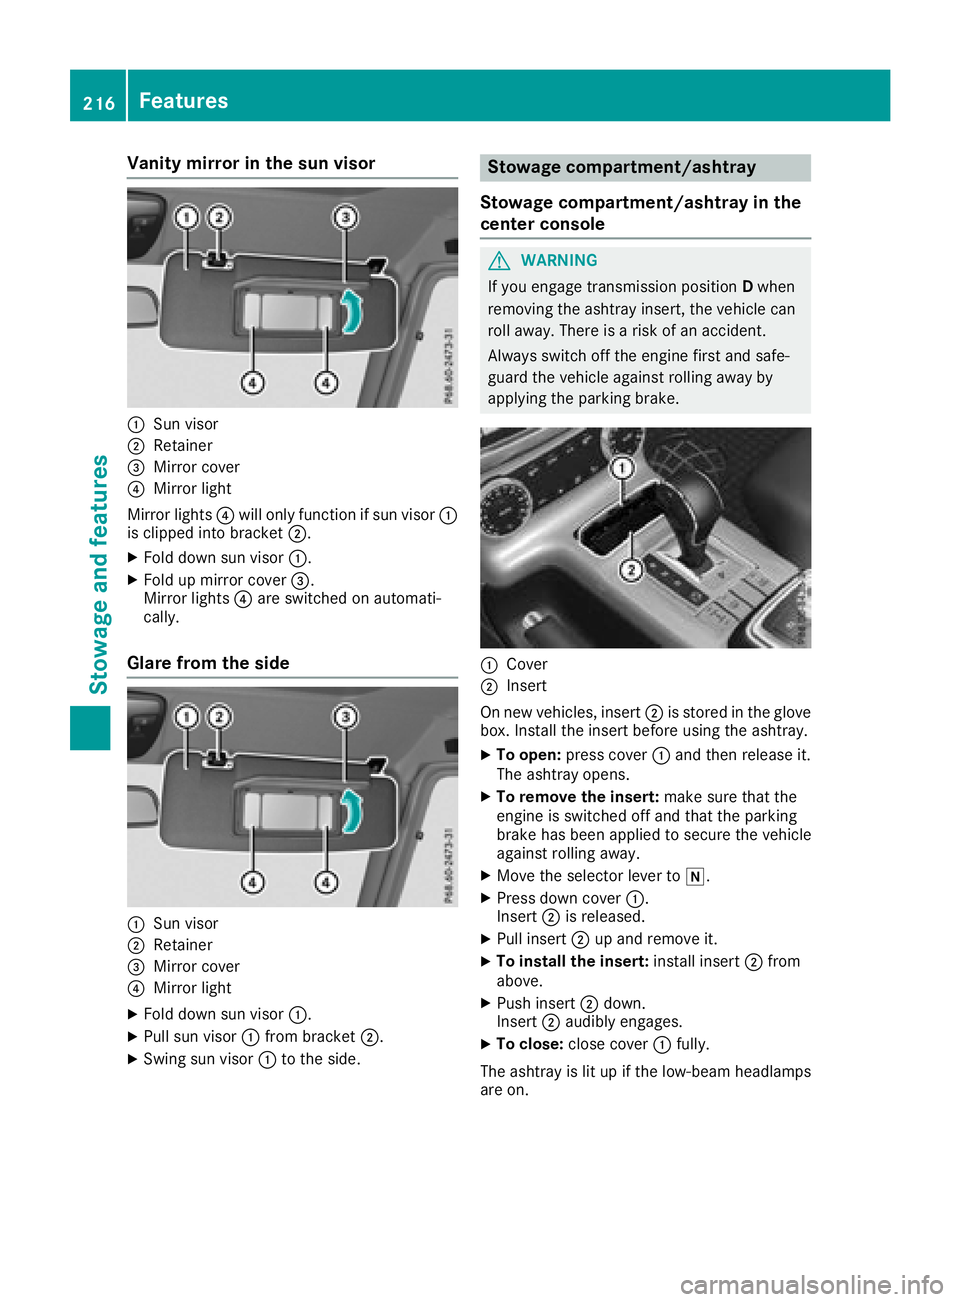
:Sun visor
;Retainer
=Mirror cover
?Mirror light
Mirror lights ?will only function if sun visor :
is clipped into bracket ;.
XFold down sun visor:.
XFold up mirror cover =.
Mirror lights ?are switched on automati-
cally.
Glare from the side
:Sun visor
;Retainer
=Mirror cover
?Mirror light
XFold down sun visor :.
XPull sun visor:from bracket ;.
XSwing sun visor :to the side.
Stowage compartment/ashtray
Stowage compartment/ashtray in the
center console
GWARNING
If you engage transmission position Dwhen
removing the ashtray insert, the vehicle can
roll away. There is a risk of an accident.
Always switch off the engine first and safe-
guard the vehicle against rolling away by
applying the parking brake.
:Cover
;Insert
On new vehicles, insert ;is stored in the glove
box. Install the insert before using the ashtray.
XTo open: press cover :and then release it.
The ashtray opens.
XTo remove the insert: make sure that the
engine is switched off and that the parking
brake has been applied to secure the vehicle
against rolling away.
XMove the selector lever to i.
XPress down cover:.
Insert ;is released.
XPull insert ;up and remove it.
XTo install the insert: install insert;from
above.
XPush insert ;down.
Insert ;audibly engages.
XTo close: close cover :fully.
The ashtray is lit up if the low-beam headlamps
are on.
216Features
Stowag ean d features
Page 252 of 294
Do not start the vehicle using a rapid charging device. If your vehicle's battery is discharged, the
engine can be jump-started from another vehicle or from a donor battery using jumper cables.
Observe the following points:
RThe battery is not accessible in all vehicles. If the other vehicle's battery is not accessible, jump-
start the vehicle using a donor battery or a jump-starting device.
RYou may only jump-start the vehicle when the engine and exhaust system are cold.
RDo not start the engine if the battery is frozen. Let the battery thaw first.
RJump-starting may be performed only using batteries with a nominal voltage of 12 V.
ROnly use jumper cables which have a sufficient cross-section and insulated terminal clamps.
RIf the battery is fully discharged, leave the battery that is being used to jump-start connected for
a few minutes before attempting to start. This charges the battery slightly.
RMake sure that the two vehicles do not touch.
Make sure that:
RThe jumper cables are not damaged.
RWhen the jumper cables are connected to the battery, uninsulated sections of the terminal clamp
do not come into contact with other metal sections.
RThe jumper cables cannot come into contact with parts which can move when the engine is
running, such as the V-belt pulley or the fan.
XApply the parking brake.
XShift the automatic transmission to position j.
XMake sure that the ignition is switched off. All indicator lamps in the instrument cluster must be
off.
XSwitch off all electrical consumers, e.g. rear window defroster, lighting, etc.
XOpen the hood.
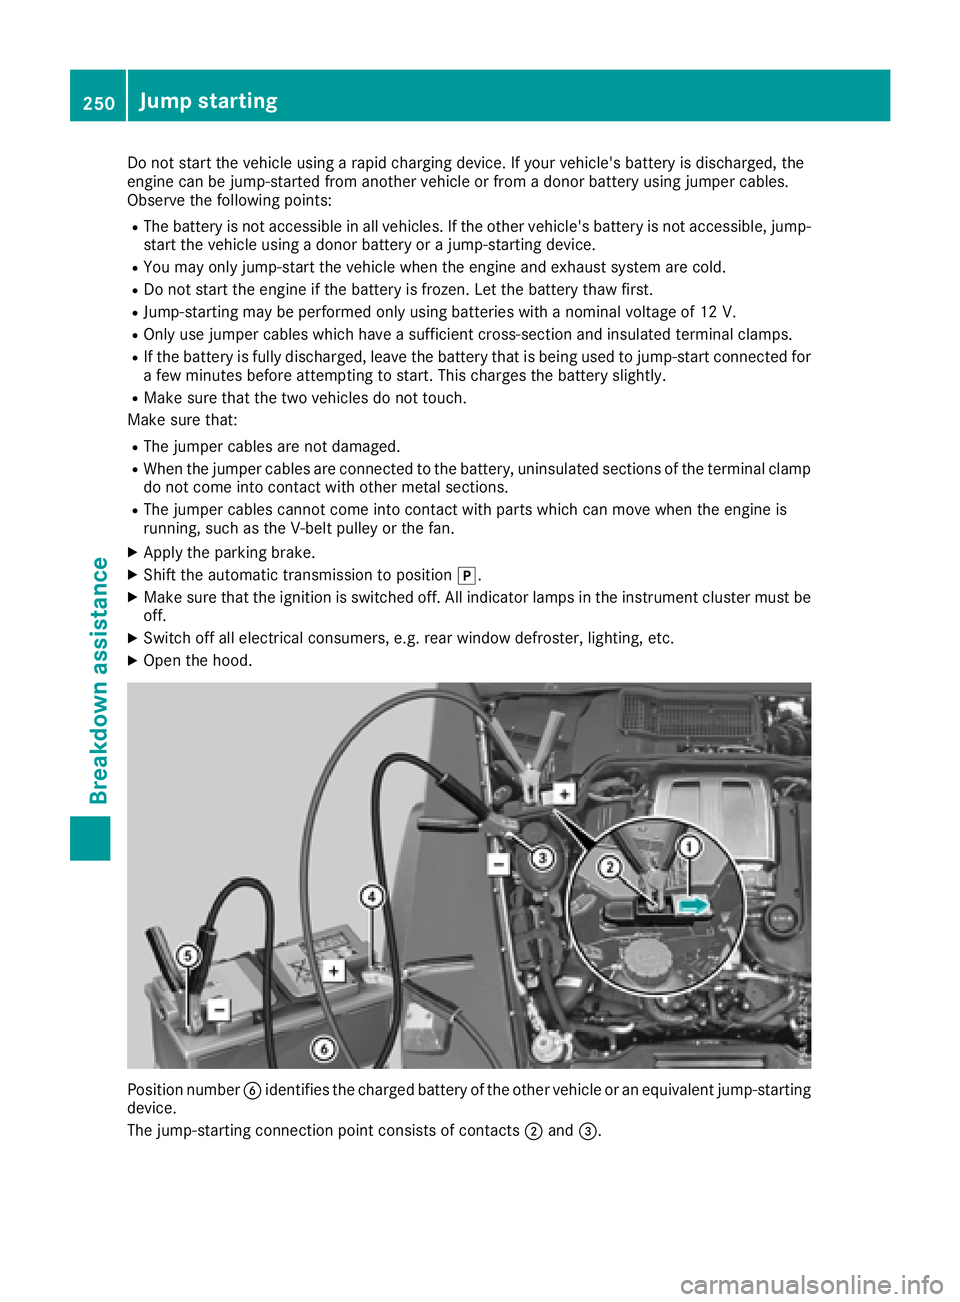
Position number Bidentifies the charged battery of the other vehicle or an equivalent jump-starting
device.
The jump-starting connection point consists of contacts ;and =.
250Jump starting
Breakdown assistance
Page 255 of 294
XWhen the vehicle is stationary, depress the
brake pedal and keep it depressed.
XShift the transfer case to positionNeutral
(Ypage 150).
XShift the automatic transmission to position
i.
XLeave the SmartKey in position 2in the igni-
tion lock.
XRelease the brake pedal.
XRelease the parking brake.
XSwitch on the hazard warning lamps
(Ypage 88).
In order to signal a change of direction when
towing the vehicle with the hazard warning
lamps switched on, use the combination switch
as usual. In this case, only the indicator lamps
for the direction of travel flash. After resetting
the combination switch, the hazard warning
lamp starts flashing again.
iThe automatic transmission can only
change gear when the battery has sufficient
charge.
If you cannot shift the automatic transmission
to position i, the propeller shafts to the
driven axles must be removed.
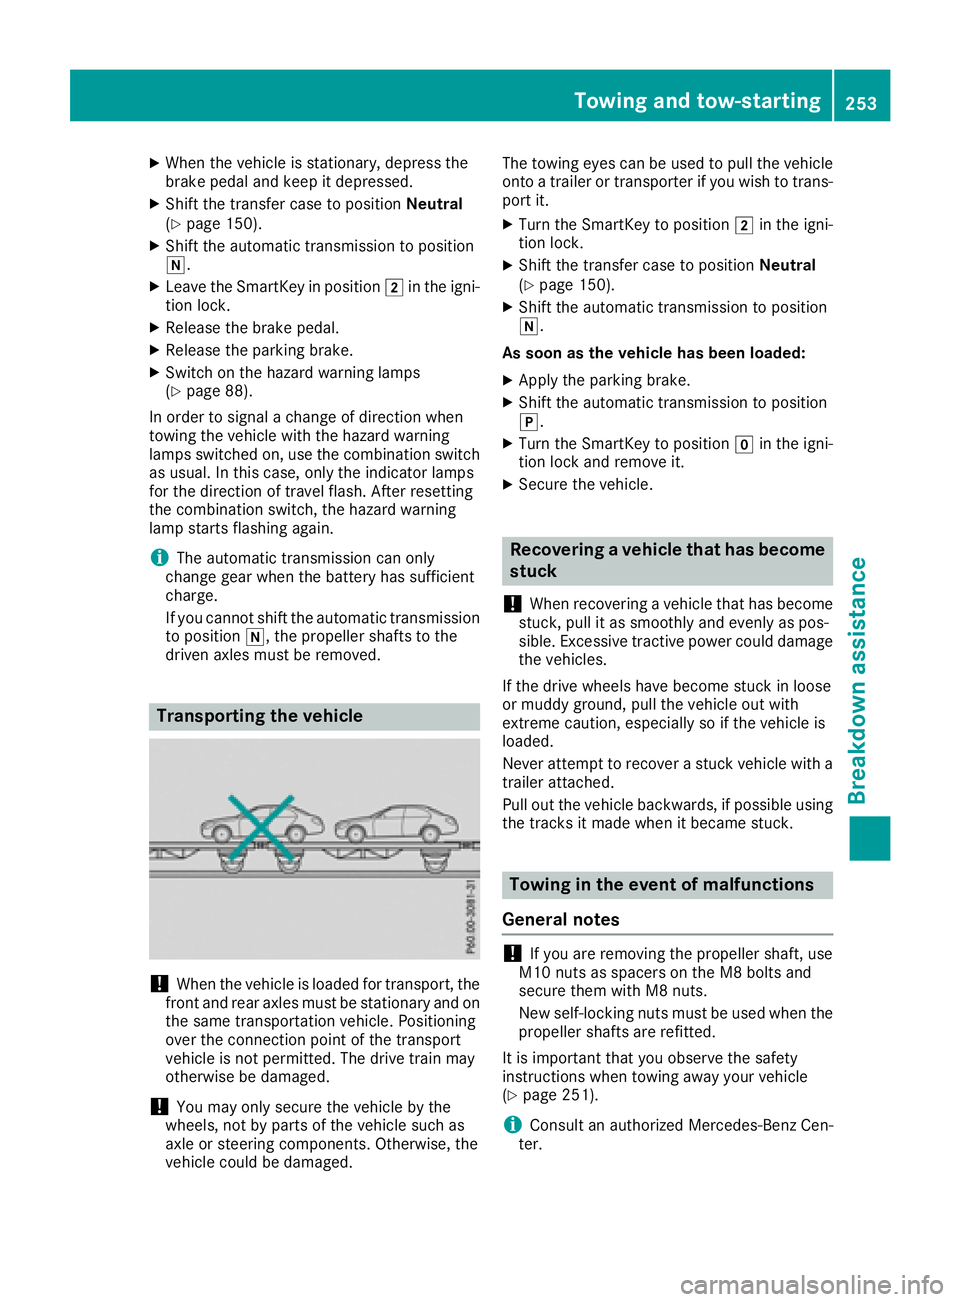
Transporting the vehicle
!When the vehicle is loaded for transport, the
front and rear axles must be stationary and on the same transportation vehicle. Positioning
over the connection point of the transport
vehicle is not permitted. The drive train may
otherwise be damaged.
!You may only secure the vehicle by the
wheels, not by parts of the vehicle such as
axle or steering components. Otherwise, the
vehicle could be damaged. The towing eyes can be used to pull the vehicle
onto a trailer or transporter if you wish to trans-
port it.
XTurn the SmartKey to position 2in the igni-
tion lock.
XShift the transfer case to position Neutral
(Ypage 150).
XShift the automatic transmission to position
i.
As soon as the vehicle has been loaded:
XApply the parking brake.
XShift the automatic transmission to position
j.
XTurn the SmartKey to position gin the igni-
tion lock and remove it.
XSecure the vehicle.
Recovering a vehicle that has become
stuck
!
When recovering a vehicle that has become
stuck, pull it as smoothly and evenly as pos-
sible. Excessive tractive power could damage
the vehicles.
If the drive wheels have become stuck in loose
or muddy ground, pull the vehicle out with
extreme caution, especially so if the vehicle is
loaded.
Never attempt to recover a stuck vehicle with a
trailer attached.
Pull out the vehicle backwards, if possible using the tracks it made when it became stuck.
Towing in the event of malfunctions
General notes
!If you are removing the propeller shaft, use
M10 nuts as spacers on the M8 bolts and
secure them with M8 nuts.
New self-locking nuts must be used when the
propeller shafts are refitted.
It is important that you observe the safety
instructions when towing away your vehicle
(
Ypage 251).
iConsult an authorized Mercedes-Benz Cen-
ter.
Towing and tow-starting253
Breakdown assistance
Z
Page 259 of 294
Important safety notes
GWARNING
If wheels and tires of th ewrong siz eare used,
th ewhee lbrakes or suspension component s
may be damaged. Ther eis aris kof an acci-
dent.
Always replace wheels and tires wit hthose
that fulfill th especification sof th eoriginal
part .
When replacing wheels, mak esur eto use th e
correct:
Rdesignation
Rmodel
When replacing tires ,mak esur eto use th e
correct:
Rdesignation
Rmanufacturer
Rmodel
GWarning
A flat tire severely impairs th edriving ,steer -
ing and braking characteristics of th evehicle.
Ther eis aris kof an accident.
do no tdriv ewit h a flat tire. Immediately
replace th eflat tire wit hyour spar ewheel, or
consult aqualified specialist workshop.
Accessories that are no tapprove dfor your vehi-
cle by Mercedes-Ben zor are no tbein gused cor-
rectl ycan impair th eoperating safety.
Before purchasing and usin gnon-approve d
accessories, visit aqualified specialist work-
sho pand ask about :
Rsuitability
Rlegal stipulation s
Rfactory recommendation s
Further information regarding wheels and tires
can be foun dunder "Wheel/tire combinations"
(
Ypage 279).
You can ask for information regarding permitte d
wheel/tire combination sat an authorize d
Mercedes-Ben zCenter. Information on tire pressur
ecan be found:
Ron th eTir eand Loading Information placard
on th eB-pillar on th edriver' sside
(
Ypage 266)
Rin th etire pressur etable in th efuel filler flap
(Ypage 120)
Runder "Tir epressure" (Ypage 260)
Operation
Information on driving
Checkth etire pressur ewhen th evehicl eis
heavily laden and adjust prio rto atrip.
While driving ,pay attention to vibrations, noises
and unusual handlin gcharacteristics ,e.g. pull-
ing to on eside .This may indicat ethat th e
wheels or tires are damaged. If you suspec tthat
a tire is defective, reduce your spee dimmedi-
ately. Stop th evehicl eas soo nas possible to
chec kth ewheels and tires for damage. Hidden
tire damag ecould also be causing th eunusual
handlin gcharacteristics .If you fin dno sign sof
damage, hav eth etires and wheels checke dat a
qualified specialist workshop.
When parking your vehicle, mak esur ethat th e
tires do no tget deformed by th ecur bor other
obstacles. If they canno tbe avoided, driv eove r
obstacles suc has curbs slowly and at an obtuse
angle. You could otherwise damag eth ewhee l
rim sand tires .
Regular checking of wheels and tires
GWARNIN G
Damaged tires can caus etire inflation pres-
sur eloss .As aresult ,you could lose control of
your vehicle. Ther eis aris kof accident.
Chec kth etires regularly for sign sof damag e
and replace any damaged tires immediately.
Chec kwheels and tires for damag eat least once
a month .Chec kwheels and tires after driving
off-road or on roug hroads. Damaged wheels
can caus e aloss of tire pressure.
Pay particular attention to damag esuc has:
Rcut sin th etires
Rpunctures in th etires
Rtears in th etires
Operation257
Wheels and tires
Z
Page 278 of 294
!On vehicles equipped with a tire pressure
monitor, electronic components are located
in the wheel.
Tire-mounting tools should not be used near
the valve. This could damage the electronic
components.
Only have tires changed at a qualified spe-
cialist workshop.
Always observe the instructions and safety
notes under "Installing a wheel" (
Ypage 276).
The wear patterns on the front and rear tires
differ, depending on the operating conditions.
Rotate the wheels before a clear wear pattern
has formed on the tires. Front tires typically
wear more on the shoulders and the rear tires in the center.
On vehicles that have the same size front and
rear wheels, you can rotate the wheels accord-
ing to the intervals in the tire manufacturer's
warranty book in your vehicle documents. If no
warranty book is available, the tires should be
rotated every 3,000 to 6,000 miles (5,000 to
10,000 km). Depending on tire wear, this may
be required earlier. Do not change the direction
of wheel rotation.
Clean the contact surfaces of the wheel and the
brake disc thoroughly every time a wheel is rota-
ted. Check the tire pressure and reactivate the
tire pressure monitor if necessary (
Ypage 265).
Direction of rotation
Tires with a specified direction of rotation have
additional benefits, e.g. if there is a risk of hydro-
planing. You will only gain these benefits if the
correct direction of rotation is observed.
An arrow on the sidewall of the tire indicates its
correct direction of rotation.
You may mount the spare wheel against the
direction of rotation. Adhere to the time restric-
tion on use as well as the speed limitation speci-
fied on the spare wheel.
Storing wheels
Store tires that are not being used in a cool, dry
and preferably dark place. Protect the tires from
oil, grease, gasoline and diesel.
Mounting a wheel
Preparing the vehicle
GWARNING
When you remove the spare wheel from the
spare wheel bracket, the vehicle’s weight dis-
tribution changes. If the vehicle is already
raised, the jack could tip over. There is a risk
of injury.
Remove the spare wheel from the spare wheel
bracket before lifting the vehicle.
XStop the vehicle on solid, non-slippery and
level ground.
XApply the parking brake.
XBring the front wheels into the straight-ahead
position.
XShift the automatic transmission to position
j.
XSwitch off the engine.
XRemove the vehicle tools and jack from the
vehicle (Ypage 244).
XRemove the spare wheel from the spare wheel bracket (Ypage 245).
XSafeguard the vehicle against rolling away.
Securing the vehicle to prevent it from
rolling away
XPlace chocks or other suitable items under
the front and rear of the wheel that is diago-
nally opposite the wheel you wish to change.
Raising the vehicle
GWARNING
If you do not position the jack correctly at the
appropriate jacking point of the vehicle, the
jack could tip over with the vehicle raised.
There is a risk of injury.
Only position the jack at the appropriate jack-
ing point of the vehicle. The base of the jack
must be positioned vertically, directly under
the jacking point of the vehicle.
!Only position the jack at the appropriate
jacking point of the vehicle. Otherwise, you
could damage the vehicle.
276Changing a wheel
Wheels and tires
Page 279 of 294
Observe the following when raising the vehi-
cle:
RTo raise the vehicle, only use the vehicle-spe-
cific jack that has been tested and approved
by Mercedes-Benz. If used incorrectly, the
jack could tip over with the vehicle raised.
RThe jack is designed only to raise and hold the
vehicle for a short time while a wheel is being
changed. It must not be used for performing
maintenance work under the vehicle.
RAvoid changing the wheel on uphill and down-
hill slopes.
RBefore raising the vehicle, secure it from roll-
ing away by applying the parking brake and
inserting wheel chocks. Do not disengage the
parking brake while the vehicle is raised.
RThe jack must be placed on a firm, flat and
non-slip surface. On a loose surface, a large,
flat, load-bearing underlay must be used. On a
slippery surface, a non-slip underlay must be
used, e.g. rubber mats.
RDo not use wooden blocks or similar objects
as a jack underlay. Otherwise, the jack will not
be able to achieve its load-bearing capacity
due to the restricted height.
RMake sure that the distance between the
underside of the tires and the ground does not
exceed 1.2 in (3 cm).
RDo not place your hands or feet under the
raised vehicle.
RDo not lie under the vehicle.
RDo not start the engine when the vehicle is
raised.
RDo not open or close a door when the vehicle is raised.
RMake sure that no persons are present in the
vehicle when the vehicle is raised.
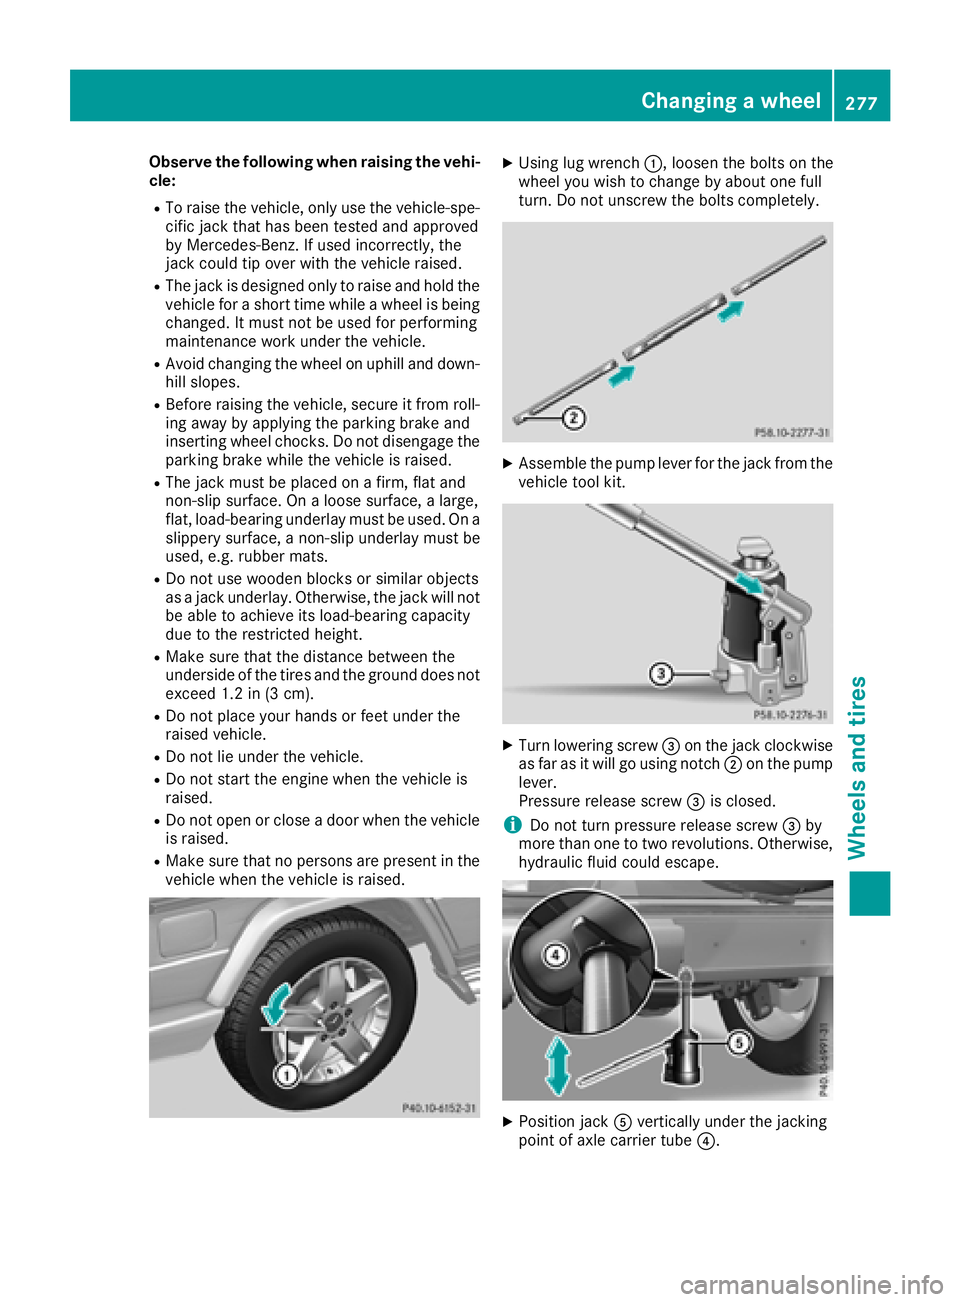
XUsing lug wrench :, loosen the bolts on the
wheel you wish to change by about one full
turn. Do not unscrew the bolts completely.
XAssemble the pump lever for the jack from the vehicle tool kit.
XTurn lowering screw =on the jack clockwise
as far as it will go using notch ;on the pump
lever.
Pressure release screw =is closed.
iDo not turn pressure release screw =by
more than one to two revolutions. Otherwise,
hydraulic fluid could escape.
XPosition jack Avertically under the jacking
point of axle carrier tube ?.
Changing a wheel277
Wheels and tires
Z