check oil MERCEDES-BENZ G-CLASS SUV 2008 Owners Manual
[x] Cancel search | Manufacturer: MERCEDES-BENZ, Model Year: 2008, Model line: G-CLASS SUV, Model: MERCEDES-BENZ G-CLASS SUV 2008Pages: 293, PDF Size: 4.49 MB
Page 9 of 293
6BAS.
.................................................. 48
EBV. .................................................. 50
Driving safety systems
4ETS. ................................................ 50
ESP ®
................................................ 48
Driving system................................... 113
Cruise control. ................................ 113
Speedtronic. ................................... 115
Driving systems
Reversing camera. ..........................119
Driving tip
Braking ........................................... 170
Trailer towing. ................................. 178
Winter ............................................. 169
Driving tips......................................... 169
Driving abroad ............................... 177
Driving on wet roads ......................171
Fording .................................. 172, 176
DVD audio
Operating (on-board computer). .....102
DVD video
Operating (on-board computer). .....102 E
Easy-entry/exit feature Activating/deactivating (on-
board computer). ............................ 109
Easy-entry feature ..........................63, 67
Easy-exit feature.................................. 67EBV (electronic brake-power distri-
bution)
................................................... 50
Electrical/electronic equipment Retrofitting ..................................... 260
Electronic brake-power distribution
see EBV
Electronic Stability Program
see ESP ®
Electronic Traction Support see 4ETS
e mark................................................. 260
Emergency key element Lost. ............................................... 226
Emergency locking
Vehicle............................................ 230
Emergency release
Fuel filler fla p.................................. 230
Emergency running mode
Automatic transmission ..................222
Emergency unlocking
Rear door. ....................................... 229
Vehicle............................................ 229
Engine
Display message ............................. 200
Running irregularl y.......................... 220
Starting ............................................. 86
Starting problems ........................... 220
Technical data. ............................... 263
Engine diagnostic warning lamp....... 215 Engine electronics.............................. 260
Malfunction..................................... 220
Engine number................................... 262
Engine oil ........................................... 279
Capacities.. ..................................... 160
Checking the oil level (automatic
transmission) .................................. 161
Checking the oil level (dipstick). .....160
Checking the oil level (on-board
computer). ...................................... 159
Consumption ................................. 159
Display message
....................................... 159, 207, 208
Filler neck. ...................................... 160
Topping up. ..................................... 160
ESP ®
(Electronic Stability Program)... 48
Activating/deactivating ....................49
Display messages ...................197, 198
Warning lamp. .......................... 48, 213
Exterior lighting
Delayed switch-off (on-board
computer). ...................................... 107
Exterior mirrors
Adjusting .......................................... 68
Anti-dazzle mode (automatic). ..........68
Malfunction..................................... 225
Parking position. ......................... 69, 71
Storing settings ................................ 70
Exterior view
Overview. .......................................... 18Index
463_AKB; 1; 8, en-GB
wobuchh,
Version: 2.10.6 2008-07-17T15:19:41+02:00 - Seite 6Dateiname: 6515_4091_02_buchblock.pdf; preflight
Page 12 of 293
9
Luggage net
Front-passenger footwell. ...............139 M
Main-beam headlamps Display message ............................. 206
Maintenance
Battery ............................................ 247
Malfunction memory
see Message memory menu
Maximum speed
Technical data. ............................... 264
Memory card...................................... 102
Operating (on-board computer). .....102
see separate operating instructions
Memory function.................................. 70
Menu (on-board computer).................. 99 Audio. ............................................. 101
DVD. ............................................... 102
Message memory. .......................... 103
Navigation. ..................................... 103
Operating........................................ 100
Resetting to factory settings........... 104
Settings .......................................... 104
Submenu overview. ........................104
Telephone. ...................................... 111
Trip computer. ................................ 110Messages
see Display messages
see Message memory menu
see Warning and indicator lamps
Mirrors
Sun visor......................................... 148
Mobile phone...................................... 150
Display message..................... 208, 209
Installation. ..................................... 260
Telephone menu (on-board com-
puter). ............................................. 111
Modifying the programming
Key. .................................................. 54
MP3..................................................... 102
Operating (on-board computer). .....102
see separate operating instructions
Multicontour seat................................. 62
Multi-function display ....................96, 98
Multi-function steering wheel....... 24, 97 N
Navigation........................................... 103 Navigation menu (on-board com-
puter). ............................................. 103
see separate operating instructions O
Off-road Differential locks............................... 93
Off-road driving
Checklist......................................... 174
Information ..................................... 173
Oil
Consumption. ................................. 159
Topping up. ..................................... 160
Oil level
Checking (dipstick). ........................160
Checking (on-board computer). ......159
On-board computer.............................. 97
Audio menu. ................................... 101
Convenience submenu. ..................105
Display messages ........................... 194
DVD menu ...................................... 102
Factory settings .............................. 104
Heating submenu............................ 105
Instrument cluster submenu ...........105
Lighting submenu. ..........................105
Message memory menu.................. 103
Navigation menu. ............................ 103
Operation menu. ............................. 100
Settings menu ................................ 104
Standard display menu. ..................101
Telephone menu. ............................ 111
Time/date submenu. ......................105 Index
463_AKB; 1; 8, en-GB
wobuchh,
Version: 2.10.6 2008-07-17T15:19:41+02:00 - Seite 9Dateiname: 6515_4091_02_buchblock.pdf; preflight
Page 162 of 293
Engine compartment
159Engine oil
Depending on driving style, the vehicle con-
sumes a maximum of 0.8 l oil per 1,000 km.
The oil consumption may be higher than this
when the vehicle is new or if you frequently
drive at high engine speeds. You can only
estimate the oil consumption after you have
driven a considerable distance.
You will find further information about engine
oil in the "Technical data" section
(Y page 279).
Checking the engine oil level To do so:
R
the vehicle should be parked on level
ground.
R the engine should be switched off for at
least five minutes if the engine was at nor-
mal operating temperature.
R the engine should be switched off for at
least 30 minutes if the engine was not at
operating temperature (i.e. if you only star-
ted the engine briefly). Via the on-board computer
i
Only possible on the G 55 AMG. On all
other models, a dipstick is used to check
the engine oil level (Y page 160).
X Make sure that the key is in position 2in
the ignition lock (Y page 59).
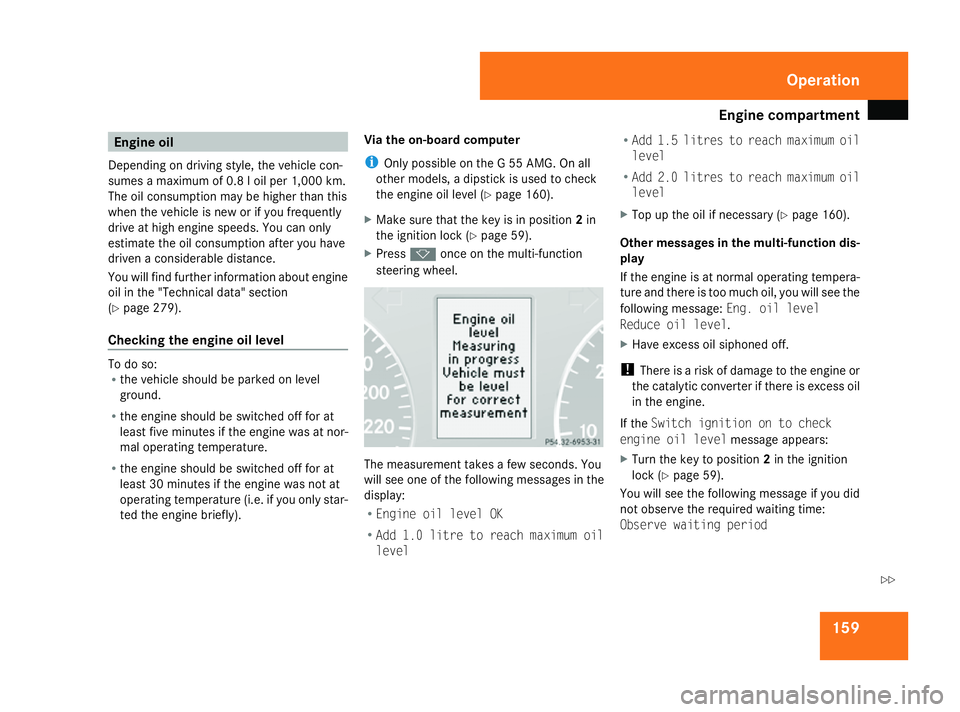
X Press konce on the multi-function
steering wheel. The measurement takes a few seconds. You
will see one of the following messages in the
display:
R
Engine oil level OK
R Add 1.0 litre to reach maximum oil
level R
Add 1.5 litres to reach maximum oil
level
R Add 2.0 litres to reach maximum oil
level
X Top up the oil if necessary ( Ypage 160).
Other messages in the multi-function dis-
play
If the engine is at normal operating tempera-
ture and there is too much oil, you will see the
following message: Eng. oil level
Reduce oil level.
X Have excess oil siphoned off.
! There is a risk of damage to the engine or
the catalytic converter if there is excess oil
in the engine.
If the Switch ignition on to check
engine oil level message appears:
X Turn the key to position 2in the ignition
lock (Y page 59).
You will see the following message if you did
not observe the required waiting time:
Observe waiting period Operation
463_AKB; 1; 8, en-GB
wobuchh,
Version: 2.10.6 2008-07-17T15:19:41+02:00 - Seite 159 ZDateiname: 6515_4091_02_buchblock.pdf; preflight
Page 163 of 293
Engine compartment
160
X
Repeat the measurement after about five
minutes if the engine is at normal operating
temperature.
X Repeat the measurement after about
30 minutes if the engine is not at normal
operating temperature (if the engine was
only started briefly).
If the engine is running, the Engine oil
level Not when engine on message
appears.
X Switch off the engine and wait for five
minutes if the engine is at normal operating
temperature, or for about 30 minutes if the
engine is not at normal operating temper-
ature (if the engine was only started
briefly), before measuring.
i If you wish to cancel the measurement,
press the korj button on the multi-
function steering wheel.
Using the oil dipstick
i Only possible on the G 320 CDI and
G 500. On the G 55 AMG, the oil level is
checked using the on-board computer
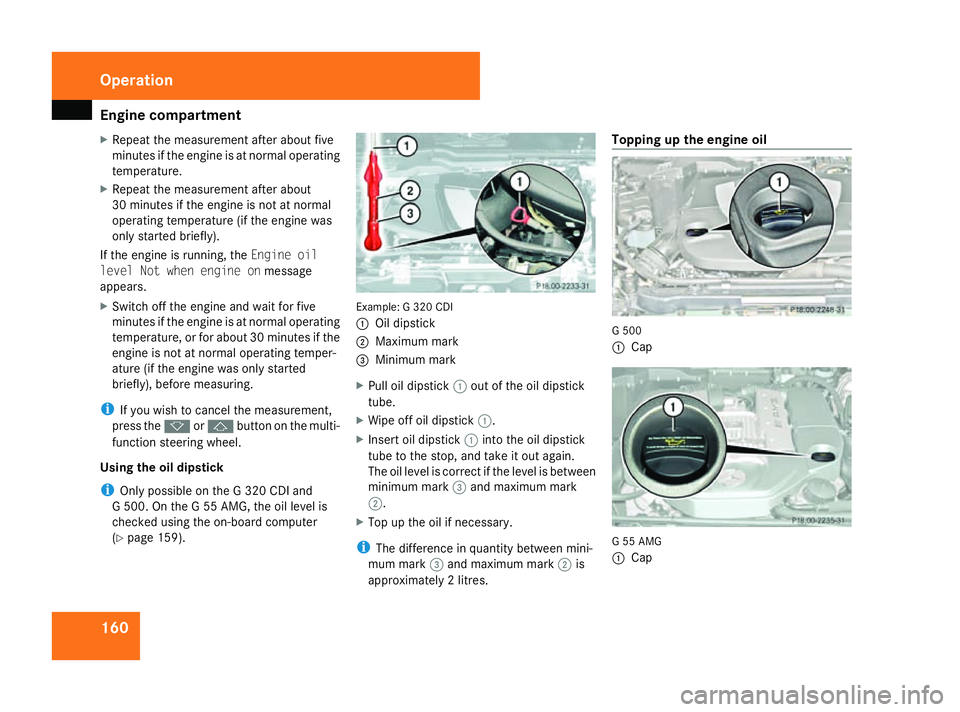
(Y page 159). Example: G 320 CDI
1
Oil dipstick
2 Maximum mark
3 Minimum mark
X Pull oil dipstick 1out of the oil dipstick
tube.
X Wipe off oil dipstick 1.
X Insert oil dipstick 1into the oil dipstick
tube to the stop, and take it out again.
The oil level is correct if the level is between
minimum mark 3and maximum mark
2.
X Top up the oil if necessary.
i The difference in quantity between mini-
mum mark 3and maximum mark 2is
approximately 2 litres. Topping up the engine oil
G 500
1
Cap G 55 AMG
1
Cap Operation
463_AKB; 1; 8, en-GB
wobuchh,
Version: 2.10.6 2008-07-17T15:19:41+02:00 - Seite 160Dateiname: 6515_4091_02_buchblock.pdf; preflight
Page 164 of 293
Engine compartment
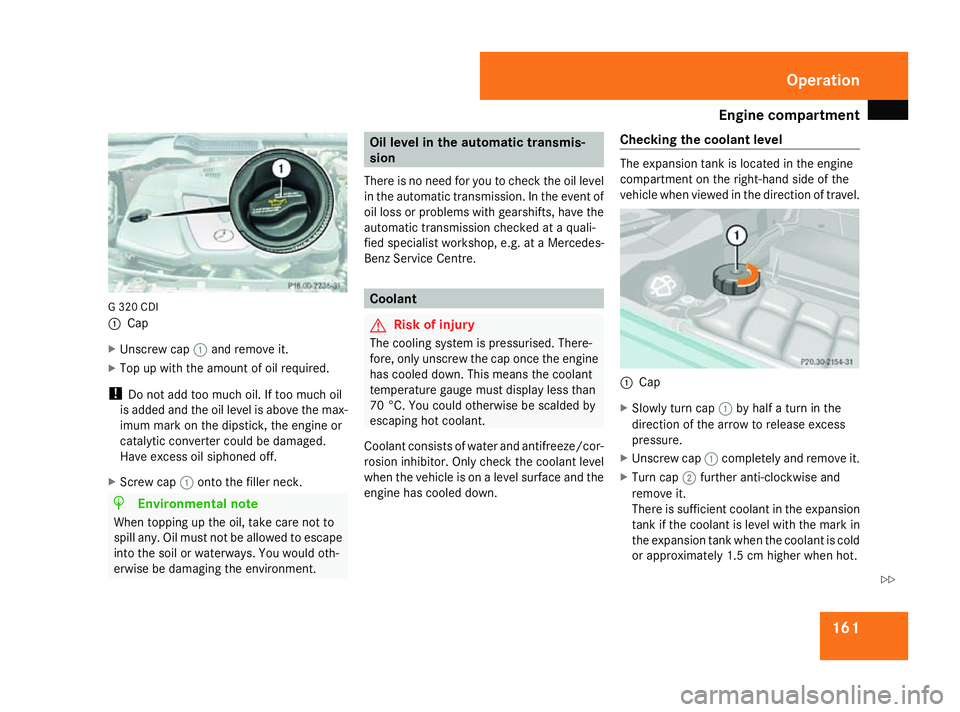
161G 320 CDI
1
Cap
X Unscrew cap 1and remove it.
X Top up with the amount of oil required.
! Do not add too much oil. If too much oil
is added and the oil level is above the max-
imum mark on the dipstick, the engine or
catalytic converter could be damaged.
Have excess oil siphoned off.
X Screw cap 1onto the filler neck. H
Environmental note
When topping up the oil, take care not to
spill any. Oil must not be allowed to escape
into the soil or waterways. You would oth-
erwise be damaging the environment. Oil level in the automatic transmis-
sion
There is no need for you to check the oil level
in the automatic transmission. In the event of
oil loss or problems with gearshifts, have the
automatic transmission checked at a quali-
fied specialist workshop, e.g. at a Mercedes-
Benz Service Centre. Coolant
G
Risk of injury
The cooling system is pressurised. There-
fore, only unscrew the cap once the engine
has cooled down. This means the coolant
temperature gauge must display less than
70 °C. You could otherwise be scalded by
escaping hot coolant.
Coolant consists of water and antifreeze/cor-
rosion inhibitor. Only check the coolant level
when the vehicle is on a level surface and the
engine has cooled down. Checking the coolant level The expansion tank is located in the engine
compartment on the right-hand side of the
vehicle when viewed in the direction of travel.
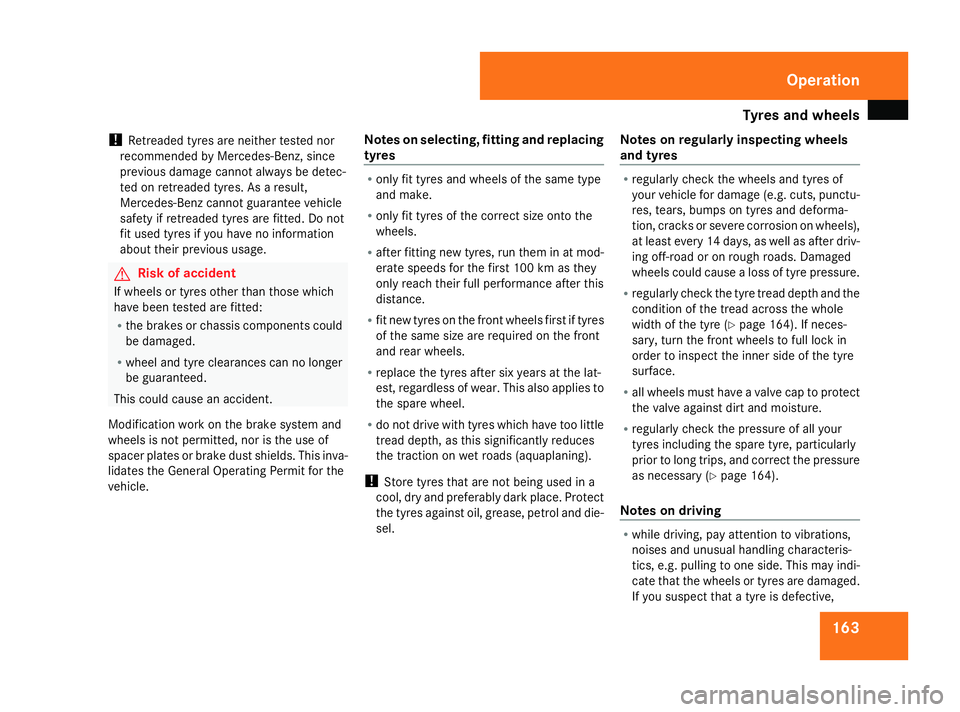
1
Cap
X Slowly turn cap 1by half a turn in the
direction of the arrow to release excess
pressure.
X Unscrew cap 1completely and remove it.
X Turn cap 2further anti-clockwise and
remove it.
There is sufficient coolant in the expansion
tank if the coolant is level with the mark in
the expansion tank when the coolant is cold
or approximately 1.5 cm higher when hot. Operation
463_AKB; 1; 8, en-GB
wobuchh,
Version: 2.10.6
2008-07-17T15:19:41+02:00 - Seite 161 ZDateiname: 6515_4091_02_buchblock.pdf; preflight
Page 166 of 293
Tyres and wheels
163
!
Retreaded tyres are neither tested nor
recommended by Mercedes-Benz, since
previous damage cannot always be detec-
ted on retreaded tyres. As a result,
Mercedes-Benz cannot guarantee vehicle
safety if retreaded tyres are fitted. Do not
fit used tyres if you have no information
about their previous usage. G
Risk of accident
If wheels or tyres other than those which
have been tested are fitted:
R the brakes or chassis components could
be damaged.
R wheel and tyre clearances can no longer
be guaranteed.
This could cause an accident.
Modification work on the brake system and
wheels is not permitted, nor is the use of
spacer plates or brake dust shields. This inva-
lidates the General Operating Permit for the
vehicle. Notes on selecting, fitting and replacing
tyres R
only fit tyres and wheels of the same type
and make.
R only fit tyres of the correct size onto the
wheels.
R after fitting new tyres, run them in at mod-
erate speeds for the first 100 km as they
only reach their full performance after this
distance.
R fit new tyres on the front wheels first if tyres
of the same size are required on the front
and rear wheels.
R replace the tyres after six years at the lat-
est, regardless of wear. This also applies to
the spare wheel.
R do not drive with tyres which have too little
tread depth, as this significantly reduces
the traction on wet roads (aquaplaning).
! Store tyres that are not being used in a
cool, dry and preferably dark place. Protect
the tyres against oil, grease, petrol and die-
sel. Notes on regularly inspecting wheels
and tyres R
regularly check the wheels and tyres of
your vehicle for damage (e.g. cuts, punctu-
res, tears, bumps on tyres and deforma-
tion, cracks or severe corrosion on wheels),
at least every 14 days, as well as after driv-
ing off-road or on rough roads. Damaged
wheels could cause a loss of tyre pressure.
R regularly check the tyre tread depth and the
condition of the tread across the whole
width of the tyre (Y page 164). If neces-
sary, turn the front wheels to full lock in
order to inspect the inner side of the tyre
surface.
R all wheels must have a valve cap to protect
the valve against dirt and moisture.
R regularly check the pressure of all your
tyres including the spare tyre, particularly
prior to long trips, and correct the pressure
as necessary (Y page 164).
Notes on driving R
while driving, pay attention to vibrations,
noises and unusual handling characteris-
tics, e.g. pulling to one side. This may indi-
cate that the wheels or tyres are damaged.
If you suspect that a tyre is defective, Operation
463_AKB; 1; 8, en-GB
wobuchh
,V ersion: 2.10.6
2008-07-17T15:19:41+02:00 - Seite 163 ZDateiname: 6515_4091_02_buchblock.pdf; preflight
Page 177 of 293
Off-road driving
174
i
Information about retrofitting special all-
terrain tyres is available from any
Mercedes-Benz Service Centre.
Checklist before driving off-road X
Engine oil level: check the engine oil and
top it up if necessary.
Only then does the engine receive enough
oil when the vehicle is standing on a steep
incline.
X Vehicle toolkit: check that the jack is
working and make sure you have the wheel-
brace, a robust tow cable and a folding
spade in the vehicle.
X Wheels and tyres: check the tyre tread
depth and tyre pressure.
X Check for damage and remove any objects,
e.g. small stones, from the wheels/tyres.
X Replace any missing valve caps.
X Replace dented or damaged wheels.
Checklist after driving off-road Driving over rough terrain places greater
demands on your vehicle than driving on nor-
mal roads. After driving off-road, check the
vehicle. This allows you to detect damage
promptly and reduce the risk of an accident
to yourself and other road users. X
Shift the transfer case to HIGH
(Y page 93).
X Disengage the differential locks
(Y page 95).
X Clean the headlamps and rear lights and
check for damage.
X Clean the front and rear licence plates.
X Clean the wheels/tyres with a water jet and
remove any foreign objects.
X Clean the wheels, wheel arches and the
vehicle underside with a water jet; check
for foreign objects and damage.
X Check whether twigs or other parts of
plants have become trapped. These
increase the risk of fire and can damage
fuel pipes, brake hoses or the rubber bel-
lows of the axle joints and propeller shafts.
X After the trip, examine without fail the
entire undercarriage, wheels, tyres, brakes,
bodywork structure, steering, chassis and
exhaust system for damage.
X After driving for extended periods across
sand, mud, gravel, water or in similarly dirty
conditions, have the brake discs, wheels,
brake pads /linings and axle joints checked
and cleaned.
X If you detect strong vibrations after off-road
travel, check for foreign objects in the
wheels and drive train and remove them if necessary. Foreign objects can disturb the
balance and cause vibrations. Travelling uphill
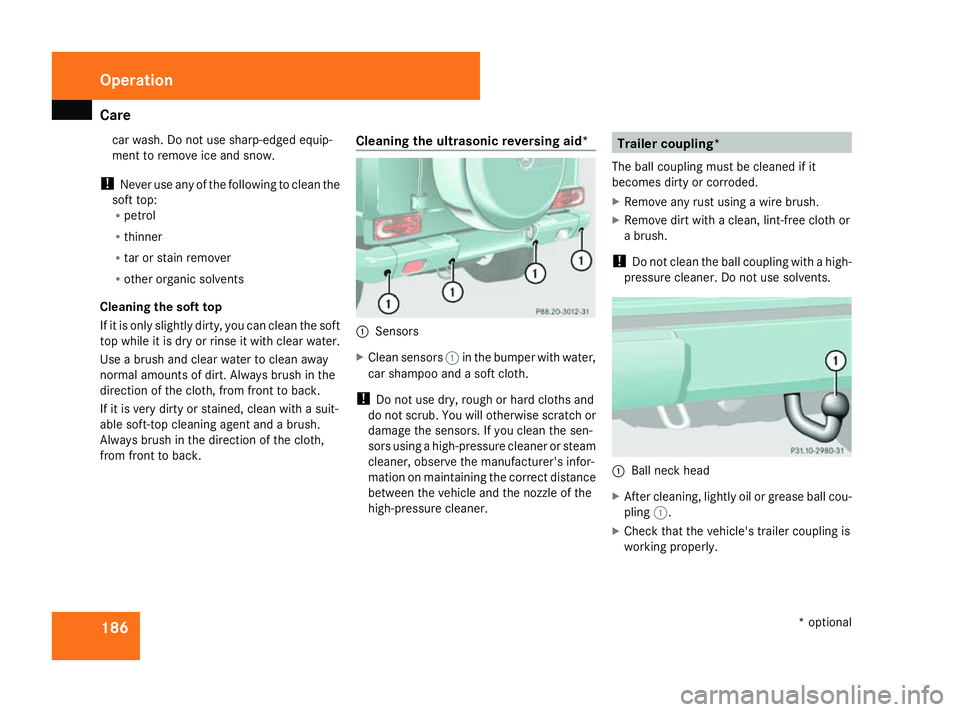
Approach/departure angle 1
Front approach/departure angle
2 Rear approach/departure angle
The table shows approach and departure
angles 1and 2at maximum load. This
information only provides an indication. The
approach and departure angles vary accord-
ing to the vehicle tyres and optional equip-
ment. Operation
463_AKB; 1; 8, en-GB
wobuchh,
Version: 2.10.6 2008-07-17T15:19:41+02:00 - Seite 174Dateiname: 6515_4091_02_buchblock.pdf; preflight
Page 189 of 293
Care
186car wash. Do not use sharp-edged equip-
ment to remove ice and snow.
! Never use any of the following to clean the
soft top:
R petrol
R thinner
R tar or stain remover
R other organic solvents
Cleaning the soft top
If it is only slightly dirty, you can clean the soft
top while it is dry or rinse it with clear water.
Use a brush and clear water to clean away
normal amounts of dirt. Always brush in the
direction of the cloth, from front to back.
If it is very dirty or stained, clean with a suit-
able soft-top cleaning agent and a brush.
Always brush in the direction of the cloth,
from front to back. Cleaning the ultrasonic reversing aid* 1
Sensors
X Clean sensors 1in the bumper with water,
car shampoo and a soft cloth.
! Do not use dry, rough or hard cloths and
do not scrub. You will otherwise scratch or
damage the sensors. If you clean the sen-
sors using a high-pressure cleaner or steam
cleaner, observe the manufacturer's infor-
mation on maintaining the correct distance
between the vehicle and the nozzle of the
high-pressure cleaner. Trailer coupling*
The ball coupling must be cleaned if it
becomes dirty or corroded.
X Remove any rust using a wire brush.
X Remove dirt with a clean, lint-free cloth or
a brush.
! Do not clean the ball coupling with a high-
pressure cleaner. Do not use solvents. 1
Ball neck head
X After cleaning, lightly oil or grease ball cou-
pling 1.
X Check that the vehicle's trailer coupling is
working properly. Operation
* optional
463_AKB; 1; 8, en-GB
wobuchh,
Version: 2.10.6 2008-07-17T15:19:41+02:00 - Seite 186Dateiname: 6515_4091_02_buchblock.pdf; preflight
Page 210 of 293
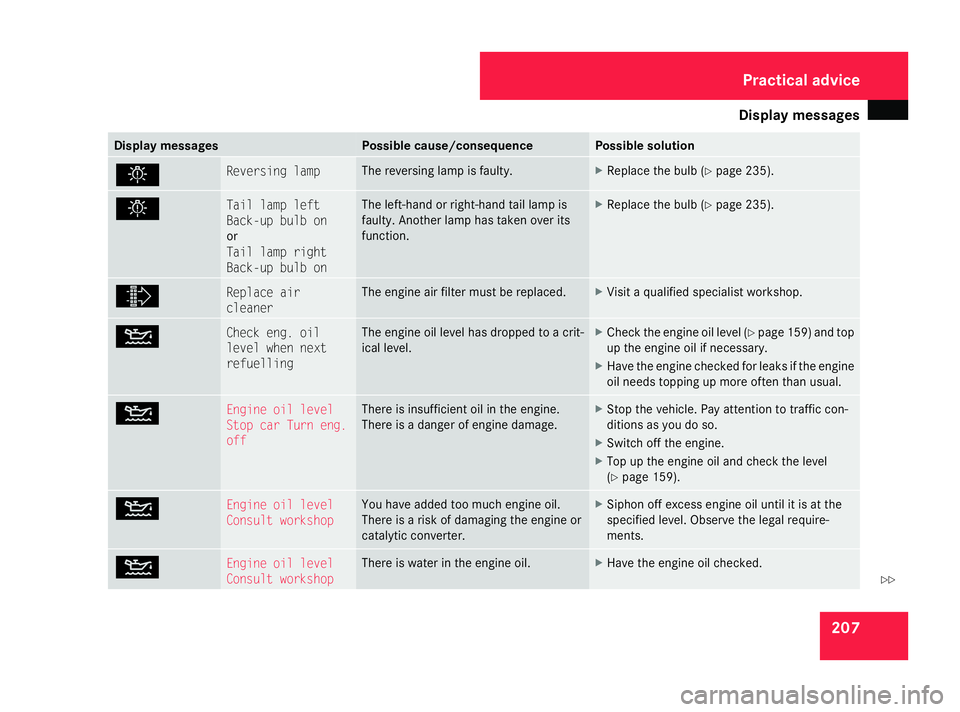
Display
messages 207Display messages Possible cause/consequence Possible solution
. Reversing lamp The reversing lamp is fa
ulty. X
Replace the bulb (Y page 235). . Tail lamp left
Back-up bulb on
or
Tail lamp right
Back-up bulb on The left-hand or right-hand tail lamp is
faulty. Another lamp has taken over its
function. X
Replace the bulb (Y page 235). ò Replace air
cleaner The engine air filter must be replaced. X
Visit a qualified specialist workshop. N Check eng. oil
level when next
refuelling The engine oil level has dropped to a crit-
ical level. X
Check the engine oil level (Y page 159) and top
up the engine oil if necessary.
X Have the engine checked for leaks if the engine
oil needs topping up more often than usual. N Engine oil level
Stop car Turn eng.
off There is insufficient oil in the engine.
There is a danger of engine damage. X
Stop the vehicle. Pay attention to traffic con-
ditions as you do so.
X Switch off the engine.
X Top up the engine oil and check the level
(Y page 159). N Engine oil level
Consult workshop You have added too much engine oil.
There is a risk of damaging the engine or
catalytic converter. X
Siphon off excess engine oil until it is at the
specified level. Observe the legal require-
ments. N Engine oil level
Consult workshop There is water in the engine oil. X
Have the engine oil checked. Practical advice
463_AKB; 1; 8, en-GB
wobuchh,
Version: 2.10.6 2008-07-17T15:19:41+02:00 - Seite 207 ZDateiname: 6515_4091_02_buchblock.pdf; preflight
Page 211 of 293
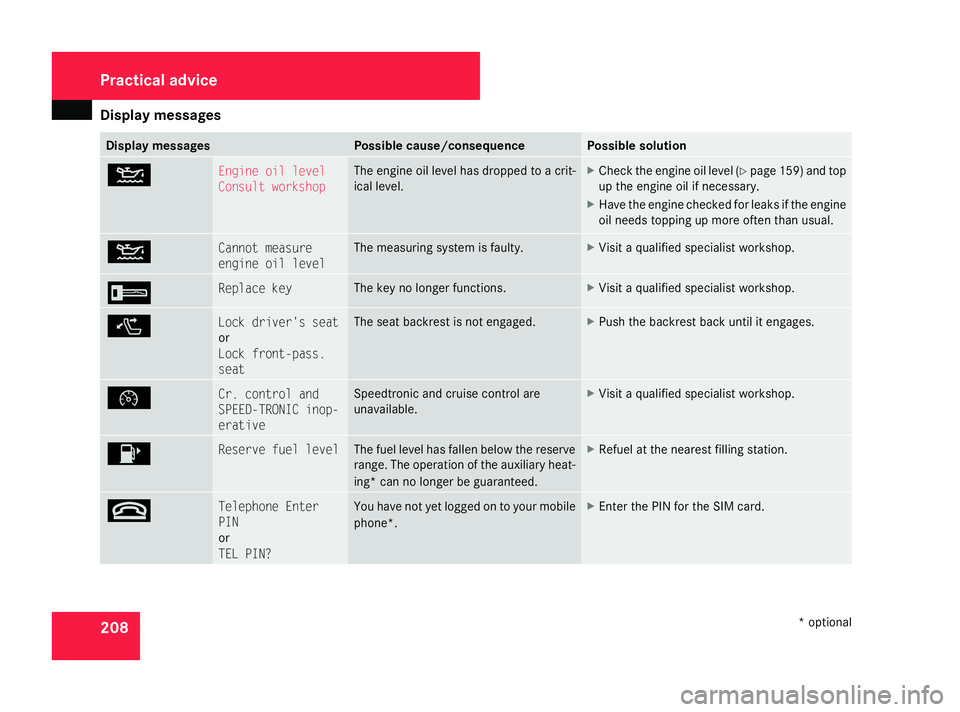
Display
messages 208 Display messages Possible cause/consequence Possible solution
N Engine oil level
Consult workshop The engine oil level has dropped to a crit-
ical level. X
Check the engine oil level (Y page 159) and top
up the engine oil if necessary.
X Have the engine checked for leaks if the engine
oil needs topping up more often than usual. N Cannot measure
engine oil level The measuring system is faulty. X
Visit a qualified specialist workshop. I Replace key The key no longer functions. X
Visit a qualified specialist workshop. ( Lock driver's seat
or
Lock front-pass.
seat The seat backrest is not engaged. X
Push the backrest back until it engages. Ñ Cr. control and
SPEED-TRONIC inop-
erative Speedtronic and cruise control are
unavailable. X
Visit a qualified specialist workshop. 4 Reserve fuel level The fuel level has fallen below the reserve
range. The operation of the auxiliary heat-
ing* can no longer be guaranteed. X
Refuel at the nearest filling station. t Telephone Enter
PIN
or
TEL PIN? You have not yet logged on to your mobile
phone*. X
Enter the PIN for the SIM card. Practical advice
* optional
463_AKB; 1; 8, en-GB
wobuchh,
Version: 2.10.6 2008-07-17T15:19:41+02:00 - Seite 208Dateiname: 6515_4091_02_buchblock.pdf; preflight