MERCEDES-BENZ G-CLASS SUV 2012 Owners Manual
Manufacturer: MERCEDES-BENZ, Model Year: 2012, Model line: G-CLASS SUV, Model: MERCEDES-BENZ G-CLASS SUV 2012Pages: 357, PDF Size: 8.86 MB
Page 161 of 357
X
Turn the fuel filler cap anti-clockwise and
remove it.
AdBlue ®
vehicles: do not confuse the fuel
filler cap with the blue AdBlue ®
filler cap.
X Insert the fuel filler cap into the holder
bracket on the inside of filler flap ?.
i AdBlue ®
vehicles do not have a bracket
on the inside of the filler flap.
X Completely insert the filler neck of the fuel
pump nozzle into the tank and refuel.
i Do not add any more fuel after the pump
stops filling for the first time. Otherwise,
fuel may leak out.
Closing X
Replace the fuel filler cap and turn it clock-
wise. The fuel filler cap audibly engages.
X Press the fuel filler flap closed until it
engages. Fuel filler flap emergency release
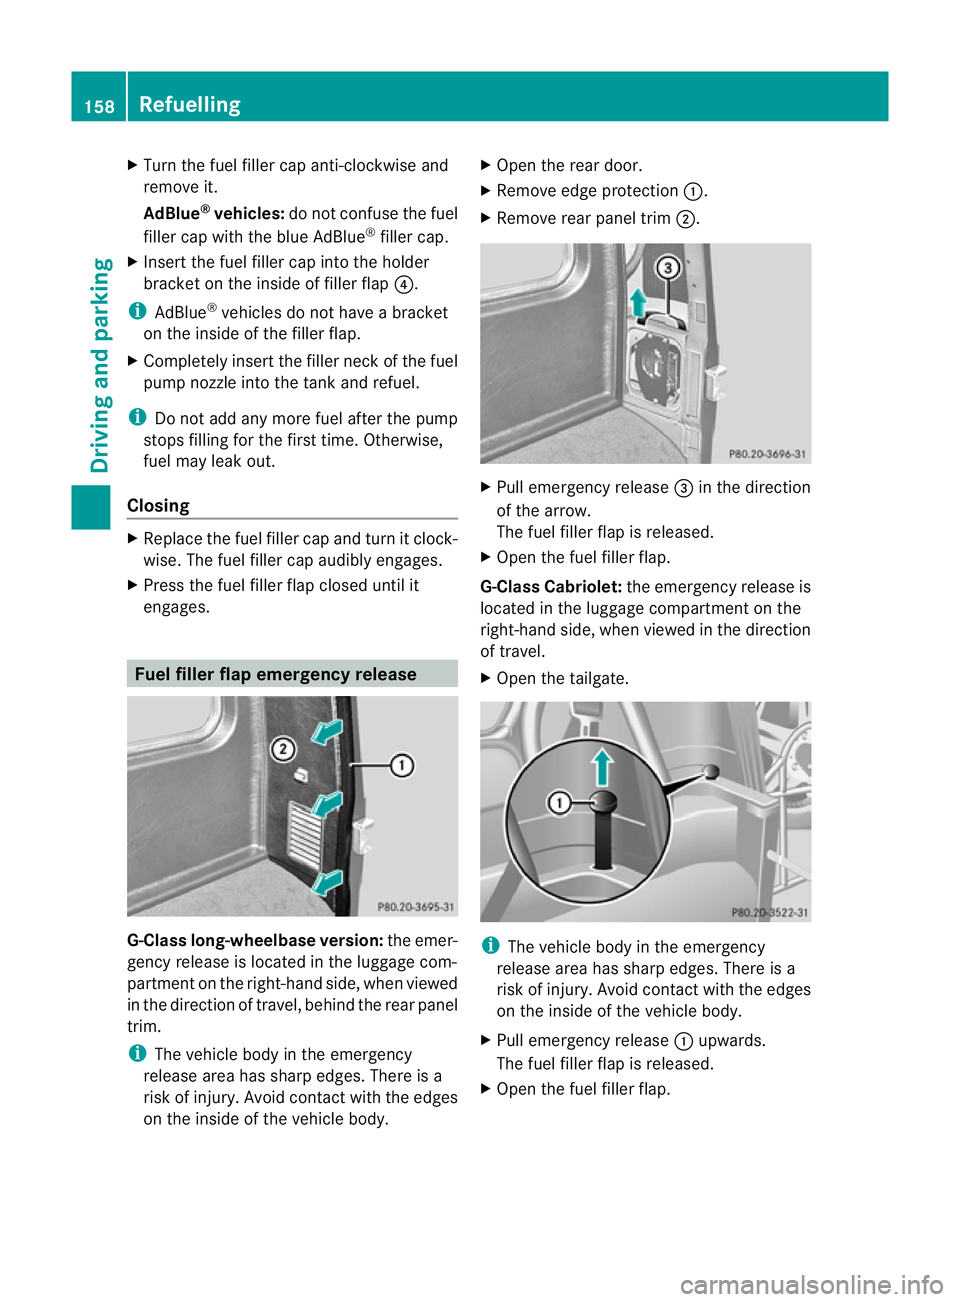
G-Class long-wheelbase version:
the emer-
gency release is located in the luggage com-
partmen tonthe right-hand side, when viewed
in the direction of travel, behind the rear panel
trim.
i The vehicle body in the emergency
release area has sharp edges. There is a
risk of injury. Avoid contact with the edges
on the inside of the vehicle body. X
Open the rear door.
X Remove edge protection :.
X Remove rear panel trim ;. X
Pull emergency release =in the direction
of the arrow.
The fuel filler flap is released.
X Open the fuel filler flap.
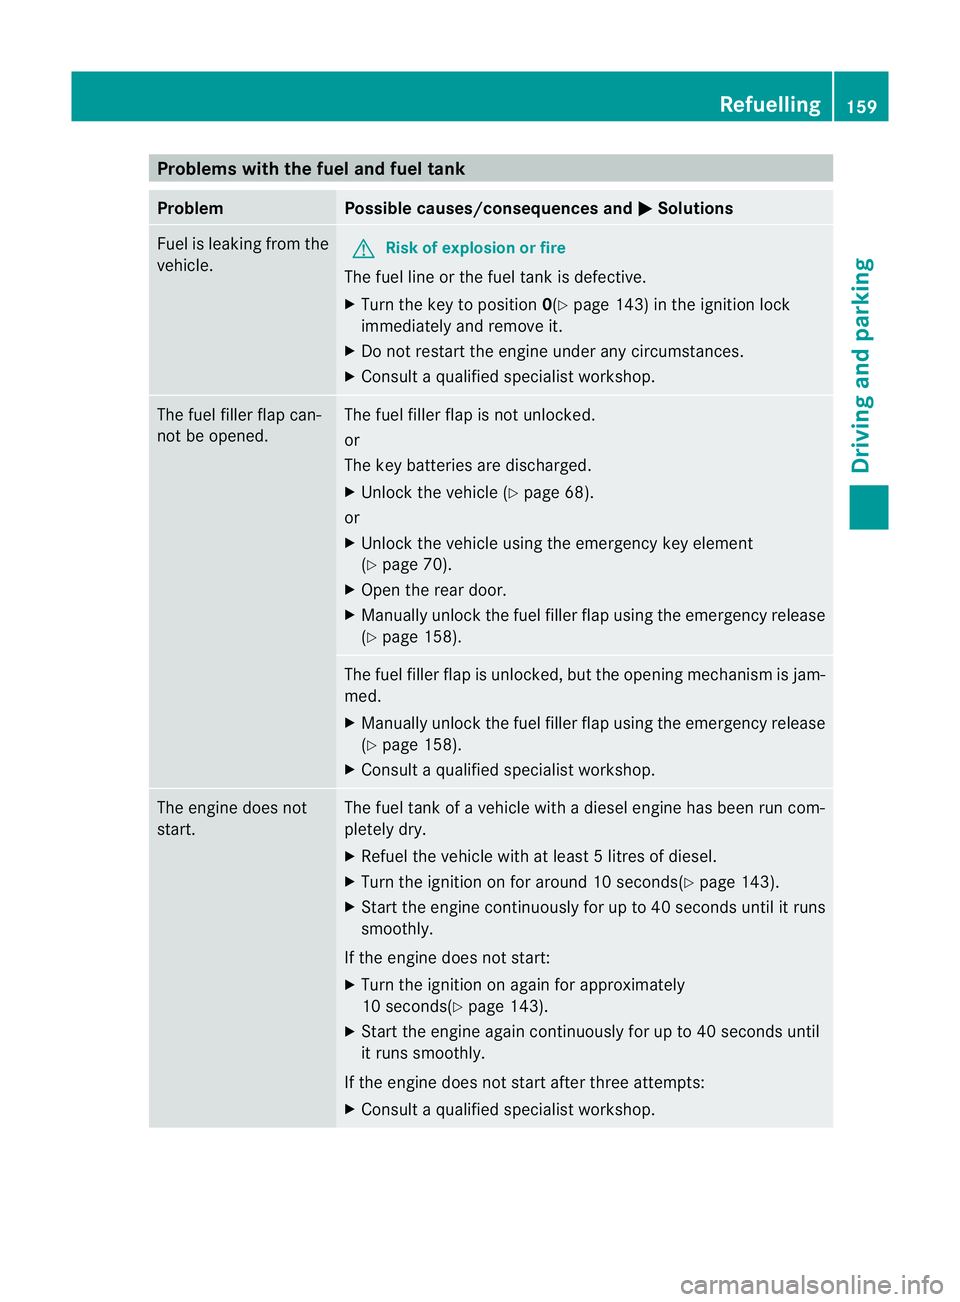
G-Class Cabriolet: the emergency release is
located in the luggage compartmentont he
right-hand side, when viewed in the direction
of travel.
X Open the tailgate. i
The vehicle body in the emergency
release area has sharp edges. There is a
risk of injury. Avoid contact with the edges
on the inside of the vehicle body.
X Pull emergency release :upwards.
The fuel filler flap is released.
X Open the fuel filler flap. 158
RefuellingDriving and parking
Page 162 of 357
Problems with the fuel and fuel tank
Problem Possible causes/consequences and
M Solutions
Fuel is leaking from the
vehicle.
G
Risk of explosion or fire
The fuel line or the fuel tank is defective.
X Turn the key to position 0(Ypage 143) in the ignition lock
immediately and remove it.
X Do not restart the engine under any circumstances.
X Consult a qualified specialist workshop. The fuel filler flap can-
not be opened. The fuel filler flap is not unlocked.
or
The key batteries are discharged.
X
Unlock the vehicle (Y page 68).
or
X Unlock the vehicle using the emergency key element
(Y page 70).
X Open the rear door.
X Manually unlock the fuel filler flap using the emergency release
(Y page 158). The fuel filler flap is unlocked, but the opening mechanism is jam-
med.
X
Manually unlock the fuel filler flap using the emergency release
(Y page 158).
X Consult a qualified specialist workshop. The engine does not
start. The fuel tank of a vehicle with a diesel engine has been run com-
pletely dry.
X
Refuel the vehicle with at least 5litres of diesel.
X Turn the ignition on for around 10 seconds(Y page 143).
X Start the engine continuously for up to 40 seconds until it runs
smoothly.
If the engine does not start:
X Turn the ignition on again for approximately
10 seconds(Y page 143).
X Start the engine again continuously for up to 40 seconds until
it runs smoothly.
If the engine does not start after three attempts:
X Consult a qualified specialist workshop. Refuelling
159Driving and parking Z
Page 163 of 357
AdBlue
®
Important notes on use To function properly, BlueTEC exhaust gas
aftertreatment 1
mus tbe operated with the
reducing agent AdBlue ®
.
When the supply of AdBlue ®
is almost used
up, the Refill AdBlue See Owner's Man‐
ual message is shown in the multifunction
display. Awarning tone also sounds.
If the Refill AdBlue No start in: .. km message is shown in the multifunction dis-
play, you can still driv ethe vehicle over the
distance shown. Awarning tone also sounds.
If the AdBlue ®
is no ttopped up, you will sub-
sequently be unable to start the engine.
After receiving the warning message, it is
preferable to fill the AdBlue ®
tank with
10 litres of AdBlue ®
.Int his way, you can
ensure that the AdBlue ®
supply lasts until the
next regular service date.
Further information about BlueTEC exhaust
gas aftertreatment and about AdBlue ®
can
be obtained from any Mercedes-Ben zService
Centre.
Topping up AdBlue ®!
Only use AdBlue ®
in accordance with
ISO 22241. Do not mix any additives with
AdBlue ®
, and do not dilute AdBlue ®
with
water. This may destroy the BlueTEC
exhaust gas aftertreatmen tsystem.
! In order to fill the AdBlue ®
tank, the vehi-
cle mus tbe parked on a level surface. The
AdBlue ®
tank can only be filled as intended
with the vehicle parked on a level surface.
Fluctuations in capacity will thus be avoi-
ded. Filling a vehicle standing on an uneven
surface is not permitted. There is a danger
of overfilling, which can cause damage to
BlueTEC exhaust gas aftertreatmen tcom-
ponents. !
Do not fill the AdBlue ®
container with a
pump nozzle.
! If there are steep gradients while driving
off-road, a sufficient filling level in the
AdBlue ®
tank must be ensured. Make sure
for this reason that there is a minimum fill
level of ten litres before driving off-road.
! Surfaces which have come into contact
with AdBlue ®
while refilling should be
rinsed immediately with water, or remove
AdBlue ®
with a moist cloth and cold water.
If AdBlue ®
has already crystallised, use a
sponge and cold water to clean the area.
AdBlue ®
residue crystallises after a certain
amount of time and soils the affected sur-
faces.
! AdBlue ®
is not a fuel additive and must
not be added to the fuel tank.IfA dBlue®
is
added to the fuel tank, this can lead to
engine damage.
If you open the AdBlue ®
tank cap, small
amounts of ammonia vapour may be
released.
Ammonia vapours have a pungen todour and
are particularly irritating to:
R skin
R mucous membranes
R eyes
You may experience a burning sensation in
your eyes, nose and throat, as well as cough-
ing and watering of the eyes.
Do not inhale any ammonia vapours that may
be released. Fill the AdBlue ®
tank only in well-
ventilated areas.
1 BlueTEC vehicles only. 160
RefuellingDriving and parking
Page 164 of 357
AdBlue
®
must not come into contact with
your skin, eyes or clothing.
R If you ge tAdBlue ®
in your eyes or on your
skin, rinse thoroughly without delay using
clear water.
R If AdBlue ®
has been swallowed, rinse your
mouth out immediately with plenty of clean
water, and drink plenty of water.
R Change immediately out of clothing conta-
minated with AdBlue ®
.
R If you notice allergic reactions, visit a doc-
tor immediately.
Keep AdBlue ®
away from children.
Have the AdBlue ®
tank refilled at a qualified
specialist workshop. However, you can also
top up the AdBlue ®
tank:
R with AdBlue ®
refill bottles
R with an AdBlue ®
refill canister
If the outside temperature is below Ò11 †, it
may be difficult to top up. If AdBlue ®
is frozen
and there is an active warning indicator, top-
ping up may not be possible. Park the vehicle
in a warm place, e.g. in a garage, until
AdBlue ®
has become liquid again. Topping up
is then possible again. Alternatively, have the
AdBlue ®
tank refilled at a qualified specialist
workshop.
Have the AdBlue ®
supply checked at a quali-
fied specialist workshop before the following
types of journeys:
R journeys abroad outside of Europe
R off-road driving
X If necessary, have AdBlue ®
topped up.
Before a longer stay outside of Europe, con-
sult a qualified specialist workshop.
For further information on AdBlue ®
, see
(Y page 345). Opening the AdBlue
®
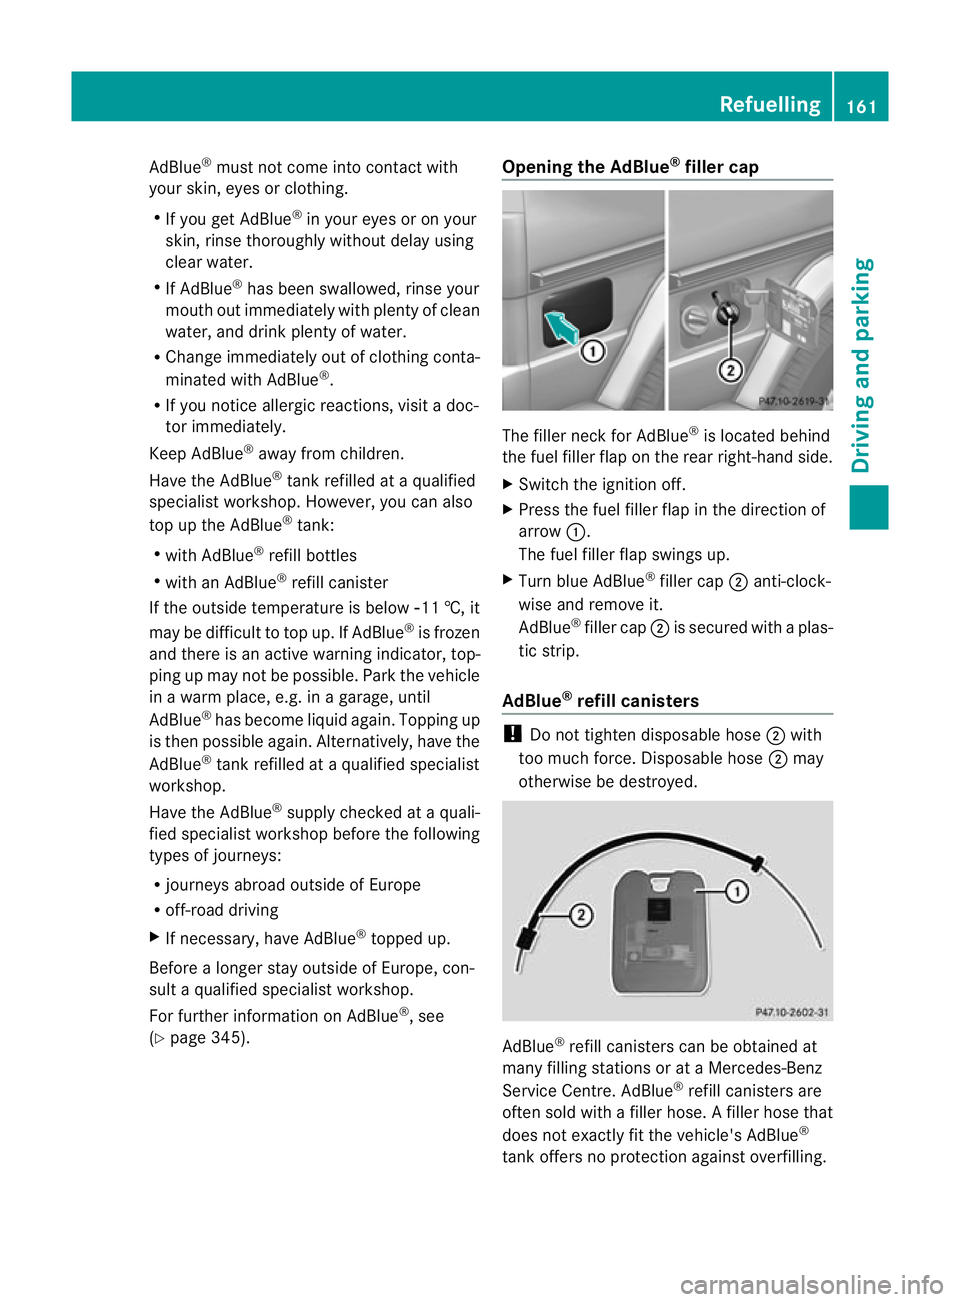
filler cap The filler neck for AdBlue
®
is located behind
the fuel filler flap on the rear right-hand side.
X Switch the ignition off.
X Press the fuel filler flap in the direction of
arrow :.
The fuel filler flap swings up.
X Turn blue AdBlue ®
filler cap ;anti-clock-
wise and remove it.
AdBlue ®
filler cap ;is secured with a plas-
tic strip.
AdBlue ®
refill canisters !
Do not tighten disposable hose ;with
too much force. Disposable hose ;may
otherwise be destroyed. AdBlue
®
refill canisters can be obtained at
many filling stations or at a Mercedes-Benz
Service Centre. AdBlue ®
refill canisters are
often sold with a filler hose. Afiller hose that
does not exactly fit the vehicle's AdBlue ®
tank offers no protection against overfilling. Refuelling
161Driving and parking Z
Page 165 of 357
AdBlue
®
may leak ou tas a result of overfilling.
Mercedes-Benz offers a special disposable
hose with overfill protection. You can obtain
this from any Mercedes-Benz Service Centre.
AdBlue ®
is available in a variety of containers
and receptacles. Only use the disposable
hose with Mercedes-Benz AdBlue ®
refill can-
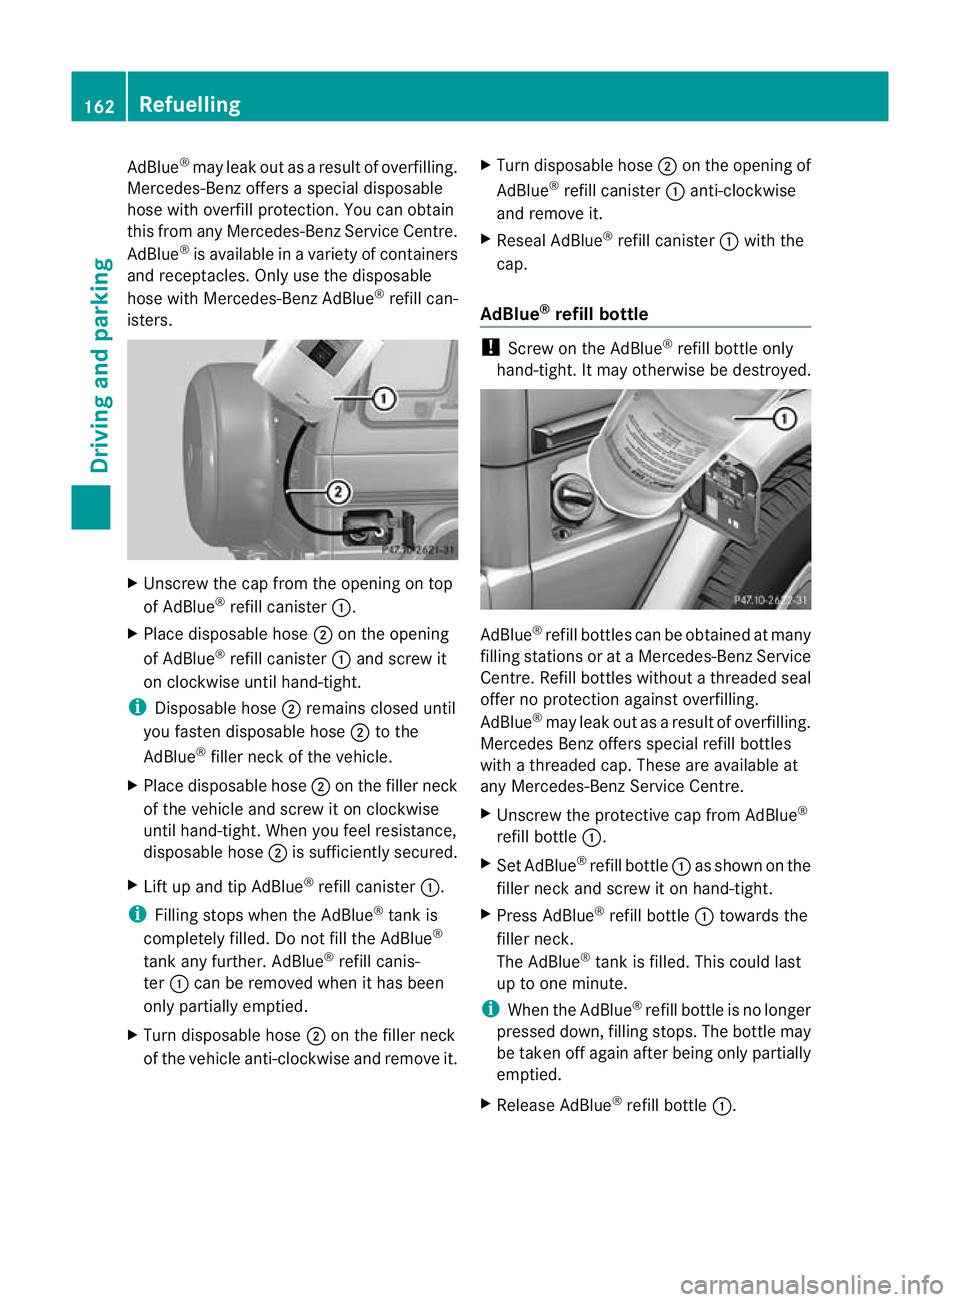
isters. X
Unscrew the cap from the opening on top
of AdBlue ®
refill canister :.
X Place disposable hose ;on the opening
of AdBlue ®
refill canister :and screw it
on clockwise until hand-tight.
i Disposable hose ;remains closed until
you fasten disposable hose ;to the
AdBlue ®
filler neck of the vehicle.
X Place disposable hose ;on the filler neck
of the vehicle and screw it on clockwise
until hand-tight. When you feel resistance,
disposable hose ;is sufficiently secured.
X Lift up and tip AdBlue ®
refill canister :.
i Filling stops when the AdBlue ®
tank is
completely filled. Do not fill the AdBlue ®
tank any further. AdBlue ®
refill canis-
ter :can be removed when it has been
only partially emptied.
X Turn disposable hose ;on the filler neck
of the vehicle anti-clockwise and remove it. X
Turn disposable hose ;on the opening of
AdBlue ®
refill canister :anti-clockwise
and remove it.
X Reseal AdBlue ®
refill canister :with the
cap.
AdBlue ®
refill bottle !
Screw on the AdBlue ®
refill bottle only
hand-tight. It may otherwise be destroyed. AdBlue
®
refill bottles can be obtained at many
filling stations or at aMercedes-BenzS ervice
Centre. Refill bottles without a threaded seal
offer no protection against overfilling.
AdBlue ®
may leak out as a result of overfilling.
Mercedes Benzo ffers special refill bottles
with a threaded cap. These are available at
any Mercedes-Benz Service Centre.
X Unscrew the protective cap from AdBlue ®
refill bottle :.
X Set AdBlue ®
refill bottle :as show nonthe
filler neck and screw it on hand-tight.
X Press AdBlue ®
refill bottle :towards the
filler neck.
The AdBlue ®
tank is filled. This could last
up to one minute.
i When the AdBlue ®
refill bottle is no longer
pressed down, filling stops. The bottle may
be taken off again after being only partially
emptied.
X Release AdBlue ®
refill bottle :.162
RefuellingDriving and parking
Page 166 of 357
X
Turn AdBlue ®
refill bottle :anti-clockwise
and remove it.
X Screw the protective cap onto AdBlue ®
refill bottle :again.
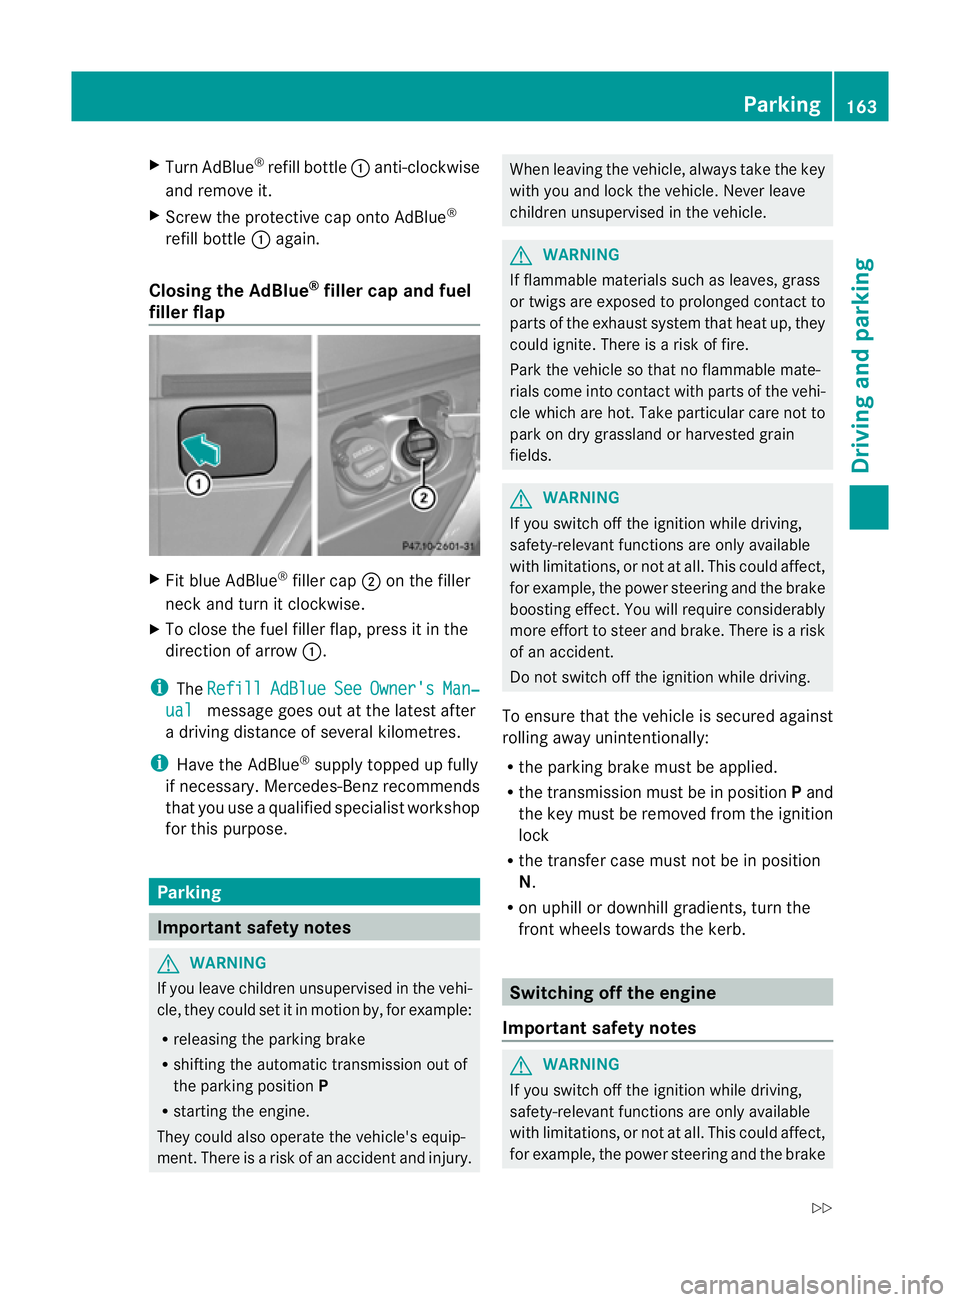
Closing the AdBlue ®
filler cap and fuel
filler flap X
Fit blue AdBlue ®
filler cap ;on the filler
neck and turn it clockwise.
X To close the fuel filler flap, press it in the
direction of arrow :.
i The Refill AdBlue See Owner's Man‐
ual message goes out at the latest after
a driving distance of several kilometres.
i Have the AdBlue ®
supply topped up fully
if necessary. Mercedes-Benz recommends
that you use a qualified specialist workshop
for this purpose. Parking
Important safety notes
G
WARNING
If you leave children unsupervised in the vehi-
cle, they could set it in motion by, for example:
R releasing the parking brake
R shifting the automatic transmission out of
the parking position P
R starting the engine.
They could also operate the vehicle's equip-
ment.T here is a risk of an accident and injury. When leaving the vehicle, always take the key
with you and lock the vehicle. Never leave
children unsupervised in the vehicle.
G
WARNING
If flammable materials such as leaves, grass
or twigs are exposed to prolonged contact to
parts of the exhaust system that heat up, they
could ignite. There is a risk of fire.
Park the vehicle so that no flammable mate-
rials come into contact with parts of the vehi-
cle which are hot. Take particular care not to
park on dry grassland or harvested grain
fields. G
WARNING
If you switch off the ignition while driving,
safety-relevant functions are only available
with limitations, or not at all. This could affect,
for example, the power steering and the brake
boosting effect.Y ou will require considerably
more effort to steer and brake. There is a risk
of an accident.
Do not switch off the ignition while driving.
To ensure that the vehicle is secured against
rolling away unintentionally:
R the parking brake must be applied.
R the transmission must be in position Pand
the key must be removed from the ignition
lock
R the transfer case must not be in position
N.
R on uphill or downhill gradients, turn the
front wheels towards the kerb. Switching off the engine
Important safety notes G
WARNING
If you switch off the ignition while driving,
safety-relevant functions are only available
with limitations, or not at all. This could affect,
for example, the power steering and the brake Parking
163Driving and parking
Z
Page 167 of 357
boosting effect. You will require considerably
more effor
tto steer and brake. There is a risk
of an accident.
Do not switch off the ignition while driving.
Vehicles with automatic transmission X
Shift the transmission to position P.
X Turn the key to position 0in the ignition
lock (Y page 143) and remove it.
The immobiliser is activated.
X Apply the parking brake firmly.
X Turn the steering wheel until the steering
wheel lock engages.
i If you switch the engine off with the trans-
mission in position Ror D, the automatic
transmission shifts to Nautomatically.
If you then open one of the front doors or
remove the key from the ignition, the auto-
matic transmission shifts to P.
If you shift the automatic transmission to
N before switching off the engine, the auto-
matic transmission remains in Neven if a
door is opened.
i The key can only be removed if the auto-
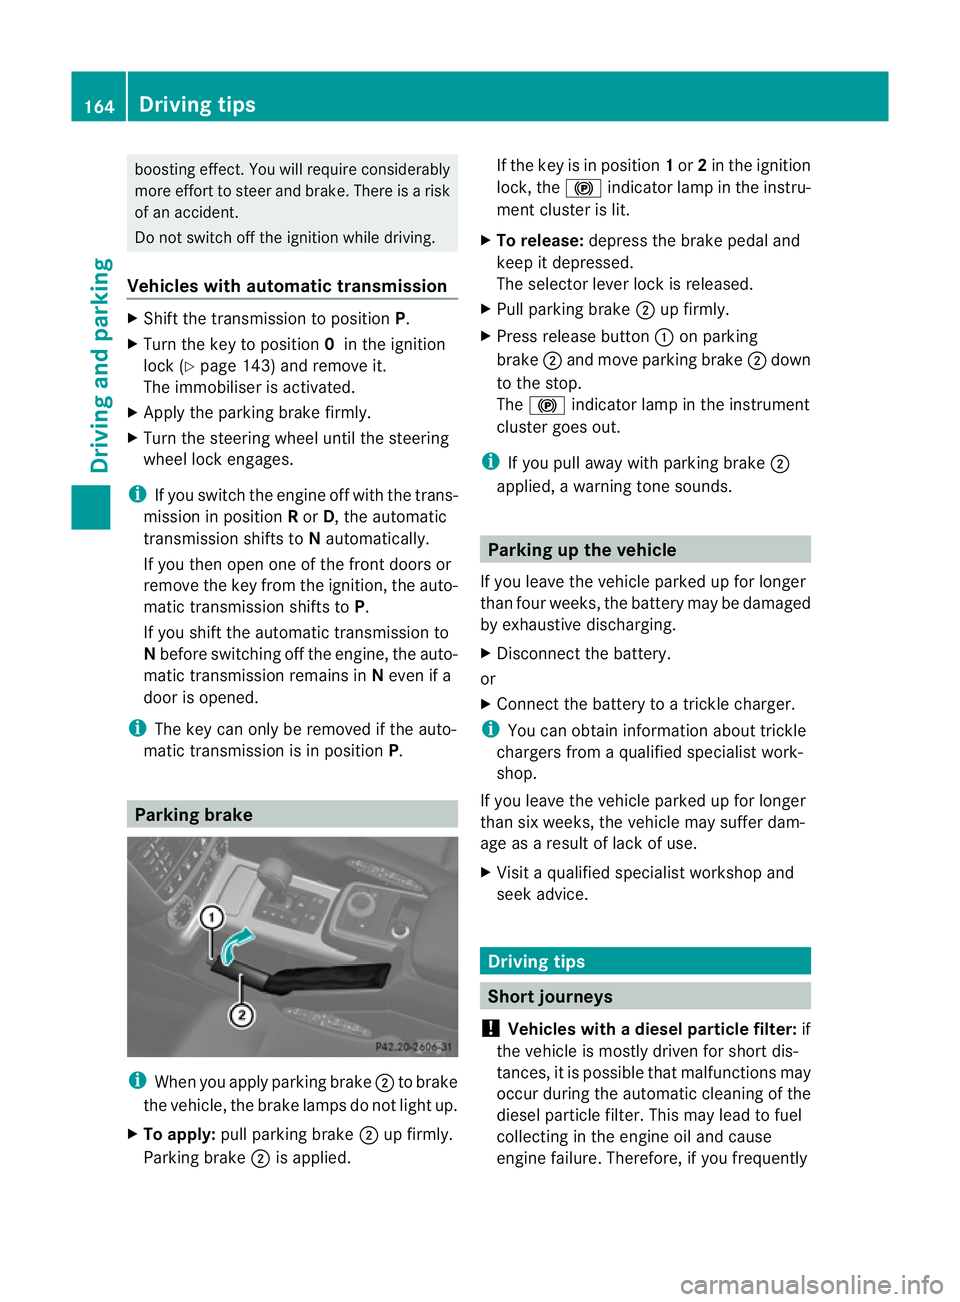
matic transmission is in position P.Parking brake
i
When you apply parking brake ;to brake
the vehicle, the brake lamps do not light up.
X To apply: pull parking brake ;up firmly.
Parking brake ;is applied. If the key is in position
1or 2in the ignition
lock, the !indicator lamp in the instru-
ment cluster is lit.
X To release: depress the brake pedal and
keep it depressed.
The selector lever lock is released.
X Pull parking brake ;up firmly.
X Press release button :on parking
brake ;and move parking brake ;down
to the stop.
The ! indicator lamp in the instrument
cluster goes out.
i If you pull away with parking brake ;
applied, a warning tone sounds. Parking up the vehicle
If you leave the vehicle parked up for longer
than four weeks, the battery may be damaged
by exhaustive discharging.
X Disconnect the battery.
or
X Connect the battery to a trickle charger.
i You can obtain information about trickle
chargers from a qualified specialist work-
shop.
If you leave the vehicle parked up for longer
than six weeks, the vehicle may suffer dam-
age as a result of lack of use.
X Visit a qualified specialist workshop and
seek advice. Driving tips
Short journeys
! Vehicles with adiesel particle filter: if
the vehicle is mostly driven for short dis-
tances, it is possible that malfunctions may
occur during the automatic cleaning of the
diesel particle filter. This may lead to fuel
collecting in the engine oil and cause
engine failure. Therefore, if you frequently 164
Driving tipsDriving and parking
Page 168 of 357
drive short distances, you should take a 20
minute trip on a motorway or rural road at
least every 500km. Brakes
Important safety notes G
WARNING
If you shift down on a slippery road surface in
an attempt to increase the engine's braking
effect, the drive wheels could lose their grip.
This increases the risk of skidding and having
an accident.
Do not shift down for additional engine brak-
ing on a slippery road surface.
Downhill gradients On long and steep downhill gradients, espe-
cially if the vehicle is laden or towing a trailer,
you must select shift range
1,2or 3
(Y page 153) in good time.
i This also applies if you have activated
cruise control or SPEEDTRONIC.
This will use the braking effec tofthe engine,
so less braking will be required to prevent the
vehicle from gaining speed. This relieves the
load on the brake system and prevents the
brakes from overheating and wearing too
quickly. If you need additional braking,
depress the brake pedal repeatedly rather
than continuously.
Heavy and light loads G
WARNING
The braking system can overheat if you leave
your foot on the brake pedal while driving.
This increases the braking distance and could
even cause the braking system to fail. There
is a risk of an accident.
Never use the brake pedal as a footrest.Do
not simultaneously depress both the brake
pedal and the accelerato rpedal while driving. If the brakes have been subjected to a heavy
load, do not stop the vehicle immediately, but
drive on for a short while. This allows the air-
flow to cool the brakes more quickly.
If the brakes have been used only moderately,
you should occasionally test their effective-
ness. To do this, brake more firmly from a
higher speed. This improves the grip of the
brakes.
Wet road surfaces
If driving in heavy rain for a prolonged period
of time without braking, there may be a
delayed reaction from the brakes when brak-
ing for the first time. This may also occur after
the vehicle has been washed.
You have to depress the brake pedal more
firmly. Maintain a greater distance from the
vehicle in front.
After driving on a wet road or having the vehi-
cle washed, brake firmly while paying atten-
tion to the traffic conditions .This will warm
up the brake discs, thereby drying them more
quickly and protecting them against corro-
sion.
Limited braking performance on salt-
treated roads If you drive on salt-treated roads, a layer of
salt may form on the brake discs and pads.
This can increase the braking distance con-
siderably.
R
Apply the brakes occasionally in order to
prevent any salt build-up. Ensure that you
do not endanger other road users when
doing so.
R Carefully depress the brake pedal at the
end of the journey and when starting the
next journey.
R Maintain a much greater distance to the
vehicle in front. Driving tips
165Driving and parking Z
Page 169 of 357
New brake pads/linings
New brake pads/brake pads and discs that
have been replaced only achieve optimum
braking effect after several hundred kilome-
tres of driving. Compensate for the reduced
braking effect by applying greate rforce to the
brake pedal.
For safety reasons, Mercedes-Benz recom-
mends that you only have brake pads/linings
fitted to your vehicle which have been
approved for Mercedes-Benz vehicles or
which correspond to an equivalent quality
standard. Brake pads/linings which have not
been approved for Mercedes-Benz vehicles or
which are not of an equivalent quality could
affect your vehicle's operating safety.
High-performance brake system for
AMG vehicles The high-performance brake system is
designed for high loads. This may lead to
noise when braking. This is dependent on:
R speed
R braking force
R environmental conditions, such as temper-
ature and humidity.
The wear of individual components of the
brake system, such as the brake pads/linings
or brake discs, depends on the individual driv-
ing style and operating conditions.
For this reason, it is impossible to state a
mileage (service life) that will be valid under
all circumstances. An aggressive driving style
will lead to high wear. You can obtain further
information about this from your Mercedes-
Benz Service Centre.
Parking brake G
WARNING
If you must brake the vehicle with the parking
brake, the braking distance is considerably
longer and the wheels could lock. This increa-
ses the risk of skidding and an accident. Only use the parking brake to brake the vehi-
cle when the service brake is faulty. Do not
apply the parking brake too firmly. If the
wheels lock, release the parking brake until
the wheels begin turning again.
When you apply the parking brake to brake
the vehicle, the brake lamps do not light up.
If you drive on wet roads or dirt-covered sur-
faces, road salt and/or dirt could get into the
parking brake.
In order to prevent corrosion and a reduction
in the braking power of the parking brake,
observe the following:
R pull the parking brake upwards with the
release button depressed from time to time
before beginning the journey
(Y page 164).
R drive for approximately 100 m at a maxi-
mum speed of 20 km/h. Tyre traction
G
WARNING
Whereas the vehicle can be fully controlled at
a certain speed on dry roads, you must reduce
your speed on wet or icy roads to achieve the
same road safety. You could otherwise cause
an accident.
Pay particular attention to the road conditions
at temperatures around freezing point.
If ice has formed on the road surface (e.g.
from fog), a thin film of water rapidly forms on
the ice when you brake, considerably reduc-
ing tyre traction. Drive with particular care in
such weather conditions. Driving on slippery surfaces
! If possible, do not let the drive wheels
spin. Otherwise, you could damage the
drive train.
X Engage the differential locks if necessary
(Y page 204). 166
Driving tipsDriving and parking
Page 170 of 357
Driving on wet roads
Aquaplaning If water has accumulated to a certain depth
on the road surface, there is a danger of aqua-
planing occurring, eve nif:
R you are driving at low speeds
R the tyres have adequate tread depth.
For this reason, do not drive in tyre ruts, and
brake carefully.
Driving on flooded roads !
Bear in mind that vehicles travelling in
front or in the opposite direction create
waves. This may cause the maximu mper-
missible water depth to be exceeded.
These notes must be observed under all
circumstances. You could otherwise dam-
age the engine, the electronics or the trans-
mission.
If you have to drive on stretches of road on
which water has collected, please bear in
mind that:
R the maximum permissible fording depth in
still water is 60 cm
R you should drive no faster than walking
pace
Off-road fording !
The water depth must not exceed 60 cm.
Note that the possible fording depth is less
in flowing water.
! Under no circumstances should you
accelerate before entering the water. The
bow wave could cause water to enter and
damage the engine and neighbouring
assemblies.
! Do not open any of the vehicle's doors
while fording. Otherwise, water could get
into the vehicle interior and damage the
vehicle's electronics and interior equip-
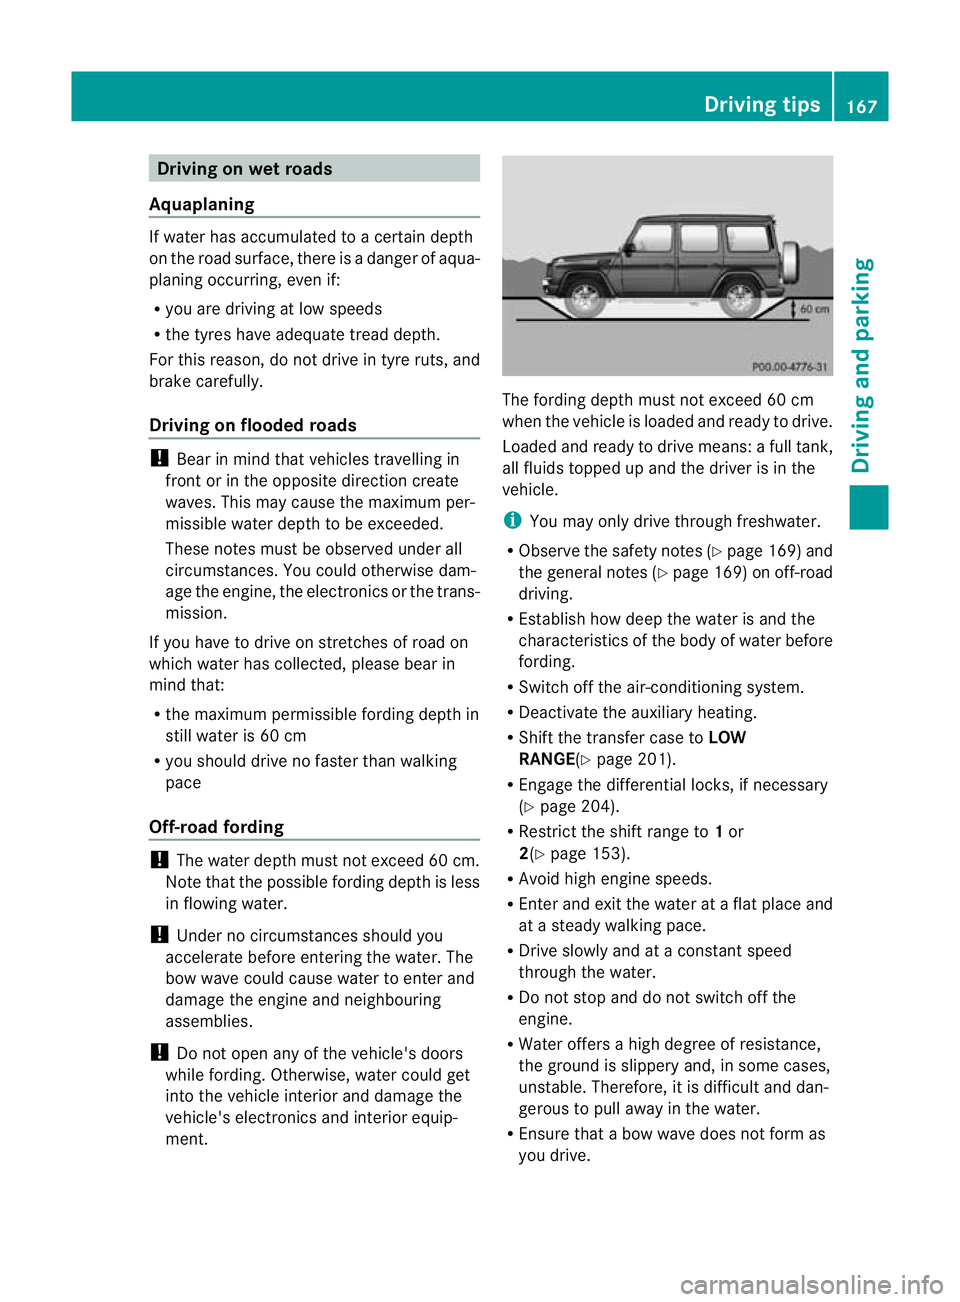
ment. The fording depth must not exceed 60 cm
when the vehicle is loaded and ready to drive.
Loaded and ready to drive means: a full tank,
all fluids topped up and the driver is in the
vehicle.
i
You may only drive through freshwater.
R Observe the safety notes (Y page 169)and
the general notes (Y page 169) on off-road
driving.
R Establish how deep the water is and the
characteristics of the body of water before
fording.
R Switch off the air-conditioning system.
R Deactivate the auxiliary heating.
R Shift the transfer case to LOW
RANGE( Ypage 201).
R Engage the differential locks, if necessary
(Y page 204).
R Restrict the shift range to 1or
2(Y page 153).
R Avoid high engine speeds.
R Enter and exi tthe water at a flat place and
at a steady walking pace.
R Drive slowly and at a constant speed
through the water.
R Do not stop and do not switch off the
engine.
R Water offers a high degree of resistance,
the ground is slippery and, in some cases,
unstable. Therefore, it is difficult and dan-
gerous to pull away in the water.
R Ensure that a bow wave does not form as
you drive. Driving tips
167Driving and parking Z