battery MERCEDES-BENZ G-CLASS SUV 2012 Owners Manual
[x] Cancel search | Manufacturer: MERCEDES-BENZ, Model Year: 2012, Model line: G-CLASS SUV, Model: MERCEDES-BENZ G-CLASS SUV 2012Pages: 357, PDF Size: 8.86 MB
Page 8 of 357
Neutral (ECO start/stop function)
.150
Overview ........................................ 149
Problem (fault) ............................... 156
Progra mselector button ................152
Pulling away ................................... 144
Selector leve r................................ 149
Shift range s................................... 153
Steering wheel gearshift paddle s... 153
Trailer towing ................................. 152
Transmissio nposition display ........150
Automatic transmission emer-
gency running mode .........................156
Auxiliary heating Activating/deactivating .................134
Activating/deactivating (on the
centre console ).............................. 135
Display message ............................ 250
Important safety notes ..................134
Malfunction ................................... .138
Problem (display message) ............138
Remote control .............................. 135
Setting ........................................... 223
Setting the departur etime ............ .136
Auxiliary ventilation
Activating/deactivating .................134
Activating/deactivating (on the
centre console ).............................. 135
Problem (display message) ............138
Remote control .............................. 135
Axle load, permissible (traile rtow-
ing) ...................................................... 350 B
Backrest (display message) .............249
BAS (Brake Assist System) .................61
Battery Changing (auxiliary heating
remote control) .............................. 137
Changing (key )................................. 71
Checking (key )................................. 71
Important safety guidelines (key )..... 70
Battery (vehicle)
Charging ........................................ 311
Display message ............................ 239
Important safety notes ..................309
Jump starting ................................. 313
Overview ........................................ 309Belt tensioner
Activation ......................................... 39
Function .......................................... .47
Blind Spo tAssist
Activating/deactivating .................220
Display message ............................ 243
Notes/function .............................. 190
Trailer towing ................................. 192
see Active Blind Spot Assist
BlueTEC (AdBlue ®
) ............................. 345
Bonnet Closing .......................................... .291
Display message ............................ 249
Important safety notes ..................290
Opening ......................................... 291
Brake fluid
Display message ............................ 232
Notes ............................................. 346
Brake lamps
Adaptive .......................................... .61
Display message ............................ 235
Brakes
ABS .................................................. 60
BAS .................................................. 61
Brake fluid (notes) .........................346
Display message ............................ 229
Driving tips .................................... 165
High-performance brake system ....166
Important safety notes ..................165
Parking brake ................................ 164
Warning lamp ................................. 253
Breakdown
see Flat tyre
see Towing away
Bulbs
Brake lamp .................................... 118
Cornering light function .................117
Foglamps ....................................... 117
Rea rfoglamp ................................. 118
Reversing lamp .............................. 118
Tai llamp ........................................ 118
see Changing bulbs Index
5
Page 13 of 357
Front-passenger seat
Display message ............................ 249
Fuel
Additives ........................................ 343
Consumption statistics ..................215
Displaying the current consump-
tion ................................................ 215
Displaying the range ......................215
Fuel gauge ..................................... 211
Grade (petrol) ................................ 342
Important safety notes ..................341
Notes for AMG vehicles .................343
Premium-grade unleaded petrol ..... 342
Problem (malfunction) ...................159
Quality (diesel )............................... 343
Refuelling ...................................... .156
Tank content/reserve fuel .............342
Fuel/water separator
Service .......................................... .295
Fuel filler flap
Emergency release ........................158
Opening/closing ............................ 157
Fuel filte r(white display message) .240
Fuel level Calling up the range (on-board
computer) ...................................... 215
Gauge ............................................ 211
Fuel reserve
see Fuel
Fuel tank
Capacity ........................................ 342
Problem (malfunction) ...................159
Fuse allocation chart ........................318
Fuse box Battery case ................................... 320
Dashboard ..................................... 319
Front-passenger footwell ...............319
Transmission tunnel ....................... 319
Fuse extractor ................................... 318
Fuses Allocation chart ............................. 318
Before changing ............................. 318
Dashboard fuse box .......................319
Fuse allocation chart .....................318
Fuse box in the front-passenger
footwell .......................................... 319
Fuse box in the transmission tun-
nel ................................................. 319Important safety notes
..................318
In the battery case .........................320 G
Garage door opener Clearing the memory .....................283
Frequencies ................................... 283
Important safety notes ..................280
Opening/closing the garage door ..282
Programming the remote control ...280
Gear indicator (on-board computer) 225
Gearshift program SETUP (on-board computer) ..........226
Genuine Mercedes-Benz parts .........338
Genuine wood trim and trim strips
(cleaning instructions) ......................300
Glove compartment ..........................267
Gradient-climbing capability (max-
imum) ................................................. 173 H
Hazard warning lamps ......................109
Headlamp Cleaning system (function) ............108
Cleaning system (notes) ................347
Headlamps
Cleaning ......................................... 298
Misting up ...................................... 110
Topping up the cleaning system ....294
see Automatic headlamp mode
Head restraints
Adjusting ......................................... 92
Adjusting (rear) ................................ 93
Fitting/removing (rear) ....................93
Luxury .............................................. 92
Resetting (front) ............................... 93
Heating
see Climate control
High-pressure cleaners ....................296
Hill start assist .................................. 145
HOLD function Function/notes ............................. 19610
Index
Page 14 of 357
I
Immobiliser .......................................... 64
Indicator and warning lamps Coolan t.......................................... 260
DISTRONI CPLUS ........................... 262
Engine diagnostics .........................259
Indicator lamps
Display message ............................ 235
Instrument cluster
Overview ........................................ 211
Warning and indicator lamps .........251
Instrument cluster lighting ..............212
Interior lighting ................................. 110
Automatic control system ..............111
Delayed switch-off (on-board
computer) ...................................... 222
Luggage compartment lighting ......112
Manual control ............................... 112
Overview ........................................ 110
Reading lamp ................................. 112
Rea rinterior lighting ...................... 113
Interior motion sensor ........................65
ISOFIX child seat securing system ....51 J
Jack Pump lever ..................................... 331
Storage location ............................ 306
Using ............................................. 330
Jump starting (engine) ......................313 K
Key Changing the battery .......................71
Checking the battery .......................71
Convenience opening feature ..........78
Display message ............................ 251
Door central locking/unlocking .......68
Emergency key element ................... 70
Important safety notes ....................68
Loss ................................................. 72
Malfunction ...................................... 72
Modifying the programming .............69
Overview .......................................... 68Problem (malfunction)
.....................72
Starting the engine ........................144
Keyp ositions
Key ................................................ 143
Kickdown
Manual drive program ....................155 L
Lap time (RACETIMER) ......................226
Lashing eyelets ................................. 271
Licence plate lamp (display mes-
sage) ................................................... 235
Lights Activating/deactivating the inte-
rior lighting delayed switch-off .......222
Automatic headlamp mode ............105
Cornering light function .................110
Courtesy lights ............................... 114
Dipped-bea mheadlamps ............... 105
Driving abroad ............................... 104
Foglamps ....................................... 106
Hazard warning lamps ...................109
Headlamp flasher ........................... 109
Ligh tswitc h................................... 104
Main-beam headlamps ................... 109
Parking lamps ................................ 108
Rea rfoglamp ................................. 107
Side lamps ..................................... 107
Switching the daytime driving
lights on/off (on-board computer) .222
Switching the daytime driving
lights on/off (switch) .....................105
Switching the exterio rlighting
delayed switch-off on/off (on-
board computer )............................ 222
Switching the surround lighting
on/off (on-board computer) ..........222
Turn signals ................................... 108
see Changing bulbs
see Interior lighting
Light sensor (display message) .......236
LIM indicator lamp Cruise control ................................ 174
DISTRONI CPLUS ........................... 183
Variabl eSPEEDTRONIC .................179
Limiting the speed
see SPEEDTRONIC Index
11
Page 25 of 357
Declarations of conformity
Wireless vehicle components The following information applies to all com-
ponents of the vehicle and the COMAN
Dsys-
tem which receive and/or transmit radio
waves:
The components of this vehicle which receive
and/o rtransmit radio waves are compliant
with the basic requirements and other rele-
vant provisions of Directive 1999/5/EC. You
can obtain further information from any
Mercedes-Benz Service Centre.
Electromagnetic compatibility The electromagnetic compatibility of the vehi-
cle components has been tested and certified
in accordance with the current version of
Directive 72/245/EE Cor the equivalent
ECE-R 10 regulation. Diagnostics connection
G
WARNING
If you connect equipment to a diagnostics
connection, it can affect the operation of the
vehicle systems. This could compromise the
operating safety of your vehicle while driving.
There is a risk of an accident.
Do not connect any equipment to a diagnos-
tics connection. G
WARNING
Loose equipment or cables hanging from a
device which are connected to a diagnostic
connection could impede pedal clearance.
The equipment or cables could get caught
between the pedals when driving and braking
suddenly. This could impair the function of the
pedals. There is a risk of accident.
Do not attach any equipment or cables in the
driver's footwell. !
If the engine is switched off and equip-
ment on the diagnostics connection is
used, the starter battery may discharge.
The diagnostics connection is only intended
for the connection of diagnostic equipment at
a qualified specialist workshop.
Connecting equipment to the diagnostics
connection can lead to emissions monitoring
information being reset, for example. This
may lead to the vehicle failing to meet the
requirements of the next emissions test dur-
ing the main inspection. Qualified specialist workshop
Aq ualified specialist workshop has the nec-
essary special skills, tools and qualifications
to correctly carry out any necessary work on
your vehicle. This particularly applies to work
relevan tto safety.
Observe the notes in the Service Booklet.
Always have the following work carried out at
a qualified specialist workshop:
R work relevant to safety
R service and maintenance work
R repair work
R modifications, installations and conver-
sions
R work on electronic components
Mercedes-Benz recommends that you use a
Mercedes-Benz Service Centre. Vehicle registration
Mercedes-Benz may ask its Service Centres
to carry out technical inspections on certain
vehicles. The quality or safety of the vehicle
is improved as a result of the inspection.
Mercedes-Benz can only inform you about
vehicle checks if it has your registration data. 22
Introduction
Page 52 of 357
tion instructions and the correct use of the
child restraint system.
Child restraint systems shoul dbe fitted to the
rear seats. Children are generally better pro-
tected there.
The entire base of the child restraint system
must always rest on the seat cushion. There-
fore, never place objects, e.g. a cushion,
under the child restraint system.
Only use child restraint systems with the orig-
inal cover designed for them. Only replace
damaged covers with genuine Mercedes-Benz
covers.
We recommend the use of child restraint sys-
tems which have been approved for
Mercedes-Benz vehicles. G
WARNING
When leaving the vehicle, it can still roll away
despite being braked by the HOLD function if:
R there is a malfunction in the system or in
the voltage supply
R the HOLD function is deactivated by the
accelerator pedal being depressed, e.g. by
a vehicle occupant
R the electrical system in the engine com-
partment, the battery or the fuses are tam-
pered with
R the battery is disconnected
There is a risk of an accident.
Before leaving the vehicle, always deactivate
the HOLD function and secure the vehicle
from rolling away. G
WARNING
Unsecured or incorrectly positioned loads
increase the risk of injury for children and all
other occupants in the event of:
R an accident
R a braking manoeuvre
R a sudden change of direction
Do not carry heavy or hard objects in the vehi-
cle interior unless they are secured. You will find further information under "Loading guide-
lines" in the index.
If a child is travelling in your vehicle, secure
the child using a child restraint system which
is appropriate to the size, age and weight of
the child and recommended for Mercedes-
Benz vehicles. You should preferably fit the
restraint system to a suitable rear seat. Make
sure that the child is secured in a child
restraint system throughout the trip.
Mercedes-Benz recommends that you only
use the child restraint systems listed under
(Y page 56).
You can obtain information about the correct
child restraint system from any Mercedes-
Benz Service Centre.
i It is advisable to use Mercedes-Benz care
products to clean child restraint systems.
You can obtain information about this at
any Mercedes-Benz Service Centre.
Child restraint system on the front-
passenger seat G
WARNING
If the front-passenger airbag is not disabled:
R a child secured in a child restraint system
on the front-passenger seat could be seri-
ously and even fatally injured by the front-
passenger airbag deploying. This is espe-
cially a risk if the child is in the immediate
vicinity of the front-passenger airbag when
it deploys.
R never secure a child on the front-passenger
seat in a rearward-facing child restraint sys-
tem. Only secure a rearward-facing child
restraint system on a suitable rear seat.
R always move the front-passenger seat to
the rearmost position if you secure a child
in a forward-facing child restraint system
on the front-passenger seat. Children in the vehicle
49Safety
Z
Page 73 of 357
neously for approximately si
xseconds until
battery chec klamp :flashes twice.
The key now functions as follows:
X To unlock the driver's door and fuel
filler flap: press the%button once.
X To unlock centrally: press the%but-
ton twice.
X To lock centrally: press the&button. Restoring factor
ysettings X
Press the %and& buttons simulta-
neously for approximately six seconds until
battery check lamp :flashes twice. Emergency key element
General notes If the vehicle can no longer be unlocked with
the key, use the emergency key element.
If you use the emergency key element to
unlock and open the driver's door, the anti-
theft alarm system will be triggered
(Y page 64).
There are several ways to tur noff the alarm:
X Press the %or& button on the key.
or
X Insert the key into the ignition lock.
If you unlock the vehicle using the emergency
key element, the fuel filler flap will not be
unlocked automatically. X
To unlock the fuel filler flap: insert the
key into the ignition lock.
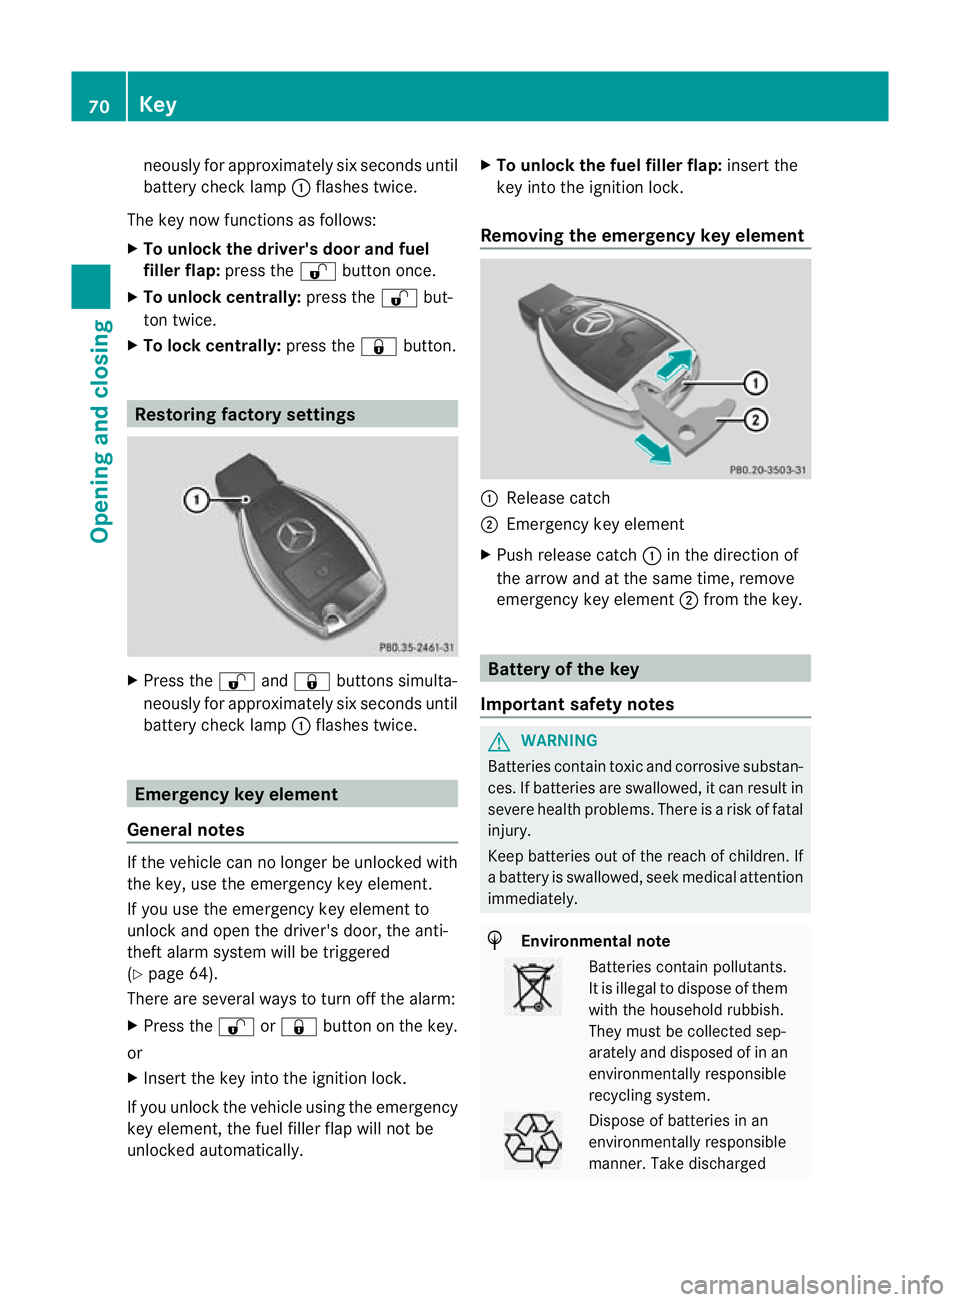
Removing the emergency key element :
Release catch
; Emergency key element
X Push release catch :in the direction of
the arrow and at the same time, remove
emergency key element ;from the key. Battery of the key
Important safety notes G
WARNING
Batteries contain toxic and corrosive substan-
ces. If batteries are swallowed, it can result in
severe health problems. There is a risk of fatal
injury.
Keep batteries out of the reach of children. If
a battery is swallowed, seek medical attention
immediately. H
Environmental note Batteries contain pollutants.
It is illegal to dispose of them
with the household rubbish.
They must be collected sep-
arately and disposed of in an
environmentally responsible
recycling system.
Dispose of batteries in an
environmentally responsible
manner. Take discharged70
KeyOpening and closing
Page 74 of 357
batteries to a qualified spe-
cialist workshop or to a col-
lection point for used batter-
ies.
Mercedes-Benz recommends that you have
the batteries replaced at a qualified specialist
workshop.
Checking the battery X
Press the &or% button.
The battery is working properly if battery
chec klamp :lights up briefly.
If battery check lamp :does no tlight up
during the test, the battery is discharged.
X Change the battery (Y page 71).
i You can get a battery in any qualified spe-
cialist workshop.
i Have the batteries replaced at a qualified
specialist workshop.
i If the key battery is checked within the
signal receptio nrange of the vehicle, press-
ing the &or% button:
R locks or
R unlocks the vehicle
Replacing the battery You require a CR 2025 3 V cell battery.
X Take the emergency key elemen tout of the
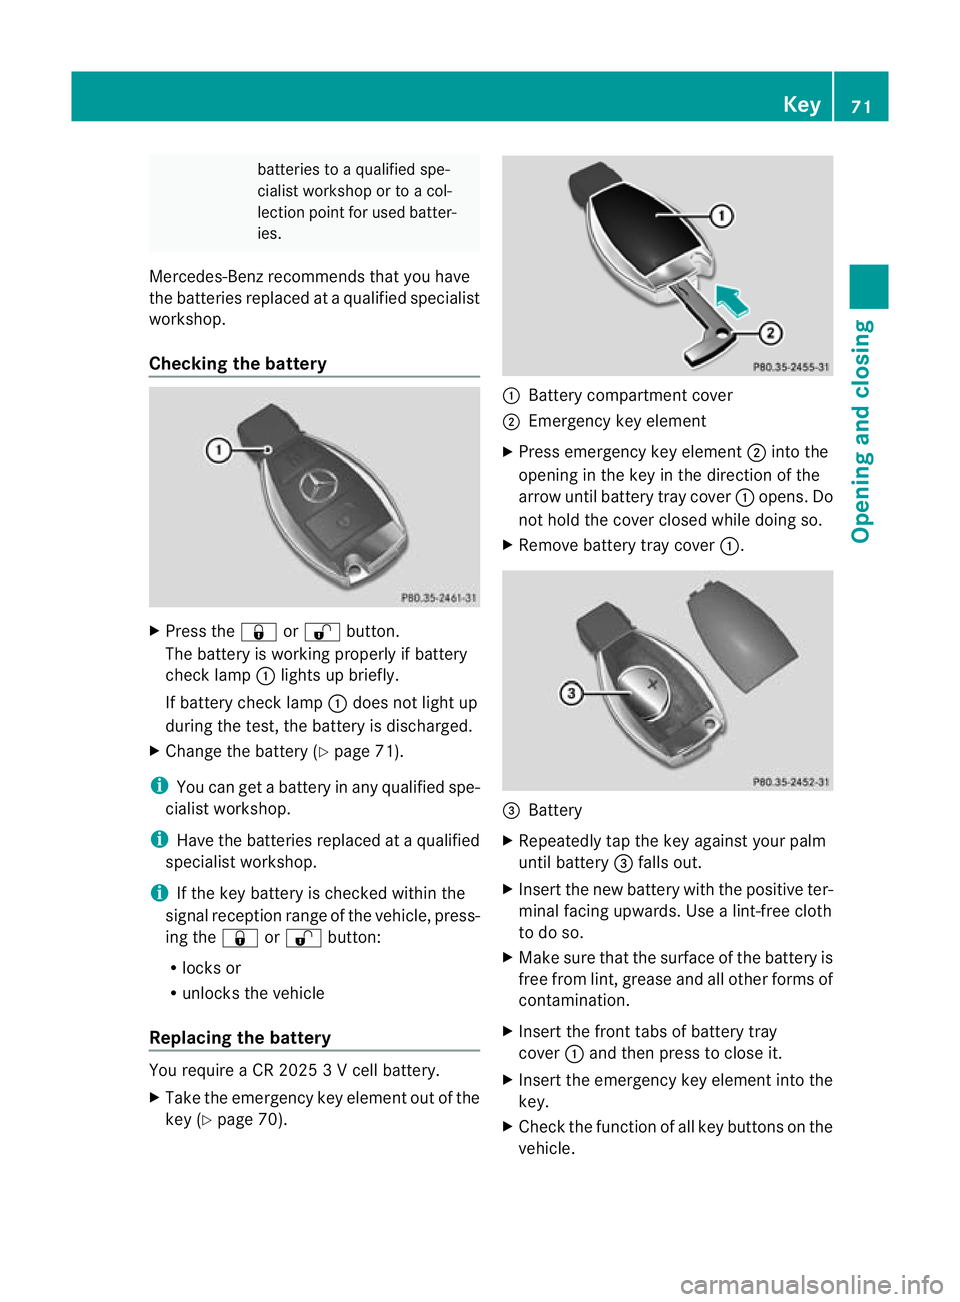
key (Y page 70). :
Battery compartment cover
; Emergency key element
X Press emergency key element ;into the
opening in the key in the direction of the
arrow until battery tray cover :opens. Do
no th old the cover closed while doing so.
X Remove battery tray cover :. =
Battery
X Repeatedly tap the key against your palm
until battery =falls out.
X Insert the new battery with the positive ter-
minal facing upwards. Use a lint-free cloth
to do so.
X Make sure that the surface of the battery is
free from lint, grease and all other forms of
contamination.
X Insert the front tabs of battery tray
cover :and then press to close it.
X Insert the emergency key element into the
key.
X Check the function of all key buttons on the
vehicle. Key
71Opening and closing Z
Page 75 of 357
Problems with the key
Problem Possible causes/consequences and
M Solutions
You cannot lock or
unlock the vehicle
using the key. The key battery is discharged or nearly discharged.
X
Point the tip of the key at the driver's door handle from a dis-
tance of approximately 50 cm and try to unlock or lock the
vehicle again.
If this does not work:
X Check the key battery (Y page 71) and replace it if necessary
(Y page 71).
X Lock (Y page 74) or unlock (Y page 75) the vehicle using
the emergency key element. The key is faulty.
X
Lock or unlock the vehicle using the emergency key element
(Y page 74).
X Have the key checked at a qualified specialist workshop. You have lost a key. X
Have the key deactivated at a qualified specialist workshop.
X Report the loss immediately to the vehicle insurers.
X If necessary, have the locks replaced as well. You have lost the emer-
gency key element. X
Report the loss immediately to the vehicle insurers.
X If necessary, have the locks replaced as well. Problem Possible causes/consequences and
M Solutions
The engine cannot be
started using the key. The key has been in position
0(Ypage 143) for a considerable
time.
X Remove the key and reinsert it into the ignition lock.
X Start the engine. The on-board voltage is too low.
X
Switch off non-essential consumers, e.g. seat heating or interior
lighting, and try to turn the key again.
If this does not work:
X Check the battery and charge it if necessary (Y page 311).
or
X Jump-start the vehicle (Y page 313).
or
X Consult a qualified specialist workshop. 72
KeyOpening and closing
Page 84 of 357
If the sliding sunroof is obstructed during
closing and reopens again slightly:
X Immediately after the sliding sunroof
blocks, pull the ¡switch in the over-
head control panel down to the point of
resistance and hold it until the sliding sun-
roof is closed.
If the sliding sunroof is obstructed again dur-
ing closing and reopens again slightly:
X Immediately after the sliding sunroof
blocks, pull the ¡switch in the over-
head control panel down to the point of
resistance and hold it until the sliding sun-
roof is closed. Soft top (G-Class Cabriolet)
Important safety notes
G
WARNING
If the closed soft top is not locked, it can open
while the vehicle is in motion. This could
cause you to lose control of the vehicle .There
is a risk of an accident.
Only drive with the soft top fully open or
closed.
! Never sit on the soft top or store heavy
objects on it. Otherwise, the soft top will be
damaged.
! The soft top swings upwards when it is
opened or closed. In order to avoid dam-
aging the soft top or other parts of the vehi-
cle when opening or closing the soft top,
observe the following:
R there must be sufficient clearance above
the vehicle.
R the tonneau cover must not be attached
to the opened soft top.
R the luggage compartmentc over must
not be pushed up by the load.
R there must not be any objects on the lug-
gage compartment cover.
R no roof rack must be fitted. R
the outside temperature must be over
−15 †.
R the fabric must not be dirty, wet or fro-
zen.
R the vehicle must not be parked at a steep
angle, e.g. off-road.
R zip fasteners and quick-release fasteners
must be closed.
The soft top can only be opened and closed if
the vehicle is stationary.
i Make sure the soft top is dry before open-
ing it. Water could otherwise enter the vehi-
cle interior or luggage compartment.
i Avoid repeatedly opening and closing the
soft top. This discharges the battery. Operating the soft top
Opening X
Move the selector lever to P.
X Apply the parking brake.
X Turn the key to position 2in the ignition
lock.
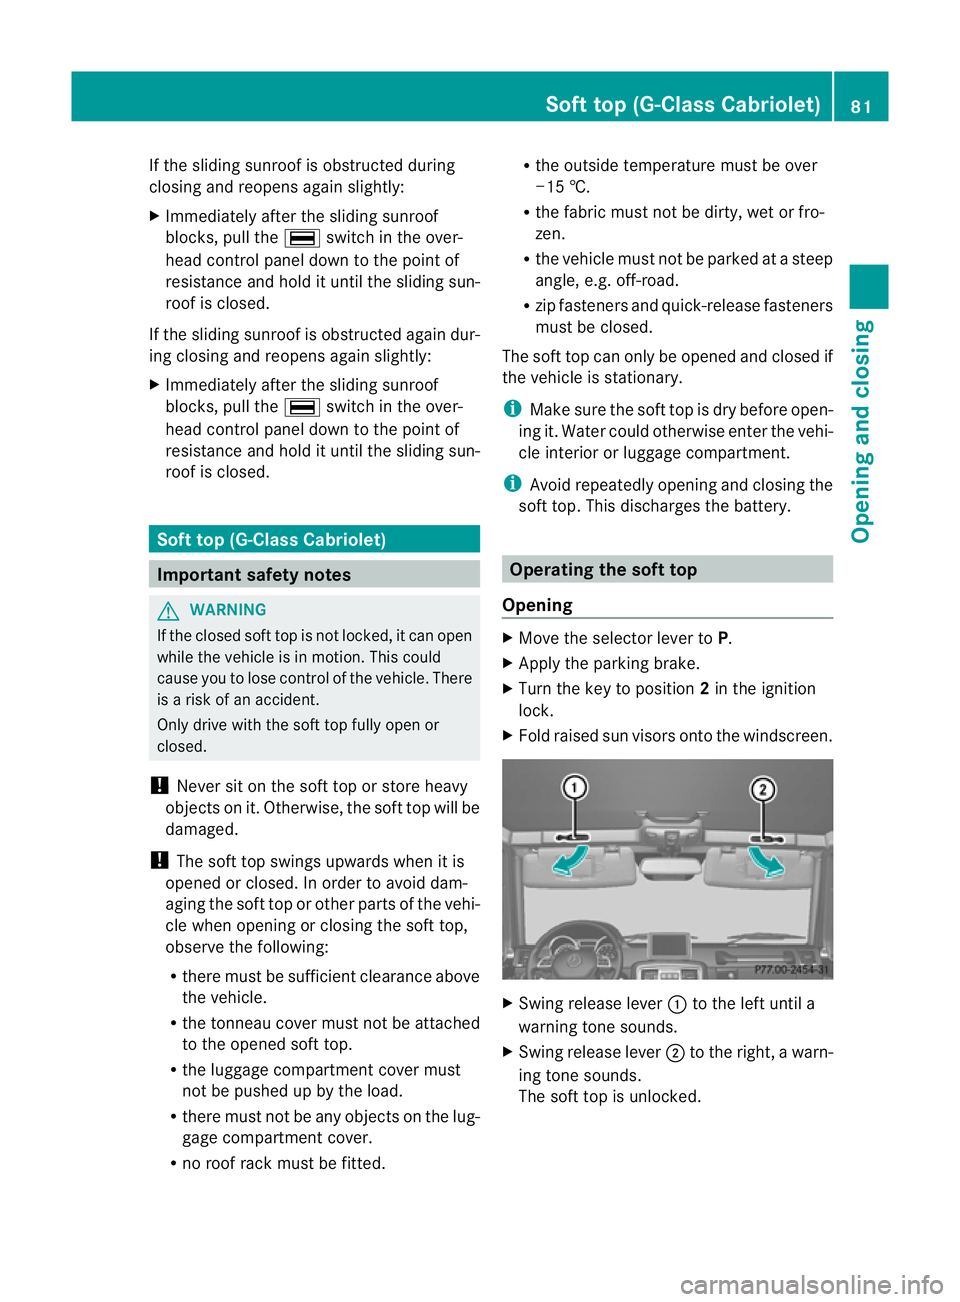
X Fold raised sun visors onto the windscreen. X
Swing release lever :to the left until a
warning tone sounds.
X Swing release lever ;to the right, a warn-
ing tone sounds.
The soft top is unlocked. Soft top (G-Class Cabriolet)
81Opening and closing Z
Page 96 of 357
X
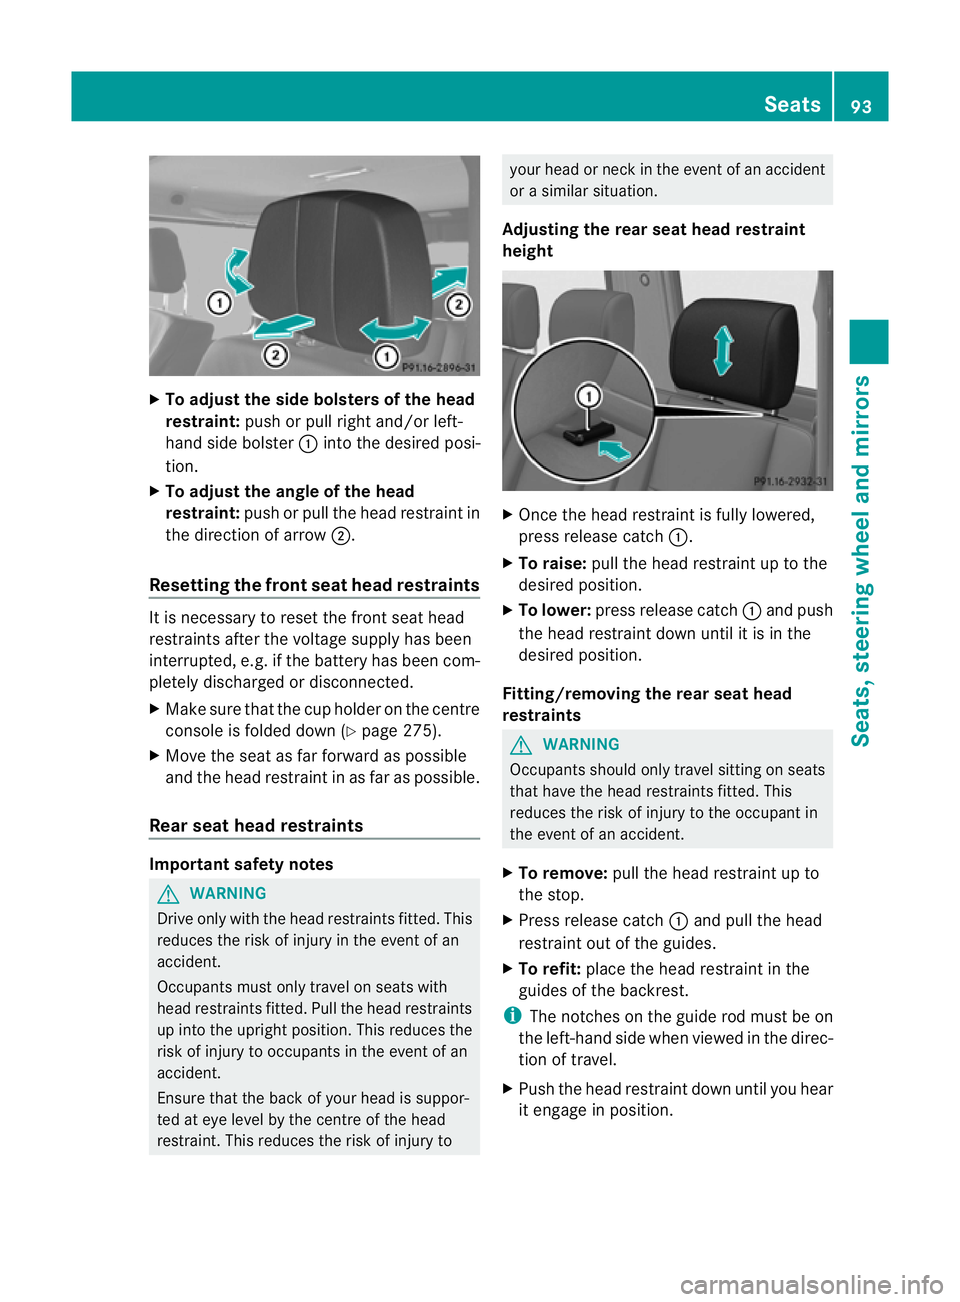
To adjust the side bolsters of the head
restraint: push or pull right and/or left-
hand side bolster :into the desired posi-
tion.
X To adjust the angle of the head
restraint: push or pull the head restraint in
the direction of arrow ;.
Resetting the front seat head restraints It is necessary to reset the front seat head
restraints after the voltage supply has been
interrupted, e.g .ifthe battery has been com-
pletely discharged or disconnected.
X Make sure that the cup holder on the centre
console is folded down (Y page 275).
X Move the seat as far forward as possible
and the head restraint in as far as possible.
Rear seat head restraints Important safety notes
G
WARNING
Drive only with the head restraints fitted. This
reduces the risk of injury in the event of an
accident.
Occupants must only travel on seats with
head restraints fitted. Pull the head restraints
up into the upright position. This reduces the
risk of injury to occupants in the event of an
accident.
Ensure that the back of your head is suppor-
ted at eye level by the centre of the head
restraint. This reduces the risk of injury to your head or neck in the event of an accident
or a similar situation.
Adjusting the rear seat head restraint
height X
Once the head restraint is fully lowered,
press release catch :.
X To raise: pull the head restraint up to the
desired position.
X To lower: press release catch :and push
the head restraint down until it is in the
desired position.
Fitting/removing the rear seat head
restraints G
WARNING
Occupants should only travel sitting on seats
that have the head restraints fitted. This
reduces the risk of injury to the occupant in
the event of an accident.
X To remove: pull the head restraint up to
the stop.
X Press release catch :and pull the head
restraint out of the guides.
X To refit: place the head restraint in the
guides of the backrest.
i The notches on the guide rod must be on
the left-hand side when viewed in the direc-
tion of travel.
X Push the head restraint down until you hear
it engage in position. Seats
93Seats, steering wheel and mirrors Z