radio MERCEDES-BENZ G-CLASS SUV 2012 User Guide
[x] Cancel search | Manufacturer: MERCEDES-BENZ, Model Year: 2012, Model line: G-CLASS SUV, Model: MERCEDES-BENZ G-CLASS SUV 2012Pages: 357, PDF Size: 8.86 MB
Page 247 of 357
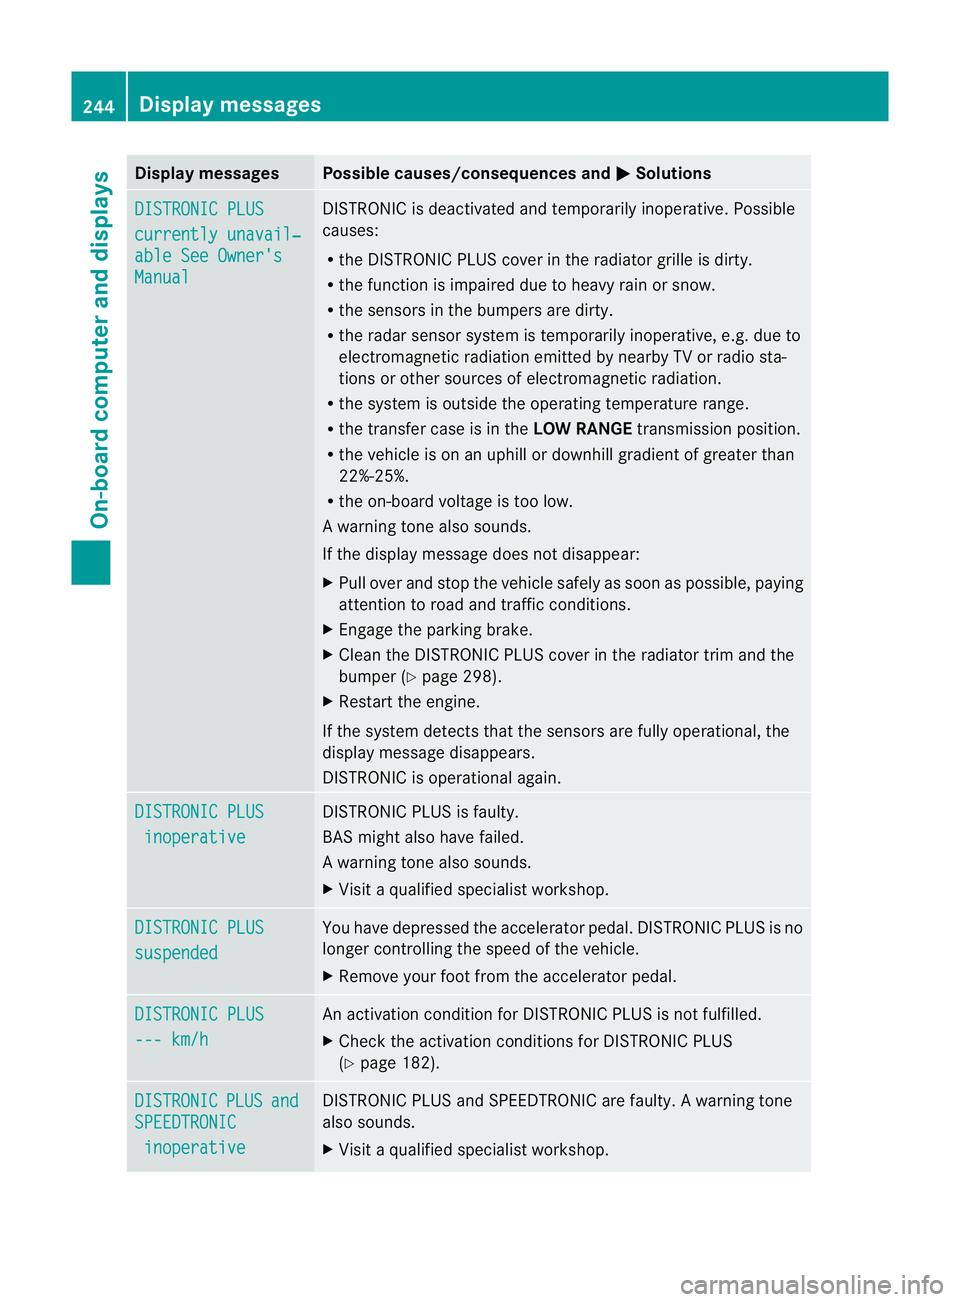
Display messages Possible causes/consequences and
M Solutions
DISTRONIC PLUS
currently unavail‐
able See Owner's
Manual DISTRONIC is deactivated and temporarily inoperative. Possible
causes:
R
the DISTRONIC PLUS cover in the radiator grille is dirty.
R the function is impaired due to heavy rain or snow.
R the sensors in the bumpers are dirty.
R the rada rsensor system is temporarily inoperative, e.g. due to
electromagnetic radiation emitted by nearby TV or radio sta-
tions or other sources of electromagnetic radiation.
R the system is outside the operating temperature range.
R the transfer case is in the LOW RANGEtransmission position.
R the vehicle is on an uphill or downhill gradient of greater than
22%-25%.
R the on-board voltage is too low.
Aw arning tone also sounds.
If the display message does no tdisappear:
X Pull over and stop the vehicle safely as soon as possible, paying
attention to road and traffic conditions.
X Engage the parking brake.
X Clean the DISTRONIC PLUS cover in the radiator trim and the
bumper (Y page 298).
X Restar tthe engine.
If the system detects that the sensors are fully operational, the
display message disappears.
DISTRONIC is operational again. DISTRONIC PLUS
inoperative DISTRONIC PLUS is faulty.
BAS might also have failed.
Aw
arning tone also sounds.
X Visi taqualified specialist workshop. DISTRONIC PLUS
suspended You have depressed the accelerator pedal. DISTRONIC PLUS is no
longer controlling the speed of the vehicle.
X
Remove your foot from the accelerator pedal. DISTRONIC PLUS
--- km/h An activation condition for DISTRONIC PLUS is not fulfilled.
X
Check the activation conditions for DISTRONIC PLUS
(Y page 182). DISTRONIC PLUS and
SPEEDTRONIC
inoperative DISTRONIC PLUS and SPEEDTRONIC are faulty. A warning tone
also sounds.
X
Visit a qualified specialist workshop. 244
Display messagesOn-board computer and displays
Page 250 of 357
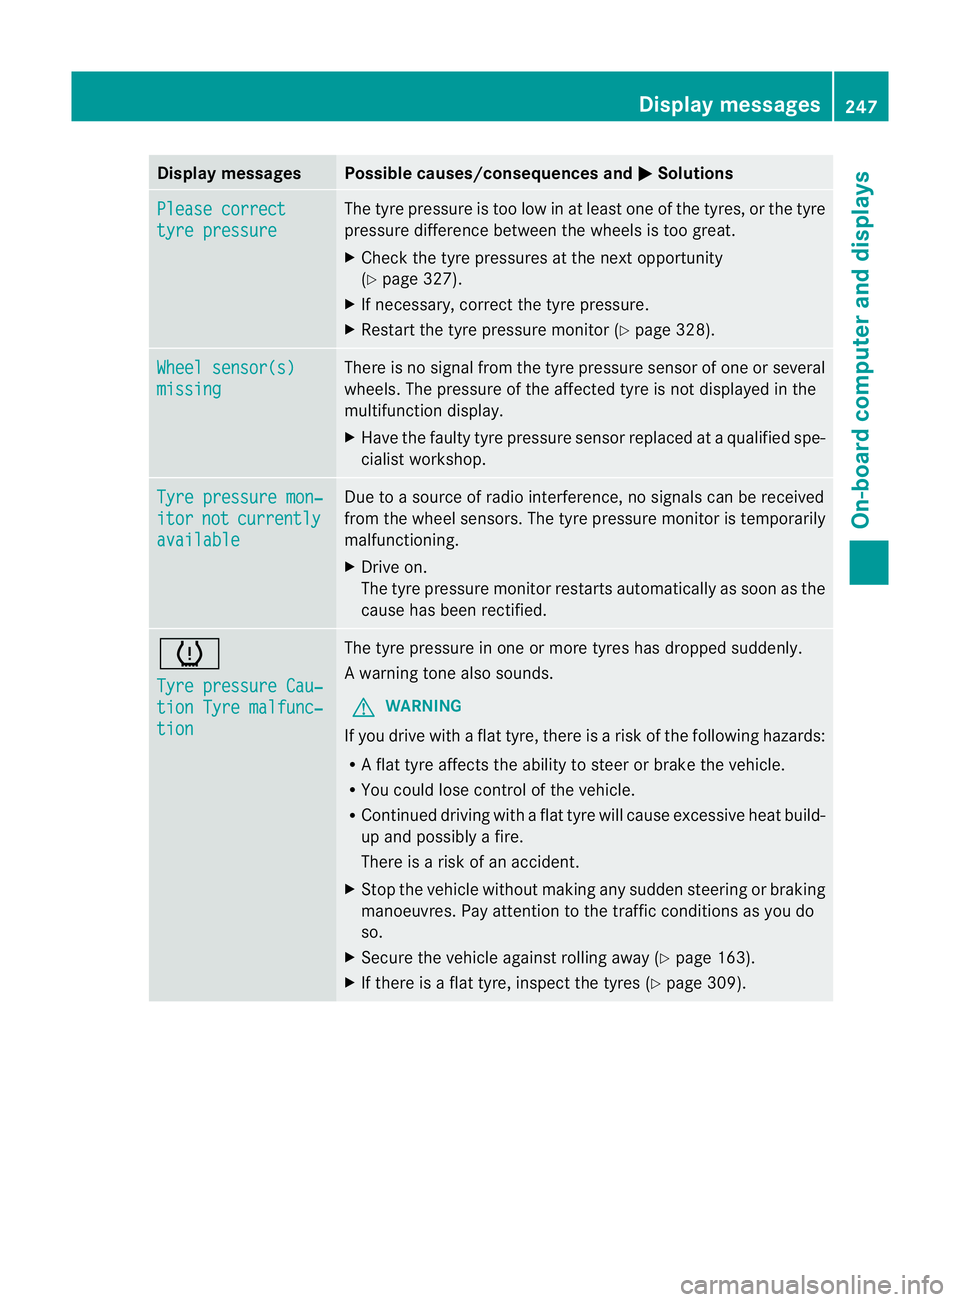
Display messages Possible causes/consequences and
M Solutions
Please correct
tyre pressure The tyre pressure is too low in at leas
tone of the tyres, or the tyre
pressure difference between the wheels is too great.
X Check the tyre pressures at the next opportunity
(Y page 327).
X If necessary, correct the tyre pressure.
X Restart the tyre pressure monitor (Y page 328).Wheel sensor(s)
missing There is no signal from the tyre pressure sensor of one or several
wheels
.The pressure of the affected tyre is not displayed in the
multifunction display.
X Have the faulty tyre pressure sensor replaced at a qualified spe-
cialist workshop. Tyre pressure mon‐
itor not currently
available Due to a source of radio interference, no signals can be received
from the wheel sensors. The tyre pressure monitor is temporarily
malfunctioning.
X
Drive on.
The tyre pressure monitor restarts automatically as soon as the
cause has been rectified. h
Tyre pressure Cau‐
tion Tyre malfunc‐
tion The tyre pressure in one or more tyres has dropped suddenly.
Aw
arning tone also sounds.
G WARNING
If you drive with a flat tyre, there is a ris kofthe following hazards:
R A flat tyre affects the ability to steer or brake the vehicle.
R You could lose control of the vehicle.
R Continued driving with a flat tyre will cause excessive heat build-
up and possibly a fire.
There is a risk of an accident.
X Stop the vehicle without making any sudden steering or braking
manoeuvres. Pay attention to the traffic conditions as you do
so.
X Secure the vehicle against rolling away (Y page 163).
X If there is a flat tyre, inspect the tyres (Y page 309). Display messages
247On-board computer and displays Z
Page 282 of 357
motion, you must only do so if the traffic sit-
uation permits. Otherwise, you could be dis-
tracted from the traffic conditions, cause an
accident and injure yourself and others.
Two-way radios and fax equipment used with-
out low-reflection exterior aerials can inter-
fere with the vehicle's electronics and thereby
jeopardise the operating safety of the vehicle
and yours afety. Therefore, you must only use
this equipment if it is correctly connected to
a separate reflection-free exterio raerial. G
WARNING
Excessive levels of electromagnetic radiation
may cause damage to your health and the
health of others. Using an exterior aerial takes
into account current scientific discussions
relating to the possible health risk posed by
electromagnetic fields.
Mercedes-Benz recommends the use of an
approved exterior aerial. This ensures:
R optimal mobile phone reception quality in
the vehicle
R mutual influences between the vehicle
electronics and mobile phones are mini-
mised
An exterior aerial has the following advan-
tages:
R it conducts the electromagnetic fields gen-
erated by a wireless device to the exterior.
R the field strength in the vehicle interior is
lower than in a vehicle that does not have
an exterior aerial.
i There are various mobile phone brackets
that may be fitted in your vehicle; in some
cases, these are country-specific. You can
obtain these mobile phone brackets from a
qualified specialist workshop.
The functions and services available when
you use the phone depend on your mobile
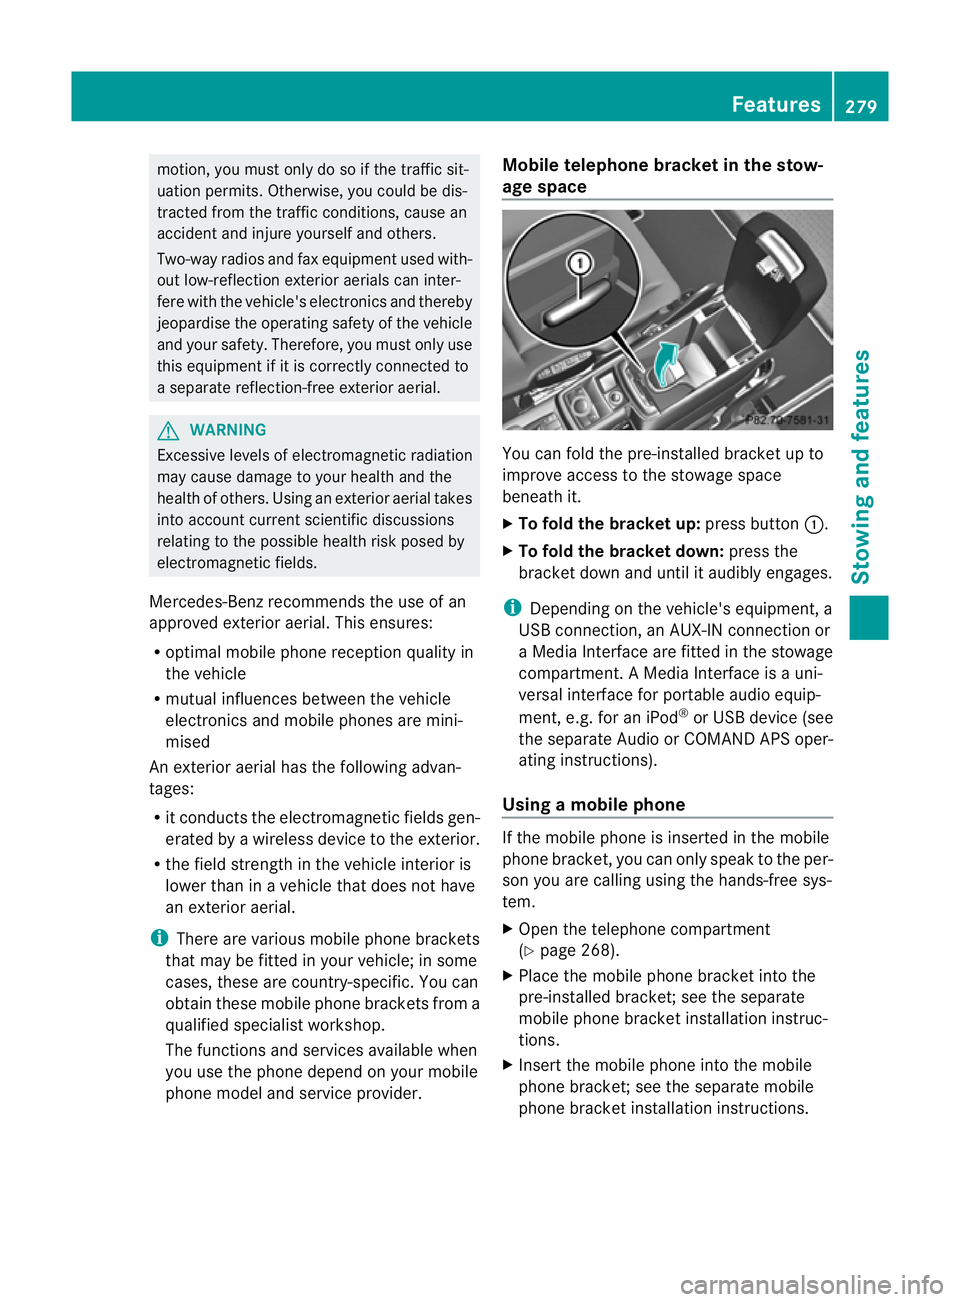
phone model and service provider. Mobile telephone bracket in the stow-
age space
You can fold the pre-installed bracket up to
improve access to the stowage space
beneath it.
X
To fold the bracket up: press button:.
X To fold the bracket down: press the
bracket down and until it audibly engages.
i Depending on the vehicle's equipment, a
USB connection, an AUX-IN connection or
a Media Interface are fitted in the stowage
compartment. A Media Interface is a uni-
versal interface for portable audio equip-
ment, e.g. for an iPod ®
or USB device (see
the separate Audio or COMAND APS oper-
ating instructions).
Using amobile phone If the mobile phone is inserted in the mobile
phone bracket, you can only speak to the per-
son you are calling using the hands-free sys-
tem.
X
Open the telephone compartment
(Y page 268).
X Place the mobile phone bracket into the
pre-installed bracket; see the separate
mobile phone bracket installation instruc-
tions.
X Inser tthe mobile phone into the mobile
phone bracket; see the separate mobile
phone bracket installation instructions. Features
279Stowing and features Z
Page 286 of 357
cator lamp
:will flash. Press the trans-
mitter button agai nifnecessary.
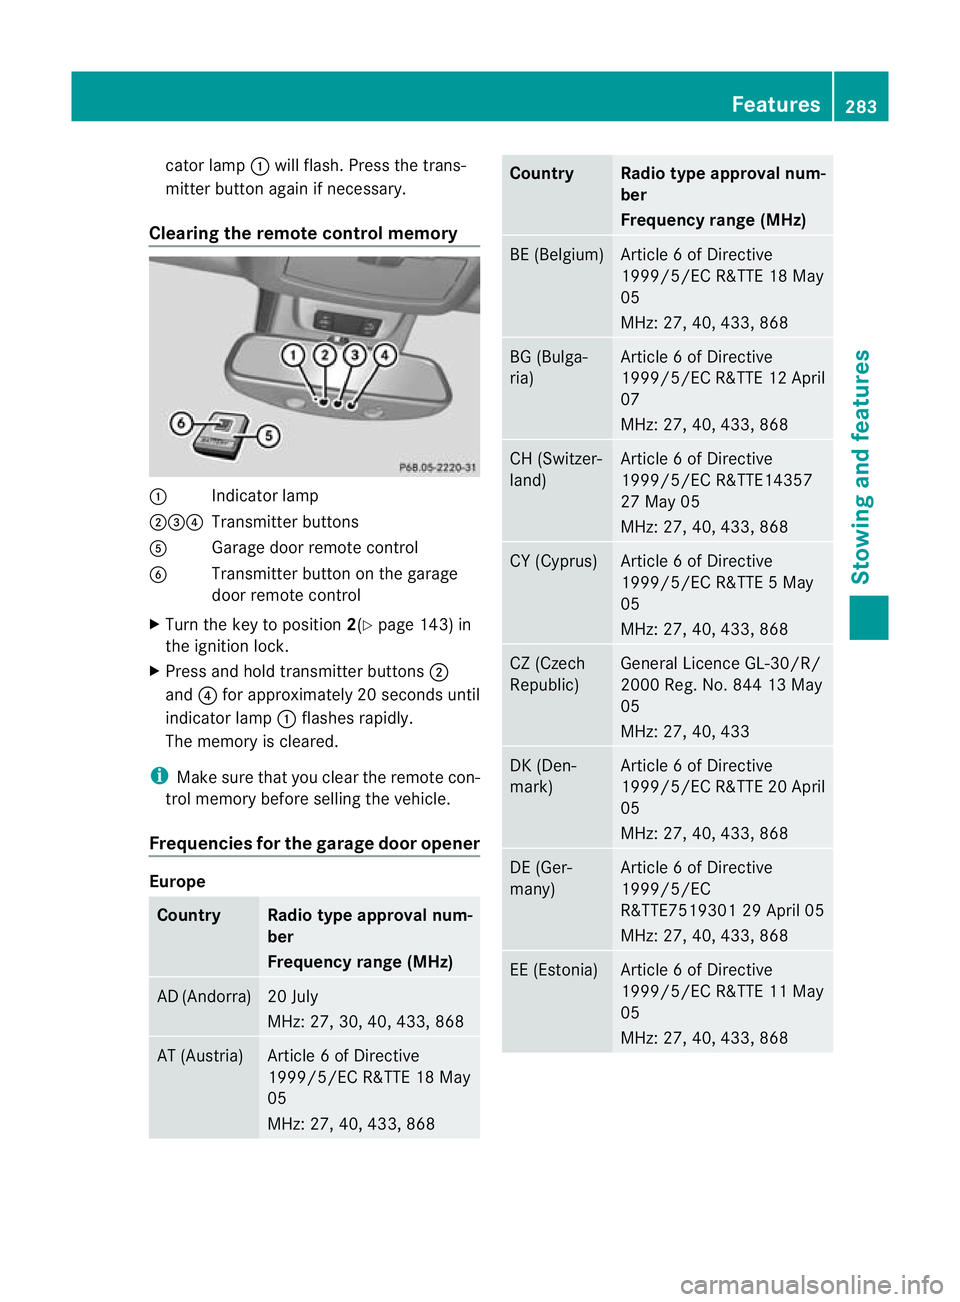
Clearing the remote control memory :
Indicator lamp
;=? Transmitter buttons
A Garage door remote control
B Transmitter button on the garage
door remote control
X Turn the key to position 2(Ypage 143) in
the ignition lock.
X Press and hold transmitter buttons ;
and ?for approximately 20 seconds until
indicator lamp :flashes rapidly.
The memory is cleared.
i Make sure that you clear the remote con-
trol memory before selling the vehicle.
Frequencies for the garage door opener Europe
Country Radio type approval num-
ber
Frequency range (MHz)
AD (Andorra) 20 July
MHz: 27, 30, 40, 433, 868
AT (Austria) Article 6 of Directive
1999/5/EC R&TTE 18 May
05
MHz: 27, 40, 433, 868 Country Radio type approval num-
ber
Frequency range (MHz)
BE (Belgium) Article 6 of Directive
1999/5/EC R&TTE 18 May
05
MHz: 27, 40, 433, 868
BG (Bulga-
ria) Article 6 of Directive
1999/5/ECR
&TTE 12 April
07
MHz: 27, 40, 433, 868 CH (Switzer-
land) Article 6 of Directive
1999/5/EC R&TTE14357
27 May 05
MHz: 27, 40, 433, 868
CY (Cyprus) Article 6 of Directive
1999/5/EC R&TTE 5 May
05
MHz: 27, 40, 433, 868
CZ (Czech
Republic) General Licence GL-30/R/
2000 Reg. No. 844 13 May
05
MHz: 27, 40, 433
DK (Den-
mark) Article 6 of Directive
1999/5/EC R&TTE 20 April
05
MHz: 27, 40, 433, 868
DE (Ger-
many) Article 6 of Directive
1999/5/EC
R&TTE7519301 29 April 05
MHz: 27, 40, 433, 868
EE (Estonia) Article 6 of Directive
1999/5/EC R&TTE 11 May
05
MHz: 27, 40, 433, 868 Features
283Stowing and features Z
Page 287 of 357
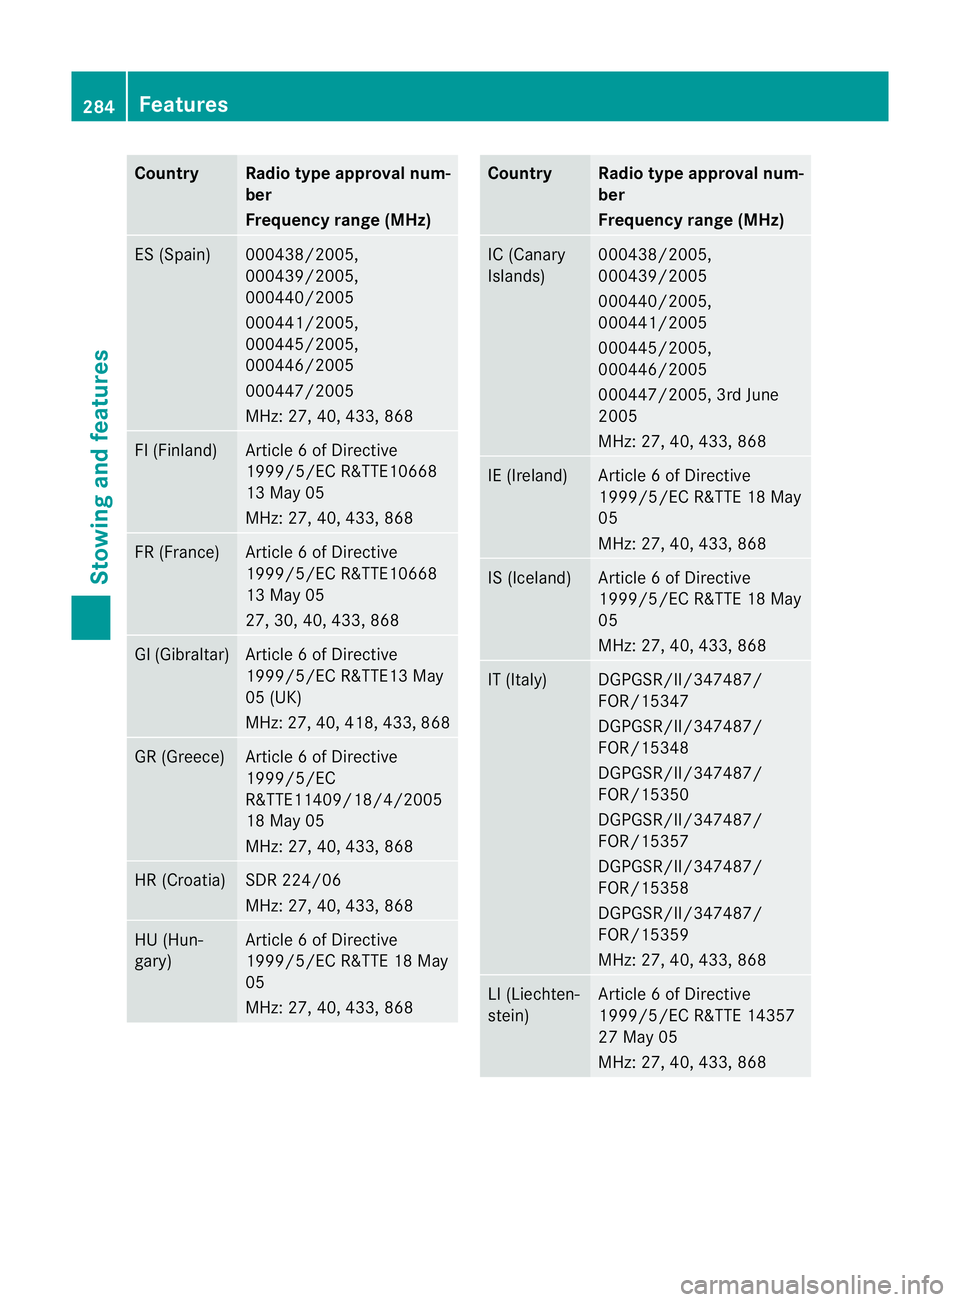
Country Radio type approval num-
ber
Frequency range (MHz)
ES (Spain) 000438/2005,
000439/2005,
000440/2005
000441/2005,
000445/2005,
000446/2005
000447/2005
MHz: 27, 40, 433, 868 FI (Finland) Article 6 of Directive
1999/5/EC R&TTE10668
13 May 05
MHz: 27, 40, 433, 868
FR (France) Article 6 of Directive
1999/5/EC R&TTE10668
13 May 05
27, 30, 40, 433, 868
GI (Gibraltar) Article 6 of Directive
1999/5/EC R&TTE13 May
05 (UK)
MHz: 27
,40, 418, 433, 868 GR (Greece) Article 6 of Directive
1999/5/EC
R&TTE11409/18/4/2005
18 May 05
MHz: 27, 40, 433, 868
HR (Croatia) SDR 224/06
MHz: 27, 40, 433, 868
HU (Hun-
gary) Article 6 of Directive
1999/5/EC R&TTE 18 May
05
MHz: 27, 40, 433, 868 Country Radio type approval num-
ber
Frequency range (MHz)
IC (Canary
Islands) 000438/2005,
000439/2005
000440/2005,
000441/2005
000445/2005,
000446/2005
000447/2005, 3rd June
2005
MHz: 27, 40, 433, 868
IE (Ireland) Article 6 of Directive
1999/5/EC R&TTE 18 May
05
MHz: 27, 40, 433, 868
IS (Iceland) Article 6 of Directive
1999/5/EC R&TTE 18 May
05
MHz: 27, 40, 433, 868
IT (Italy) DGPGSR/II/347487/
FOR/15347
DGPGSR/II/347487/
FOR/15348
DGPGSR/II/347487/
FOR/15350
DGPGSR/II/347487/
FOR/15357
DGPGSR/II/347487/
FOR/15358
DGPGSR/II/347487/
FOR/15359
MHz: 27, 40, 433, 868
LI (Liechten-
stein) Article 6 of Directive
1999/5/EC R&TTE 14357
27 May 05
MHz: 27, 40, 433, 868284
FeaturesStowing and features
Page 288 of 357
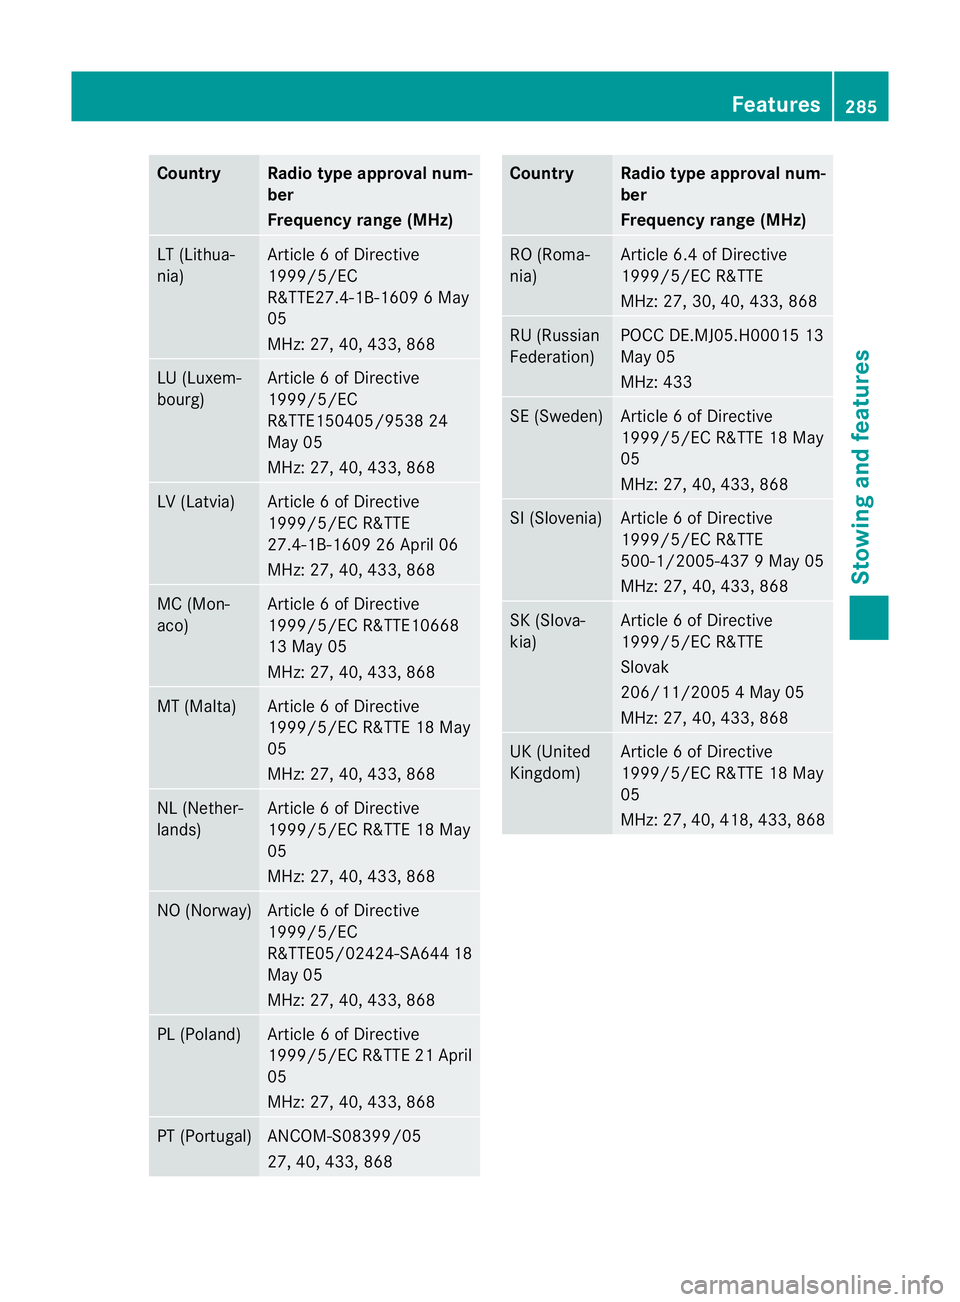
Country Radio type approval num-
ber
Frequency range (MHz)
LT (Lithua-
nia) Article 6 of Directive
1999/5/EC
R&TTE27.4-1B-1609 6 May
05
MHz: 27, 40, 433, 868 LU (Luxem-
bourg) Article 6 of Directive
1999/5/EC
R&TTE150405/9538 24
May 05
MHz: 27, 40, 433, 868 LV (Latvia) Article 6 of Directive
1999/5/EC R&TTE
27.4-1B-1609 26 April 06
MHz: 27, 40, 433, 868 MC (Mon-
aco) Article 6 of Directive
1999/5/EC R&TTE10668
13 May 05
MHz: 27, 40, 433, 868
MT (Malta) Article 6 of Directive
1999/5/EC R&TTE 18 May
05
MHz: 27, 40, 433, 868 NL (Nether-
lands) Article 6 of Directive
1999/5/EC R&TTE 18 May
05
MHz: 27, 40, 433, 868 NO (Norway) Article 6 of Directive
1999/5/EC
R&TTE05/02424-SA64
418
May 05
MHz: 27, 40, 433, 868 PL (Poland) Article 6 of Directive
1999/5/ECR
&TTE 21 April
05
MHz: 27, 40, 433, 868 PT (Portugal) ANCOM-S08399/05
27, 40, 433, 868 Country Radio type approval num-
ber
Frequency range (MHz)
RO (Roma-
nia) Article 6.4 of Directive
1999/5/EC R&TTE
MHz: 27, 30, 40, 433, 868
RU (Russian
Federation) POCC DE.MJ05.H00015 13
May 05
MHz: 433
SE (Sweden) Article 6 of Directive
1999/5/EC R&TTE 18 May
05
MHz: 27, 40, 433, 868
SI (Slovenia) Article 6 of Directive
1999/5/EC R&TTE
500-1/2005-437 9 May 05
MHz: 27, 40, 433, 868
SK (Slova-
kia) Article 6 of Directive
1999/5/EC R&TTE
Slovak
206/11/2005 4 May 05
MHz: 27, 40, 433, 868
UK (United
Kingdom) Article 6 of Directive
1999/5/EC R&TTE 18 May
05
MHz: 27, 40, 418, 433, 868 Features
285Stowing and features Z
Page 289 of 357
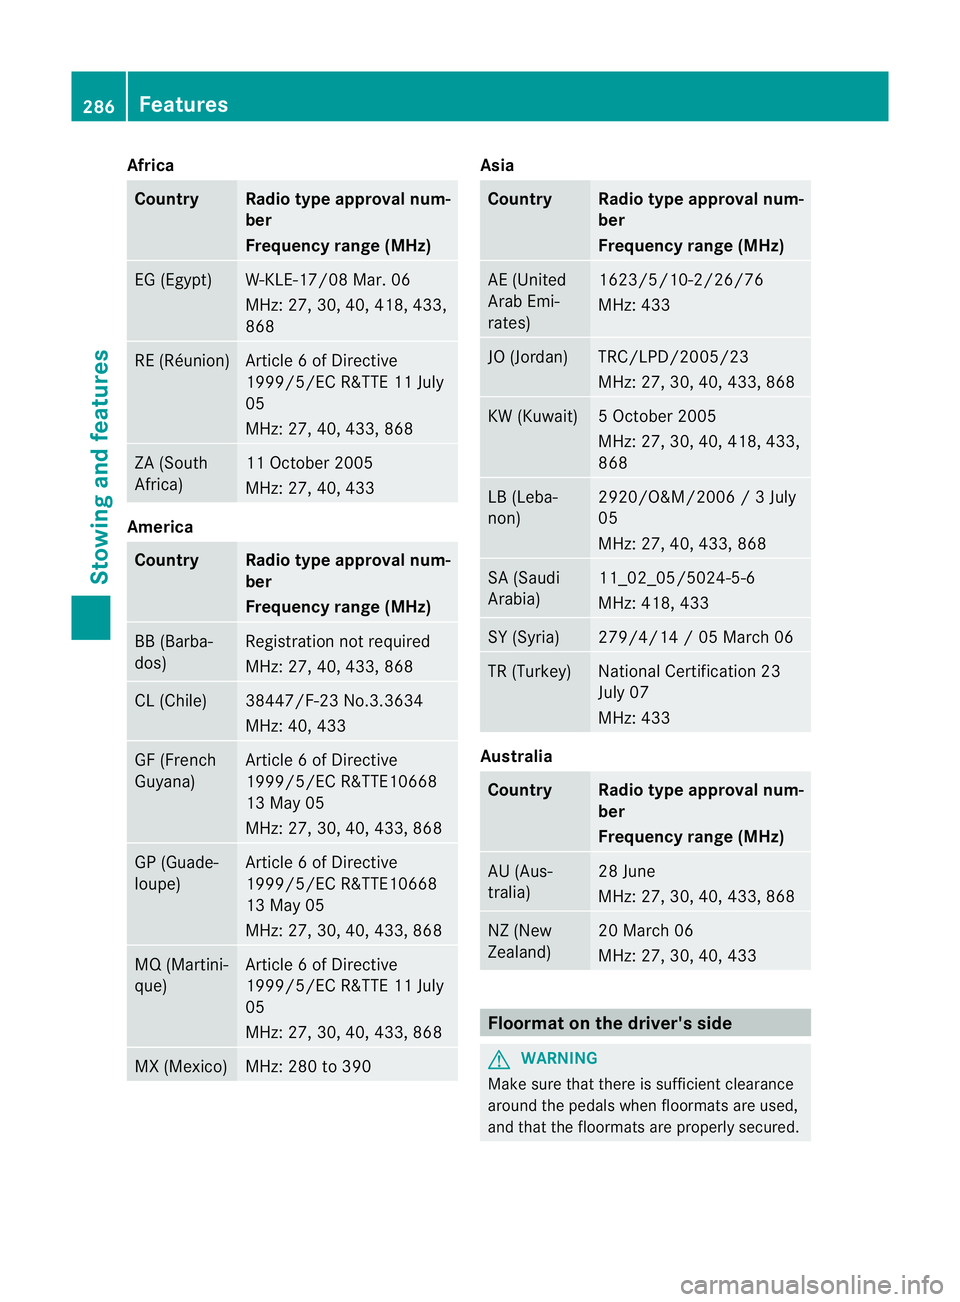
Africa
Country Radio type approval num-
ber
Frequency range (MHz)
EG (Egypt) W-KLE-17/08 Mar. 06
MHz: 27, 30, 40
,418, 433,
868 RE (Réunion) Article 6 of Directive
1999/5/EC R&TTE 11 July
05
MHz: 27, 40, 433, 868
ZA (South
Africa) 11 October 2005
MHz: 27, 40, 433
America
Country Radio type approval num-
ber
Frequency range (MHz)
BB (Barba-
dos) Registration not required
MHz: 27, 40, 433, 868
CL (Chile) 38447/F-23 No.3.3634
MHz: 40, 433
GF (French
Guyana) Article 6 of Directive
1999/5/EC R&TTE10668
13 May 05
MHz: 27, 30, 40, 433, 868
GP (Guade-
loupe) Article 6 of Directive
1999/5/EC R&TTE10668
13 May 05
MHz: 27, 30, 40, 433, 868
MQ (Martini-
que) Article 6 of Directive
1999/5/EC R&TTE 11 July
05
MHz: 27, 30, 40, 433, 868
MX (Mexico) MHz: 280 to 390 Asia
Country Radio type approval num-
ber
Frequency range (MHz)
AE (United
Arab Emi-
rates) 1623/5/10-2/26/76
MHz: 433
JO (Jordan) TRC/LPD/2005/23
MHz: 27, 30, 40, 433, 868
KW (Kuwait) 5 October 2005
MHz: 27, 30, 40, 418, 433,
868
LB (Leba-
non) 2920/O&M/2006 / 3 July
05
MHz: 27, 40, 433, 868
SA (Saudi
Arabia) 11_02_05/5024-5-6
MHz: 418, 433
SY (Syria) 279/4/14 / 05 March 06
TR (Turkey) National Certification 23
July 07
MHz: 433
Australia
Country Radio type approval num-
ber
Frequency range (MHz)
AU (Aus-
tralia) 28 June
MHz: 27, 30, 40, 433, 868
NZ (New
Zealand) 20 March 06
MHz: 27, 30, 40, 433
Floormat on the driver's side
G
WARNING
Make sure that there is sufficient clearance
around the pedals whe nfloormats are used,
and that the floormats are properly secured. 286
FeaturesStowing and features
Page 317 of 357
Do not use a rapid charging device to start the vehicle.
Make sure the jump leads are not damaged.
Make sure the jump leads are not touching any other metal objects when they are connected
to the battery.
If the indicator/warning lamps do not ligh tup at temperatures around or below freezing point,
the discharged battery is likely to be frozen (a commonplace scenario). In this case, do not
jump-start the vehicle or recharge the battery.
Once the battery has thawed out, its service life may be dramatically reduced.
The starting characteristic scan be impaired, particularly at low temperatures.
It is recommended that you have the thawed out battery checked at a qualified specialist
workshop.
Do no tuse a rapid charging device to start the vehicle. If your vehicle's battery is discharged,
the engine can be jump-started from another vehicle or from a second battery using jump
leads. Observe the following points:
R The battery is not accessible in all vehicles. If the other vehicle's battery is not accessible,
jump-start the vehicle using a second battery or ajump-starting device.
R Vehicles with apetrol engine: only jump-star tthe vehicle when the engine and exhaust
system are cold.
R Do not start the engine if the battery is frozen. Let the battery thaw first.
R Jump-starting may only be performed from batteries with a nominal voltage of 12 V.
R Only use jump leads that have a sufficient cross-section and insulated terminal clamps.
R If the battery is fully discharged, leave the battery that is being used to jump-start connected
for a few minutes before attempting to start. This charges the empty battery a little.
R Make sure that the two vehicles do not touch.
Make sure that:
R The jump leads are not damaged.
R Non-insulated parts of the terminal clamps do not come into contact with other metal parts
while the jump leads are connected to the battery.
R The jump leads cannot come into contact with parts such as the pulley or the fan. These
parts move when the engine is started and while it is running.
X Apply the parking brake.
X Move the selector lever to P.
X Switch off all electrical consumers (e.g. radio, blower, etc.).
X Open the bonnet (Y page 291).314
Jump-startingBreakdown assistance
Page 331 of 357
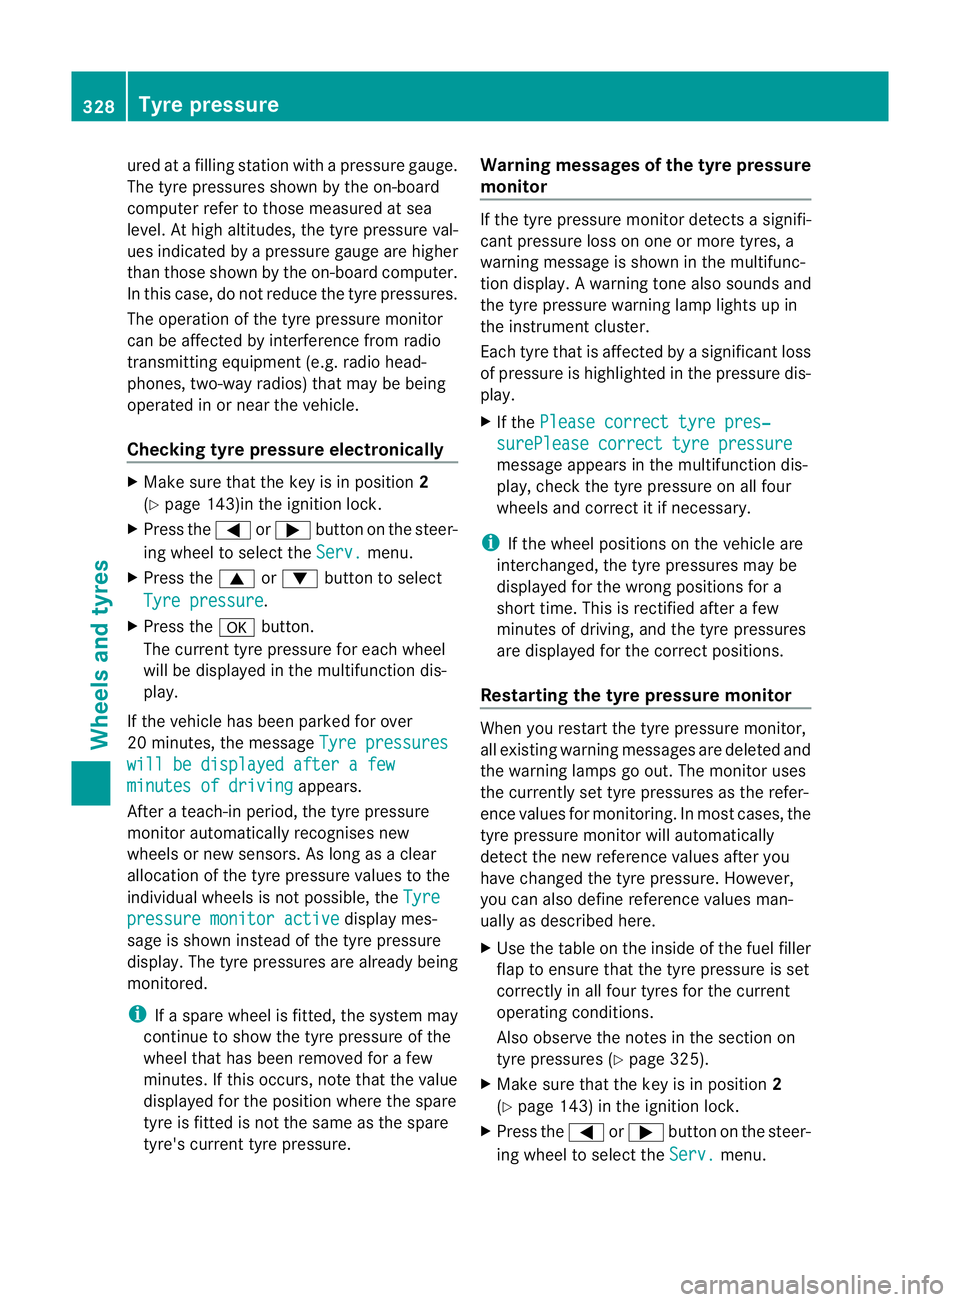
ured at a filling station with a pressure gauge.
The tyre pressures shown by the on-board
computer refer to those measured at sea
level. At high altitudes, the tyre pressure val-
ues indicated by a pressur
egauge are higher
than those shown by the on-board computer.
In this case, do no treduce the tyre pressures.
The operation of the tyre pressure monitor
can be affected by interference from radio
transmitting equipment (e.g. radio head-
phones, two-way radios) that may be being
operated in or near the vehicle.
Checking tyre pressure electronically X
Make sure that the key is in position 2
(Y page 143)in the ignition lock.
X Press the =or; button on the steer-
ing wheel to select the Serv. menu.
X Press the 9or: button to select
Tyre pressure .
X Press the abutton.
The curren ttyre pressur efor each wheel
will be displayed in the multifunction dis-
play.
If the vehicle has been parked for over
20 minutes, the message Tyre pressureswill be displayed after a few
minutes of driving appears.
After a teach-in period, the tyre pressure
monitor automatically recognises new
wheels or new sensors. As long as a clear
allocation of the tyre pressure values to the
individual wheels is not possible, the Tyrepressure monitor active display mes-
sage is shown instead of the tyre pressure
display .The tyre pressures are already being
monitored.
i If a spare wheel is fitted, the system may
continue to show the tyre pressure of the
wheel that has been removed for a few
minutes. If this occurs, note that the value
displayed for the position where the spare
tyre is fitted is not the same as the spare
tyre's current tyre pressure. Warning messages of the tyre pressure
monitor If the tyre pressure monitor detects a signifi-
cant pressure loss on one or more tyres, a
warning message is shown in the multifunc-
tion display.
Awarning tone also sounds and
the tyre pressure warning lamp lights up in
the instrument cluster.
Each tyre that is affected by a significant loss
of pressure is highlighted in the pressure dis-
play.
X If the Please correct tyre pres‐ surePlease correct tyre pressure
message appears in the multifunction dis-
play, check the tyre pressure on all four
wheels and correct it if necessary.
i If the wheel positions on the vehicle are
interchanged, the tyre pressures may be
displayed for the wrong positions for a
short time. This is rectified after a few
minutes of driving, and the tyre pressures
are displayed for the correct positions.
Restarting the tyre pressure monitor When you restar
tthe tyre pressure monitor,
all existing warning messages are deleted and
the warning lamps go out. The monitor uses
the currently set tyre pressures as the refer-
ence values for monitoring. In most cases, the
tyre pressure monitor will automatically
detect the new referencev alues after you
have changed the tyre pressure .However,
you can also define reference values man-
ually as described here.
X Use the table on the inside of the fuel filler
flap to ensure that the tyre pressure is set
correctly in all four tyres for the current
operating conditions.
Also observe the notes in the section on
tyre pressures (Y page 325).
X Make sure that the key is in position 2
(Y page 143) in the ignition lock.
X Press the =or; button on the steer-
ing wheel to select the Serv. menu.328
Tyre pressureWheels and tyres
Page 332 of 357
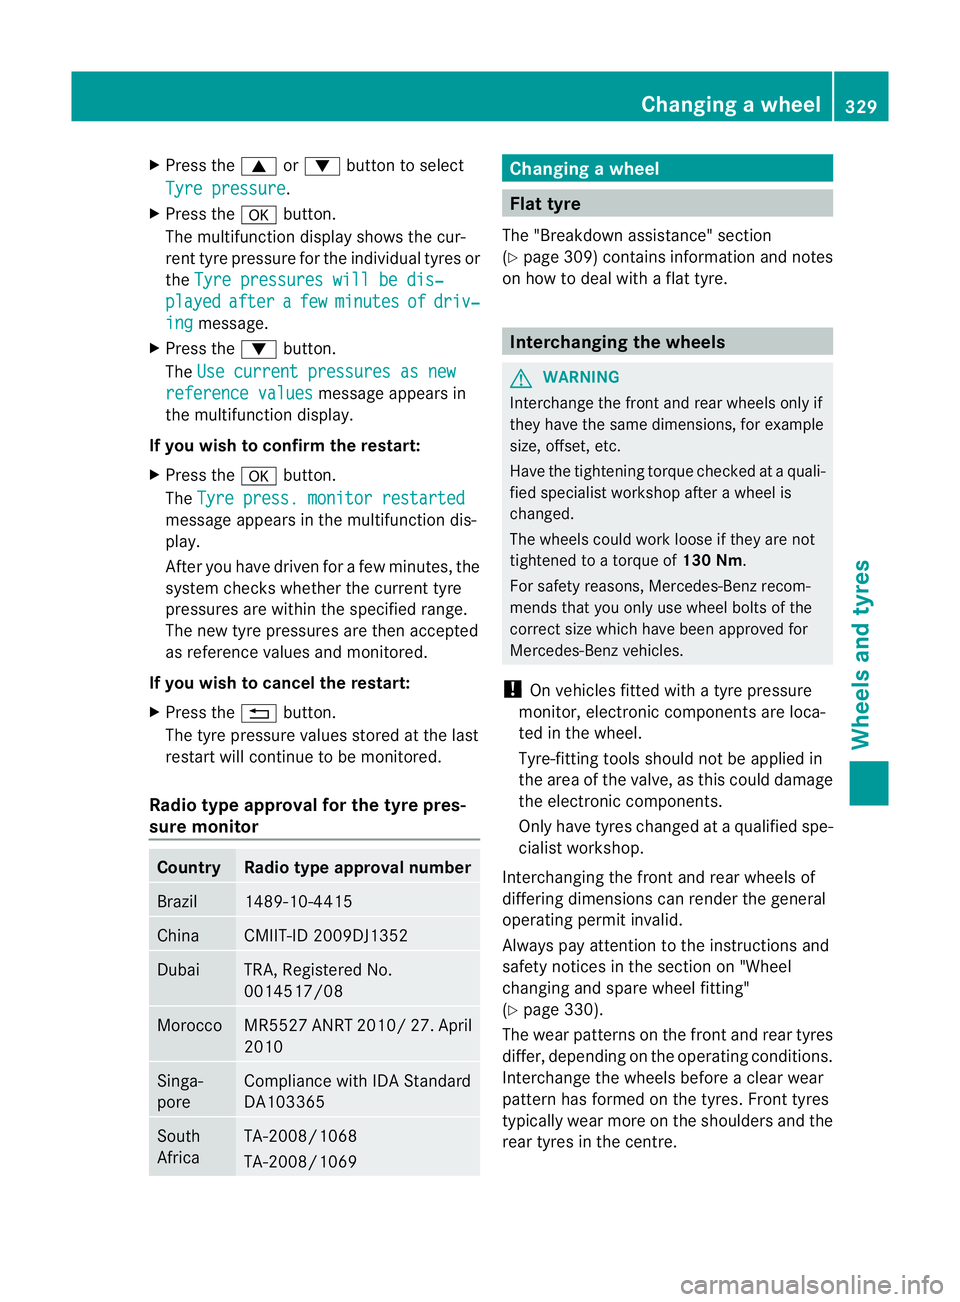
X
Press the 9or: button to select
Tyre pressure .
X Press the abutton.
The multifunction display shows the cur-
rent tyre pressure for the individual tyres or
the Tyre pressures will be dis‐ played after a few minutes of driv‐
ing message.
X Press the :button.
The Use current pressures as new reference values message appears in
the multifunction display.
If you wish to confirm the restart:
X Press the abutton.
The Tyre press. monitor restarted message appears in the multifunction dis-
play.
After you have driven for a few minutes, the
system checks whether the current tyre
pressures are within the specified range.
The new tyre pressures are then accepted
as reference values and monitored.
If you wish to cancel the restart:
X Press the %button.
The tyre pressure values stored at the last
restart will continue to be monitored.
Radio type approval for the tyre pres-
sure monitor Country Radio type approval number
Brazil 1489-10-4415
China CMIIT-ID 2009DJ1352
Dubai TRA, Registered No.
0014517/08
Morocco MR5527 ANRT 2010/2
7. April
2010 Singa-
pore Compliance with IDA Standard
DA103365
South
Africa TA-2008/1068
TA-2008/1069 Changing
awheel Flat tyre
The "Breakdown assistance" section
(Y page 309) contains information and notes
on how to deal with a fla ttyre. Interchanging the wheels
G
WARNING
Interchange the front and rear wheels only if
they have the same dimensions, fo rexample
size, offset, etc.
Have the tightening torque checked at a quali-
fied specialist workshop afte rawheel is
changed.
The wheels could work loose if they are not
tightened to a torque of 130 Nm.
For safety reasons, Mercedes-Ben zrecom-
mends that you only use wheel bolts of the
correct size which have been approved for
Mercedes-Benz vehicles.
! On vehicles fitted with a tyre pressure
monitor, electronic components are loca-
ted in the wheel.
Tyre-fitting tools should not be applied in
the area of the valve, as this could damage
the electronic components.
Only have tyres changed at a qualified spe-
cialist workshop.
Interchanging the front and rear wheels of
differing dimensions can render the general
operating permit invalid.
Always pay attention to the instructions and
safety notices in the section on "Wheel
changing and spare wheel fitting"
(Y page 330).
The wear patterns on the fron tand rea rtyres
differ, depending on the operating conditions.
Interchange the wheels before a clear wear
pattern has formed on the tyres. Front tyres
typically wear more on the shoulders and the
rear tyres in the centre. Changing
awheel
329Wheels and tyres Z