heating MERCEDES-BENZ G-CLASS SUV 2012 Service Manual
[x] Cancel search | Manufacturer: MERCEDES-BENZ, Model Year: 2012, Model line: G-CLASS SUV, Model: MERCEDES-BENZ G-CLASS SUV 2012Pages: 357, PDF Size: 8.86 MB
Page 224 of 357
Settings menu
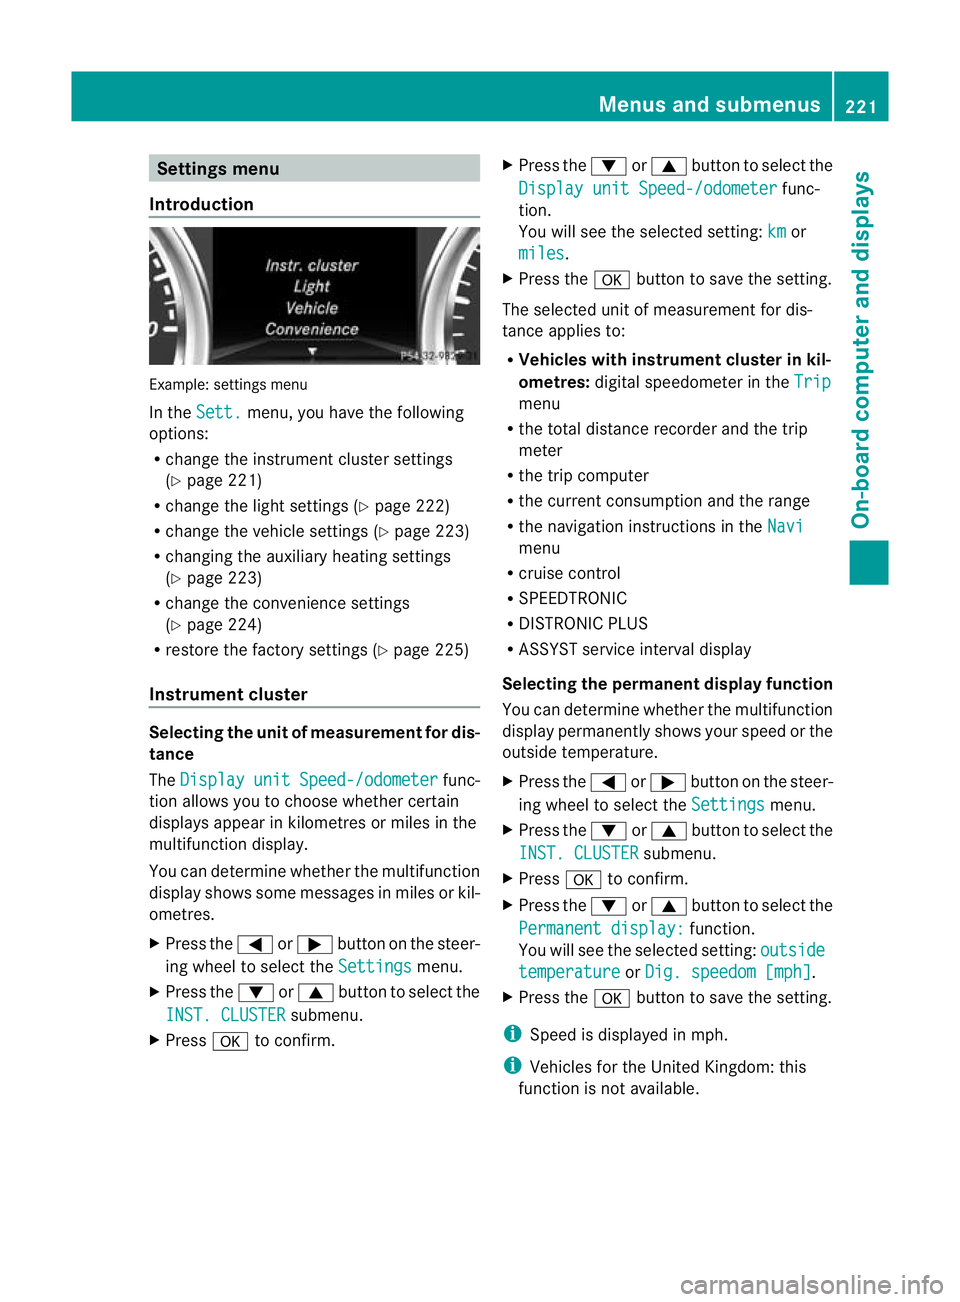
Introduction Example: settings menu
In the
Sett. menu, you have the following
options:
R change the instrument cluster settings
(Y page 221)
R change the light settings (Y page 222)
R change the vehicle settings (Y page 223)
R changing the auxiliary heating settings
(Y page 223)
R change the convenience settings
(Y page 224)
R restore the factory settings (Y page 225)
Instrument cluster Selecting the unit of measurement for dis-
tance
The
Display unit Speed-/odometer func-
tion allows you to choose whether certain
displays appear in kilometres or miles in the
multifunction display.
You can determine whether the multifunction
display shows some messages in miles or kil-
ometres.
X Press the =or; button on the steer-
ing wheel to select the Settings menu.
X Press the :or9 button to select the
INST. CLUSTER submenu.
X Press ato confirm. X
Press the :or9 button to select the
Display unit Speed-/odometer func-
tion.
You will see the selected setting: km or
miles .
X Press the abutton to save the setting.
The selected unit of measurement for dis-
tance applies to:
R Vehicles with instrument cluster in kil-
ometres: digital speedometer in the Trip menu
R the total distance recorder and the trip
meter
R the trip computer
R the current consumption and the range
R the navigation instructions in the Navi menu
R cruise control
R SPEEDTRONIC
R DISTRONIC PLUS
R ASSYST service interval display
Selecting the permanent display function
You can determine whether the multifunction
display permanently shows your speed or the
outside temperature.
X Press the =or; button on the steer-
ing wheel to select the Settings menu.
X Press the :or9 button to select the
INST. CLUSTER submenu.
X Press ato confirm.
X Press the :or9 button to select the
Permanent display: function.
You will see the selected setting: outside temperature or
Dig. speedom [mph] .
X Press the abutton to save the setting.
i Speed is displayed in mph.
i Vehicles for the United Kingdom: this
function is not available. Menus and submenus
221On-board computer and displays Z
Page 226 of 357
Vehicle
Setting permanen
tSPEEDTRONIC
X Press the =or; button on the steer-
ing wheel to select the Settings menu.
X Press the :or9 button to select the
Vehicle submenu.
X Press ato confirm.
X Press :or9 to select the Limit speed (winter tyres): function.
You will see the current setting.
X Press ato confirm.
X Press the :or9 button to adjust
permanent SPEEDTRONIC in increments of
ten (230 km/h to
160 km/h ). The
Off set-
ting switches permanent SPEEDTRONIC
off.
X Press the abutton to store the entry.
For further information on permanent SPEED-
TRONIC (Y page 182).
Switching the automatic locking feature
on/off
If you activate the Auto. door locks func-
tion, the vehicle is centrally locked above a
speed of approximately 15 km/h.
X Press the =or; button on the steer-
ing wheel to select the Settings menu.
X Press the :or9 button to select the
Vehicle submenu.
X Press ato confirm.
X Press :or9 to select the Auto. door locks function.
When the Auto. door locks function is
activated, the vehicle doors are displayed
in red in the multifunction display.
X Press the abutton to save the setting.
For further information on the automatic lock-
ing feature, see (Y page 74). Activating/deactivating the acoustic
locking confirmation
If you switch on the
Acoustic Lock function,
an acoustic signal sounds when you lock the
vehicle.
X Press the =or; button on the steer-
ing wheel to select the Settings menu.
X Press the :or9 button to select the
Vehicle submenu.
X Press ato confirm.
X Press the :or9 button to select the
Acoustic Lock function.
If the Acoustic Lock function is activated,
the & symbol in the multifunction dis-
play lights up red.
X Press the abutton to save the setting.
Heating Auxiliary heating departure time
G
WARNING
Exhaust fumes are produced when the auxili-
ary heating is in operation. Inhaling these
exhaust fumes can be poisonous. You should
therefore switch off the auxiliary heating in
confined spaces without an extraction sys-
tem, e.g. a garage. G
WARNING
When operating the auxiliary heating parts of
the vehicle can get very hot. Make sure that
the exhaust system does not under any cir-
cumstances come into contact with easily
ignitable material such as dry grass or fuels.
The material could otherwise ignite and set
the vehicle alight. Choose your parking spot
accordingly.
Operating the auxiliary heating is thus pro-
hibited at filling stations or when your vehicle
is being refuelled. You must therefore switch
off the auxiliary heating at filling stations.
! Operating the auxiliary heating/ventila-
tion draws on the vehicle battery. After you
have heated or ventilated the vehicle a Menus and submenus
223On-board computer and displays Z
Page 227 of 357
maximum of two times, drive for a longer
distance.
This function is only available on vehicles with
auxiliary heating (Y page 126).
In the Heating submenu, you can select a
stored departure time or change a departure
time.
The auxiliary heating timer function calcu-
lates the switch-on time according to the out-
side temperature so that the vehicle is pre-
heated by the departure time. When the
departure time is reached, the auxiliary heat-
ing continues to heat for a further five
minutes and then switches off. The auxiliary
heating adopts the THERMATIC temperature
setting.
You can switch off the auxiliary heating by
using the remote control or the &auxiliary
heating button on the centre console.
Selecting the departure time or deactivat-
ing a selected departure time
X Press the =or; button on the steer-
ing wheel to select the Settings menu.
X Press the :or9 button to select the
Heating submenu.
X Press ato confirm.
You will see the selected setting.
X Press ato confirm.
X Press the :or9 button to select
one of the three departure times or Timeroff (no timer active).
X Press ato confirm.
If a departure time is selected, the yellow
indicator lamp lights up on the &auxil-
iary heating button.
Changing the departure time
X Press the =or; button on the steer-
ing wheel to select the Settings menu.
X Press the :or9 button to select the
Heating submenu.
X Press ato confirm.
You will see the selected setting. X
Press ato confirm.
X Press the :or9 button to select
Change A ,
B or
C .
X Press ato confirm.
You can now change the departure time.
X Press the =or; button to select the
display to be changed :hours, minutes.
X Press the :or9 button to set the
selected display.
X Press the abutton to store the entry.
The yellow indicator lamp on the &aux-
iliary heating button lights up.
Convenience Activating/deactivating the EASY-
ENTRY/EXIT feature
G
WARNING
The steering wheel moves when the EASY-
ENTRY/EXIT feature is active. There is a risk
of occupants becoming trapped. Before acti-
vating the EASY-ENTRY/EXIT feature, make
sure that nobody can become trapped.
Do not leave children unsupervised in the
vehicle, even if they are secured in a child
restraint system. The children could open the
driver's door and thereby unintentionally acti-
vate the EASY-ENTRY/EXIT feature and
become trapped.
X Press the =or; button on the steer-
ing wheel to select the Settings menu.
X Press the :or9 button to select the
CONVENIENCE submenu.
X Press ato confirm.
X Press :or9 to select the Easy Entry/Exit: function.
If the Easy Entry/Exit function is activa-
ted, the vehicle steering wheel is displayed
in red in the multifunction display.
X Press the abutton to save the setting.
Further information on the EASY-ENTRY/EXIT
feature (Y page 98). 224
Menus and submenusOn-board computer and displays
Page 243 of 357
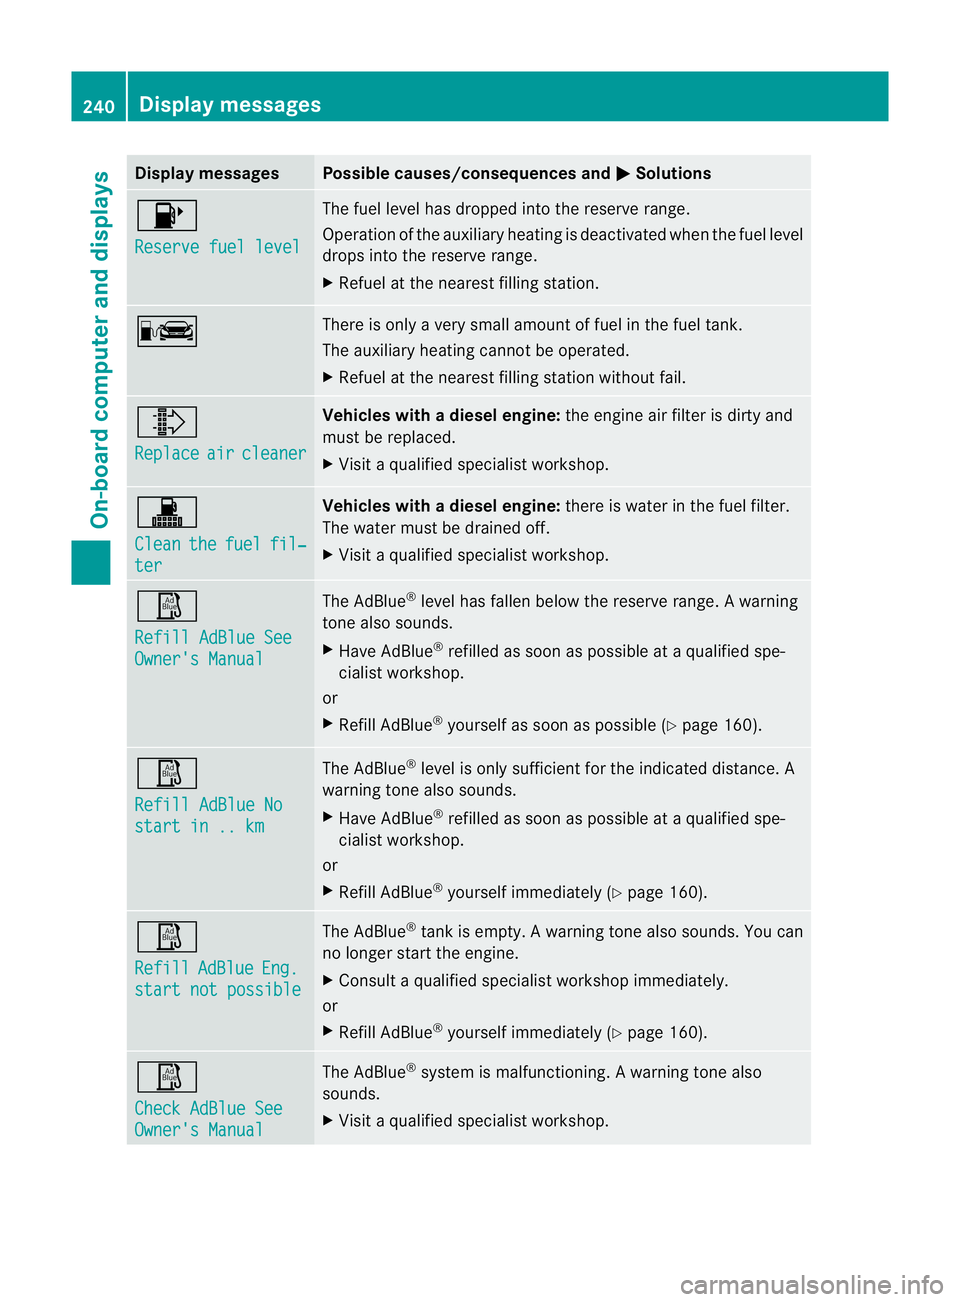
Display messages Possible causes/consequences and
M Solutions
8
Reserve fuel level The fuel level has dropped into the reserve range.
Operation of the auxiliary heating is deactivated when the fuel level
drops into the reserve range.
X
Refuel at the neares tfilling station. C There is only a very small amoun
toffuel in th efuel tank.
The auxiliary heating canno tbe operated.
X Refuel at the nearest filling station without fail. ¸
Replace
air cleaner Vehicles with
adiesel engine: the engine air filter is dirty and
must be replaced.
X Visit a qualified specialist workshop. !
Clean
the fuel fil‐
ter Vehicles with
adiesel engine: there is water in the fuel filter.
The water must be drained off.
X Visit a qualified specialist workshop. Ø
Refill AdBlue See
Owner's Manual The AdBlue
®
level has fallen below the reserve range. Awarning
tone also sounds.
X Have AdBlue ®
refilled as soon as possible at a qualified spe-
cialist workshop.
or
X Refill AdBlue ®
yourself as soon as possible (Y page 160).Ø
Refill AdBlue No
start in .. km The AdBlue
®
level is only sufficient for the indicated distance. A
warning tone also sounds.
X Have AdBlue ®
refilled as soon as possible at a qualified spe-
cialist workshop.
or
X Refill AdBlue ®
yourself immediately ( Ypage 160). Ø
Refill
AdBlue Eng.
start not possible The AdBlue
®
tan kis empty. Awarning tone also sounds. You can
no longer start the engine.
X Consult a qualified specialist workshop immediately.
or
X Refill AdBlue ®
yourself immediately ( Ypage 160). Ø
Check AdBlue See
Owner's Manual The AdBlue
®
system is malfunctioning. A warning tone also
sounds.
X Visi taqualified specialist workshop. 240
Display messagesOn-board computer and displays
Page 253 of 357
Display messages Possible causes/consequences and
M Solutions
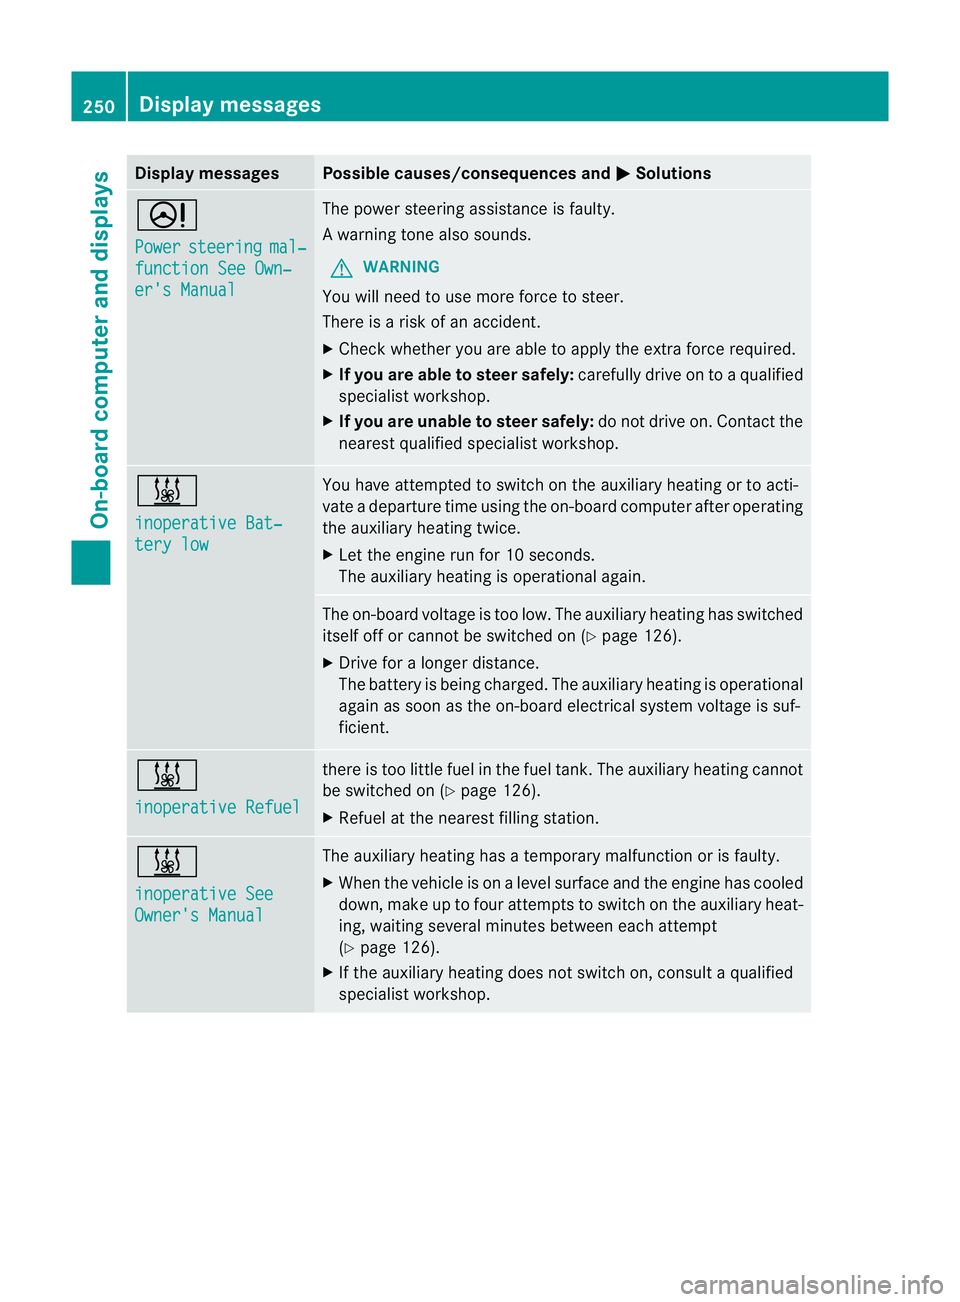
D
Power
steering mal‐
function See Own‐
er's Manual The powe
rsteering assistance is faulty.
Aw arning tone also sounds.
G WARNING
You will need to use more force to steer.
There is a ris kofanaccident.
X Check whethe ryou are able to apply the extra force required.
X If you are able to steer safely: carefully drive on to a qualified
specialist workshop.
X If you are unable to steer safely: do not drive on. Contact the
nearest qualified specialist workshop. &
inoperative Bat‐
tery low You have attempted to switch on the auxiliary heating or to acti-
vate a departure time using the on-board computer after operating
the auxiliary heating twice.
X
Let the engine run for 10 seconds.
The auxiliary heating is operational again. The on-board voltage is too low. The auxiliary heating has switched
itself off or cannot be switched on (Y
page 126).
X Drive for a longer distance.
The battery is being charged. The auxiliary heating is operational
again as soon as the on-board electrical system voltage is suf-
ficient. &
inoperative Refuel there is too little fuel in the fuel tank.T
he auxiliary heating cannot
be switched on (Y page 126).
X Refuel at the nearest filling station. &
inoperative See
Owner's Manual The auxiliary heating has a temporary malfunction or is faulty.
X
When the vehicle is on alevel surface and the engine has cooled
down, make up to four attempts to switch on the auxiliary heat-
ing, waiting several minutes between each attempt
(Y page 126).
X If the auxiliary heating does not switch on, consult a qualified
specialist workshop. 250
Display messagesOn-board computer and displays
Page 263 of 357
Problem Possible causes/consequences and
M Solutions
8
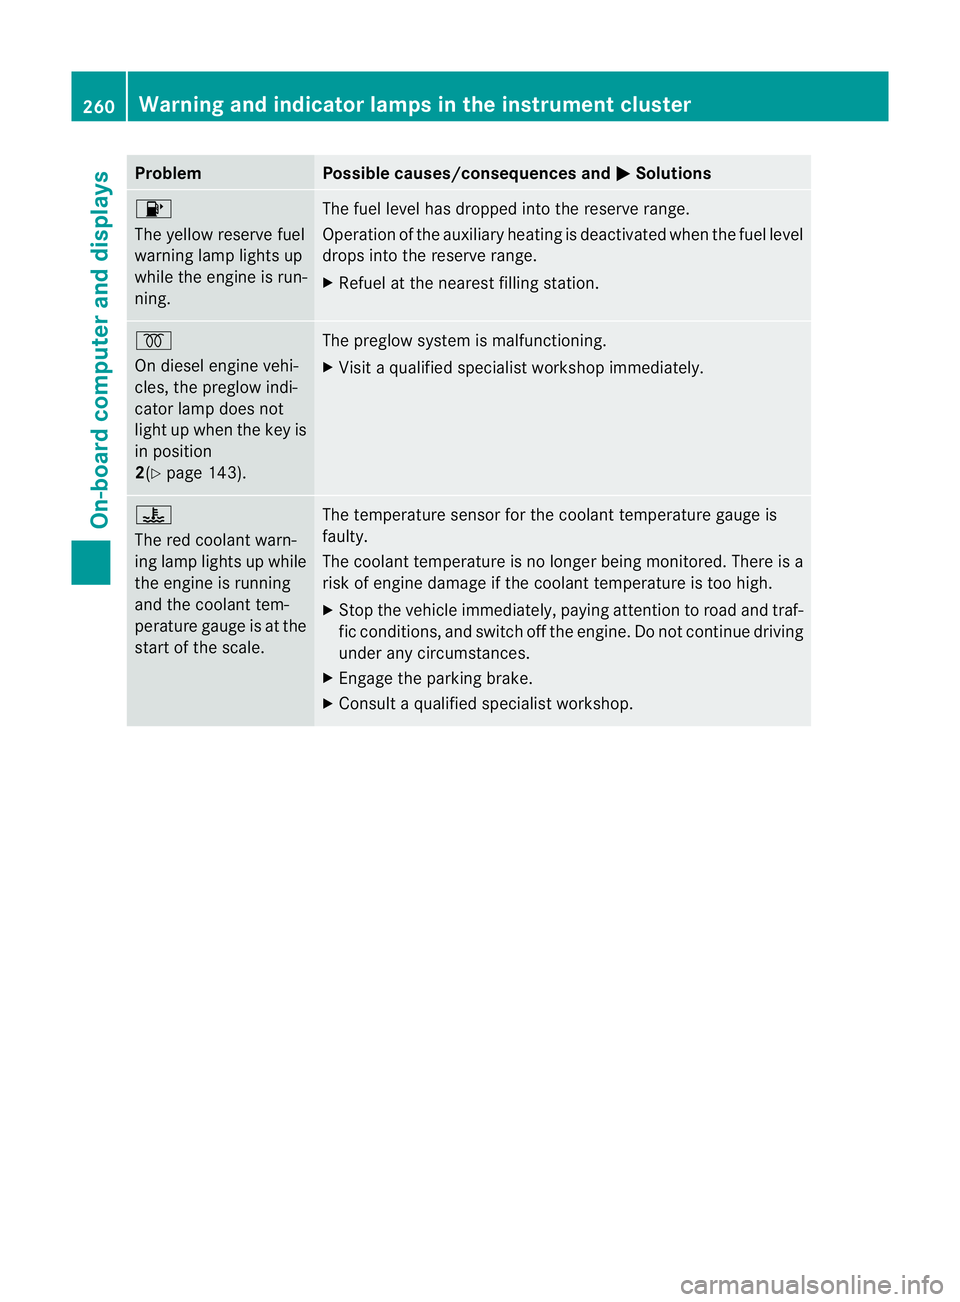
The yellow reserve fuel
warning lamp lights up
while the engine is run-
ning.
The fuel level has dropped into the reserve range.
Operation of the auxiliary heating is deactivated when the fuel level
drops into the reserve range.
X
Refuel at the nearest filling station. %
On diesel engine vehi-
cles, the preglow indi-
cator lamp does not
light up when the key is
in position
2(Y
page 143). The preglow system is malfunctioning.
X
Visit a qualified specialist workshop immediately. ?
The red coolant warn-
ing lamp lights up while
the engine is running
and the coolant tem-
perature gauge is at the
start of the scale.
The temperature sensor for the coolant temperature gauge is
faulty.
The coolant temperature is no longer being monitored. There is a
risk of engine damage if the coolant temperature is too high.
X
Stop the vehicle immediately, paying attention to road and traf-
fic conditions, and switch off the engine. Do not continue driving
under any circumstances.
X Engage the parking brake.
X Consult a qualified specialist workshop. 260
Warning and indicator lamps in the instrument clusterOn-board computer and displays
Page 280 of 357
Stowage compartment/ashtray
Stowage compartment/ashtray in the
centre console G
WARNING
Make sure that the engine has been switched
off and that the parking brake is applied so
that the vehicle cannot pull away unintention-
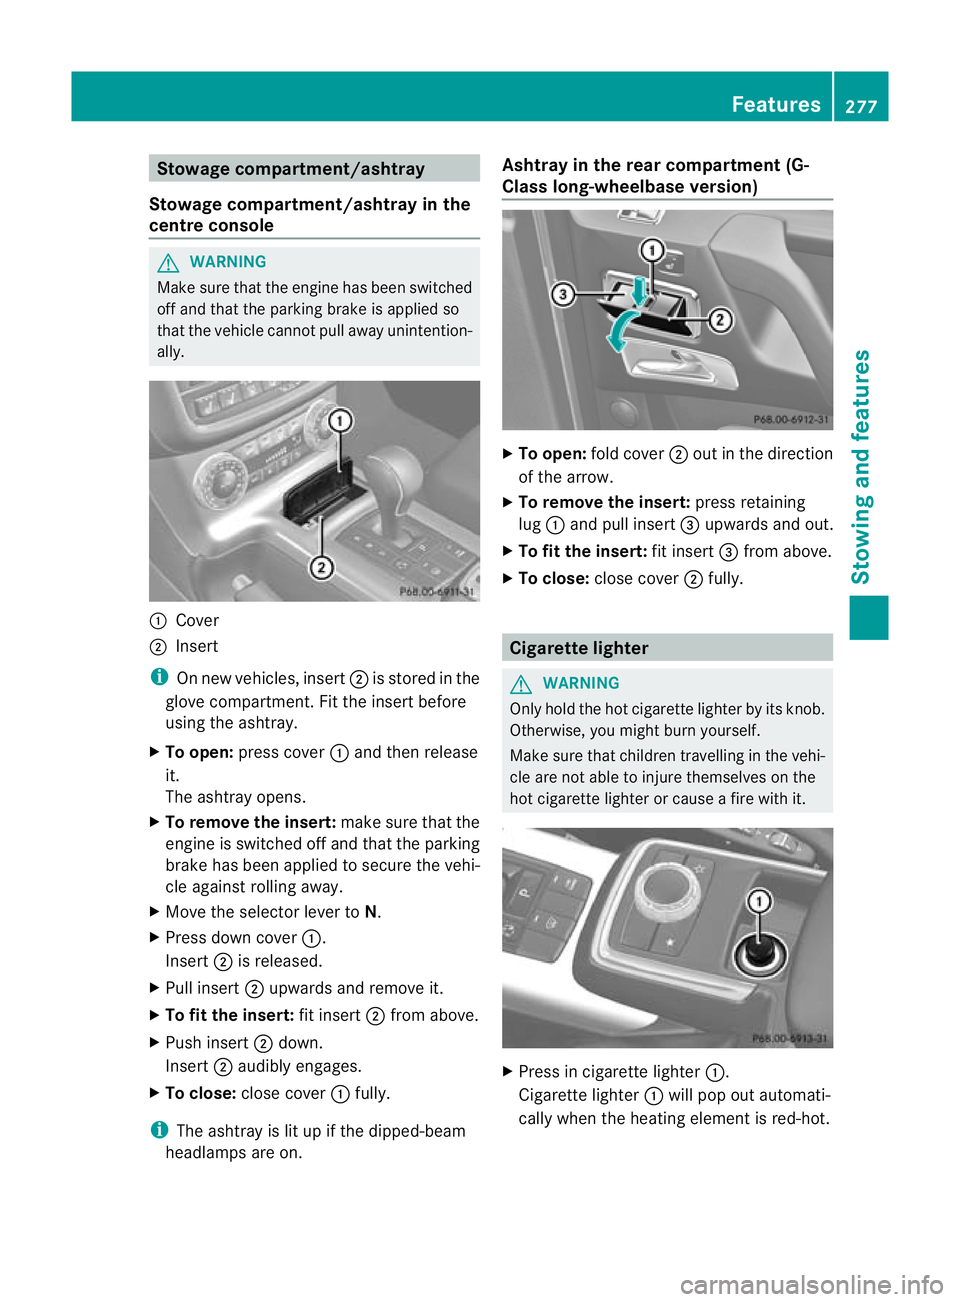
ally. :
Cover
; Insert
i On new vehicles, insert ;is stored in the
glove compartment. Fit the insert before
using the ashtray.
X To open: press cover :and then release
it.
The ashtray opens.
X To remove the insert: make sure that the
engine is switched off and that the parking
brake has been applied to secure the vehi-
cle against rolling away.
X Move the selector lever to N.
X Press down cover :.
Insert ;is released.
X Pull insert ;upwards and remove it.
X To fit the insert: fit insert;from above.
X Push insert ;down.
Insert ;audibly engages.
X To close: close cover :fully.
i The ashtray is lit up if the dipped-beam
headlamps are on. Ashtray in the rear compartment (G-
Class long-wheelbase version)
X
To open: fold cover ;out in the direction
of the arrow.
X To remove the insert: press retaining
lug :and pull insert =upwards and out.
X To fit the insert: fit insert=from above.
X To close: close cover ;fully. Cigarette lighter
G
WARNING
Only hold the hot cigarette lighter by its knob.
Otherwise, you might burn yourself.
Make sure that children travelling in the vehi-
cle are not able to injure themselves on the
hot cigarette lighter or cause a fire with it. X
Press in cigarette lighter :.
Cigarette lighter :will pop out automati-
cally when the heating element is red-hot. Features
277Stowing and features Z
Page 299 of 357
after having cleaned the wheels with wheel
cleaner. Wheel cleaners could cause
increased corrosio
nofthe brake discs and
brake pads/linings. For this reason, you
should drive for a few minutes after clean-
ing. Braking heats the brake discs and the
brake pads/linings, thus drying them. The
vehicle can then be parked up. Care of the exterior
Automatic car wash G
WARNING
Braking efficiency is reduced after washing
the vehicle. This could cause an accident. For
this reason, following a car wash, drive with
particular care until the brakes are dry.
! Preferably use car washes with adjustable
high-pressure jets for pre-washing. This
corresponds with the specifications for
cabriolet programmes. In car washes that
use high water pressures, there is a risk
that a small amount of water may leak into
the vehicle.
! Cabriolet: do not treat the vehicle with
hot wax under any circumstances.
! Make sure that the automatic car wash is
suitable for the size of the vehicle. Fold in
the exterior mirrors before the vehicle is
washed. The exterior mirrors could other-
wise be damaged.
! Make sure that the automatic transmis-
sion is in position Nwhen washing your
vehicle in a tow-through car wash. The vehi-
cle could be damaged if the transmission is
in another position.
! Make sure that:
R the side windows and sliding sunroof are
closed completely.
R the blower for the ventilation/heating is
switched off (airflow control is turned to position
0/theÃandÁ buttons
are switched off).
R the windscreen wiper switch is at posi-
tion 0.
The vehicle could otherwise be damaged.
You can wash the vehicle in an automatic car
wash from the very start.
Wash off excess dirt before cleaning the vehi-
cle in an automatic car wash.
After using an automatic car wash, wipe off
wax from the windscreen and the wiper
blades. This will prevent smears and reduce
wiping noises caused by residue on the wind-
screen.
High-pressure cleaning equipment G
WARNING
Do not use high-pressure cleaners with circu-
lar-jet nozzles (dirt grinders) to clean your
vehicle, in particular the tyres. You could oth-
erwise damage the tyres and cause an acci-
dent.
! Always maintain a distance of at least
30 cm between the vehicle and the high-
pressure cleaner nozzle. Information about
the correct distance is available from the
equipment manufacturer.
Move the high-pressure cleaner nozzle
around when cleaning your vehicle.
Do not aim directly at any of the following:
R tyres
R door gaps, roof gaps, joints etc.
R soft top (Cabriolet)
R electrical components
R battery
R connectors
R lights
R seals
R trim elements
R ventilation slots
Damaged seals or electrical components
can lead to leaks or failures. 296
CareMaintenance and care
Page 345 of 357
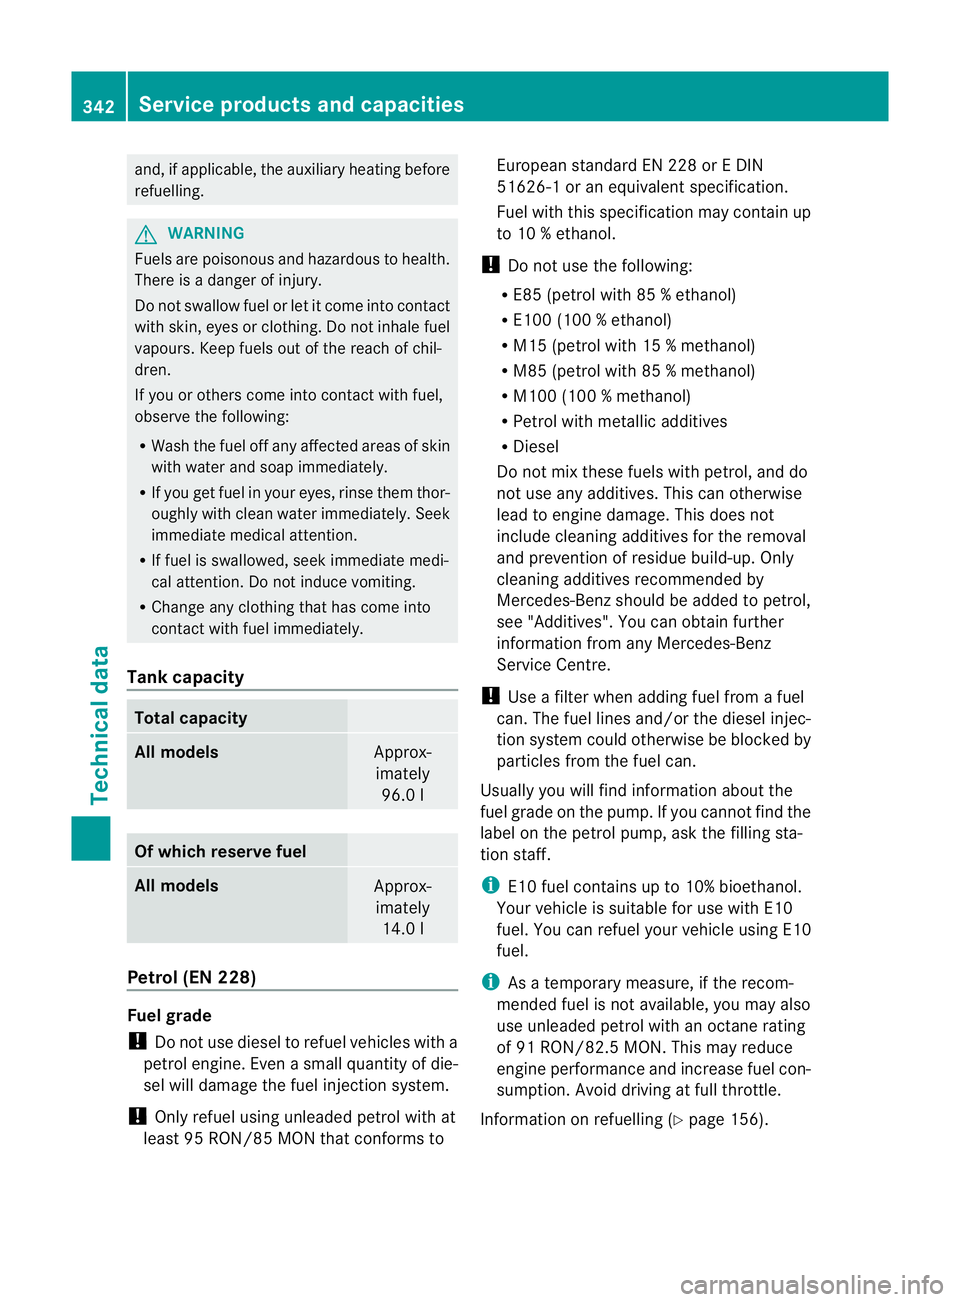
and, if applicable, the auxiliary heating before
refuelling.
G
WARNING
Fuels are poisonous and hazardous to health.
There is a danger of injury.
Do no tswallow fuel or let it come into contact
with skin, eyes or clothing. Do not inhale fuel
vapours. Keep fuels out of the reach of chil-
dren.
If you or others come into contact with fuel,
observe the following:
R Wash the fuel off any affected areas of skin
with water and soap immediately.
R If you get fuel in your eyes, rinse them thor-
oughly with clean water immediately. Seek
immediate medical attention.
R If fuel is swallowed, seek immediate medi-
cal attention. Do not induce vomiting.
R Change any clothing that has come into
contac twith fuel immediately.
Tank capacity Total capacity
All models
Approx-
imately 96.0 l Of which reserve fuel
All models
Approx-
imately 14.0 l Petrol (EN 228)
Fuel grade
!
Do not use diesel to refuel vehicles with a
petrol engine. Even asmall quantity of die-
sel will damage the fuel injection system.
! Only refuel using unleaded petrol with at
least 95 RON/85 MON that conforms to European standard EN 228 or E DIN
51626-1 or an equivalent specification.
Fuel with this specification may contain up
to 10 % ethanol.
! Do not use the following:
R E85 (petrol with 85 % ethanol)
R E100 (100 %ethanol)
R M15 (petrol with 15 % methanol)
R M85 (petrol with 85 % methanol)
R M100 (100 % methanol)
R Petrol with metallic additives
R Diesel
Do not mix these fuels with petrol, and do
not use any additives. This can otherwise
lead to engine damage. This does not
include cleaning additives for the removal
and prevention of residue build-up. Only
cleaning additives recommended by
Mercedes-Benzs hould be added to petrol,
see "Additives". You can obtain further
information from any Mercedes-Benz
Service Centre.
! Use a filter when adding fuel from a fuel
can. The fuel lines and/or the diesel injec-
tion system could otherwise be blocked by
particles from the fuel can.
Usually you will find information about the
fuel grade on the pump. If you cannot find the
label on the petrol pump, ask the filling sta-
tion staff.
i E10 fuel contains up to 10% bioethanol.
Your vehicle is suitable for use with E10
fuel. You can refuel your vehicle using E10
fuel.
i As a temporary measure, if the recom-
mended fuel is not available, you may also
use unleaded petrol with an octane rating
of 91 RON/82.5 MON. This may reduce
engine performance and increase fuel con-
sumption. Avoid driving at full throttle.
Information on refuelling (Y page 156).342
Service products and capacitiesTechnical data
Page 347 of 357
G
WARNING
If you mix diesel fuel with petrol, the flash
point of this fuel mixture is lower than that of
pure diesel fuel .When the engine is running,
components in the exhaust system may over-
heat unnoticed. There is arisk of fire.
Never refuel with petrol. Never add petrol to
diesel fuel.
! When refuelling, only use diesel fuel that
conforms to the European standard EN 590
or is of equivalen tquality. Fuel that does
not conform to EN 590 can lead to
increased wear as well as damage to the
engine and exhaust system.
! Do no tuse the following:
R marine diesel
R heating oil
R bio-diesel
R vegetable oil
R petrol
R paraffin
R kerosene
Do not mix such fuels with diesel fuel and
do not use any special additives. This can
otherwise lead to engine damage.T his
does not include flow improver additives.
For further information, see "Flow improv-
ers".
! Vehicles with adiesel particle filter: in
countries outside the EU, only refuel with
low-sulphur Euro diesel with a sulphur con-
ten tunde r50p pm; otherwise the emission
control system could be damaged.
! Vehicles without adiesel particle fil-
ter: in countries where only diesel fuel with
a high sulphur conten tis available, you will
need to carry out your vehicle's oil change
at shorter intervals. More information
aboutt he interval for oil change can be
obtained from any qualified specialist
workshop.
Usually you will find information about the
fuel grade on the pump. If you cannot find the label on the petrol pump, ask the filling sta-
tion staff.
Information on refuelling (Y
page 157).
Low outside temperatures
In winter months, diesel fuel with an improved
cold flow quality is available. In Europe, the
EN 590 standard defines various climate-
dependent temperature categories. Malfunc-
tions can be avoided by refuelling with diesel
fuel that corresponds to the climatic specifi-
cations outlined in EN 590. At unusually low
outside temperatures, it is possible that the
flow characteristics of the diesel fuel could be
insufficient .Accordingly, diesel fuel from
warmer areas may not be suitable for opera-
tion in colder climati cconditions.
i Further information on country-specific
fuel properties can be obtained from oil
companies, e.g. at filling stations.
Flow improvers
Flow improvers can be added to improve the
cold resistance of diesel fuel. The effective-
ness of flow improvers cannot be guaranteed
with all fuels.
Only use flow improvers tested and approved
by Mercedes-Benz. During use, please
observe the information on operation.
Correct dosage and thorough mixing are deci-
sive factors in ensuring improvement in low-
temperature resistance. Under certain cir-
cumstances, an excessive dosage may
actually decrease low-temperature resist-
ance and should therefore be avoided. Follow
the manufacturer's dosing instructions.
Mix the additive into the diesel in good time,
before the flow characteristics of the diesel
become insufficient. Otherwise, malfunctions
can only be rectified by heating the entire fuel
system, e.g. by parking in a heated garage.
More information about recommended flow
improvers can be obtained from any qualified
specialist workshop. 344
Service products and capacitiesTechnical data