buttons MERCEDES-BENZ G-CLASS SUV 2012 Owners Manual
[x] Cancel search | Manufacturer: MERCEDES-BENZ, Model Year: 2012, Model line: G-CLASS SUV, Model: MERCEDES-BENZ G-CLASS SUV 2012Pages: 357, PDF Size: 8.86 MB
Page 19 of 357
SRS (Supplemental Restraint Sys-
tem)
Display message ............................ 233
Introduction ..................................... 39
Warning lamp ................................. 259
Warning lamp (function) ................... 39
Starting the engine
Important safety notes ..................144
Steering (display message) ..............250
Steering wheel Adjusting (electrically). ....................97
Buttons (on-board computer) ......... 213
Gearshift paddles ........................... 153
Important safety notes ....................97
Steering wheel heating ....................97
Storing settings (memory function) 102
Steering wheel gearshift paddles ....153
Steering wheel heating Malfunction indicator lamp ..............98
Stopwatch (RACETIMER) ................... 226
Stowage areas ................................... 267
Stowage compartment Map pockets .................................. 268
Stowage compartments
Armrest (underneath) ....................268
Cuph older..................................... 275
Glove compartment .......................267
Important safety information .........267
Summer tyres .................................... 323
Sun visor ............................................ 276
Supplemental Restraint System see SRS (Supplemental Restraint
System)
Supplement Restraint System
see SRS (Supplemental Restraint
System)
Surround lighting (on-board com-
puter) ................................................. .222
Suspension tuning SETUP (on-board computer) ..........226
Switching off the alarm (ATA) ............64 T
Tailgate Display message ............................ 249
Opening dimensions ......................348
Tailgate (Cabriolet)
Opening/closing .............................. 76
opening the cover ..........................304
Tail lamps
Display message ............................ 236
see Lights
Technical data
Capacities ...................................... 341
Information .................................... 338
Trailer loads ................................... 350
Tyres .............................................. 333
Tyres/wheels ................................. 333
Vehicle data ................................... 348
Wheels ........................................... 333
Telephone
Accepting acall............................. 219
Display message ............................ 251
Menu (on-board computer) ............218
Number from the phone book ....... .219
Redialling ....................................... 220
Rejecting/ending acall................. 219
Telephone compartment ..................268
Temperature Coolant .......................................... 212
Coolant (on-board computer) ......... 225
Engine oil (on-board computer) ...... 225
Outside temperature ..................... .212
Setting (climate control) ................131
TEMPOMAT
Function/notes ............................. 173
Theft-deterrent system
ATA (Anti-Theft Alarm system) .........64
Immobiliser ...................................... 64
Tilt/sliding sunroof
see Sliding sunroof
Time
see Separate Owner' smanual
Timing (RACETIMER) .........................226
Tonneau cover ..................................... 85
Top Tether ............................................ 52
Total distance recorder ....................215
Tow-away protection ..........................6516
Index
Page 37 of 357
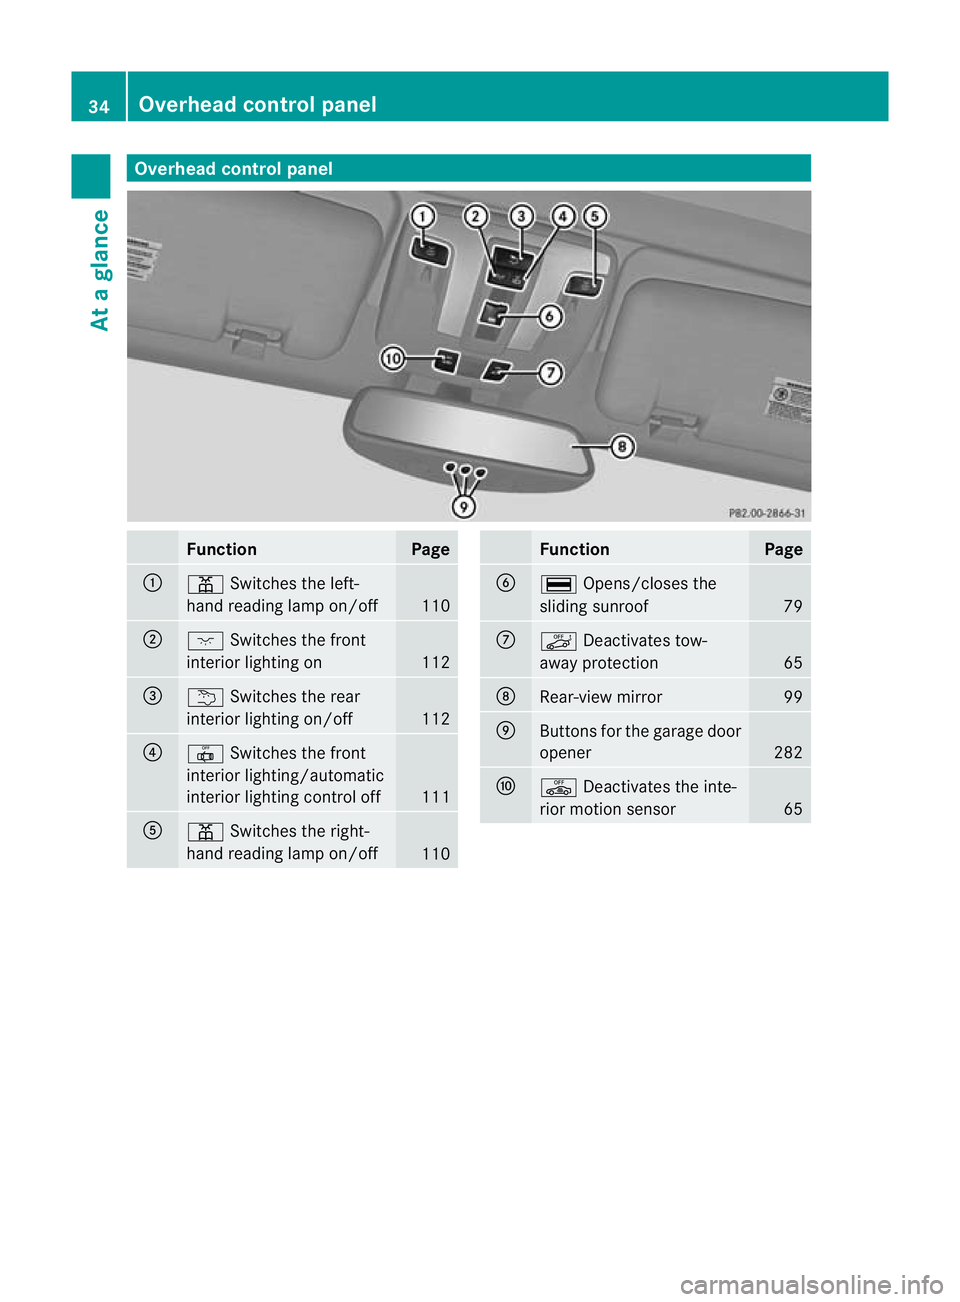
Overhea
dcontrol panel Function Page
:
p
Switches the left-
hand reading lamp on/off 110
;
c
Switches the front
interio rlighting on 112
=
u
Switches the rear
interior lighting on/off 112
?
|
Switches the front
interior lighting/automatic
interior lighting control off 111
A
p
Switches the right-
hand reading lamp on/off 110 Function Page
B
¡
Opens/closes the
sliding sunroof 79
C
ë
Deactivates tow-
away protection 65
D
Rear-view mirror 99
E
Buttons for the garage door
opener 282
F
ê
Deactivates the inte-
rior motion sensor 6534
Overhead control panelAt a glance
Page 49 of 357
X
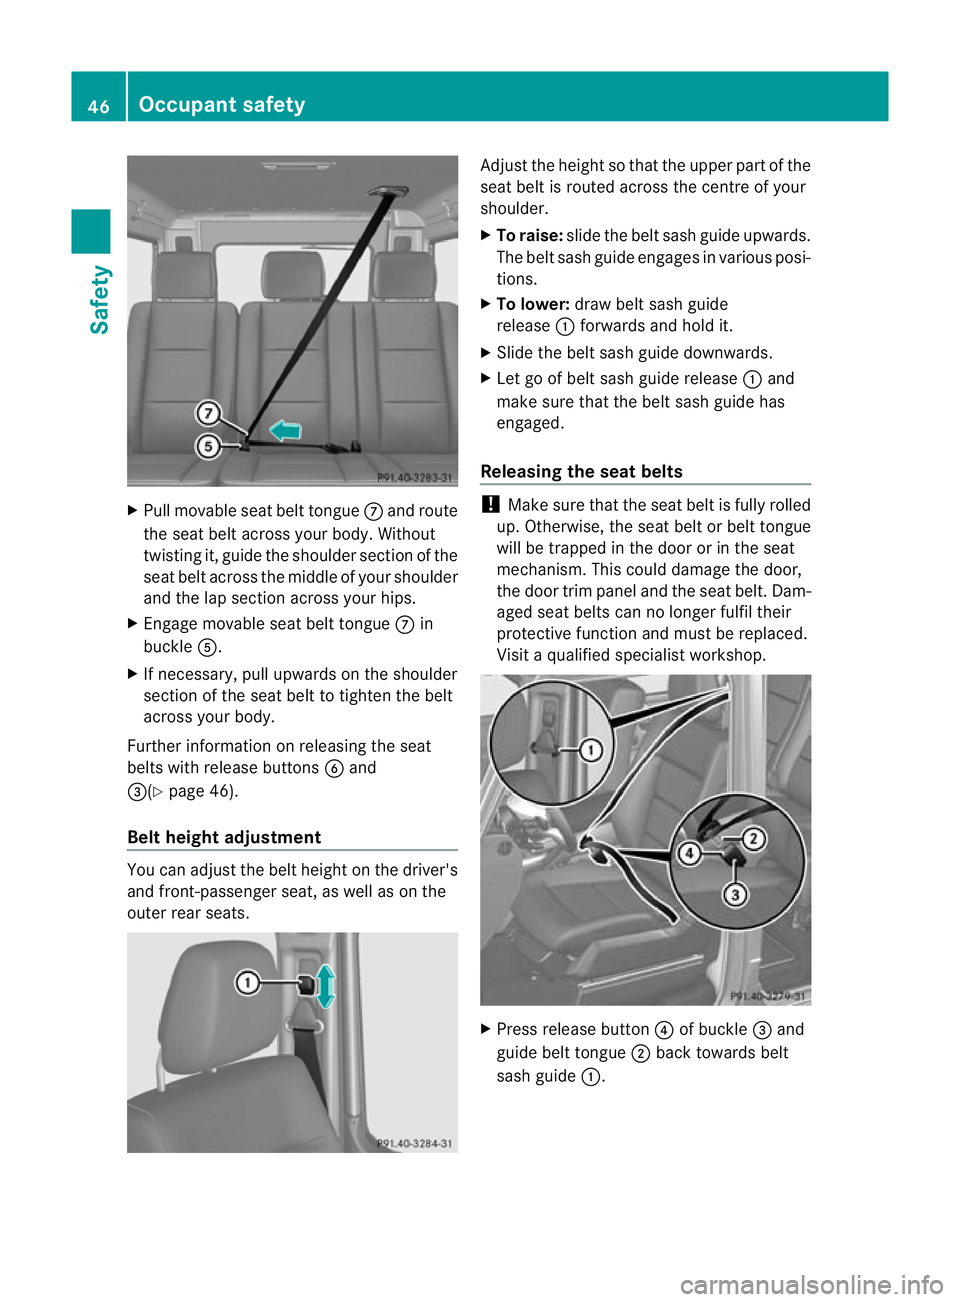
Pull movable seat belt tongue Cand route
the seat belt across your body. Without
twisting it, guide the shoulder section of the
seat belt across the middle of your shoulder
and the lap section across your hips.
X Engage movable seat belt tongue Cin
buckle A.
X If necessary, pull upwards on the shoulder
section of the seat belt to tighten the belt
across your body.
Further information on releasing the seat
belts with release buttons Band
=(Y page 46).
Belt height adjustment You can adjust the belt height on the driver's
and front-passenger seat, as well as on the
outer rear seats. Adjust the height so that the upper part of the
seat belt is routed across the centre of your
shoulder.
X
To raise: slide the belt sash guide upwards.
The belt sash guide engages in various posi-
tions.
X To lower: draw belt sash guide
release :forwards and hold it.
X Slide the belt sash guide downwards.
X Let go of belt sash guide release :and
make sure that the belt sash guide has
engaged.
Releasing the seat belts !
Make sure that the seat belt is fully rolled
up. Otherwise, the seat belt or belt tongue
will be trapped in the door or in the seat
mechanism .This could damage the door,
the door trim panel and the seat belt. Dam-
aged seat belts can no longer fulfil their
protective function and must be replaced.
Visit a qualified specialist workshop. X
Press release button ?of buckle =and
guide belt tongue ;back towards belt
sash guide :. 46
Occupant safetySafety
Page 72 of 357
Do not attach any heavy or large objects to
the key .Remove any bulky keyrings before
inserting the key into the ignition lock. G
WARNING
When the double locks are activated, the
doors can no longer be opened from the
inside. People in the vehicle can no longer get
out, e.g. in hazardous situations. There is a
risk of injury.
Therefore, do not leave any people unsuper-
vised in the vehicle, particularly children, eld-
erly people or people in need of special assis-
tance. Do not activate the double lock when
people are in the vehicle.
Deactivating the double lock
i If the vehicle has been locked with the
key, the double lock function is activated
as standard. It is then not possible to open
the doors from inside the vehicle.
X Deactivate the interior motion sensor
(Y page 65).
X Lock the vehicle with the key.
The double lock is deactivated and the
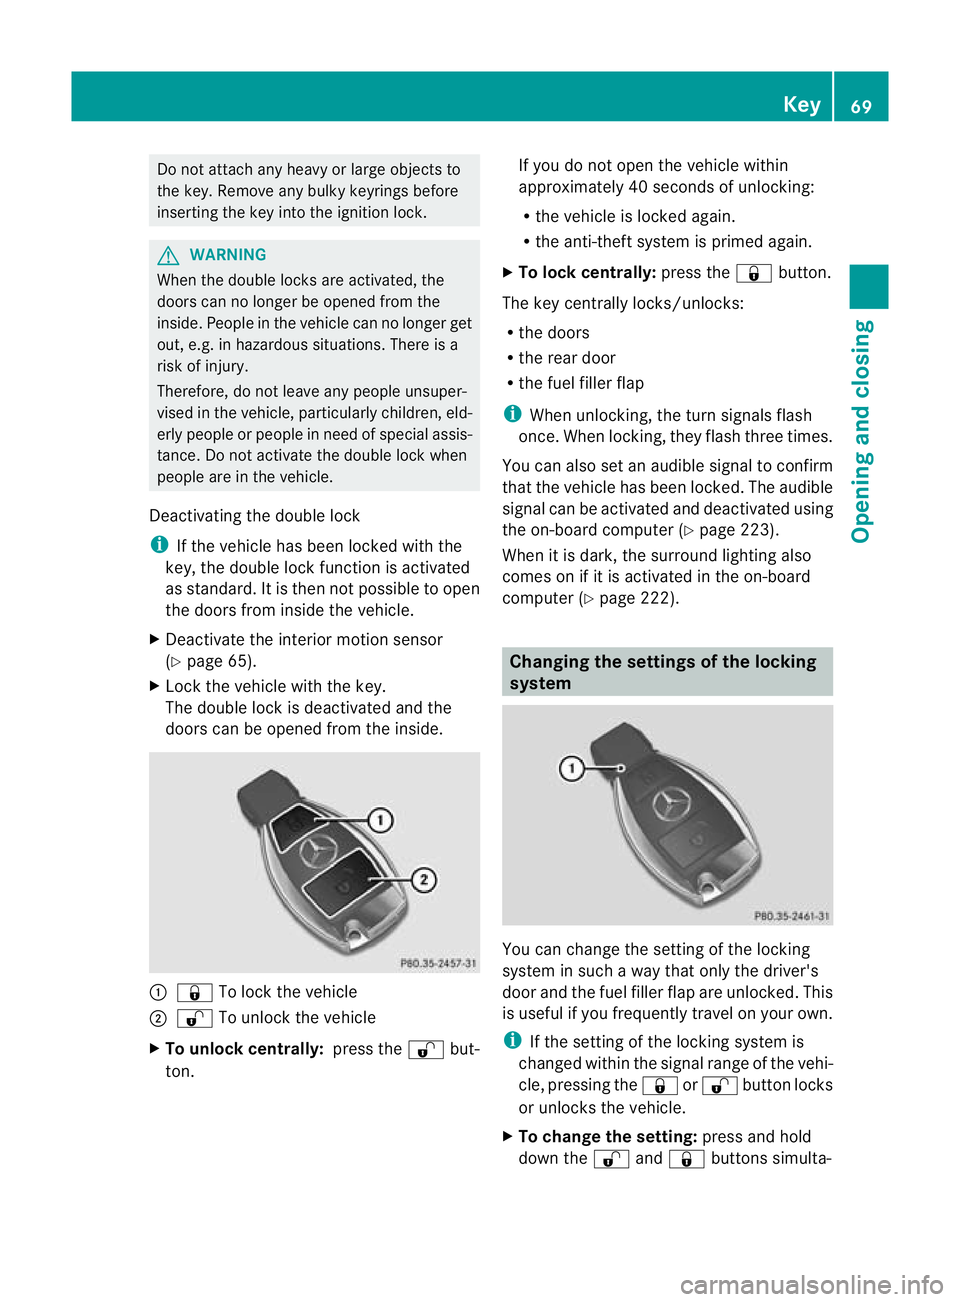
doors can be opened from the inside. :
& To lock the vehicle
; % To unlock the vehicle
X To unlock centrally: press the%but-
ton. If you do not open the vehicle within
approximately 40 seconds of unlocking:
R
the vehicle is locked again.
R the anti-theft system is primed again.
X To lock centrally: press the&button.
The key centrally locks/unlocks:
R the doors
R the rear door
R the fuel filler flap
i When unlocking, the turn signals flash
once. When locking, they flash three times.
You can also set an audible signal to confirm
that the vehicle has been locked. The audible
signal can be activated and deactivated using
the on-board computer (Y page 223).
When it is dark, the surround lighting also
comes on if it is activated in the on-board
computer (Y page 222). Changing the settings of the locking
system
You can change the setting of the locking
system in such a way that only the driver's
door and the fuel filler flap are unlocked. This
is useful if you frequently travel on your own.
i
If the setting of the locking system is
changed within the signal range of the vehi-
cle, pressing the &or% button locks
or unlocks the vehicle.
X To change the setting: press and hold
down the %and& buttons simulta- Key
69Opening and closing Z
Page 73 of 357
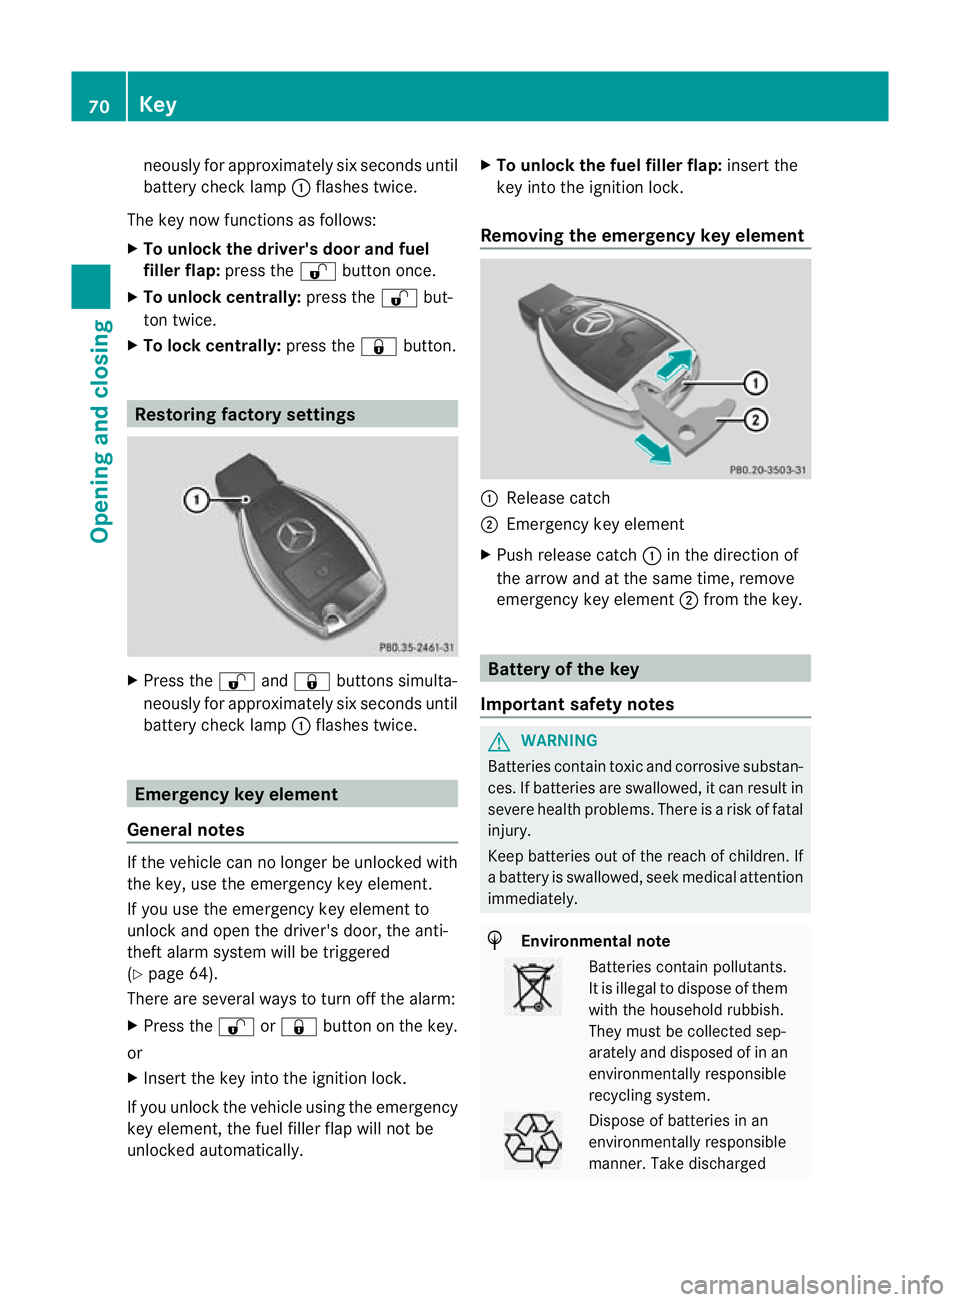
neously for approximately si
xseconds until
battery chec klamp :flashes twice.
The key now functions as follows:
X To unlock the driver's door and fuel
filler flap: press the%button once.
X To unlock centrally: press the%but-
ton twice.
X To lock centrally: press the&button. Restoring factor
ysettings X
Press the %and& buttons simulta-
neously for approximately six seconds until
battery check lamp :flashes twice. Emergency key element
General notes If the vehicle can no longer be unlocked with
the key, use the emergency key element.
If you use the emergency key element to
unlock and open the driver's door, the anti-
theft alarm system will be triggered
(Y page 64).
There are several ways to tur noff the alarm:
X Press the %or& button on the key.
or
X Insert the key into the ignition lock.
If you unlock the vehicle using the emergency
key element, the fuel filler flap will not be
unlocked automatically. X
To unlock the fuel filler flap: insert the
key into the ignition lock.
Removing the emergency key element :
Release catch
; Emergency key element
X Push release catch :in the direction of
the arrow and at the same time, remove
emergency key element ;from the key. Battery of the key
Important safety notes G
WARNING
Batteries contain toxic and corrosive substan-
ces. If batteries are swallowed, it can result in
severe health problems. There is a risk of fatal
injury.
Keep batteries out of the reach of children. If
a battery is swallowed, seek medical attention
immediately. H
Environmental note Batteries contain pollutants.
It is illegal to dispose of them
with the household rubbish.
They must be collected sep-
arately and disposed of in an
environmentally responsible
recycling system.
Dispose of batteries in an
environmentally responsible
manner. Take discharged70
KeyOpening and closing
Page 74 of 357
batteries to a qualified spe-
cialist workshop or to a col-
lection point for used batter-
ies.
Mercedes-Benz recommends that you have
the batteries replaced at a qualified specialist
workshop.
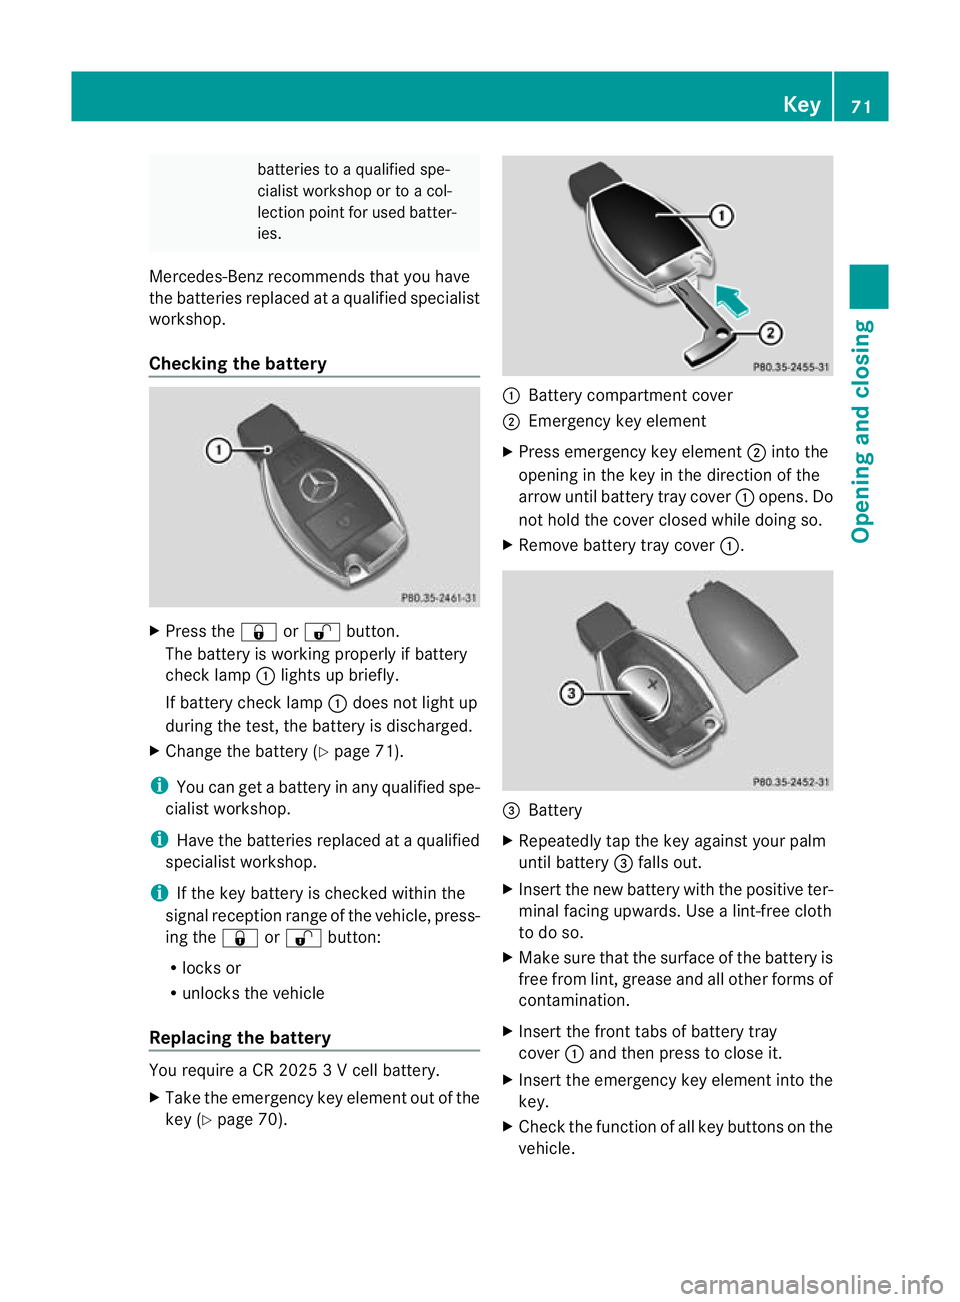
Checking the battery X
Press the &or% button.
The battery is working properly if battery
chec klamp :lights up briefly.
If battery check lamp :does no tlight up
during the test, the battery is discharged.
X Change the battery (Y page 71).
i You can get a battery in any qualified spe-
cialist workshop.
i Have the batteries replaced at a qualified
specialist workshop.
i If the key battery is checked within the
signal receptio nrange of the vehicle, press-
ing the &or% button:
R locks or
R unlocks the vehicle
Replacing the battery You require a CR 2025 3 V cell battery.
X Take the emergency key elemen tout of the
key (Y page 70). :
Battery compartment cover
; Emergency key element
X Press emergency key element ;into the
opening in the key in the direction of the
arrow until battery tray cover :opens. Do
no th old the cover closed while doing so.
X Remove battery tray cover :. =
Battery
X Repeatedly tap the key against your palm
until battery =falls out.
X Insert the new battery with the positive ter-
minal facing upwards. Use a lint-free cloth
to do so.
X Make sure that the surface of the battery is
free from lint, grease and all other forms of
contamination.
X Insert the front tabs of battery tray
cover :and then press to close it.
X Insert the emergency key element into the
key.
X Check the function of all key buttons on the
vehicle. Key
71Opening and closing Z
Page 77 of 357

The central locking button does not lock or
unlock the fuel filler flap.
X
To unlock: press button :.
X To lock: press button ;.
i You cannot unlock the vehicle centrally
from the inside if the vehicle has been
locked from the outside using the key.
i It is only possible to lock the vehicle cen-
trally if all doors are closed. Automatic locking feature
:
To switch off
; To activate
X To deactivate: press and hold button :
for about five seconds until a tone sounds.
X To activate: press and hold button ;for
about five seconds until a tone sounds.
i If you press one of the two buttons and
do not hear a tone, the relevant setting has
already been selected. The vehicle is locked automatically when the
ignition is switched on and the wheels are
turning.
You could therefore be locked out if:
R
the vehicle is being pushed.
R the vehicle is being towed.
R the vehicle is being tested on a dynamom-
eter.
You can also switch the automatic locking
function on and off using the on-board com-
puter (Y page 223). Unlocking the driver's door (emer-
gency key element)
If the vehicle can no longer be centrally
unlocked with the key, use the emergency
key element.
If you use the emergenc ykey element to
unlock and open the driver's door, the anti-
thef talarm system will be triggered
(Y page 64).
Take the emergency key elemen tout of the
key (Y page 70). X
Inser tthe emergency key element into the
lock of the driver's door as far as it will go.
X Turn the emergency key element anti-
clockwise to position 1.
The door is unlocked.
i On right-hand-drive vehicles, turn the
emergency key element clockwise. 74
DoorsOpening and closing
Page 88 of 357
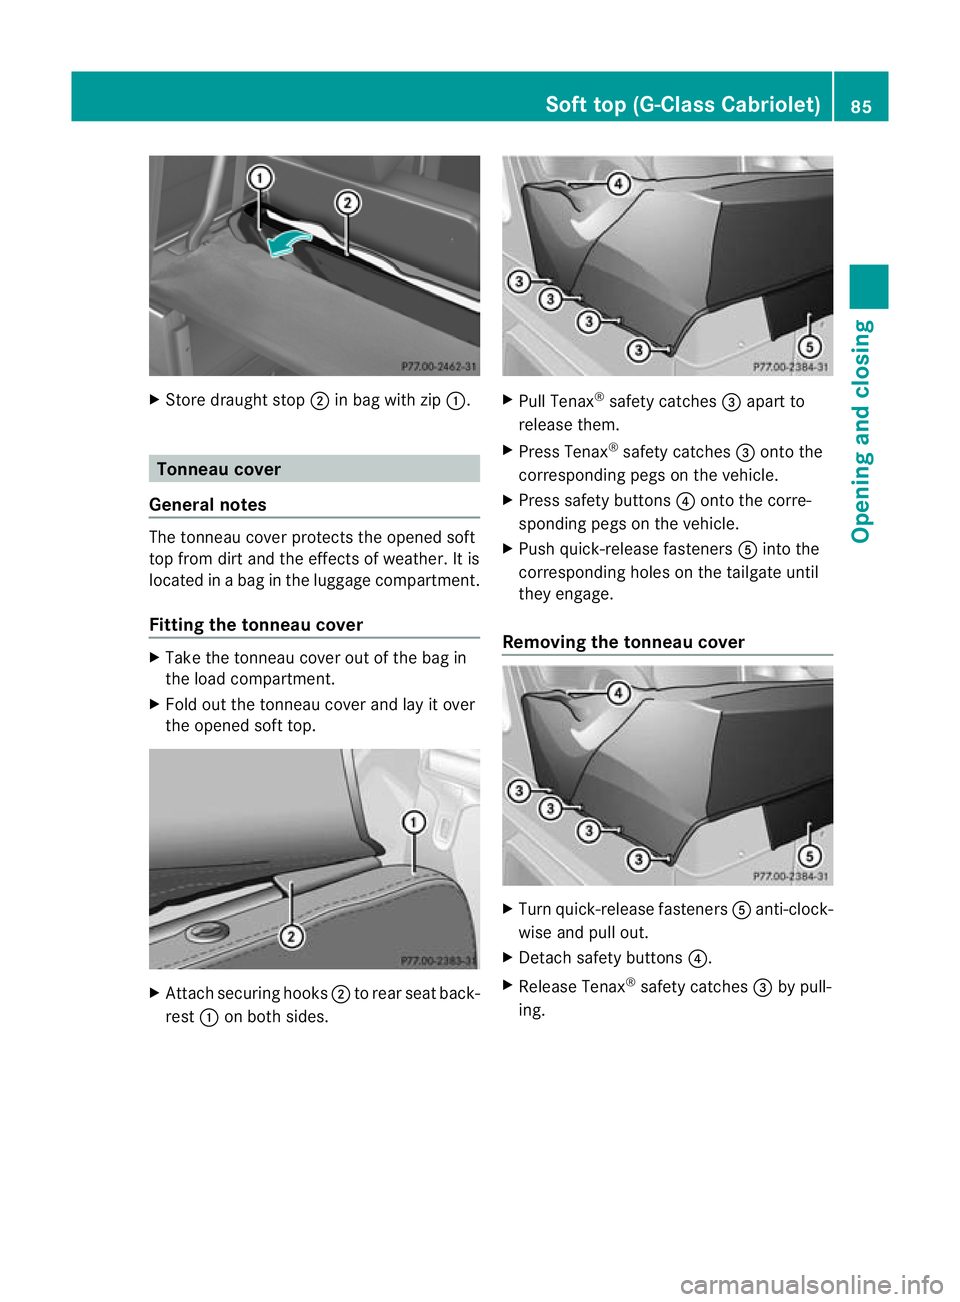
X
Store draught stop ;in bag with zip :. Tonneau cover
General notes The tonneau cove
rprotects the opened soft
top from dirt and the effects of weather. It is
located in a bag in the luggage compartment.
Fitting the tonneau cover X
Take the tonneau cover out of the bag in
the load compartment.
X Fold out the tonneau cover and lay it over
the opened soft top. X
Attach securing hooks ;to rear seat back-
rest :on both sides. X
Pull Tenax ®
safety catches =apart to
release them.
X Press Tenax ®
safety catches =onto the
corresponding pegs on the vehicle.
X Press safety buttons ?onto the corre-
sponding pegs on the vehicle.
X Push quick-release fasteners Ainto the
corresponding holes on the tailgate until
they engage.
Removing the tonneau cover X
Turn quick-release fasteners Aanti-clock-
wise and pull out.
X Detach safety buttons ?.
X Release Tenax ®
safety catches =by pull-
ing. Soft top (G-Class Cabriolet)
85Opening and closing Z
Page 94 of 357
Seats
Important safety notes
G
WARNING
The seats can still be adjusted when there is
no key in the ignition lock. For this reason,
children should never be left unsupervised in
the vehicle. They could adjust the seats and
become trapped. G
WARNING
Only adjust the driver's seat when the vehicle
is stationary. You will otherwise be distracted
from the road and traffic conditions and you
could lose control of the vehicle as a result of
the seat moving. This could cause an acci-
dent. G
WARNING
If you adjust the seat height carelessly, you or
others could be trapped and thereby injured.
Children in particular could unintentionally
press the buttons to electrically adjust the
seats and become trapped.
Take care that:
R while moving the seats, your hands do not
get under the lever assembly of the seat
adjustment system.
R children in the vehicle do not slide their
hands under the levers. G
WARNING
Make sure that nobody can become trapped
when adjusting the seats.
Observe the notes on airbags.
Secure children as recommended; see the
"Children in the vehicle" section. G
WARNING
Make sure that the back of your head is sup-
ported at eye level by the central area of the
head restraint .Ifyour head is not supported
correctly by the head restraint, you could suf-
fer a severe neck injury in the event of an accident
.Never drive if the head restraints are
not engaged and set correctly. G
WARNING
Occupants should only travel sitting on seats
which have the head restraints fitted. On a
seat which is occupied, move the head
restraint into the upright position .This
reduces the risk of injury to the passenger in
the event of an accident. G
WARNING
As eat belt can only offer its intended degree
of protection when the backrest is almost ver-
tical and the occupant is sitting upright. Avoid
seat positions that do not allow the seat belt
to be routed correctly. Adjust the backrest so
that it is as upright as possible. Never travel
with the backrest reclined too far backwards.
You could otherwise be seriously or even
fatally injured in the event of an accident or
sudden braking.
! To avoid damage to the seats and the seat
heating, observe the following information:
R do not spill any liquids on the seats. If
liquid is spilled on the seats, dry them as
soon as possible.
R if the seat covers are damp or wet, do not
switch on the seat heating. The seat
heating should also not be used to dry
the seats.
R clean the seat covers as recommended;
see the "Interior care" section.
R do not transport heavy loads on the
seats. Do not place sharp objects on the
seat cushions, e.g. knives, nails or tools.
The seats should only be occupied by
passengers, if possible.
R when the seat heating is in operation, do
not cover the seats with insulating mate-
rials, e.g. blankets, coats, bags, seat cov-
ers, child seats or booster seats.
! Make sure that there are no objects in the
footwell or behind the seats when moving Seats
91Seats, steering wheel and mirrors Z
Page 98 of 357
The following adjustments are made:
R
the seat cushion and head restraint move
down.
R the seat moves forwards or backwards,
depending on the starting position.
R backrest :tilts forwards.
R on the driver's side, the steering wheel
moves upwards and towards the dash-
board.
X Fold backrest :forwards in the direction
of the arrow.
Folding the seat back X
Push backrest :back until the seat
engages.
The seat cushion, head restraint, backrest
and steering wheel (driver's side) move
back to their original positions.
For safety reasons, the seat only moves to
its original position if this is in frontoft he
EASY-ENTRY position.
i Store the seat position using the memory
function (Y page 102).
i If your seat position is behind the EASY-
ENTRY position, you can return to this posi-
tion by pressing one of the memory but-
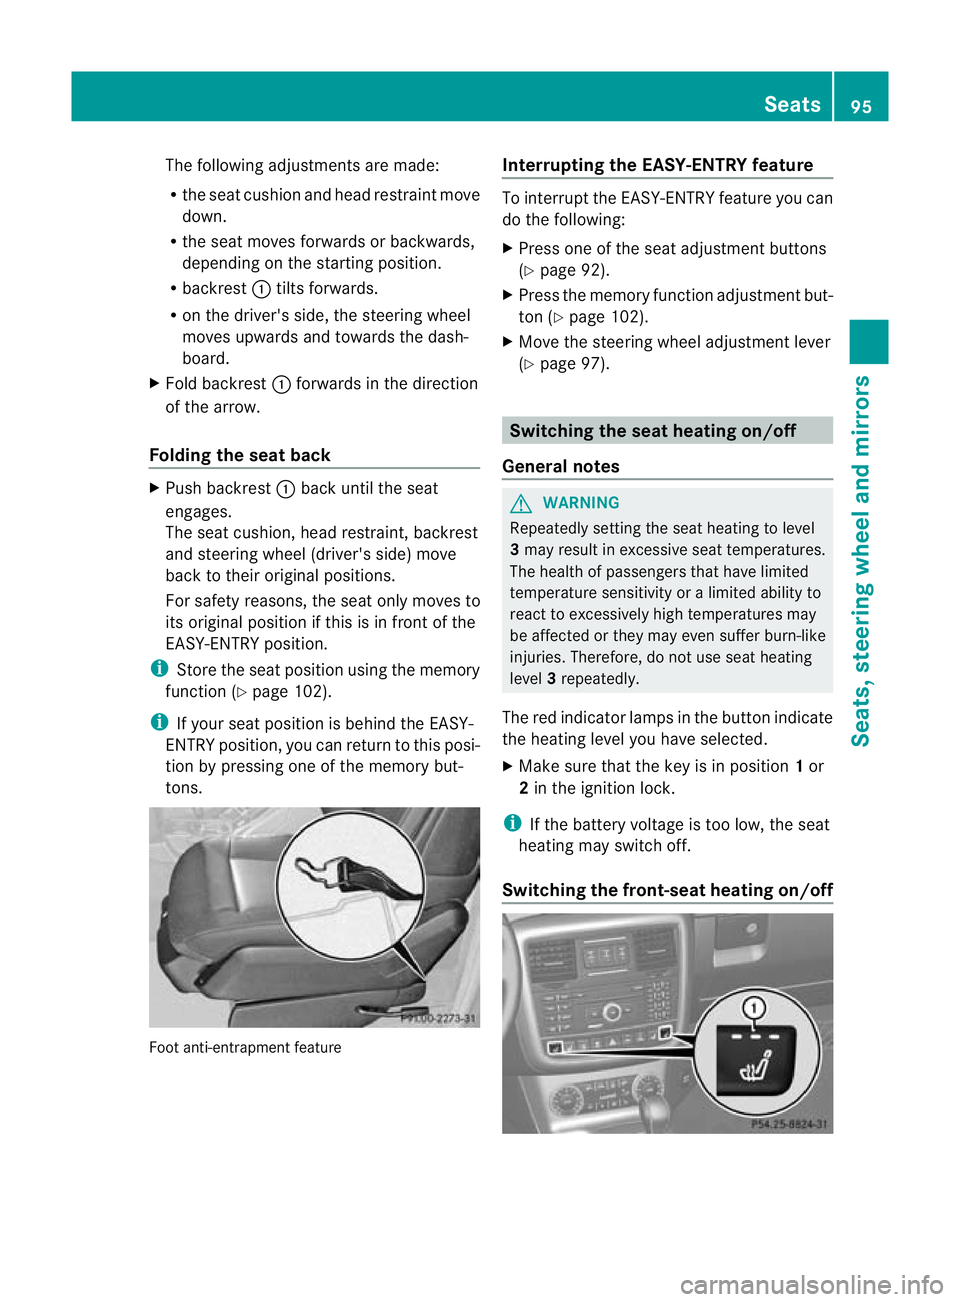
tons. Foot anti-entrapment feature Interrupting the EASY-ENTRY feature To interrupt the EASY-ENTRY feature you can
do the following:
X
Press one of the seat adjustment buttons
(Y page 92).
X Press the memory function adjustment but-
ton (Y page 102).
X Move the steering wheel adjustment lever
(Y page 97). Switching the seat heating on/off
General notes G
WARNING
Repeatedly setting the seat heating to level
3 may result in excessive seat temperatures.
The health of passengers that have limited
temperature sensitivity or a limited ability to
react to excessively high temperatures may
be affected or they may even suffer burn-like
injuries. Therefore, do not use seat heating
level 3repeatedly.
The red indicator lamps in the button indicate
the heating level you have selected.
X Make sure that the key is in position 1or
2 in the ignition lock.
i If the battery voltage is too low, the seat
heating may switch off.
Switching the front-seat heating on/off Seats
95Seats, steering wheel and mirrors Z