buttons MERCEDES-BENZ G-CLASS SUV 2012 User Guide
[x] Cancel search | Manufacturer: MERCEDES-BENZ, Model Year: 2012, Model line: G-CLASS SUV, Model: MERCEDES-BENZ G-CLASS SUV 2012Pages: 357, PDF Size: 8.86 MB
Page 99 of 357
X
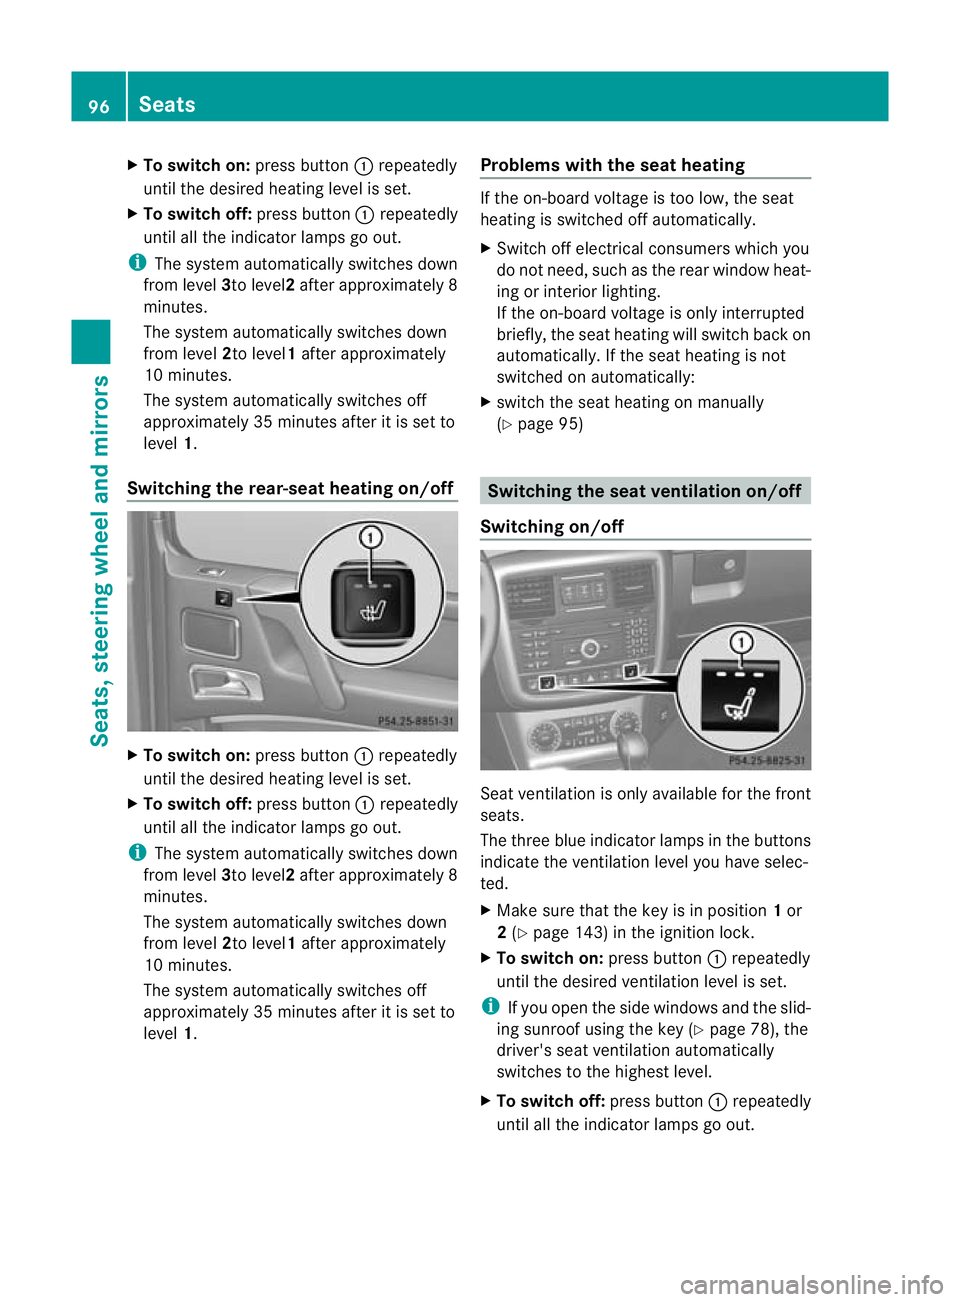
To switc hon:press button :repeatedly
until the desired heating level is set.
X To switch off: press button:repeatedly
until all the indicator lamps go out.
i The system automatically switches down
from level 3to level2after approximately 8
minutes.
The system automatically switches down
from level 2to level1 after approximately
10 minutes.
The system automatically switches off
approximately 35 minutes after it is set to
level 1.
Switching the rear-seat heating on/off X
To switch on: press button:repeatedly
until the desired heating level is set.
X To switch off: press button:repeatedly
until all the indicator lamps go out.
i The system automatically switches down
from level 3to level2after approximately 8
minutes.
The system automatically switches down
from level 2to level1 after approximately
10 minutes.
The system automatically switches off
approximately 35 minutes after it is set to
level 1. Problems with the seat heating If the on-board voltage is too low, the seat
heating is switched off automatically.
X
Switch off electrical consumers which you
do not need, such as the rear window heat-
ing or interior lighting.
If the on-board voltage is only interrupted
briefly, the seat heating will switch back on
automatically. If the seat heating is not
switched on automatically:
X switch the seat heating on manually
(Y page 95) Switching the seat ventilation on/off
Switching on/off Seat ventilation is only available for the front
seats.
The three blue indicator lamps in the buttons
indicate the ventilation level you have selec-
ted.
X
Make sure that the key is in position 1or
2 (Y page 143) in the ignition lock.
X To switch on: press button:repeatedly
until the desired ventilation level is set.
i If you open the side windows and the slid-
ing sunroof using the key (Y page 78), the
driver's seat ventilation automatically
switches to the highest level.
X To switch off: press button:repeatedly
until all the indicator lamps go out. 96
SeatsSeats, steering wheel and mirrors
Page 101 of 357
X
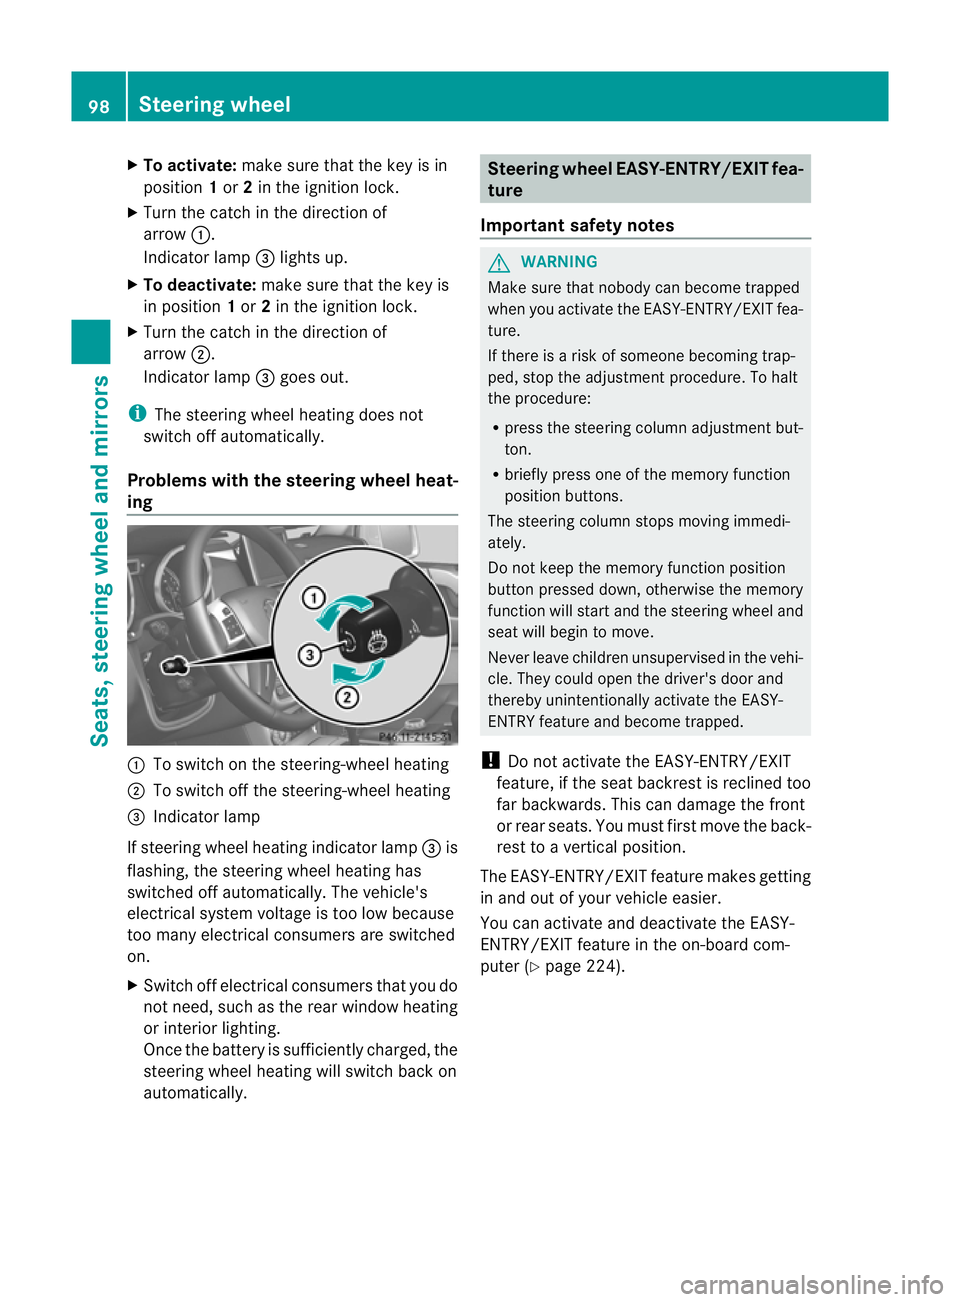
To activate: make sure tha tthe key is in
position 1or 2in the ignition lock.
X Turn the catch in the direction of
arrow :.
Indicator lamp =lights up.
X To deactivate: make sure that the key is
in position 1or 2in the ignition lock.
X Turn the catch in the direction of
arrow ;.
Indicator lamp =goes out.
i The steering wheel heating does not
switch off automatically.
Problems with the steering wheel heat-
ing :
To switch on the steering-wheel heating
; To switch off the steering-wheel heating
= Indicator lamp
If steering wheel heating indicator lamp =is
flashing, the steering wheel heating has
switched off automatically .The vehicle's
electrical system voltage is too low because
too many electrical consumers are switched
on.
X Switch off electrical consumers that you do
not need, such as the rear window heating
or interior lighting.
Once the battery is sufficiently charged, the
steering wheel heating will switch back on
automatically. Steering wheel EASY-ENTRY/EXIT fea-
ture
Important safety notes G
WARNING
Make sure that nobody can become trapped
when you activate the EASY-ENTRY/EXIT fea-
ture.
If there is a risk of someone becoming trap-
ped, stop the adjustment procedure. To halt
the procedure:
R press the steering column adjustment but-
ton.
R briefly press one of the memory function
position buttons.
The steering column stops moving immedi-
ately.
Do not keep the memory function position
button pressed down, otherwise the memory
function will start and the steering wheel and
seat will begin to move.
Never leave children unsupervised in the vehi-
cle. They could open the driver's door and
thereby unintentionally activate the EASY-
ENTRY feature and become trapped.
! Do not activate the EASY-ENTRY/EXIT
feature, if the seat backrest is reclined too
far backwards. This can damage the front
or rear seats. You must first move the back-
rest to a vertical position.
The EASY-ENTRY/EXIT feature makes getting
in and out of your vehicle easier.
You can activate and deactivate the EASY-
ENTRY/EXIT feature in the on-board com-
puter (Y page 224). 98
Steering wheelSeats, steering wheel and mirrors
Page 105 of 357
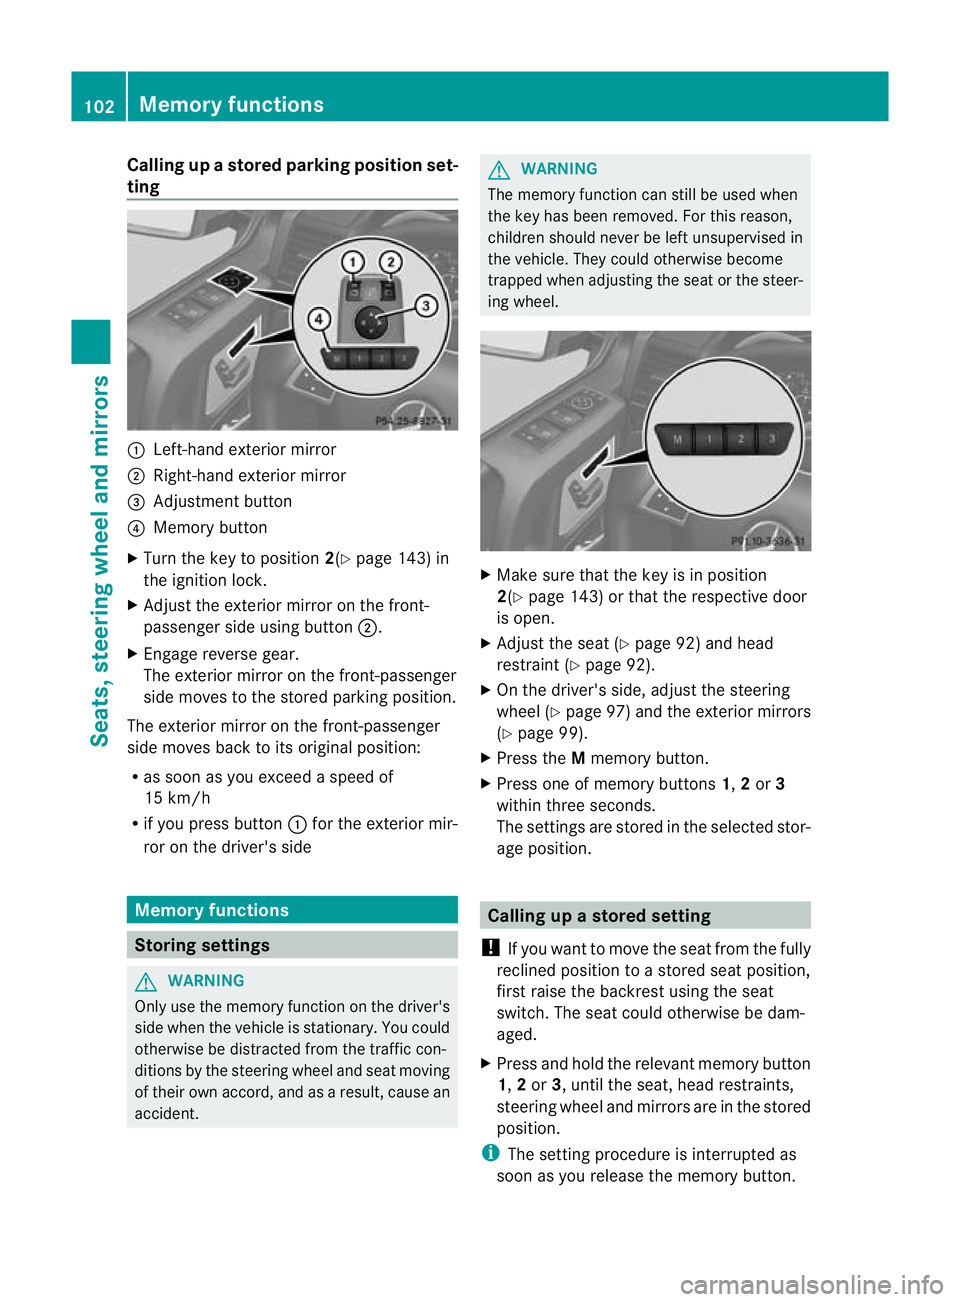
Calling up
astore dparking position set-
ting :
Left-hand exterior mirror
; Right-hand exterio rmirror
= Adjustment button
? Memory button
X Turn the key to position 2(Ypage 143) in
the ignition lock.
X Adjust the exterior mirror on the front-
passenger side using button ;.
X Engage reverse gear.
The exterior mirror on the front-passenger
side moves to the stored parking position.
The exterior mirror on the front-passenger
side moves back to its original position:
R as soon as you exceed a speed of
15 km/h
R if you press button :for the exterior mir-
ror on the driver's side Memory functions
Storing settings
G
WARNING
Only use the memory function on the driver's
side when the vehicle is stationary. You could
otherwise be distracted from the traffic con-
ditions by the steering wheel and seat moving
of their own accord, and as a result, cause an
accident. G
WARNING
The memory function can still be used when
the key has been removed. For this reason,
children should never be left unsupervised in
the vehicle. They could otherwise become
trapped when adjusting the seat or the steer-
ing wheel. X
Make sure that the key is in position
2(Y page 143) or that the respective door
is open.
X Adjust the seat (Y page 92) and head
restraint (Y page 92).
X On the driver's side, adjust the steering
wheel (Y page 97) and the exterior mirrors
(Y page 99).
X Press the Mmemory button.
X Press one of memory buttons 1,2or 3
within three seconds.
The settings are stored in the selected stor-
age position. Calling up
astore dsetting
! If you want to move the seat from the fully
reclined position to a stored seat position,
first raise the backres tusing the seat
switch. The seat could otherwise be dam-
aged.
X Press and hold the relevant memory button
1, 2or 3, until the seat, head restraints,
steering wheel and mirrors are in the stored
position.
i The setting procedure is interrupted as
soon as you release the memory button. 102
Memory functionsSeats, steering wheel and mirrors
Page 128 of 357
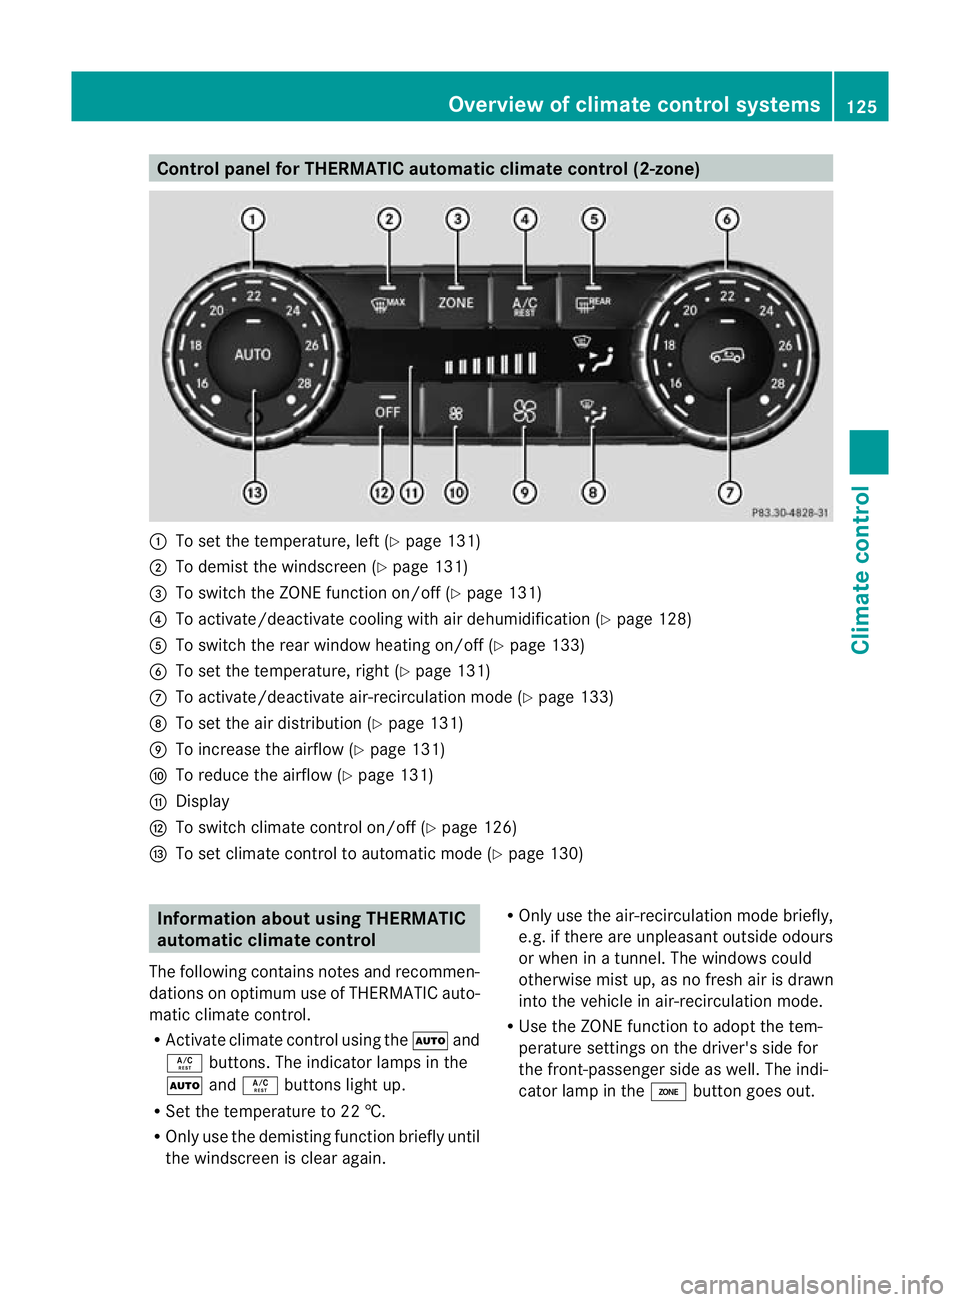
Control panel for THERMATIC automatic climate control (2-zone)
:
To set the temperature, left (Y page 131)
; To demist the windscree n(Ypage 131)
= To switch the ZONE function on/off (Y page 131)
? To activate/deactivate cooling with air dehumidification (Y page 128)
A To switch the rear window heating on/off (Y page 133)
B To set the temperature, right (Y page 131)
C To activate/deactivate air-recirculation mode (Y page 133)
D To set the air distribution (Y page 131)
E To increase the airflow (Y page 131)
F To reduce the airflow (Y page 131)
G Display
H To switch climate control on/off (Y page 126)
I To set climate control to automatic mode (Y page 130)Information about using THERMATIC
automatic climate control
The following contains notes and recommen-
dations on optimum use of THERMATIC auto-
matic climate control.
R Activate climate contro lusing the Ãand
Á buttons. The indicator lamps in the
à andÁ buttons light up.
R Set the temperature to 22 †.
R Only use the demisting function briefly until
the windscreen is clear again. R
Only use the air-recirculation mode briefly,
e.g. if there are unpleasant outside odours
or when in a tunnel. The windows could
otherwise mist up, as no fresh air is drawn
into the vehicle in air-recirculation mode.
R Use the ZONE function to adopt the tem-
perature settings on the driver's side for
the front-passenger side as well.T he indi-
cator lamp in the ábutton goes out. Overview of climate control systems
125Climate control Z
Page 139 of 357
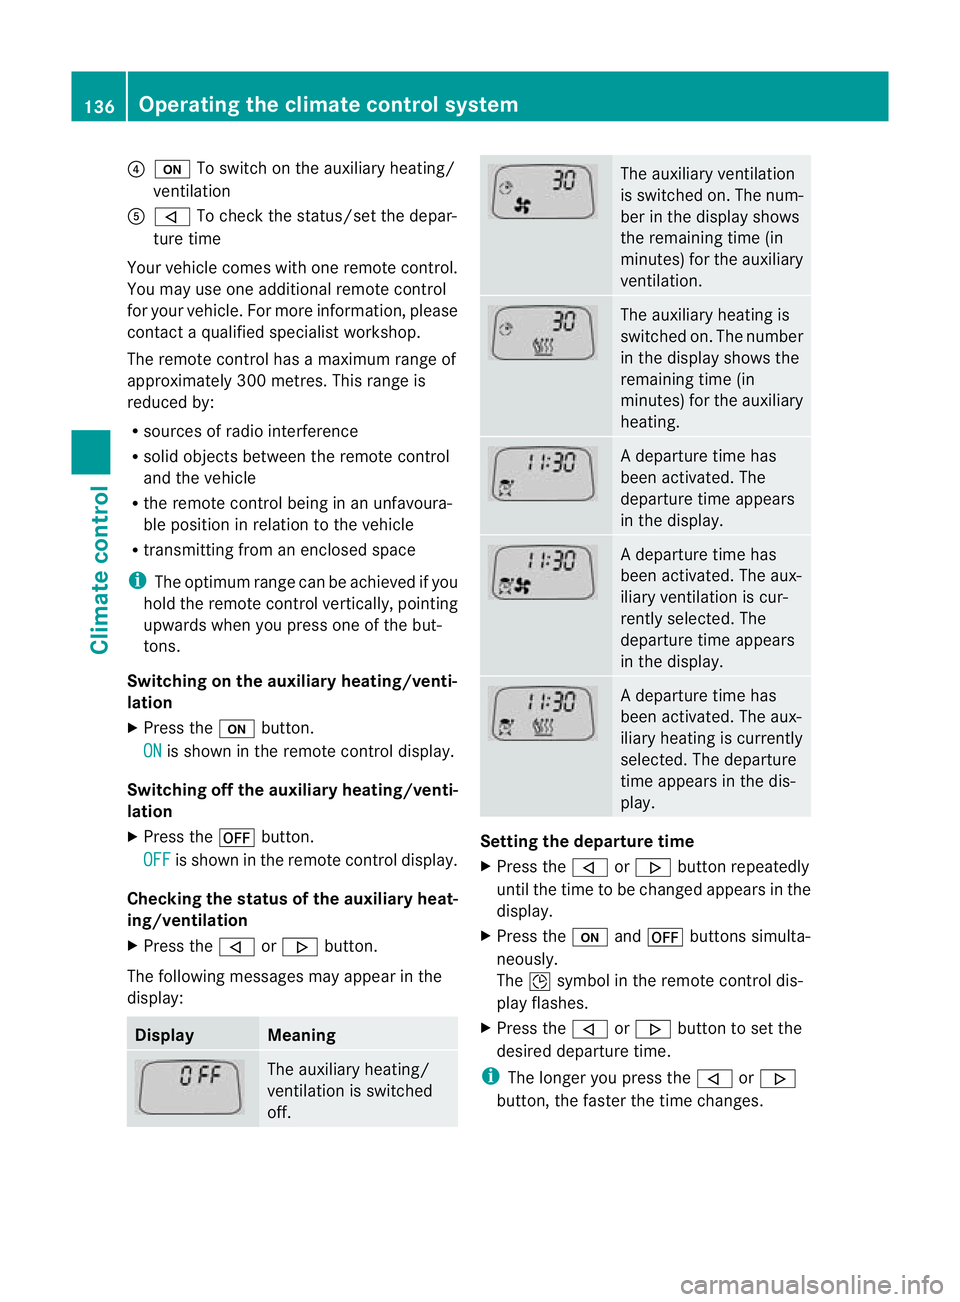
?
u To switch on the auxiliary heating/
ventilation
A , To check the status/set the depar-
ture time
Your vehicle comes with one remote control.
You may use one additional remote control
for your vehicle. For more information, please
contact a qualified specialist workshop.
The remote control has a maximum range of
approximately 300 metres. This range is
reduced by:
R sources of radio interference
R solid objects between the remote control
and the vehicle
R the remote control being in an unfavoura-
ble position in relation to the vehicle
R transmitting from an enclosed space
i The optimum range can be achieved if you
hold the remote control vertically, pointing
upwards when you press one of the but-
tons.
Switching on the auxiliar yheating/venti-
lation
X Press the ubutton.
ON is shown in the remote control display.
Switching off the auxiliary heating/venti-
lation
X Press the ^button.
OFF is shown in the remote control display.
Checkin gthe status of the auxiliary heat-
ing/ventilation
X Press the ,or. button.
The following messages may appear in the
display: Display Meaning
The auxiliary heating/
ventilation is switched
off. The auxiliary ventilation
is switched on. The num-
ber in the display shows
the remaining time (in
minutes) for the auxiliary
ventilation.
The auxiliary heating is
switched on. The number
in the display shows the
remaining time (in
minutes) for the auxiliary
heating.
Ad
eparture time has
been activated. The
departure time appears
in the display. Ad
eparture time has
been activated. The aux-
iliary ventilation is cur-
rently selected. The
departure time appears
in the display. Ad
eparture time has
been activated. The aux-
iliary heating is currently
selected. The departure
time appears in the dis-
play. Setting the departure time
X
Press the ,or. button repeatedly
until the time to be changed appears in the
display.
X Press the uand^ buttons simulta-
neously.
The Îsymbol in the remote control dis-
play flashes.
X Press the ,or. button to set the
desired departure time.
i The longer you press the ,or.
button, the faster the time changes. 136
Operating the climate control systemClimate control
Page 140 of 357
X
Press the uand^ buttons simulta-
neously.
The new departure time is stored.
Activating the set departure time
X Press the ,or. button repeatedly
until the desired departure time appears in
the display.
X Press the ubutton.
The Ísymbol and the departure time
appear in the display.
Deactivating a set departure time
X Press the ,or. button.
The status of the auxiliary heating is shown
in the display.
X Press the .button.
The first departure time stored appears in
the display.
X Press the ^button.
The display message OFF appears in the
display.
Replacing the batteries in the remote
control G
WARNING
Batteries contain poisonous substances.
Swallowing/ingesting batteries can result in
serious personal injury or death.
Always keep batteries away from children. If
a battery is swallowed, seek immediate med-
ical attention. H
Environmental note Batteries contain pollutants.
It is illegal to dispose of them
with the household rubbish.
They must be collected sep-
arately and disposed of in an
environmentally responsible
recycling system.
Dispose of batteries in an
environmentally responsible
manner
.Take discharged
batteries to a qualified spe- cialis
tworkshop or to a col-
lection point for used batter-
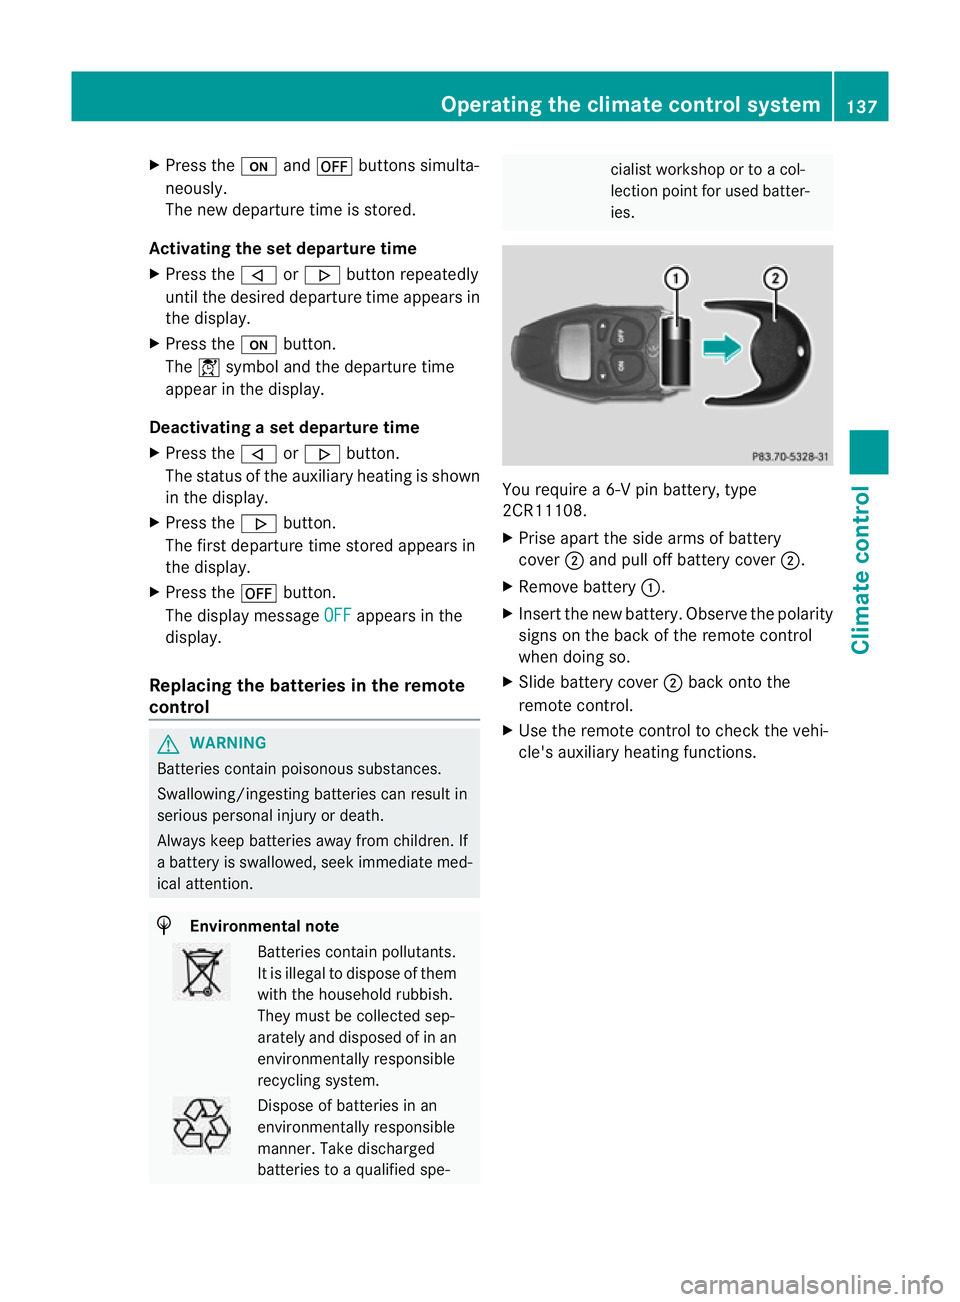
ies. You require a 6-V pin battery, type
2CR11108.
X
Prise apart the side arms of battery
cover ;and pull off battery cover ;.
X Remove battery :.
X Insert the new battery. Observe the polarity
signs on the back of the remote control
when doing so.
X Slide battery cover ;back onto the
remote control.
X Use the remote control to check the vehi-
cle's auxiliary heating functions. Operating the climate control system
137Climate control Z
Page 216 of 357
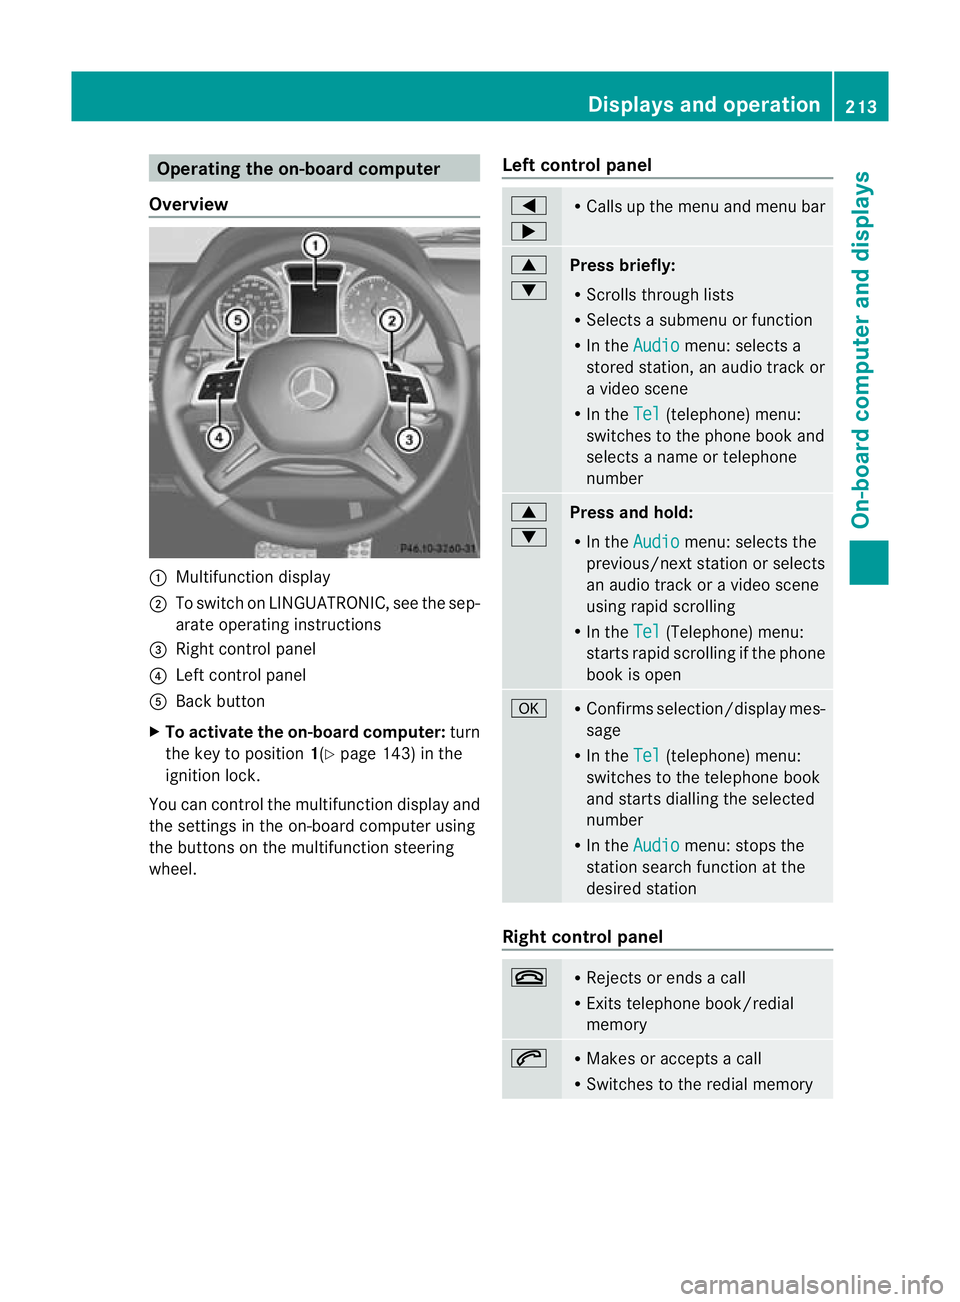
Operating the on-board computer
Overview :
Multifunction display
; To switch on LINGUATRONIC, see the sep-
arate operating instructions
= Right control panel
? Left control panel
A Back button
X To activate the on-board computer: turn
the key to position 1(Ypage 143) in the
ignition lock.
You can control the multifunction display and
the settings in the on-board computer using
the buttons on the multifunction steering
wheel. Left control panel =
; R
Calls up the menu and menu bar 9
:
Press briefly:
R
Scrolls through lists
R Selects a submenu or function
R In the Audio menu: selects a
stored station, an audio trac kor
a video scene
R In the Tel (telephone) menu:
switches to the phone book and
selects a name or telephone
number 9
:
Press and hold:
R
In the Audio menu: selects the
previous/next statio norselects
an audio trac koravideo scene
using rapid scrolling
R In the Tel (Telephone) menu:
starts rapid scrolling if the phone
book is open a R
Confirms selection/display mes-
sage
R In the Tel (telephone) menu:
switches to the telephone book
and starts dialling the selected
number
R In the Audio menu: stops the
station search function at the
desired station Right control panel
~ R
Rejects or ends a call
R Exits telephone book/redial
memory 6 R
Makes or accepts a call
R Switches to the redial memory Displays and operation
213On-board computer and displays Z
Page 283 of 357
Operating the mobile phone
You can operate the telephon
eusing the
6 and~ buttons on the multifunction
steering wheel. You can operate other mobile
phone functions via the on-board computer
(Y page 218).
When you remove the key from the ignition
lock, the mobile phone remains switched on
for approximately ten minutes (run-on time).
If you make a call during this time, the mobile
phone will be switched off approximately ten
minutes after you have ended the call. Garage door opener
Important safety notes You can use the HomeLink
®
garage door
opener integrated into the rear-view mirror to
operate up to three different gate/garage
door opener systems.
i The garage door opener is only available
for certain countries. Observe the legal
requirements for each individual country.
The HomeLink ®
garage door opener is
compatible with most European garage and
gate opener drives. More information on
HomeLink ®
and/or compatible products is
available from:
R any Mercedes-Benz Service Centre
R the HomeLink ®
hotline
(0) 08000 466 354 65 (free of charge) or
+49 (0) 6838 907 277 (charges apply)
R on the Internet at:
http://www.homelink.com
Programming the remote control Programming
G
WARNING
Only press the button on the integrated
garage door opener if there are no persons or
objects present within the sweep of the garage door. Persons could otherwise be
injured as the door moves.
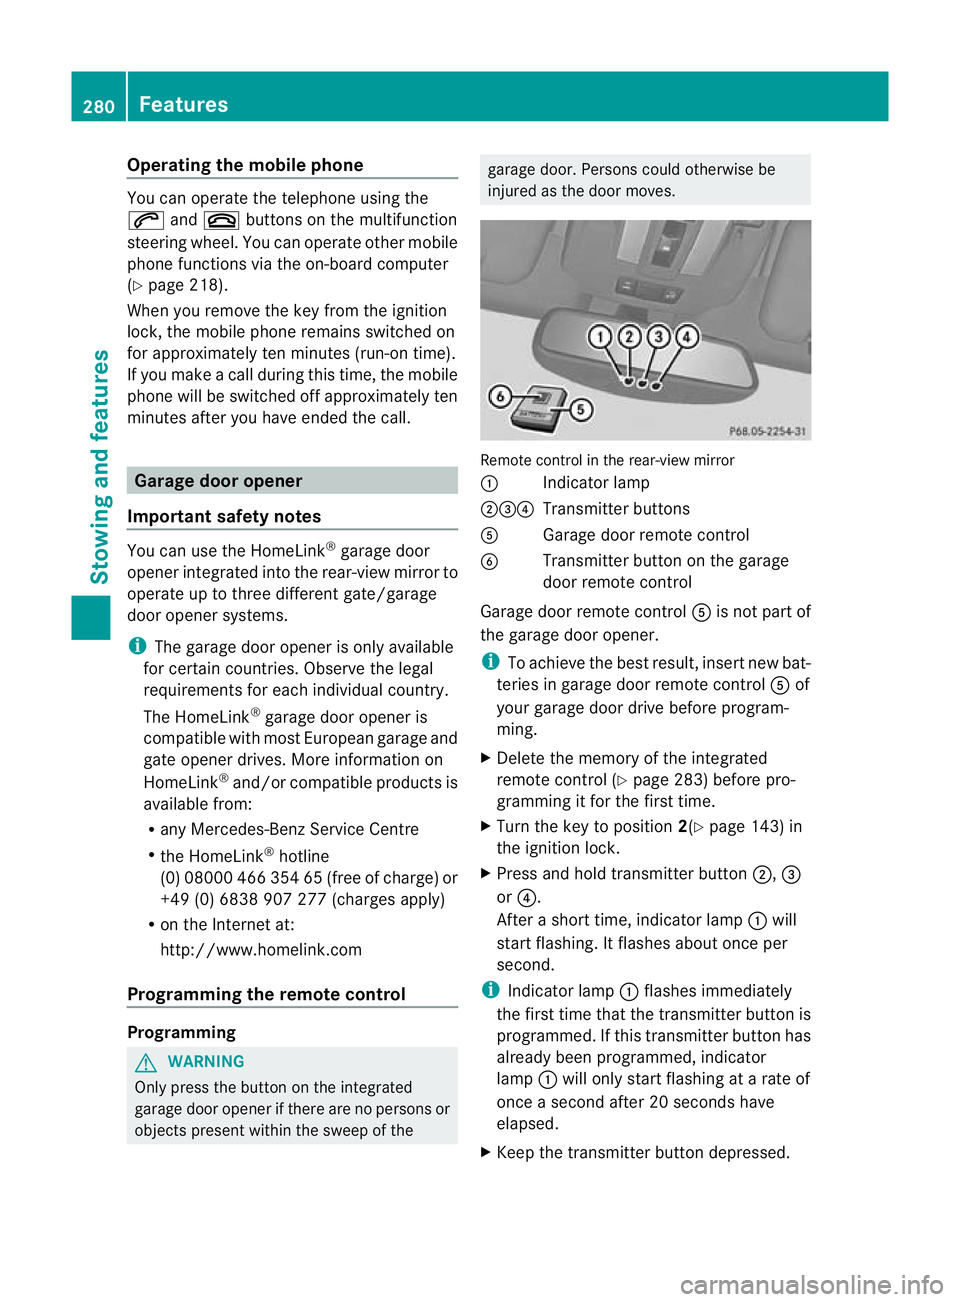
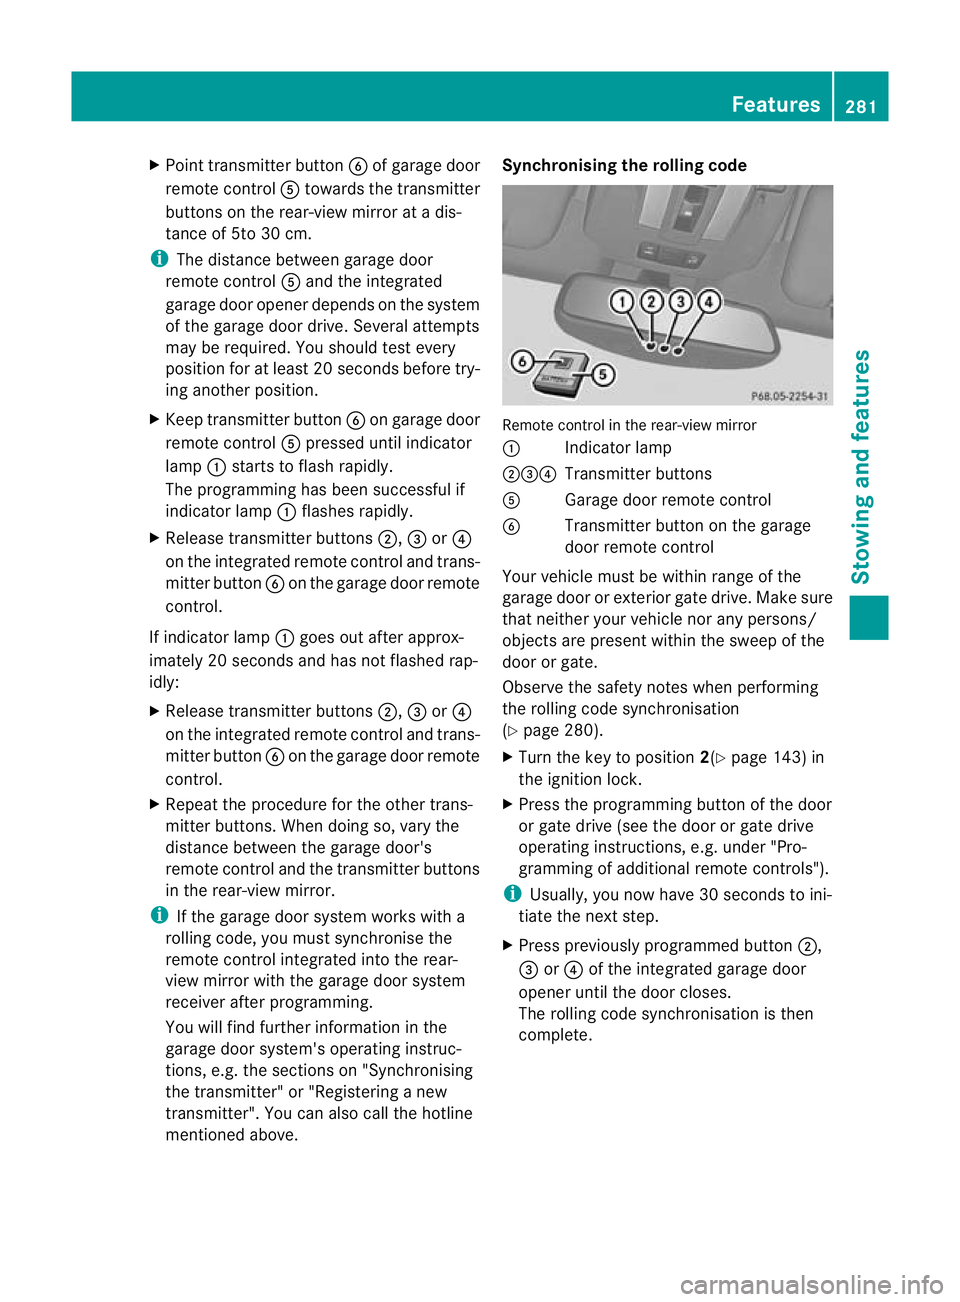
Remote control in the rear-view mirror
:
Indicator lamp
;=? Transmitter buttons
A Garage door remote control
B Transmitter button on the garage
door remote control
Garage door remote control Ais not part of
the garage door opener.
i To achieve the best result, insert new bat-
teries in garage door remote control Aof
your garage door drive before program-
ming.
X Delete the memory of the integrated
remote control (Y page 283) before pro-
gramming it for the first time.
X Turn the key to position 2(Ypage 143) in
the ignition lock.
X Press and hold transmitter button ;,=
or ?.
After a short time, indicator lamp :will
start flashing. It flashes abouto nce per
second.
i Indicato rlamp :flashes immediately
th ef irst tim ethat the transmitter button is
programmed. If this transmitter button has
already been programmed, indicator
lamp :will only start flashing at a rate of
once a second after 20 seconds have
elapsed.
X Keep the transmitter button depressed. 280
FeaturesStowing and features
Page 284 of 357
X
Point transmitter button Bof garage door
remote control Atowards the transmitter
buttons on the rear-view mirror at a dis-
tance of 5to 30 cm.
i The distance between garage door
remote control Aand the integrated
garage door opener depends on the system
of the garage door drive. Several attempts
may be required. You should test every
position for at least 20 seconds before try-
ing another position.
X Keep transmitter button Bon garage door
remote control Apressed until indicator
lamp :starts to flash rapidly.
The programming has been successful if
indicator lamp :flashes rapidly.
X Release transmitter buttons ;,=or?
on the integrated remot econtrol and trans-
mitter button Bon the garage door remote
control.
If indicator lamp :goes out after approx-
imately 20 seconds and has not flashed rap-
idly:
X Release transmitter buttons ;,=or?
on the integrated remote control and trans-
mitter button Bon the garage door remote
control.
X Repeat the procedure for the other trans-
mitter buttons. When doing so, vary the
distance between the garage door's
remote control and the transmitter buttons
in the rear-view mirror.
i If the garage door system works with a
rolling code, you must synchronise the
remote control integrated into the rear-
view mirror with the garage door system
receiver after programming.
You will find further information in the
garage door system's operating instruc-
tions, e.g. the section son"Synchronising
the transmitter" or "Registering a new
transmitter". You can also call the hotline
mentioned above. Synchronising the rolling code
Remote control in the rear-view mirror
:
Indicator lamp
;=? Transmitter buttons
A Garage doo rremote control
B Transmitter button on the garage
door remote control
Your vehicle must be within range of the
garage door or exterior gate drive. Make sure
that neither your vehicle nor any persons/
objects are present within the sweep of the
door or gate.
Observe the safety notes when performing
the rolling code synchronisation
(Y page 280).
X Turn the key to position 2(Ypage 143) in
the ignition lock.
X Press the programming button of the door
or gate drive (see the door or gate drive
operating instructions, e.g. under "Pro-
gramming of additional remote controls").
i Usually, you now have 30 seconds to ini-
tiate the next step.
X Press previously programmed button ;,
= or? of the integrated garage door
opener until the door closes.
The rolling code synchronisation is then
complete. Features
281Stowing and features Z
Page 285 of 357
Problems when programming
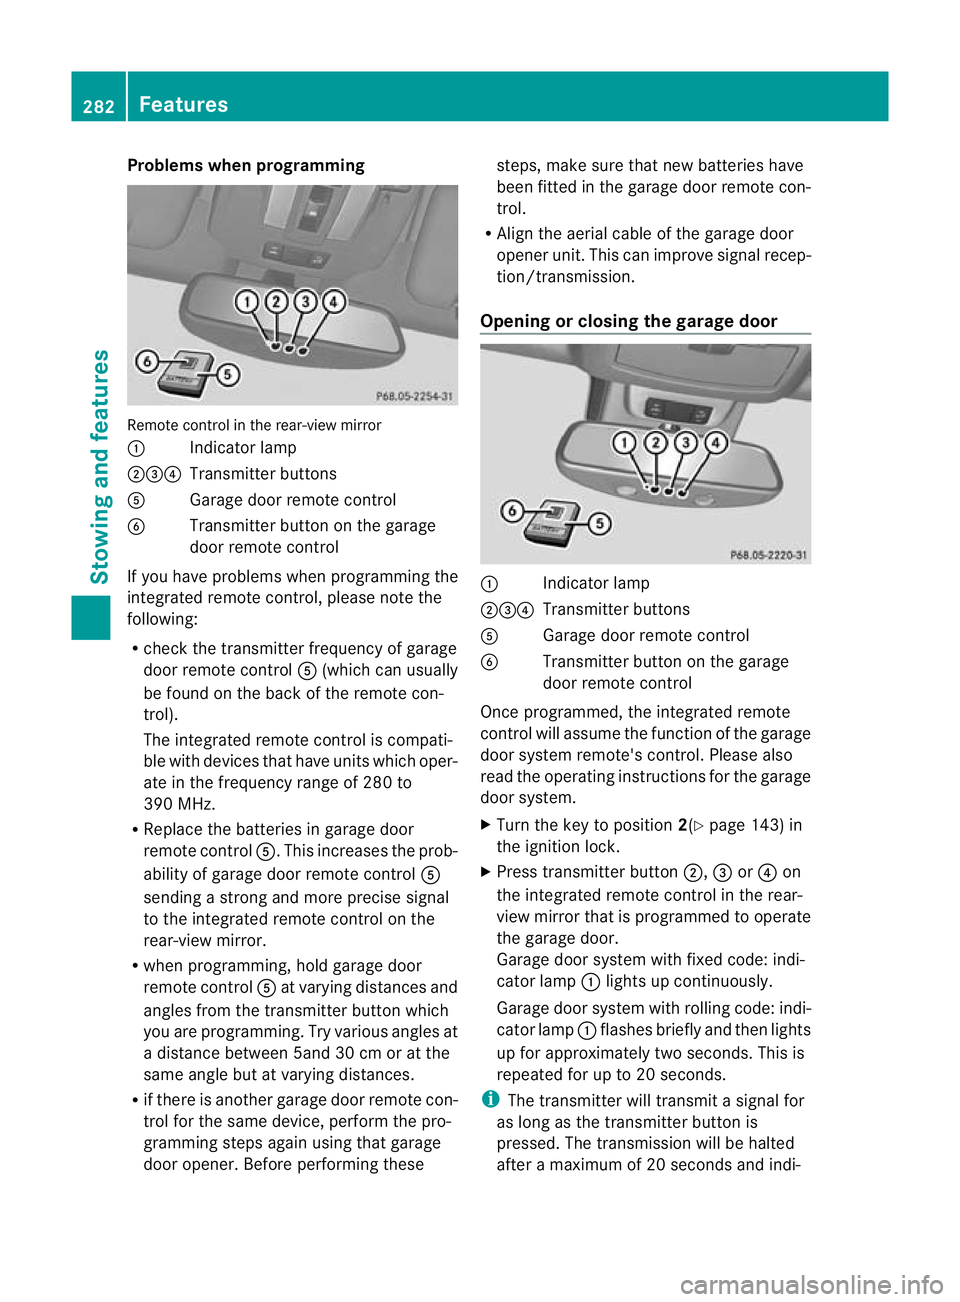
Remote control in the rear-view mirror
:
Indicator lamp
;=? Transmitter buttons
A Garage door remote control
B Transmitter button on the garage
door remote control
If you have problems when programming the
integrated remote control, please note the
following:
R check the transmitter frequency of garage
door remote control A(which can usually
be found on the back of the remote con-
trol).
The integrated remote control is compati-
ble with devices that have units which oper-
ate in the frequency range of 280 to
390 MHz.
R Replace the batteries in garage door
remote control A.This increases the prob-
ability of garage door remote control A
sending a strong and more precise signal
to the integrated remote control on the
rear-view mirror.
R when programming, hold garage door
remote control Aat varying distances and
angles from the transmitter button which
you are programming. Try various angles at
a distance between 5and 30 cm or at the
same angle but at varying distances.
R if there is another garage door remote con-
trol for the same device, perform the pro-
gramming steps again using that garage
door opener. Before performing these steps, make sure that new batteries have
been fitted in the garage door remote con-
trol.
R Align the aerial cable of the garage door
opener unit. This can improve signal recep-
tion/transmission.
Opening or closing the garage door :
Indicator lamp
;=? Transmitter buttons
A Garage door remote control
B Transmitter button on the garage
door remote control
Once programmed, the integrated remote
control will assume the function of the garage
door system remote's control. Please also
read the operating instructions for the garage
door system.
X Turn the key to position 2(Ypage 143) in
the ignition lock.
X Press transmitter button ;,=or? on
the integrated remote control in the rear-
view mirror that is programmed to operate
the garage door.
Garage door system with fixed code: indi-
cator lamp :lights up continuously.
Garage door system with rolling code: indi-
cator lamp :flashes briefly and then lights
up for approximately two seconds. This is
repeated for up to 20 seconds.
i The transmitter will transmit a signal for
as long as the transmitter button is
pressed. The transmission will be halted
after a maximum of 20 seconds and indi- 282
FeaturesStowing and features