charging MERCEDES-BENZ G-CLASS SUV 2012 Owners Manual
[x] Cancel search | Manufacturer: MERCEDES-BENZ, Model Year: 2012, Model line: G-CLASS SUV, Model: MERCEDES-BENZ G-CLASS SUV 2012Pages: 357, PDF Size: 8.86 MB
Page 8 of 357
Neutral (ECO start/stop function)
.150
Overview ........................................ 149
Problem (fault) ............................... 156
Progra mselector button ................152
Pulling away ................................... 144
Selector leve r................................ 149
Shift range s................................... 153
Steering wheel gearshift paddle s... 153
Trailer towing ................................. 152
Transmissio nposition display ........150
Automatic transmission emer-
gency running mode .........................156
Auxiliary heating Activating/deactivating .................134
Activating/deactivating (on the
centre console ).............................. 135
Display message ............................ 250
Important safety notes ..................134
Malfunction ................................... .138
Problem (display message) ............138
Remote control .............................. 135
Setting ........................................... 223
Setting the departur etime ............ .136
Auxiliary ventilation
Activating/deactivating .................134
Activating/deactivating (on the
centre console ).............................. 135
Problem (display message) ............138
Remote control .............................. 135
Axle load, permissible (traile rtow-
ing) ...................................................... 350 B
Backrest (display message) .............249
BAS (Brake Assist System) .................61
Battery Changing (auxiliary heating
remote control) .............................. 137
Changing (key )................................. 71
Checking (key )................................. 71
Important safety guidelines (key )..... 70
Battery (vehicle)
Charging ........................................ 311
Display message ............................ 239
Important safety notes ..................309
Jump starting ................................. 313
Overview ........................................ 309Belt tensioner
Activation ......................................... 39
Function .......................................... .47
Blind Spo tAssist
Activating/deactivating .................220
Display message ............................ 243
Notes/function .............................. 190
Trailer towing ................................. 192
see Active Blind Spot Assist
BlueTEC (AdBlue ®
) ............................. 345
Bonnet Closing .......................................... .291
Display message ............................ 249
Important safety notes ..................290
Opening ......................................... 291
Brake fluid
Display message ............................ 232
Notes ............................................. 346
Brake lamps
Adaptive .......................................... .61
Display message ............................ 235
Brakes
ABS .................................................. 60
BAS .................................................. 61
Brake fluid (notes) .........................346
Display message ............................ 229
Driving tips .................................... 165
High-performance brake system ....166
Important safety notes ..................165
Parking brake ................................ 164
Warning lamp ................................. 253
Breakdown
see Flat tyre
see Towing away
Bulbs
Brake lamp .................................... 118
Cornering light function .................117
Foglamps ....................................... 117
Rea rfoglamp ................................. 118
Reversing lamp .............................. 118
Tai llamp ........................................ 118
see Changing bulbs Index
5
Page 107 of 357
Useful information
i This Owner's Manual describes all mod-
els, series and optional equipment for your
vehicle that were available at the time of
going to press. Country-specific differen-
ces are possible. Note that your vehicle
may not be fitted with all features descri-
bed. This is also the case for systems and
functions relevant to safety.
i Read the information on qualified special-
ist workshops: (Y page 22). Exterior lighting
Important safety notes
For reasons of safety, Mercedes-Benz recom-
mends that you drive with the lights switched
on even during the daytime. In some coun-
tries, operation of the headlamps varies due
to legal requirements and self-imposed obli-
gations. Driving abroad
Converting to symmetrical dipped
beam If your journey takes you to countries where
vehicles are driven on the opposite side of the
road to the country in which the vehicle is
registered, your headlamps must be switched
to symmetrical dipped beam. This prevents
oncoming traffic from being dazzled. Sym-
metrical lights do not illuminate as large an
area of the edge of the carriageway.
Have the headlamps converted at a qualified
specialist workshop as close to the border as
possible before driving in these countries.
Converting to asymmetrical dipped
beam after returning Have the headlamps converted back to asym-
metrical dipped-beam headlamps at a quali- fied specialist workshop as soon as possible
after crossing the border again. Light switch
Operation !
Switch off the side lamps and dipped-
beam headlamps when you leave the vehi-
cle. This prevents the battery from dis-
charging.
! If the battery has been excessively dis-
charged, the side lamps or parking lamps
are automatically switched off to enable
the nex tengine start. Always park your
vehicle safely and sufficiently li taccording
to legal standards. Avoid the continuous
use of the Tside lamps for several
hours. If possible, switch on the Xright
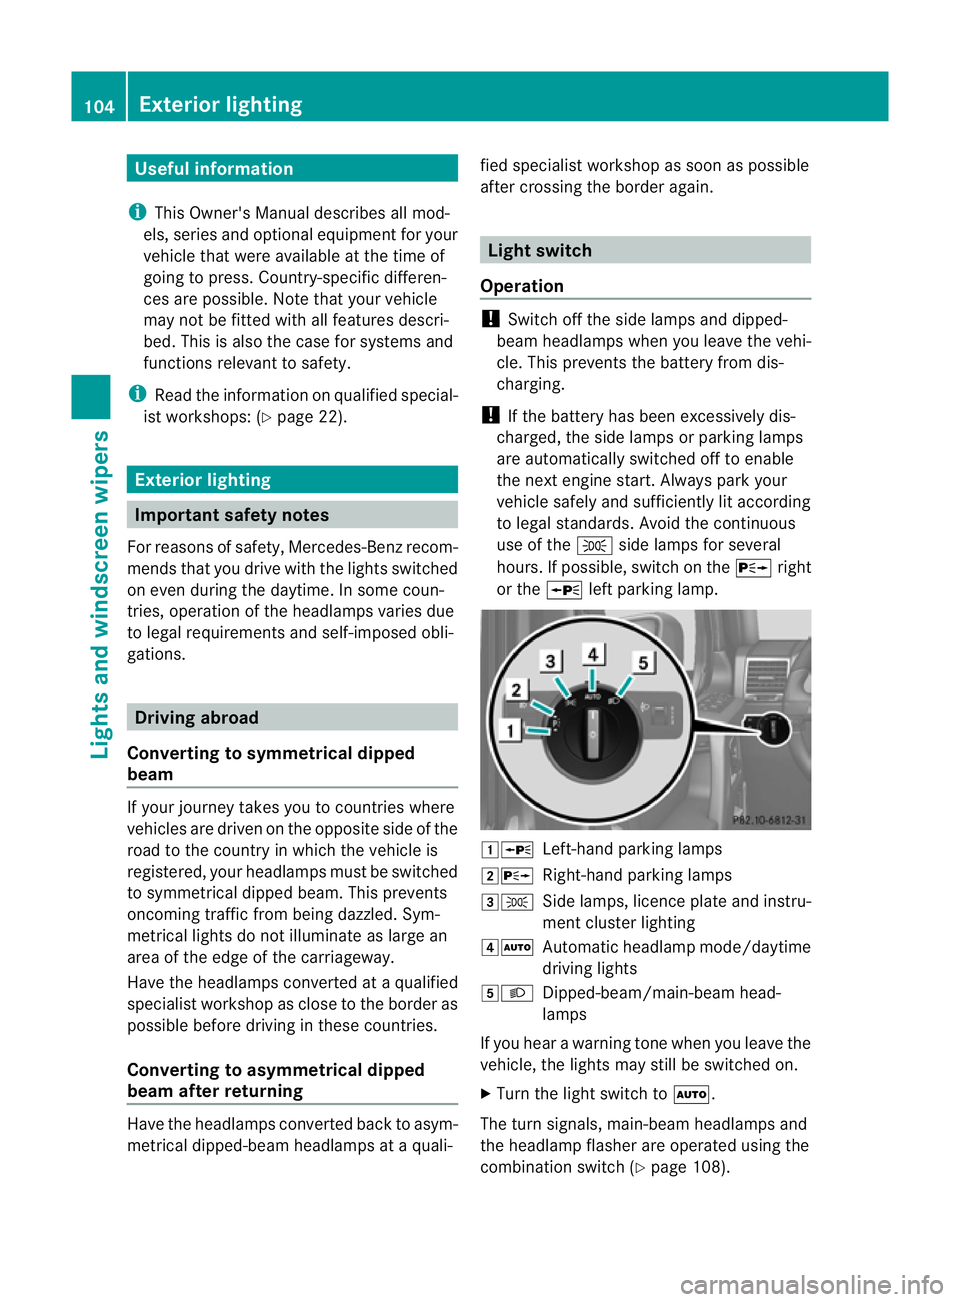
or the Wleft parking lamp. 1W
Left-hand parking lamps
2X Right-hand parking lamps
3T Side lamps, licence plate and instru-
ment cluster lighting
4Ã Automati cheadlamp mode/daytime
driving lights
5L Dipped-beam/main-beam head-
lamps
If you hear a warning tone when you leave the
vehicle, the lights may still be switched on.
X Turn the light switch to Ã.
The turn signals, main-beam headlamps and
the headlamp flasher are operated using the
combination switch (Y page 108).104
Exterior lightingLights and windscreen wipers
Page 114 of 357
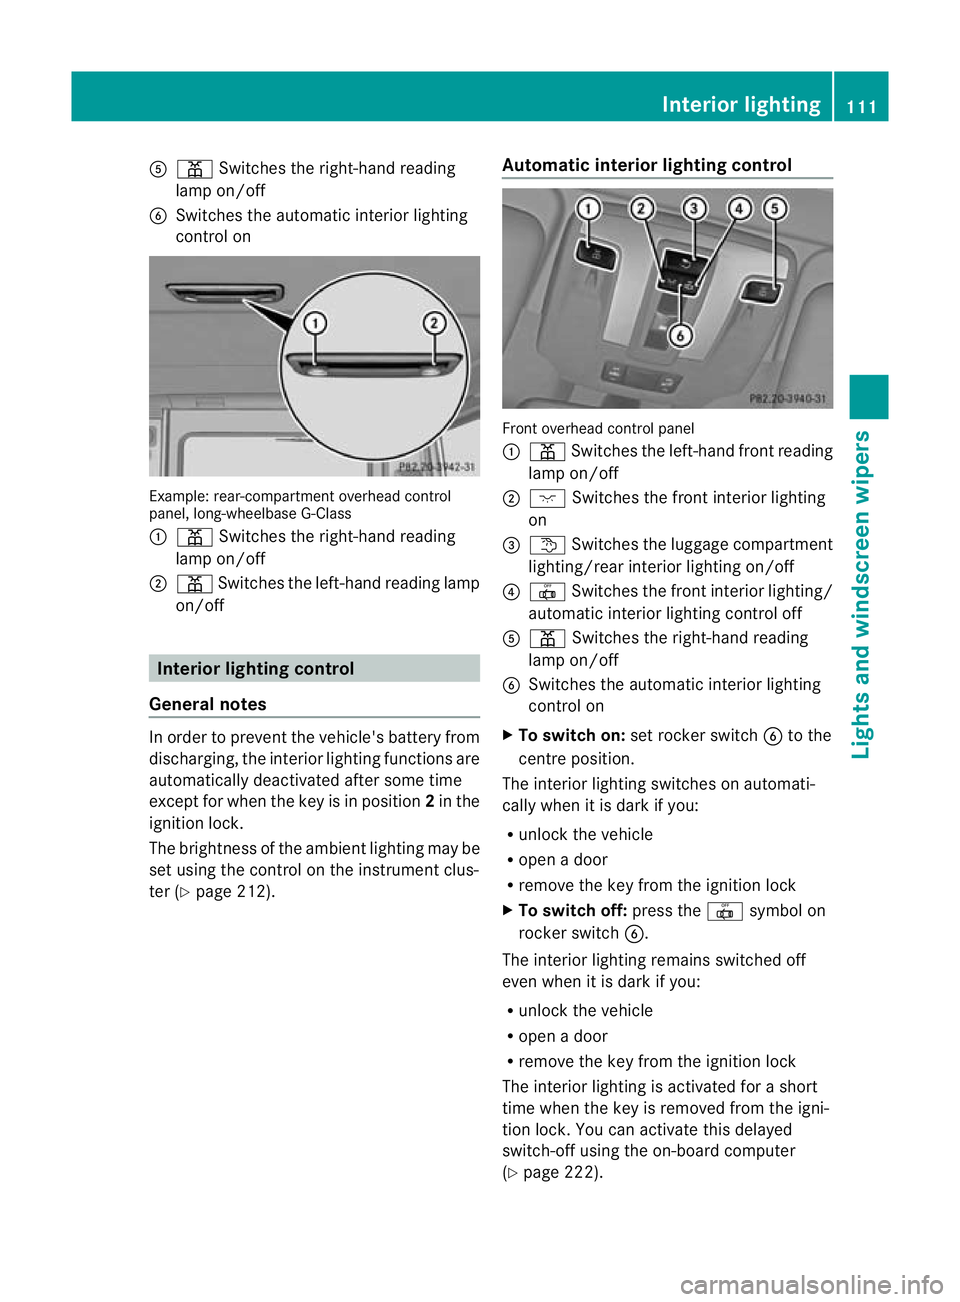
A
p Switches the right-hand reading
lamp on/off
B Switches the automatic interio rlighting
control on Example: rear-compartment overhead control
panel, long-wheelbase G-Class
: p Switches the right-hand reading
lamp on/off
; p Switches the left-hand reading lamp
on/off Interior lighting control
General notes In order to prevent the vehicle's battery from
discharging, the interior lighting functions are
automatically deactivated after some time
except for when the key is in position 2in the
ignition lock.
The brightness of the ambien tlighting may be
set using the control on the instrument clus-
ter (Y page 212). Automatic interior lighting control Front overhead control panel
:
p Switches the left-hand front reading
lamp on/off
; c Switches the front interior lighting
on
= t Switches the luggage compartment
lighting/rear interior lighting on/off
? | Switches the front interior lighting/
automatic interior lighting control off
A p Switches the right-hand reading
lamp on/off
B Switches the automatic interior lighting
control on
X To switch on: set rocker switch Bto the
centre position.
The interior lighting switches on automati-
cally when it is dark if you:
R unloc kthe vehicle
R open a door
R remove the key from the ignition lock
X To switch off: press the|symbol on
rocker switch B.
The interior lighting remains switched off
even when it is dark if you:
R unlock the vehicle
R open a door
R remove the key from the ignition lock
The interior lighting is activated for a short
time when the key is removed from the igni-
tion lock. You can activate this delayed
switch-off using the on-board computer
(Y page 222). Interior lighting
111Lights and windscreen wipers Z
Page 116 of 357
Front overhead control panel
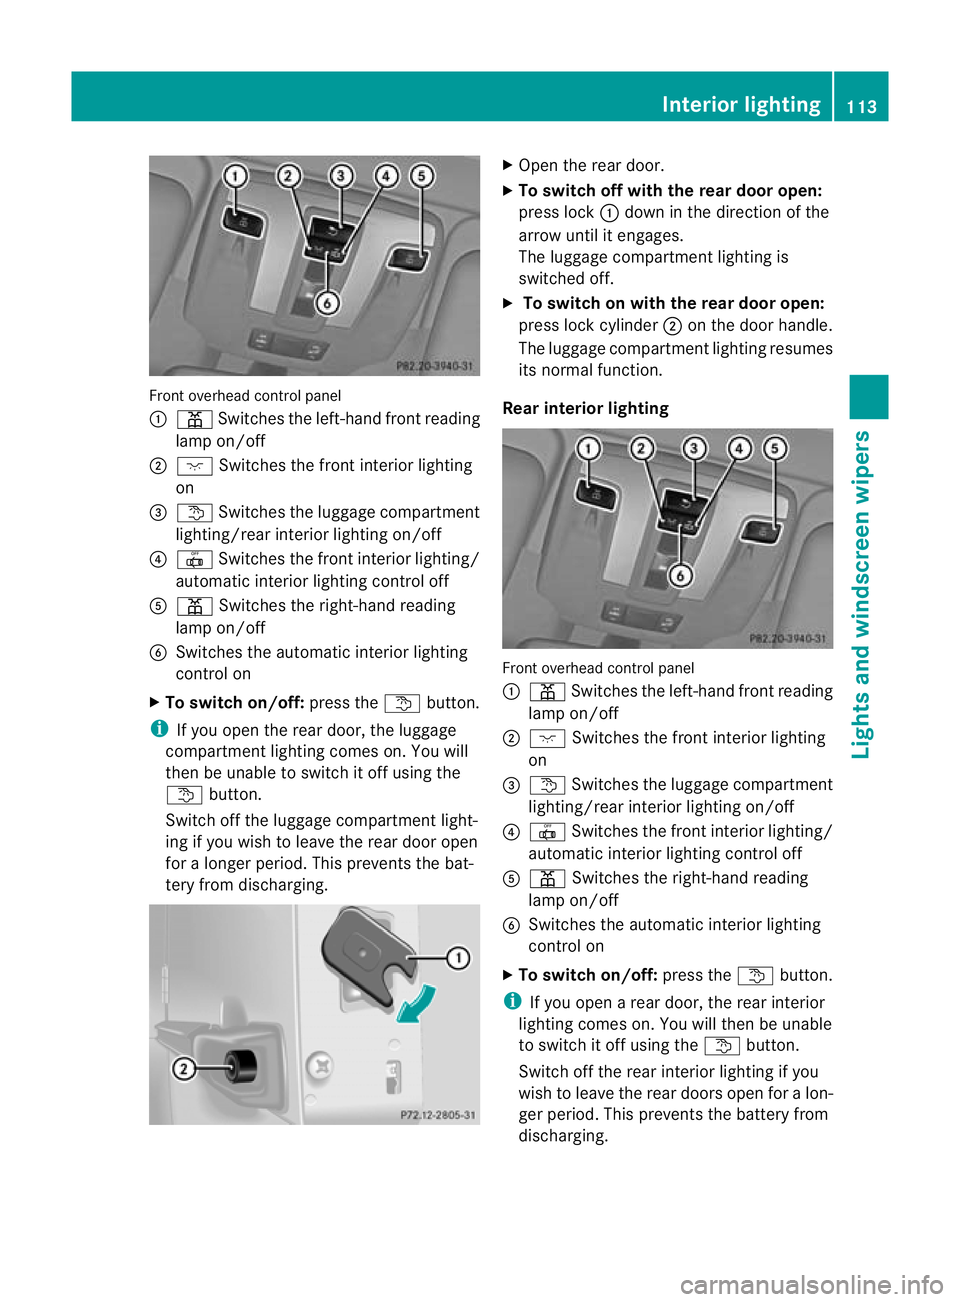
:
p Switches the left-hand front reading
lamp on/off
; c Switches the front interior lighting
on
= t Switches the luggage compartment
lighting/rea rinterior lighting on/off
? | Switches the front interio rlighting/
automatic interior lighting control off
A p Switches the right-hand reading
lamp on/off
B Switches the automatic interior lighting
control on
X To switch on/off: press thetbutton.
i If you open the rear door, the luggage
compartmen tlighting comes on. You will
the nbe unable to switch it off using the
t button.
Switch off the luggage compartment light-
ing if you wish to leave the rear door open
for a longer period. This prevents the bat-
tery from discharging. X
Open the rear door.
X To switch off with the rear door open:
press lock :down in the direction of the
arrow until it engages.
The luggage compartment lighting is
switched off.
X To switch on with the rear door open:
press lock cylinder ;on the door handle.
The luggage compartment lighting resumes
its normal function.
Rear interior lighting Front overhead control panel
:
p Switches the left-hand fron treading
lamp on/off
; c Switches the front interior lighting
on
= t Switches the luggage compartment
lighting/rear interior lighting on/off
? | Switches the fron tinterior lighting/
automatic interio rlighting control off
A p Switches the right-hand reading
lamp on/off
B Switches the automatic interior lighting
control on
X To switch on/off: press thetbutton.
i If you open a rear door, the rear interior
lighting comes on. You will the nbe unable
to switch it off using the tbutton.
Switch off the rear interior lighting if you
wish to leave the rear doors open for a lon-
ger period. This prevents the battery from
discharging. Interior lighting
113Lights and windscreen wipers Z
Page 167 of 357
boosting effect. You will require considerably
more effor
tto steer and brake. There is a risk
of an accident.
Do not switch off the ignition while driving.
Vehicles with automatic transmission X
Shift the transmission to position P.
X Turn the key to position 0in the ignition
lock (Y page 143) and remove it.
The immobiliser is activated.
X Apply the parking brake firmly.
X Turn the steering wheel until the steering
wheel lock engages.
i If you switch the engine off with the trans-
mission in position Ror D, the automatic
transmission shifts to Nautomatically.
If you then open one of the front doors or
remove the key from the ignition, the auto-
matic transmission shifts to P.
If you shift the automatic transmission to
N before switching off the engine, the auto-
matic transmission remains in Neven if a
door is opened.
i The key can only be removed if the auto-
matic transmission is in position P.Parking brake
i
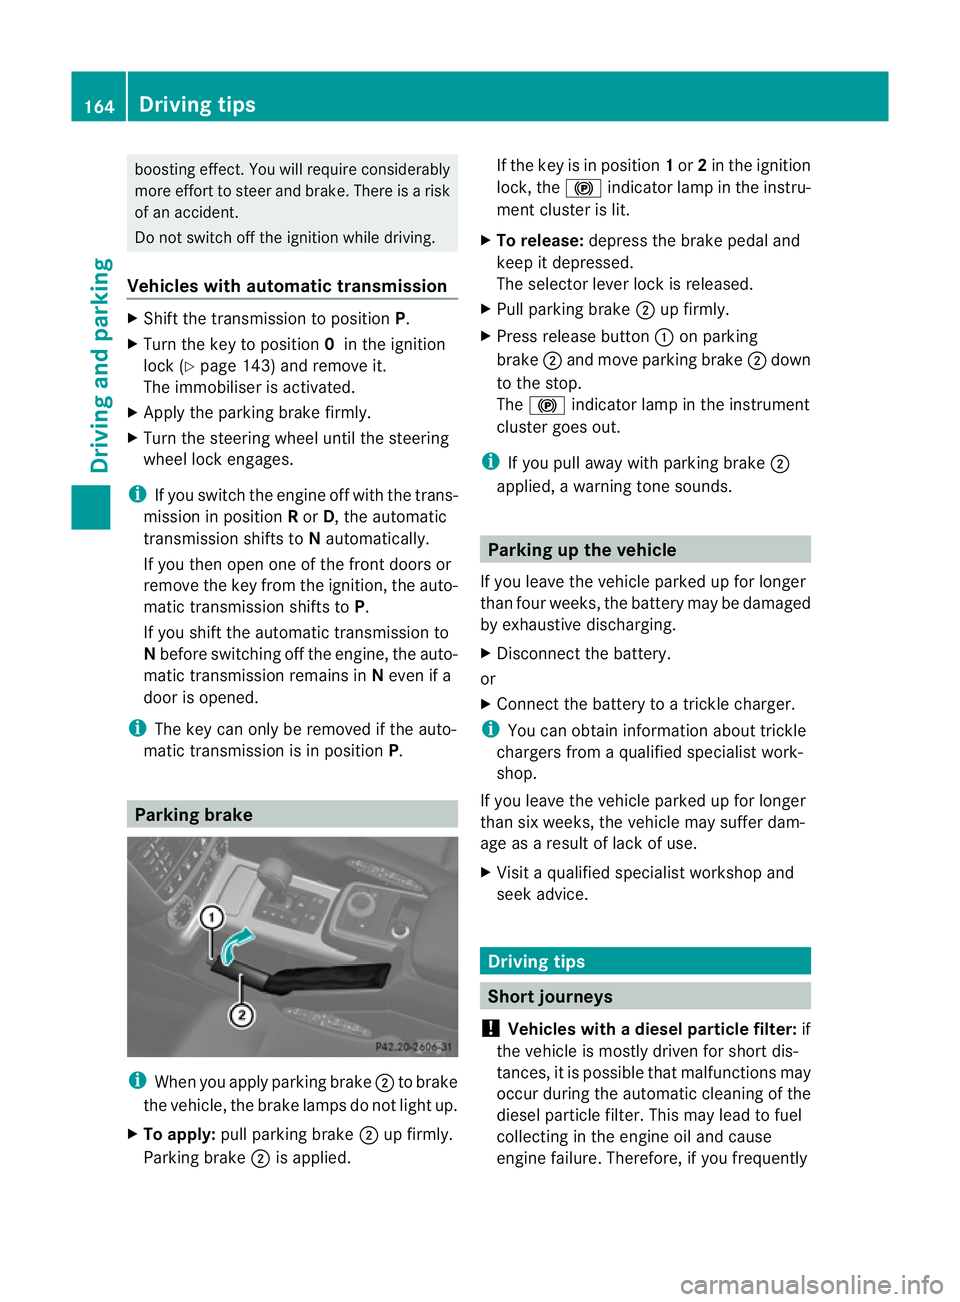
When you apply parking brake ;to brake
the vehicle, the brake lamps do not light up.
X To apply: pull parking brake ;up firmly.
Parking brake ;is applied. If the key is in position
1or 2in the ignition
lock, the !indicator lamp in the instru-
ment cluster is lit.
X To release: depress the brake pedal and
keep it depressed.
The selector lever lock is released.
X Pull parking brake ;up firmly.
X Press release button :on parking
brake ;and move parking brake ;down
to the stop.
The ! indicator lamp in the instrument
cluster goes out.
i If you pull away with parking brake ;
applied, a warning tone sounds. Parking up the vehicle
If you leave the vehicle parked up for longer
than four weeks, the battery may be damaged
by exhaustive discharging.
X Disconnect the battery.
or
X Connect the battery to a trickle charger.
i You can obtain information about trickle
chargers from a qualified specialist work-
shop.
If you leave the vehicle parked up for longer
than six weeks, the vehicle may suffer dam-
age as a result of lack of use.
X Visit a qualified specialist workshop and
seek advice. Driving tips
Short journeys
! Vehicles with adiesel particle filter: if
the vehicle is mostly driven for short dis-
tances, it is possible that malfunctions may
occur during the automatic cleaning of the
diesel particle filter. This may lead to fuel
collecting in the engine oil and cause
engine failure. Therefore, if you frequently 164
Driving tipsDriving and parking
Page 313 of 357
G
WARNING
During the charging process, a battery produ-
ces hydrogen gas. If a short circuit occurs or
sparks are created, the hydrogen gas can
ignite. There is a risk of an explosion.
R Make sure that the positive terminal of a
connected battery does not come into con-
tact with vehicle parts.
R Never place metal objects or tools on a bat-
tery.
R It is important that you observe the descri-
bed order of the battery terminals when
connecting and disconnecting a battery.
R When jump-starting, make sure that the
battery poles with identical polarity are
connected.
R It is particularly important to observe the
described order when connecting and dis-
connecting the jump leads.
R Never connect or disconnect the battery
terminals while the engine is running. G
WARNING
Electrostatic build-up can lead to the creation
of sparks, which could ignite the highly explo-
sive gases of a battery .There is a risk of an
explosion.
Before handling the battery, touch the vehicle
body to remove any existing electrostatic
build-up. G
WARNING
Battery acid is caustic. There is a risk of injury.
Avoid contact with the skin, eyes or clothing.
Do not inhale any battery gases. Do not lean
over the battery. Keep children away from
batteries. Wash battery acid immediately with
water and seek medical attention.
! Have the battery checked regularly at a
qualified specialist workshop.
Observe the service intervals in the Service
Booklet or contact a qualified specialist
workshop for more information. !
Always have work on the battery carried
out at a qualified specialist workshop.
Should it, in exceptional circumstances, be
absolutely necessary to disconnectt he bat-
tery yourself, please observe the following:
R switch off the engine and remove the
key. Check that all the indicator lamps in
the instrumentc luster are off.Otherwise,
you may damage electroni ccomponents
such as the alternator, for example.
R first, disconnect the negative terminal
clamp, followed by the positive terminal
clamp. Never swap the terminal clamps.
The vehicle electronics may otherwise be
damaged.
R on vehicles with automatic transmission,
the transmission is locked in position P
after disconnecting the battery. The vehi-
cle is secured against rolling away.Y ou
can then no longer move the vehicle.
The battery and the cover of the positive
terminal clamp must be fitted securely dur-
ing operation.
! Have the battery checked and, if neces-
sary, replaced at a qualified specialist
workshop every two years or at least every
20,000 km. H
Environmental note Batteries contain pollutants.
It is illegal to dispose of them
with the household rubbish.
They must be collected sep-
arately and disposed of in an
environmentally responsible
recycling system. Dispose of batteries in an
environmentally responsible
manner
.Take discharged
batteries to a qualified spe-
cialis tworkshop or to a col-
lection point for used batter-
ies. 310
Battery (vehicle)Breakdown assistance
Page 314 of 357
In order for the battery to achieve the maxi-
mum possible service life, it must always be
sufficiently charged.
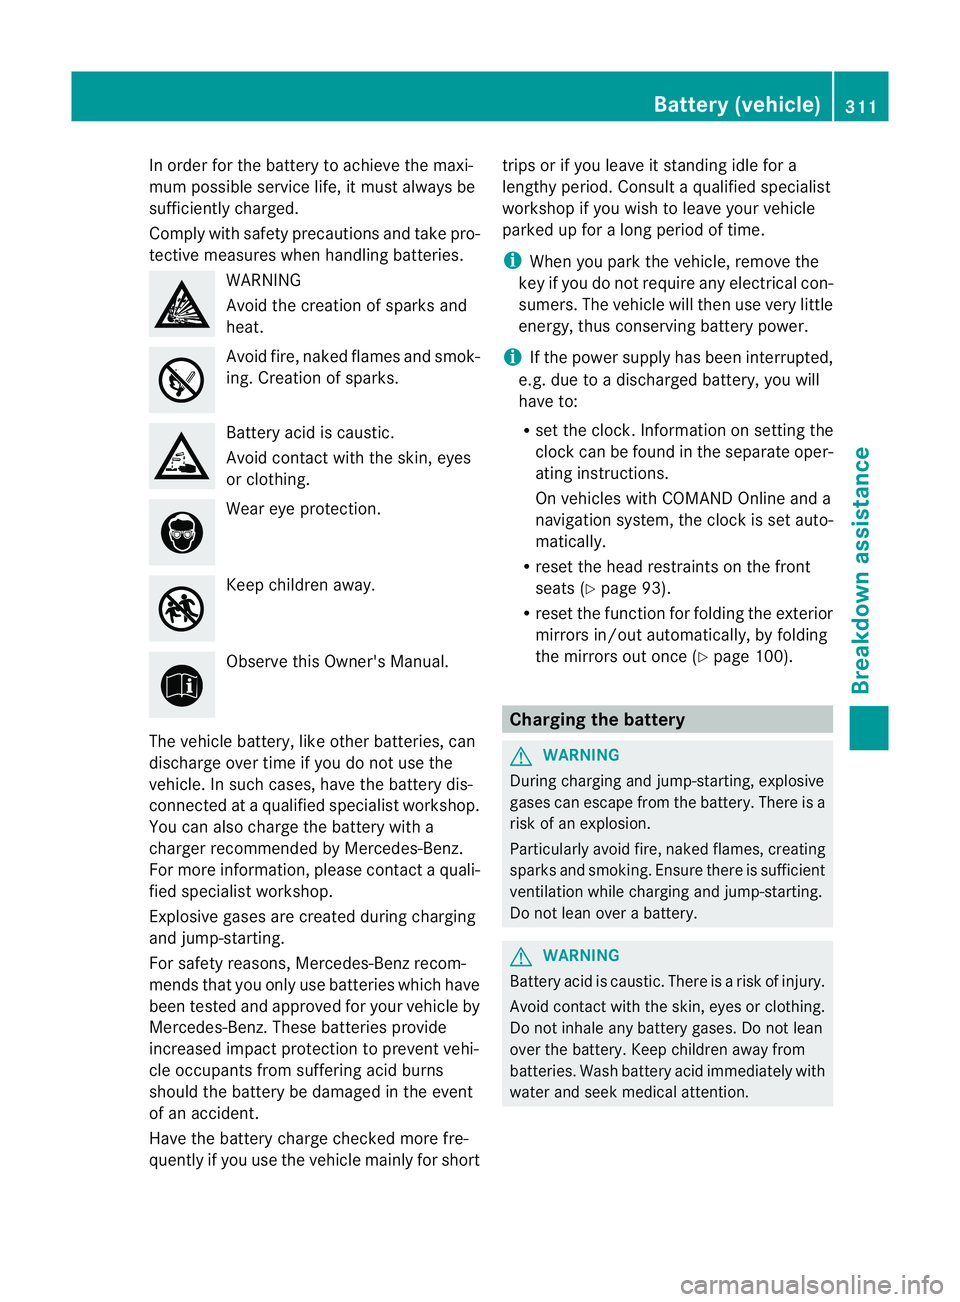
Comply with safety precautions and take pro-
tective measures when handling batteries. WARNING
Avoid the creation of sparks and
heat.
Avoid fire, naked flames and smok-
ing. Creation of sparks.
Battery acid is caustic.
Avoid contact with the skin, eyes
or clothing.
Wear eye protection.
Keep childre
naway. Observe this Owner's Manual.
The vehicle battery, like other batteries, can
discharge over time if you do not use the
vehicle. In such cases, have the battery dis-
connected at a qualified specialist workshop.
You can also charge the battery with a
charger recommended by Mercedes-Benz.
For more information, please contac taquali-
fied specialist workshop.
Explosive gases are created during charging
and jump-starting.
For safety reasons, Mercedes-Benz recom-
mends that you only use batteries which have
been tested and approved for your vehicle by
Mercedes-Benz .These batteries provide
increased impact protection to prevent vehi-
cle occupants from suffering acid burns
should the battery be damaged in the event
of an accident.
Have the battery charge checked more fre-
quently if you use the vehicle mainly for short trips or if you leave it standing idle for a
lengthy period. Consult a qualified specialist
workshop if you wish to leave your vehicle
parked up for a long period of time.
i
When you park the vehicle, remove the
key if you do not require any electrical con-
sumers. The vehicle will then use very little
energy, thus conserving battery power.
i If the power supply has been interrupted,
e.g. due to a discharged battery, you will
have to:
R set the clock. Information on setting the
clock can be found in the separate oper-
ating instructions.
On vehicles with COMAND Online and a
navigation system, the clock is set auto-
matically.
R reset the head restraints on the front
seats (Y page 93).
R reset the function for folding the exterior
mirrors in/out automatically, by folding
the mirrors out once (Y page 100). Charging the battery
G
WARNING
During charging and jump-starting, explosive
gases can escape from the battery. There is a
risk of an explosion.
Particularly avoid fire, naked flames, creating
sparks and smoking. Ensure there is sufficient
ventilation while charging and jump-starting.
Do not lean over a battery. G
WARNING
Battery acid is caustic. There is a risk of injury.
Avoid contact with the skin, eyes or clothing.
Do not inhale any battery gases. Do not lean
over the battery. Keep children away from
batteries. Wash battery acid immediately with
water and seek medical attention. Battery (vehicle)
311Breakdown assistance Z
Page 315 of 357
G
WARNING
A discharged battery can freeze at tempera-
tures below freezing point. When jump-start-
ing the vehicle or charging the battery, gases
can escape from the battery .There is a risk of
an explosion.
Allow the frozen battery to thaw out before
charging it or jump-starting.
! Only charge the installed battery with a
battery charger which has been tested and
approved by Mercedes-Benz. These battery
chargers allow the battery to be charged
while still installed in the vehicle.
! Only use battery chargers with a maxi-
mum charging voltage of 14.8 V.
! Only charge the battery using the jump-
start connection point.
Never charge a battery still installed in the
vehicle unless a battery charger unit
approved by Mercedes-Ben zis being used.
Ab attery charge runit specially adapted for
Mercedes-Benz vehicles and tested and
approved by Mercedes-Benz is available as an
accessory .Itpermits the charging of the bat-
tery in its installed position .Contact a
Mercedes-Benz Service Centre for informa-
tion and availability. Charge the battery in
accordance with the separate instructions for
the battery charger.
The jump-starting connection point is in the
engine compartment (Y page 313).
Read the battery charger's operating instruc-
tions before charging the battery.
X Open the bonnet (Y page 291).
X Connect the battery charger to the positive
terminal and earth point in the same order
as when connecting the donor battery in
the jump-starting procedure
(Y page 313). 312
Battery (vehicle)Breakdown assistance
Page 316 of 357
Jump-starting
G
WARNING
Battery acid is caustic. There is a risk of injury.
Avoid contact with the skin, eyes or clothing. Do not inhale any battery gases. Do not lean over
the battery. Keep children away from batteries. Wash battery acid immediately with water and
seek medical attention. G
WARNING
Gases escaping from the battery during jump-starting may cause minor explosions. Avoid cre-
ating sparks. Keep naked flames away from the battery, and do not smoke.
Comply with the important safety precautions when handling batteries. You will find these under
"Battery (vehicle) -important safety notes" in the index. G
WARNING
During charging and jump-starting, explosive gases can escape from the battery .There is a risk
of an explosion.
Particularly avoid fire, naked flames, creating sparks and smoking. Ensure there is sufficient
ventilation while charging and jump-starting. Do not lean over a battery. G
WARNING
During the charging process, a battery produces hydrogen gas. If a short circuit occurs or sparks
are created, the hydrogen gas can ignite. There is a risk of an explosion.
R Make sure that the positive terminal of a connected battery does not come into contact with
vehicle parts.
R Never place metal objects or tools on a battery.
R It is important that you observe the described order of the battery terminals when connecting
and disconnecting a battery.
R When jump-starting, make sure that the battery poles with identical polarity are connected.
R It is particularly important to observe the described order when connecting and disconnecting
the jump leads.
R Never connect or disconnect the battery terminals while the engine is running. G
WARNING
Ad ischarged battery can freeze at temperatures below freezing point .When jump-starting the
vehicle or charging the battery, gases can escape from the battery. There is a risk of an explosion.
Allow the frozen battery to thaw out before charging it or jump-starting. G
WARNING
Non-combusted fuel can collect in the exhaust system and ignite. There is a risk of fire. Avoid
repeated and lengthy starting attempts.
! Avoid repeated and lengthy starting attempts. Otherwise, non-combusted fuel may dam-
age the catalytic converter and create a risk of fire. Jump-starting
313Breakdown assistance Z
Page 317 of 357
Do not use a rapid charging device to start the vehicle.
Make sure the jump leads are not damaged.
Make sure the jump leads are not touching any other metal objects when they are connected
to the battery.
If the indicator/warning lamps do not ligh tup at temperatures around or below freezing point,
the discharged battery is likely to be frozen (a commonplace scenario). In this case, do not
jump-start the vehicle or recharge the battery.
Once the battery has thawed out, its service life may be dramatically reduced.
The starting characteristic scan be impaired, particularly at low temperatures.
It is recommended that you have the thawed out battery checked at a qualified specialist
workshop.
Do no tuse a rapid charging device to start the vehicle. If your vehicle's battery is discharged,
the engine can be jump-started from another vehicle or from a second battery using jump
leads. Observe the following points:
R The battery is not accessible in all vehicles. If the other vehicle's battery is not accessible,
jump-start the vehicle using a second battery or ajump-starting device.
R Vehicles with apetrol engine: only jump-star tthe vehicle when the engine and exhaust
system are cold.
R Do not start the engine if the battery is frozen. Let the battery thaw first.
R Jump-starting may only be performed from batteries with a nominal voltage of 12 V.
R Only use jump leads that have a sufficient cross-section and insulated terminal clamps.
R If the battery is fully discharged, leave the battery that is being used to jump-start connected
for a few minutes before attempting to start. This charges the empty battery a little.
R Make sure that the two vehicles do not touch.
Make sure that:
R The jump leads are not damaged.
R Non-insulated parts of the terminal clamps do not come into contact with other metal parts
while the jump leads are connected to the battery.
R The jump leads cannot come into contact with parts such as the pulley or the fan. These
parts move when the engine is started and while it is running.
X Apply the parking brake.
X Move the selector lever to P.
X Switch off all electrical consumers (e.g. radio, blower, etc.).
X Open the bonnet (Y page 291).314
Jump-startingBreakdown assistance