fuel cap MERCEDES-BENZ G-CLASS SUV 2012 Owners Manual
[x] Cancel search | Manufacturer: MERCEDES-BENZ, Model Year: 2012, Model line: G-CLASS SUV, Model: MERCEDES-BENZ G-CLASS SUV 2012Pages: 357, PDF Size: 8.86 MB
Page 12 of 357
ECO start/stop function
Deactivating/activatin g................. 146
General information .......................145
Electronic Stability Program
see ESP ®
(Electroni cStability Program)
Electronic Traction System
see 4ETS (Electronic Traction System)
Emergenc yclosing
Sof ttop ............................................ 82
Emergency key element
Function/notes ................................ 70
General notes .................................. 70
Removing ......................................... 70
Emergency locking
Vehicle ............................................. 75
Emergency unlocking
Vehicle ............................................. 74
Engine
Display message ............................ 237
ECO start/stop function ................145
Engine number ............................... 341
Jump-starting ................................. 313
Running irregularl y......................... 148
Starting problems ..........................148
Starting the engine with the key ....144
Stopping ........................................ 163
Warning lamp (engine diagnostics) 259
Engine electronics
Notes ............................................. 339
Problem (fault) ............................... 148
Engine oil
Additives ........................................ 346
Checking the oil level ..................... 291
Display message ............................ 239
Filling capacity ............................... 346
Notes about oil grades ................... 345
Temperature (on-board computer) .225
Topping up ..................................... 293
Viscosity ........................................ 346
Environmental protection
Note ................................................ .20
Returning an end-of-life vehicle .......20
ESP ®
(Electronic Stability Pro-
gram) AMG menu (on-board computer) ...226
Deactivating/activating ...................63
Display message ............................ 229Function/notes ................................ 62
Important safety guidelines
.............62
Trailer stabilisatio n.......................... 63
Warning lamp ................................. 256
Exhaus ttail pipe (cleaning instruc-
tions) .................................................. 299
Exterior lighting see Lights
Exterior mirrors
Adjusting ......................................... 99
Anti-dazzle mode (automatic) ........100
Folding in/ou t(automatically) .......100
Folding in/ou t(electrically) .............99
Folding in whe nlocking (on-board
computer) ...................................... 225
Out of position (troubleshooting) ...100
Parking position ............................. 101
Resetting ....................................... 100
Storing settings (memory function) 102 F
Faul tmessage
see Display messages
Filler cap
see Fuel filler flap
Fire extinguisher ............................... 305
First-aid kit ......................................... 305
Fitting awheel
Removing awheel .......................... 332
Fitting wheels
Fitting awheel ............................... 332
Raising the vehicle .........................330
Securing the vehicle against roll-
ing away ........................................ 330
Flat tyre
Preparing the vehicle .....................309
Floormat ............................................ .286
Foglamps Switching on/off ........................... 106
Folding the seat backrest (rear)
forwards/back .................................. 269
Frequencies Garage door opene r....................... 283
Mobile phone ................................. 339
Two-way radio ................................ 339
Fron tfoglam p(display message) ....236 Index
9
Page 13 of 357
Front-passenger seat
Display message ............................ 249
Fuel
Additives ........................................ 343
Consumption statistics ..................215
Displaying the current consump-
tion ................................................ 215
Displaying the range ......................215
Fuel gauge ..................................... 211
Grade (petrol) ................................ 342
Important safety notes ..................341
Notes for AMG vehicles .................343
Premium-grade unleaded petrol ..... 342
Problem (malfunction) ...................159
Quality (diesel )............................... 343
Refuelling ...................................... .156
Tank content/reserve fuel .............342
Fuel/water separator
Service .......................................... .295
Fuel filler flap
Emergency release ........................158
Opening/closing ............................ 157
Fuel filte r(white display message) .240
Fuel level Calling up the range (on-board
computer) ...................................... 215
Gauge ............................................ 211
Fuel reserve
see Fuel
Fuel tank
Capacity ........................................ 342
Problem (malfunction) ...................159
Fuse allocation chart ........................318
Fuse box Battery case ................................... 320
Dashboard ..................................... 319
Front-passenger footwell ...............319
Transmission tunnel ....................... 319
Fuse extractor ................................... 318
Fuses Allocation chart ............................. 318
Before changing ............................. 318
Dashboard fuse box .......................319
Fuse allocation chart .....................318
Fuse box in the front-passenger
footwell .......................................... 319
Fuse box in the transmission tun-
nel ................................................. 319Important safety notes
..................318
In the battery case .........................320 G
Garage door opener Clearing the memory .....................283
Frequencies ................................... 283
Important safety notes ..................280
Opening/closing the garage door ..282
Programming the remote control ...280
Gear indicator (on-board computer) 225
Gearshift program SETUP (on-board computer) ..........226
Genuine Mercedes-Benz parts .........338
Genuine wood trim and trim strips
(cleaning instructions) ......................300
Glove compartment ..........................267
Gradient-climbing capability (max-
imum) ................................................. 173 H
Hazard warning lamps ......................109
Headlamp Cleaning system (function) ............108
Cleaning system (notes) ................347
Headlamps
Cleaning ......................................... 298
Misting up ...................................... 110
Topping up the cleaning system ....294
see Automatic headlamp mode
Head restraints
Adjusting ......................................... 92
Adjusting (rear) ................................ 93
Fitting/removing (rear) ....................93
Luxury .............................................. 92
Resetting (front) ............................... 93
Heating
see Climate control
High-pressure cleaners ....................296
Hill start assist .................................. 145
HOLD function Function/notes ............................. 19610
Index
Page 160 of 357
would result in damage to the fuel system and
engine, which could lead to a vehicle fire.
! Do not use petrol to refuel vehicles with a
diesel engine. Do not use diesel to refuel
vehicles with a petrol engine. Even small
amounts of the wrong fuel result in damage
to the fuel system and the engine.
! Do not switch on the ignition if you acci-
dentally refuel with the wrong fuel. Other-
wise, the fuel will enter the fuel lines .Notify
a qualified specialist workshop and have
the fuel tank and fuel lines drained com-
pletely.
! Overfilling the fuel tank could damage the
fuel system.
! Take care not to spill any fuel on painted
surfaces. You could otherwise damage the
paintwork.
! Use a filter when adding fuel from a fuel
can. The fuel lines and/or the diesel injec-
tion system could otherwise be blocked by
particles from the fuel can.
For further information on fuel and fuel quality
(Y page 341). Refuelling
Fuel filler flap !
AdBlue ®
is not a fuel additive and must
not be added to the fuel tank.IfA dBlue®
is
added to the fuel tank, this can lead to
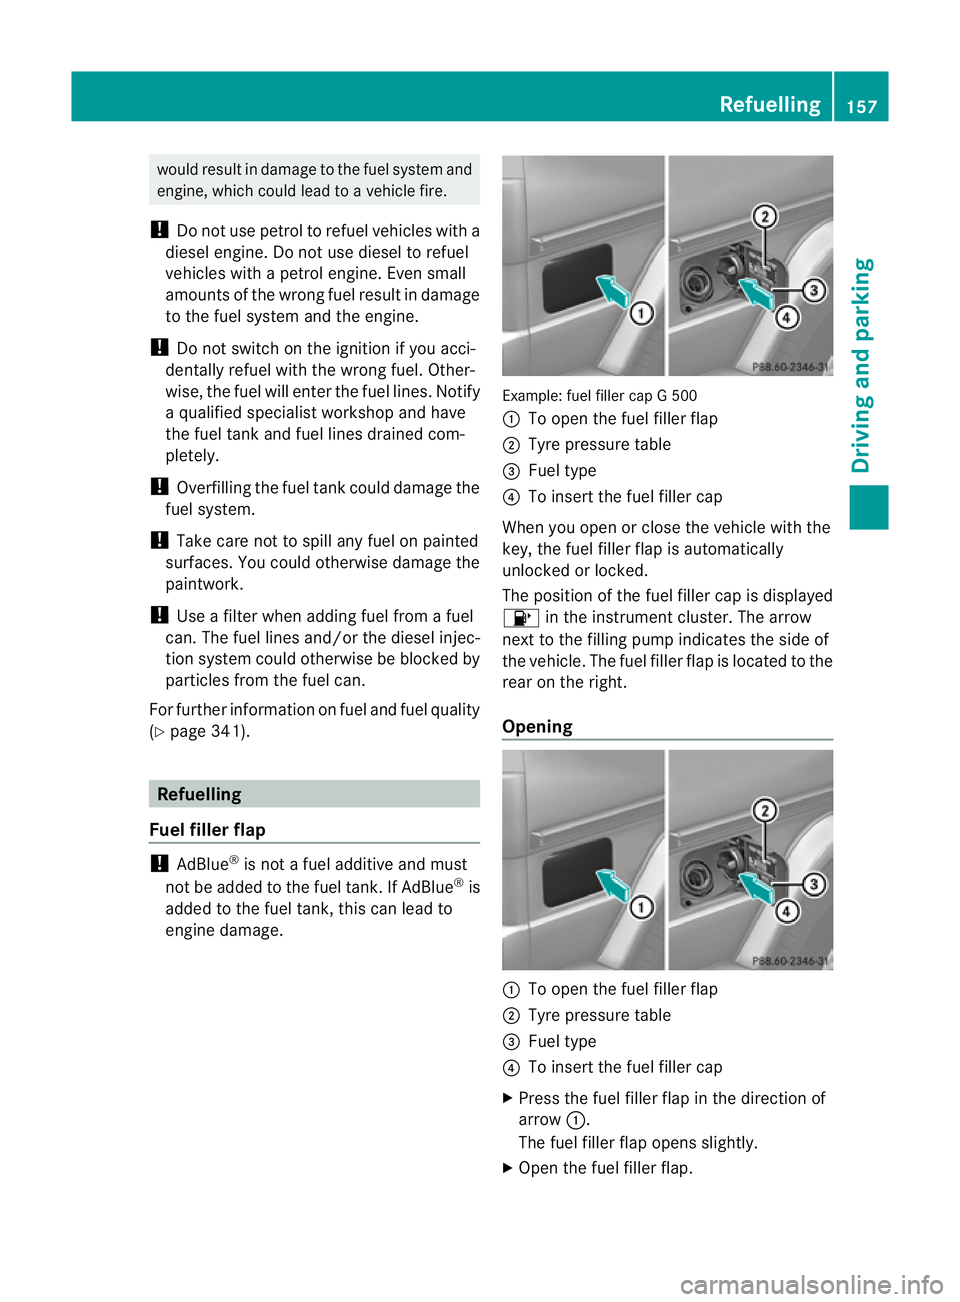
engine damage. Example: fuel filler cap G 500
:
To open the fuel filler flap
; Tyre pressure table
= Fuel type
? To insert the fuel filler cap
When you open or close the vehicle with the
key, the fuel filler flap is automatically
unlocked or locked.
The position of the fuel filler cap is displayed
8 in the instrument cluster. The arrow
nex tto the filling pump indicates the side of
the vehicle. The fuel filler flap is located to the
rear on the right.
Opening :
To open the fuel filler flap
; Tyre pressure table
= Fuel type
? To insert the fuel filler cap
X Press the fuel filler flap in the direction of
arrow :.
The fuel filler flap opens slightly.
X Open the fuel filler flap. Refuelling
157Driving and parking Z
Page 161 of 357
X
Turn the fuel filler cap anti-clockwise and
remove it.
AdBlue ®
vehicles: do not confuse the fuel
filler cap with the blue AdBlue ®
filler cap.
X Insert the fuel filler cap into the holder
bracket on the inside of filler flap ?.
i AdBlue ®
vehicles do not have a bracket
on the inside of the filler flap.
X Completely insert the filler neck of the fuel
pump nozzle into the tank and refuel.
i Do not add any more fuel after the pump
stops filling for the first time. Otherwise,
fuel may leak out.
Closing X
Replace the fuel filler cap and turn it clock-
wise. The fuel filler cap audibly engages.
X Press the fuel filler flap closed until it
engages. Fuel filler flap emergency release
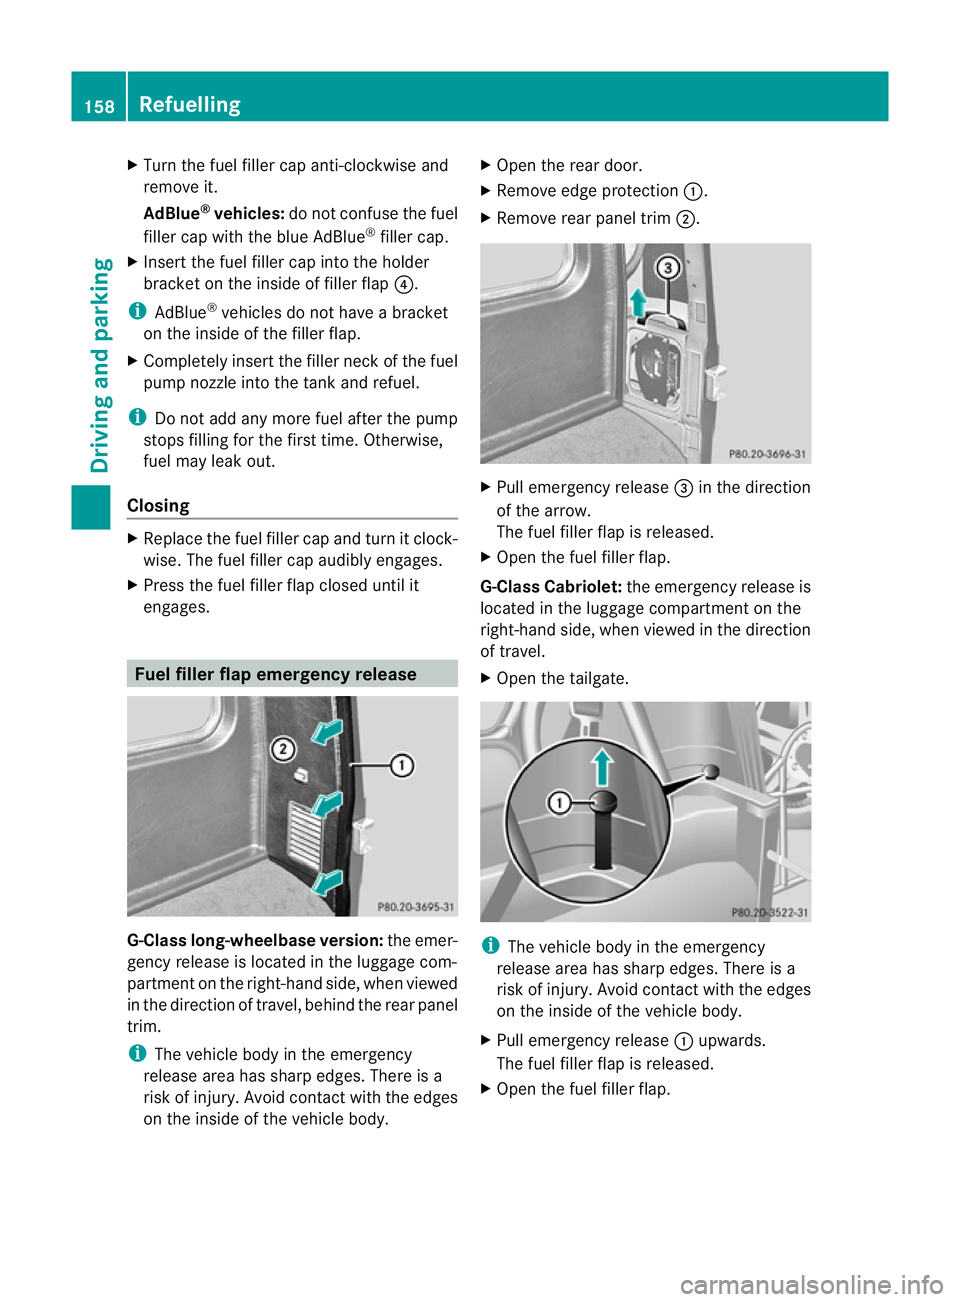
G-Class long-wheelbase version:
the emer-
gency release is located in the luggage com-
partmen tonthe right-hand side, when viewed
in the direction of travel, behind the rear panel
trim.
i The vehicle body in the emergency
release area has sharp edges. There is a
risk of injury. Avoid contact with the edges
on the inside of the vehicle body. X
Open the rear door.
X Remove edge protection :.
X Remove rear panel trim ;. X
Pull emergency release =in the direction
of the arrow.
The fuel filler flap is released.
X Open the fuel filler flap.
G-Class Cabriolet: the emergency release is
located in the luggage compartmentont he
right-hand side, when viewed in the direction
of travel.
X Open the tailgate. i
The vehicle body in the emergency
release area has sharp edges. There is a
risk of injury. Avoid contact with the edges
on the inside of the vehicle body.
X Pull emergency release :upwards.
The fuel filler flap is released.
X Open the fuel filler flap. 158
RefuellingDriving and parking
Page 163 of 357
AdBlue
®
Important notes on use To function properly, BlueTEC exhaust gas
aftertreatment 1
mus tbe operated with the
reducing agent AdBlue ®
.
When the supply of AdBlue ®
is almost used
up, the Refill AdBlue See Owner's Man‐
ual message is shown in the multifunction
display. Awarning tone also sounds.
If the Refill AdBlue No start in: .. km message is shown in the multifunction dis-
play, you can still driv ethe vehicle over the
distance shown. Awarning tone also sounds.
If the AdBlue ®
is no ttopped up, you will sub-
sequently be unable to start the engine.
After receiving the warning message, it is
preferable to fill the AdBlue ®
tank with
10 litres of AdBlue ®
.Int his way, you can
ensure that the AdBlue ®
supply lasts until the
next regular service date.
Further information about BlueTEC exhaust
gas aftertreatment and about AdBlue ®
can
be obtained from any Mercedes-Ben zService
Centre.
Topping up AdBlue ®!
Only use AdBlue ®
in accordance with
ISO 22241. Do not mix any additives with
AdBlue ®
, and do not dilute AdBlue ®
with
water. This may destroy the BlueTEC
exhaust gas aftertreatmen tsystem.
! In order to fill the AdBlue ®
tank, the vehi-
cle mus tbe parked on a level surface. The
AdBlue ®
tank can only be filled as intended
with the vehicle parked on a level surface.
Fluctuations in capacity will thus be avoi-
ded. Filling a vehicle standing on an uneven
surface is not permitted. There is a danger
of overfilling, which can cause damage to
BlueTEC exhaust gas aftertreatmen tcom-
ponents. !
Do not fill the AdBlue ®
container with a
pump nozzle.
! If there are steep gradients while driving
off-road, a sufficient filling level in the
AdBlue ®
tank must be ensured. Make sure
for this reason that there is a minimum fill
level of ten litres before driving off-road.
! Surfaces which have come into contact
with AdBlue ®
while refilling should be
rinsed immediately with water, or remove
AdBlue ®
with a moist cloth and cold water.
If AdBlue ®
has already crystallised, use a
sponge and cold water to clean the area.
AdBlue ®
residue crystallises after a certain
amount of time and soils the affected sur-
faces.
! AdBlue ®
is not a fuel additive and must
not be added to the fuel tank.IfA dBlue®
is
added to the fuel tank, this can lead to
engine damage.
If you open the AdBlue ®
tank cap, small
amounts of ammonia vapour may be
released.
Ammonia vapours have a pungen todour and
are particularly irritating to:
R skin
R mucous membranes
R eyes
You may experience a burning sensation in
your eyes, nose and throat, as well as cough-
ing and watering of the eyes.
Do not inhale any ammonia vapours that may
be released. Fill the AdBlue ®
tank only in well-
ventilated areas.
1 BlueTEC vehicles only. 160
RefuellingDriving and parking
Page 164 of 357
AdBlue
®
must not come into contact with
your skin, eyes or clothing.
R If you ge tAdBlue ®
in your eyes or on your
skin, rinse thoroughly without delay using
clear water.
R If AdBlue ®
has been swallowed, rinse your
mouth out immediately with plenty of clean
water, and drink plenty of water.
R Change immediately out of clothing conta-
minated with AdBlue ®
.
R If you notice allergic reactions, visit a doc-
tor immediately.
Keep AdBlue ®
away from children.
Have the AdBlue ®
tank refilled at a qualified
specialist workshop. However, you can also
top up the AdBlue ®
tank:
R with AdBlue ®
refill bottles
R with an AdBlue ®
refill canister
If the outside temperature is below Ò11 †, it
may be difficult to top up. If AdBlue ®
is frozen
and there is an active warning indicator, top-
ping up may not be possible. Park the vehicle
in a warm place, e.g. in a garage, until
AdBlue ®
has become liquid again. Topping up
is then possible again. Alternatively, have the
AdBlue ®
tank refilled at a qualified specialist
workshop.
Have the AdBlue ®
supply checked at a quali-
fied specialist workshop before the following
types of journeys:
R journeys abroad outside of Europe
R off-road driving
X If necessary, have AdBlue ®
topped up.
Before a longer stay outside of Europe, con-
sult a qualified specialist workshop.
For further information on AdBlue ®
, see
(Y page 345). Opening the AdBlue
®
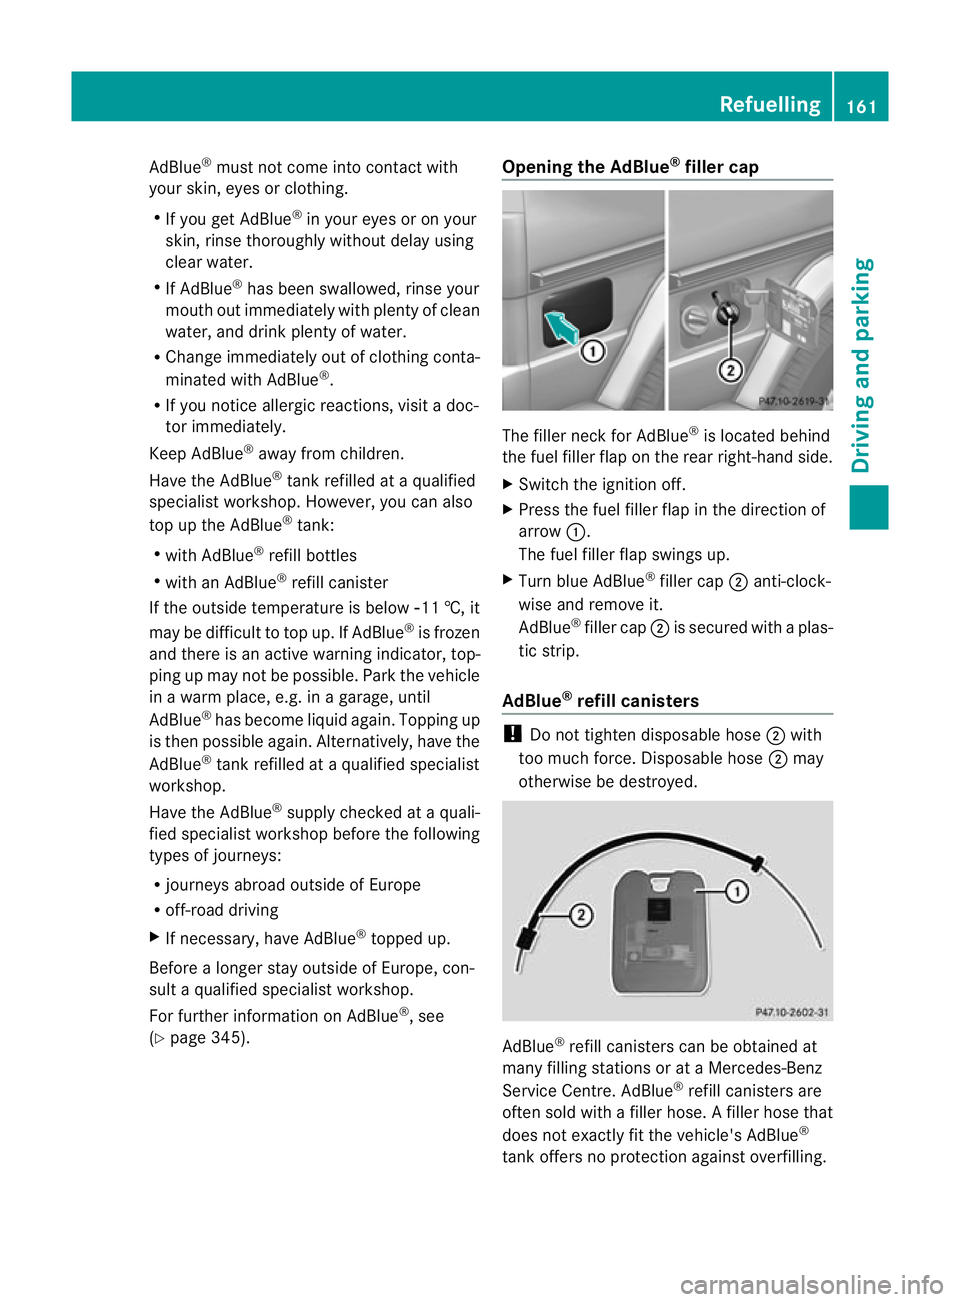
filler cap The filler neck for AdBlue
®
is located behind
the fuel filler flap on the rear right-hand side.
X Switch the ignition off.
X Press the fuel filler flap in the direction of
arrow :.
The fuel filler flap swings up.
X Turn blue AdBlue ®
filler cap ;anti-clock-
wise and remove it.
AdBlue ®
filler cap ;is secured with a plas-
tic strip.
AdBlue ®
refill canisters !
Do not tighten disposable hose ;with
too much force. Disposable hose ;may
otherwise be destroyed. AdBlue
®
refill canisters can be obtained at
many filling stations or at a Mercedes-Benz
Service Centre. AdBlue ®
refill canisters are
often sold with a filler hose. Afiller hose that
does not exactly fit the vehicle's AdBlue ®
tank offers no protection against overfilling. Refuelling
161Driving and parking Z
Page 165 of 357
AdBlue
®
may leak ou tas a result of overfilling.
Mercedes-Benz offers a special disposable
hose with overfill protection. You can obtain
this from any Mercedes-Benz Service Centre.
AdBlue ®
is available in a variety of containers
and receptacles. Only use the disposable
hose with Mercedes-Benz AdBlue ®
refill can-
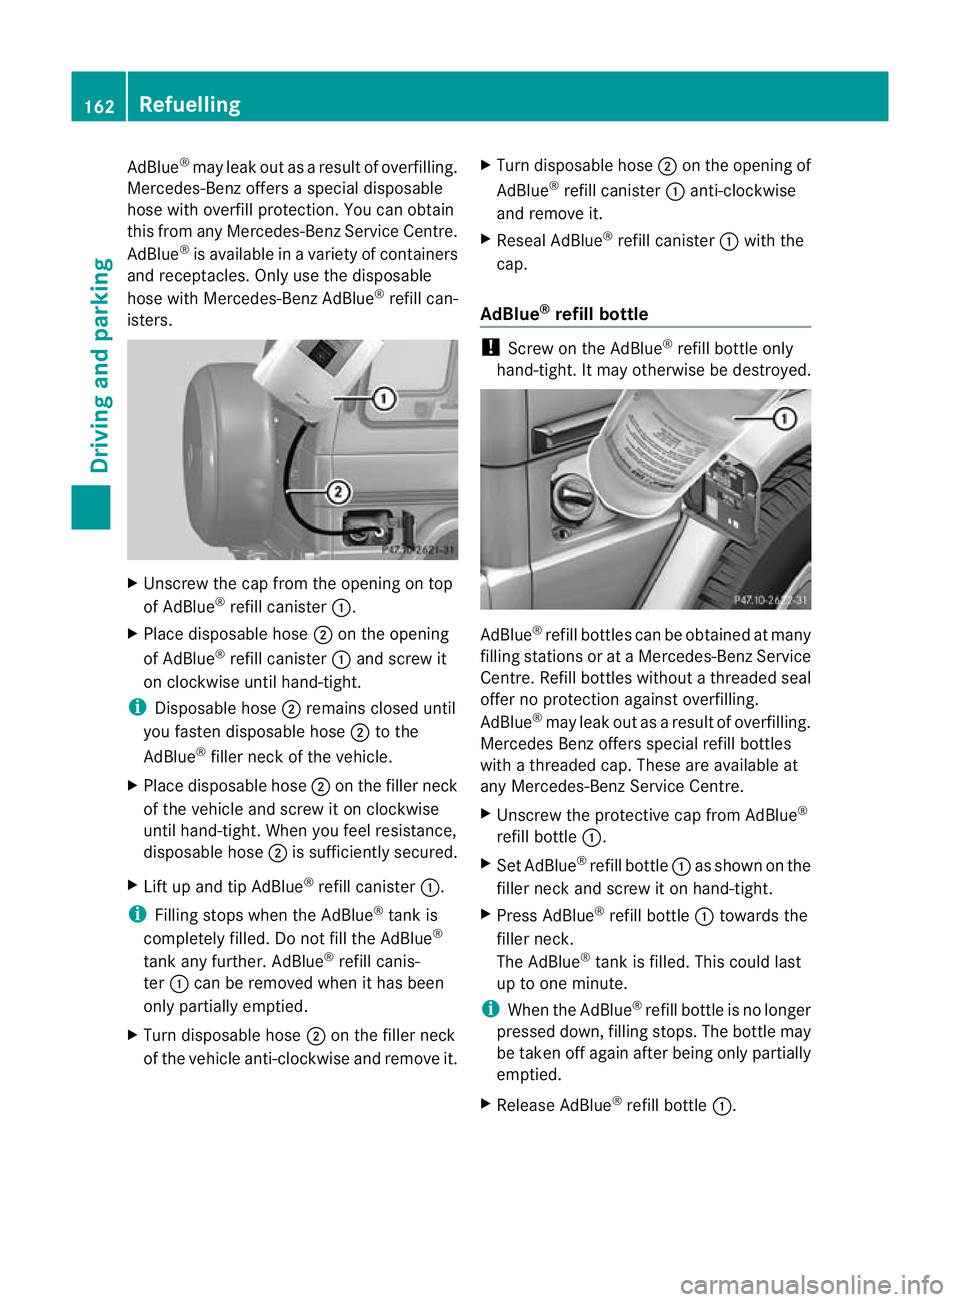
isters. X
Unscrew the cap from the opening on top
of AdBlue ®
refill canister :.
X Place disposable hose ;on the opening
of AdBlue ®
refill canister :and screw it
on clockwise until hand-tight.
i Disposable hose ;remains closed until
you fasten disposable hose ;to the
AdBlue ®
filler neck of the vehicle.
X Place disposable hose ;on the filler neck
of the vehicle and screw it on clockwise
until hand-tight. When you feel resistance,
disposable hose ;is sufficiently secured.
X Lift up and tip AdBlue ®
refill canister :.
i Filling stops when the AdBlue ®
tank is
completely filled. Do not fill the AdBlue ®
tank any further. AdBlue ®
refill canis-
ter :can be removed when it has been
only partially emptied.
X Turn disposable hose ;on the filler neck
of the vehicle anti-clockwise and remove it. X
Turn disposable hose ;on the opening of
AdBlue ®
refill canister :anti-clockwise
and remove it.
X Reseal AdBlue ®
refill canister :with the
cap.
AdBlue ®
refill bottle !
Screw on the AdBlue ®
refill bottle only
hand-tight. It may otherwise be destroyed. AdBlue
®
refill bottles can be obtained at many
filling stations or at aMercedes-BenzS ervice
Centre. Refill bottles without a threaded seal
offer no protection against overfilling.
AdBlue ®
may leak out as a result of overfilling.
Mercedes Benzo ffers special refill bottles
with a threaded cap. These are available at
any Mercedes-Benz Service Centre.
X Unscrew the protective cap from AdBlue ®
refill bottle :.
X Set AdBlue ®
refill bottle :as show nonthe
filler neck and screw it on hand-tight.
X Press AdBlue ®
refill bottle :towards the
filler neck.
The AdBlue ®
tank is filled. This could last
up to one minute.
i When the AdBlue ®
refill bottle is no longer
pressed down, filling stops. The bottle may
be taken off again after being only partially
emptied.
X Release AdBlue ®
refill bottle :.162
RefuellingDriving and parking
Page 166 of 357
X
Turn AdBlue ®
refill bottle :anti-clockwise
and remove it.
X Screw the protective cap onto AdBlue ®
refill bottle :again.
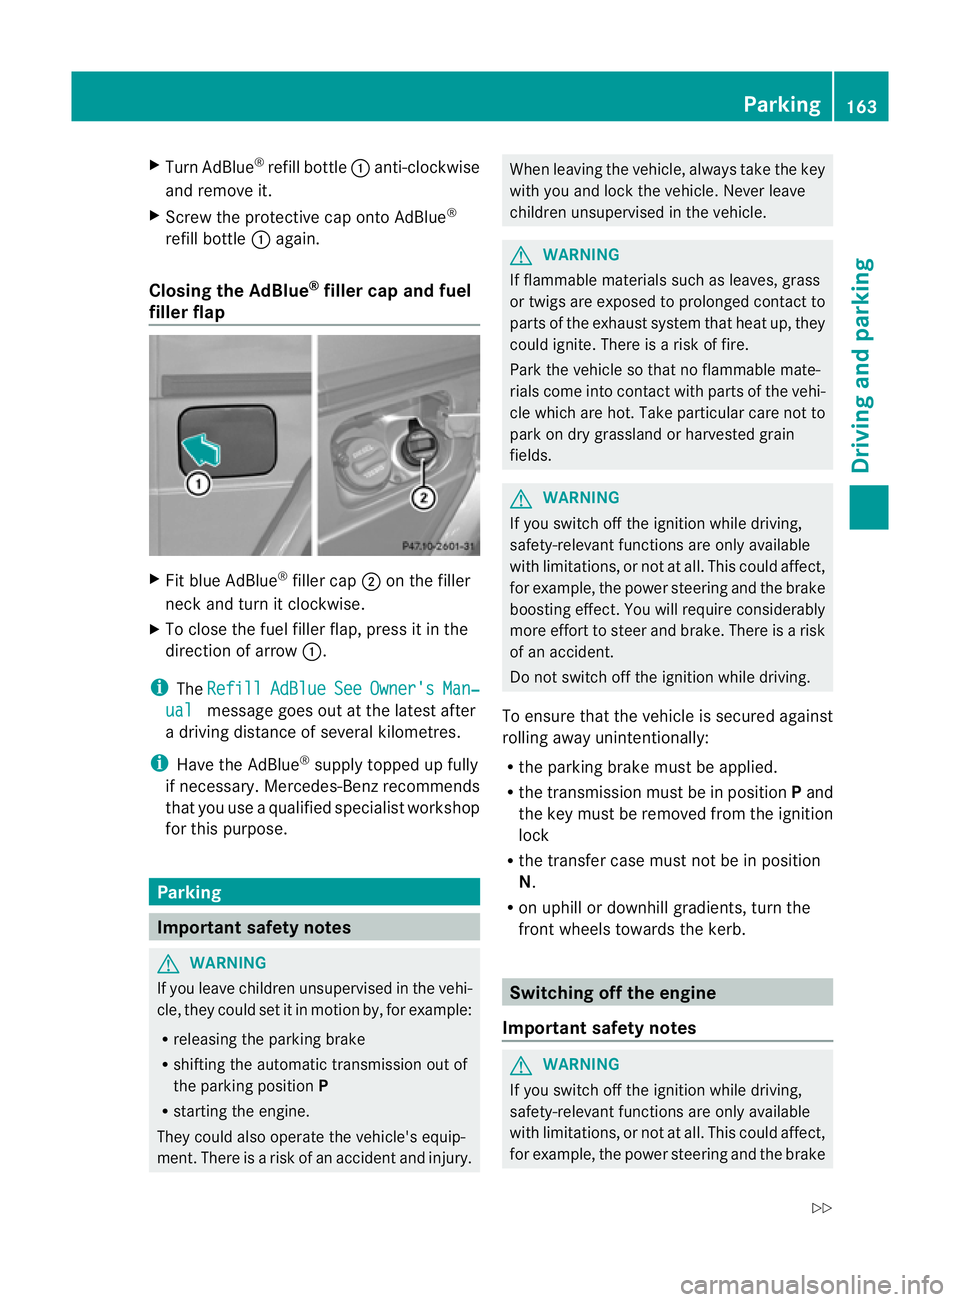
Closing the AdBlue ®
filler cap and fuel
filler flap X
Fit blue AdBlue ®
filler cap ;on the filler
neck and turn it clockwise.
X To close the fuel filler flap, press it in the
direction of arrow :.
i The Refill AdBlue See Owner's Man‐
ual message goes out at the latest after
a driving distance of several kilometres.
i Have the AdBlue ®
supply topped up fully
if necessary. Mercedes-Benz recommends
that you use a qualified specialist workshop
for this purpose. Parking
Important safety notes
G
WARNING
If you leave children unsupervised in the vehi-
cle, they could set it in motion by, for example:
R releasing the parking brake
R shifting the automatic transmission out of
the parking position P
R starting the engine.
They could also operate the vehicle's equip-
ment.T here is a risk of an accident and injury. When leaving the vehicle, always take the key
with you and lock the vehicle. Never leave
children unsupervised in the vehicle.
G
WARNING
If flammable materials such as leaves, grass
or twigs are exposed to prolonged contact to
parts of the exhaust system that heat up, they
could ignite. There is a risk of fire.
Park the vehicle so that no flammable mate-
rials come into contact with parts of the vehi-
cle which are hot. Take particular care not to
park on dry grassland or harvested grain
fields. G
WARNING
If you switch off the ignition while driving,
safety-relevant functions are only available
with limitations, or not at all. This could affect,
for example, the power steering and the brake
boosting effect.Y ou will require considerably
more effort to steer and brake. There is a risk
of an accident.
Do not switch off the ignition while driving.
To ensure that the vehicle is secured against
rolling away unintentionally:
R the parking brake must be applied.
R the transmission must be in position Pand
the key must be removed from the ignition
lock
R the transfer case must not be in position
N.
R on uphill or downhill gradients, turn the
front wheels towards the kerb. Switching off the engine
Important safety notes G
WARNING
If you switch off the ignition while driving,
safety-relevant functions are only available
with limitations, or not at all. This could affect,
for example, the power steering and the brake Parking
163Driving and parking
Z
Page 210 of 357
for a maximu
mload; see the tyre pressure
table in the fuel filler flap (Y page 325).
You will find installation dimensions and loads
in the technical data (Y page 350).
The maximum permissible trailer drawbar
noseweight on the ball coupling is:
R 140 kg (G-Class long-wheelbase version)
R 115 kg (G-Class Cabriolet)
However, the actual noseweight must not
exceed the value given on the trailer tow hitch
or trailer identification plates. The lowest
weight applies.
i When towing a trailer, set the tyre pres-
sure on the rear axle of the towing vehicle
for a maximum load; see the tyre pressure
table in the fuel filler flap (Y page 325).
Please note that when towing a trailer, PARK-
TRONIC (Y page 197) and Blind Spot Assist
(Y page 190) are only available with limita-
tions, or not at all.
i On vehicles without level control, the
height of the ball coupling will alter accord-
ing to the load placed on the vehicle. If nec-
essary, use a trailer with a height-adjusta-
ble drawbar.
Driving tips X
On long and steep downhill gradients,
select shift range 1,2or 3(Y page 153) in
good time.
i This also applies if you have activated
cruise control or SPEEDTRONIC.
X If necessary, shift the transfer case to LOW
RANGE(Y page 202).
This will use the braking effect of the
engine, so less braking will be required to
prevent the vehicle from gaining speed.
This relieves the load on the brake system
and prevents the brakes from overheating
and wearing too quickly. If you need addi-
tional braking, depress the brake pedal
repeatedly rather than continuously. The maximum permissible speed for vehicle/
trailer combinations depends on the type of
trailer. Before beginning the journey, check
the trailer's documents to see what the max-
imum permitted speed is. Observe the legally
prescribed maximum speed in the relevant
country.
For certain Mercedes-Benz vehicles, the max-
imum permissible rear axle load is increased
when towing a trailer. Refer to the "Technical
data" section to find out whether this applies
to your vehicle. If you utilise any of the added
maximum rear axle load when towing a trailer,
the vehicle/trailer combination may not
exceed a maximum speed of 100 km/h for
reasons concerning the operating permit.
This also applies in countries in which the
permissible maximum speed for vehicle/
trailer combinations is above 100 km/h.
When towing a trailer, your vehicle's handling
characteristics will be different in comparison
to when driving without a trailer, and it will
consume more fuel.
Driving tips
If the trailer swings from side to side:
X
Do not accelerate.
X Do not countersteer.
X Brake if necessary.
R Maintain a greater distance from the vehi-
cle in front than when driving without a
trailer.
R Avoid braking abruptly. If possible, brake
gently at first to allow the trailer to run on.
Then, increase the braking force rapidly.
R The values given for gradient-climbing
capabilities from a standstill refer to sea
level. When driving in mountainous areas,
note that the power output of the engine,
and consequently the vehicle's gradient-
climbing capability, decrease with increas-
ing altitude. Towing
atrailer
207Driving an d parking Z
Page 316 of 357
Jump-starting
G
WARNING
Battery acid is caustic. There is a risk of injury.
Avoid contact with the skin, eyes or clothing. Do not inhale any battery gases. Do not lean over
the battery. Keep children away from batteries. Wash battery acid immediately with water and
seek medical attention. G
WARNING
Gases escaping from the battery during jump-starting may cause minor explosions. Avoid cre-
ating sparks. Keep naked flames away from the battery, and do not smoke.
Comply with the important safety precautions when handling batteries. You will find these under
"Battery (vehicle) -important safety notes" in the index. G
WARNING
During charging and jump-starting, explosive gases can escape from the battery .There is a risk
of an explosion.
Particularly avoid fire, naked flames, creating sparks and smoking. Ensure there is sufficient
ventilation while charging and jump-starting. Do not lean over a battery. G
WARNING
During the charging process, a battery produces hydrogen gas. If a short circuit occurs or sparks
are created, the hydrogen gas can ignite. There is a risk of an explosion.
R Make sure that the positive terminal of a connected battery does not come into contact with
vehicle parts.
R Never place metal objects or tools on a battery.
R It is important that you observe the described order of the battery terminals when connecting
and disconnecting a battery.
R When jump-starting, make sure that the battery poles with identical polarity are connected.
R It is particularly important to observe the described order when connecting and disconnecting
the jump leads.
R Never connect or disconnect the battery terminals while the engine is running. G
WARNING
Ad ischarged battery can freeze at temperatures below freezing point .When jump-starting the
vehicle or charging the battery, gases can escape from the battery. There is a risk of an explosion.
Allow the frozen battery to thaw out before charging it or jump-starting. G
WARNING
Non-combusted fuel can collect in the exhaust system and ignite. There is a risk of fire. Avoid
repeated and lengthy starting attempts.
! Avoid repeated and lengthy starting attempts. Otherwise, non-combusted fuel may dam-
age the catalytic converter and create a risk of fire. Jump-starting
313Breakdown assistance Z