height MERCEDES-BENZ G-CLASS SUV 2012 Owners Manual
[x] Cancel search | Manufacturer: MERCEDES-BENZ, Model Year: 2012, Model line: G-CLASS SUV, Model: MERCEDES-BENZ G-CLASS SUV 2012Pages: 357, PDF Size: 8.86 MB
Page 17 of 357
Resetting the current lap
...............227
Starting anew lap .......................... 226
Stopping ........................................ 226
RACETIMER (on-board computer) ....226
Radar sensors Overview ........................................ 351
Radiator cover ................................... 291
Radio Selecting astation ......................... 217
see separate operating instructions
Reading lamp ..................................... 110
Rear bench seat Folding forward .............................. 270
Rear compartment
Setting the airv ents...................... 140
Rear-compartment seat belt sta-
tus indicator ........................................ 47
Rear door Closing ............................................ .76
Display message ............................ 249
Important safety notes ....................75
Opening ........................................... 75
Opening/closing .............................. 75
Rear foglamp
Display message ............................ 236
Switching on/off ........................... 107
Rear lamps
see Lights
Rear seat bench
Folding into an upright position .....270
Rear-view mirror
Anti-dazzle mode (automatic) ........100
Rear window heating
Problem (fault) ............................... 133
Switching on/off ........................... 133
Rear window wiper
Switching on/off ........................... 120
Refuelling
Fuel gauge ..................................... 211
Important safety notes ..................156
Refuelling proces s......................... 157
see Fuel
Remote control
Auxiliary heating/ventilation .......... 135
Changing the batteries (auxiliary
heating) ......................................... 137
Programming (garage door opener) 280 Reserve (fuel tank)
see Fuel
Reserve fuel
Display message ............................ 240
Warning lamp ................................. 260
Residual heat
Switching on/off ........................... 133
Restraint systems
see SRS (Supplemental Restraint
System)
Rev counter ........................................ 212
Reversing camera Function/notes ............................. 200
Reversing camera (cleaning
instructions) ...................................... 299
Reversing lamp Changing bulbs .............................. 118
Reversing lamp (display message) ..236
Roof see Soft top
Roof load (maximum) ........................348
Route (navigation) see Route guidance (navigation)
Route guidance (navigation) ............216 S
Safety Childre ninthe vehicle ..................... 48
Child restraint systems ....................48
Safety net
Detaching and storing .................... 274
Important safety information .........272
Releasing ....................................... 274
with luggage compartment
enlargement .................................. 273
without luggage compartment
enlargement .................................. 272
Safety systems
see Driving safety systems
Seat
Folding the front seat backrests
forwards (EASY-ENTRY feature) .......94
Seat backrest
Folding back .................................. 269
Seat belt
Adjusting the height ......................... 46
Belt force limiter .............................. 4714
Index
Page 48 of 357
X
If necessary, adjustt he seat belt to the
appropriate height (Y page 46).
X If necessary, pull upwards on the shoulder
section of the seat belt to tighten the belt
across your body.
Further information on releasing the seat
belts with release button ?(Ypage 46).
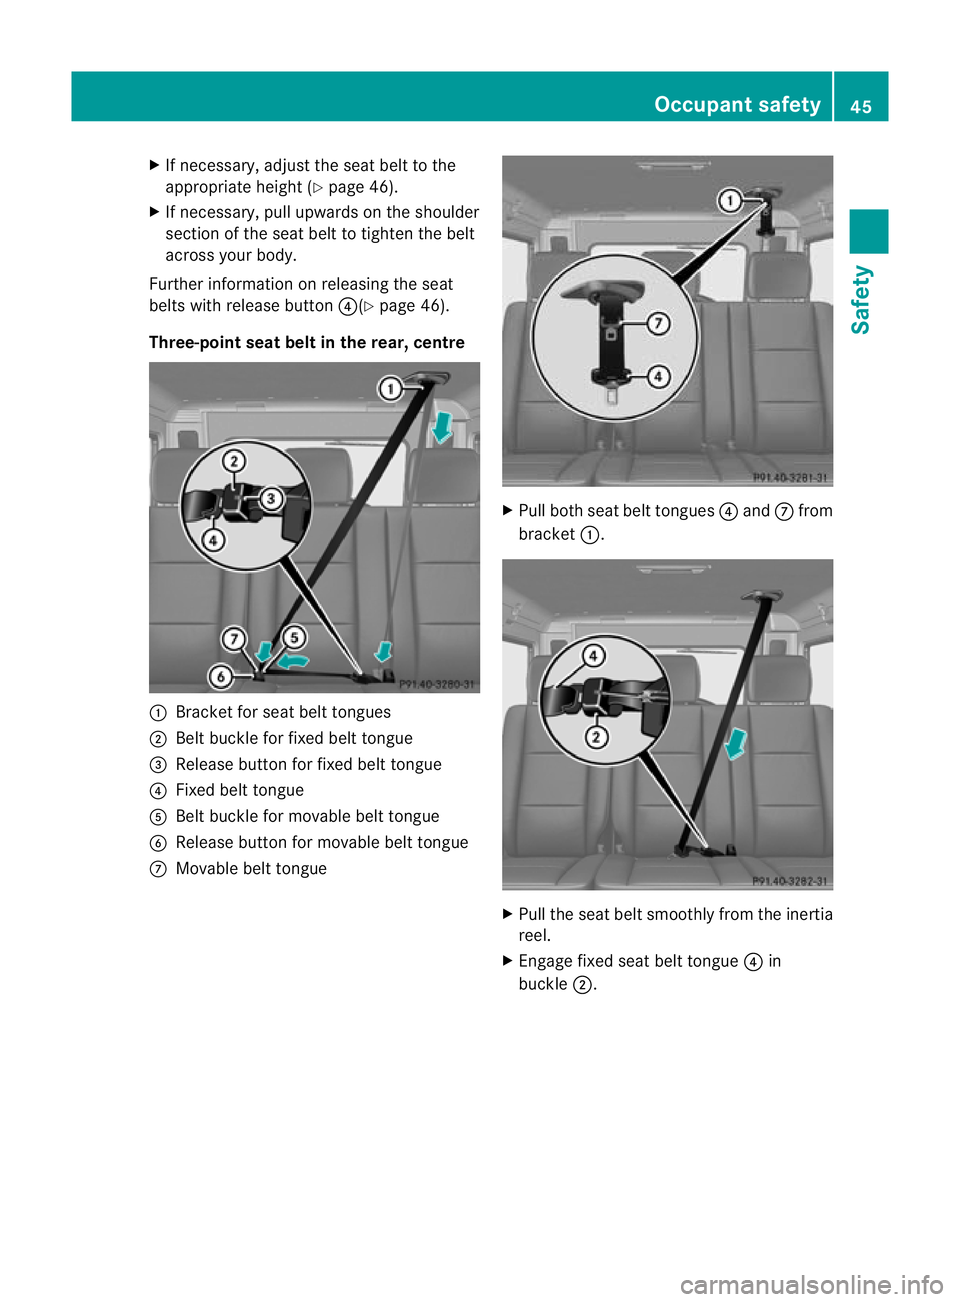
Three-point seat belt in the rear, centre :
Bracket for seat belt tongues
; Belt buckle for fixed belt tongue
= Release button for fixed belt tongue
? Fixed belt tongue
A Belt buckle for movable belt tongue
B Release button for movable belt tongue
C Movable belt tongue X
Pull both seat belt tongues ?and Cfrom
bracket :. X
Pull the seat belt smoothly from the inertia
reel.
X Engage fixed seat belt tongue ?in
buckle ;. Occupant safety
45Safety Z
Page 49 of 357
X
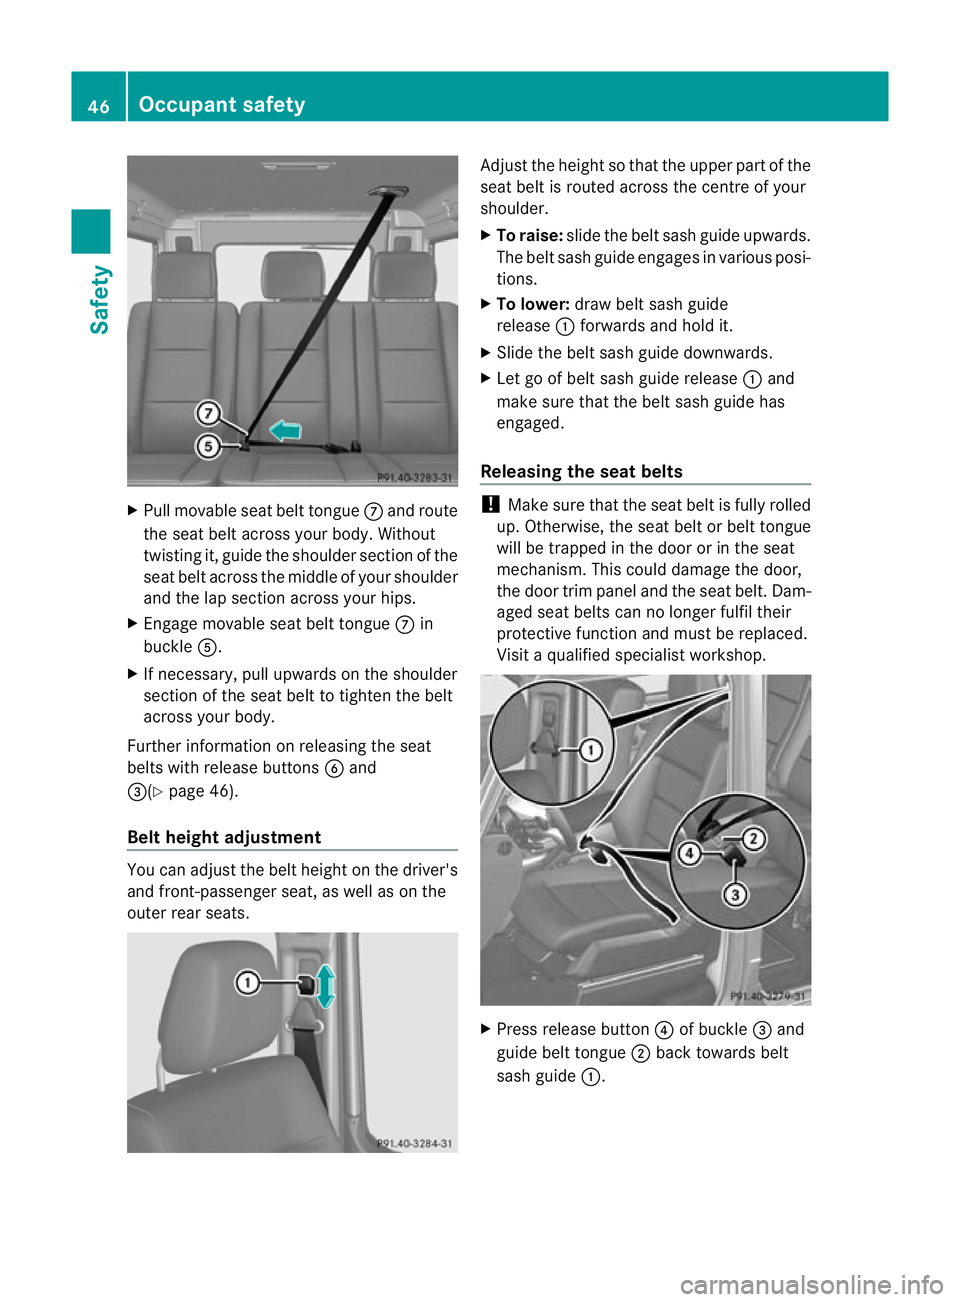
Pull movable seat belt tongue Cand route
the seat belt across your body. Without
twisting it, guide the shoulder section of the
seat belt across the middle of your shoulder
and the lap section across your hips.
X Engage movable seat belt tongue Cin
buckle A.
X If necessary, pull upwards on the shoulder
section of the seat belt to tighten the belt
across your body.
Further information on releasing the seat
belts with release buttons Band
=(Y page 46).
Belt height adjustment You can adjust the belt height on the driver's
and front-passenger seat, as well as on the
outer rear seats. Adjust the height so that the upper part of the
seat belt is routed across the centre of your
shoulder.
X
To raise: slide the belt sash guide upwards.
The belt sash guide engages in various posi-
tions.
X To lower: draw belt sash guide
release :forwards and hold it.
X Slide the belt sash guide downwards.
X Let go of belt sash guide release :and
make sure that the belt sash guide has
engaged.
Releasing the seat belts !
Make sure that the seat belt is fully rolled
up. Otherwise, the seat belt or belt tongue
will be trapped in the door or in the seat
mechanism .This could damage the door,
the door trim panel and the seat belt. Dam-
aged seat belts can no longer fulfil their
protective function and must be replaced.
Visit a qualified specialist workshop. X
Press release button ?of buckle =and
guide belt tongue ;back towards belt
sash guide :. 46
Occupant safetySafety
Page 57 of 357
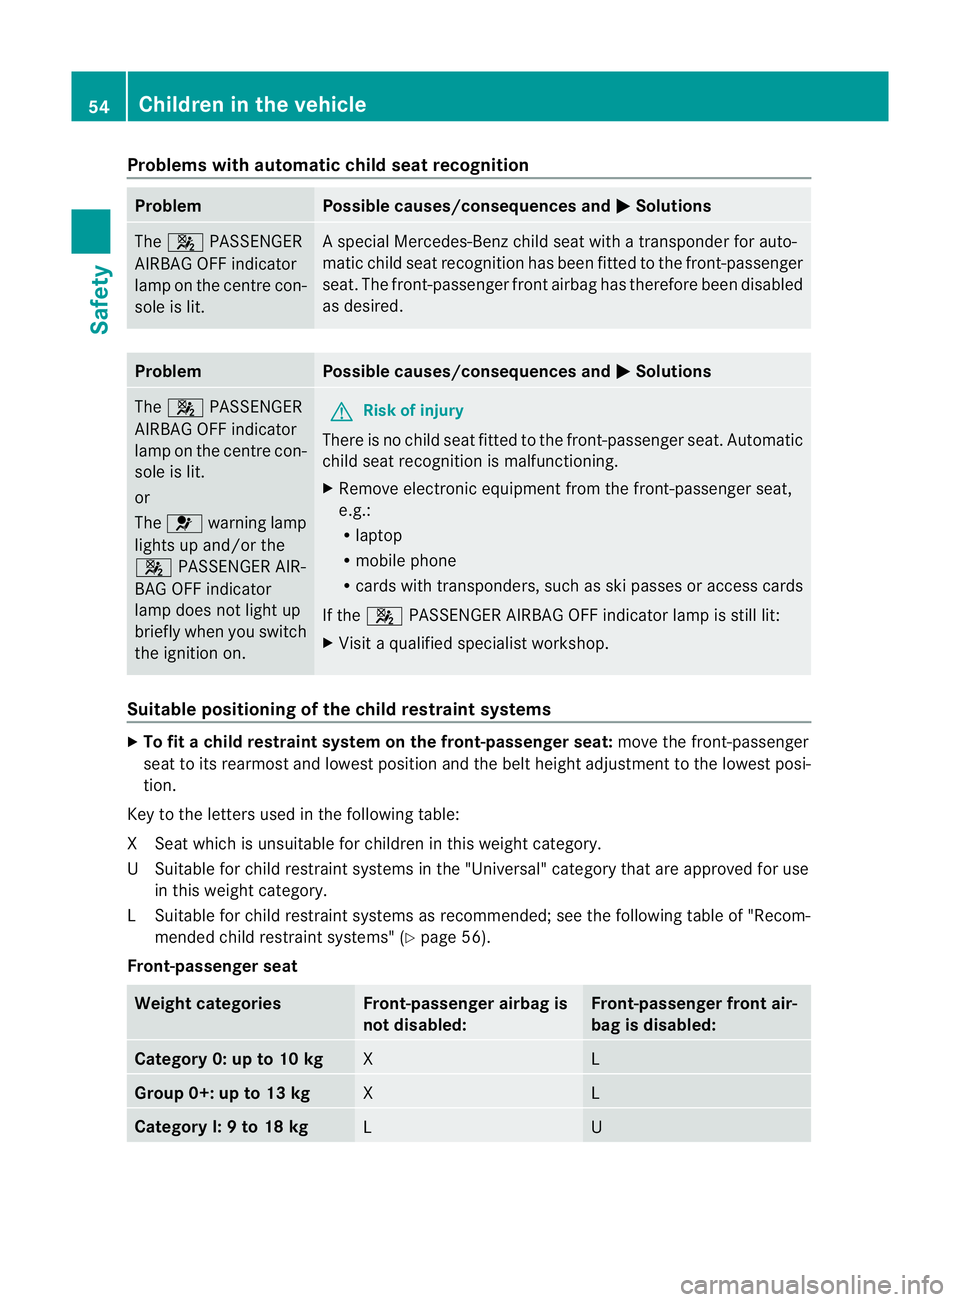
Problems with automatic child seat recognition
Problem Possible causes/consequences and
M Solutions
The
4 PASSENGER
AIRBAG OFF indicator
lamp on the centre con-
sole is lit. As
pecial Mercedes-Benz child seat with a transponder for auto-
matic child seat recognition has been fitted to the front-passenger
seat. The front-passenger fron tairbag has therefore been disabled
as desired. Problem Possible causes/consequences and
M Solutions
The
4 PASSENGER
AIRBAG OFF indicator
lamp on the centre con-
sole is lit.
or
The 6 warning lamp
lights up and/or the
4 PASSENGER AIR-
BAG OFF indicator
lamp does not light up
briefly when you switch
the ignition on. G
Risk of injury
There is no child seat fitted to the front-passenger seat .Automatic
child seat recognition is malfunctioning.
X Remove electronic equipmen tfrom the front-passenge rseat,
e.g.:
R laptop
R mobile phone
R cards with transponders, such as ski passes or access cards
If the 4 PASSENGER AIRBAG OFF indicator lamp is still lit:
X Visit a qualified specialist workshop. Suitable positioning of the child restraint systems
X
To fit a child restraint system on the front-passenger seat: move the front-passenger
seat to its rearmost and lowest position and the belt height adjustment to the lowest posi-
tion.
Key to the letters used in the following table:
XS eat which is unsuitable for children in this weight category.
US uitable for child restraint systems in the "Universal" category that are approved for use
in this weigh tcategory.
LS uitable for child restraint systems as recommended; see the following table of "Recom-
mended child restraint systems" (Y page 56).
Front-passenger seat Weight categories Front-passenger airbag is
not disabled: Front-passenger front air-
bag is disabled:
Category 0: up to 10 kg
X L
Group 0+: up to 13 kg
X L
Category I: 9 to 18 kg
L U54
Children in the vehicleSafety
Page 94 of 357
Seats
Important safety notes
G
WARNING
The seats can still be adjusted when there is
no key in the ignition lock. For this reason,
children should never be left unsupervised in
the vehicle. They could adjust the seats and
become trapped. G
WARNING
Only adjust the driver's seat when the vehicle
is stationary. You will otherwise be distracted
from the road and traffic conditions and you
could lose control of the vehicle as a result of
the seat moving. This could cause an acci-
dent. G
WARNING
If you adjust the seat height carelessly, you or
others could be trapped and thereby injured.
Children in particular could unintentionally
press the buttons to electrically adjust the
seats and become trapped.
Take care that:
R while moving the seats, your hands do not
get under the lever assembly of the seat
adjustment system.
R children in the vehicle do not slide their
hands under the levers. G
WARNING
Make sure that nobody can become trapped
when adjusting the seats.
Observe the notes on airbags.
Secure children as recommended; see the
"Children in the vehicle" section. G
WARNING
Make sure that the back of your head is sup-
ported at eye level by the central area of the
head restraint .Ifyour head is not supported
correctly by the head restraint, you could suf-
fer a severe neck injury in the event of an accident
.Never drive if the head restraints are
not engaged and set correctly. G
WARNING
Occupants should only travel sitting on seats
which have the head restraints fitted. On a
seat which is occupied, move the head
restraint into the upright position .This
reduces the risk of injury to the passenger in
the event of an accident. G
WARNING
As eat belt can only offer its intended degree
of protection when the backrest is almost ver-
tical and the occupant is sitting upright. Avoid
seat positions that do not allow the seat belt
to be routed correctly. Adjust the backrest so
that it is as upright as possible. Never travel
with the backrest reclined too far backwards.
You could otherwise be seriously or even
fatally injured in the event of an accident or
sudden braking.
! To avoid damage to the seats and the seat
heating, observe the following information:
R do not spill any liquids on the seats. If
liquid is spilled on the seats, dry them as
soon as possible.
R if the seat covers are damp or wet, do not
switch on the seat heating. The seat
heating should also not be used to dry
the seats.
R clean the seat covers as recommended;
see the "Interior care" section.
R do not transport heavy loads on the
seats. Do not place sharp objects on the
seat cushions, e.g. knives, nails or tools.
The seats should only be occupied by
passengers, if possible.
R when the seat heating is in operation, do
not cover the seats with insulating mate-
rials, e.g. blankets, coats, bags, seat cov-
ers, child seats or booster seats.
! Make sure that there are no objects in the
footwell or behind the seats when moving Seats
91Seats, steering wheel and mirrors Z
Page 95 of 357
the seat back. There is a risk tha
tthe seats
and/or the objects could be damaged.
! When the rear bench seat is folded for-
wards, the front seats cannot be moved to
their rearmost position. You could other-
wise damage the seats and the rear bench
seat.
! Make sure that the sun visor is folded up
before adjusting the backrest and head
restraint height. The head restraint and sun
visor could otherwise collide when the head
restraint is fully extended.
i If the front door is open, the seats can be
adjusted for up 30 minutes after the igni-
tion has been switched off.
i The rear-compartment head restraints
can be removed (Y page 93).
For more information, contact a qualified
specialist workshop.
i You can find further information about
enlarging the luggage compartment( fold-
ing the rear bench sea tforwards) on
(Y page 270). Adjusting the seats electrically
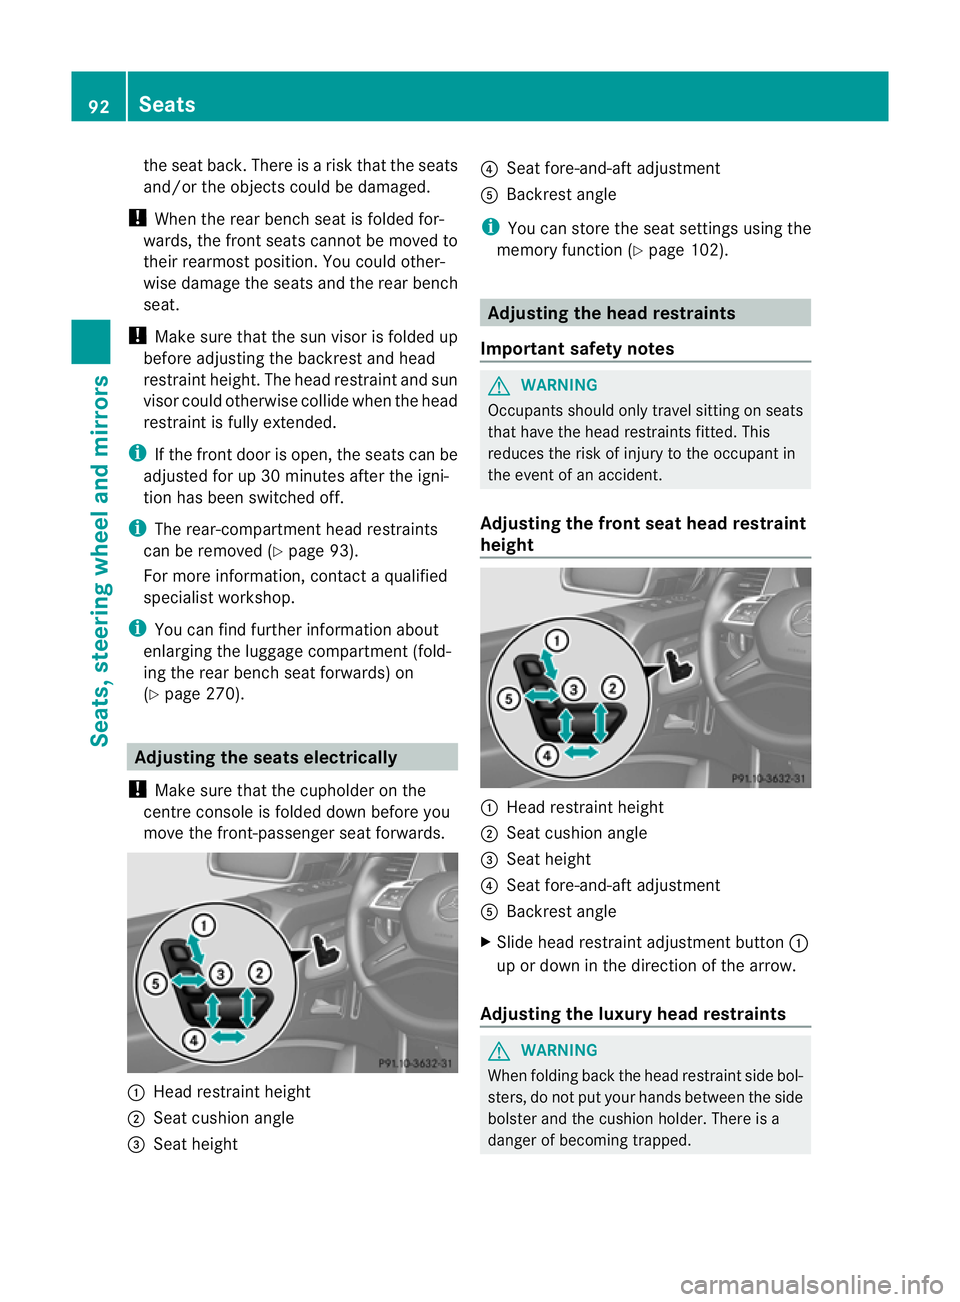
! Make sure that the cupholder on the
centre console is folded down before you
move the front-passenger seat forwards. :
Head restraint height
; Seat cushion angle
= Seat height ?
Seat fore-and-aft adjustment
A Backrest angle
i You can store the seat settings using the
memory function (Y page 102). Adjusting the head restraints
Important safety notes G
WARNING
Occupants should only travel sitting on seats
that have the head restraints fitted. This
reduces the risk of injury to the occupant in
the event of an accident.
Adjusting the front seat head restraint
height :
Head restraint height
; Seat cushion angle
= Seat height
? Seat fore-and-aft adjustment
A Backrest angle
X Slide head restraint adjustmen tbutton :
up or down in the direction of the arrow.
Adjusting the luxury head restraints G
WARNING
When folding bac kthe head restraint side bol-
sters, do not put your hands between the side
bolster and the cushion holder. There is a
danger of becoming trapped. 92
SeatsSeats, steering wheel and mirrors
Page 96 of 357
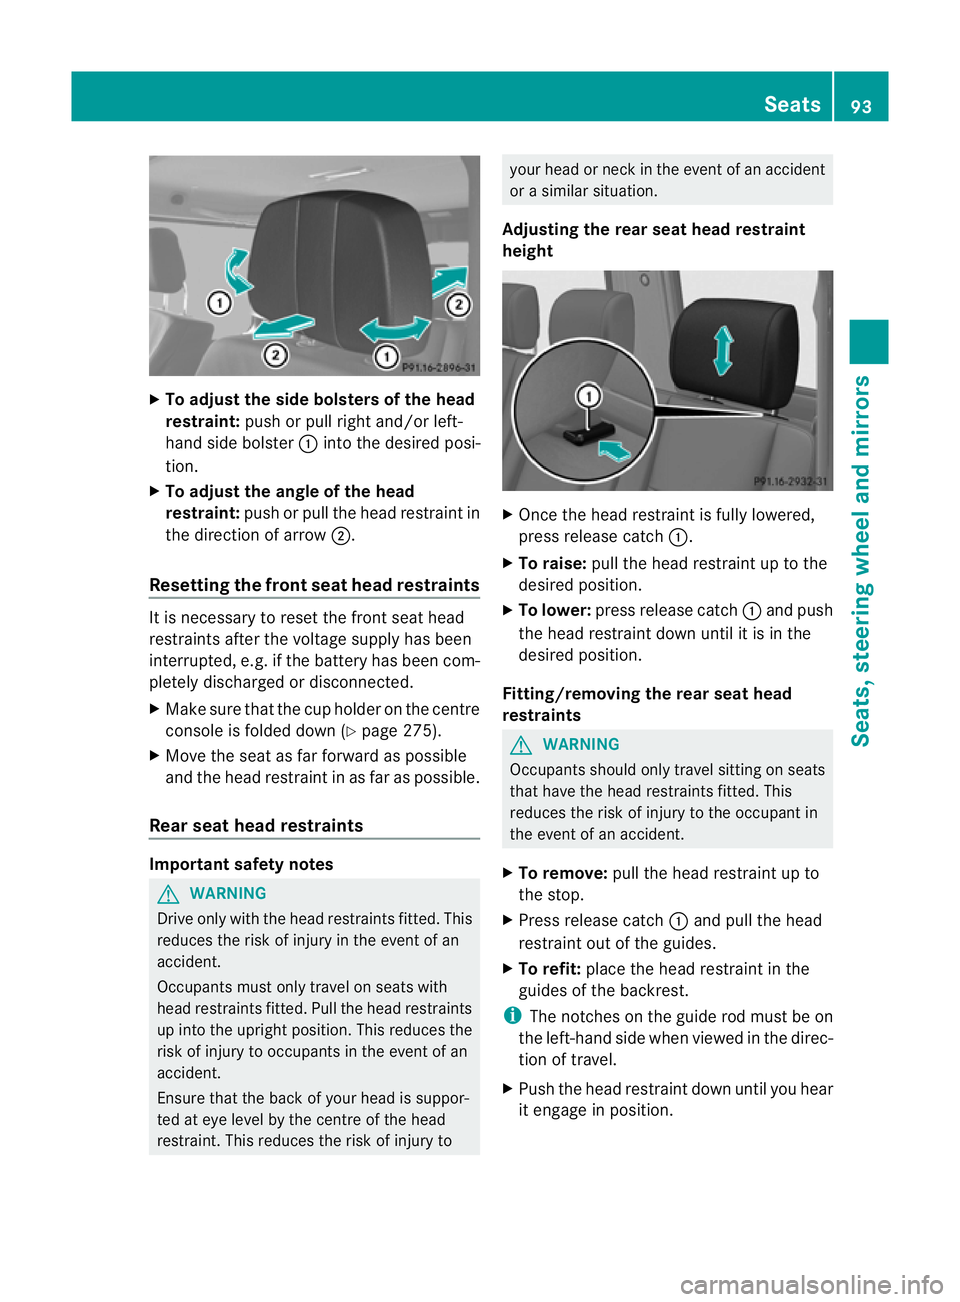
X
To adjust the side bolsters of the head
restraint: push or pull right and/or left-
hand side bolster :into the desired posi-
tion.
X To adjust the angle of the head
restraint: push or pull the head restraint in
the direction of arrow ;.
Resetting the front seat head restraints It is necessary to reset the front seat head
restraints after the voltage supply has been
interrupted, e.g .ifthe battery has been com-
pletely discharged or disconnected.
X Make sure that the cup holder on the centre
console is folded down (Y page 275).
X Move the seat as far forward as possible
and the head restraint in as far as possible.
Rear seat head restraints Important safety notes
G
WARNING
Drive only with the head restraints fitted. This
reduces the risk of injury in the event of an
accident.
Occupants must only travel on seats with
head restraints fitted. Pull the head restraints
up into the upright position. This reduces the
risk of injury to occupants in the event of an
accident.
Ensure that the back of your head is suppor-
ted at eye level by the centre of the head
restraint. This reduces the risk of injury to your head or neck in the event of an accident
or a similar situation.
Adjusting the rear seat head restraint
height X
Once the head restraint is fully lowered,
press release catch :.
X To raise: pull the head restraint up to the
desired position.
X To lower: press release catch :and push
the head restraint down until it is in the
desired position.
Fitting/removing the rear seat head
restraints G
WARNING
Occupants should only travel sitting on seats
that have the head restraints fitted. This
reduces the risk of injury to the occupant in
the event of an accident.
X To remove: pull the head restraint up to
the stop.
X Press release catch :and pull the head
restraint out of the guides.
X To refit: place the head restraint in the
guides of the backrest.
i The notches on the guide rod must be on
the left-hand side when viewed in the direc-
tion of travel.
X Push the head restraint down until you hear
it engage in position. Seats
93Seats, steering wheel and mirrors Z
Page 100 of 357
i
If the battery voltage is too low, the seat
ventilation may switch off.
Problems with the seat ventilation If one or all of the indicator lamps in the seat
ventilation button are flashing, the seat ven-
tilatio nhas switched off automatically. The
vehicle's electrical system voltage is too low
because too many electrical consumers are
switched on.
X Switch off electrical consumers that you do
no tn eed, such as the rear window heating
or interior lighting.
Once the battery is sufficiently charged, the
seat ventilation will switch back on auto-
matically. Steering wheel
Important safety notes
G
WARNING
Do not adjust the steering wheel while driving.
Adjusting the steering wheel while driving
could cause the driver to lose control of the
vehicle.
The electrical steering wheel adjustment can
be operated at any time. Therefore, do not
leave children unattended in the vehicle or
with access to an unlocked vehicle. Children
having unsupervised access to a vehicle could
result in an acciden tand/o rserious personal
injury. Adjusting the steering wheel
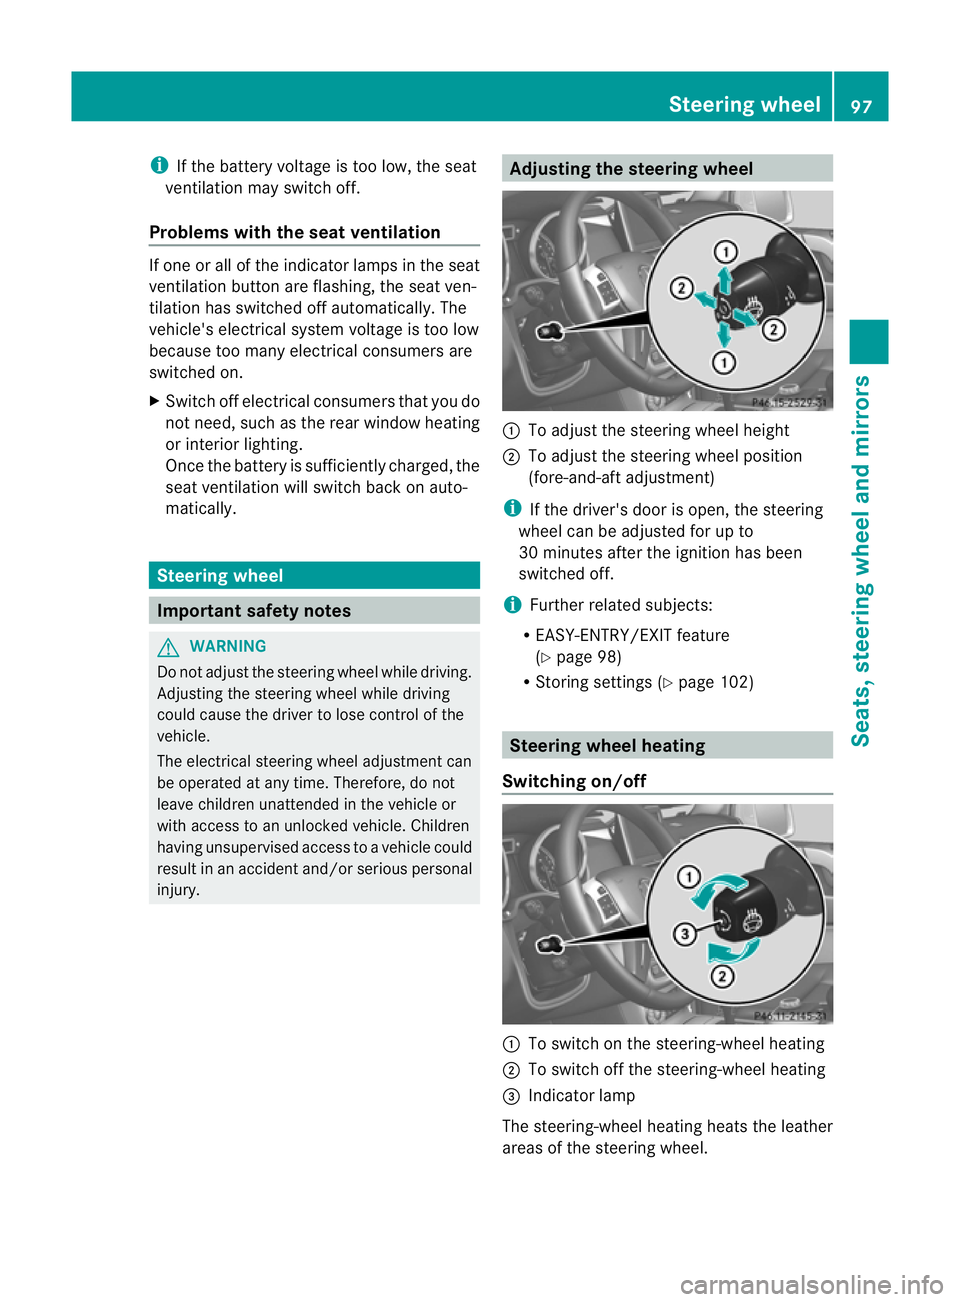
:
To adjust the steering wheel height
; To adjust the steering wheel position
(fore-and-aft adjustment)
i If the driver's door is open, the steering
wheel can be adjusted for up to
30 minutes after the ignition has been
switched off.
i Further related subjects:
R EASY-ENTRY/EXIT feature
(Y page 98)
R Storing settings (Y page 102) Steering wheel heating
Switching on/off :
To switch on the steering-wheel heating
; To switch off the steering-wheel heating
= Indicator lamp
The steering-wheel heating heats the leather
areas of the steering wheel. Steering wheel
97Seats, steering wheel and mirrors Z
Page 210 of 357
for a maximu
mload; see the tyre pressure
table in the fuel filler flap (Y page 325).
You will find installation dimensions and loads
in the technical data (Y page 350).
The maximum permissible trailer drawbar
noseweight on the ball coupling is:
R 140 kg (G-Class long-wheelbase version)
R 115 kg (G-Class Cabriolet)
However, the actual noseweight must not
exceed the value given on the trailer tow hitch
or trailer identification plates. The lowest
weight applies.
i When towing a trailer, set the tyre pres-
sure on the rear axle of the towing vehicle
for a maximum load; see the tyre pressure
table in the fuel filler flap (Y page 325).
Please note that when towing a trailer, PARK-
TRONIC (Y page 197) and Blind Spot Assist
(Y page 190) are only available with limita-
tions, or not at all.
i On vehicles without level control, the
height of the ball coupling will alter accord-
ing to the load placed on the vehicle. If nec-
essary, use a trailer with a height-adjusta-
ble drawbar.
Driving tips X
On long and steep downhill gradients,
select shift range 1,2or 3(Y page 153) in
good time.
i This also applies if you have activated
cruise control or SPEEDTRONIC.
X If necessary, shift the transfer case to LOW
RANGE(Y page 202).
This will use the braking effect of the
engine, so less braking will be required to
prevent the vehicle from gaining speed.
This relieves the load on the brake system
and prevents the brakes from overheating
and wearing too quickly. If you need addi-
tional braking, depress the brake pedal
repeatedly rather than continuously. The maximum permissible speed for vehicle/
trailer combinations depends on the type of
trailer. Before beginning the journey, check
the trailer's documents to see what the max-
imum permitted speed is. Observe the legally
prescribed maximum speed in the relevant
country.
For certain Mercedes-Benz vehicles, the max-
imum permissible rear axle load is increased
when towing a trailer. Refer to the "Technical
data" section to find out whether this applies
to your vehicle. If you utilise any of the added
maximum rear axle load when towing a trailer,
the vehicle/trailer combination may not
exceed a maximum speed of 100 km/h for
reasons concerning the operating permit.
This also applies in countries in which the
permissible maximum speed for vehicle/
trailer combinations is above 100 km/h.
When towing a trailer, your vehicle's handling
characteristics will be different in comparison
to when driving without a trailer, and it will
consume more fuel.
Driving tips
If the trailer swings from side to side:
X
Do not accelerate.
X Do not countersteer.
X Brake if necessary.
R Maintain a greater distance from the vehi-
cle in front than when driving without a
trailer.
R Avoid braking abruptly. If possible, brake
gently at first to allow the trailer to run on.
Then, increase the braking force rapidly.
R The values given for gradient-climbing
capabilities from a standstill refer to sea
level. When driving in mountainous areas,
note that the power output of the engine,
and consequently the vehicle's gradient-
climbing capability, decrease with increas-
ing altitude. Towing
atrailer
207Driving an d parking Z
Page 294 of 357
Opens the bonnet
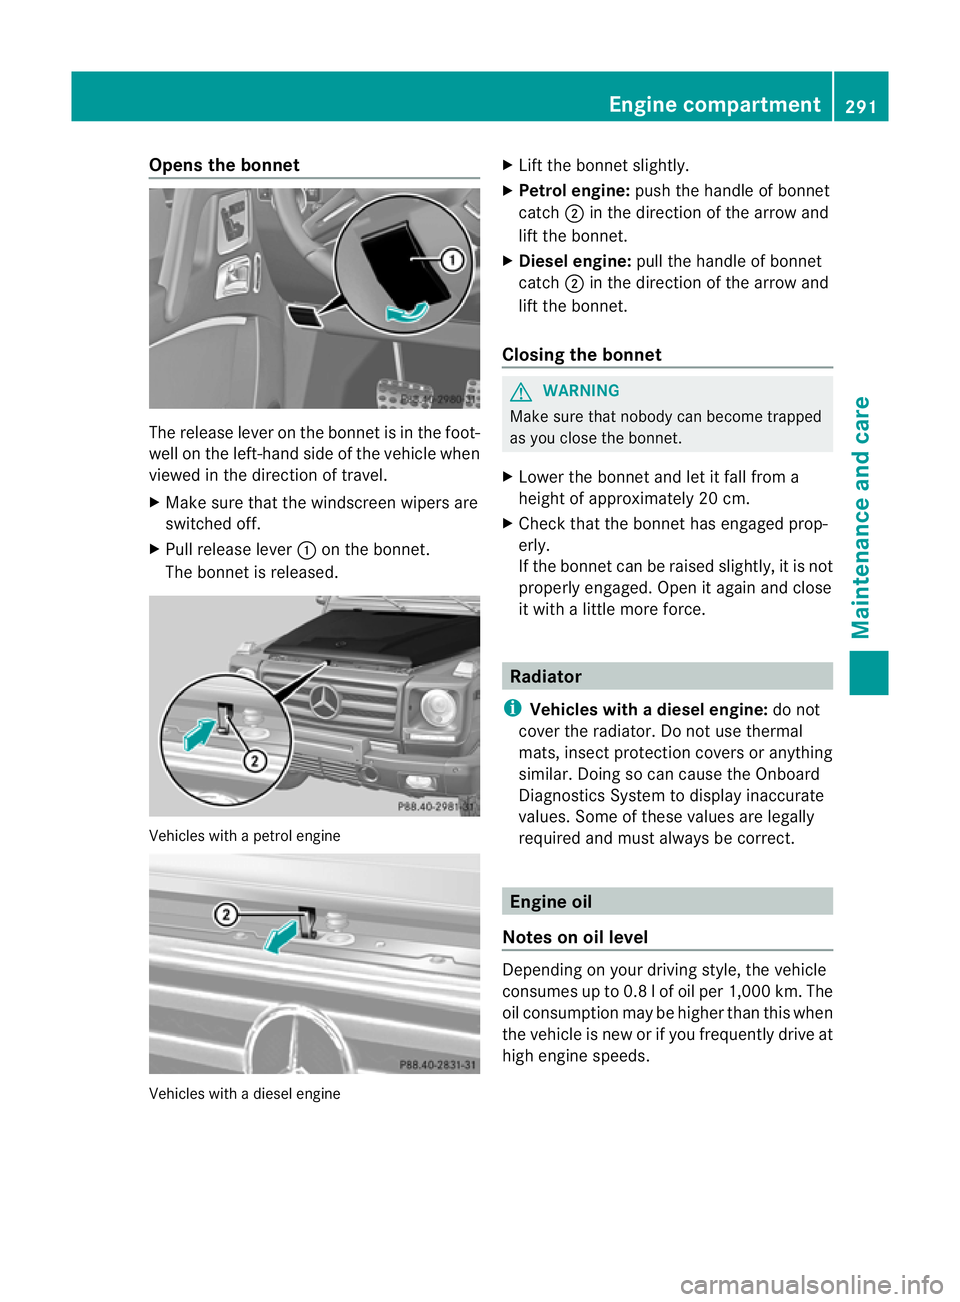
The release lever on the bonnet is in the foot-
well on the left-hand side of the vehicle when
viewed in the direction of travel.
X Make sure that the windscreen wipers are
switched off.
X Pull release lever :on the bonnet.
The bonnet is released. Vehicles with a petrol engine
Vehicles with a diesel engine X
Lift the bonnet slightly.
X Petrol engine: push the handle of bonnet
catch ;in the direction of the arrow and
lift the bonnet.
X Diesel engine: pull the handle of bonnet
catch ;in the direction of the arrow and
lift the bonnet.
Closing the bonnet G
WARNING
Make sure that nobody can become trapped
as you close the bonnet.
X Lower the bonnet and let it fall from a
height of approximately 20 cm.
X Check that the bonnet has engaged prop-
erly.
If the bonnet can be raised slightly, it is not
properly engaged. Open it again and close
it with a little more force. Radiator
i Vehicles with adiesel engine: do not
cover the radiator. Do not use thermal
mats, insect protection covers or anything
similar. Doing so can cause the Onboard
Diagnostics System to display inaccurate
values. Some of these values are legally
required and must always be correct. Engine oil
Notes on oil level Depending on your driving style, the vehicle
consumes up to 0.
8lof oil per 1,000 km. The
oil consumption may be higher than this when
the vehicle is new or if you frequently drive at
high engine speeds. Engine compartment
291Maintenance and care Z