washer fluid MERCEDES-BENZ G-CLASS SUV 2012 Owners Manual
[x] Cancel search | Manufacturer: MERCEDES-BENZ, Model Year: 2012, Model line: G-CLASS SUV, Model: MERCEDES-BENZ G-CLASS SUV 2012Pages: 357, PDF Size: 8.86 MB
Page 18 of 357
Bel
ttensioner .................................. 47
Cleaning ......................................... 301
Display message ............................ 232
Fastening ......................................... 44
Fastening, front ............................... 44
Fastening in the rear, centre ............45
Important safety guidelines .............43
Rea rseat belt status indicator .........47
Releasing ......................................... 46
Warning lamp ................................. 252
Warning lamp (function) ................... 47
Seat heating
Malfunction indicator lamp ..............96
Seats
Adjusting (electrically). ....................92
Adjusting the 4-way lumba rsup-
por t.................................................. 94
Adjusting the head restraint ............92
Cleaning the cover .........................300
Correct driver's seat position ........... 90
Important safety notes ....................91
Overview .......................................... 91
Storing settings (memory function) 102
Switching sea theating on/off .........95
Switching the sea tventilation on/
off .................................................... 96
Seat ventilation
Malfunction indicator lamp ..............97
Securing aload .................................. 270
Sensors (cleaning instructions) .......298
Service menu (on-board computer) .220
Service products
AdBlue ®
special additive s.............. 345
Brake fluid ..................................... 346
Coolant (engine) ............................ 347
Engine oil ....................................... 345
Fuel ................................................ 341
Important safety notes ..................341
Notes ............................................. 341
Washer fluid .................................. .347
Settings
Calling up a stored setting .............102
Factory (on-board computer) .........225
On-board computer .......................221
Setting the air distribution ...............131
SETUP (on-board computer) .............226
Shift ranges ....................................... 153Short journeys (diesel particle fil-
ter)
...................................................... 164
Side lamps Switching on/off ........................... 107
Side windows
Convenience opening ......................78
Important safety notes ....................77
Opening/closing .............................. 77
Overview .......................................... 77
Troubleshooting ............................... 78
Ski rack .............................................. 275
Sliding sunroof Important safety information ...........79
Opening/closing .............................. 79
Operating manually ..........................79
Problem (malfunction) .....................80
Snow chains ...................................... 324
Socket Front-passenger footwell ...............278
Luggage compartment ...................278
Rea rcompartmen t......................... 278
Soft top
Closing ............................................ .82
Closing manually in an emergenc y... 82
Important safety notes ....................81
Opening ........................................... 81
Troubleshooting ............................... 87
Spare fuses ........................................ 318
Spare wheel Fitting ............................................ 329
Notes/data .................................... 333
Spare wheel bracket at the rear ....307
Stainless-steel spare wheel cover ..308
Specialist workshop ............................ 22
Speed, controlling see Cruise control
Speedometer
Digita l............................................ 216
In the Instrument cluster ...............211
Segments ...................................... 212
Selecting the unit of measurement 221
see Instrument cluster
SPEEDTRONIC
Display message ............................ 244
Permanent ..................................... 182
Selecting ........................................ 179
Variabl e......................................... 178 Index
15
Page 21 of 357
V
Vanity mirror Sun visor ........................................ 276
Variable SPEEDTRONIC
Function/note s............................. 178
Vehicle
Correct use ...................................... 23
Data acquisition ............................... 23
Display message ............................ 248
Electronics ..................................... 339
Emergency locking ........................... 75
Emergency unlocking .......................74
Equipment ....................................... 21
Implied warranty .............................. 23
Individua lsettings .......................... 221
Leaving parked up .........................164
Locking (key )................................... 68
Lowering ........................................ 332
Pulling away ................................... 144
Raising ........................................... 330
Registration ..................................... 22
Securing from rolling away ............330
Towing away .................................. 315
Tow-starting ................................... 315
Transporting .................................. 317
Unlocking (key )................................ 68
Vehicle data ................................... 348
Vehicle data ....................................... 348
Vehicle dimensions ...........................348
Vehicle identification number see VIN
Vehicle identification plate ..............340
Vehicle tool kit .................................. 306
Vehicle tool kit pocket ......................306
Vehicle weights ................................. 348
Ventilation Setting the airflow .........................131
Video
Operating the DVD ......................... 218
VIN ...................................................... 340W
Warning and indicator lamps ABS ................................................ 254
Brakes ........................................... 253
Distance warning signa l................. 262ESP
®
.............................................. 256
ESP ®
OFF ....................................... 257
Fuel tank ........................................ 260
LIM (cruise control) ........................ 174
LIM (DISTRONIC PLUS) ..................183
LIM (variable SPEEDTRONIC) .........179
Overview .................................. 29, 251
Parking brake ................................ 259
PASSENGER AIRBAG OFF ................50
Preglow .......................................... 260
Seat bel t........................................ 252
SRS ................................................ 259
Tyr ep ressure monitor ...................263
Warning triangle ................................ 304
Washer fluid Display message ............................ 251
Wheel bol ttightening torque ...........332
Wheels Changing/replacing .......................329
Changing awheel .......................... 329
Checking ........................................ 323
Cleaning ......................................... 297
Cleaning (warning) .........................330
Fitting anew wheel ........................ 332
Fitting awheel ............................... 330
Important safety notes ..................322
Overview ........................................ 322
Removing awheel .......................... 332
Storing ........................................... 330
Technical data ............................... 333
Tightening torque ........................... 332
Whee lsize/tyre size ...................... 333
Windowbag
Display message ............................ 234
Operation ........................................ .42
Windows
see Side windows
Windows (cleaning instructions) .....298
Windscreen Demisting ...................................... 131
Windscreen heating ..........................132
Windscreen washe rfluid
see Windscreen washer system
Windscreen washer system
Notes ............................................. 347
Topping up ..................................... 29418
Index
Page 111 of 357
BN
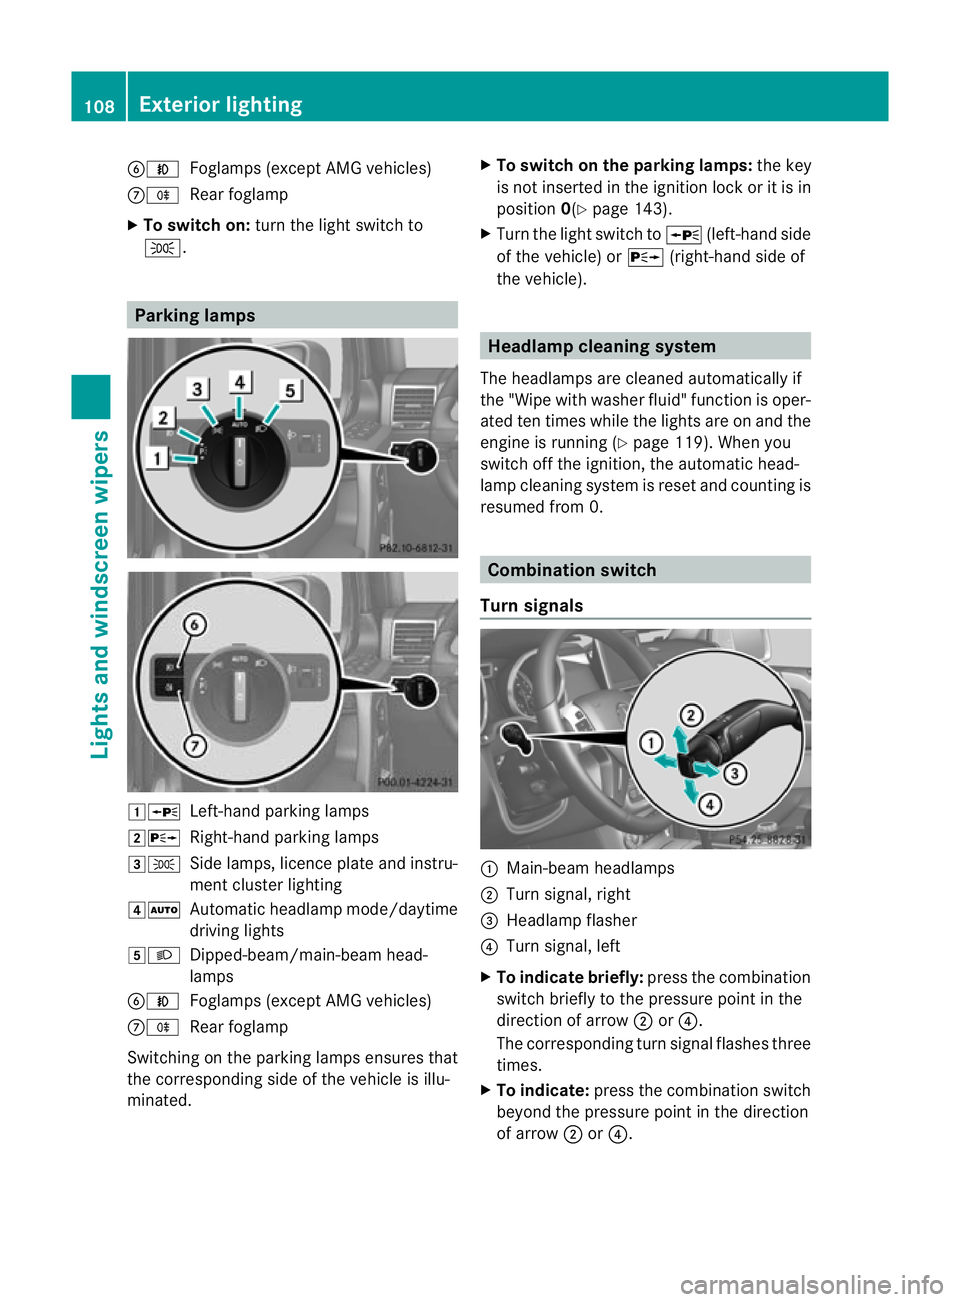
Foglamps (except AMG vehicles)
CR Rear foglamp
X To switc hon:turn the light switch to
T. Parking lamps
1W
Left-hand parking lamps
2X Right-hand parking lamps
3T Side lamps, licence plate and instru-
ment cluster lighting
4Ã Automatic headlamp mode/daytime
driving lights
5L Dipped-beam/main-beam head-
lamps
BN Foglamps (except AMG vehicles)
CR Rear foglamp
Switching on the parking lamps ensures that
the corresponding side of the vehicle is illu-
minated. X
To switch on the parking lamps: the key
is not inserted in the ignition lock or it is in
position 0(Ypage 143).
X Turn the light switch to W(left-hand side
of the vehicle) or X(right-hand side of
the vehicle). Headlamp cleaning system
The headlamps are cleaned automatically if
the "Wipe with washer fluid" function is oper-
ated ten times while the lights are on and the
engine is running (Y page 119). When you
switch off the ignition, the automatic head-
lamp cleaning system is reset and counting is
resumed from 0. Combination switch
Turn signals :
Main-beam headlamps
; Turn signal, right
= Headlamp flasher
? Turn signal, left
X To indicate briefly: press the combination
switch briefly to the pressure point in the
direction of arrow ;or?.
The corresponding turn signal flashes three
times.
X To indicate: press the combination switch
beyond the pressure point in the direction
of arrow ;or?. 108
Exterior lightingLights and windscreen wipers
Page 122 of 357
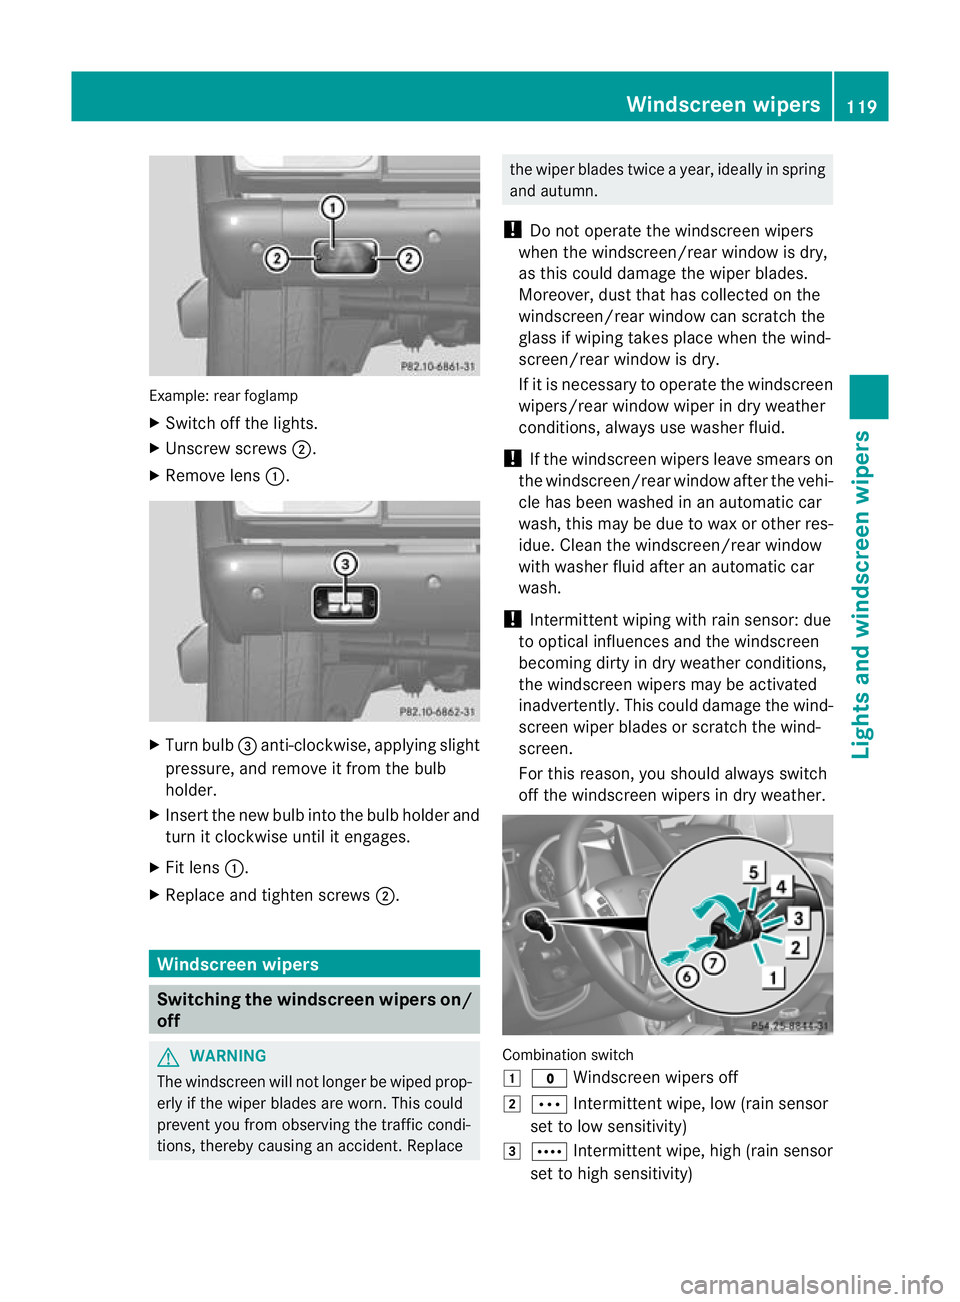
Example: rea
rfoglamp
X Switch off the lights.
X Unscrew screws ;.
X Remove lens :. X
Turn bulb =anti-clockwise, applying slight
pressure, and remove it from the bulb
holder.
X Insert the new bulb into the bulb holder and
turn it clockwise until it engages.
X Fit lens :.
X Replace and tighten screws ;.Windscreen wipers
Switching the windscreen wipers on/
off G
WARNING
The windscreen will not longer be wiped prop-
erly if the wiper blades are worn. This could
prevent you from observing the traffic condi-
tions, thereby causing an accident .Replace the wiper blades twice a year, ideally in spring
and autumn.
! Do not operate the windscreen wipers
when the windscreen/rear window is dry,
as this could damage the wiper blades.
Moreover, dust that has collected on the
windscreen/rear window can scratch the
glass if wiping takes place when the wind-
screen/rear window is dry.
If it is necessary to operate the windscreen
wipers/rear window wiper in dry weather
conditions, always use washer fluid.
! If the windscreen wipers leave smears on
the windscreen/rear window after the vehi-
cle has been washed in an automatic car
wash, this may be due to wax or other res-
idue. Clean the windscreen/rear window
with washer fluid after an automatic car
wash.
! Intermittent wiping with rain sensor: due
to optical influences and the windscreen
becoming dirty in dry weather conditions,
the windscreen wipers may be activated
inadvertently. This could damage the wind-
screen wiper blades or scratch the wind-
screen.
For this reason, you should always switch
off the windscreen wipers in dry weather. Combination switch
1
$ Windscreen wipers off
2 Ä Intermittentw ipe, low (rain sensor
set to low sensitivity)
3 Å Intermitten twipe, high (rain sensor
set to high sensitivity) Windscreen wipers
119Lights and windscreen wipers Z
Page 123 of 357
4
° Continuous wipe, slow
5 ¯ Continuous wipe, fast
B í Single wipe
C î To wipe with washe rfluid
X Turn the key to position 1or 2in the ignition
lock.
X Turn the combination switch to the corre-
sponding position.
Intermittent wiping is interrupted if you stop
and open a front door. This protects people
getting into and out of the vehicle fro mbeing
sprayed with water.
In the ÄorÅ position, the appropriate
wiping frequency is set automatically accord-
ing to the intensity of the rain. In the Å
position, the rain sensor is more sensitive
than in the Äposition, causing the wind-
screen wipers to wipe more frequently.
i When the windscreen wipers are
switched on and you stop the vehicle, the
windscreen wipers wipe more slowly. Switching the rear window wiper on/
off
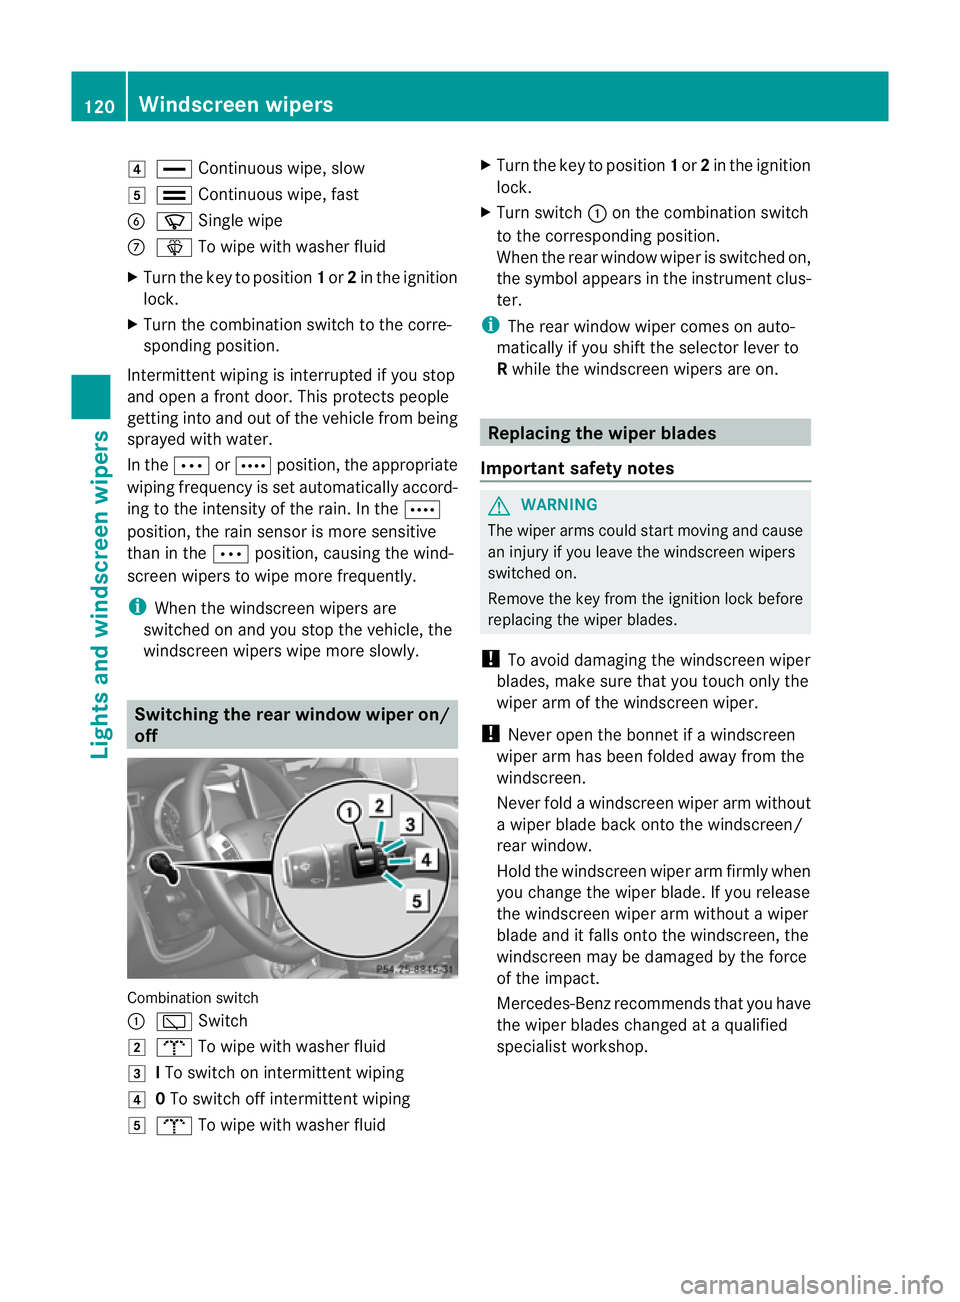
Combination switch
:
è Switch
2 b To wipe with washer fluid
3 ITo switch on intermittent wiping
4 0To switch off intermittent wiping
5 b To wipe with washer fluid X
Turn the key to position 1or 2in the ignition
lock.
X Turn switch :on the combination switch
to the corresponding position.
When the rear window wiper is switched on,
the symbol appears in the instrument clus-
ter.
i The rear window wiper comes on auto-
matically if you shift the selector lever to
R while the windscreen wipers are on. Replacing the wiper blades
Important safety notes G
WARNING
The wiper arms could start moving and cause
an injury if you leave the windscreen wipers
switched on.
Remove the key from the ignition lock before
replacing the wiper blades.
! To avoid damaging the windscreen wiper
blades, make sure that you touch only the
wiper arm of the windscreen wiper.
! Never open the bonnet if a windscreen
wiper arm has been folded away from the
windscreen.
Never fold a windscreen wiper arm without
a wiper blade back onto the windscreen/
rear window.
Hold the windscreen wiper arm firmly when
you change the wiper blade. If you release
the windscreen wiper arm without a wiper
blade and it falls onto the windscreen, the
windscreen may be damaged by the force
of the impact.
Mercedes-Benzr ecommends that you have
the wiper blades changed at aqualified
specialist workshop. 120
Windscreen wipersLights and windscreen wipers
Page 254 of 357
Display messages Possible causes/consequences and
M Solutions
Telephone No
service Your vehicle is outside the network provider's transmitter/
receiver range.
X
Wait until the mobile phone operational readiness symbol
appears in the multifunction display. ¥
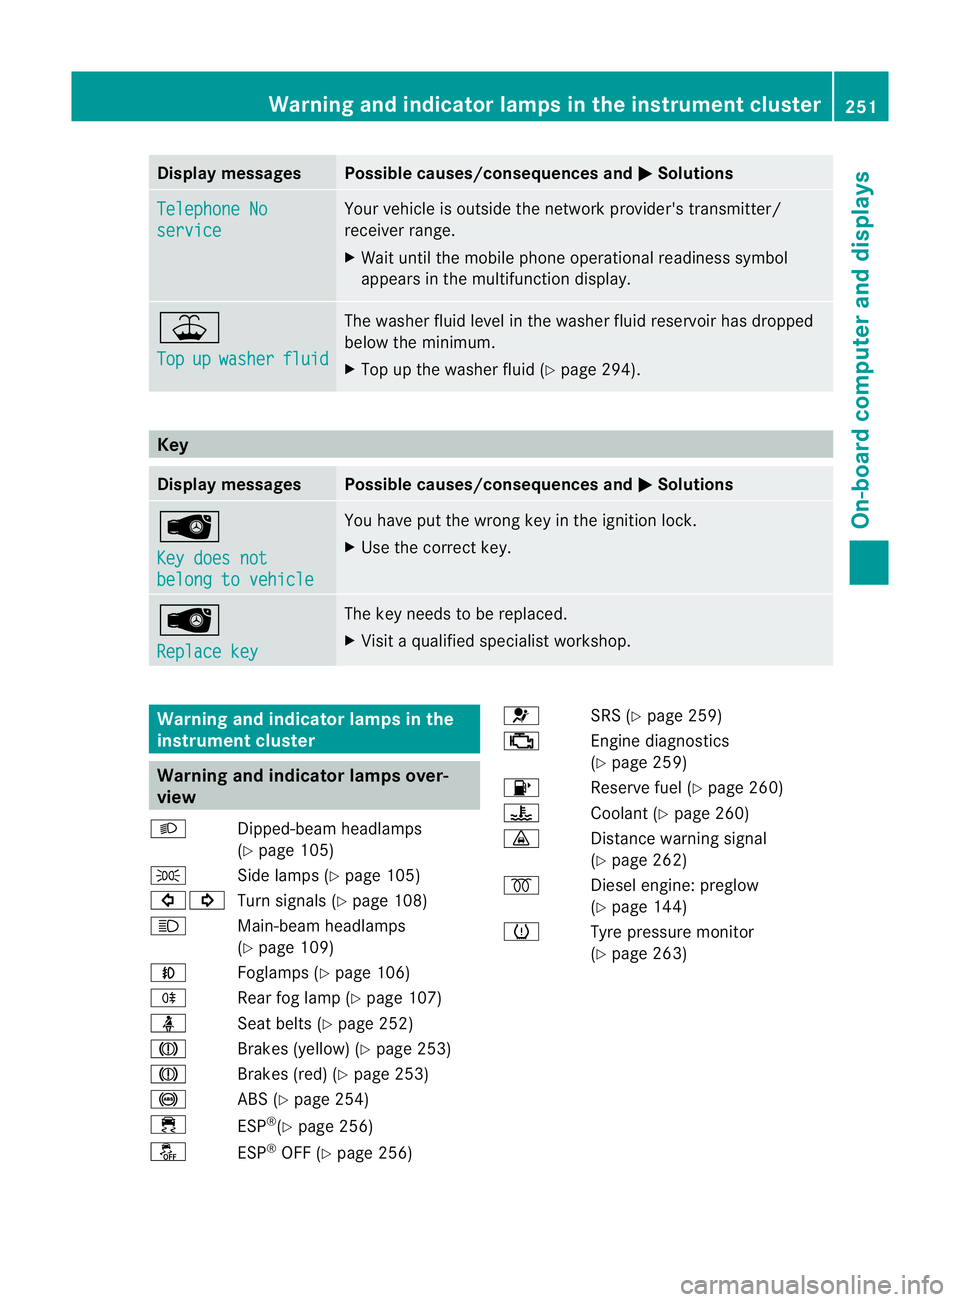
Top
up washer fluid The washer fluid level in th
ewasher fluid reservoir has dropped
below the minimum.
X Top up the washe rfluid (Y page 294). Key
Displa
ymessages Possible causes/consequences and
M Solutions
Â
Key does not
belong to vehicle You have put the wrong key in the ignitio
nlock.
X Use the correct key. Â
Replace key The key needs to be replaced.
X Visit a qualified specialist workshop. Warning and indicator lamps in the
instrument cluster Warning and indicator lamps over-
view
L Dipped-beam headlamps
(Ypage 105)
T Side lamps (Y page 105)
#! Turn signals (Y page 108)
K Main-beam headlamps
(Ypage 109)
N Foglamps (Y page 106)
R Rear fog lamp (Y page 107)
ü Seat belts (Y page 252)
J Brakes (yellow) (Y page 253)
J Brakes (red) (Y page 253)
! ABS (Ypage 254)
÷ ESP®
(Y page 256)
å ESP®
OFF (Y page 256) 6
SRS (Ypage 259)
; Engine diagnostics
(Ypage 259)
8 Reserve fuel (Y page 260)
? Coolant (Ypage 260)
· Distance warning signal
(Ypage 262)
% Diesel engine: preglow
(Ypage 144)
h Tyre pressure monitor
(Ypage 263) Warning and indicator lamps in the instrument cluster
251On-board computer and displays Z
Page 297 of 357
X
Chec kthe coolant temperature display in
the instrument cluster.
The coolant temperature must be below
70 †.
X Slowly turn cap :half a turn anti-clock-
wise to allow excess pressure to escape.
X Turn cap :further anti-clockwise and
remove it.
If the coolant is at the level of marker bar
= in the filler neck when cold, there is
enough coolant in coolant expansion
tank ;.
If the coolant level is approximately
1.5 cm above marker bar =in the filler
neck when warm, there is enough coolant
in coolant expansion tank ;.
X If necessary, top up with coolant that has
been tested and approved by Mercedes-
Benz.
X Replace cap :and turn it clockwise as far
as it will go.
For further information on coolant, see
(Y page 347).
Topping up the windscreen washer sys-
tem/headlampc leaning systemG
WARNING
Windscreen washer fluid is highly flammable.
Fire, naked flames and smoking are prohibi-
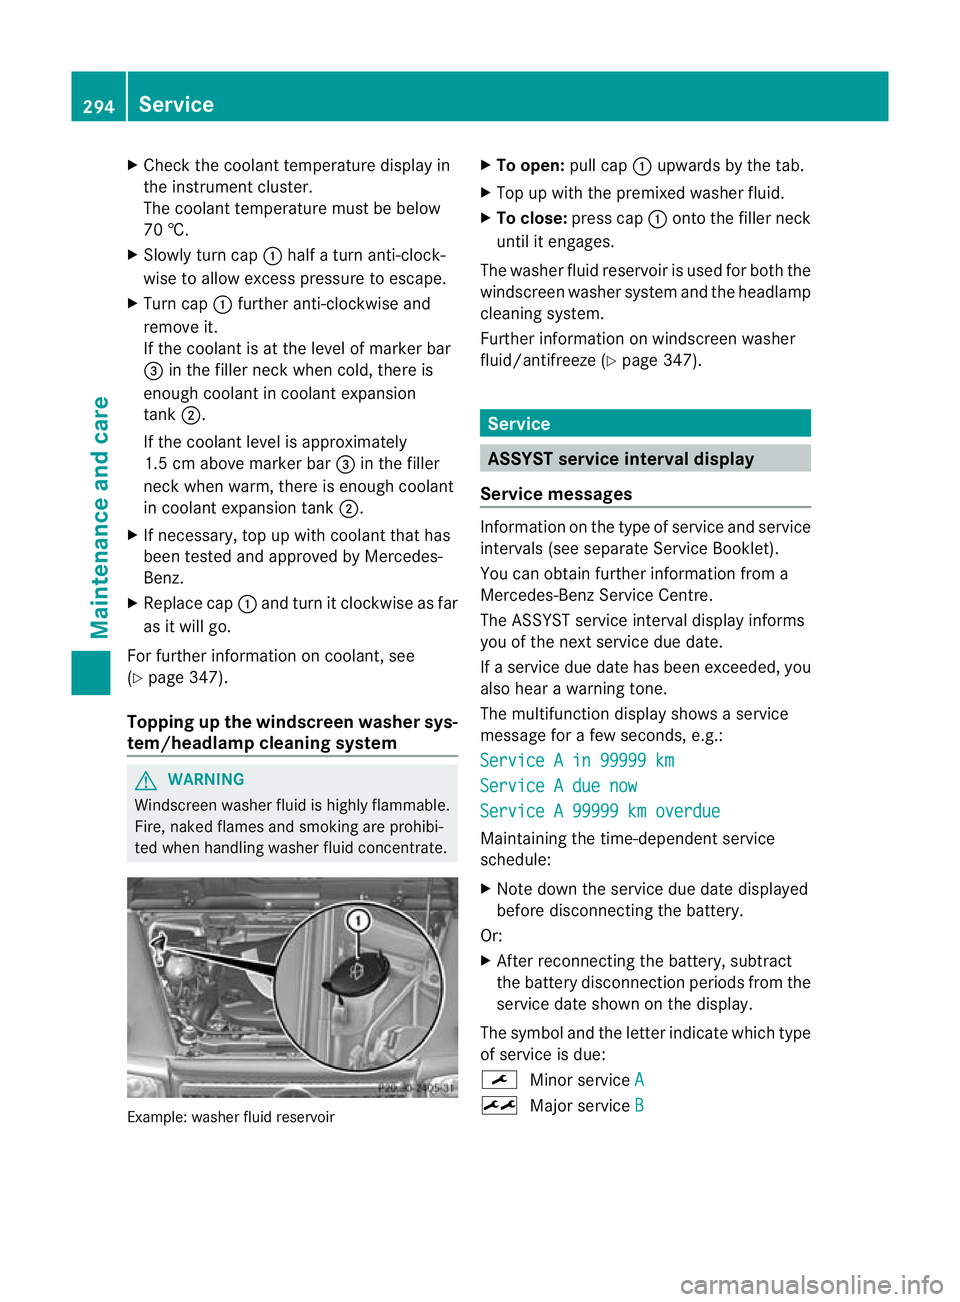
ted when handling washer fluid concentrate. Example: washer fluid reservoir X
To open: pull cap:upwards by the tab.
X Top up with the premixed washer fluid.
X To close: press cap :onto the filler neck
until it engages.
The washer fluid reservoir is used for both the
windscreen washer syste mand the headlamp
cleaning system.
Further informatio nonwindscreen washer
fluid/antifreeze (Y page 347). Service
ASSYST service interval display
Service messages Information on the type of service and service
intervals (see separate Service Booklet).
You can obtain further information from a
Mercedes-Benz Service Centre.
The ASSYST service interval display informs
you of the nex tservice due date.
If a service due date has been exceeded, you
also hear a warning tone.
The multifunction display shows a service
message for a few seconds, e.g.:
Service A in 99999 km Service A due now
Service A 99999 km overdue
Maintaining the time-dependen
tservice
schedule:
X Note down the service due date displayed
before disconnecting the battery.
Or:
X After reconnecting the battery, subtract
the battery disconnection periods from the
service date shown on the display.
The symbol and the letter indicate which type
of service is due:
¯ Minor service A ±
Major service B294
ServiceMaintenance and care
Page 344 of 357
from the data show
nhere. You can find the
data applicable to your vehicle on the vehi-
cle's identification plate. Vehicle identification number (VIN)
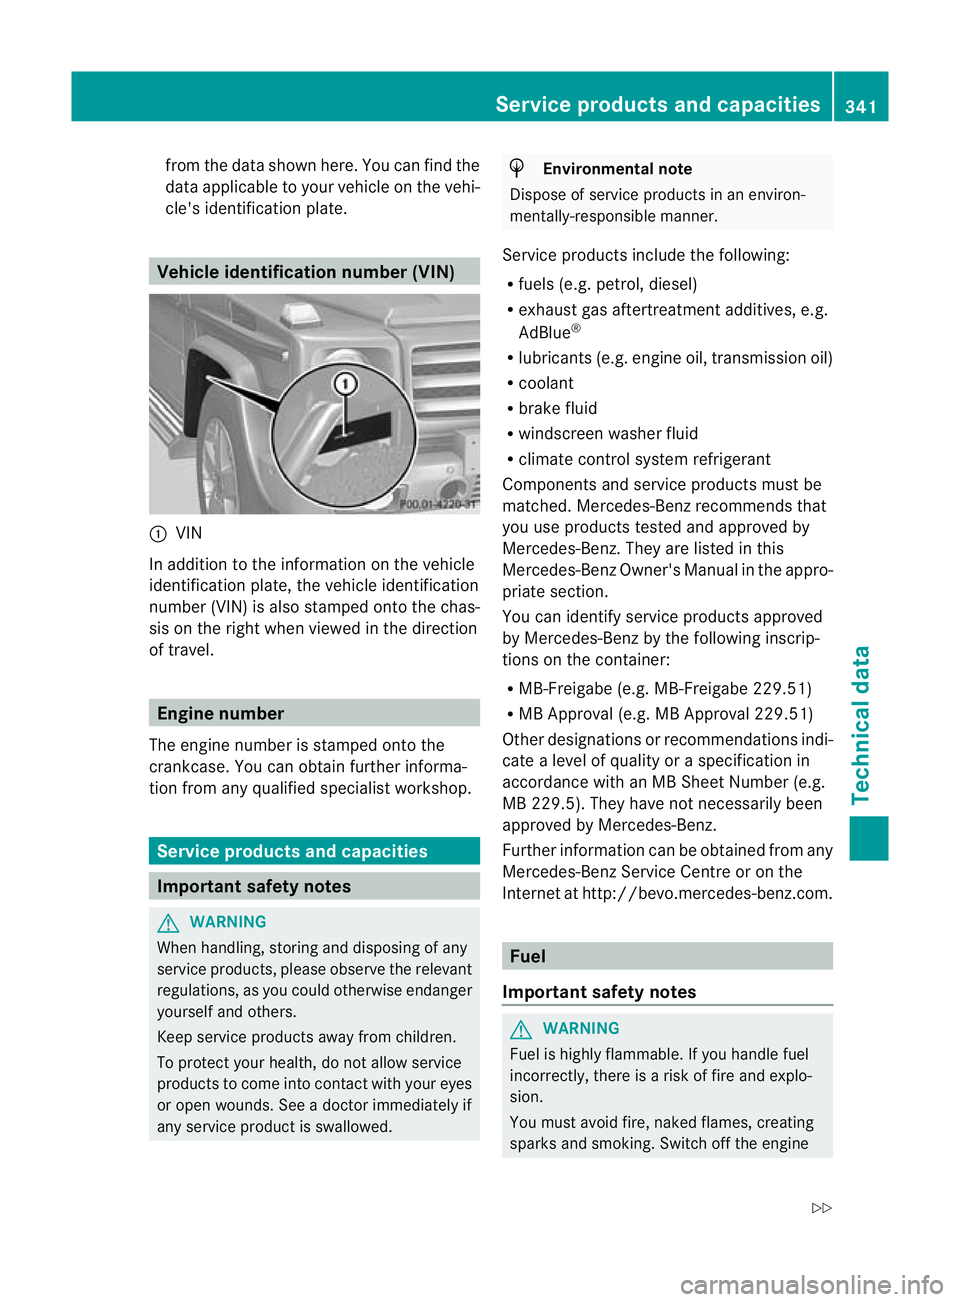
:
VIN
In addition to the information on the vehicle
identification plate, the vehicle identification
number (VIN) is also stamped onto the chas-
sis on the right when viewed in the direction
of travel. Engine number
The engine number is stamped onto the
crankcase. You can obtain further informa-
tion from any qualified specialist workshop. Service products and capacities
Important safety notes
G
WARNING
When handling, storing and disposing of any
service products, please observe the relevant
regulations, as you could otherwise endanger
yourself and others.
Keep service products away from children.
To protec tyour health, do not allow service
products to come into contact with your eyes
or open wounds. See a doctor immediately if
any service product is swallowed. H
Environmental note
Dispose of service products in an environ-
mentally-responsible manner.
Service products include the following:
R fuels (e.g. petrol, diesel)
R exhaust gas aftertreatmen tadditives, e.g.
AdBlue ®
R lubricants (e.g. engine oil, transmission oil)
R coolant
R brake fluid
R windscreen washer fluid
R climate control system refrigerant
Components and service products must be
matched. Mercedes-Benz recommends that
you use products tested and approved by
Mercedes-Benz .They are listed in this
Mercedes-Ben zOwner's Manual in the appro-
priate section.
You can identify service products approved
by Mercedes-Ben zby the following inscrip-
tions on the container:
R MB-Freigabe (e.g. MB-Freigabe 229.51)
R MB Approval (e.g. MB Approval 229.51)
Other designations or recommendations indi-
cate a level of quality or a specification in
accordance with an MB Sheet Number (e.g.
MB 229.5). The yhave no tnecessarily been
approved by Mercedes-Benz.
Further information can be obtained from any
Mercedes-Benz Service Centre or on the
Internet at http://bevo.mercedes-benz.com. Fuel
Important safety notes G
WARNING
Fuel is highly flammable. If you handle fuel
incorrectly, there is a risk of fire and explo-
sion.
You must avoid fire, naked flames, creating
sparks and smoking. Switch off the engine Service products and capacities
341Technical data
Z
Page 350 of 357
If the boiling point of the brake fluid is too low,
vapourp ockets may form in the brake system
when the brakes are applied hard (e.g. when
driving downhill). This impairs braking effi-
ciency.
You should have the brake fluid renewed at
regular intervals. The brake fluid change inter-
vals can be found in the Service Booklet.
Only use brake fluid approved by Mercedes-
Benz according to MB Approval 331.0.
Information about approved brake fluid can
be obtained at any qualified specialist work-
shop or on the Internet at:
http://bevo.mercedes-benz.com.
i Have the brake fluid regularly replaced at
a qualified specialist workshop. Coolant
Important safety notes G
WARNING
Antifreeze is highly flammable. Fire, naked
flames and smoking are prohibited when han-
dling antifreeze.
If antifreeze comes into contact with hot
engine parts, it may ignite and you could burn
yourself. Do not spill any antifreeze on hot
engine parts.
! Only add coolant that has been premixed
with the desired antifreez eprotection. You
could otherwise damage the engine.
Further information on coolants can be
found in the Mercedes-Benz Specifications
for Service Products, MB Specifications for
Service Products 310.1, e.g. on the Inter-
net at http://bevo.mercedes-benz.com.
Or contact a qualified specialist workshop.
! Always use a suitable coolant mixture,
even in countries where high temperatures
prevail. Otherwise, the engine cooling system is not
sufficiently protected from corrosion and
overheating.
! The engine cooling system is filled with
coolant, which must be renewed after
15 years or after 250,000 kilometres at the
latest.
The coolant is a mixture of water and anti-
freeze/corrosion inhibitor. It performs the
following tasks:
R anti-corrosio nprotection
R antifreeze protection
R raising the boiling point
If antifreeze/corrosion inhibitor is present in
the correct concentration, the boiling point of
the coolant will be around 130 †.
The antifreeze/corrosion inhibitor concentra-
tion in the engine cooling system should:
R be at least 50%. This will protect the engine
cooling system against freezing downto
approximately -3 7†.
R not exceed 55% (antifreeze protection
down to -45 †). Hea twill otherwise not be
dissipated as effectively.
If the vehicle has lost coolant, top it up with
equal amounts of water and antifreeze/cor-
rosio ninhibitor. Mercedes-Benz recom-
mends an antifreeze/corrosion inhibito rin
accordance with MB Specifications for
Service Products 310.1.
The coolan tis checked at every maintenance
interval at a qualified specialist workshop.
i When the vehicle is first delivered, it is fil-
led with a coolant mixture that ensures
adequate antifreeze and corrosion protec-
tion. Washer fluid
Important safety notes G
WARNING
Windscreen washer concentrate is highly
flammable. If it comes into contact with hot Service products and capacities
347Technical data
Z
Page 351 of 357
engine components or the exhaust system it
could ignite. There is a risk of fire and injury.
Make sure that no windscreen washer con-
centrate is spilled next to the filler neck.
! Only use washer fluid that is suitable for
plastic lamp lenses, e.g. MB SummerFit or
MB WinterFit .Unsuitabl ewasher fluid
could damage the plastic lenses of the
headlamps.
! Do no tuse distilled or de-ionised water in
the washer fluid reservoir. Otherwise, the
level sensor may be damaged.
! Only the washer fluids SummerFit and
WinterFit can be mixed. Otherwise, the
spraying nozzles could become blocked.
At temperatures above freezing:
X Fill the washer fluid reservoir with a mixture
of water and washer fluid, e.g. MB Sum-
merFit.
X Mix 1 part MB SummerFit to 100 parts
water.
At temperatures below freezing:
X Fill the washer fluid reservoir with a mixture
of water and washer fluid, e.g. MB Winter-
Fit.
Adapt the mixing ratio to the outside temper-
ature.
X Down to Ò10 †: mix 1 part MB WinterFit to
2 parts water.
X Down to Ò20 †: mix 1 part MB WinterFit to
1 part water.
X Down to Ò29 †: mix 2 parts MB WinterFit
to 1 part water.
i Add washer fluid concentrate, e.g. MB
SummerFit or MB WinterFit, to the washer
fluid all year round. Vehicle data
General notes
Please note that for the specified vehicle
data:
R the heights specified may vary as a result
of:
-tyres
- load
- condition of the suspension
- optional equipment
R items of optional equipment increase the
unladen weight and reduce the maximum
payload. The unladen weight is specified in
accordance with EC directive and includes:
-driver (68 kg)
- luggage (7 kg)
- all fluids (fuel tank 90% full)
R vehicle-specific weight information can be
found on the vehicle identification plate
(Y page 340).
R Only for certain countries: you can find
vehicle-specific vehicle data in the COC
documents (CERTIFICATE OF CONFORM-
ITY). These documents are delivered with
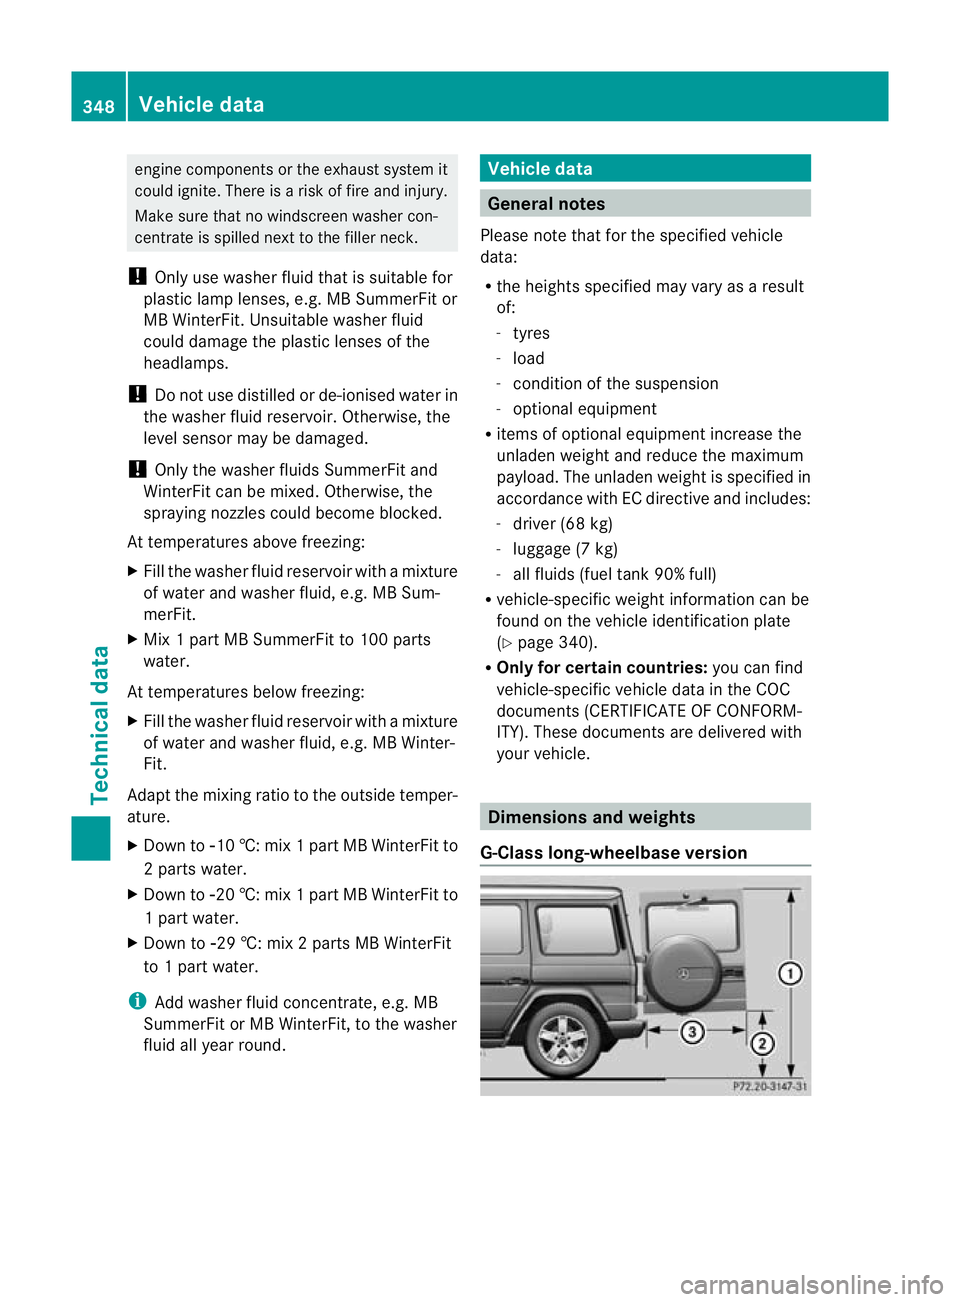
your vehicle. Dimensions and weights
G-Class long-wheelbase version 348
Vehicle dataTechnical data