rear view mirror MERCEDES-BENZ G-CLASS SUV 2013 Owners Manual
[x] Cancel search | Manufacturer: MERCEDES-BENZ, Model Year: 2013, Model line: G-CLASS SUV, Model: MERCEDES-BENZ G-CLASS SUV 2013Pages: 364, PDF Size: 9.62 MB
Page 14 of 364
Triggering the vehicle alarm ........... 280
Vehicle remote malfunction
diagnosis
....................................... 278
Vehicle remote unlocking .............. 277
Mechanical key
Function/notes ................................ 70
General notes .................................. 70
Removing
......................................... 70
Memory card (audio) ......................... 216
Memory function ................................. 95
Message memory (on-board
computer) .......................................... 225
Messages see Display messages
Mirrors
Sun visor ........................................ 269
see Exterior mirrors
see Rear-view mirror
Mobile phone
Menu (on-board computer) ............ 216
Mounting wheels
Mounting a new wheel ................... 343
Raising the vehicle ......................... 342
Removing a wheel ..........................343
Securing the vehicle against
rolling away ................................... 341
MP3
Operation ....................................... 216
see separate operating instructions
Multifunction display
Function/notes ............................. 212
Permanent display ......................... 219
Multifunction steering wheel
Back button ................................... 211
Operating the on-board computer . 210
Overview .......................................... 31N
Navigation Menu (on-board computer) ............ 214
see separate operating instructions
NECK-PRO head restraints
Operation ......................................... 47
Resetting after being triggered ........ 48
Notes on breaking-in a new
vehicle ................................................ 138 O
Occupant safety Children in the vehicle .....................54
Important safety notes ....................38
Odometer
see Trip odometer
Off-road
Differential locks ............................ 201
Off-road ABS .................................... 61
Off-road driving
Checklist ........................................ 165
Driving on sand .............................. 166
Important safety notes .................. 164
Traveling uphill ............................... 167
Off-road fording ................................. 162
Off-road system 4MATIC .......................................... 193
Oil
see Engine oil
On-board computer
AMG menu ..................................... 222
Assistance menu ........................... 218
Audio menu ................................... 215
Convenience submenu .................. 221
Display messages ..........................224
DISTRONIC PLUS ........................... 182
Factory settings submenu ............. 222
Important safety notes .................. 208
Instrument cluster submenu ..........219
Lighting submenu .......................... 219
Menu overview .............................. 212
Message memory .......................... 225
Navigation menu ............................ 214
Operation ....................................... 210
RACETIMER ................................... 222
Service menu ................................. 218
Settings menu ............................... 218
Standard display ............................ 212
Telephone menu ............................ 216
Trip menu ...................................... 212
Vehicle submenu ........................... 220
Video DVD operation ..................... 216
Operating system
see On-board computer
Outside temperature display ...........210
Overhead control panel ......................3412
Index
Page 15 of 364
Override feature
Rear side windows ........................... 59P
Paint code number ............................ 349
Paintwork (cleaning instructions) ...296
Panic alarm .......................................... 38
Parcel net ........................................... 264
Parking ............................................... 156
Engaging park position .................. 146
Important safety notes ..................156
Position of exterior mirror, front-
passenger side .................................
94
see PARKTRONIC
Parking aid
see Exterior mirrors
see PARKTRONIC
Parking brake
Applying ......................................... 157
Display message ............................ 228
Warning lamp ................................. 255
Parking lamps
Switching on/off ........................... 102
PARKTRONIC
Deactivating/activating ................. 196
Driving system ............................... 194
Function/notes ............................. 194
Important safety notes .................. 194
Problem (malfunction) ...................197
Range of the sensors ..................... 194
Trailer towing ................................. 196
Warning display ............................. 195
Pedals ................................................. 159
Plastic trim (cleaning instructions) . 298
Power supply (trailer) ....................... 206
Power washers .................................. 295
Product information ............................20
Programming SmartKey ......................................... 69
Program selector button .................. 149
Pulling away Automatic transmission ................. 140Q
Qualified specialist workshop ...........23 R
RACETIMER Deleting all laps ............................. 223
Displaying and starting ..................222
Displaying the intermediate time ...223
Resetting the current lap ............... 223
Starting a new lap ..........................223
Stopping
........................................ 223
RACETIMER (on-board computer) .... 222
Radio Selecting a station .........................215
see separate operating instructions
Reading lamp ..................................... 105
Rear bench seat Folding forward .............................. 266
Rear compartment
Setting the air vents ......................136
Rear door
Closing ............................................. 77
Display message ............................ 246
Important safety notes .................... 77
Opening ........................................... 77
Opening/closing .............................. 77
Rear fog lamp
Display message ............................ 233
Switching on/off ........................... 101
Rear lamps
see Lights
see Tail lamps
Rear seat bench
Folding into an upright position ..... 266
Rear view camera
Function/notes ............................. 197
Rear view camera (cleaning
instructions) ...................................... 298
Rear-view mirror Dipping (automatic) .........................94
Rear window defroster
Problem (malfunction) ...................133
Switching on/off ........................... 133
Rear window wiper
Switching on/off ........................... 115
Refueling
Fuel gauge ..................................... 209
Important safety notes .................. 153
Refueling process .......................... 154
see Fuel Index
13
Page 36 of 364
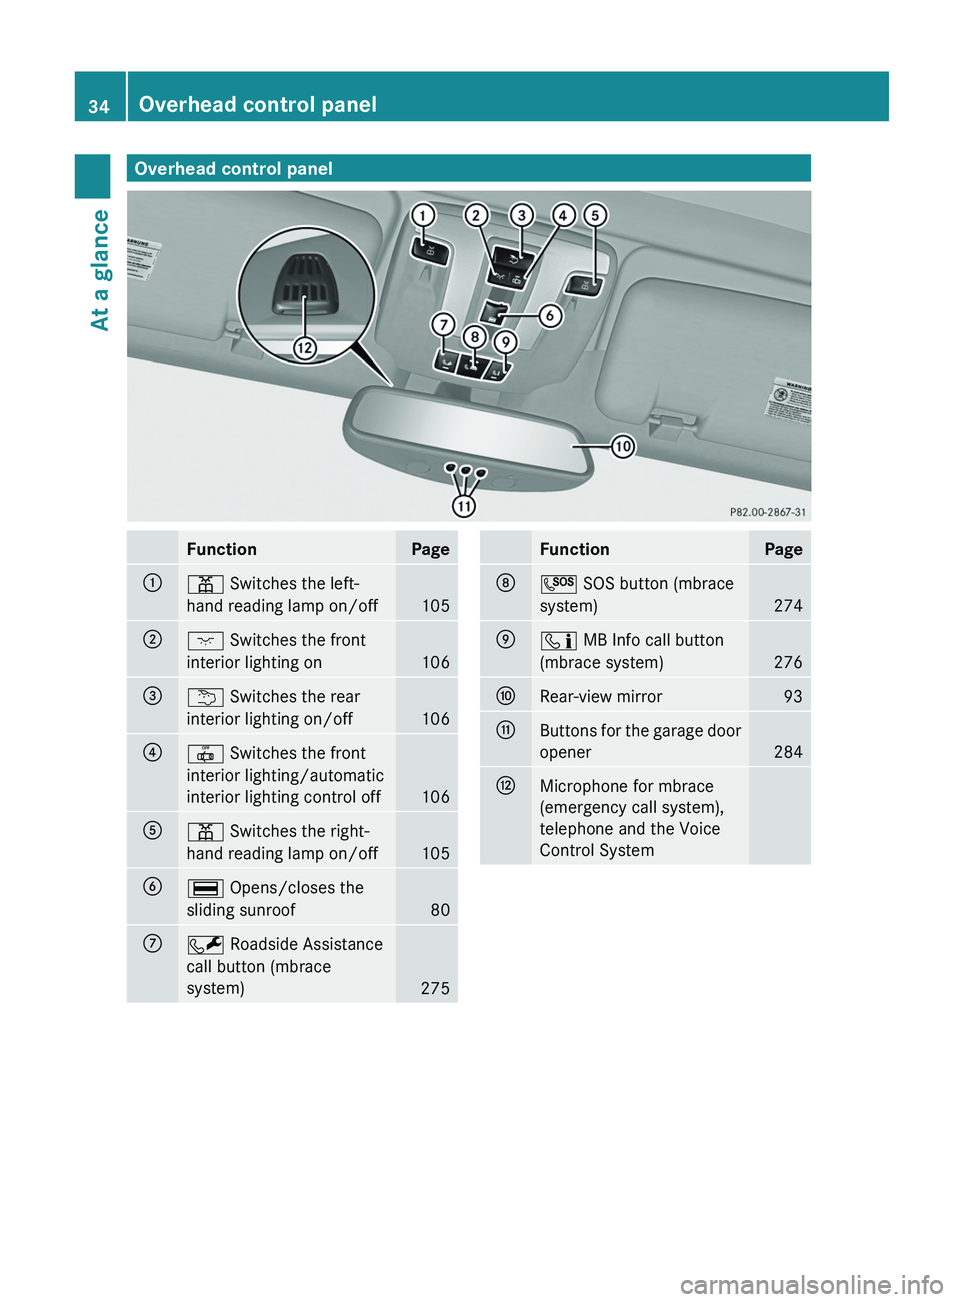
Overhead control panel
Function Page
0043
003D Switches the left-
hand reading lamp on/off
105
0044
004A Switches the front
interior lighting on
106
0087
0042 Switches the rear
interior lighting on/off
106
0085
0033 Switches the front
interior lighting/automatic
interior lighting control off
106
0083
003D Switches the right-
hand reading lamp on/off
105
0084
006A Opens/closes the
sliding sunroof
80
006B
0052 Roadside Assistance
call button (mbrace
system)
275 Function Page
006C
0053 SOS button (mbrace
system)
274
006D
00D9 MB Info call button
(mbrace system)
276
006E
Rear-view mirror 93
006F
Buttons for the garage door
opener
284
0070
Microphone for mbrace
(emergency call system),
telephone and the Voice
Control System34
Overhead control panelAt a glance
Page 86 of 364
Useful information
i This Operator's Manual describes all
models and all standard and optional
equipment of your vehicle available at the
time of publication of the Operator's
Manual. Country-specific differences are
possible. Please note that
your vehicle may
not be equipped with all features
described. This also applies to safety-
related systems and functions.
i Read the information on qualified
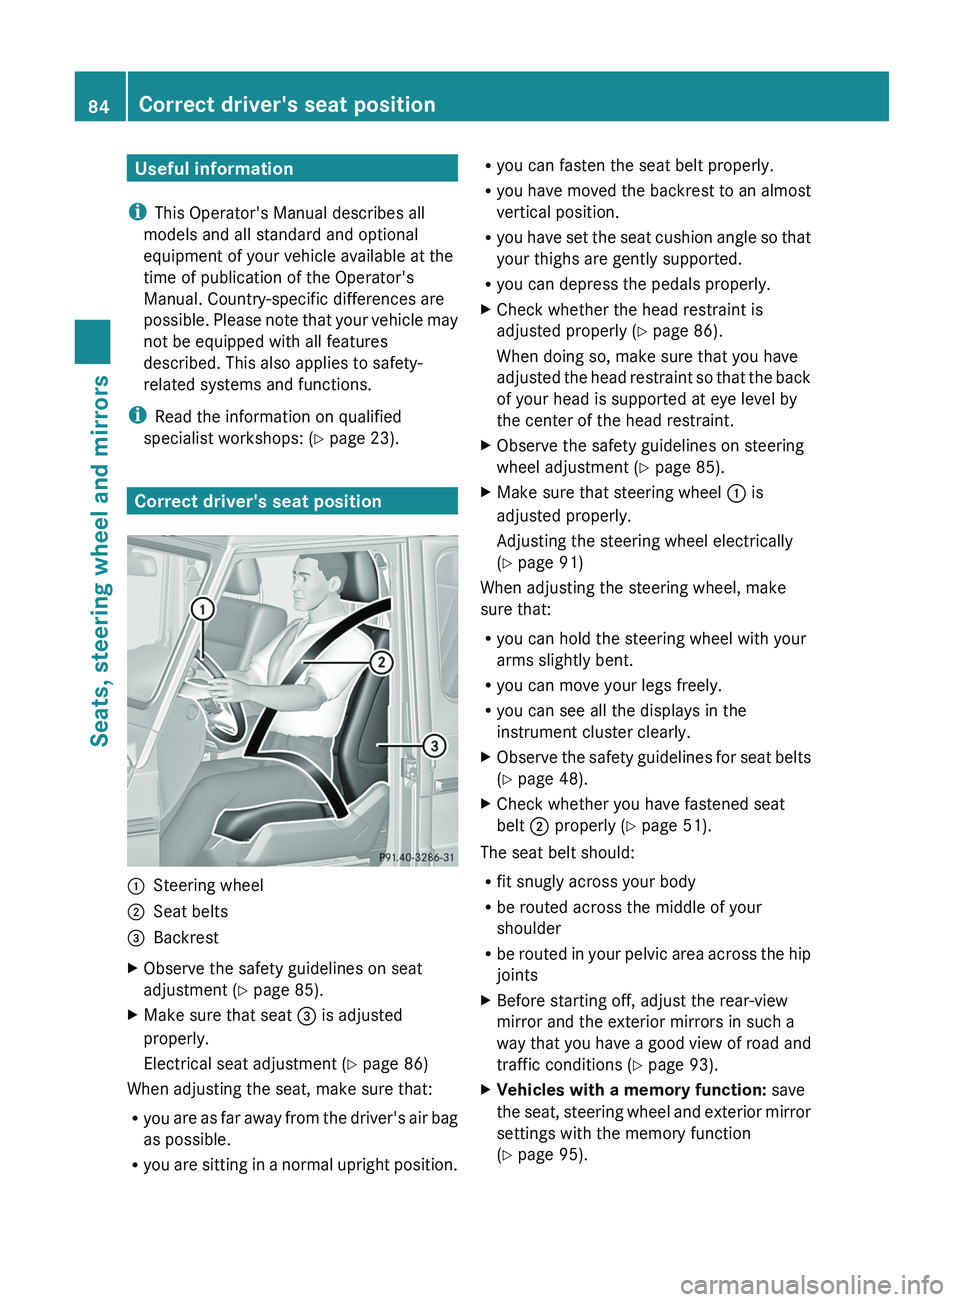
specialist workshops: ( Y page 23).Correct driver's seat position
0043
Steering wheel
0044 Seat belts
0087 Backrest
X Observe the safety guidelines on seat
adjustment ( Y page 85).
X Make sure that seat 0087 is adjusted
properly.
Electrical seat adjustment ( Y page 86)
When adjusting the seat, make sure that:
R you are as far
away from the driver's air bag
as possible.
R you are sitting in a normal upright position. R
you can fasten the seat belt properly.
R you have moved the
backrest to an almost
vertical position.
R you have set the seat cushion angle so that
your thighs are gently supported.
R you can depress the pedals properly.
X Check whether the head restraint is
adjusted properly ( Y page 86).
When doing so, make sure that you have
adjusted the
head restraint so that the back
of your head is supported at eye level by
the center of the head restraint.
X Observe the safety guidelines on steering
wheel adjustment ( Y page 85).
X Make sure that steering wheel 0043 is
adjusted properly.
Adjusting the steering wheel electrically
(Y page 91)
When adjusting the steering wheel, make
sure that:
R you can hold the steering wheel with your
arms slightly bent.
R you can move your legs freely.
R you can see all the displays in the
instrument cluster clearly.
X Observe the safety guidelines for seat belts
(Y page 48).
X Check whether you have fastened seat
belt 0044 properly ( Y page 51).
The seat belt should:
R fit snugly across your body
R be routed across the middle of your
shoulder
R be routed in your
pelvic area across the hip
joints
X Before starting off, adjust the rear-view
mirror and the exterior mirrors in such a
way that you have
a good view of road and
traffic conditions (Y page 93).
X Vehicles with a memory function: save
the seat, steering wheel
and exterior mirror
settings with the memory function
(Y page 95). 84
Correct driver's seat position
Seats, steering wheel and mirrors
Page 87 of 364
Seats
Important safety notes
G
WARNING
The seats can still be adjusted when there is
no key in the ignition lock. For this reason,
children should never be left unsupervised in
the vehicle. They could otherwise become
trapped when adjusting the seat. G
WARNING
In order to avoid possible loss of vehicle
control, all seat, head restraint, steering
wheel and rear view mirror adjustments, as
well as fastening of seat belts, must be done
before setting the vehicle in motion. G
WARNING
Do not adjust the driver's seat while driving.
Adjusting the seat while driving could cause
the driver to lose control of the vehicle.
Never travel in a
moving vehicle with the seat
backrest in an excessively reclined position as
this can be dangerous. You could slide under
the seat belt in a collision. If you slide under
it, the seat belt would apply force at the
abdomen or neck. This could cause serious or
fatal injuries. The seat backrest and seat belts
provide the best restraint when the wearer is
in a position that is as upright as possible and
seat belts are properly positioned on the
body. G
WARNING
Your seat belt must be adjusted so that you
can correctly fasten your seat belt.
Observe the following points:
R adjust the seat backrest
until your arms are
slightly angled when holding the steering
wheel.
R adjust the seat to a comfortable seating
position that still allows you to reach the
accelerator/brake pedal safely. The
position should be as far back as possible with the driver still able to operate the
controls properly.
R adjust the head restraint so that it is as
close to the head
as possible and the center
of the head restraint supports the back of
the head at eye level.
R never place hands under the seat or near
any moving parts while a seat is being
adjusted.
Failure to do so could result in an accident
and/or serious personal injury. G
WARNING
According to accident statistics, children are
safer when properly restrained on the rear
seats than on the
front-passenger seat. Thus,
we strongly recommend that children be
placed in the rear seat whenever possible.
Regardless of seating position, children 12
years old and under must be seated and
properly secured in an appropriately sized
child restraint system or booster seat
recommended for the size and weight of the
child. For additional information, see the
"Children in the vehicle" section.
A child's risk of serious or fatal injuries is
significantly increased if the child restraints
are not properly secured in the vehicle and/
or the child is not properly secured in the child
restraint. G
WARNING
For your protection, drive only with properly
positioned head restraints.
Adjust the head restraint
so that it is as close
to the head as possible and the center of the
head restraint supports the back of the head
at eye level. This will reduce the potential for
injury to the head and neck in the event of an
accident or similar situation.
Do not drive the vehicle without the seat head
restraints. Head restraints are intended to
help reduce injuries during an accident. Seats
85
Seats, steering wheel and mirrors Z
Page 90 of 364
center of the head restraint supports the back
of the head at eye level. This will reduce the
potential for injury
to
the head and neck in the
event of an accident or similar situation.
With a rear seat occupied, make sure to move
the respective head restraint up from the
lowest non-use position and have the
occupant adjust the head restraint properly.
Do not drive the vehicle without the seat head
restraints installed when the rear seats are
occupied. Head restraints are intended to
help reduce injuries during an accident. G
WARNING
Make sure the rear seat head restraints
engage when placing them upright manually.
Otherwise their protective function
cannot be
ensured.
The back of the head will not be supported in
the event of a collision. That could cause
serious or even fatal injuries. Rear seat
occupants can be seriously injured or killed.
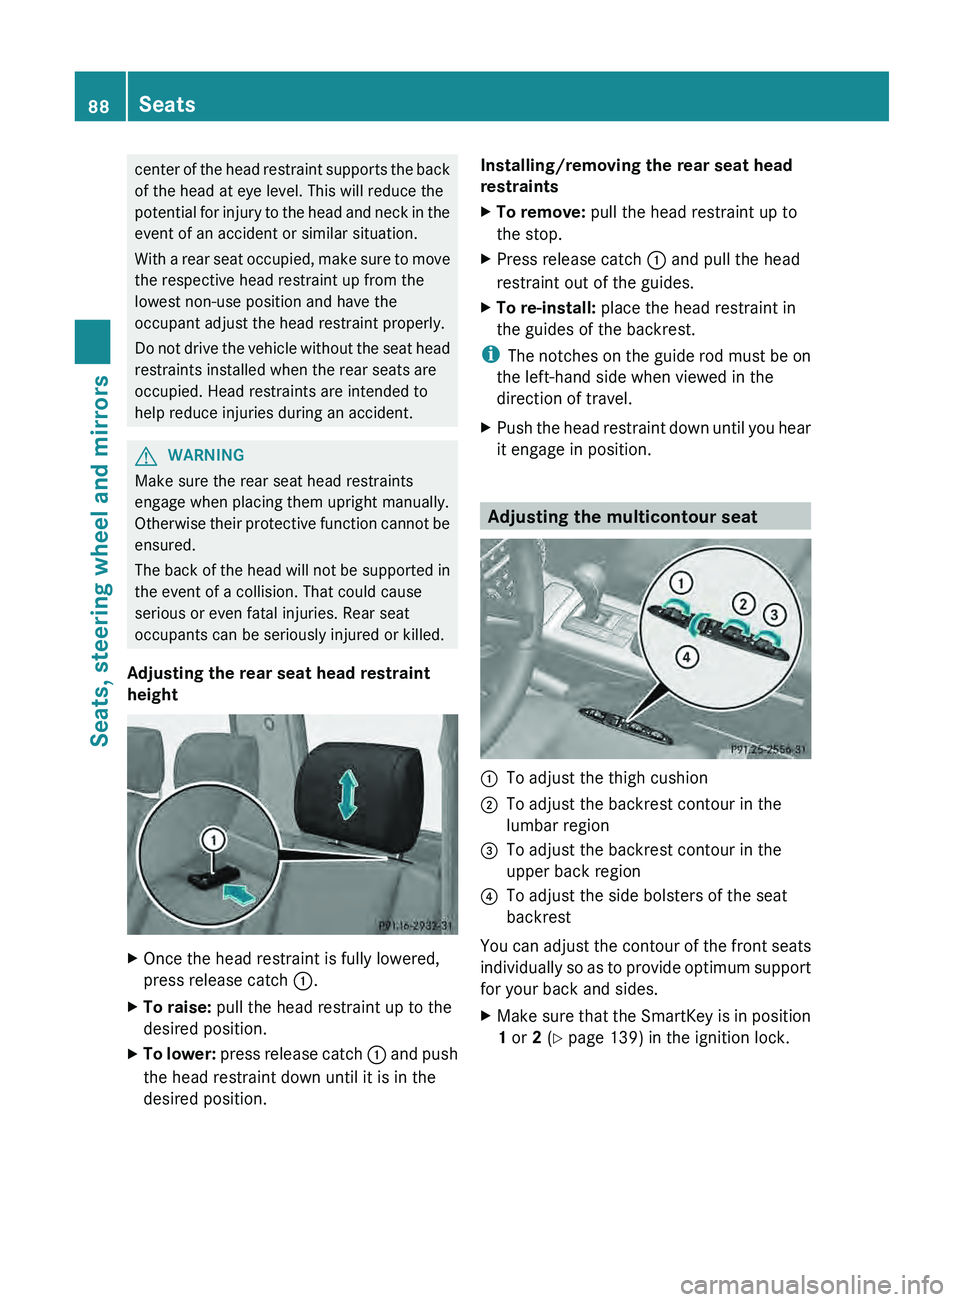
Adjusting the rear seat head restraint
height X
Once the head restraint is fully lowered,
press release catch 0043.
X To raise: pull the head restraint up to the
desired position.
X To lower:
press release catch 0043 and
push
the head restraint down until it is in the
desired position. Installing/removing the rear seat head
restraints
X
To remove: pull the head restraint up to
the stop.
X Press release catch 0043 and pull the head
restraint out of the guides.
X To re-install: place the head restraint in
the guides of the backrest.
i The notches on
the
guide rod must be on
the left-hand side when viewed in the
direction of travel.
X Push the head restraint down until you hear
it engage in position. Adjusting the multicontour seat
0043
To adjust the thigh cushion
0044 To adjust the backrest contour in the
lumbar region
0087 To adjust the backrest contour in the
upper back region
0085 To adjust the side bolsters of the seat
backrest
You can adjust the contour of the front seats
individually so as to
provide optimum support
for your back and sides.
X Make sure that the SmartKey is in position
1 or 2 (Y page 139) in the ignition lock.88
Seats
Seats, steering wheel and mirrors
Page 95 of 364
Mirrors
Rear-view mirror
X Adjust the rear-view mirror by hand so you
have a good overview of the traffic
conditions behind you. Exterior mirrors
Adjusting the exterior mirrors G
WARNING
The exterior mirrors reduce the size of the
image. Objects are actually closer than they
appear. You could misjudge
the distance from
vehicles driving behind and cause an
accident, e.g. when changing lane. For this
reason, make sure of the actual distance from
the vehicle driving behind by glancing over
your shoulder. X
Make sure that the SmartKey is in position
1 or 2 (Y page 139) in the ignition lock.
X Press button 0043 to select the left-hand
exterior mirror
or
X Press button 0044 to select the right-hand
exterior mirror.
X Press button 0087 up, down, or to the left or
right until you have adjusted the exterior
mirror to the correct position. You should
have a good overview of traffic conditions.
i The convex exterior mirrors provide a
larger field of vision. i
The exterior mirrors are automatically
heated if the rear window defroster is
switched on and the outside temperature
is low.
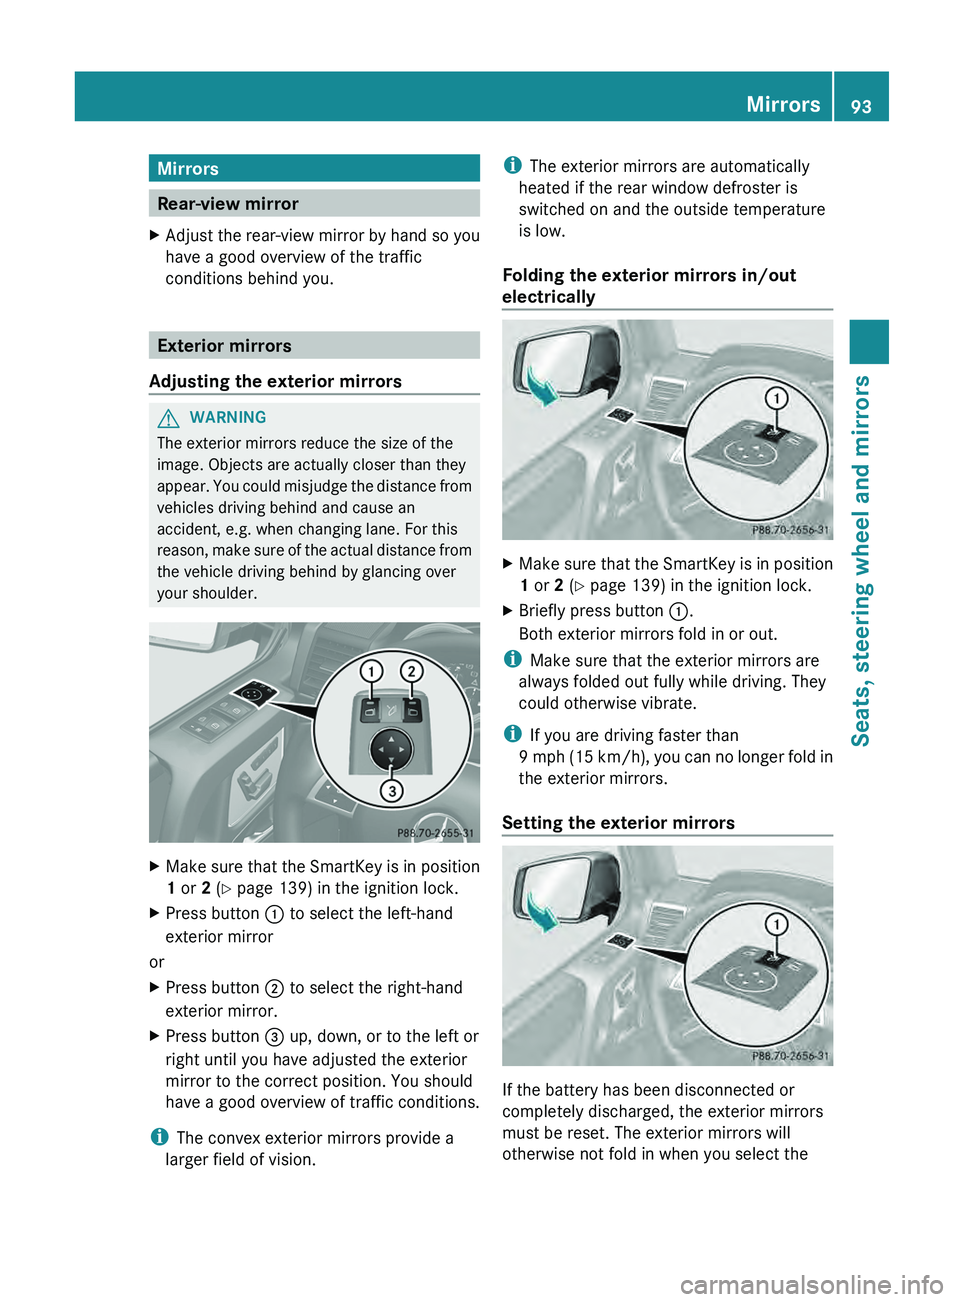
Folding the exterior mirrors in/out
electrically X
Make sure that the SmartKey is in position
1 or 2 (Y page 139) in the ignition lock.
X Briefly press button 0043.
Both exterior mirrors fold in or out.
i Make sure that the exterior mirrors are
always folded out fully while driving. They
could otherwise vibrate.
i If you are driving faster than
9 mph (15
km/h
), you can no longer fold in
the exterior mirrors.
Setting the exterior mirrors If the battery has been disconnected or
completely discharged, the exterior mirrors
must be reset. The exterior mirrors will
otherwise not fold in when you select the Mirrors
93
Seats, steering wheel and mirrors Z
Page 96 of 364
"Fold in mirrors when locking" function in the
on-board computer (Y page 221).
X
Make sure that the SmartKey is in position
1(Y page 139) in the ignition lock.
X Briefly press button 0043.
Folding the exterior mirrors in/out
automatically If the "Fold in mirrors when locking" function
is activated in the on-board computer
(Y page 221):
R
the exterior mirrors fold
in automatically as
soon as you lock the vehicle from the
outside.
R the exterior mirrors fold out again
automatically as soon as you unlock the
vehicle and then open the driver's or front-
passenger door.
Exterior mirror out of position X
Press button 0043 repeatedly until you hear
the mirror engage in position.
The mirror housing is engaged again and
you can adjust the
exterior mirrors as usual
(Y page 93). Automatic anti-glare mirrors
G
WARNING
If incident light from headlamps is prevented
from striking the sensor in the rear-view
mirror, for instance,
by
luggage piled too high
in the vehicle, the mirror's automatic anti-
glare function will not operate.
Incident light could then blind you. This may
distract you from the traffic conditions and,
as a result, you may cause an accident.
The rear-view mirror and the exterior mirror
on the driver's side automatically go into anti-
glare mode if:
R the ignition is switched on and
R incident light from headlamps strikes the
sensor in the rear-view mirror. i
The mirrors do not
go into anti-glare mode
if reverse gear is engaged or if the interior
lighting is switched on. Parking position for the exterior
mirror on the front-passenger side
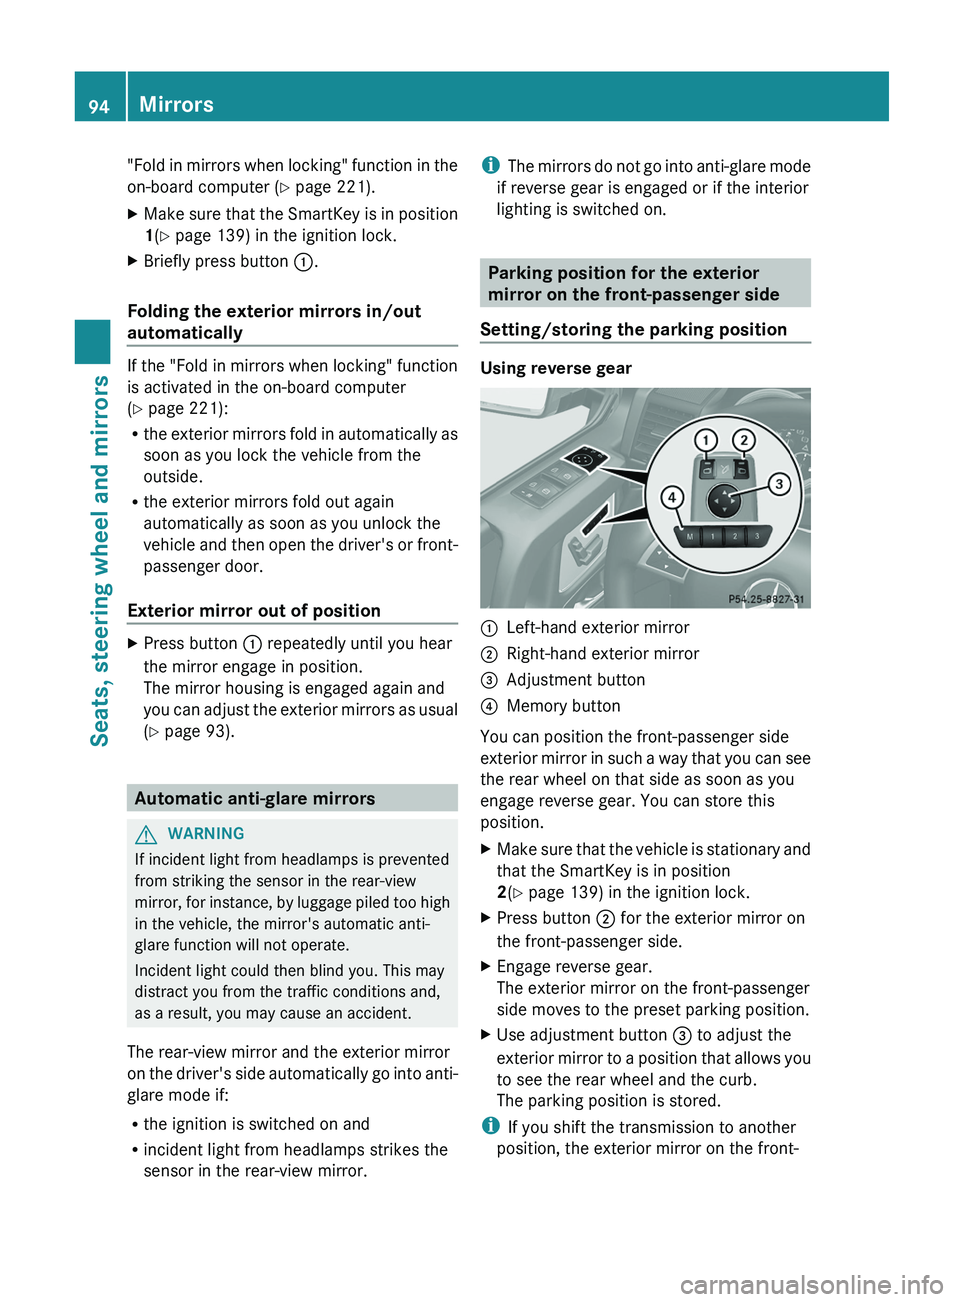
Setting/storing the parking position Using reverse gear
0043
Left-hand exterior mirror
0044 Right-hand exterior mirror
0087 Adjustment button
0085 Memory button
You can position the front-passenger side
exterior mirror in
such
a way that you can see
the rear wheel on that side as soon as you
engage reverse gear. You can store this
position.
X Make sure that the vehicle is stationary and
that the SmartKey is in position
2(Y page 139) in the ignition lock.
X Press button 0044 for the exterior mirror on
the front-passenger side.
X Engage reverse gear.
The exterior mirror on the front-passenger
side moves to the preset parking position.
X Use adjustment button 0087 to adjust the
exterior mirror to a
position that allows you
to see the rear wheel and the curb.
The parking position is stored.
i If you shift the transmission to another
position, the exterior mirror on the front- 94
Mirrors
Seats, steering wheel and mirrors
Page 107 of 364
signal or turn the steering wheel to the
straight-ahead position
The cornering light
function
may remain lit for
a short time, but is automatically switched off
after no more than three minutes. Headlamps and indicator lamps
fogged up on the inside
The headlamps and the
indicator lamps in the
exterior mirrors may fog up on the inside if
there is high atmospheric humidity.
X Drive with the headlamps switched on.
The level of moisture diminishes,
depending on the length
of the journey and
the weather conditions (humidity and
temperature).
If the level of moisture does not diminish:
X Have the headlamps checked at a qualified
specialist workshop. Interior lighting
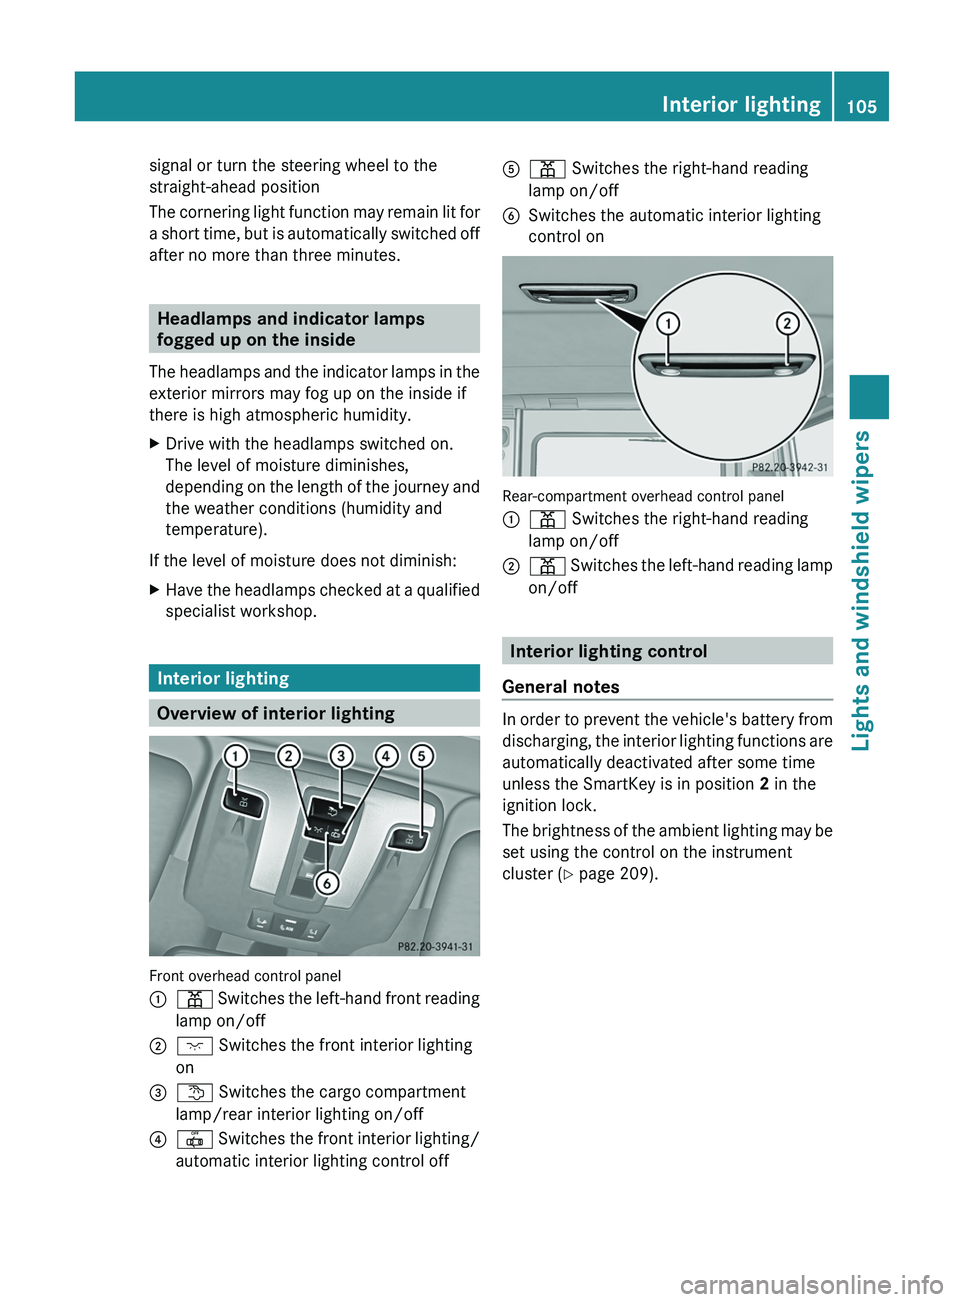
Overview of interior lighting
Front overhead control panel
0043
003D Switches the left-hand front reading
lamp on/off
0044 004A Switches the front interior lighting
on
0087 0041 Switches the cargo compartment
lamp/rear interior lighting on/off
0085 0033
Switches the front interior lighting/
automatic interior lighting control off 0083
003D Switches the right-hand reading
lamp on/off
0084 Switches the automatic interior lighting
control on Rear-compartment overhead control panel
0043
003D Switches the right-hand reading
lamp on/off
0044 003D Switches the left-hand reading lamp
on/off Interior lighting control
General notes In order to prevent the vehicle's battery from
discharging, the interior
lighting
functions are
automatically deactivated after some time
unless the SmartKey is in position 2 in the
ignition lock.
The brightness of the ambient lighting may be
set using the control on the instrument
cluster (Y page 209). Interior lighting
105
Lights and windshield wipers Z
Page 111 of 364
Bulbs and lamps are an important aspect of
vehicle safety. You
must
therefore make sure
that these function correctly at all times.
Have the headlamp setting checked regularly.
Other bulbs G
WARNING
Bulbs and lamps can become very hot. For
this reason, allow them to cool down before
changing them. Otherwise, you could burn
yourself when you touch them.
Keep bulbs out of the reach of children.
Otherwise, they could, for example, damage
the bulbs and injure themselves.
Never use a bulb which has been dropped.
Such a bulb may explode and injure you.
Halogen bulbs are pressurized and could
explode when you change them, especially if
they are very hot. You should therefore wear
eye protection and gloves when you are
changing them.
There are bulbs other than the Xenon bulbs
that you cannot replace. Replace only the
bulbs listed ( Y
page 109). Have the bulbs that
you cannot replace yourself changed at a
qualified specialist workshop.
If you require assistance changing bulbs,
consult a qualified specialist workshop.
Do not touch the glass tube of new bulbs with
your bare hands. Even minor contamination
can burn into the glass surface and reduce
the service life of the bulbs. Always use a lint-
free cloth or only touch the base of the bulb
when installing.
Only use bulbs of the correct type.
If the new bulb still does not light up, consult
a qualified specialist workshop.
Bulbs and lamps are an important aspect of
vehicle safety. You must therefore make sure
that these function correctly at all times.
Have the headlamp setting checked regularly. Before changing bulbs Have the following bulbs changed at a
qualified specialist workshop:
R
Additional turn signals in the exterior
mirrors
R High-mounted brake lamp
R High-beam/low-beam headlamps (Xenon
bulbs)
R Daytime running lamps
R Parking lamp/standing lamp
R License plate lamp
i Individual segments of the license plate
lamp LEDs may fail without a display
message appearing in the multifunction
display. Regularly check the license plate
lamp. If necessary, visit a qualified
specialist workshop.
You can replace the following bulbs:
R Fog lamp/cornering light with fog lamp
function
R Turn signal lamp (front)
R Brake/tail lamp
R Turn signal lamp (rear)
R Tail lamp/standing lamp
R Backup lamp
R Rear fog lamp
R Side marker lamps Overview: changing bulbs/bulb types
Front lamps You can change the following bulbs. The bulb
type can be found in the legend. Replacing bulbs
109
Lights and windshield wipers Z