parking brake MERCEDES-BENZ G-CLASS SUV 2014 Service Manual
[x] Cancel search | Manufacturer: MERCEDES-BENZ, Model Year: 2014, Model line: G-CLASS SUV, Model: MERCEDES-BENZ G-CLASS SUV 2014Pages: 272, PDF Size: 39.13 MB
Page 155 of 272
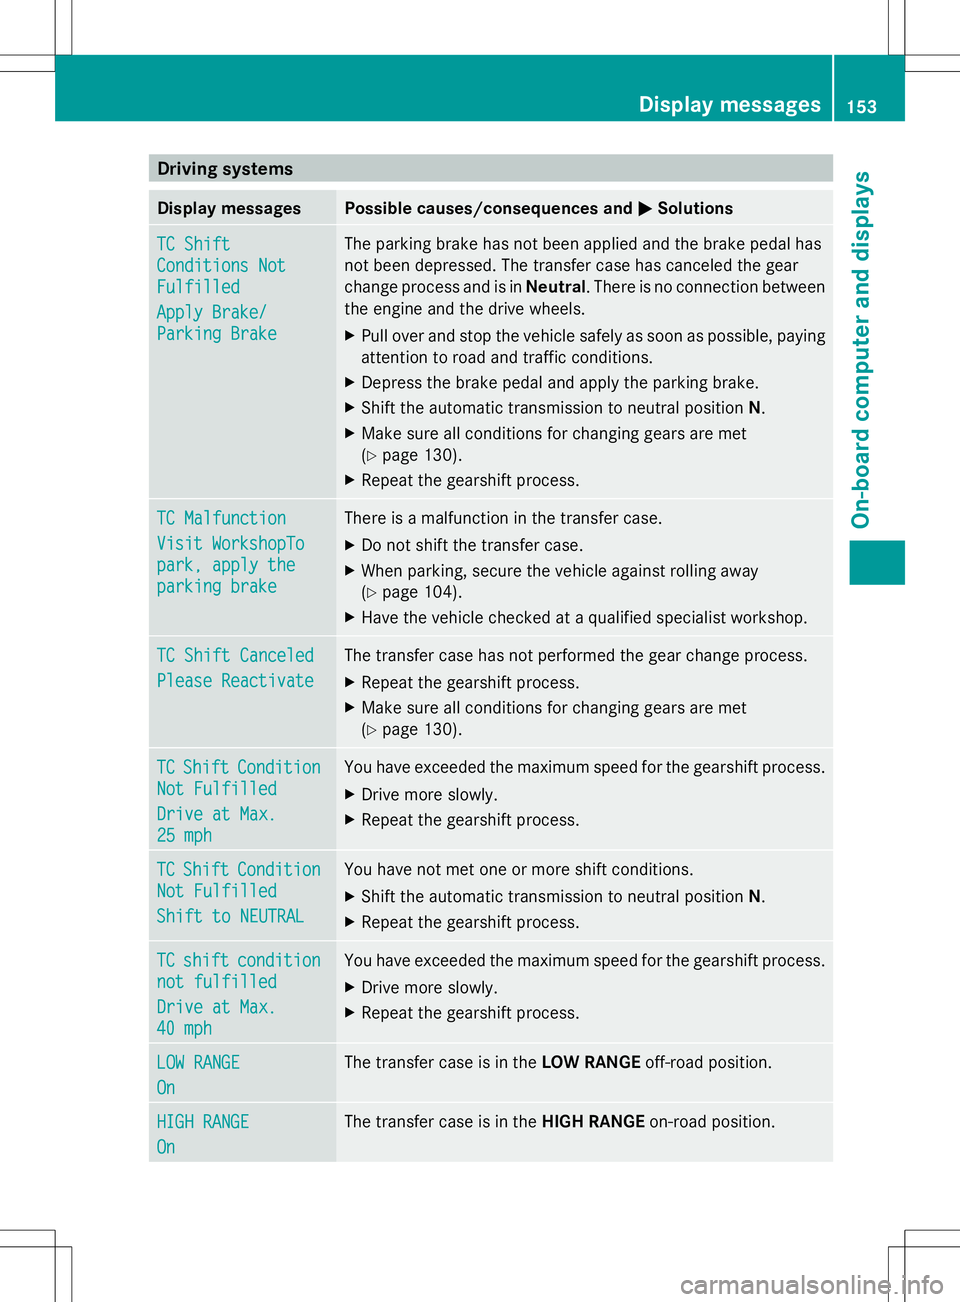
Driving systems
Display messages Possible causes/consequences and
M
MSolutions TC Shift
TC Shift
Conditions Not Conditions Not
Fulfilled Fulfilled
Apply Brake/ Apply Brake/
Parking Brake Parking Brake The parking brake has not been applied and the brake pedal has
not been depressed. The transfer case has canceled the gear
change process and is in
Neutral. There is no connection between
the engine and the drive wheels.
X Pull over and stop the vehicle safely as soon as possible, paying
attention to road and traffic conditions.
X Depress the brake pedal and apply the parking brake.
X Shift the automatic transmission to neutral position N.
X Make sure all conditions for changing gears are met
(Y page 130).
X Repeat the gearshift process. TC Malfunction TC Malfunction
Visit WorkshopTo Visit WorkshopTo
park, apply the park, apply the
parking brake parking brake There is a malfunction in the transfer case.
X
Do not shift the transfer case.
X When parking, secure the vehicle against rolling away
(Y page 104).
X Have the vehicle checked at a qualified specialist workshop. TC Shift Canceled TC Shift Canceled
Please Reactivate Please Reactivate The transfer case has not performed the gear change process.
X
Repeat the gearshift process.
X Make sure all conditions for changing gears are met
(Y page 130). TC TC
Shift
Shift Condition
Condition
Not Fulfilled
Not Fulfilled
Drive at Max. Drive at Max.
25 mph 25 mph You have exceeded the maximum speed for the gearshift process.
X
Drive more slowly.
X Repeat the gearshift process. TC TC
Shift
Shift Condition
Condition
Not Fulfilled
Not Fulfilled
Shift to NEUTRAL Shift to NEUTRAL You have not met one or more shift conditions.
X
Shift the automatic transmission to neutral position N.
X Repeat the gearshift process. TC TC
shift
shift condition
condition
not fulfilled
not fulfilled
Drive at Max. Drive at Max.
40 mph 40 mph You have exceeded the maximum speed for the gearshift process.
X
Drive more slowly.
X Repeat the gearshift process. LOW RANGE LOW RANGE
On On The transfer case is in the
LOW RANGEoff-road position. HIGH RANGE
HIGH RANGE
On On The transfer case is in the
HIGH RANGEon-road position. Display
messages
153On-board computer and displays Z
Page 216 of 272
X
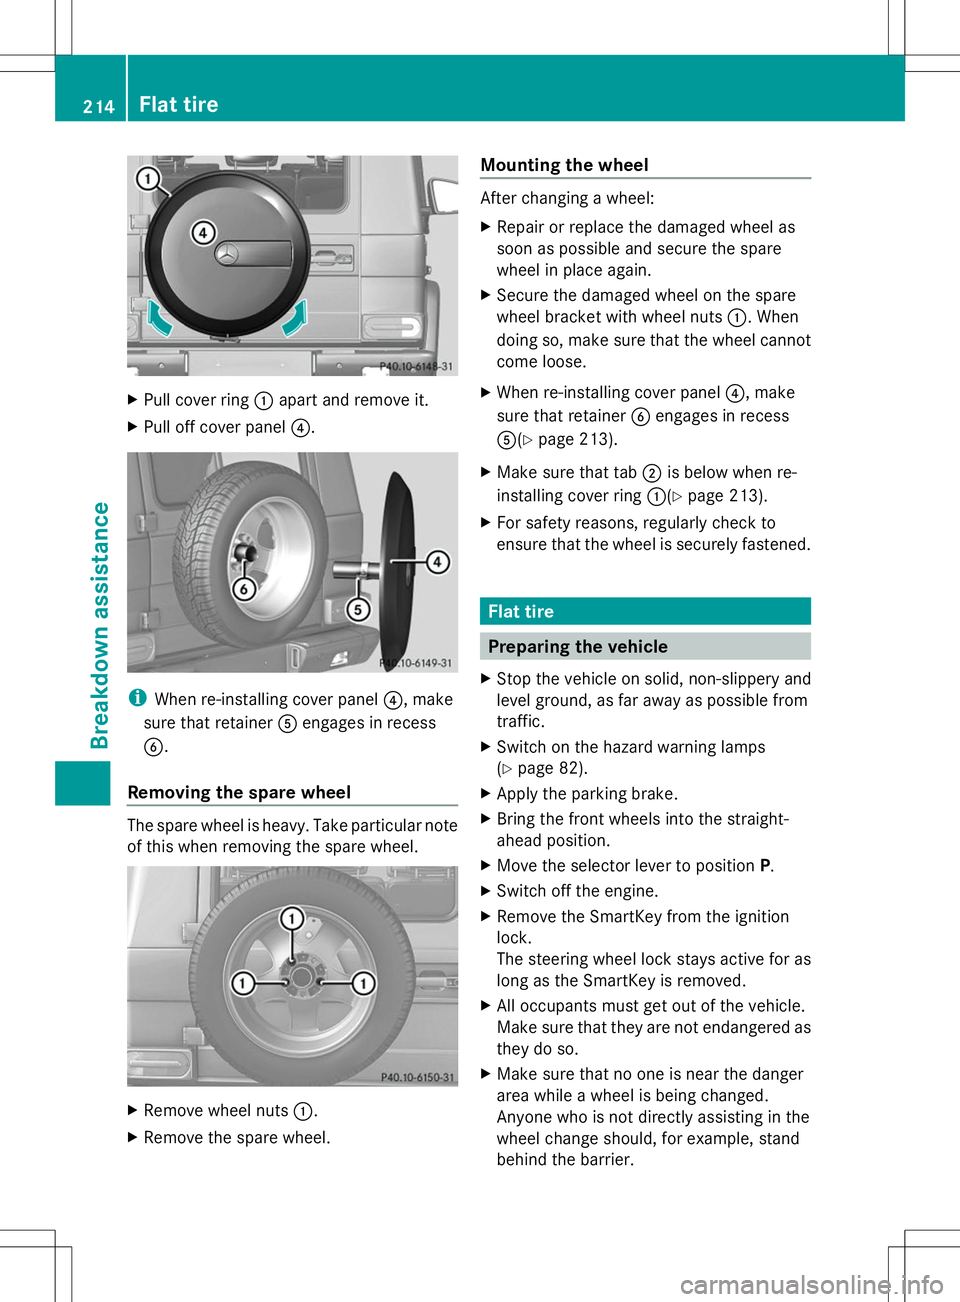
Pull cover ring :apart and remove it.
X Pull off cover panel ?.i
When re-installing cover panel ?, make
sure that retainer Aengages in recess
B.
Removing the spare wheel The spare wheel is heavy. Take particular note
of this when removing the spare wheel. X
Remove wheel nuts :.
X Remove the spare wheel. Mounting the wheel After changing a wheel:
X
Repair or replace the damaged wheel as
soon as possible and secure the spare
wheel in place again.
X Secure the damaged wheel on the spare
wheel bracket with wheel nuts :. When
doing so, make sure that the wheel cannot
come loose.
X When re-installing cover panel ?, make
sure that retainer Bengages in recess
A(Y page 213).
X Make sure that tab ;is below when re-
installing cover ring :(Ypage 213).
X For safety reasons, regularly check to
ensure that the wheel is securely fastened. Flat tire
Preparing the vehicle
X Stop the vehicle on solid, non-slippery and
level ground, as far away as possible from
traffic.
X Switch on the hazard warning lamps
(Y page 82).
X Apply the parking brake.
X Bring the front wheels into the straight-
ahead position.
X Move the selector lever to position P.
X Switch off the engine.
X Remove the SmartKey from the ignition
lock.
The steering wheel lock stays active for as
long as the SmartKey is removed.
X All occupants must get out of the vehicle.
Make sure that they are not endangered as
they do so.
X Make sure that no one is near the danger
area while a wheel is being changed.
Anyone who is not directly assisting in the
wheel change should, for example, stand
behind the barrier. 214
Flat tireBreakdown assistance
Page 222 of 272
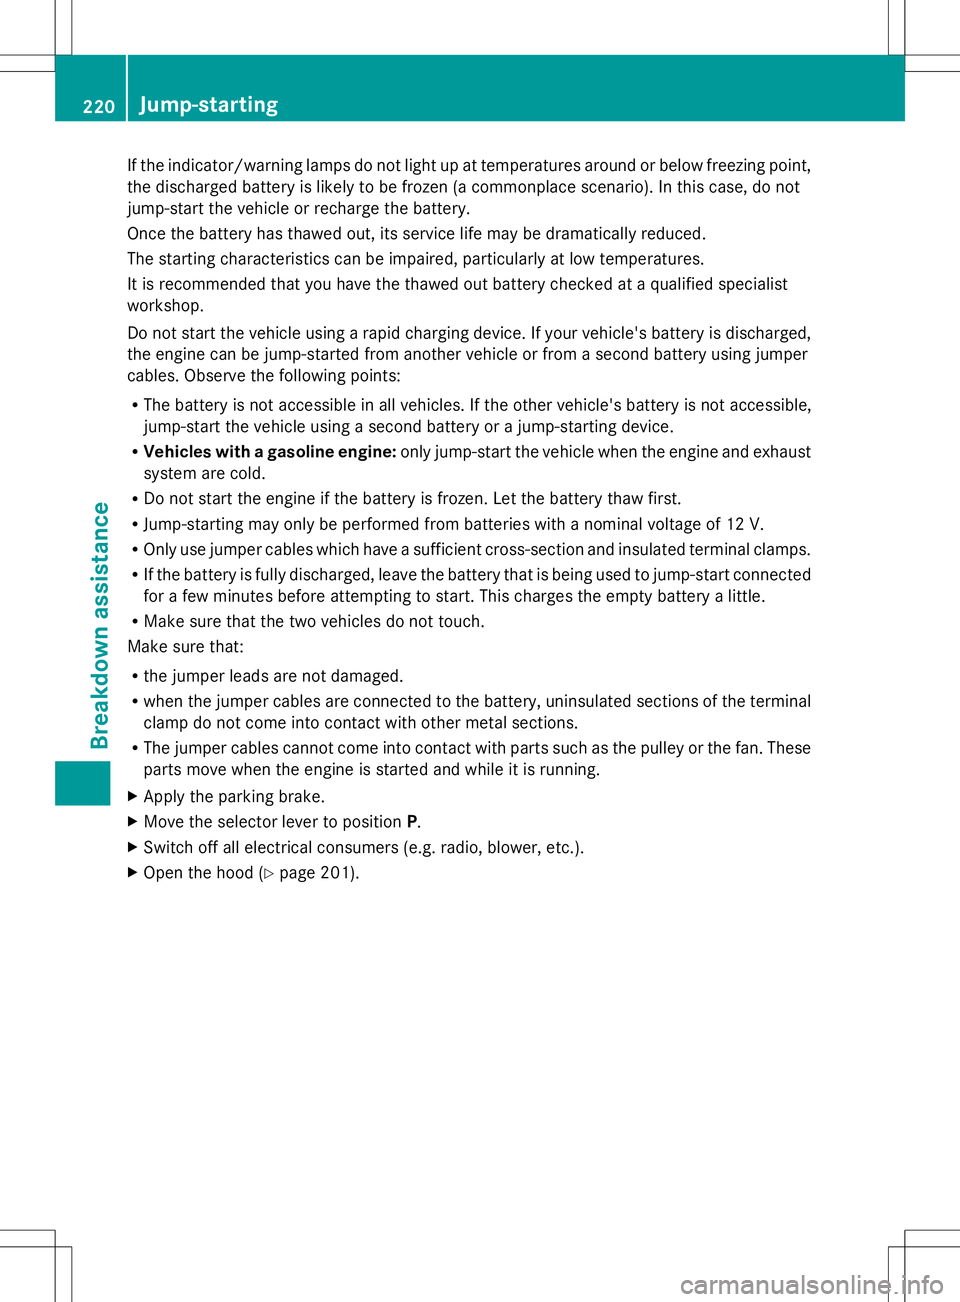
If the indicator/warning lamps do not light up at temperatures around or below freezing point,
the discharged battery is likely to be frozen (a commonplace scenario). In this case, do not
jump-start the vehicle or recharge the battery.
Once the battery has thawed out, its service life may be dramatically reduced.
The starting characteristics can be impaired, particularly at low temperatures.
It is recommended that you have the thawed out battery checked at a qualified specialist
workshop.
Do not start the vehicle using a rapid charging device. If your vehicle's battery is discharged,
the engine can be jump-started from another vehicle or from a second battery using jumper
cables. Observe the following points:
R The battery is not accessible in all vehicles. If the other vehicle's battery is not accessible,
jump-start the vehicle using a second battery or a jump-starting device.
R Vehicles with a gasoline engine: only jump-start the vehicle when the engine and exhaust
system are cold.
R Do not start the engine if the battery is frozen. Let the battery thaw first.
R Jump-starting may only be performed from batteries with a nominal voltage of 12 V.
R Only use jumper cables which have a sufficient cross-section and insulated terminal clamps.
R If the battery is fully discharged, leave the battery that is being used to jump-start connected
for a few minutes before attempting to start. This charges the empty battery a little.
R Make sure that the two vehicles do not touch.
Make sure that:
R the jumper leads are not damaged.
R when the jumper cables are connected to the battery, uninsulated sections of the terminal
clamp do not come into contact with other metal sections.
R The jumper cables cannot come into contact with parts such as the pulley or the fan. These
parts move when the engine is started and while it is running.
X Apply the parking brake.
X Move the selector lever to position P.
X Switch off all electrical consumers (e.g. radio, blower, etc.).
X Open the hood (Y page 201).220
Jump-startingBreakdown assistance
Page 225 of 272
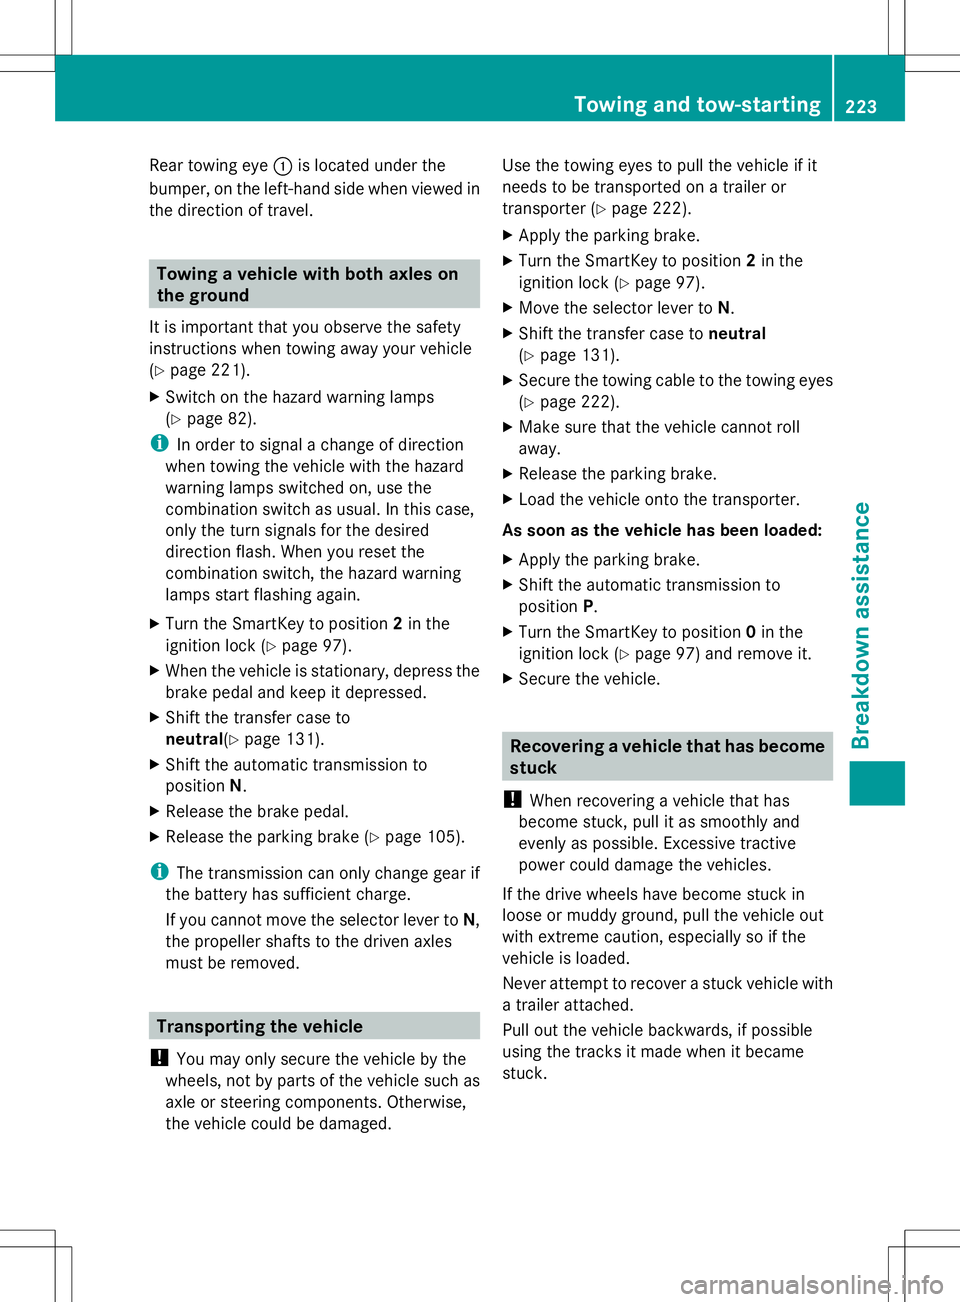
Rear towing eye
:is located under the
bumper, on the left-hand side when viewed in
the direction of travel. Towing a vehicle with both axles on
the ground
It is important that you observe the safety
instructions when towing away your vehicle
(Y page 221).
X Switch on the hazard warning lamps
(Y page 82).
i In order to signal a change of direction
when towing the vehicle with the hazard
warning lamps switched on, use the
combination switch as usual. In this case,
only the turn signals for the desired
direction flash. When you reset the
combination switch, the hazard warning
lamps start flashing again.
X Turn the SmartKey to position 2in the
ignition lock (Y page 97).
X When the vehicle is stationary, depress the
brake pedal and keep it depressed.
X Shift the transfer case to
neutral(Y page 131).
X Shift the automatic transmission to
position N.
X Release the brake pedal.
X Release the parking brake (Y page 105).
i The transmission can only change gear if
the battery has sufficient charge.
If you cannot move the selector lever to N,
the propeller shafts to the driven axles
must be removed. Transporting the vehicle
! You may only secure the vehicle by the
wheels, not by parts of the vehicle such as
axle or steering components. Otherwise,
the vehicle could be damaged. Use the towing eyes to pull the vehicle if it
needs to be transported on a trailer or
transporter (Y
page 222).
X Apply the parking brake.
X Turn the SmartKey to position 2in the
ignition lock (Y page 97).
X Move the selector lever to N.
X Shift the transfer case to neutral
(Y page 131).
X Secure the towing cable to the towing eyes
(Y page 222).
X Make sure that the vehicle cannot roll
away.
X Release the parking brake.
X Load the vehicle onto the transporter.
As soon as the vehicle has been loaded:
X Apply the parking brake.
X Shift the automatic transmission to
position P.
X Turn the SmartKey to position 0in the
ignition lock (Y page 97) and remove it.
X Secure the vehicle. Recovering a vehicle that has become
stuck
! When recovering a vehicle that has
become stuck, pull it as smoothly and
evenly as possible. Excessive tractive
power could damage the vehicles.
If the drive wheels have become stuck in
loose or muddy ground, pull the vehicle out
with extreme caution, especially so if the
vehicle is loaded.
Never attempt to recover a stuck vehicle with
a trailer attached.
Pull out the vehicle backwards, if possible
using the tracks it made when it became
stuck. Towing and tow-starting
223Breakdown assistance Z
Page 227 of 272
Before changing a fuse
X Park the vehicle and apply the parking
brake.
X Switch off all electrical consumers.
X Remove the SmartKey from the ignition
lock.
All indicator lamps in the instrument cluster
must be off.
The fuses are located in various fuse boxes:
R Main fuse box on the driver's side of the
dashboard
R Fuse box in the front-passenger footwell
R Fuse box in the transmission tunnel
R Fuse box in the battery case
R Fuse box in the cargo compartment
The fuse allocation chart and the spare fuses
are in the main fuse box on the dashboard
(Y page 225).
You will find the fuse removal device in the
vehicle tool kit (Y page 212). Dashboard fuse box
! Do not use a pointed object such as a
screwdriver to open the cover in the
dashboard. You could damage the
dashboard or the cover.
! Make sure that no moisture can enter the
fuse box when the cover is open.
! When closing the cover, make sure that it
is lying correctly on the fuse box. Moisture
seeping in or dirt could otherwise impair
the operation of the fuses. X
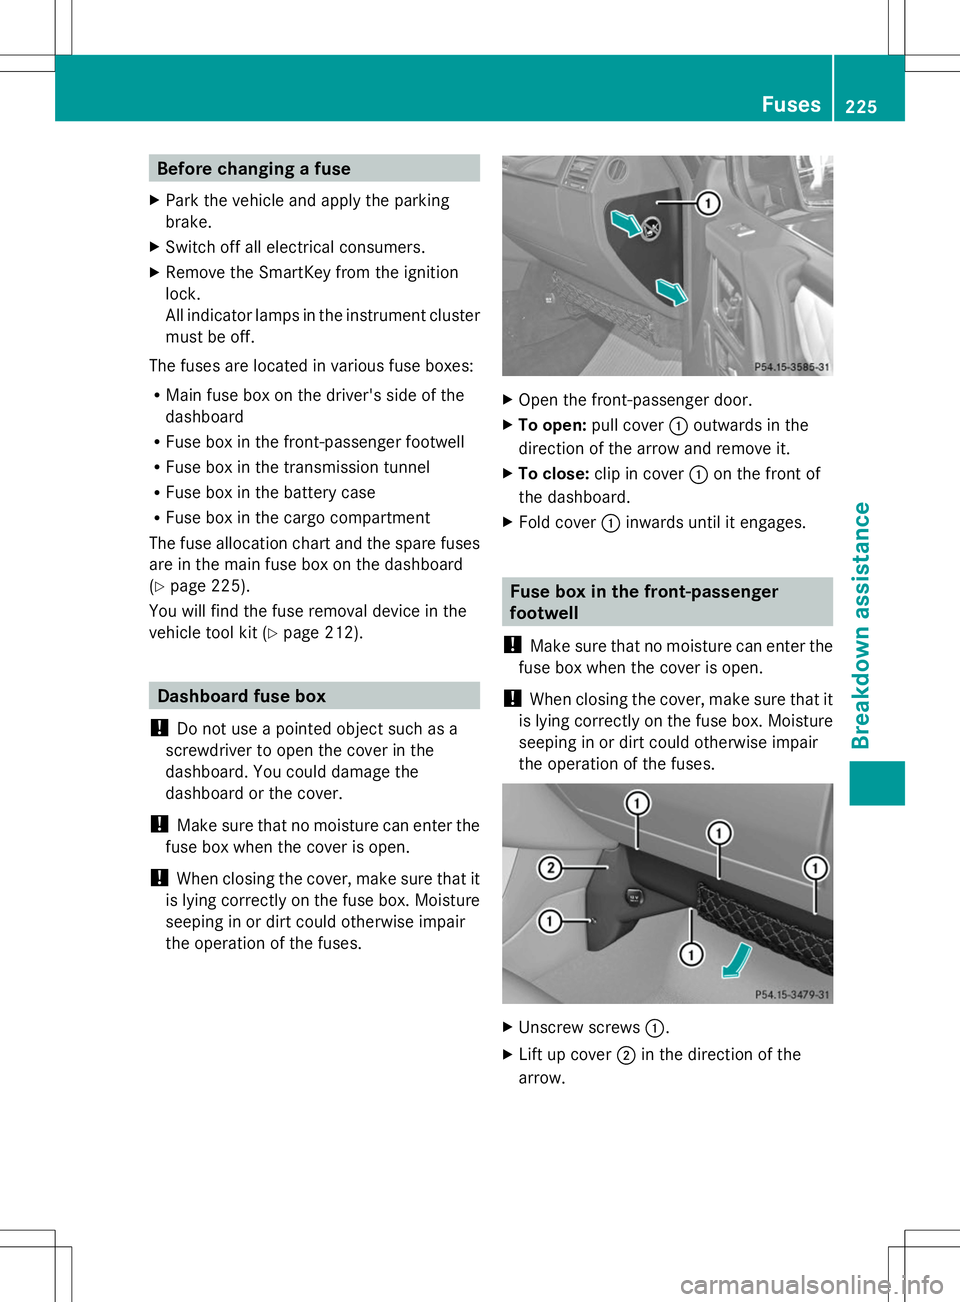
Open the front-passenger door.
X To open: pull cover :outwards in the
direction of the arrow and remove it.
X To close: clip in cover :on the front of
the dashboard.
X Fold cover :inwards until it engages. Fuse box in the front-passenger
footwell
! Make sure that no moisture can enter the
fuse box when the cover is open.
! When closing the cover, make sure that it
is lying correctly on the fuse box. Moisture
seeping in or dirt could otherwise impair
the operation of the fuses. X
Unscrew screws :.
X Lift up cover ;in the direction of the
arrow. Fuses
225Breakdo wn assis tance Z
Page 253 of 272
Securing the vehicle to prevent it from
rolling away X
On level ground: place chocks or other
suitable items under the front and rear of
the wheel that is diagonally opposite the
wheel you wish to change.
X On downhill gradients: place chocks or
other suitable items in front of the wheels
of the front and rear axle.
Raising the vehicle G
WARNING
If you do not position the jack correctly at the
appropriate jacking point of the vehicle, the
jack could tip over with the vehicle raised.
There is a risk of injury.
Only position the jack at the appropriate
jacking point of the vehicle. The base of the
jack must be positioned vertically, directly
under the jacking point of the vehicle.
! The jack is designed exclusively for
jacking up the vehicle at the jacking points.
Otherwise, your vehicle could be damaged.
The following must be observed when raising
the vehicle:
R to raise the vehicle, only use the vehicle-
specific jack that has been tested and
approved by Mercedes-Benz. If used
incorrectly, the jack could tip over with the
vehicle raised.
R the jack is designed only to raise and hold
the vehicle for a short time while a wheel
is being changed. It is not suited for
performing maintenance work under the
vehicle.
R avoid changing the wheel on uphill and
downhill slopes.
R before raising the vehicle, secure it from
rolling away by applying the parking brake
and inserting wheel chocks. Never
disengage the parking brake while the
vehicle is raised. R
the jack must be placed on a firm, flat and
non-slip surface. On a loose surface, a
large, load-bearing underlay must be used.
On a slippery surface, a non-slip underlay
must be used, e.g. rubber mats.
R do not use wooden blocks or similar
objects as a jack underlay. Otherwise, the
jack will not be able to achieve its load-
bearing capacity due to the restricted
height.
R make sure that the distance between the
underside of the tires and the ground does
not exceed 1.2 in (3 cm).
R never place your hands and feet under the
raised vehicle.
R never lie under the raised vehicle.
R never start the engine when the vehicle is
raised.
R never open or close a door or the tailgate
when the vehicle is raised.
R make sure that no persons are present in
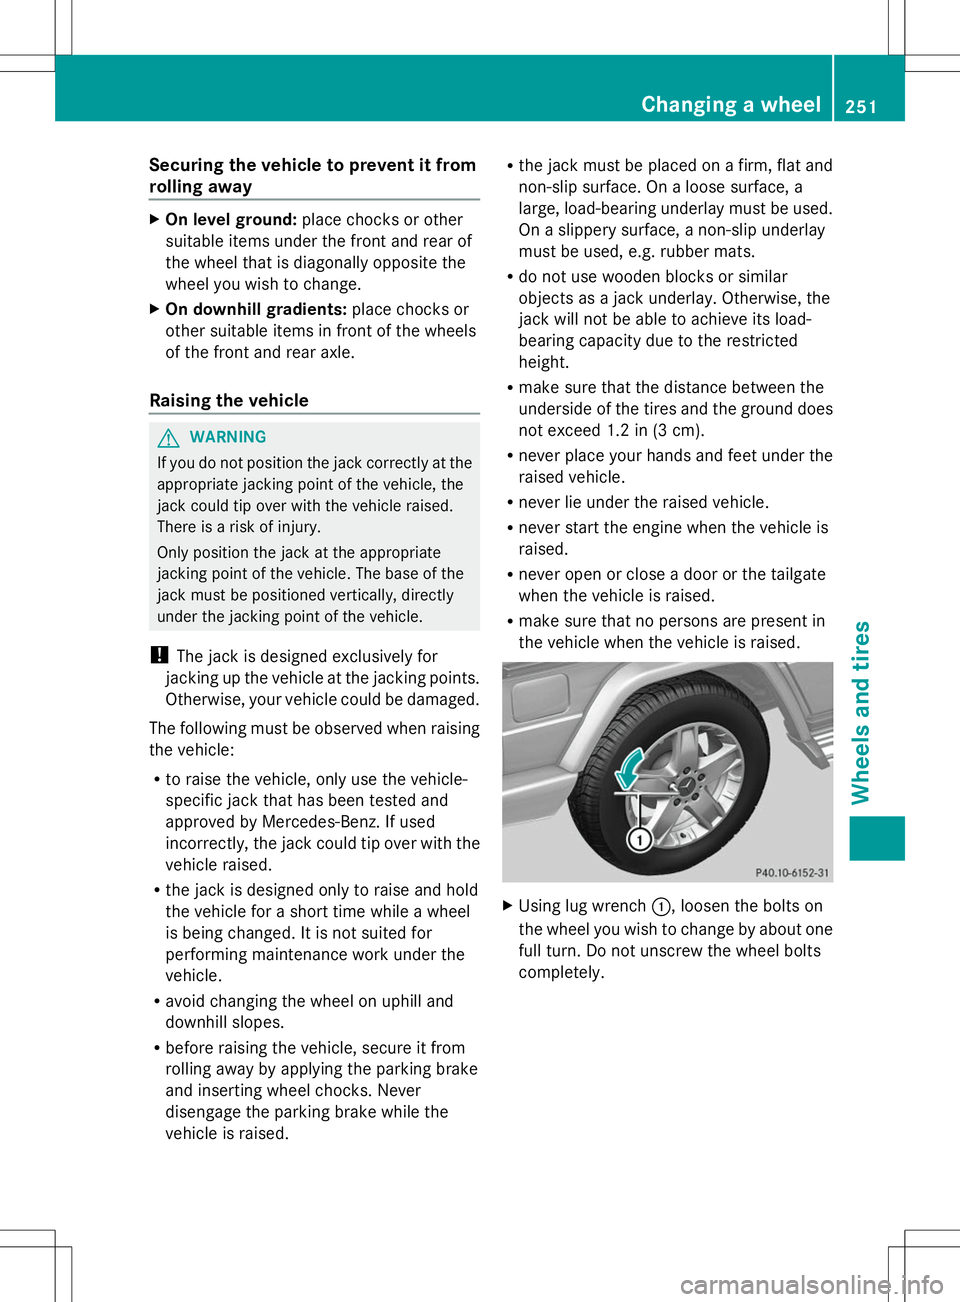
the vehicle when the vehicle is raised. X
Using lug wrench :, loosen the bolts on
the wheel you wish to change by about one
full turn. Do not unscrew the wheel bolts
completely. Changing a wheel
251Wheels and tires Z