key MERCEDES-BENZ G-CLASS SUV 2015 User Guide
[x] Cancel search | Manufacturer: MERCEDES-BENZ, Model Year: 2015, Model line: G-CLASS SUV, Model: MERCEDES-BENZ G-CLASS SUV 2015Pages: 274, PDF Size: 31.95 MB
Page 24 of 274

Introduction
In addition to the printed Operator's Manual,the vehicle document wallet also contains
further operating instructions, such as:
R Digital Operator's Manual on CD
R Maintenance Booklet
R Equipment-dependent supplements
The printed Operator's Manual provides infor-
mation on selected functions of your vehicle.
You can also access the Digital Operator's
Manual via COMAND. If you have further
questions that are not covered in the printed
Operator's Manual, please consult the Digital
Operator's Manual. The vehicle functions and
functions of COMAND are described in the
Digital Operator's Manual.
You can purchase a printed Operator's Man-
ual with the same contents as the Digital
Operator's Manual in an authorized
Mercedes-Benz Center.
iYou will not incur any costs when calling
up the Digital Operator's Manual. It works
without connecting to the Internet.
In the following sections you will find further
information about: R how to install the Digital Operator's Manual
on your COMAND ( Ypage 22)
R how to access and operate the Digital Oper-
ator's Manual
R various options for accessing the individual
topics covered by the Digital Operator's
Manual.
There are three options for accessing via the
basic menu of the Digital Operator's Manual:
R Visual search
R Keyword Search
R Contents
You can change the set language for the Dig- ital Operator's Manual under "Settings" in thebasic menu.
Installation
Check whether or not the Digital Operator's
Manual has already been installed. To do so,
call up the Digital Operator's Manual via
COMAND as follows:
X Using the COMAND controller, select the® symbol from the menu bar in the
COMAND display and press Wto confirm.
X Choose the "Operator's Manual" selection
card and press Wto confirm.
There are two possibilities:
1. The Digital Operator's Manual is instal-
led. The basic menu for the Digital Opera-
tor's Manual opens.
2. The Digital Operator's Manual is not
installed. The following message appears:
The Operator's Manual has not yet
been installed. Please insert the
correct disc.
If the Digital Operator's Manual has not yet
been installed, you have the option of instal-
ling it yourself. You will find the installation CD
required in the vehicle document wallet.
The duration of the installation process may
vary.
The installation process takes approximately
five minutes. This timespan only applies if you install the Digital Operator's Manual while the
vehicle is at a standstill and no other
COMAND functions are in use at the time. The
duration of the installation process may
increase accordingly if other COMAND func-
tions such as navigation or telephony are in
use at the time.
If you encounter any problems during instal-
lation, please contact your authorized
Mercedes-Benz Center.
X To install the Digital Operator's Manual:
stop the vehicle safely, paying attention to
road and traffic conditions.
X Turn the SmartKey to position 2in the igni-
tion lock.
X Switch on COMAND.
22Digital Operator's Manual
Page 26 of 274

XTurn cVd the COMAND controller to select
individual vehicle components.
Individual vehicle elements are highlighted in red. Just one vehicle component per view is highlighted.
X To confirm the currently selected section,press Wthe COMAND controller.
After you have selected a section, one of the following happens:
R you go straight to the corresponding sec-
tion in the Digital Operator's Manual.
R a list opens up with further, in-depth head-
ings that you can select using the COMAND controller.
R you go down a level to the visual search.
You can refine your search here by turning
the COMAND controller and selecting indi- vidual vehicle elements which are highligh-
ted in red =.
Keyword search
The keyword search allows you to perform a
keyword search using character entry. A
detailed description of character entry can be
found in the section "COMAND" under the
heading "Phone book - entering characters".
:Selection list of available keywords
;Character bar
=% Back button X
To enter a keyword: turncVd or slide
ZV ÆXVY the COMAND controller to
select a character.
X To confirm the character, press Wthe
COMAND controller.
Selection list :is then filtered.
X Select characters in the same way until
COMAND jumps automatically to selection
list :.
Alternatively, you can call up selection list :by pressing
OK.
Contents
In the contents, the topics are listed in the
same order as in the printed Operator's Man-
ual. You can select a section and then a sub-
section.
:Topic bar
;Currently selected section in the contents
=Section not currently selected in the con-
tents
?% Back symbol
X Turn cVd or slide ZVÆXVY the COMAND
controller to select the desired section.
X To confirm the selection, press Wthe
COMAND controller.
A further selection list with the correspond- ing subsection opens.
X Select the corresponding subsection in the
same way.
24Digital Operator's Manual
Page 47 of 274

vehicle. The child restraint system must beappropriate to the age, weight and size of
the child
R always observe the instructions and safety
notes in the "Children in the vehicle" sec-
tion of this Operator's Manual( Y page 55) in addition to the child
restraint system manufacturer's installa-
tion instructions
GWARNING
The seat belts may not perform their intended protective function if:
R they are damaged, modified, extremely
dirty, bleach or dyed
R the seat belt buckle is damaged or
extremely dirty
R the Emergency Tensioning Devices, belt
anchorages or inertia reels have been modi-
fied
Seat belts may sustain non-visible damage in an accident, e.g. due to glass splinters. Modi-
fied or damaged seat belts may tear or fail,
e.g. in an accident. Modified Emergency Ten-
sioning Devices could accidentally trigger or
fail to deploy when necessary. This poses an
increased risk of injury or even fatal injury.
Never modify the seat belts, Emergency Ten-
sioning Devices, belt anchorages or inertia
reels. Make sure that the seat belts are
undamaged, not worn out and clean. Follow-
ing an accident, have the seat belts checked
immediately at a qualified specialist work-shop.
Only use seat belts that have been approved
for your vehicle by Mercedes-Benz.
Proper use of the seat belts
Observe the safety notes on the seat belt ( Y page 44).
All vehicle occupants must be wearing the
seat belt correctly before beginning the jour-
ney. Also make sure that all vehicle occu-
pants are always wearing the seat belt cor-
rectly while the vehicle is in motion. When fastening the seat belt, always make
sure that:
R the seat belt tongue is only inserted to the
belt buckle belonging to that seat.
R the seat belt is tight across your body.
Avoid wearing bulky clothing, e.g. a winter coat.
R the seat belt is not twisted.
Only then can the forces which occur be
distributed over the area of the belt.
R the shoulder section of the belt is always
routed across the center of your shoulder.
The shoulder section of the belt must not
come into contact with your neck or be
routed under your arm. Where possible,
adjust the seat belt to the appropriate
height.
R the lap belt passes tightly and as low down
as possible across your lap.
The lap belt must always be routed across
your hip joints and not across your abdo-
men. This applies particularly to pregnant
women. If necessary, push the lap belt
down to your hip joint and pull it tight usingthe shoulder section of the belt.
R the seat belt is not routed across sharp,
pointed or fragile objects.
If you have such items located on or in your
clothing, e.g. pens, keys or eyeglasses,
store these in a suitable place.
R only one person is using a seat belt at atime.
Infants and children must never travel sit-
ting on the lap of a vehicle occupant. In the
event of an accident, they could be crushed
between the vehicle occupant and seat
belt.
R objects are never secured with a seat belt if
the seat belt is also being used by one of the
vehicle's occupants.
Seat belts are only intended to secure and
restrain vehicle occupants. Always observe
the "Loading guidelines" for securing objects,
luggage or loads ( Ypage 192).
Occupant safety45
Safety
Z
Page 57 of 274

Automatic measures after an acci-
dent
Immediately after an accident, the following
measures are implemented, depending on
the type and severity of the impact:R the hazard warning lamps are activated
R the emergency lighting is activated
R the vehicle doors are unlocked
R the front side windows are lowered
R the electrically adjustable steering wheel is
raised
R the engine is switched off and the fuel sup-
ply is cut off
R vehicles with mbrace: automatic emer-
gency call
Children in the vehicle
Important safety notes
Accident statistics show that children
secured in the rear seats are safer than chil-
dren secured in the front seats. For this rea-
son, Mercedes-Benz strongly advises that you
install a child restraint system on a rear seat.
Children are generally better protected there.
If a child younger than twelve years and under
5 ft (1.50 m)in height is traveling in the vehi-
cle:
R always secure this child in a restraint sys-
tem approved for Mercedes-Benz vehicles.
The child restraint system must be appro-
priate to the age, weight and size of thechild.
R be sure to observe the instructions and
safety notes in this section in addition to
the child restraint system manufacturer's
installation instructions.
GWARNING
If you leave children unsupervised in the vehi-
cle, they could set it in motion by, for example:
R release the parking brake.
R shift the automatic transmission out of the
parking position P.
R start the engine.
In addition, they may operate vehicle equip-
ment and become trapped. There is a risk of
an accident and injury.
When leaving the vehicle, always take the
SmartKey with you and lock the vehicle. Never
leave children unsupervised in the vehicle.
GWARNING
If persons, particularly children are subjected to prolonged exposure to extreme heat or
cold, there is a risk of injury, possibly even
fatal. Never leave children unattended in the
vehicle.
GWARNING
If the child restraint system is subjected to
direct sunlight, parts may get very hot. Chil-
dren may burn themselves on these parts,
particularly on the metal parts of the child
restraint system. There is a risk of injury.
If you leave the vehicle, taking the child with
you, always ensure that the child restraint
system is not exposed to direct sunlight. Pro-tect it with a blanket, for example. If the child
restraint system has been exposed to direct
sunlight, let it cool down before securing the
child in it. Never leave children unattended inthe vehicle.
Always make sure that all vehicle occupants
are positioned properly in their seats and
have correctly fastened their seat belts. Take
particular care with children.
Please take note of the safety notes on seat
belts ( Ypage 44) and the notes on their cor-
rect use ( Ypage 45).
A booster seat may be necessary to achieve
proper seat belt positioning for children over
Children in the vehicle55
Safety
Z
Page 61 of 274

XRoute Top Tether belt =under the head
restraint between the two head restraint
bars.
X Hook Top Tether hook :of Top Tether belt
= into Top Tether anchorage ;.
Make sure that Top Tether belt Bis not
twisted.
X Tension Top Tether belt =. Always comply
with the child restraint system manufactur-
er's installation instructions when doing so.
X Move head restraint back down again
slightly if necessary ( Ypage 85). Make
sure that you do not interfere with the cor-
rect routing of Top Tether belt =.
BabySmart™ air bag deactivation sys-
tem
The BabySmart™ air bag deactivation sys-
tem's sensor system in the front-passenger
seat detects whether a special Mercedes-
Benz child restraint system with a trans-
ponder for the BabySmart™ air bag deactiva-
tion system has been installed. In this case,
the PASSENGER AIR BAG OFF indicator lamp lights up and remains lit. The front-passengerfront air bag is deactivated.
When the SmartKey is removed from the igni-
tion lock or is in position 0, the PASSENGER
AIR BAG OFF indicator lamp is not lit.
iIf the front-passenger front air bag is
deactivated by the BabySmart™ air bag
deactivation system, the following remain
enabled on the front-passenger side:
R the side impact air bag
R the pelvis air bag
R the window curtain air bag
R the Emergency Tensioning Device
GWARNING
If you secure a child in a child restraint system
on the front-passenger seat and the
PASSENGER AIR BAG OFF indicator lamp is
off, the front-passenger front air bag can
deploy in the event of an accident. The child
could be struck by the air bag. This poses an
increased risk of injury or even fatal injury.
Make sure that the front-passenger front air
bag has been disabled. The PASSENGER AIR
BAG OFF indicator lamp must be lit.
GWARNING
If the PASSENGER AIR BAG OFF indicator
lamp is lit, the front-passenger front air bag isdeactivated. It will not be deployed in the
event of an accident and cannot perform its
intended protective function. A person in the
front-passenger seat could then, for example, come into contact with the vehicle's interior,
especially if the person is sitting too close to
the dashboard. This poses an increased risk of injury or even fatal injury.
In this case the front-passenger seat may notbe used. You may only transport a child on the
front-passenger seat if they are seated in a
suitable rearward or forward-facing child
restraint system. Always observe the child
restraint system manufacturer's installation
instructions.
GWARNING
If you secure a child in a forward-facing child
restraint system on the front-passenger seat
and you position the front-passenger seat too close to the dashboard, in the event of an
accident, the child could:
R come into contact with the vehicle's inte-
rior if the PASSENGER AIR BAG OFF indi-
cator lamp is lit, for example
R be struck by the air bag if the PASSENGER
AIR BAG OFF indicator lamp is off
This poses an increased risk of injury or even fatal injury.
Move the front-passenger seat as far back as
possible. Always make sure that the shoulder belt strap is correctly routed from the vehicle
belt sash guide to the shoulder belt guide on
the child restraint system. The shoulder belt
strap must be routed forwards and down-
wards from the belt sash guide. If necessary,
adjust the belt sash guide and the front-
Child ren in the vehi cle59
Safety
Z
Page 62 of 274
passenger seat accordingly. Always observe
the information about suitable positioning of
the child restraint system in this Operator's
Manual as well as the child restraint system
manufacturer's installation instructions.
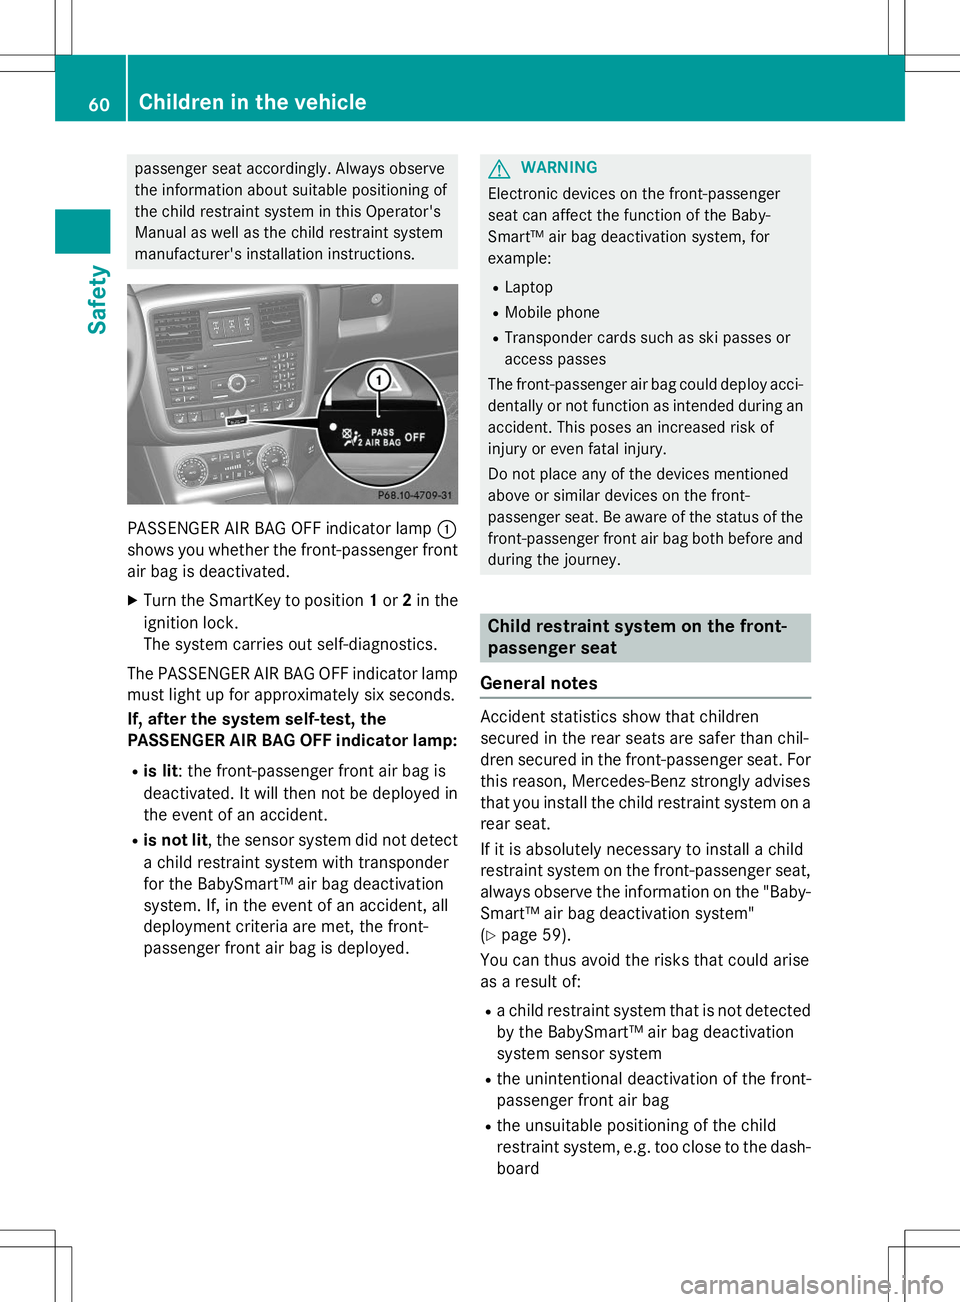
PASSENGER AIR BAG OFF indicator lamp:
shows you whether the front-passenger front air bag is deactivated.
X Turn the SmartKey to position 1or 2in the
ignition lock.
The system carries out self-diagnostics.
The PASSENGER AIR BAG OFF indicator lamp
must light up for approximately six seconds.
If, after the system self-test, the
PASSENGER AIR BAG OFF indicator lamp: R is lit : the front-passenger front air bag is
deactivated. It will then not be deployed in
the event of an accident.
R is not lit , the sensor system did not detect
a child restraint system with transponder
for the BabySmart™ air bag deactivation
system. If, in the event of an accident, all
deployment criteria are met, the front-
passenger front air bag is deployed.
GWARNING
Electronic devices on the front-passenger
seat can affect the function of the Baby-
Smart™ air bag deactivation system, forexample:
R Laptop
R Mobile phone
R Transponder cards such as ski passes or
access passes
The front-passenger air bag could deploy acci-
dentally or not function as intended during an accident. This poses an increased risk of
injury or even fatal injury.
Do not place any of the devices mentioned
above or similar devices on the front-
passenger seat. Be aware of the status of thefront-passenger front air bag both before andduring the journey.
Child restraint system on the front-
passenger seat
General notes
Accident statistics show that children
secured in the rear seats are safer than chil-
dren secured in the front-passenger seat. For this reason, Mercedes-Benz strongly advises
that you install the child restraint system on a
rear seat.
If it is absolutely necessary to install a child
restraint system on the front-passenger seat,
always observe the information on the "Baby- Smart™ air bag deactivation system"( Y page 59).
You can thus avoid the risks that could arise
as a result of:
R a child restraint system that is not detected
by the BabySmart™ air bag deactivation
system sensor system
R the unintentional deactivation of the front-
passenger front air bag
R the unsuitable positioning of the child
restraint system, e.g. too close to the dash-
board
60Children in the vehicle
Safety
Page 65 of 274

GWARNING
When leaving the vehicle, always remove the
SmartKey from the ignition lock. Always take
the SmartKey with you and lock the vehicle.
Do not leave children unattended in the vehi-cle, even if they are secured in a child restraint
system, or with access to an unlocked vehicle. A child's unsupervised access to a vehicle
could result in an accident and/or serious
personal injury. The children could: R injure themselves on parts of the vehicle
R be seriously or fatally injured through
excessive exposure to extreme heat or cold
R injure themselves or cause an accident with
vehicle equipment that can be operated
even if the SmartKey is removed from the
ignition lock or removed from the vehicle,
such as seat adjustment, steering wheel
adjustment, or the memory function
If children open a door, they could injure other
persons or get out of the vehicle and injure
themselves or be injured by following traffic.
Do not expose the child restraint system to
direct sunlight. The child restraint system's
metal parts, for example, could become very
hot, and the child could be burned on theseparts.
Child-proof locks for the rear doors
GWARNING
Children could open a rear door from inside
the vehicle. This could result in serious inju-
ries or an accident. Therefore, when children
ride in the rear always secure the rear doors
with the child-proof locks.
You secure each door individually with the
child-proof locks on the rear doors. A door
secured with a child-proof lock cannot be
opened from inside the vehicle. When the
vehicle is unlocked, the door can be opened
from the outside.
X To activate: press the child-proof lock
lever down in the direction of arrow ;.
X Make sure that the child-proof locks are
working properly.
X To deactivate: press the child-proof lock
lever up in the direction of arrow :.
Override feature for the rear side win-dows
GWARNING
When children ride on the vehicle's rear seats,
activate the override switch. Otherwise, the
children could be injured, e.g. by trapping
themselves in the rear side window.
X To activate/deactivate: press button:.
If indicator lamp ;is lit, operation of the
rear side windows is disabled. Operation is
only possible using the switches in the driv- er's door. If indicator lamp ;is off, oper-
ation is possible using the switches in the
rear compartment.
Children in the vehicle63
Safety
Z
Page 70 of 274
 (on AMG vehicles above
62 mph (100 km/h)) or you exceed a cer-
tain lateral acceleration.
Traile")
iIf ESP®
is deactivated, it is reactivated
automatically if you are driving at above
37 mph (60 km/h) (on AMG vehicles above
62 mph (100 km/h)) or you exceed a cer-
tain lateral acceleration.
Trailer stabilization
GWARNING
If road and weather conditions are poor,
trailer stabilization will not be able to prevent the vehicle/trailer combination from swerv-
ing. Trailers with a high center of gravity can
tip over before ESP ®
can detect this. There is
a risk of an accident.
Always adapt your driving style to the prevail- ing road and weather conditions.
Trailer stabilization does not work if ESP ®
is
deactivated because of a malfunction.
If your vehicle with trailer (vehicle/trailer
combination) begins to lurch, you can only
stabilize the vehicle/trailer combination by
depressing the brake firmly.
In this situation, ESP ®
assists you and can
detect if the vehicle/trailer combination
begins to lurch. ESP ®
slows the vehicle down
by braking and limiting the engine output until the vehicle/trailer combination has stabi- lized.
Trailer stabilization is active above speeds of
about 37 mph (60 km/h).
EBD (electronic brake force distribu- tion)
iObserve the "Important safety notes" sec-
tion ( Ypage 64).
GWARNING
If EBD is malfunctioning, the rear wheels can
lock, e.g. under full braking. This increases the
risk of skidding and an accident.
You should therefore adapt your driving style
to the different handling characteristics. Have
the brake system checked at a qualified spe-
cialist workshop.
Observe information regarding indicator and
warning lamps ( Ypage 163) as well as dis-
play messages ( Ypage 148).
EBD monitors and controls the brake pres-
sure on the rear wheels to improve driving
stability while braking.
ADAPTIVE BRAKE
ADAPTIVE BRAKE provides increased braking
safety. In addition to the braking function,
ADAPTIVE BRAKE also has the HOLD function
( Y page 126) and hill start assist
( Y page 105).
Theft deterrent locking system
Immobilizer
X
To activate: remove the SmartKey from
the ignition lock.
X To deactivate: switch on the ignition.
The immobilizer prevents your vehicle from
being started without the correct SmartKey.
When leaving the vehicle, always take the
SmartKey with you and lock the vehicle. The
engine can be started by anyone with a valid
SmartKey that is left inside the vehicle.
iThe immobilizer is always deactivated
when you start the engine.
In the event that the engine cannot be star-
ted when the starter battery is fully
charged, the immobilizer may be faulty.
Contact an authorized Mercedes-Benz
Center or call 1-800-FOR-MERCedes (in the USA) or 1-800-387-0100 (in Canada).
68Theft deterrent locking system
Safety
Page 71 of 274

XTo arm: lock the vehicle with the Smart-
Key.
Indicator lamp :flashes. The alarm sys-
tem is armed after approximately
15 seconds.
X To disarm: unlock the vehicle with")
ATA (anti-theft alarm system)
XTo arm: lock the vehicle with the Smart-
Key.
Indicator lamp :flashes. The alarm sys-
tem is armed after approximately
15 seconds.
X To disarm: unlock the vehicle with the
SmartKey.
iIf you then do not open a side door or the
rear door, the alarm system switches back
on again after approximately 40 seconds.
X To stop the alarm: insert the SmartKey
into the ignition lock.
The alarm is switched off.
or X Press the %or& button on the
SmartKey.
The alarm is switched off.
A visual and audible alarm is triggered if the
alarm system is armed and you open: R a door
R a door using the mechanical key
R the rear door
R the hood
The alarm is also triggered if:
R the position of the vehicle is changed.
R a window is smashed.
The alarm is not switched off, even if you
close the open door that triggered it, for
example.
iIf the alarm stays on for more than
30 seconds, the mbrace emergency call
system (USA only) or Tele Aid system (Can- ada only) initiates a call to the Customer
Assistance Center automatically. The
mbrace emergency call system initiates the
call if:
R you have subscribed to the Tele Aid ser-
vice.
R the Tele Aid service has been activated
properly.
R the required mobile phone, power supply
and GPS are available.
Theft deterrent locking system69
Safety
Z
Page 73 of 274

Useful information..............................72
SmartKey ............................................. 72
Doors .................................................... 75
Rear door ............................................. 76
Side windows ...................................... 77
Sliding sunroof .................................... 77
71
Opening and closing