buttons MERCEDES-BENZ G-CLASS SUV 2015 Owners Manual
[x] Cancel search | Manufacturer: MERCEDES-BENZ, Model Year: 2015, Model line: G-CLASS SUV, Model: MERCEDES-BENZ G-CLASS SUV 2015Pages: 274, PDF Size: 31.95 MB
Page 7 of 274
Engaging reverse gear ................... 106
Engaging the park position ............ 106
Important safety notes.................. 105
Manual drive progra m.................... 107
Neutral (ECO start/stop func-
tion) ............................................... 106
Overview ........................................ 105
Program selector button ................ 107
Pulling away ................................... 104
Selector lever ................................ 106
Shift ranges ................................... 107
Steering wheel paddle shifters ...... 107
Transmission position dis-
play ........................................ 106, 107
Auxiliary ventilation
Activating/deactivating ................. 100
Activating/deactivating (on the
center console ).............................. 100
Problem (display message) ............ 100
Axle load, permissible (trailer tow-
ing) ...................................................... 269
B
BabySmart™
Air bag deactivation system ............. 59
Back button ....................................... 180
Backup lamp
Display message ............................ 148
Ball coupling
Installing ........................................ 140
BAS (Brake Assist System) ................. 65
Battery
Checking (SmartKey) ....................... 74
Important safety guidelines
(SmartKey) ....................................... 73
Replacing (SmartKey) ...................... 74
Battery (vehicle)
Charging ........................................ 219
Display message ............................ 148
Important safety notes .................. 216
Jump starting ................................. 220
Overview ........................................ 216
Blind Spot Assist
Activating/deactivating ................. 147
Display message ............................ 148
Notes/function .............................. 124 Bluetooth
®
see also Digital Operator's Man-
ual .................................................. 172
Brake fluid
Display message .................... 148, 152
Notes ............................................. 264
Warning lamp ................................. 162
Brake fluid level ................................ 209
Brake lamps
Adaptive ........................................... 66
Display message ............................ 148
Brakes
ABS .................................................. 65
BAS .................................................. 65
Brake fluid (notes) ......................... 264
Display message .................... 148, 149
High-performance brake system .... 112
Important safety notes .................. 112
Maintenance .................................. 112
Parking brake ................................ 111
Riding tips ...................................... 112
Warning lamp ................................. 162
Breakdown
see Flat tire
see Towing away
Brightness control (instrument
cluster lighting) ................................... 33
Brush guard ....................................... 201
Bulbs
see Replacing bulbs
Buttons on the COMAND control-
ler ........................................................ 180
C
Calling up a malfunction
see Display messages
Care
Car wash ........................................ 211
Carpets .......................................... 212
Display ........................................... 212
Gear or selector lever .................... 212
Headlamps ..................................... 211
Interior ........................................... 212
Matte finish ................................... 211Note s............................................. 211
Paint .............................................. 211
Plastic trim .................................... 212
Index5
Page 19 of 274
Stainless-steel spare hub cap ........ 215
Special seat belt retractor .................. 56
Specialist workshop ............................ 28
Speed, controlling
see Cruise control
Speedometer
In the Instrument cluster ............... 146
Segments ...................................... 146
Selecting the unit of measure-
ment .............................................. 147
see Instrument cluster
SPEEDTRONIC
Display message ............................ 148
Selecting ........................................ 116
Variabl e......................................... 115
Standing lamps
Display message ............................ 148
Switching on/of f.............................. 91
Starting the engine
Important safety notes .................. 104
Steering (display message) ...... 148, 160
Steering wheel
Adjusting (electrically) ..................... 87
Buttons (on-board computer) ......... 146
Important safety notes .................... 86
Paddle shifters ............................... 107
Steering wheel heating .................... 87
Storing settings (memory func-
tion) ................................................. 87
Steering wheel (cleaning instruc-
tions) .................................................. 212
Steering wheel paddle shifters ........ 107
Stopwatch (RACETIMER) ................... 147
Stowage areas ................................... 193
Stowage compartments
Armrest (under) ............................. 193
Center console .............................. 193
Cup holders ................................... 197
Display message) ........................... 148
Door stowage compartment .......... 193
Glove box ....................................... 193
Important safety information ......... 193
Summer tires ..................................... 232
Surround lighting (on-board com- puter) .................................................. 147
Switching air-recirculation mode
on/off ................................................. 100 Switching off the alarm (ATA)
............ 69
T
Tachometer........................................ 146
Tail lamps
Display message ............................ 148
see Lights
Tank content
Fuel gaug e..................................... 146
Technical data
Capacities ...................................... 259
Tires ............................................... 254
Tires/wheels ................................. 254
Trailer load s................................... 269
Vehicle data ................................... 266
Wheels ........................................... 254
TELEAID
Call priority .................................... 201
Emergency call .............................. 198
Important safety notes .................. 197
MB info call button ........................ 200
Roadside Assistance button .......... 200
Self-test ......................................... 198
System .......................................... 198
Telephone
Accepting a call ............................. 147
Display message ............................ 148
Number from the phone book ........ 147
Redialing ........................................ 147
Rejecting/ending a call ................. 147
see also Digital Operator's Man-ual.................................................. 172
Telephone compartment .................. 193
Temperature
Coolant .......................................... 146
Coolant (on-board computer) ......... 147
Engine oil (on-board computer) ...... 147
Outside temperature ...................... 146
Theft deterrent systems
ATA (Anti-Theft Alarm system )......... 69
Immobilizer ...................................... 68
Tilt/sliding sunroof
see Sliding sunroof
Time
see separate operating instructions
Timing (RACETIMER) ......................... 147
Index17
Page 27 of 274
Operation
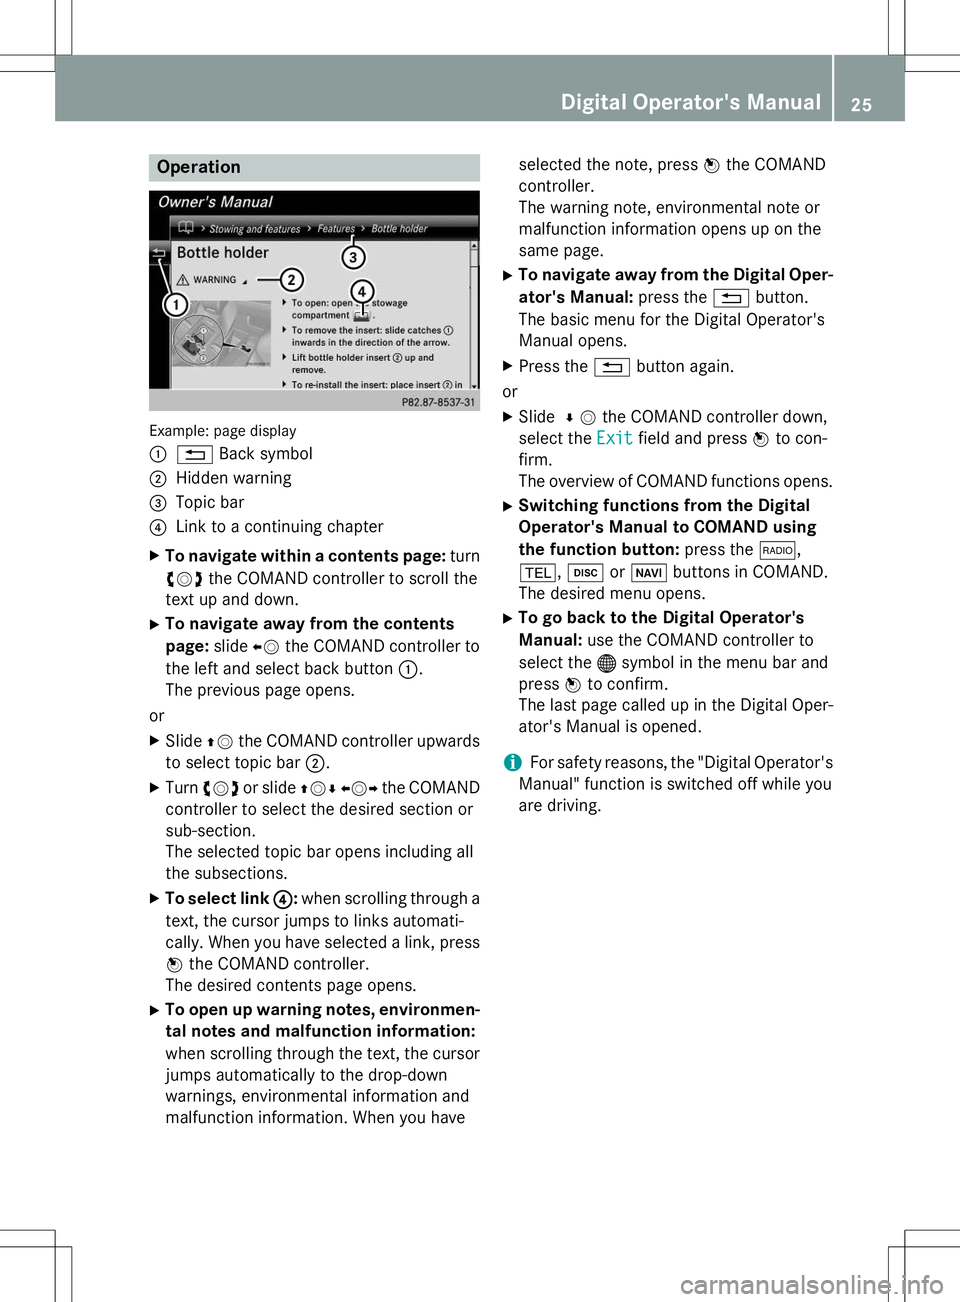
Example: page display :
%Back symbol
;Hidden warning
=Topic bar
?Link to a continuing chapter
X To navigate within a contents page: turn
cVd the COMAND controller to scroll the
text up and down.
X To navigate away from the contents page: slideXVthe COMAND controller to
the left and select back button :.
The previous page opens.
or X Slide ZVthe COMAND controller upwards
to select topic bar ;.
X Turn cVd or slide ZVÆXVY the COMAND
controller to select the desired section or
sub-section.
The selected topic bar opens including all
the subsections.
X To select link ?
:when scrolling through a
text, the cursor jumps to links automati-
cally. When you have selected a link, press
W the COMAND controller.
The desired contents page opens.
X To open up warning notes, environmen-
tal notes and malfunction information:
when scrolling through the text, the cursor
jumps automatically to the drop-down
warnings, environmental information and
malfunction information. When you have selected the note, press
Wthe COMAND
controller.
The warning note, environmental note or
malfunction information opens up on the
same page.
X To navigate away from the Digital Oper-
ator's Manual: press the%button.
The basic menu for the Digital Operator's
Manual opens.
X Press the %button again.
or
X Slide ¬V the COMAND controller down,
select the
Exitfield and press Wto con-
firm.
The overview of COMAND functions opens.
X Switching functions from the Digital
Operator's Manual to COMAND using
the function button: press the$,
% ,h orØ buttons in COMAND.
The desired menu opens.
X To go back to the Digital Operator's
Manual: use the COMAND controller to
select the ®symbol in the menu bar and
press Wto confirm.
The last page called up in the Digital Oper-
ator's Manual is opened.
iFor safety reasons, the "Digital Operator's
Manual" function is switched off while you
are driving.
Digital Operator's Manual25
Page 40 of 274
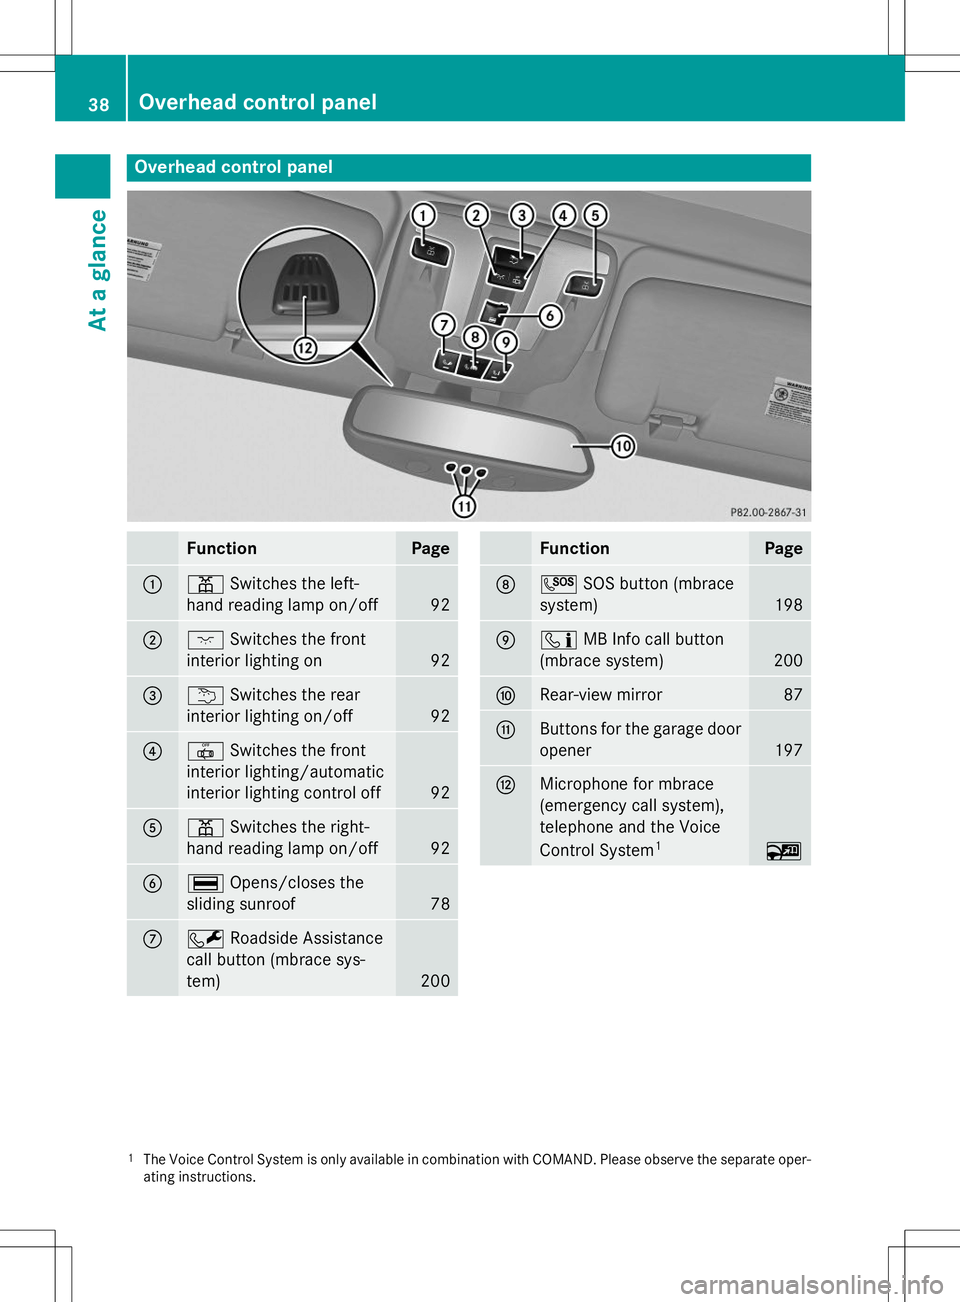
Overhead control panel
FunctionPage
:pSwitches the left-
hand reading lamp on/off
92
;c Switches the front
interior lighting on
92
=u Switches the rear
interior lighting on/off
92
?| Switches the front
interior lighting/automatic
interior lighting control off
92
Ap Switches the right-
hand reading lamp on/off
92
B¡ Opens/closes the
sliding sunroof
78
CF Roadside Assistance
call button (mbrace sys- tem)
200
FunctionPage
DG SOS button (mbrace
system)
198
Eï MB Info call button
(mbrace system)
200
FRear-view mirror87
GButtons for the garage door opener
197
HMicrophone for mbrace
(emergency call system),
telephone and the Voice
Control System 1
~
1
The Voice Control System is only available in combination with COMAND. Please observe the separate oper-
ating instructions.
38Overhead control panel
At a glance
Page 66 of 274
Pets in the vehicle
GWARNING
If you leave animals unattended or unsecuredin the vehicle, they could press buttons or
switches, for example.
As a result, they could: R activate vehicle equipment and become
trapped, for example
R activate or deactivate systems, thereby
endangering other road users
Unsecured animals could also be flung around
the vehicle in the event of an accident or sud- den steering or braking, thereby injuring vehi-
cle occupants. There is a risk of an accident
and injury.
Never leave animals unattended in the vehi-
cle. Always secure animals properly during
the journey, e.g. use a suitable animal trans-
port box.
Driving safety systems
Overview of driving safety systems
In this section, you will find information about the following driving safety systems:
R ABS ( Anti-lock Braking System)
R BAS ( Brake Assist System)
R Adaptive brake lights
R ESP ®
(E lectronic Stability Program)
R EBD ( Electronic Brake force Distribution)
R ADAPTIVE BRAKE
R Trailer stabilization
Important safety notes
GWARNING
The ABS, the BAS, and the ESP ®
switch off
when the differential locks are switched on.
When the ABS, the BAS, and the ESP ®
are
switched off
R wheels may lock during hard braking
R steering capabilities are reduced
R braking distance is increased
R vehicle stability in standard driving maneu-
vers is increased
Make sure the differential locks are switched on at all times except when driving off-road for
example. Switch on the differential locks
immediately when returning from off-roaddriving.
If you fail to adapt your driving style or if you
are inattentive, the driving safety systems can neither reduce the risk of an accident nor
override the laws of physics. Driving safety
systems are merely aids designed to assist
driving. You are responsible for the distance
to the vehicle in front, for vehicle speed and
for braking in good time. Always adapt your
driving style to suit the prevailing road and
weather conditions and maintain a safe dis-
tance from the vehicle in front. Drive care-fully.
iPlease note that the driving safety sys-
tems described only work as effectively as
possible if there is adequate contact
between the tires and the road surface. Pay particular attention to the information
regarding tires, recommended minimum
tire tread depths etc. in the "Wheels and
tires" section ( Ypage 230).
In wintry driving conditions, always use
winter tires (M+S tires) and if necessary,
snow chains. Only in this way will the driv-
ing safety systems described in this section work as effectively as possible.
64Driving safety systems
Safety
Page 76 of 274
Checking the battery
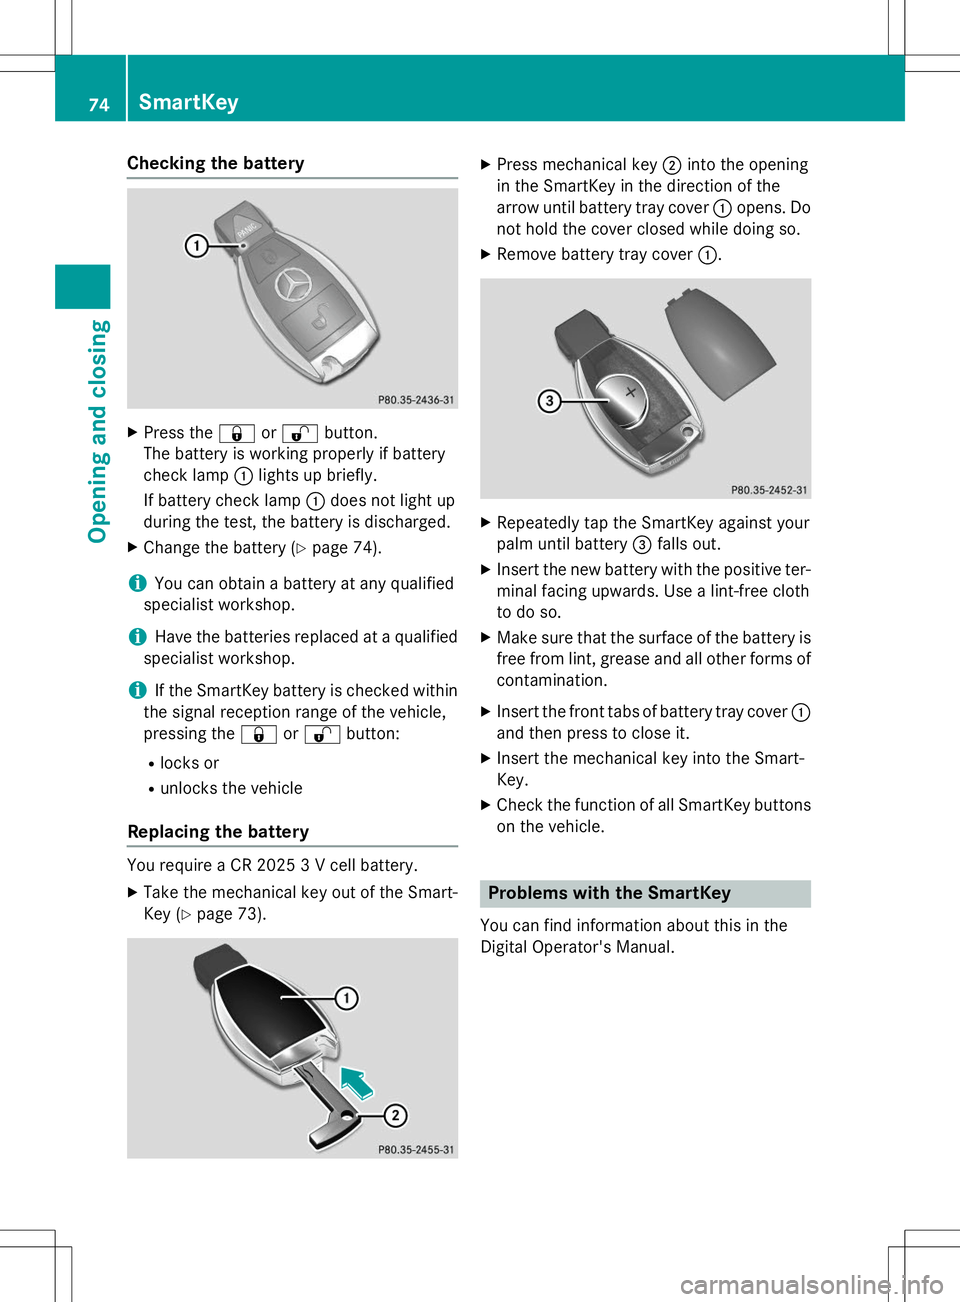
XPress the &or% button.
The battery is working properly if battery
check lamp :lights up briefly.
If battery check lamp :does not light up
during the test, the battery is discharged.
X Change the battery ( Ypage 74).
iYou can obtain a battery at any qualified
specialist workshop.
iHave the batteries replaced at a qualified
specialist workshop.
iIf the SmartKey battery is checked within
the signal reception range of the vehicle,
pressing the &or% button:
R locks or
R unlocks the vehicle
Replacing the battery
You require a CR 2025 3 V cell battery.
X Take the mechanical key out of the Smart-
Key ( Ypage 73).
X
Press mechanical key ;into the opening
in the SmartKey in the direction of the
arrow until battery tray cover :opens. Do
not hold the cover closed while doing so.
X Remove battery tray cover :.
X
Repeatedly tap the SmartKey against your
palm until battery =falls out.
X Insert the new battery with the positive ter-
minal facing upwards. Use a lint-free cloth
to do so.
X Make sure that the surface of the battery is
free from lint, grease and all other forms of
contamination.
X Insert the front tabs of battery tray cover :
and then press to close it.
X Insert the mechanical key into the Smart-Key.
X Check the function of all SmartKey buttons
on the vehicle.
Problems with the SmartKey
You can find information about this in the
Digital Operator's Manual.
74SmartKey
Opening and closing
Page 149 of 274
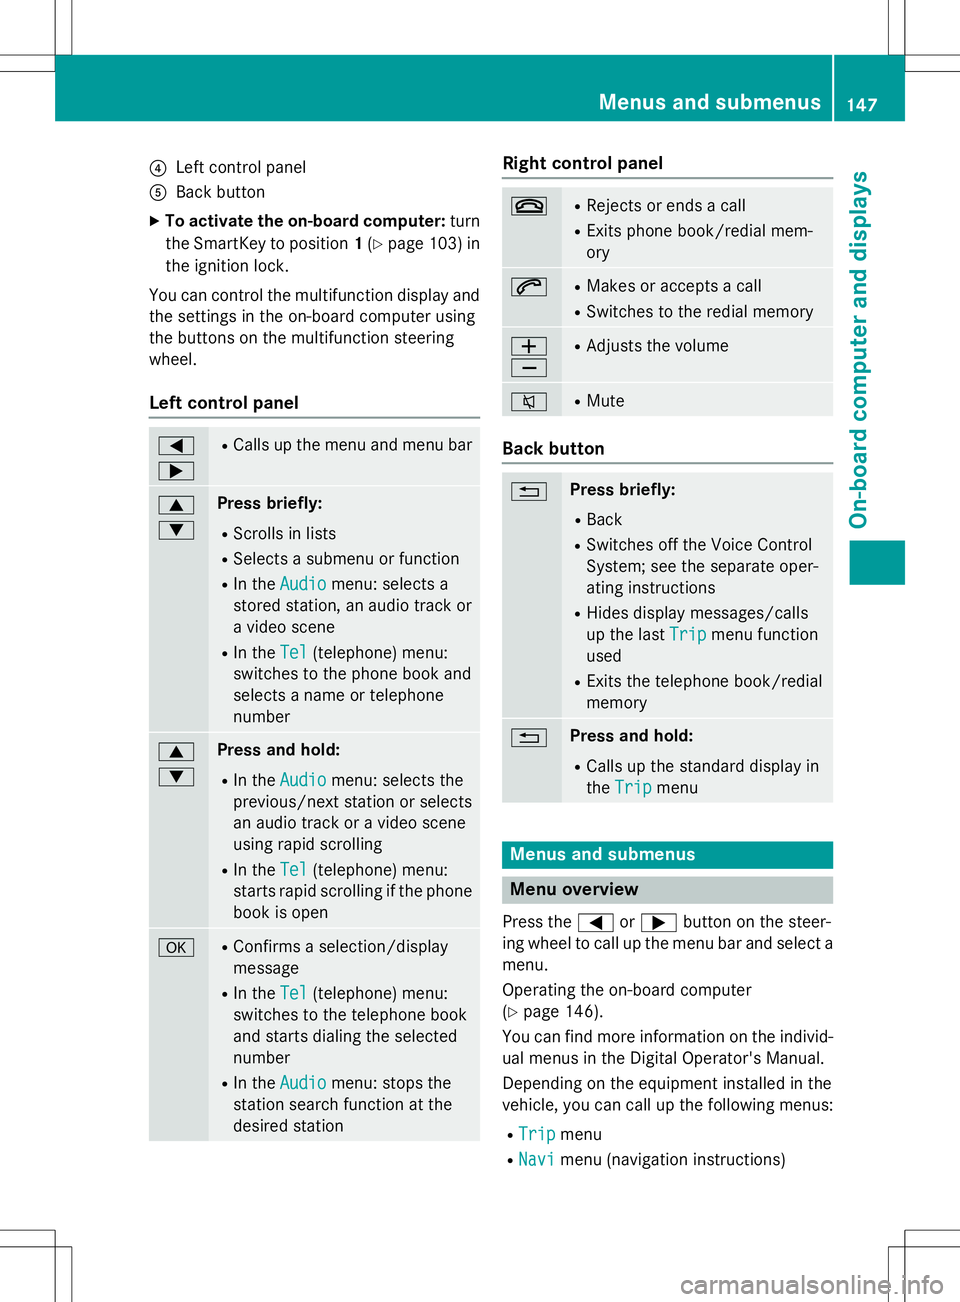
?Left control panel
ABack button
X To activate the on-board computer: turn
the SmartKey to position 1(Y page 103) in
the ignition lock.
You can control the multifunction display and
the settings in the on-board computer using
the buttons on the multifunction steering
wheel.
Left control panel
= ;R Calls up the menu and menu bar
9 :Press briefly:
R Scrolls in lists
R Selects a submenu or function
R In the
Audiomenu: selects a
stored station, an audio track or
a video scene
R In the
Tel(telephone) menu:
switches to the phone book and
selects a name or telephonenumber
9 :Press and hold:
R In the
Audiomenu: selects the
previous/next station or selects
an audio track or a video scene
using rapid scrolling
R In the
Tel(telephone) menu:
starts rapid scrolling if the phone
book is open
aR Confirms a selection/display
message
R In the
Tel(telephone) menu:
switches to the telephone book
and starts dialing the selectednumber
R In the
Audiomenu: stops the
station search function at the
desired station
Right control panel
~R Rejects or ends a call
R Exits phone book/redial mem- ory
6RMakes or accepts a call
R Switches to the redial memory
W XRAdjusts the volume
8RMute
Back button
%Press briefly:
R Back
R Switches off the Voice Control
System; see the separate oper-
ating instructions
R Hides display messages/calls
up the last
Tripmenu function
used
R Exits the telephone book/redial memory
%Press and hold:
R Calls up the standard display in the
Tripmenu
Menus and submenus
Menu overview
Press the =or; button on the steer-
ing wheel to call up the menu bar and select a
menu.
Operating the on-board computer ( Y page 146).
You can find more information on the individ-
ual menus in the Digital Operator's Manual.
Depending on the equipment installed in the
vehicle, you can call up the following menus:
R
Tripmenu
R
Navimenu (navigation instructions)
Menus and submenus147
On-board computer and displays
Z
Page 176 of 274
certain menu items or COMAND will display amessage to this effect.
COMAND operating system
Overview
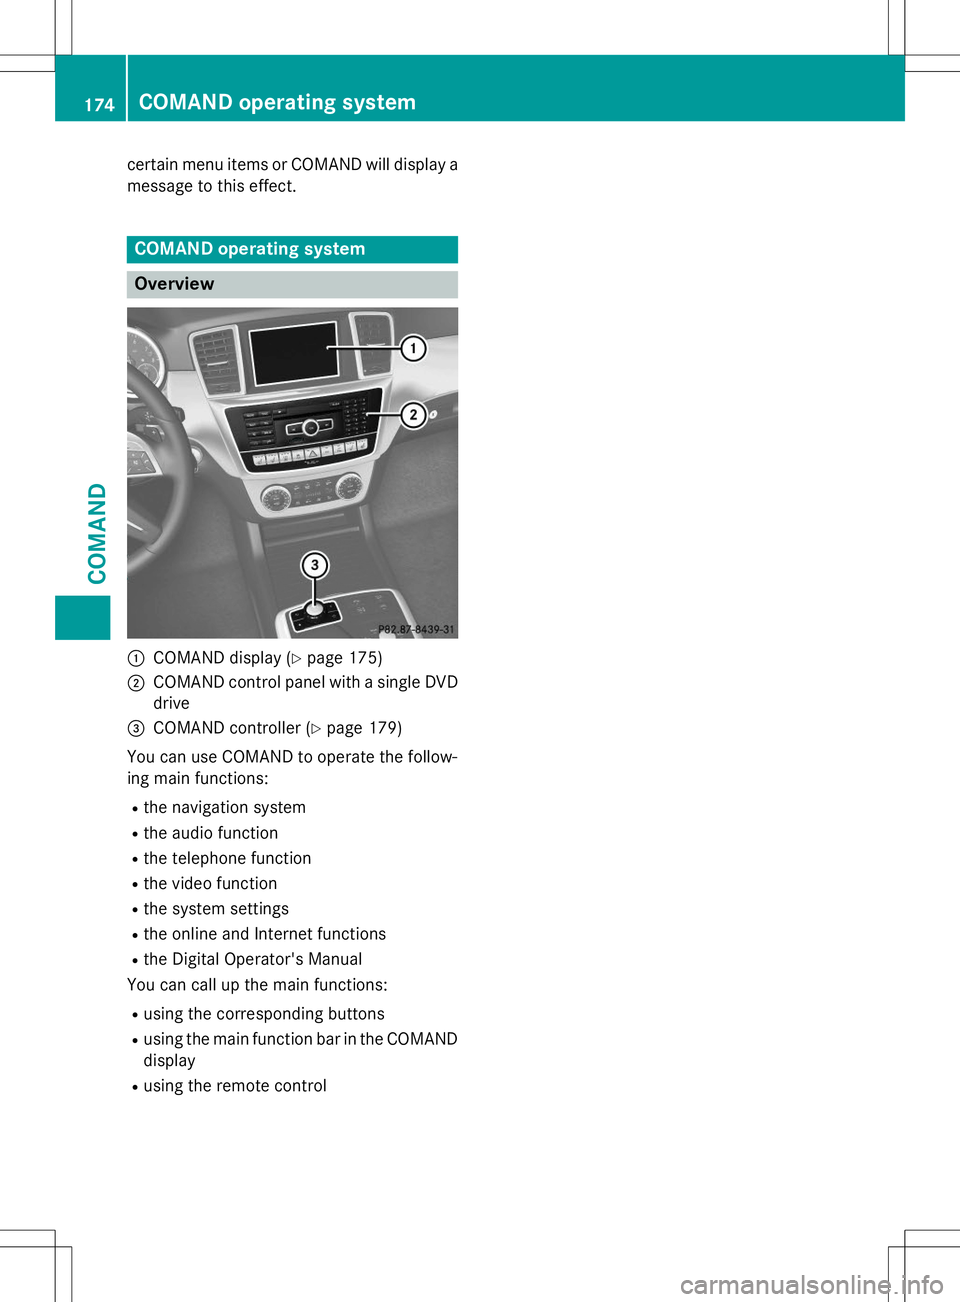
:COMAND display ( Ypage 175)
;COMAND control panel with a single DVD
drive
=COMAND controller ( Ypage 179)
You can use COMAND to operate the follow-
ing main functions:
R the navigation system
R the audio function
R the telephone function
R the video function
R the system settings
R the online and Internet functions
R the Digital Operator's Manual
You can call up the main functions:
R using the corresponding buttons
R using the main function bar in the COMAND
display
R using the remote control
174COMAND operating system
COMAND
Page 182 of 274
The COMAND controller can be:R pressed briefly or pressed and held W
R turned clockwise or counter-clockwise cVd
R slid left or right XVY
R slid forwards or backwards ZVÆ
R slid diagonally aVb
Example of operation
In the instructions, operating sequences are
described as follows:
X Press the $button.
Radio mode is activated.
X Select
Radioby sliding VÆand turning
cVd the COMAND controller and press W
to confirm.
X Confirm
Station Listby pressing W.
The station list appears.
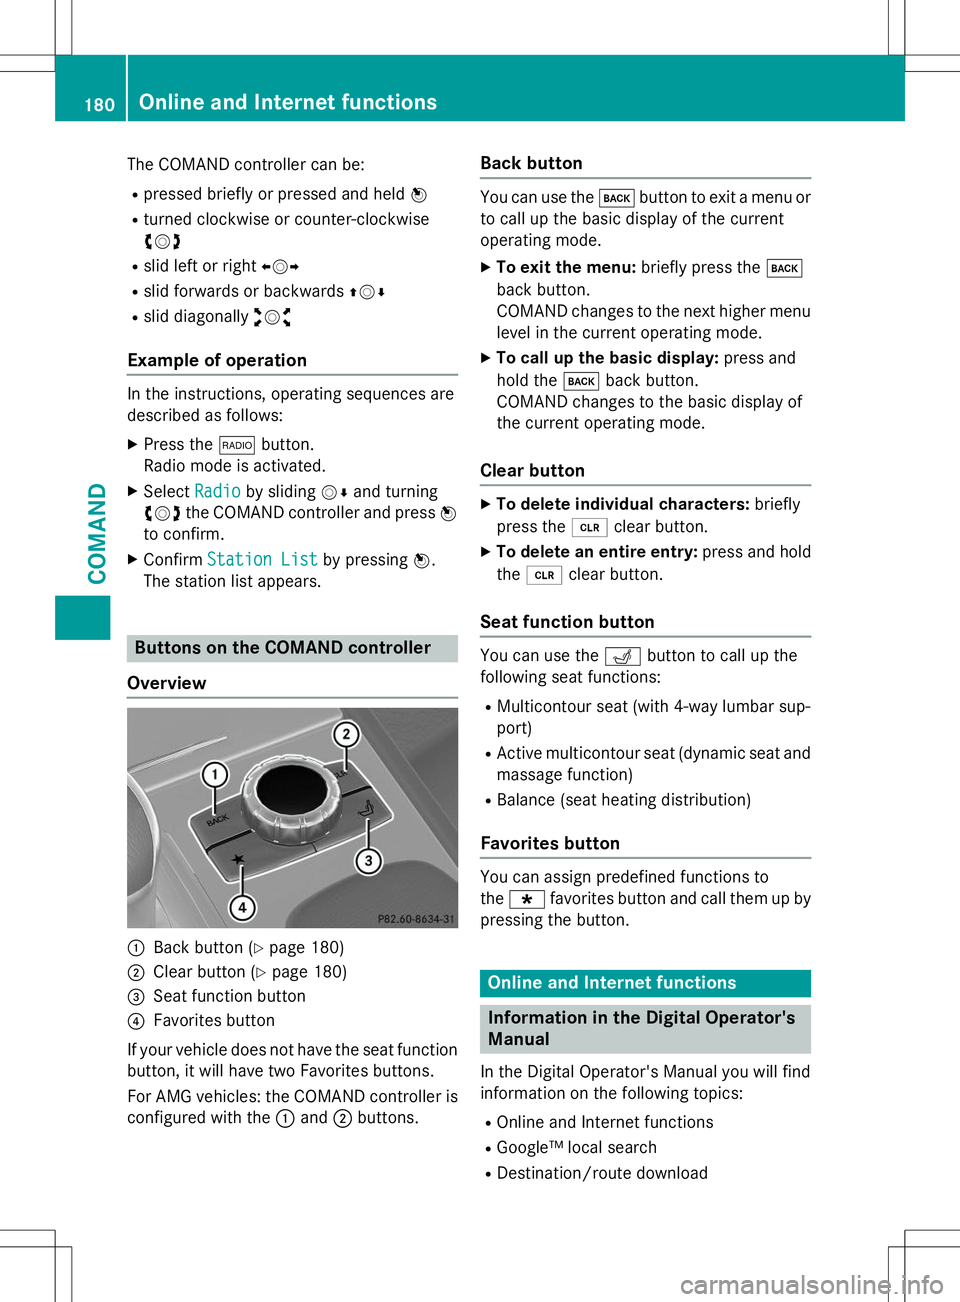
Buttons on the COMAND controller
Overview
:Back button ( Ypage 180)
;Clear button ( Ypage 180)
=Seat function button
?Favorites button
If your vehicle does not have the seat function
button, it will have two Favorites buttons.
For AMG vehicles: the COMAND controller is
configured with the :and ;buttons.
Back button
You can use the kbutton to exit a menu or
to call up the basic display of the current
operating mode.
X To exit the menu: briefly press thek
back button.
COMAND changes to the next higher menu
level in the current operating mode.
X To call up the basic display: press and
hold the kback button.
COMAND changes to the basic display of
the current operating mode.
Clear button
X To delete individual characters: briefly
press the 2clear button.
X To delete an entire entry: press and hold
the 2 clear button.
Seat function button
You can use the Tbutton to call up the
following seat functions:
R Multicontour seat (with 4-way lumbar sup- port)
R Active multicontour seat (dynamic seat and
massage function)
R Balance (seat heating distribution)
Favorites button
You can assign predefined functions to the ; favorites button and call them up by
pressing the button.
Online and Internet functions
Information in the Digital Operator's
Manual
In the Digital Operator's Manual you will find
information on the following topics: R Online and Internet functions
R Google™ local search
R Destination/route download
180Online and Internet functions
COMAND
Page 212 of 274
Maintaining the time-dependent service schedule:X Before disconnecting the battery, note
down the service due date displayed.
or X After reconnecting the battery, subtract
the battery disconnection periods from the
service date shown on the display.
iThe service interval display should not be
confused with the 4engine oil level dis-
play.
The symbol and the letter indicate which type
of service is due: ¯ Minor service
A
±Major serviceB
The ASSYST service interval display does not
take into account any periods of time during
which the battery is disconnected.
Hiding a service message
X To hide the service message, press the % back button on the multifunction
steering wheel ( Ypage 35).
Displaying service messages
Use the buttons on the multifunction steering
wheel.
X Switch on the ignition.
X Press =or; to select the standard
display menu on the steering wheel
( Y page 147).
X Press 9or: to select the service
interval display. The ¯ or± service symbol and the
service due date are displayed.
Points to remember
The specified maintenance interval takes only the normal operation of the vehicle into
account. Under arduous operating conditions
or increased load on the vehicle, mainte-
nance work must be carried out more fre-
quently, for example: R regular city driving with frequent intermedi-
ate stops
R if the vehicle is primarily used to travel
short distances
R use in mountainous terrain or on poor road
surfaces
R if the engine is often left idling for long peri-
ods
Under these or similar conditions, have, for
example, the air filter, engine oil and oil filter
replaced or changed more frequently. Under
arduous operating conditions, the tires must
be checked more often. Further information
can be obtained at a qualified specialist work- shop, e.g. an authorized Mercedes-Benz Cen-
ter.
Fuel/water separator
HEnvironmental note
Dispose of service products in an environ-
mentally responsible manner.
!If you continue driving without having the
fuel/water separator serviced, this could
cause damage to the engine. Any resulting
damage is not covered by the warranty.
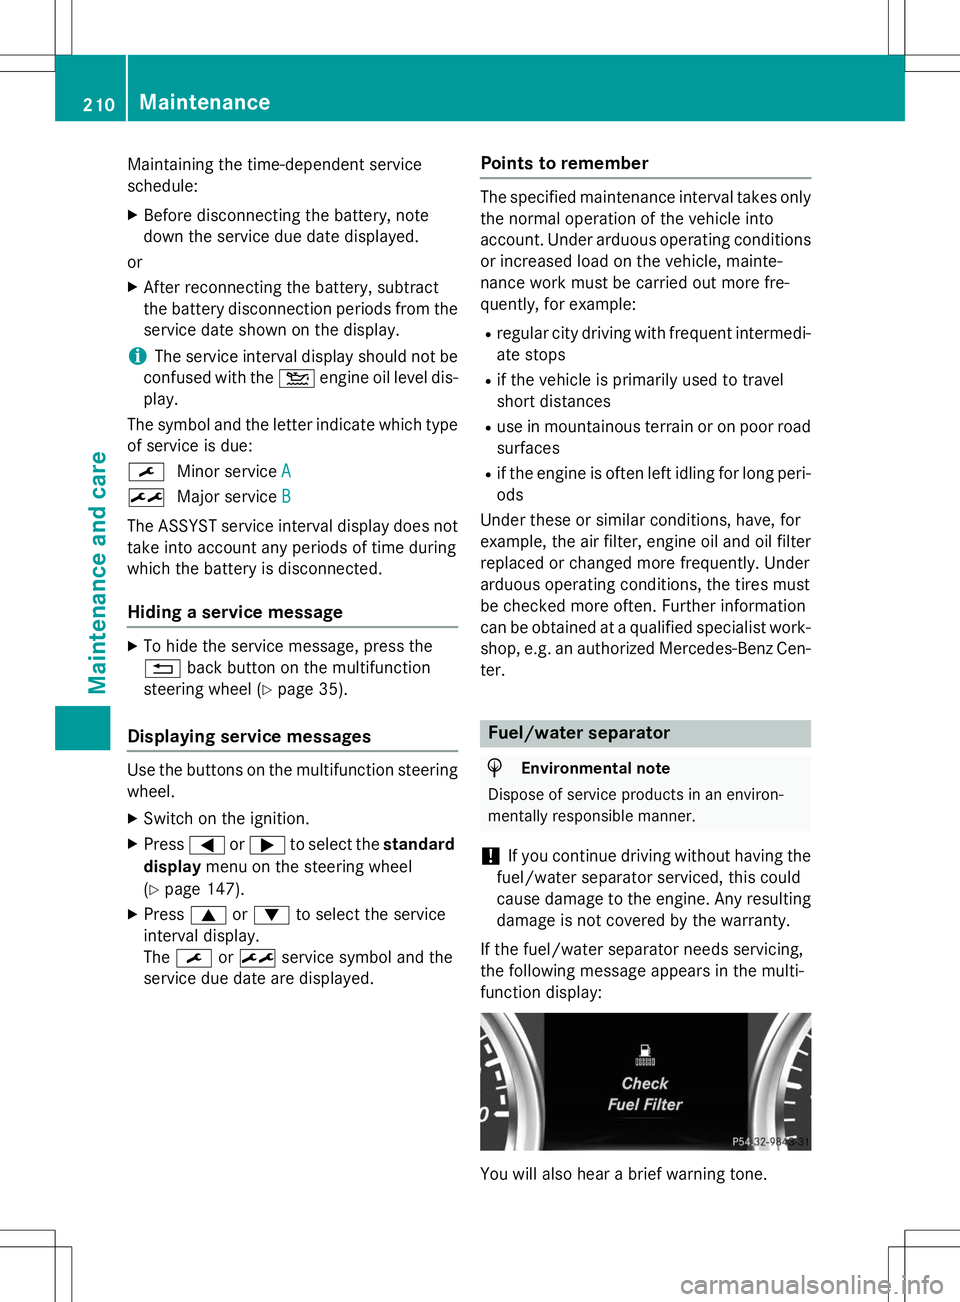
If the fuel/water separator needs servicing,
the following message appears in the multi-
function display:
You will also hear a brief warning tone.
210Maintenance
Maintenance and care