MERCEDES-BENZ G-CLASS SUV 2016 Owners Manual
Manufacturer: MERCEDES-BENZ, Model Year: 2016, Model line: G-CLASS SUV, Model: MERCEDES-BENZ G-CLASS SUV 2016Pages: 261, PDF Size: 6.01 MB
Page 141 of 261
i
Vehicles for the United Kingdom: this func-
tion is unavailable.
Selects language
X Press the =or; button on the steering
wheel to select the Settings
Settingsmenu.
X Press the :or9 button to select the
Instrument cluster
Instrument cluster submenu.
X Press ato confirm.
X Press :or9 to select the Language:
Language:
function.
You will see the current setting.
X Press ato confirm.
X Press the :or9 button to change the
setting.
X Press ato store the entry.
Time/date Setting the date
X Press the =or; button on the steering
wheel to select the Settings Settingsmenu.
X Press :or9 to select the Time/Date Time/Date
submenu.
X Press ato confirm.
X Press :or9 to select the Date: Date:func-
tion.
You will see the current setting.
X To set the date: pressaagain.
X Press =or; to switch between the
day, month and year.
X Press :or9 to set the day, month or
year.
X Press ato store the entry.
The display shows the selected date.
Setting the time X Press the =or; button on the steering
wheel to select the Settings
Settings menu.
X Press :or9 to select the Time/Date Time/Date
submenu.
X Press ato confirm.
X Press :or9 to select the Time:
Time:func-
tion.
You will see the current setting.
X To set the time: pressaagain.
X Press =or; to switch between hours
and minutes. X
Press :or9 to set the hours or
minutes.
X Press ato store the entry.
The display shows the selected time.
Lights Setting the daytime driving lights
The Daytime driving lights Daytime driving lights function can
only be switched on with the engine switched
off.
X Press the =or; button on the steering
wheel to select the Settings Settingsmenu.
X Press the :or9 button to select the
Lights
Lights submenu.
X Press ato confirm.
X Press the :or9 button to select the
Daytime driving lights
Daytime driving lights function.
If the Daytime
Daytime driving
drivinglights
lightsfunction has
been switched on, the cone of light and the
W symbol are shown in red in the multi-
function display.
X Press ato save the setting.
Further information on daytime driving lights
(Y page 74).
Surround lighting and exterior lighting
delayed switch-off X Press the =or; button on the steering
wheel to select the Settings Settingsmenu.
X Press the :or9 button to select the
Lights
Lights submenu.
X Press ato confirm.
X Press the :or9 button to select the
Surround lighting
Surround lighting function.
When the Surround lighting
Surround lighting function has
been activated, the cone of light is shown in
red in the multifunction display.
X Press ato save the setting.
Activating exterior lighting delayed switch-off
temporarily:
X Before leaving the vehicle, turn the key to
position 0in the ignition lock (Y page 96).
X Turn the key to position 2in the ignition lock
(Y page 96).
Exterior lighting delayed switch-off is deacti-
vated.
Exterior lighting delayed switch-off is reactiva-
ted the next time you start the engine. 138
Menus and submenusOn-boardc
omputer and displays
Page 142 of 261
i
Depending on your vehicle's equipment,
when the surround lighting and exterio rlight-
ing delaye dswitch-off ar eon, the following
light up:
R side lamps
R dipped-beam headlamps
Switchin gthe interior lighting delayed
switch-off on/off
If yo uactivate the Lighting
Lighting delayed
delayedsw.-off
sw.-off
function, the interio rlighting remains on for
20 second safter yo uremove the key fro mthe
ignition lock.
X Press the =or; button on the steering
whee ltoselect theSettings
Settings menu.
X Press the :or9 button to select the
Lights
Lights submenu.
X Press ato confirm.
X Press the :or9 button to select the
Lighting delaye dsw.-off
Lighting delayed sw.-off function.
If the Lighting delayed sw.-off
Lighting delayed sw.-off function
has been activated, the vehicle interior is dis-
played in red in the multifunction display.
X Press ato save the setting.
Vehicle Activating/deactivating the automatic
locking feature
If you activate the Automatic door locks Automatic door locks
function, the vehicle is centrallyl ockedabov ea
spee dofa pproximately 15 km/h.
X Press the =or; buttononthesteering
whee ltos elect the Settings
Settings menu.
X Press the :or9 buttontos elect the
Vehicle
Vehicle submenu.
X Press ato confirm.
X Press the :or9 button to select the
Automatic doo rlocks
Automatic door locks function.
When the Automatic
Automatic door
doorlocks
locks function is
activated, the vehicle doors are displayed in
red in the multifunction display.
X Press ato save the setting.
For further information on the automatic locking
feature; see (Y page 62). Activating/deactivating the acoustic
locking confirmation
If you swi tchont heAcoustic Acoustic Lock
Lockfunction ,an
acoustic signal sounds when you loc kthe vehi-
cle.
X Press the =or; buttononthesteering
whee ltos elect the Settings
Settings menu.
X Press the :or9 buttontos elect the
Vehicle
Vehicle submenu.
X Press ato confirm.
X Press the :or9 button to select the
Acoustic Lock
Acoustic Lock function.
If the Acoustic Lock
Acoustic Lock function is activated,
the & symbol in the multifunctio ndisplay
lights up red.
X Press ato save the setting.
Heating Auxiliary heating departure time
G
DAN
GER
If th eexhaust pipe is blocke dorsufficient
ventilation is no tpossible, toxic exhaust
fumes can ente rthe vehicle, especially car-
bon monoxide. This is th ecase, e.g. in
enclosed spaces, or if th evehicl eiss tuck in
snow. There is ariskoff atal injuries.
You should switch off th eauxiliary heating in
enclosed spaces whic hdonothav eane xtrac-
tion system, e.g. agarage. If th evehicl eis
stuck in snow and you mus tleav ethe auxiliary
heating running, keep th eexhaust pipe and
th ea rea around th evehicl eclear of snow. To
guarantee asufficien tsupply of fresh air, open
aw indow on th eside of th evehicl eaway from
th ew ind. G
WARNING
When th eauxiliary heating is switched on,
parts of the vehicl ecan become very hot.
Flammable materials such as leaves, grass or twigs may ignite if they come into contact
with:
R hot parts of the exhaust system
R the exhaust gas itself
There is arisk of fire. Menus and submenus
139On-boardcomputer and displays
Z
Page 143 of 261
When the auxiliary heating is switched on,
make sure that:
R no flammable materials come into contact
with hot vehicle components
R the exhaust gas can escape from the
exhaust pipe unhindered
R the exhaust gas does not come into contact
with flammable materials.
! Operatin
gthe auxiliary heating/ventilation
draws on the vehicle battery. After you have
heated or ventilated the vehicle amaximum of
two times, drive for alonger distance.
Only vehicles with auxiliary heating have this
function (Y page 89).
In the Heating Heating submenu, you can select a
stored departure time or change adeparture
time.
The auxiliary heating timer function calculates
the switch-on time accordin gtothe outside
temperature so that the vehicle is preheated by the departure time. When the departure time isreached, the auxiliary heating continues to heat for afurther five minutes and then switches off.
The auxiliary heating selects the temperature
setting of the THERMATIC automatic climate
control.
You can switch the auxiliary heating on or off by
using the &auxiliary heating button on the
centre console or the remot econtrol.
Selecting the departure time or deactivat- ing aselected departure time
X Press the =or; button on the steering
wheel to select the Settings Settingsmenu.
X Press the :or9 button to select the
Heating
Heating submenu.
X Press ato confirm.
You will see the selected setting.
X Press ato confirm.
X Press the :or9 button to select one
of the three departur etimes or Timer
Timeroff
off(no
timer active).
X Press ato confirm.
If ad eparture time is selected, the yellow
indicator lamp lights up on the &auxiliary
heating button. Changing the departure time
X
Press the =or; buttonont hesteering
wheel to selec tthe Settings Settings menu.
X Pres sthe : or9 button to selec tthe
Heating
Heating submenu.
X Press ato confirm.
Yo uw ill see the selected setting.
X Press ato confirm.
X Press the :or9 button to select
Change A Change A, Change B
Change BorChange C
Change C.
X Press ato confirm.
You can now change the departure time.
X Press the =or; button to select the
displaytobec hanged: hours, minutes.
X Press the :or9 button to set the
selected display.
X Press ato store the entry.
The yellow indicator lamp on the &auxili-
ary heating button lights up.
Comfort Activating/deactivating the EASY-
ENTRY/EXIT feature
G
WARNING
When the EASY-ENTRY/EXI Tfeature adjusts
the steering wheel, you and other vehicle
occupants –particularl ychildren –could
become trapped. There is arisk of injury.
Whil ethe EASY-ENTRY/EXIT feature is mak-
ing adjustments, make sure that no one has
any body parts in the swee pofthe steering
wheel.
If someone is trapped:
R press one of the memory function position
buttons, or
R move the switch for steering whee ladjust-
ment in the opposite direction to that in
which the steering whee lismoving.
The adjustment process is stopped.
X Press the =or; button on the steering
whee ltoselect the Settings Settings menu.
X Press the :or9 button to select the
Convenience
Convenience submenu.
X Press ato confirm. 140
Menu
sand submenusOn-boar dcomputer and displays
Page 144 of 261
X
Press the :or9 button to select the
Easy Entry/Exit
Easy Entry/Exit function.
If the Easy
Easy Entry/Exit
Entry/Exit function is activated,
the vehicle steering wheel appears in red in
the multifunction display.
X Press ato save the setting.
Further informatio nonthe EASY-ENTRY/EXIT
feature (Y page 72). Resetting to factory settings
X Press the =or; button on the steering
wheel to select the Settings
Settingsmenu.
X Press the :or9 button to select the
Factory setting Factory setting submenu.
X Press ato confirm.
The Reset
Reset all allsettings?
settings? displaymessage
appears.
X Press the :or9 button to select No
Noor
Yes
Yes.
X Press ato confirm the selection.
If you have selected Yes
Yesand confirmed, the
multifunction displays howsaconfirmation
message. Display messages
Intro
duction
General notes Display messages appear in th
emultifunction
display.
Display message swithg raphic symbols ar esim-
plified in the Owner' sManualand ma ydiffer
fro mt he symbols in the multifunctio ndisplay.
Please respond in accordance with the display
message sand follo wthe additional note sinthis
Owner' sManual.
Certain displa ymessage sareaccompanied by
an audibl ewarning tone or acontinuous warning
tone. When yo
ustop and park the vehicle, please
observe the notes on:
R HOLD function (Y page 122)
R Parking (Y page 113)
Hiding displa ymessages X
Press the aor% button on the steering
wheel.
The multifunction display hides the display
message.
High-priority display messages are shown in red in the multifunction display. Some high-priority
display messages cannot be hidden.
The multifunction display shows these mes-
sages continuously until the causes for the mes- sages have been remedied.
Message memor ymenu The on-board computer saves certain display
messages in the
message memory.Y ou can
call up the display messages:
X Press the =or; button on the steering
wheel to select the Serv. Serv.menu.
If there are display messages, the multifunc-
tion display shows 2messages
2m essages ,for example.
X Press the 9or: button to select the
entry, e.g. 2messages
2m essages.
X Press ato confirm.
X Press the 9or: button to scroll
through the display messages.
When the ignition is switched off, all display
messages are deleted apart from some high-
priority display messages. Once the causes of
the high-priorit ydisplay messages have been
rectified, these display messages are deleted as well. Display me
ssages
141On-board compute rand displays Z
Page 145 of 261
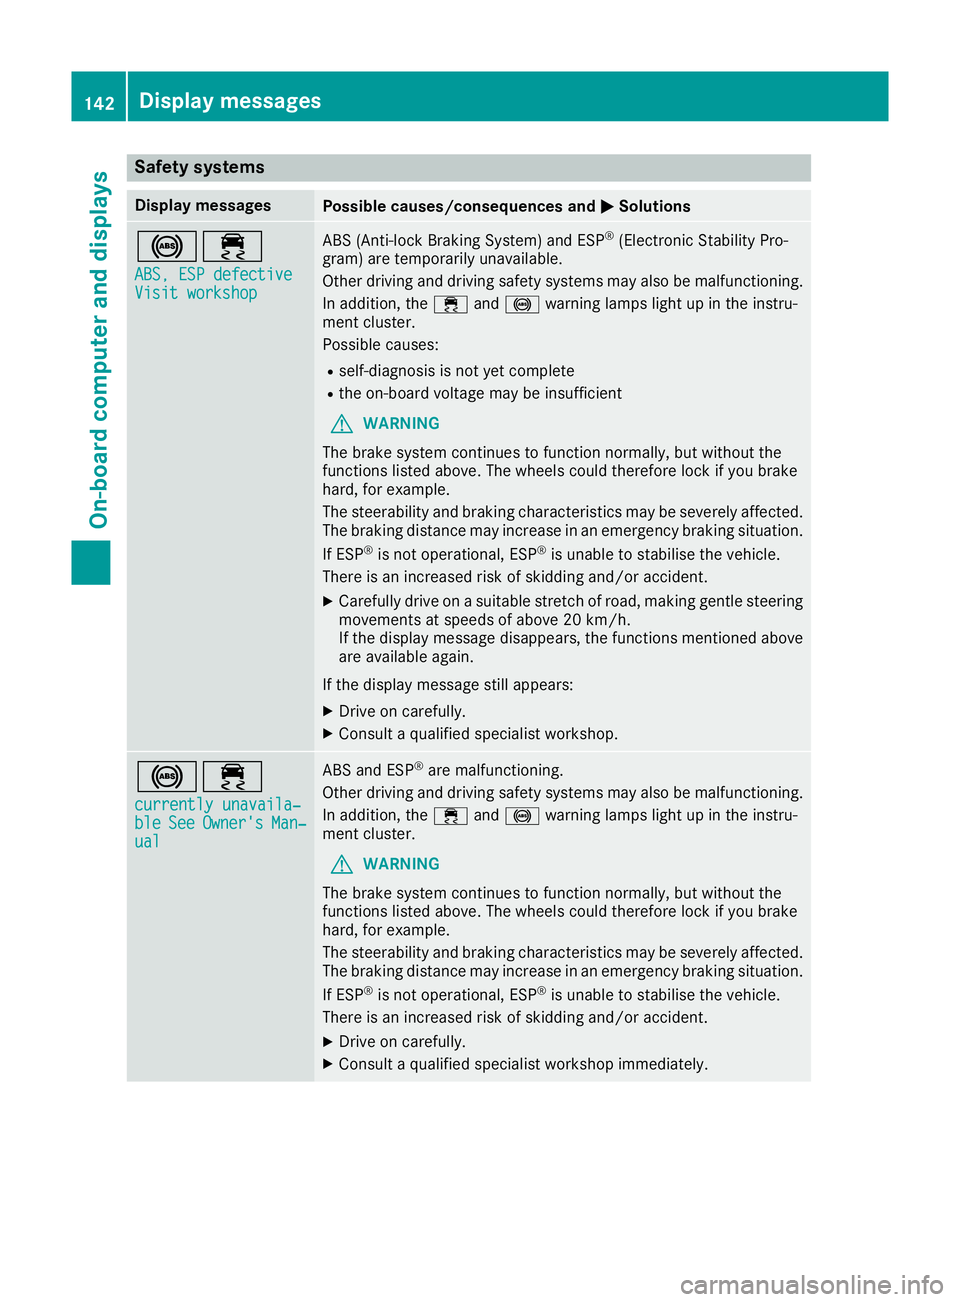
Safety systems
Display messages
Possible causes/consequences and
M
MSolutions !÷
ABS, ESP defective
ABS, ESP defective
Visit workshop Visit workshop ABS (Anti-lock Braking System
)and ESP ®
(Electronic Stability Pro-
gram) ar etemporaril yunavailable.
Othe rdriving and driving safety system smayalso be malfunctioning.
In addition, the ÷and! warning lamps light up in the instru-
ment cluster.
Possibl ecauses:
R self-diagnosi sisnot yetcomplete
R the on-board voltag emaybe insufficient
G WARNING
The brake system continue stofunctio nnormally ,but withou tthe
functions listed above .The wheels could therefore lock if yo ubrake
hard, for example.
The steerability and braking characteristics ma ybeseverely affected.
The braking distance ma yincrease in an emergency braking situation.
If ESP ®
is not operational ,ESP ®
is unabl etostabilise the vehicle.
There is an increased ris kofskidding and/or accident.
X Carefully drive on asuitabl estretch of road, making gentle steering
movements at speed sofabove 20 km/h.
If the display message disappears, the functions mentione dabove
ar ea vailable again.
If the display message still appears: X Driv eonc arefully.
X Consult aquali fied specialist workshop. !÷
currently unavaila‐ currently unavaila‐
ble ble See
SeeOwner's
Owner's Man‐
Man‐
ual
ual ABS and ESP
®
arem alfunctioning.
Othe rdriving and driving safety system smayalso be malfunctioning.
In addition, the ÷and! warning lamps light up in the instru-
ment cluster.
G WARNING
The brake system continue stofunctio nnormally ,but withou tthe
functions listed above .The wheels could therefore lock if yo ubrake
hard, for example.
The steerability and braking characteristics ma ybeseverely affected.
The braking distance ma yincrease in an emergency braking situation.
If ESP ®
is not operational ,ESP ®
is unabl etostabilise the vehicle.
There is an increased ris kofskidding and/or accident.
X Driv eonc arefully.
X Consult aquali fied specialist workshop immediately. 142
Displa
ymessagesOn-boar dcomputer and displays
Page 146 of 261
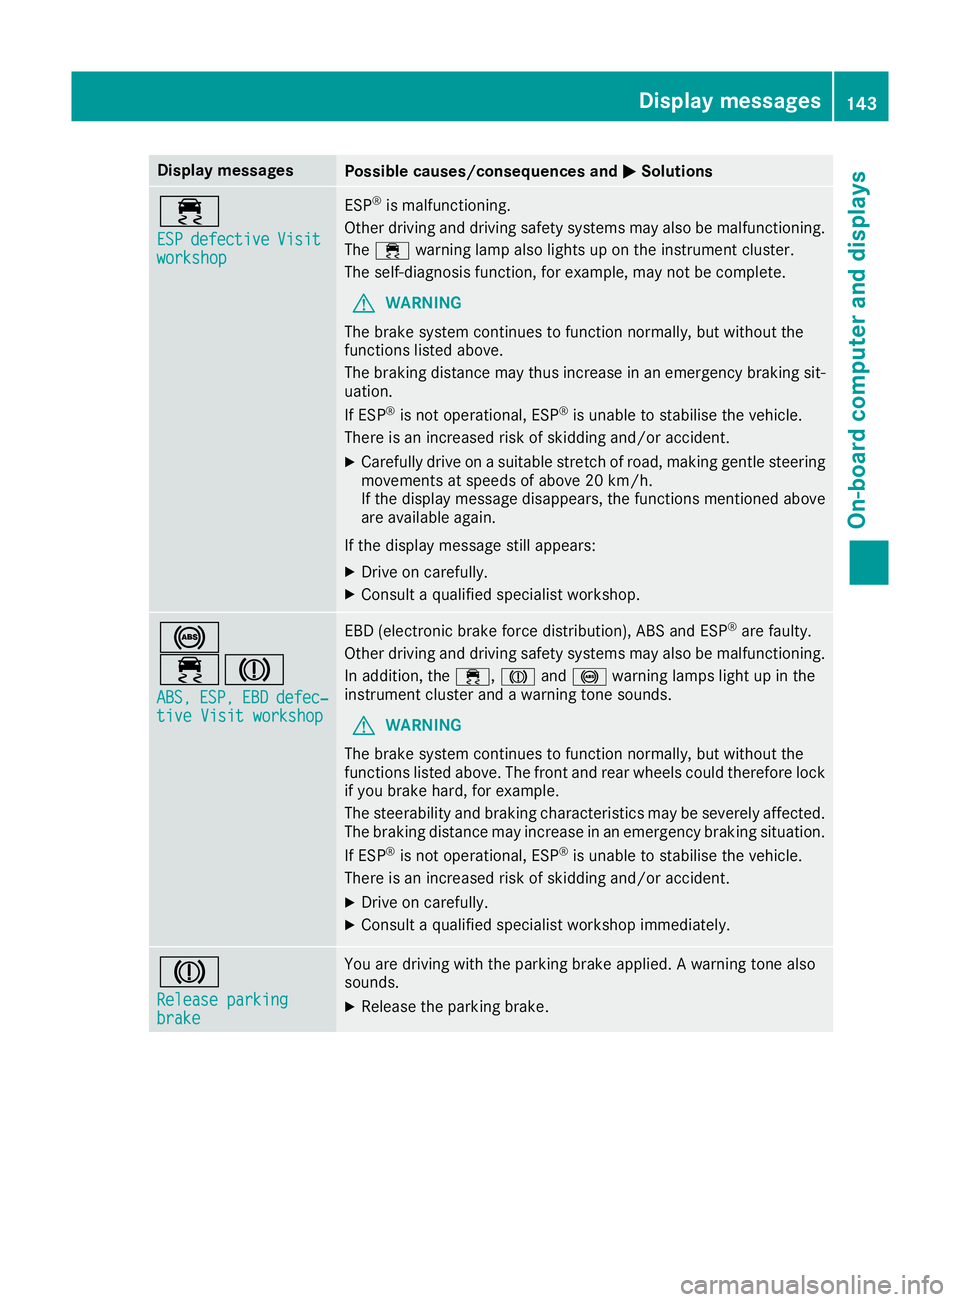
Display messages
Possible causes/consequence
sand M
MSolutions ÷
ESP ESP
defective
defective Visit
Visit
workshop
workshop ESP
®
is malfunctioning.
Other driving and driving safet ysystem smayalso be malfunctioning.
The ÷ warning lamp also lights up on the instrument cluster.
The self-diagnosi sfun ction, for example, ma ynot be complete.
G WARNING
The brake system continue stofunctio nnormally ,but withou tthe
functions listed above.
The braking distance ma ythu sincrease in an emergency braking sit-
uation.
If ESP ®
is not operational ,ESP ®
is unabl etostabilise the vehicle.
There is an increased ris kofskidding and/or accident.
X Carefully drive on asuitabl estretch of road, making gentle steering
movements at speeds of above 20 km/h.
If the displa ymessage disappears, the functions mentione dabove
ar ea vailable again.
If the displa ymessage still appears:
X Driv eonc arefully.
X Consult aquali fied specialis tworkshop. !
÷J
ABS, ABS, ESP,
ESP,EBD
EBDdefec‐
defec‐
tiv eVisit workshop
tive Visit workshop EBD (electron
icbrake force distribution), ABS and ESP ®
aref aulty.
Othe rdrivin gand drivin gsafety system smayalso be malfunctioning.
In addition, the ÷,Jand! warning lamps light up in the
instrument cluster and awarning tone sounds.
G WARNING
The brake system continue stofunctio nnormally ,but withou tthe
functions listed above .The front and rea rwheel scould therefore lock
if yo ubrake hard, for example.
The steerability and braking characteristics ma ybeseverely affected.
The braking distance ma yincrease in an emergency braking situation.
If ESP ®
is not operational ,ESP ®
is unabl etostabilise the vehicle.
There is an increased ris kofskidding and/or accident.
X Driv eonc arefully.
X Consult aquali fied specialis tworkshop immediately. J
Releas
eparking
Release parking
brake brake You are driving with the parking brake applied.
Awarnin gtonea lso
sounds.
X Release the parking brake. Display me
ssages
143On-board compute rand displays Z
Page 147 of 261
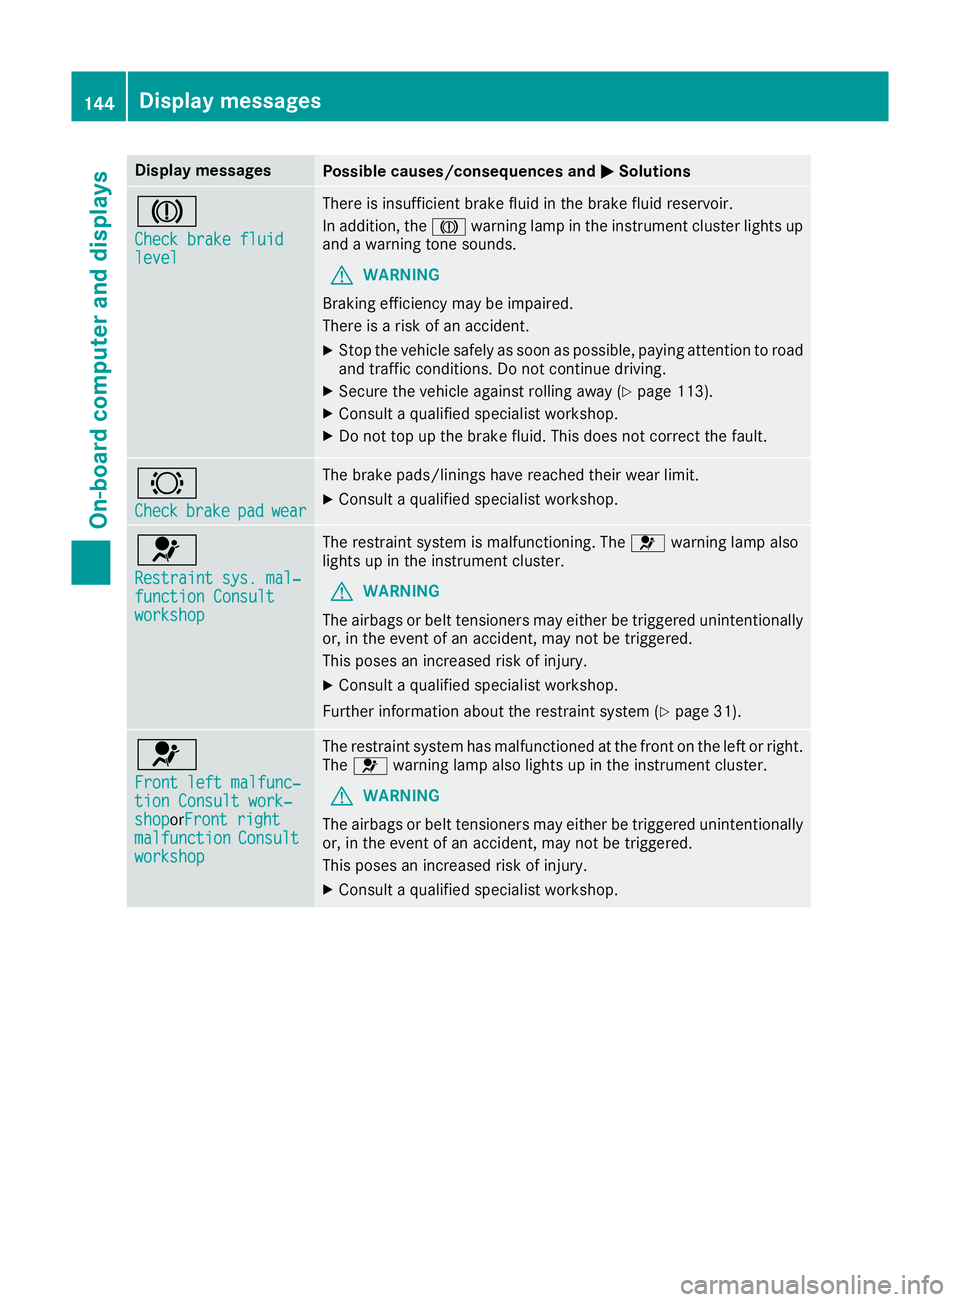
Display messages
Possible causes/consequence
sand M
MSolutions J
Check brake fluid Check brake fluid
level level There is insufficient brake fluid in the brake fluid reservoir.
In addition, the Jwarning lamp in the instrument cluster lights up
and awarning tones ounds.
G WARNING
Brakin gefficienc ymay be impaired.
There is arisk of an accident.
X Stop the vehicle safely as soon as possible, paying attention to road
and traffic conditions. Do not continue driving.
X Secure the vehicle against rolling away (Y page 113).
X Consult aqualified specialist workshop.
X Do not top up the brake fluid. This does not correc tthe fault. #
Check Check
brake
brakepad
padwear
wear The brake pads/linings have reached their wear limit.
X Consult aqualified specialist workshop. 6
Restraint sys. mal‐ Restraint sys. mal‐
function Consult function Consult
workshop workshop The restraint system is malfunctioning. The
6warning lamp also
lights up in the instrument cluster.
G WARNING
The airbags or belt tensioners may either be triggered unintentionally or, in the event of an accident ,may not be triggered.
This poses an increased risk of injury.
X Consult aqualified specialist workshop.
Further information about the restraint system (Y page 31).6
Front left malfunc‐ Front left malfunc‐
tion Consult work‐ tion Consult work‐
shop shoporFront right
Front right
malfunction
malfunction Consult
Consult
workshop
workshop The restraint system has malfunctioned at the front on the left or right.
The 6 warning lamp also lights up in the instrument cluster.
G WARNING
The airbags or belt tensioners may either be triggered unintentionally or, in the event of an accident ,may not be triggered.
This poses an increased risk of injury.
X Consult aqualified specialist workshop. 144
Display messagesOn-board computer and displays
Page 148 of 261
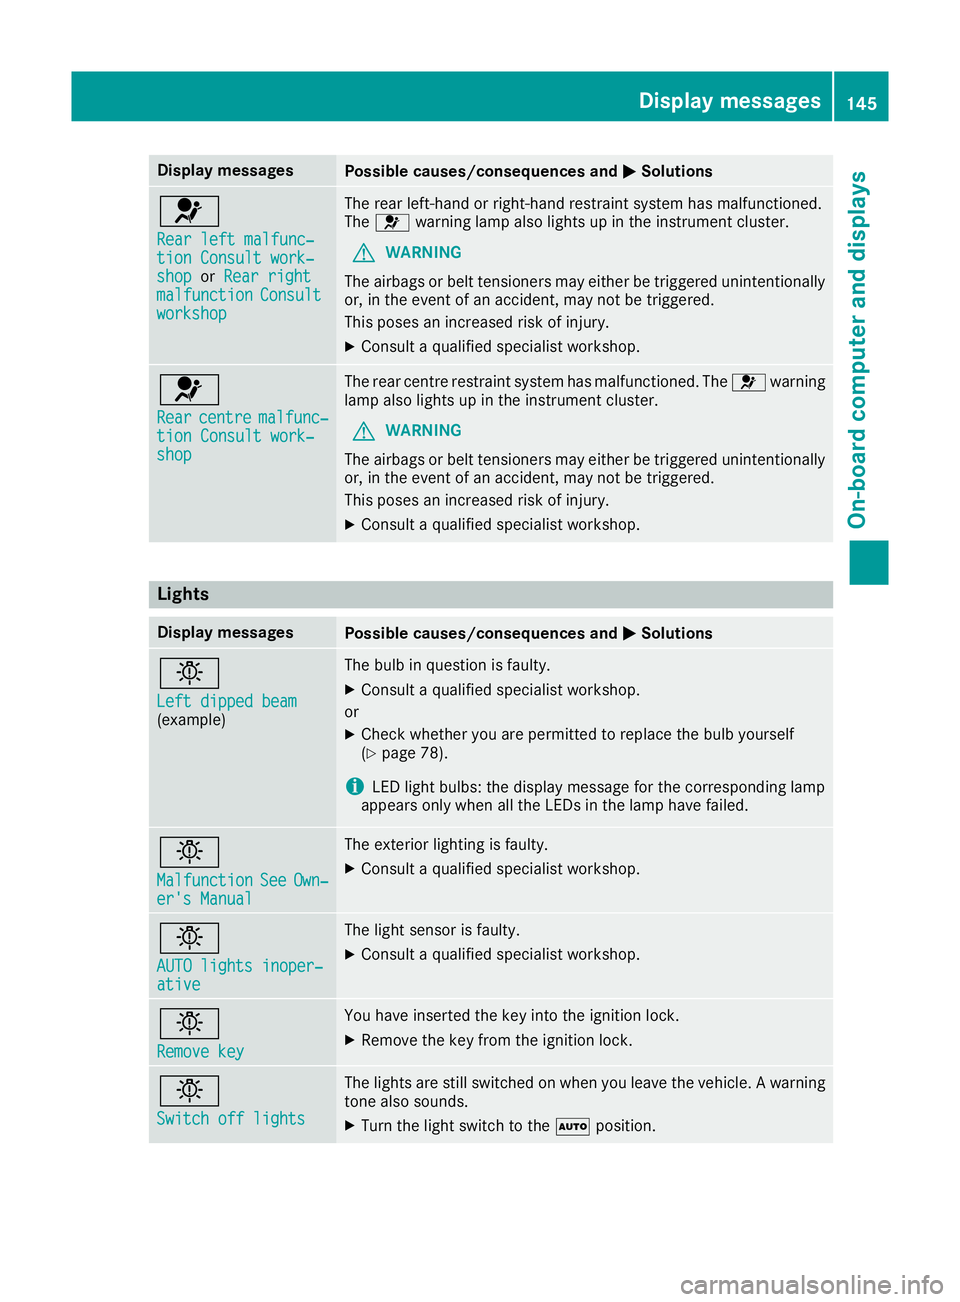
Display messages
Possible causes/consequence
sand M
MSolutions 6
Rear left malfunc‐ Rear left malfunc‐
tion Consult work‐ tion Consult work‐
shop shop
orRear right
Rear right
malfunction
malfunction Consult
Consult
workshop
workshop The rear left-hand or right-hand restraint system has malfunctioned.
The 6 warning lamp also lights up in the instrument cluster.
G WARNING
The airbags or belt tensioners may either be triggered unintentionally or, in the event of an accident, may not be triggered.
This poses an increased risk of injury.
X Consult aqualified specialist workshop. 6
Rear Rear
centre
centre malfunc‐
malfunc‐
tion Consult work‐
tion Consult work‐
shop shop The rear centre restraint system has malfunctioned. The
6warning
lamp also lights up in the instrument cluster.
G WARNING
The airbags or belt tensioners may either be triggered unintentionally or, in the event of an accident ,may not be triggered.
This poses an increased risk of injury.
X Consult aqualified specialist workshop. Lights
Display messages
Possible causes/consequence
sand M
MSolutions b
Left dipped beam Left dipped beam
(example) The bulb in question is faulty.
X Consult aqualified specialist workshop.
or X Check whether you are permitted to replace the bulb yourself
(Y page 78).
i LED light bulbs: the display message for the corresponding lamp
appears only when all the LEDsint he lamp have failed.b
Malfunction Malfunction
See
SeeOwn‐
Own‐
er's Manual
er's Manual The exterior lighting is faulty.
X Consult aqualified specialist workshop. b
AUTO lights inoper‐ AUTO lights inoper‐
ative ative The light sensor is faulty.
X
Consult aqualified specialist workshop. b
Remove key Remove key You have inserted the key into the ignition lock.
X Remove the key from the ignition lock. b
Switch off lights Switch off lights The lights are still switched on when you leave the vehicle.
Awarning
tonea lso sounds.
X Turn the light switch to the Ãposition. Display me
ssages
145On-board compute rand displays Z
Page 149 of 261
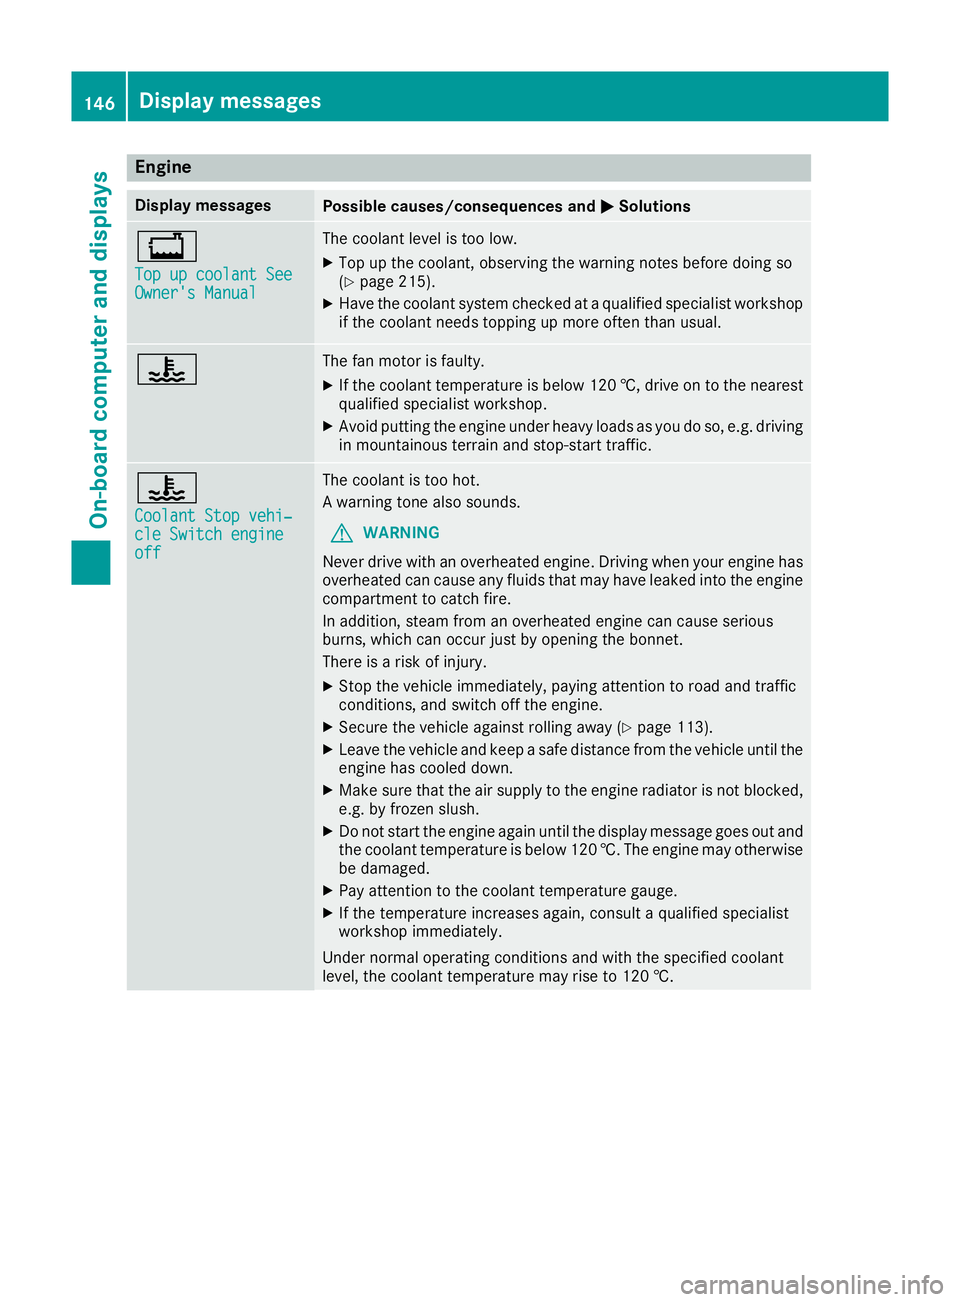
Engine
Display messages
Possible causes/consequences and
M
MSolutions +
Top up coolan
tSee
Top up coolant See
Owner's Manual Owner's Manual The coolant level is too low.
X Top up the coolant, observing the warning notes before doing so
(Y page 215).
X Have the coolant system checked at aqualified specialist workshop
if the coolant needs topping up more often than usual. ? The fan motor is faulty.
X If the coolant temperature is below 120 †, drive on to the nearest
qualified specialist workshop.
X Avoid putting the engine under heavy loads as you do so, e.g. driving
in mountainous terrain and stop-start traffic. ?
Coolant Stop vehi‐ Coolant Stop vehi‐
cle Switch engine cle Switch engine
off off The coolant is too hot.
Aw
arning tonea lso sounds.
G WARNING
Never drive with an overheated engine. Drivin gwhen your engine has
overheated can cause any fluids that may have leaked into the engine compartment to catchf ire.
In addition, steam from an overheated engine can cause serious
burns, which can occur just by opening the bonnet.
There is arisk of injury.
X Stop the vehicle immediately, paying attention to road and traffic
conditions, and switch off the engine.
X Secure the vehicle against rolling away (Y page 113).
X Leave the vehicle and keep asafe distance from the vehicle until the
engine has cooled down.
X Make sure that the air supply to the engine radiator is not blocked,
e.g. by frozen slush.
X Do not start the engine again until the display message goes out and
the coolant temperature is below 120 †. The engine may otherwisebe damaged.
X Pay attention to the coolant temperature gauge.
X If the temperature increases again, consult aqualified specialist
workshop immediately.
Under normal operating conditions and with the specified coolant
level, the coolant temperature may rise to 120 †. 146
Display messagesOn-board computer and displays
Page 150 of 261
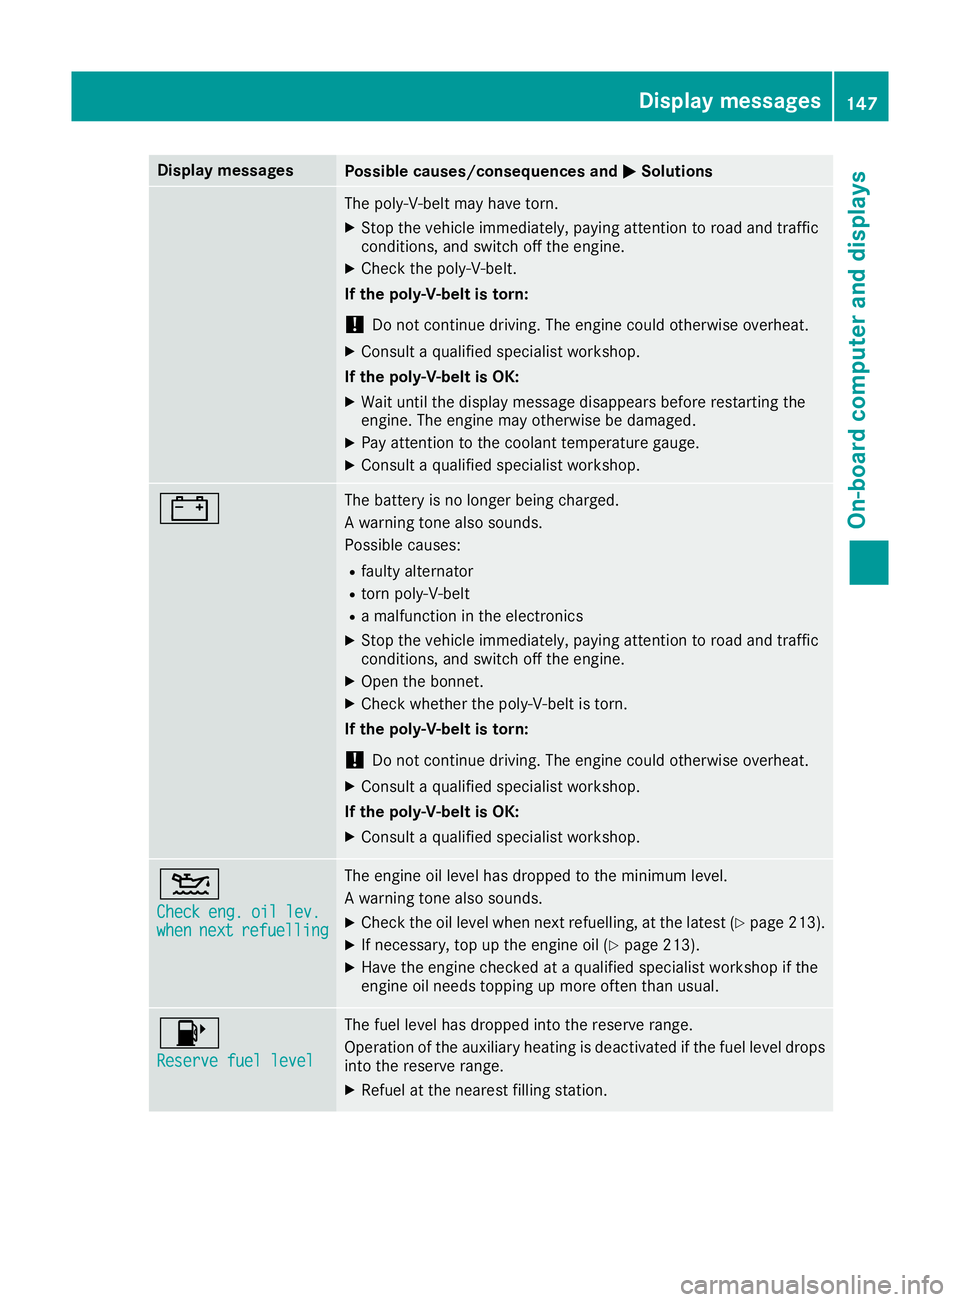
Display messages
Possible causes/consequence
sand M
MSolutions The poly-V-belt may have torn.
X Stop the vehicle immediately, paying attention to road and traffic
conditions, and switch off the engine.
X Check the poly-V-belt.
If the poly-V-belt is torn:
! Do not continue driving. The engine could otherwise overheat.
X Consult aqualified specialist workshop.
If the poly-V-belt is OK:
X Wait until the display message disappears before restarting the
engine. The engine may otherwise be damaged.
X Pay attention to the coolant temperature gauge.
X Consult aqualified specialist workshop. # The battery is no longer being charged.
Aw
arning tonea lso sounds.
Possible causes:
R faulty alternator
R torn poly-V-belt
R am alfunction in the electronics
X Stop the vehicle immediately, paying attention to road and traffic
conditions, and switch off the engine.
X Open the bonnet.
X Check whether the poly-V-belt is torn.
If the poly-V-belt is torn:
! Do not continue driving. The engine could otherwise overheat.
X Consult aqualified specialist workshop.
If the poly-V-belt is OK: X Consult aqualified specialist workshop. 4
Check Check
eng.
eng.oil
oillev.
lev.
when
when next
nextrefuelling
refuelling The engine oil level has dropped to the minimum level.
Aw
arning tonea lso sounds.
X Check the oil level when next refuelling, at the latest (Y page 213).
X If necessary, top up the engine oil (Y page 213).
X Have the engine checked at aqualified specialist workshop if the
engine oil needs topping up more often than usual. 8
Reserve fuel level Reserve fuel level The fuel level has dropped into the reserve range.
Operation of the auxiliary heating is deactivated if the fuel level drops
into the reserve range.
X Refuel at the nearest filling station. Display me
ssages
147On-board compute rand displays Z