steering wheel MERCEDES-BENZ G-CLASS SUV 2016 User Guide
[x] Cancel search | Manufacturer: MERCEDES-BENZ, Model Year: 2016, Model line: G-CLASS SUV, Model: MERCEDES-BENZ G-CLASS SUV 2016Pages: 261, PDF Size: 6.01 MB
Page 71 of 261
G
WARNING
You coul dlose control of the vehicl ewhile
driving if you:
R adjust the driver's seat, steering whee lor
mirrors
R fasten the seat belt
There is arisk of an accident.
Adjust the driver's seat, headr estraint, steer-
ing whee land mirrors and fasten yours eat
beltb efore starting the engine. G
WARNING
The headr estraints cannot provid ethe inten-
ded protection unless they are fitted and
adjusted correctly. There is an increased risk of injury to the heada nd neck in the event of
an accident or sudden braking, for example.
Always drive with the headr estraints fitted.
Ensure that the centre of the headr estraints
support the back of each vehicl eoccupant's
headate ye levelbefore driving off.
Make sure that you do not interchange the head restraints of the front and rear seats when
adjusting the headr estraints. Otherwise, you
cannot adjust the height and angle of the head
restraints correctly.
Adjust the headr estraint so that it is as close as
possible to yourh ead. G
WARNING
If the driver's seat is not correctly engaged, it coul dunexpectedly move while driving. This
coul dcausey ou to lose control of the vehicle.
There is arisk of an accident.
Always ensure that the driver's seat is
engaged before starting the vehicle. G
WARNING
If you adjust the seat height carelessly, you or other vehicl eoccupants coul dbetrappe dand
thereby injured .Childre ninparticular could
accidentally press the electrica lseat adjust-
ment buttons and become trapped. There is a
risk of injury.
Whil emoving the seats, make sure that your
hands or other body parts do not get under the lever assembly of the sea
tadjustmen tsys-
tem. G
WARNING
Whe nadjusting aseat, you or another vehicle
occupant coul dbecome trappe dbythe guide
rail of the seat, for instance. There is arisk of
injury.
Make sure that no one has any part of their
body withi nthe swee pofthe seat when
adjusting it. G
WARNING
If the seat beltisn ot in the seat beltg uide, it
no longer offers the intended leve lofprotec-
tion. An incorrectly fastened seat beltc an also
caus eadditiona linjuries. This poses an
increased risk of injury or even fatal injury.
Before starting ajourney ,alwaysm ake sure
that the seat beltisint he seat beltguide and
all vehicl eoccupants have fastened their seat
belts properly.
! To avoi
ddamage to the seats and the seat
heating, observe the following information:
R do not spil lany liquidsont he seats. If liquid
is spilled on the seats, dry them as soon as possible.
R if the seat covers are damp or wet, do not
switch on the seat heating. The seat heat-
ing should alson ot be used to dry the seats.
R clea nthe seat covers as recommended;
see "Interio rcare".
R do not transport heav yloads on the seats.
Do not place sharp objects on the seat
cushions, e.g. knives, nail sortools. The
seats should only be occupied by passen-
gers, if possible.
R when the seat heating is in operation, do
not cover the seats with insulating materi-
als,e .g. blankets, coats, bags, seat covers,
child seats or booster seats.
! Make sure that there are no objects in the
footwel lunder or behind the seats when mov-
ing the seats back. There is arisk that the
seats and/or the objects coul dbedamaged.
! When the rear bench seat is folde
dfor-
wards, the front seats cannot be moved to 68
SeatsSeats
,steering wheela nd mirrors
Page 72 of 261
their rearmost position. Yo
ucould otherwise
damage the seats and the rea rbench seat.
! Make sure tha
tthe su nvisor is folde dup
befor eadjusting the backrest and head
restraint height. The head restraint and sun
visor could otherwis ecollide when the head
restraint is full yextended.
i If the front door is open, the seats can be
adjusted for up to 30 minute safter the igni-
tio nh asbeen switched off.
i The rea
rseath eadr estraints can be
remove d(Ypage 70).
For mor einformation, contact aquali fied spe-
cialist workshop.
i Furthe
rinformation abou tenlarging the lug-
gage compartment (folding the rea rbench
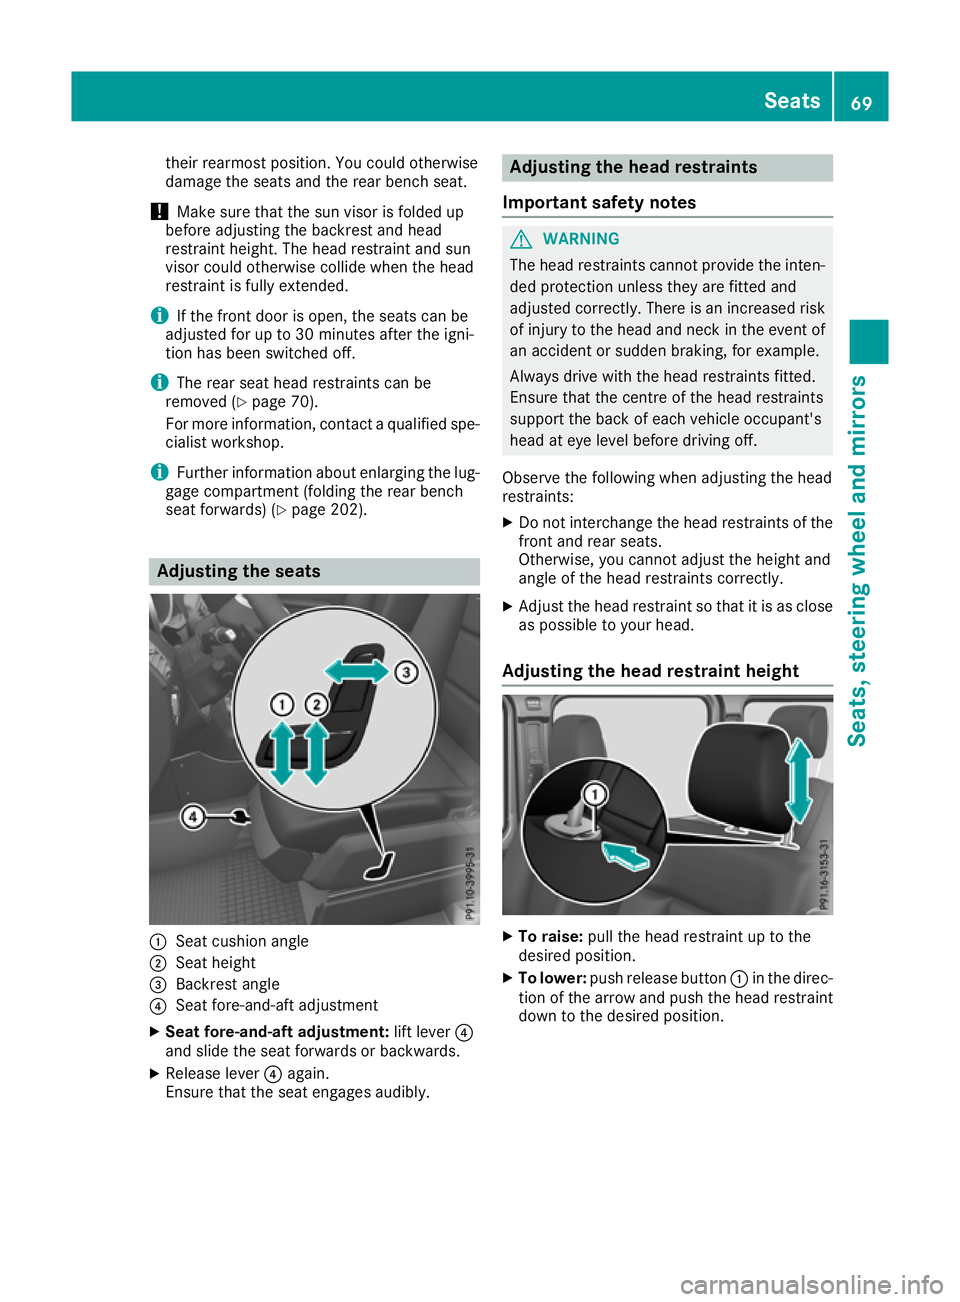
seat forwards )(Ypage 202). Adjustin
gthe seats :
Seat cushion angle
; Seat height
= Backrest angle
? Seat fore-and-aft adjustment
X Sea tfore-and-aft adjustment: lift lever?
and slide the sea tforward sorbackwards.
X Releas elever ? again.
Ensur ethat the sea tengages audibly. Adjustin
gthe hea drestraints
Important safety notes G
WARNING
Th eh ead restraints cannot provid ethe inten-
ded protection unless they are fitted and
adjusted correctly. There is an increased risk of injury to the head and neck in the event of
an accident or sudden braking, for example.
Always drive with the head restraints fitted.
Ensure that the centre of the head restraints
support the back of each vehicl eoccupant's
head at eye leve lbefore driving off.
Observe the following when adjusting the head
restraints:
X Do not interchange the head restraints of the
front and rear seats.
Otherwise, you cannot adjust the height and
angle of the head restraints correctly.
X Adjust the head restraint so that it is as close
as possible to yourh ead.
Adjusting the head restraint height X
To raise: pull the head restraint up to the
desired position.
X To lower: push release button :in the direc-
tion of the arrow and push the head restraint down to the desired position. Seats
69Seats,steering wheela nd mirrors Z
Page 74 of 261
even suffer burn-like injuries. There is
arisk of
injury.
Therefore, do not switch on the seat heating
repeatedly.
The red indicator lamps in the button indicate
the heating level you have selected.
X Make sure that the key is in position 1or2
in the ignition lock.
i If the batter
yvoltage is too low, the seat
heating may switch off.
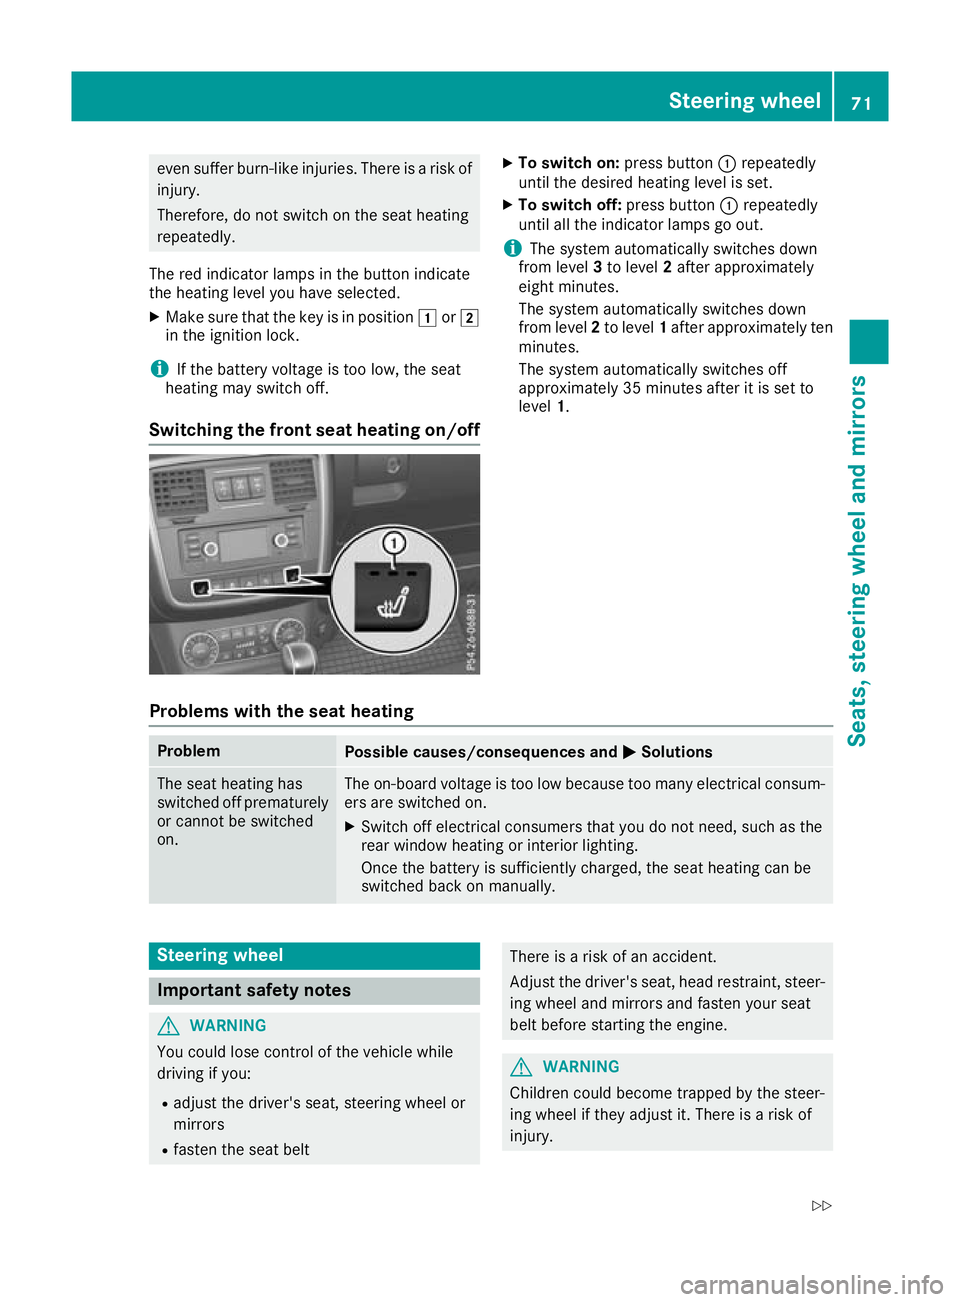
Switching the front seat heating on/off X
To switch on: press button:repeatedly
until th edesir ed heating level is set.
X To switc hoff:press button :repeatedly
unti lallthe indicator lamps go out.
i The system automaticall
yswitches down
from level 3to level 2afte rapproximately
eight minutes.
The system automaticall yswitches down
from level 2to level 1afte rapp roximatel yten
minutes.
The system automaticall yswitches off
approximatel y35minutes afte ritisset to
level 1.
Problems wit hthe seat heating Problem
Possible causes/consequences and
M MSolutions The seat heating has
switched off prematurely
or cannot be switched
on. The on-board voltage is too low because too many electrical consum-
ers are switched on.
X Switch off electrical consumers that you do not need, such as the
rear window heating or interior lighting.
Once the battery is sufficiently charged, the seat heating can be
switched back on manually. Steering wheel
Important safety notes
G
WARNING
You could lose control of the vehicle while
driving if you:
R adjust the driver's seat, steering wheel or
mirrors
R faste nthe seat belt There is
arisk of an accident.
Adjust the driver's seat, head restraint, steer- ing wheel and mirrors and fasten your seat
belt before starting the engine. G
WARNING
Children could becom etrappe dbythe steer-
ing whee lifthey adjust it. There is arisk of
injury. Steering wheel
71Seats,steering wheela nd mirrors
Z
Page 75 of 261
When leaving the vehicle, alway
stake the key
with you and lock the vehicle. Never leave
children unattended in the vehicle.
The electrically adjustable steerin gwheel can
still be adjusted when there is no key in the igni-
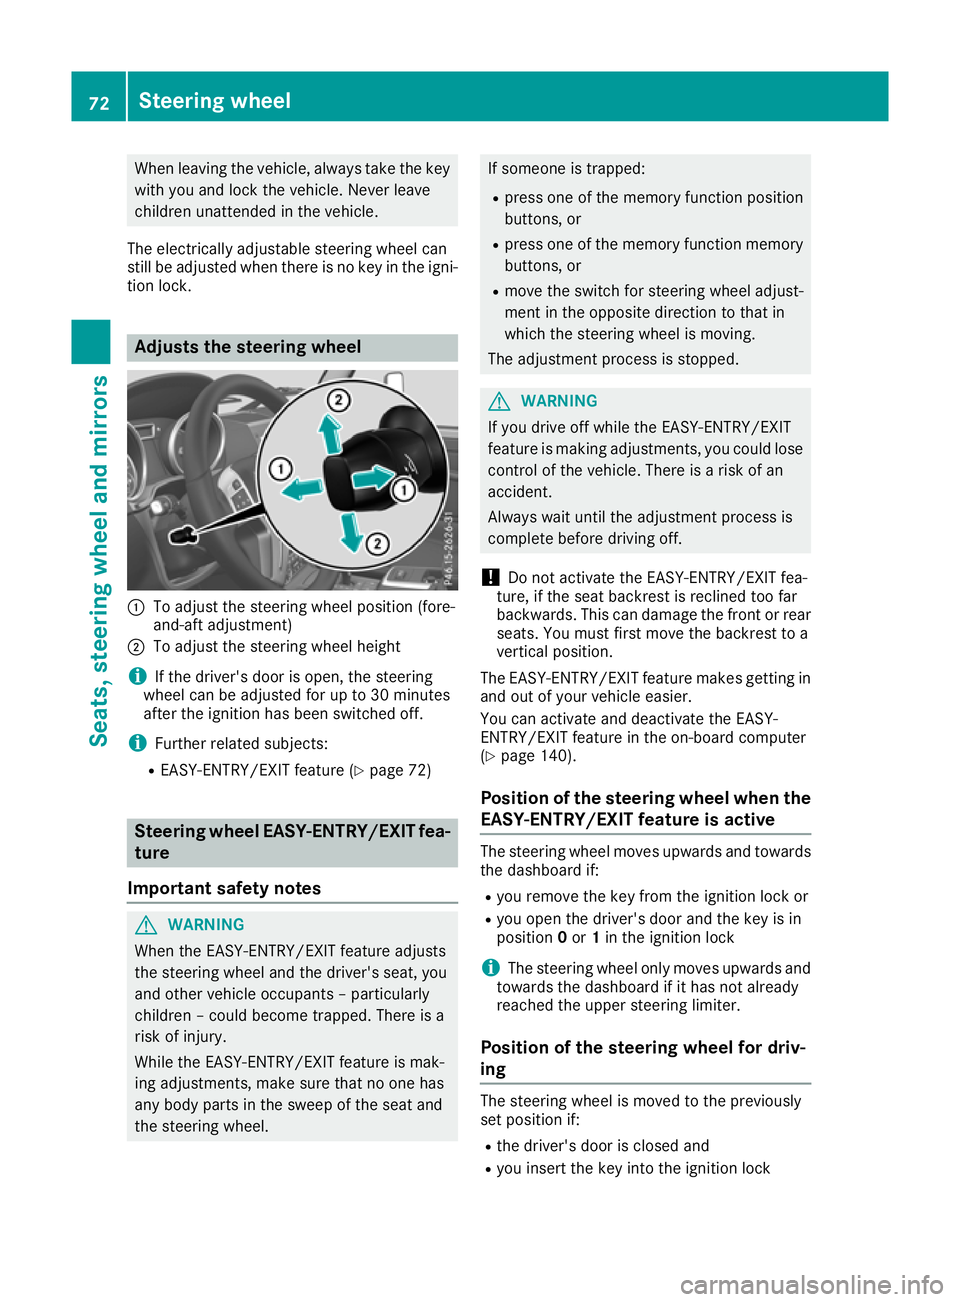
tion lock. Adjust
sthe steering wheel :
To adjust the steeri ngwheel position (fore-
and-aft adjustment)
; To adjust the steerin gwheel height
i If the driver's door is open, the steering
wheel can be adjusted for up to 30 minutes
after the ignition has been switched off.
i Further related subjects:
R EASY-ENTRY/EXIT feature (Y page 72)Steering wheel EASY-ENTRY/EXIT fea-
ture
Important safety notes G
WARNING
When the EASY-ENTRY/EXIT feature adjusts
the steering wheel and the driver's seat, you
and other vehicle occup ants –p articularly
children –couldb ecome trapped. There is a
risk of injury.
Whil ethe EASY-ENTRY/EXIT feature is mak-
ing adjustments, make sure that no one has
any body parts in the swee pofthe seat and
the steering wheel. If someone is trapped:
R press one of the memory function position
buttons, or
R press one of the memory function memory
buttons, or
R move the switch for steering wheel adjust-
ment in the opposite direction to that in
which the steering wheel is moving.
The adjustment process is stopped. G
WARNING
If you drive off while the EASY-ENTRY/EXIT
feature is making adjustments, you coul dlose
control of the vehicle. There is arisk of an
accident.
Always waitu ntil the adjustment process is
complete before driving off.
! Do not activate the EASY-ENTRY/EXIT fea-
ture, if the seat backrest is recline dtoo far
backwards. This can damage the front or rear seats. You must first move the backrest to a
vertical position.
The EASY-ENTRY/EXIT feature makes getting in
and out of yourv ehicleeasier.
You can activate and deactivate the EASY-
ENTRY/EXIT feature in the on-board computer
(Y page1 40).
Position of the steering wheel whent he
EASY-ENTRY/EXIT feature is active The steering wheel moves upwards and towards
the dashboard if:
R you remov ethe key from the ignition lock or
R you open the driver's door and the key is in
position 0or 1in the ignition lock
i The steerin
gwheel only moves upwards and
towards the dashboard if it has not already
reached the upper steerin glimiter.
Position of the steering wheel for driv-
ing The steerin
gwheel is moved to the previously
set position if:
R the driver's door is closed and
R you insert the key into the ignition lock 72
Steering wheelSeats, steering wheel and mirrors
Page 76 of 261
The last position of the steerin
gcolumn is stored
when you switch off the ignition. Mirrors
Rear-view mirror
G
WARNING
Electrolyte may escape if the glass in an auto- matic anti-dazzle mirro rbreaks. The electro-
lyte is harmfu land causes irritation. It must
not come into contact with yours kin, eyes,
respiratory organs or clothing or be swal-
lowed. There is arisk of injury.
If you come into contact with the electrolyte,
observe the following:
R Rinse off the electrolyte from yours kin
immediatel ywith water.
R Immediately rinse the electrolyte out of
youre yest horoughly with clea nwater.
R If the electrolyte is swallowed,i mmediately
rinse yourm outh out thoroughly.Don ot
induce vomiting.
R If electrolyte comes into contact with your
skin or hairoriss wallowed,seek medical
attention immediately.
R Immediately change out of clothing which
has come into contact with electrolyte.
R If an allergic reactio noccurs, seek medical
attention immediately.
X Adjust the rear-view mirror in such away that
you have agood view of road and traffic con-
ditions behind you.
The rear-view mirror automatically goes into
anti-dazzle mode if:
R the ignitio nisswitched on
R incident light from headlamps strikes the sen-
sor in the rear-view mirror
The rear-view mirror does not go into anti-dazzle
mode if reverse gearise ngaged or if the interior
lighting is switched on. Exterior mi
rrors
Adjusting th eexterio rmirror smanually X
Adjust th eexterio rmirrors in such awaythat
yo uc an get agoodo verview of roa dand traf-
fic conditions. Mirrors
73Seats, steering wheel and mirrors Z
Page 98 of 261
Running-i
nnotes Importan
tsafety notes
In certain driving and driving safet ysystems ,the
sensor sadjust automatically while acertai ndis-
tance is bein gdriven after th evehicl ehas been
delivere dorafter repairs .Full system effective-
ness is no treached until th eend of this teach-in
process.
Brake pads/lining sand disc stha teither are new
or have been replace dachiev eoptimum braking
effec tonlya fter several hundre dkilometres of
driving .Compensat efor th ereduce dbraking
effec tbya pplyin ggreate rforce to th ebrake
pedal. Th
ef irs t1 500km
The mor eyou trea tthe engine with sufficient
car eatt he start, the mor esatisfie dyou will be
with the engine performance later on.
R Driv eatv aryingvehicl espeeds and engine
speeds for the first 1500 km
R Avoi doverstraining the vehicl eduringt his
period, e.g .drivin gatf ullt hrottle
R When shifting gear smanually, shift up in good
time ,befor et he rev counter needl ereaches
Ô of the wa ytothe red area of the rev counter
display
R Do not shift down agearm anuall yino rder to
brake
R Try to avoi ddepressing the accelerator pedal
beyond the pressure point (kickdown)
After 1500 km ,you maygradually bring the
vehicl euptof ullr oa da nd engine speeds.
Yo us houl dalsoo bserve these note sonrunning-
in if the engine or parts of the drive train on your vehicl ehaveb eenr eplaced.
Alway sobserve the maximum permissible
speed. Driving
Importan
tsafety notes G
WARNING
Objectsint he driver's footwel lcan impede
peda ltravel or block apeda lwhich is depressed. This jeopardises safe operatio
nof
the vehicle. There is arisk of an accident.
Stow all objects in the vehicle safely, so that
they cannot reach the driver' sfootwell. Make
sure the floormat sand carpet sare properly
secured so that they cannot slip and obstruct the pedals. Do not lay several floormat sor
carpet sontop of one another. G
WARNING
Unsuitable footwear can hinder correct usage of the pedals, e.g.:
R shoe swith thick soles
R shoes with high heels
R slippers
There is arisk of an accident.
Wears uitable footwea rtoensure correct
usage of the pedals. G
WARNING
If you switch off the ignitio nwhile driving,
safety-relevant functions are only available
with limitations, or not at all.T his couldaffect,
for example, the power steering and the brake
boosting effect. You willr equire considerably
more effort to steer and brake. There is arisk
of an accident.
Do not switch off the ignitio nwhile driving. G
WARNING
If the parking brake has not been fully
released when driving, the parking brake can:
R overheat and caus eafire
R lose its hold function.
There is arisk of fire and an accident. Release
the parking brake full ybefore driving off.
! Warm up the engine quickly. Do not use the
engine's full performance until it has reached operating temperature.
Only set the automatic transmission to the
respective drive positions when the vehicl eis
stationary.
Where possible,a voids pinning the drive
wheels when pulling awayons lippery roads.
Otherwise, you coul ddamage the drive train. Driving
95Drivingand parking Z
Page 107 of 261
Kickdown
Use kickdown for maximu
macceleration:
X Depress the accelerator pedal beyond the
pressure point.
The automatic transmission shifts to alower
gear depending on the engine speed.
X Ease off the accelerator pedal once the
desired speed is reached.
The automatic transmission shifts back up.
Towing atrailer X
Drive in the middle of the engine speed range
on uphill gradients.
X Limit the shift range to 3or 2depending on
the uphill or downhill gradient (Y page 105).
X Shift the transfer case int ooff-roa ddriving
position LOWR ANGE on extreme uphill gra-
dients or stee pdownhil lgradients
(Y page 124). Progra
mselector button
General notes The program selector button allows you to
choose between drive programs with different
driving characteristics.
The automatic transmission switches to auto-
matic drive program Eeach time the engine is
started.
Available drive programs E
Economy Com
fortable, economical
driving S
Sport Sport
ydriving style M
Manual Manual gearshifting
Furthe
rinformation on the automatic drive pro-
gra m( Ypage 104). Select
ing the drive program Program selector button
X Press program selector button :repeatedly
until the desired drive program is shown in the multifunction display. Steering wheel gearshift paddles
In the automatic drive program
,you can restrict
or derestrict the shift range using steering wheel gearshift paddles :and ;(Y page 105).
In the manuald rive program, you can change
gears manually using steering wheel gearshift
paddles :and ;(Ypage 106).
You can only change gear with the steering
wheel gearshift paddles when the transmission
is in position D. Automatic drive program
Drive program Eis characterised by the follow-
ing:
R comfort-orientated engine an dtransmission
settings.
R optimal fuel consumption resulting from the
automatic transmission shifting up sooner. 104
Auto
matictransmissionDriving and parking
Page 109 of 261
Manual gearshifting
Temporary setting X
To activate: shift the selector lever to posi-
tion D.
X Pull steering whee lgearshift paddle :or;.
The temporary setting will remai nactive for a
certain amount of time .Unde rcertain condi-
tions, the minimu mamount of time is extended,
e.g .int he cas eoflatera lacceleration, during an
overru nphase or when driving on stee pterrain.
X To deactivate: pull steering whee lgearshift
paddle ;and hol ditinp lace.
or X Use the lever to switch the transmission posi-
tion.
or X Chang ethe drive program.
Shiftin ggears X
To shift up: pull steering whee lgearshift pad-
dle ;.
The automatic transmission shifts up to the
next gear.
X To shift down: pull steering whee lgearshift
paddle :.
The automatic transmission shifts down to
the next gear.
Automatic downshifting occurs when coast-
ing.
If the engine woul dexceed the maximum
engine speed when shifting down, the auto-
matic transmission protects against engine
damage by not shifting down.
Gearshift recommendation The gearshift recommendation assist
syou in
adopting afuel-efficien tdriving style. The rec-
ommended gear is shown on the multifunction
display.
X When gearshift recommendation :is shown
on the multifunction display of the instrument
cluster, shift to recommended gear ;. Manual drivep
rogram
General information In manua
ldrive program M,you can change gear
yourself by using the steering wheel gearshift
paddles. The transmission must be in position D
to do this. The gear currently selected and
engaged is shown in the multifunction display.
Manuald rive program Mdiffers from drive pro-
grams Cand Swith regard to spontaneity,
responsiveness and smoothness of gear
changes. 106
Automatic transmissionDriving and parking
Page 117 of 261
To ensure that the vehicle is safeguarded
against rolling away unintentionally:
R the parking brake must be applied
R the transmission must be in position Pand the
key must be removed from the ignition lock
R the transfer case must not be in the neutral
position
R on uphill or downhill gradients, turn the front
wheels towards the kerb
R the empty vehicle must be secured at the
front axle with awheel chock or similar
object ,for example, on uphill or downhill gra-
dients
R al aden vehicle must also be secured at the
rear axle with awheel chock or similar object,
for example, on uphill or downhill gradients Switching off the engine
G
WARNING
The automatic transmission switches to neu-
tral position Nwhen you switch off the engine.
The vehicle may roll away. There is arisk of an
accident.
After switching off the engine, alwayss witch
to parking position P.Prevent the parked vehi-
cle from rolling awaybya pplying the parking
brake.
X Shift the automatic transmission to position
P.
X Turn the key to position 0in the ignitionlock
and remove it.
The immobiliser is activated.
X Firmly apply the parking brake.
X Turn the steering whee luntil the steering
whee llock engages.
If you switch the engine off with the transmis-
sion in position Ror D,t he automatic transmis-
sion shifts to Nautomatically.
If you then open the driver's door or the front-
passenger door or remove the key from the igni- tion, the automatic transmission shifts to P
automatically.
If you switch off the engine while the transmis-
sion is in position N,the automatic transmission
remains in Neven if adoor is opened .The auto-
matic transmission only automatically shifts into neutral
Nwhe nyou switc hoff the engine
using the key. Parking brake
G
WARNING
If you mus tbrake the vehicl ewith the parking
brake, the braking distance is considerably
longer and the wheels coul dlock. This increa-
ses the risk of skidding and an accident.
Only use the parking brake to brake the vehi- cle when the service brake is faulty. Do not
apply the parking brake too firmly .Ifthe
wheels lock, release the parking brake until
the wheels begi nturning again. G
WARNING
If you leave children unattended in the vehi-
cle, they may be abletos et the vehiclein
motion if, for example, they:
R release the parking brake
R shift the automatic transmission out of park
position P
R start the engine
In addition, they may operate vehicl eequip-
ment and become trapped. There is arisk of
an accident and injury.
When leaving the vehicle, alwayst ake the key
with you and lock the vehicle. Never leave
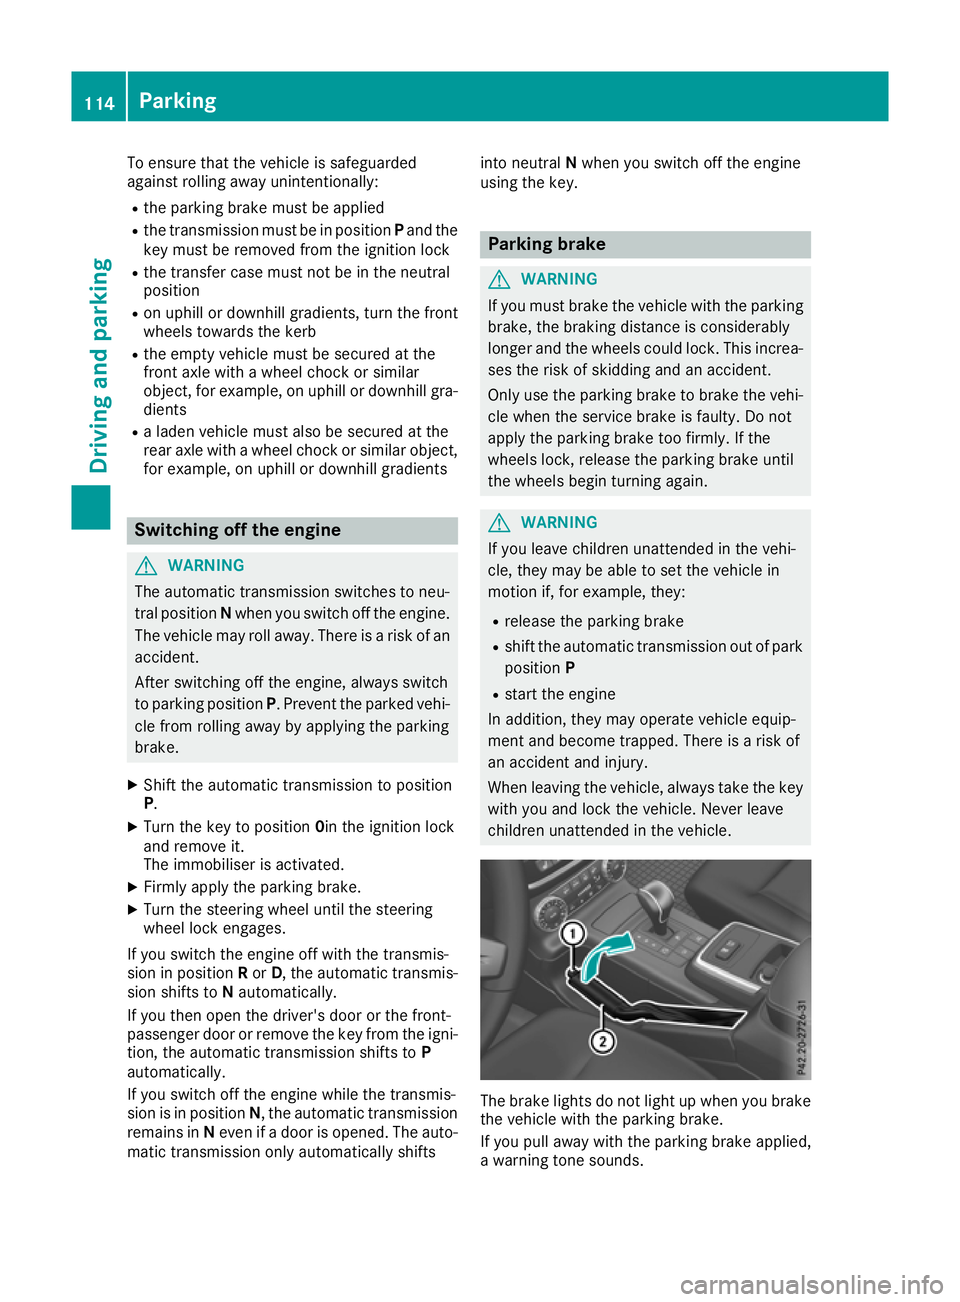
children unattended in the vehicle. The brake light
sdonot light up when you brake
the vehicle with the parking brake.
If you pull away with the parking brake applied,
aw arning tones ounds.114
ParkingDriving and parking
Page 120 of 261
Alway
sreplace al lbrake discs and brake pads/
lining sonana xleatt he same time .Alway sfit
new brake pads/lining swhenr eplacing brake
discs.
The vehicl eisequippe dwithl ightweight brake
discs to which the whee lassembl ywithr im and
threaded connectio nism atched.
The us eofbrake discs othe rtha nt hose
approved by Mercedes-Benz ma yalter track
width and is subject to approval, if applicable.
Whe nhandling the brake discs, shock-type
load ssuchast hoseexperience dwhenc hanging
wheels ,can lead to areduction in comfort when
driving with lightweight brake discs. Avoid
shock-typ eloads on the lightweight brake discs,
particularly on the brake plate. Driving on slippe
rysurfaces
! Where possible, avoid spinnin
gthe drive
wheels when pulling away on slipper yroads.
You could otherwise damage th edrive train.
Thi stypeofd amage is no tcovered by the
term soft heMercedes-Ben zwarranty.
X Engage th edifferential locks if necessary
(Y page 126). Drivin
gonw et roads
Aquaplaning If wate
rhas accumulated to acertain depth on
the road surface, there is adanger of aquaplan-
ing occurring, even if:
R you are driving at low speeds
R the tyres have adequate tread depth
For this reason, drive in the following manner in the event of heavy rain or in conditions in which
aquaplaning can occur:
R lowery ours peed
R avoid tyre ruts
R avoid sudden steering movements
R brake carefully
Drivin gonflooded roads !
Bear in mind that vehicles travelling in front
or in the opposite direction create waves. This may cause the maximum permissibl ewater
depth to be exceeded. These notes must be observed under all cir-
cumstances. You could otherwise damage
the engine, the electronics or the transmis-
sion.
If you must drive on stretches of road on which
water has collected, please bear in mind that:
R in the case of standing water, the water level
must be no higher than the lower edge of the
vehicle body
R you should drive no faster than walking pace
Off-road fording !
Under no circumstances should you accel-
erate before entering the water. The bow
wave could cause water to enter and damage
the engine and neighbouring assemblies.
! Do not open any of the vehicle's doors while
fording. Otherwise, water could get into the
vehicle interior and damage the vehicle's
electronics and interior equipment.
i You may only drive through fresh water.
R Observe the safety notes (Y page 119) and
general notes (Y page 119) on driving off-
road
R Establish how deep the water is and the char-
acteristics of the body of water before fording
R Switch off automatic climate control
R Vehicles with auxiliary heating/ventila-
tion: switch the auxiliary heating/ventilation
off
R Shift the transfer case to the LOW RANGE
off-road driving position (Y page 124)
R Engage the differential locks if necessary
(Y page 119)
R Avoid high engine speeds
R Enter and exit the water at aflat place and at
as teady walking pace
R Drive slowly and at aconstant speed through
the water
R Ensure that abow wave does not form as you
drive
R Do not stop and do not switch off the engine.
Water offers ahigh degree of resistance, the
ground is slippery and, in some cases, unsta- ble. Therefore, it is difficult and dangerous to pull awayinw ater
R Cleana ny mud from the tyre tread after ford-
ing
R Apply the brakes to dry them after fording Driving tips
117Driving and parking Z