steering wheel MERCEDES-BENZ G-CLASS SUV 2016 Owner's Manual
[x] Cancel search | Manufacturer: MERCEDES-BENZ, Model Year: 2016, Model line: G-CLASS SUV, Model: MERCEDES-BENZ G-CLASS SUV 2016Pages: 261, PDF Size: 6.01 MB
Page 121 of 261
Alway
sobserve the fording depth values
(Y page 255). Parkin
gthe vehicle after heavy loads
on the engine
! Vehicles with
adiesel engine: your vehi-
cle's exhaust gas turbocharger may get very
hot under heavy engine load, e.g. during:
R trailer towing
R longer motorway journeys at high speed
R longer journeys through mountainous ter-
rain
X Let the engine run for approximately another
two minutes while the vehicle is stationary
before switching off the engine.
This way, the exhaust gas turbocharger can
cool down more effectively. Winte
rdriving G
WARNING
If you shift dow nonaslippery road surface in
an attempt to increas ethe engine's braking
effect, the drive wheels coul dlose their grip.
This increases the risk of skidding and having
an accident.
Do not shift downf or additionalengine brak-
ing on aslippery road surface. G
WARNING
If you select the LOW RANGE off-road gearon as lippery road surface, the wheels coul dlose
traction:
R if you release the accelerator peda lwhen
the vehicl eisinmotion
R if Off-road ABS intervenes when braking
If the wheels lose traction, it willnol onger be
possible to steer the vehicle. This increases
the risk of skidding and having an accident.
Never select the LOW RANGE off-road gear
when driving on slippery road surfaces. G
DANGER
If the exhaus tpipe is blocke doradequate
ventilation is no tpossible, poisonous gases
suc hasc arbon monoxide (CO) may ente rthe
vehicle. This is th ecase, e.g. if th evehicle
become strapped in snow. There is ariskof
fatal injury.
If you leav ethe engin eortheauxiliary heating
running, mak esuret he exhaust pipe and area
around th evehicl eare clear of snow. To
ensur eana dequate supply of fresh air, open a
window on th eside of th evehicl ethatisn ot
facing int othe wind.
Hav eyour vehicl ewinterproofed at aqualified
specialist workshop at th eonset of winter.
You should drive particularly carefully on slip-
per yroads urfaces. Avoid sudden acceleration,
steering and braking manoeuvres.
If th evehicl ethreaten stoskidorc annotbe
stoppe dwhen moving at low speed:
X Shift th eautomatic transmission to position
N.
X Try to bring th evehicl eunder control by using
corrective steering.
The outside temperature indicator is not
designed to serve as an ice-warning device and
is therefor eunsuitable for that purpose.
Changes in th eoutside temperature are dis-
played after ashort delay.
Indicate dtem peratures jus tabov ethe freezing
poin tdon otguarantee that th eroads urfac eis
free of ice .The roa dmay still be icy, especially in
wooded area soronbridges.The vehicl ecould
skid if you fail to adapt your drivin gstyle. Always
adapt your drivin gstyle and drive at aspeed to
suit th eprevailing weather conditions.
You should pay special attention to roa dcondi-
tion swhen temperatures are around freezing
point.
Further information on drivin gwiths nowc hains
(Y page 237).
Further information on drivin gwiths ummer
tyres (Y page 237).
Observ ethe note sint he"Winte roperation "sec-
tion (Y page 236). 118
Driving tipsDriving and parking
Page 124 of 261
X
Clean th ewheels, wheel arches and th evehi-
cle underside wit hawaterjet;c he ck for any
foreign object sand damage.
X Chec kwhether twigs or other part sofplants
have become trapped. Thes eincreas ethe risk
of fir eand can damag efuel pipes ,brake
hoses or th erubbe rbellows of th eaxle joints
and propeller shafts.
X Afte rthe trip, examin ewithout fail th eentire
undercarriage, wheels, tyres, bodywork struc- ture, brakes, steering ,cha ssis and exhaust
system for damage.
X Afte rdriving in sand, mud, gravel, wate ror
similar dirt yconditions ,have th efollowing
checked and cleaned:
R brak ediscs
R wheels
R brak epads
R axle joints
X If you notic estron gv ibrations after off-road
driving ,che ck for foreign object sinthe
wheel sand driv etrain and ,ifnecessary,
remove them. Foreign object scan disturb the
balance and caus evibrations.
Driving on sand Observ
ethe following rules when driving on
sand:
R shift the transfer case to the LOW RANGEoff-
road driving position (Y page 124).
R avoid high engine speeds.
R Shift the automatic transmission to alow
gear.
R drive quickly to overcome the rolling resist-
ance. Otherwise, the vehicle could dig itself
into the sand.
R drive in the tracks of other vehicles if possible.
When doing so, make sure that:
- the tyre ruts are not too deep
- the sand is firm enough
- your vehicle has sufficient ground clear-
ance
Tyre rutsa nd unpaved roads !
Check that the ruts are not too deep and
that your vehicle has sufficient clearance.
Otherwise, your vehicle could be damaged or bottom out and get stuck. Observe the following rules when driving along
ruts in off-road terrain or on roads with loose
gravel:
R shift the transfer case to the LOW RANGEoff-
road driving position (Y page 124)
R avoid high engine speeds
R observe the safety notes (Y page 119) and the
general notes (Y page 119) on off-road driving
R shift the automatic transmission to alow gear
R drive slowly
R where ruts are too deep, drive with the wheels
on one side on the middle section of turf if
possible
Driving over obstacles !
Obstacles could damage the floor of the
vehicle or componentsoft he chassis. Ask
passengers for guidance when driving over
large obstacles. Any damage to the vehicle
always increases the risk of an accident.
! Drive with particular care when driving over
an obstacle while driving up or down asteep
slope.
The vehicle could otherwise tilt and slide side- waysort ip over.
Observe the following rules when driving over
tree stumps, large stones and other obstacles:
R observe the safety notes (Y page 119) and the
general notes (Y page 119) on off-road driving
R shift the transfer case to the LOW RANGEoff-
road driving position (Y page 124)
R avoid high engine speeds
R shift the automatic transmission to alow gear
R make sure that you have enough ground
clearance before driving across an obstacle
R drive very slowly
R try to drive straight over the centreofo bsta-
cles: front wheel first, then rear wheel Travelling uphill
Approach/departure angle G
WARNING
If you drive on asteep incline at an angle or
turn on asteep incline, the vehicl ecoulds lip
sideways, tip and overturn. There is arisk of
an accident. Drivingt
ips
121Driving an dparking
Z
Page 125 of 261
When driving on an incline, drive into the line
of fall (upwards or downwards in astraight
line) and do not turn.
Always observe the approach/departure angle
values (Y page 255).
R Observe the safety notes (Y page 119) and
general notes (Y page 119) on driving off-
road.
R Follow the line of fall when driving on slopes
and steep inclines.
R Befor edriving on extreme uphill and extreme
downhill gradients ,set the transfer case to
the LOW RANGE off-road driving position
(Y page 124).
R Engage the differential locks if necessary
(Y page 126).
R Drive slowly.
R Accelerate gently and make sure that the
wheels are gripping.
R Avoid high engine speeds, except when driv-
ing on sandy and muddy routes with high driv-
ing resistance.
R Use the braking power of the engine when
driving down aslope. Observe the engine
speed; do not overrev the engine.
R Shift the automatic transmission to alow gear
appropriate for tackling an uphill gradient or a long, steep downhill gradient.
The HOLD function assists you when pulling
away and manoeuvrin gonaslope or hillside
(Y page 122).
Maximum gradient-climbing capability Alwayso
bserve the maximu mgradient climbing
ability values (Y page 255).
Hilltops When drivin
gupanu phill gradient, slightly
reduce pressure on the accelerator immediately
before reaching the brow of the hill. Make use of the vehicle's own impetus to travel over the
brow.
This style of driving prevents:
R the vehicle from lifting off the ground on the
brow of ahill
R loss of traction
R the vehicle from travelling too quickly down
the other side Driving downhill R
Drive slowly.
R Do no tdrive at an angle down stee pinclines.
Stee rinto the line of fall and drive with the
front wheels aligned straight forwards .Oth-
erwise, the vehicl ecould slip sideways ,tip
and overturn.
R Before tackling stee pdownhil lgradients ,shift
the automatic transmission to alow gear.
By doing so, yo uwillu se the braking effect of
the engine to reduce the speed. If thi sisnot
sufficient, brake gently .Whend oing so, make
sure tha tthe vehicl eisfacing in the direction
of the line of fall.
R Observe the note sondrivinginm ountainous
terrai n(Ypage 122).
R Check tha tthe servic ebrake is workin gnor-
mall yafter alon gd ownhil lstretch.
When drivin gatspeeds below60km/h ,off-road
ABS is activated and the front wheels lock cycli- cally durin gbraking .The digging-i neffect ach-
ieved in the proces sreduce sthe stopping dis-
tance durin goff-roa ddriving. Thi slim its steering
capability. Driving systems
HOLD function
General notes Th
eH OLD function can assist the driver in the
following situations:
R when pulling away,e specially on steep slopes
R when manoeuvring on steep slopes
R when waiting in traffic
The vehicle is kept stationary without the driver having to depress the brake pedal.
The braking effect is cancelled and the HOLD
function deactivated when you depress the
accelerator pedal to pull away.
Do not use the HOLD function when driving off-
road, on steep uphill or downhill gradients or on
slippery or loose surfaces. The HOLD function
cannot hold the vehicle on such surfaces. 122
Driving systemsDriving and parking
Page 135 of 261
the engine compartment, leav
ethe bonnet
close dand notify the fir ebrigade.
The coolant temperatur egauge is in the instru-
ment cluste ronthe right-hand side (Y page 26).
Under normal operating conditions and with the specifie dcoolant level ,the coolant temperature
ma yriseto1 20 †.
At high outside temperatures and when driving
in mountainou sterrain, the coolant temperature
ma yrisetot he end of the scale. Operatin
gthe on-board computer
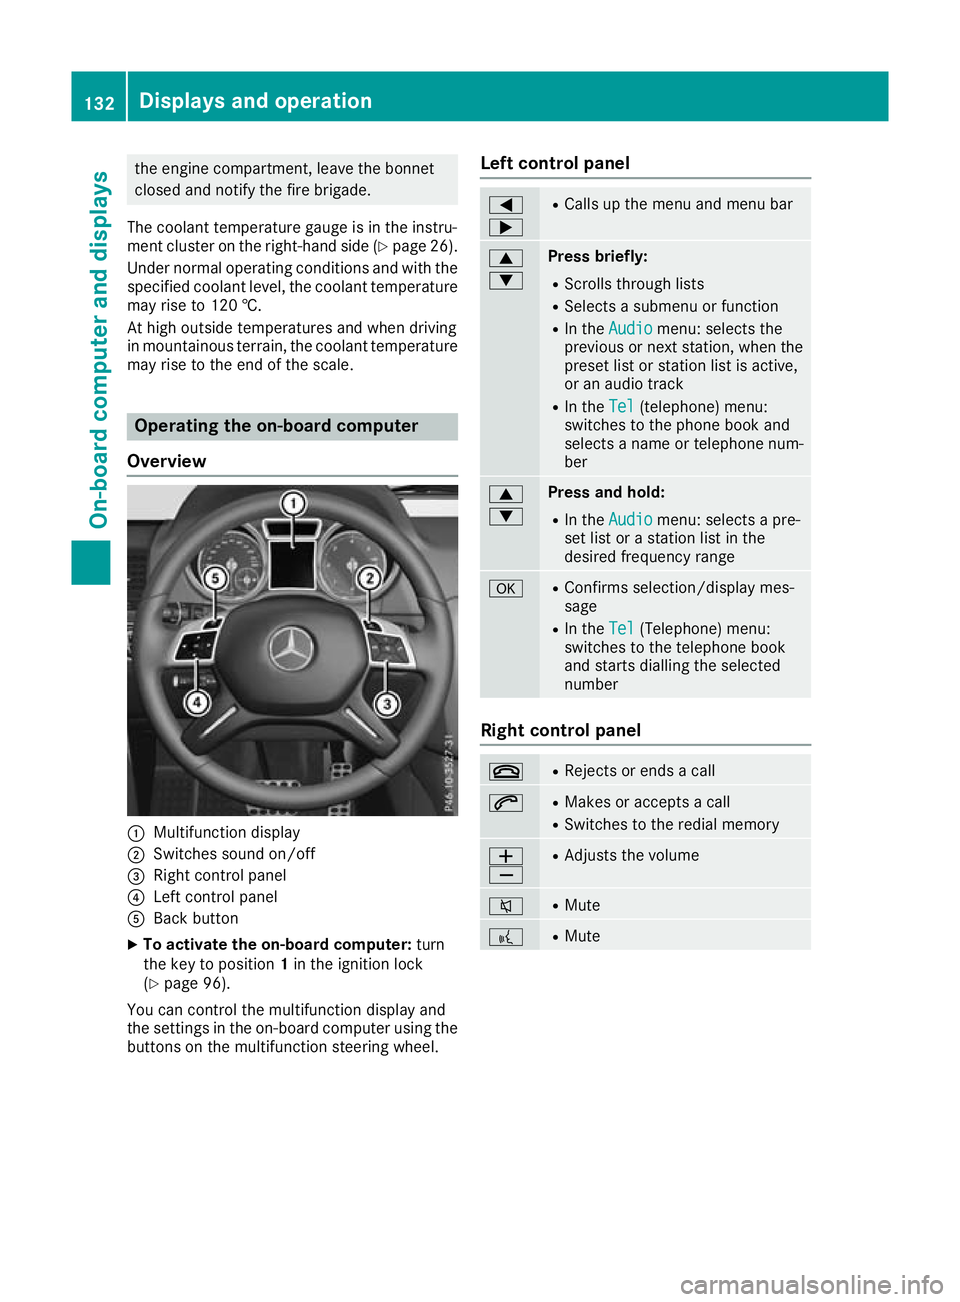
Overview :
Multifunction display
; Switches sound on/off
= Right control panel
? Left control panel
A Back button
X To activate the on-board computer: turn
the key to position 1in the ignition lock
(Y page 96).
You can control the multifunction display and
the settings in the on-board computer using the buttons on the multifunction steering wheel. Left control panel =
; R
Calls up the menu and menu bar 9
: Press briefly:
R Scrolls through lists
R Selects asubmenu or function
R In the Audio Audio menu: selects the
previous or next station, when the preset list or station list is active,
or an audio track
R In the Tel Tel(telephone) menu:
switches to the phone book and
selects aname or telephone num-
ber 9
: Press and hold:
R
In the Audio Audio menu: selects apre-
set list or astation list in the
desired frequency range a R
Confirms selection/displaym es-
sage
R In the Tel
Tel(Telephone) menu:
switches to th etelephone book
and start sdiallin gthe selected
number Right contro
lpanel ~ R
Rejects or end sacall 6 R
Makes or accept sacall
R Switches to the redial memory W
X R
Adjusts the volume 8 R
Mute ? R
Mute 132
Displays and operationOn-board computer and displays
Page 136 of 261
Back button
% Press briefly:
R Back
R Hides displa ymessages/calls up
the last Trip
Tripmenu function used
R Exitst he telephone book/redial
memory % Press and hold:
R Callsupt he standard display in the
Trip
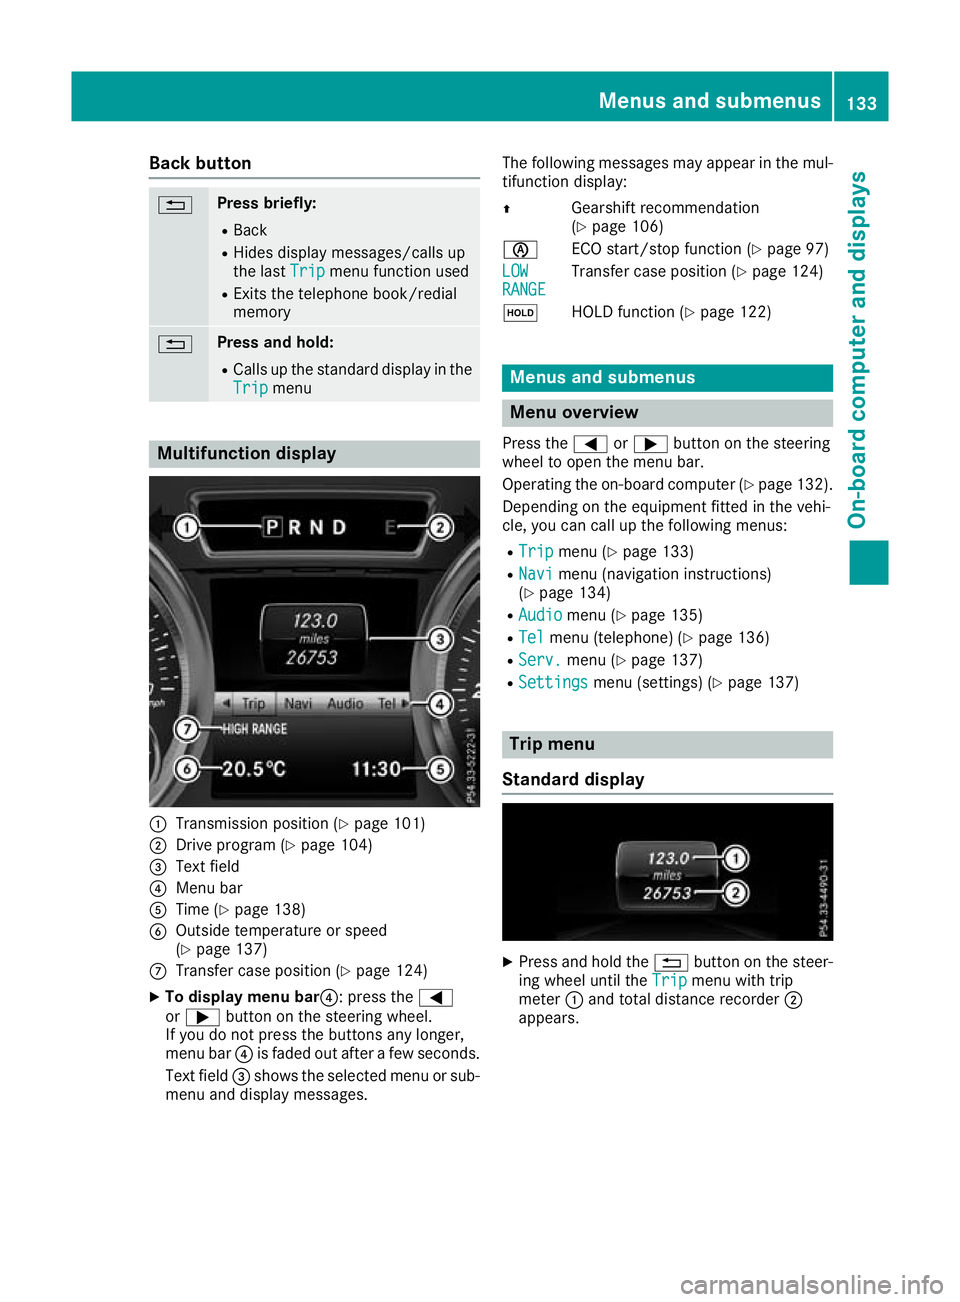
Trip menu Multifunction display
:
Transmission position (Y page 101)
; Drive program (Y page 104)
= Text field
? Menu bar
A Time (Y page 138)
B Outside temperature or speed
(Ypage 137)
C Transfer case position (Y page 124)
X To display menu bar?:p ress the=
or ; button on the steerin gwheel.
If you do not press the button sany longer,
menu bar ?is faded out after afew seconds.
Text field =shows the selected menu or sub-
menu and display messages. The following messages may appear in the mul-
tifunction display:
Z Gearshift recommendation
(Ypage 106)
è ECO start/stopf unction (Ypage 97)
LOW LOW
RANGE RANGE Transfer case position (Y
page 124)
ë HOLD function (Y page 122) Menu
sand submenus Menu overview
Press the =or; button on the steering
whee ltoopen the menu bar.
Operating the on-board compute r(Ypag e132).
Depending on the equipment fitted in the vehi-
cle, you can call up the following menus:
R Trip Trip menu (Y page133)
R Navi
Navi menu (navigatio ninstructions)
(Y pag e134)
R Audio
Audio menu (Y page135)
R Tel
Tel menu (telephone) (Y page136)
R Serv.
Serv. menu (Y page137)
R Settings
Settings menu (settings) (Y page137) Trip menu
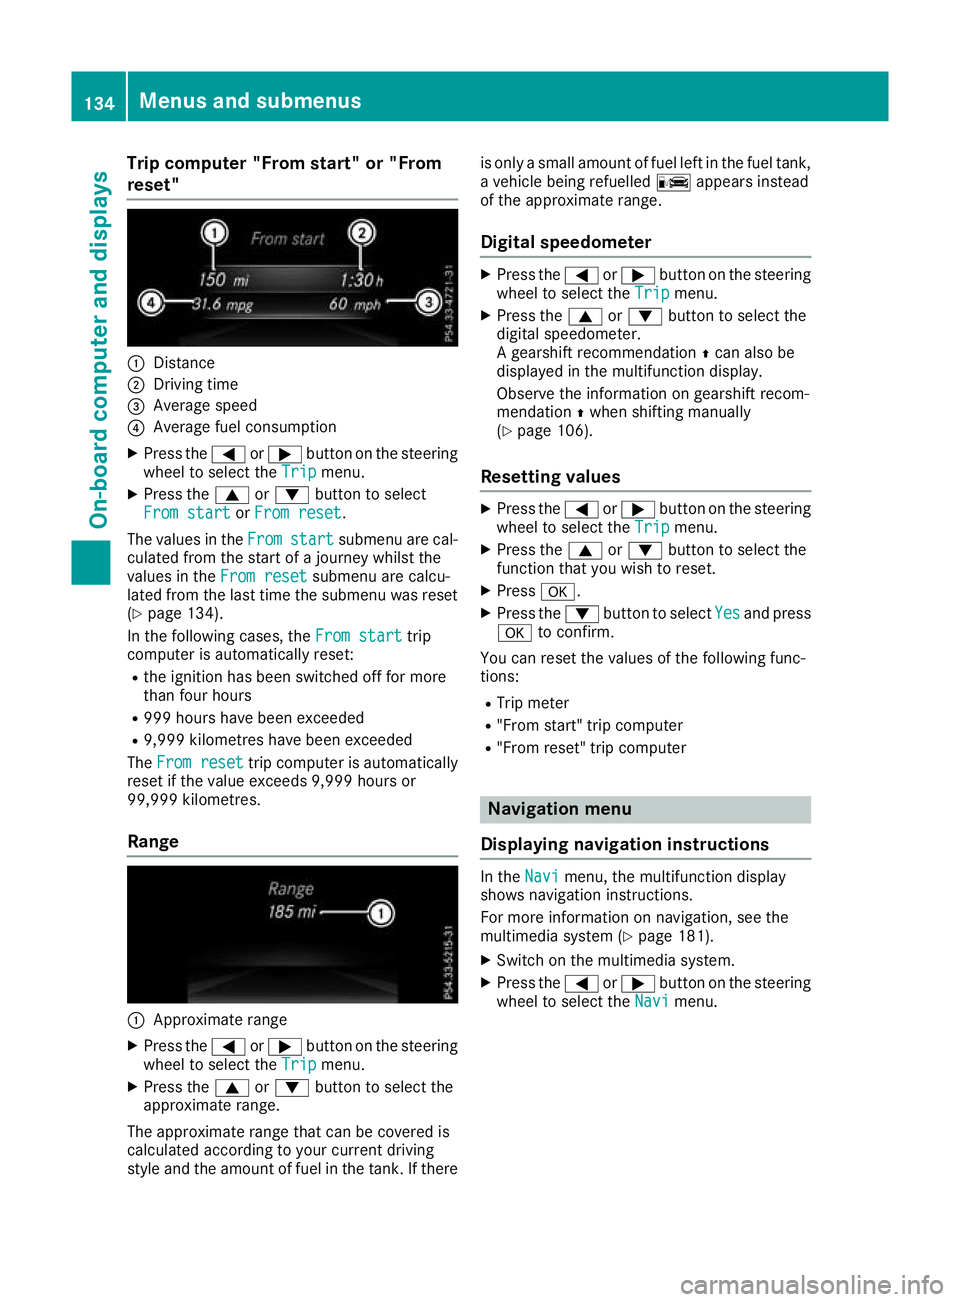
Standard display X
Pres sand hold the %button on the steer-
ing wheel until the Trip
Tripmenu with trip
meter :and total distanc erecorder ;
appears. Menu
sand submenus
133On-boardcomputer and displays Z
Page 137 of 261
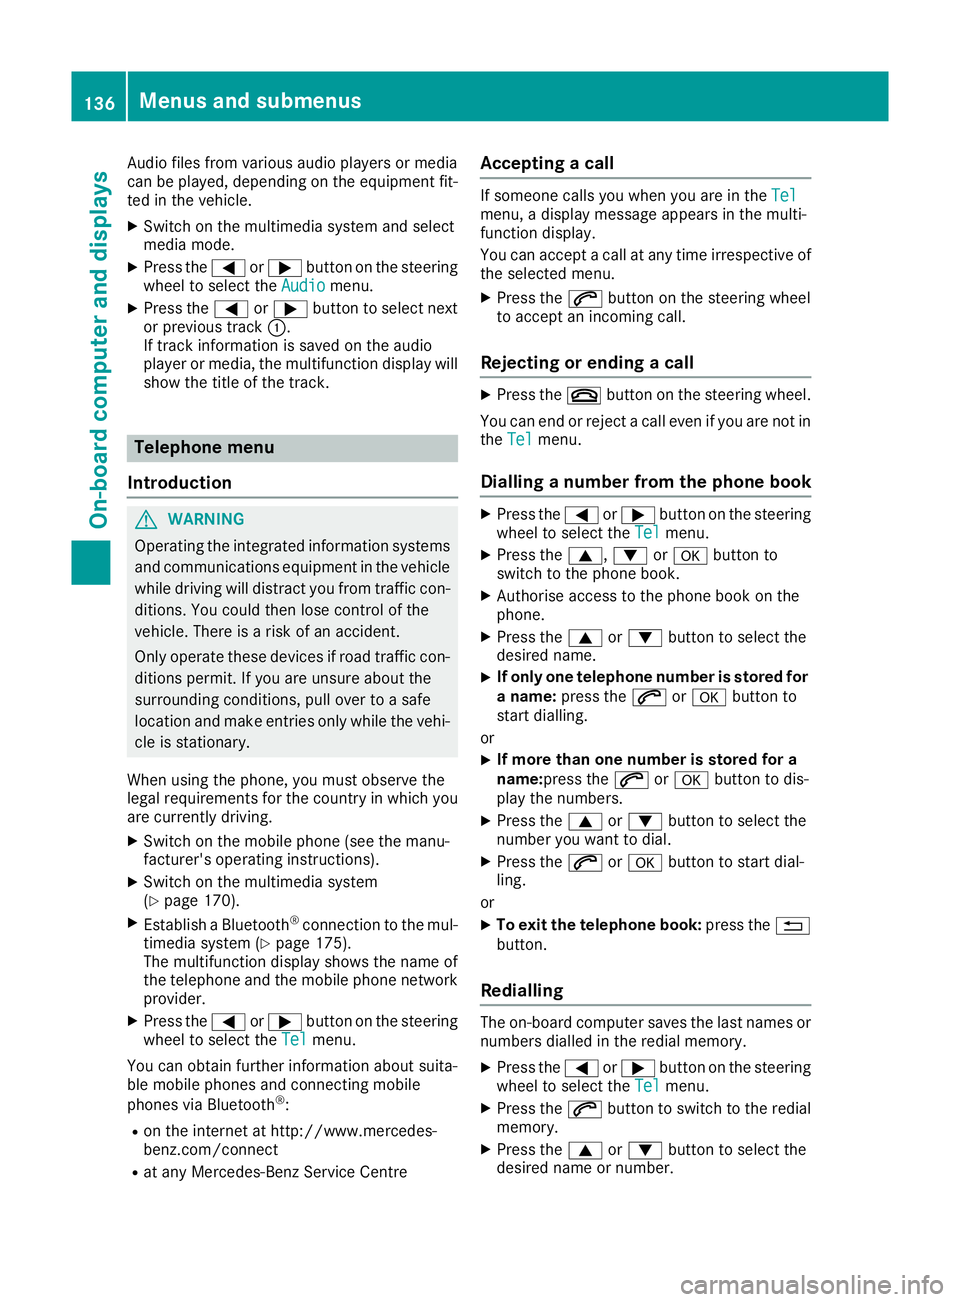
Trip compute
r"From start" or "From
reset" :
Distance
; Driving time
= Averag espeed
? Averag efuelconsumption
X Press the =or; button on the steering
whee ltoselect the Trip
Tripmenu.
X Press the 9or: button to select
Fro mstart
From start orFrom reset
From reset.
The valuesint heFrom
From start
start submenu are cal-
culated from the start of ajourney whilst the
valuesint heFrom reset
From reset submenu are calcu-
lated from the last time the submenu was reset
(Y page 134).
In the following cases, the From start
From start trip
computer is automaticallyr eset:
R the ignition has been switched off for more
than four hours
R 999 hours have been exceeded
R 9,999 kilometres have been exceeded
The From reset From reset trip computer is automatically
reset if the value exceeds 9,999 hours or
99,999 kilometres.
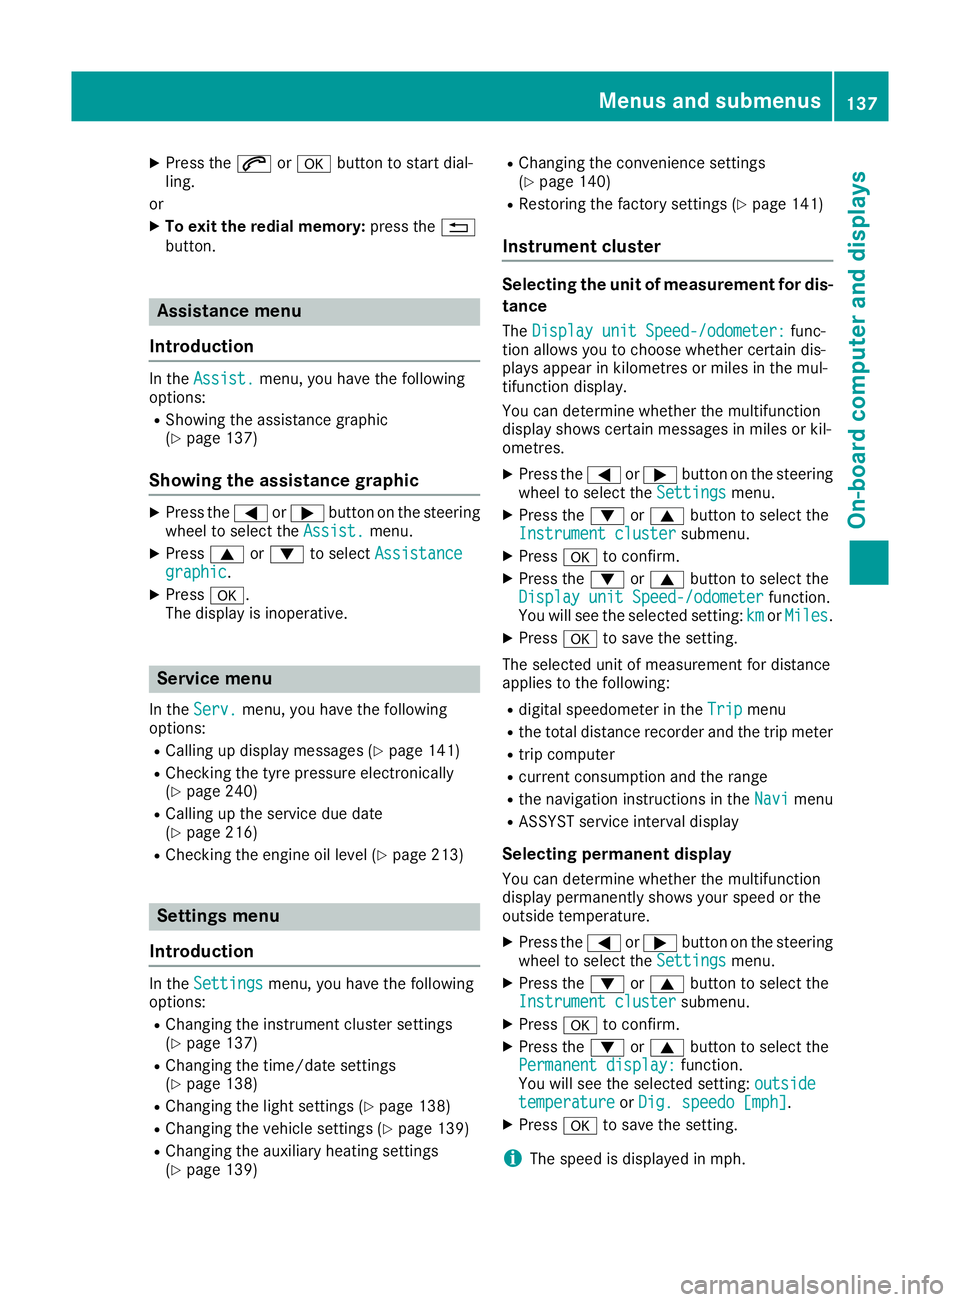
Range :
Approx imaterange
X Press the =or; button on the steering
whee ltoselect the Trip
Tripmenu.
X Press the 9or: button to select the
approximate range.
The approximate range tha tcan be covered is
calculate daccording to your current driving
style and the amount of fuel in the tank. If there is only
asmall amount of fuel left in the fuel tank,
av ehicle being refuelled Cappears instead
of the approximate range.
Digita lspeedometer X
Press the =or; button on the steering
wheel to select the Trip
Tripmenu.
X Press the 9or: button to select the
digital speedometer.
Ag earshift recommendation Zcan also be
displayed in the multifunction display.
Observe the information on gearshift recom-
mendation Zwhen shiftin gmanually
(Y page 106).
Resetting values X
Press the =or; button on the steering
wheel to select the Trip Tripmenu.
X Press the 9or: button to select the
function that you wish to reset.
X Press a.
X Press the :button to select Yes Yesand press
a to confirm.
You can reset the values of the following func-
tions:
R Trip meter
R "From start "trip computer
R "From reset" trip computer Navigat
ionm enu
Displaying navigatio ninstructions In the
Navi Navimenu, the multif unction display
shows navigation instructions.
For more information on navigation, see the
multimedia system (Y page 181).
X Switch on the multimedia system.
X Press the =or; button on the steering
wheel to select the Navi Navimenu. 134
Menu
sand submenusOn-boar dcomputer and displays
Page 139 of 261
Audio files from various audi
oplayer sorm edia
can be played ,depen ding on the equipment fit-
ted in the vehicle.
X Switch on the multimedia system and select
media mode.
X Press the =or; button on the steering
whee ltoselect the Audio
Audio menu.
X Press the =or; button to select next
or previous track :.
If trac kinformatio niss aved on the audio
player or media ,the multifunctio ndisplay will
sho wthe titl eofthe track. Telephon
emenu
Introduction G
WARNING
Oper ating the integrated information systems
and communications equipment in the vehicle
while driving willd istract you from traffic con-
ditions. You coul dthen lose control of the
vehicle. There is arisk of an accident.
Only operate these devices if road traffic con-
ditions permit. If you are unsure about the
surrounding conditions, pullo ver toasafe
location and make entries only while the vehi-
cle is stationary.
When using the phone, you must observe the
lega lrequirements for the country in which you
are currently driving.
X Switch on the mobil ephone (see the manu-
facturer' soperating instructions).
X Switch on the multimedi asystem
(Y page1 70).
X Establish aBluetooth ®
connection to the mul-
timedi asystem (Y page175).
The multifunction display show sthe name of
the telephone and the mobil ephone network
provider.
X Press the =or; button on the steering
whee ltoselect the Tel Telmenu.
You can obtai nfurther information about suita-
ble mobil ephones and connecting mobile
phones via Bluetooth ®
:
R on the internet at http://www.mercedes-
benz.com/connect
R at any Mercedes-Benz Service Centre Accepting
acall If someon
ecalls you when you are in the Tel
Tel
menu, adisplay messag eappears in the multi-
function display.
You can accept acall at any time irrespective of
the selected menu.
X Press the 6button on the steering wheel
to accept an incoming call.
Rejecting or ending acall X
Press the ~button on the steering wheel.
You can end or reject acall even if you are not in
the Tel Tel menu.
Dialling anumber from the phone book X
Press the =or; button on the steering
wheel to select the Tel
Tel menu.
X Press the 9,:ora button to
switch to the phone book.
X Authorise access to the phone book on the
phone.
X Press the 9or: button to select the
desired name.
X If only one telephone number is stored for
an ame: press the 6ora button to
start dialling.
or X If more thano
ne number is stored for a
name:press the 6ora button to dis-
play the numbers.
X Press the 9or: button to select the
number you want to dial.
X Press the 6ora button to start dial-
ling.
or X To exit the telephone book: press the%
button.
Redialling The on-board computer saves the last names or
numbers dialled in the redial memory.
X Press the =or; button on the steering
wheel to select the Tel Telmenu.
X Press the 6button to switch to the redial
memory.
X Press the 9or: button to select the
desired name or number. 136
Menus and submenusOn-board computer and displays
Page 140 of 261
X
Press the 6ora button to start dial-
ling.
or X To exit the redial memory: press the%
button. Assistance menu
Introduction In the
Assist.
Assist. menu, you have the following
options:
R Showin gthe assistance graphic
(Y page 137)
Showing the assistanc egraphic X
Press the =or; button on the steering
wheel to select the Assist.
Assist. menu.
X Press 9or: to select Assistance
Assistance
graphic
graphic.
X Press a.
The displa yisinoperative. Service menu
In the Serv.
Serv. menu, you have the following
options:
R Calling up display messages (Y page 141)
R Checking the tyre pressure electronically
(Y page 240)
R Calling up the service due date
(Y page 216)
R Checking the engine oil level (Y page 213)Settings menu
Introduction In the
Settings
Settings menu, you have the following
options:
R Changing the instrument cluster settings
(Y page 137)
R Changing the time/date settings
(Y page 138)
R Changing the light settings (Y page 138)
R Changing the vehicle settings (Y page 139)
R Changing the auxiliary heating settings
(Y page 139) R
Changing the convenience settings
(Y pag e140)
R Restorin gthe factory settings (Y page 141)
Instrumen tcluster Selecting the uni
tofmeasurement for dis-
tance
The Display unit Speed-/odometer: Display unit Speed-/odometer: func-
tion allowsy ou to choose whether certain dis-
playsa ppear in kilometres or miles in the mul-
tifunction display.
You can determine whether the multifunction
display shows certain messages in miles or kil-
ometres.
X Press the =or; button on the steering
wheel to select the Settings Settingsmenu.
X Press the :or9 button to select the
Instrument cluster
Instrument cluster submenu.
X Press ato confirm.
X Press the :or9 button to select the
Display unit Speed-/odometer
Display unit Speed-/odometer function.
You will see the selected setting: km
kmorMiles
Miles.
X Press ato save the setting.
The selected unit of measurement for distance
applies to the following:
R digital speedometer in the Trip Tripmenu
R the total distance recorder and the trip meter
R trip computer
R current consumption and the range
R the navigation instruction sintheNavi
Navi menu
R ASSYST service interval display
Selecting permanent display You can determine whether the multifunction
displayp ermanently shows your speed or the
outside temperature.
X Press the =or; button on the steering
wheel to select the Settings
Settingsmenu.
X Press the :or9 button to select the
Instrument cluster
Instrument cluster submenu.
X Press ato confirm.
X Press the :or9 button to select the
Permanent display:
Permanent display: function.
You will see the selected setting: outside
outside
temperature
temperature orDig. speedo [mph]
Dig. speedo [mph].
X Press ato save the setting.
i The speed is displayed in mph. Menus and submenus
137On-boardcomputer and displays Z
Page 141 of 261
i
Vehicles for the United Kingdom: this func-
tion is unavailable.
Selects language
X Press the =or; button on the steering
wheel to select the Settings
Settingsmenu.
X Press the :or9 button to select the
Instrument cluster
Instrument cluster submenu.
X Press ato confirm.
X Press :or9 to select the Language:
Language:
function.
You will see the current setting.
X Press ato confirm.
X Press the :or9 button to change the
setting.
X Press ato store the entry.
Time/date Setting the date
X Press the =or; button on the steering
wheel to select the Settings Settingsmenu.
X Press :or9 to select the Time/Date Time/Date
submenu.
X Press ato confirm.
X Press :or9 to select the Date: Date:func-
tion.
You will see the current setting.
X To set the date: pressaagain.
X Press =or; to switch between the
day, month and year.
X Press :or9 to set the day, month or
year.
X Press ato store the entry.
The display shows the selected date.
Setting the time X Press the =or; button on the steering
wheel to select the Settings
Settings menu.
X Press :or9 to select the Time/Date Time/Date
submenu.
X Press ato confirm.
X Press :or9 to select the Time:
Time:func-
tion.
You will see the current setting.
X To set the time: pressaagain.
X Press =or; to switch between hours
and minutes. X
Press :or9 to set the hours or
minutes.
X Press ato store the entry.
The display shows the selected time.
Lights Setting the daytime driving lights
The Daytime driving lights Daytime driving lights function can
only be switched on with the engine switched
off.
X Press the =or; button on the steering
wheel to select the Settings Settingsmenu.
X Press the :or9 button to select the
Lights
Lights submenu.
X Press ato confirm.
X Press the :or9 button to select the
Daytime driving lights
Daytime driving lights function.
If the Daytime
Daytime driving
drivinglights
lightsfunction has
been switched on, the cone of light and the
W symbol are shown in red in the multi-
function display.
X Press ato save the setting.
Further information on daytime driving lights
(Y page 74).
Surround lighting and exterior lighting
delayed switch-off X Press the =or; button on the steering
wheel to select the Settings Settingsmenu.
X Press the :or9 button to select the
Lights
Lights submenu.
X Press ato confirm.
X Press the :or9 button to select the
Surround lighting
Surround lighting function.
When the Surround lighting
Surround lighting function has
been activated, the cone of light is shown in
red in the multifunction display.
X Press ato save the setting.
Activating exterior lighting delayed switch-off
temporarily:
X Before leaving the vehicle, turn the key to
position 0in the ignition lock (Y page 96).
X Turn the key to position 2in the ignition lock
(Y page 96).
Exterior lighting delayed switch-off is deacti-
vated.
Exterior lighting delayed switch-off is reactiva-
ted the next time you start the engine. 138
Menus and submenusOn-boardc
omputer and displays
Page 143 of 261
When the auxiliary heating is switched on,
make sure that:
R no flammable materials come into contact
with hot vehicle components
R the exhaust gas can escape from the
exhaust pipe unhindered
R the exhaust gas does not come into contact
with flammable materials.
! Operatin
gthe auxiliary heating/ventilation
draws on the vehicle battery. After you have
heated or ventilated the vehicle amaximum of
two times, drive for alonger distance.
Only vehicles with auxiliary heating have this
function (Y page 89).
In the Heating Heating submenu, you can select a
stored departure time or change adeparture
time.
The auxiliary heating timer function calculates
the switch-on time accordin gtothe outside
temperature so that the vehicle is preheated by the departure time. When the departure time isreached, the auxiliary heating continues to heat for afurther five minutes and then switches off.
The auxiliary heating selects the temperature
setting of the THERMATIC automatic climate
control.
You can switch the auxiliary heating on or off by
using the &auxiliary heating button on the
centre console or the remot econtrol.
Selecting the departure time or deactivat- ing aselected departure time
X Press the =or; button on the steering
wheel to select the Settings Settingsmenu.
X Press the :or9 button to select the
Heating
Heating submenu.
X Press ato confirm.
You will see the selected setting.
X Press ato confirm.
X Press the :or9 button to select one
of the three departur etimes or Timer
Timeroff
off(no
timer active).
X Press ato confirm.
If ad eparture time is selected, the yellow
indicator lamp lights up on the &auxiliary
heating button. Changing the departure time
X
Press the =or; buttonont hesteering
wheel to selec tthe Settings Settings menu.
X Pres sthe : or9 button to selec tthe
Heating
Heating submenu.
X Press ato confirm.
Yo uw ill see the selected setting.
X Press ato confirm.
X Press the :or9 button to select
Change A Change A, Change B
Change BorChange C
Change C.
X Press ato confirm.
You can now change the departure time.
X Press the =or; button to select the
displaytobec hanged: hours, minutes.
X Press the :or9 button to set the
selected display.
X Press ato store the entry.
The yellow indicator lamp on the &auxili-
ary heating button lights up.
Comfort Activating/deactivating the EASY-
ENTRY/EXIT feature
G
WARNING
When the EASY-ENTRY/EXI Tfeature adjusts
the steering wheel, you and other vehicle
occupants –particularl ychildren –could
become trapped. There is arisk of injury.
Whil ethe EASY-ENTRY/EXIT feature is mak-
ing adjustments, make sure that no one has
any body parts in the swee pofthe steering
wheel.
If someone is trapped:
R press one of the memory function position
buttons, or
R move the switch for steering whee ladjust-
ment in the opposite direction to that in
which the steering whee lismoving.
The adjustment process is stopped.
X Press the =or; button on the steering
whee ltoselect the Settings Settings menu.
X Press the :or9 button to select the
Convenience
Convenience submenu.
X Press ato confirm. 140
Menu
sand submenusOn-boar dcomputer and displays