sensor MERCEDES-BENZ G-CLASS SUV 2016 Owners Manual
[x] Cancel search | Manufacturer: MERCEDES-BENZ, Model Year: 2016, Model line: G-CLASS SUV, Model: MERCEDES-BENZ G-CLASS SUV 2016Pages: 261, PDF Size: 6.01 MB
Page 14 of 261
Interior lighting
.................................. .77
Automatic contro lsystem ................ 77
Delayed switch-off (on-board
computer) ...................................... 139
Luggage compartment lighting ........ 78
Manua lcontro l................................. 77
Overview .......................................... 77
Reading lamp ................................... 78
Rear interio rlighting ........................ 78
iPod ®
and iPhone ®
Audio playback .............................. 178
ISOFIX chil dseats ecur ings ystem .... 40 J
Jack Declaration of conformity ................ 22
Pump leve r.....................................2 44
Storage location ............................ 223
Using ............................................. 244
Jump starting (engine) ......................227 K
Key Changing the battery ....................... 59
Checki ngtheb attery ...................... .59
Display message ............................ 155
Doo rcentral locking/unlocking ....... 57
Emergency key element ................... 58
Important safety note s.................... 57
Los s................................................. 60
Modifying the programming ............. 58
Overview .......................................... 57
Positions (ignition lock) .................... 96
Problem (malfunction) ..................... 60
Starting the engine .......................... 96
Ke yp ositions
Key .................................................. 96 L
Language (on-board computer) ........ 138
Lashin geyelets ................................ .203
Licenc eplate lamp (display mes-
sage) ................................................... 145
Light sensor (display message) ....... 145Lights
Activating/deac tivating th einte-
rior lighting delayed switch-off ...... .139
Automatic headlamp mode .............. 75
Combination switch ......................... 76
Dipped-bea mheadlamps ................. 74
Driving abroad ................................. 74
General notes .................................. 74
Hazard warning lamps ..................... 76
Headlamp flasher ............................ .76
Light switch .....................................74
Main-beam headlamps ..................... 76
Misted up headlamps ....................... 76
Parking lamps ..................................75
Rear foglamp .................................. .75
Sid elam ps ....................................... 75
Switching the daytime driving
lights on/of f(on -board com-
puter) ............................................. 138
Switching the daytime driving
lights on/of f(switch) ....................... 74
Switching the exterio rlighting
delaye dswitch-off on/of f(on-
board computer) ............................ 138
Switching the surround lighting
on/of f(on -board computer) .......... 138
Turn signal s..................................... 76
see Interior lighting
see Replacing bulbs
Loadin gguidelines ............................ 198
Locking
see Central locking
Locking (doors)
Automati c........................................ 62
Emergency locking ........................... 62
From inside (central locking but-
ton) .................................................. 62
Locking centrally
see Central locking
Locking verification signal (on-
board computer) ............................... 139
LO WR ANGE off-road gear ................ 124
Luggag ecom partment cover
Fitting/removing ........................... 204
Important safety notes .................. 203
Notes/function .............................. 203
Opening and closing ...................... 203 Index
11
Page 23 of 261
Environmental protection
General notes
H
Environmenta
lnote
Daimler' sdeclared polic yisone of compre-
hensive environmental protection.
Our objectives are to use th enatural resour-
ces whic hformt hebasis of our existence on
this plane tsparingl yand in amanner which
takes th erequirements of bot hnature and
humanity int oconsideration.
You to ocan help to protect th eenvironment
by operatin gyour vehicle in an environmen-
tally-responsible manner.
Fuel consumption and th erateofe ngine,
transmission ,brak eand tyr ewear depen don
th ef ollowing factors:
R operatin gcondition sofyour vehicle
R your personal driving style
You can influenc ebothf actors. Therefore,
please bear th efollowing in mind:
Operatin gconditions:
R avoid shor ttrips, as these increase fuel
consumption.
R observe th ecorrec ttyrep ressure.
R do not carry any unnecessar yweight in the
vehicle.
R remove th eroof rac koncey ou no longer
nee dit.
R ar egularly serviced vehicle will contribute
to environmental protection .You should
therefore adher etotheservic eintervals.
R all maintenanc ework should be carried out
at aq ualifie dspecialist workshop.
Personal driving style:
R do not depress th eaccelerator pedal when
starting th eengine.
R do not warm up th eengine when th evehicle
is stationary.
R driv ecarefully and maintain asafe distance
fro mt hevehicle in front.
R avoid frequent, sudden acceleration and
braking. R
change gear in good time an duseeach gear
only up to Ôof its maximum engine speed.
R switch off the engine in stationar ytraffic.
R monitor the vehicle's fue lconsumption. Returnin
ganend-of-life vehicle
EU countrie sonly:
Mercedes-Benz will take back your end-of-life
vehicl efor environmentally friendl ydisposa lin
accordance with the Europea nUnion(EU) End-
Of-Life Vehicles Directive.
An etwork of return points and disassembly
plants ha sbeene stablished for yo utoreturn
your vehicle. Yo ucan leave it at any of these
points free of charge .Thism akesani mportant
contribution to closing the recycling circl eand
conserving resources.
For further information abou tthe recycling and
disposa lofend-of-life vehicles, and the take-
back conditions ,pleas evisit the national
Mercedes-Benz website for your country. Genuine Mercedes-Benz parts
H
Environmental note
Daimle rAGalso supplies reconditioned
assemblies and part swhicha re of th esame
qualit yasnew parts. For these, th esame war-
ranty applies as for new parts.
! Airbags and seat belt tensioners
,aswell as
control unit sand sensor sfor these restraint
systems, may be installe dinthefollowing
areas of your vehicle:
R doors
R door pillars
R door sills
R seats
R dashboard
R instrumen tcluster
R centr econsole
Do not install accessories such as audio sys-
tem sint hese areas. Do not carry out repairs
or welding. You could impair th eoperating
efficiency of th erestraint systems. 20
Introduction
Page 45 of 261
X
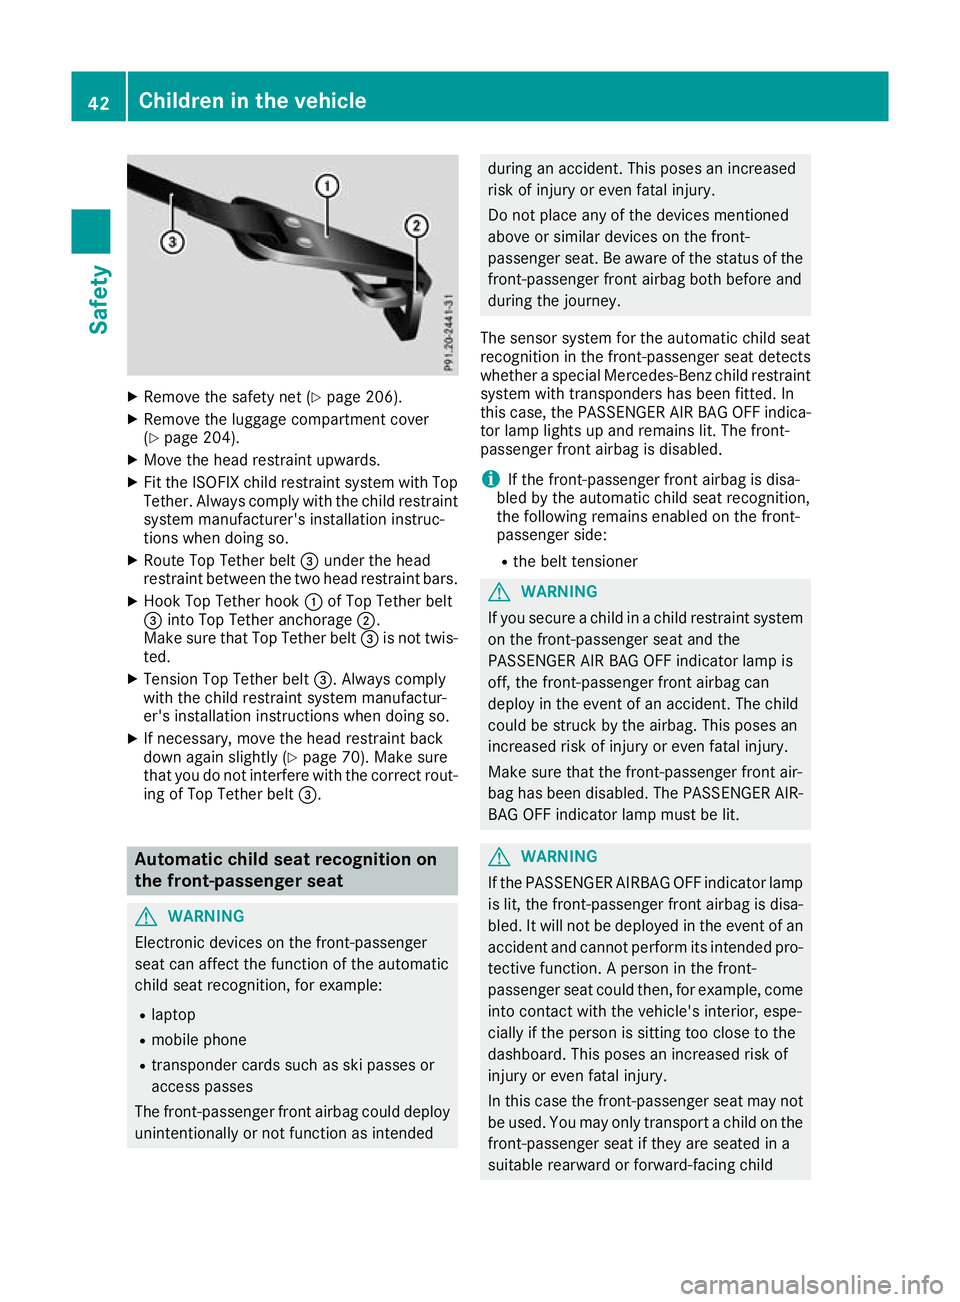
Remove th esafet ynet ( Ypage 206).
X Remove th eluggag ecom partmen tcover
(Y page 204).
X Mov ethe head restrain tupwards.
X Fit th eISOFI Xchild restrain tsystem wit hTop
Tether .Always comply wit hthe child restraint
system manufacturer' sinstallation instruc-
tion swhen doin gso.
X Rout eTop Tether belt =under th ehead
restrain tbetween th etwo head restrain tbars.
X Hook Top Tether hook :of Top Tether belt
= intoT op Tether anchorage ;.
Mak esuret hatT op Tether belt =is no ttwis-
ted.
X Tension Top Tether belt =.Always comply
wit hthe child restrain tsystem manufactur-
er' sinstallation instruction swhen doin gso.
X If necessary, mov ethe head restrain tback
down again slightly (Y page 70). Makesure
that you do no tinterfere wit hthe correc trout-
ing of Top Tether belt =.Automati
cchild sea trecognition on
th ef ront-passenger seat G
WARNING
Electronic device sonthe front-passenger
seat can affect the function of the automatic
child seat recognition, for example:
R laptop
R mobil ephone
R transponde rcards such as ski passes or
access passes
The front-passenge rfront airbag coul ddeploy
unintentionally or not function as intended during an accident. This pose
sanincreased
risk of injury or even fatal injury.
Do not place any of the devices mentioned
above or similar devices on the front-
passenger seat. Be aware of the status of the front-passenger fron tairbag both before and
during the journey.
The sensor system for the automatic child seat
recognition in the front-passenger seat detects
whether aspecial Mercedes-Benz child restraint
system with transponder shas been fitted. In
this case, the PASSENGER AIR BAGO FF indica-
tor lamp lights up and remains lit. The front-
passenger fron tairbag is disabled.
i If the front-passenger fron tairbag is disa-
bled by the automatic child seat recognition,
the following remains enabled on the front-
passenger side:
R the belt tensioner G
WARNING
If you secure achild in achild restraint system
on the front-passenge rseat and the
PASSENGER AIR BAG OFF indicator lamp is
off, the front-passenge rfront airbag can
deploy in the event of an accident. The child
coul dbes truck by the airbag. This poses an
increased risk of injury or even fatal injury.
Make sure that the front-passenge rfront air-
bag has been disabled. The PASSENGER AIR- BAG OFF indicator lamp must be lit. G
WARNING
If the PASSENGER AIRBAG OFF indicator lamp is lit, the front-passenge rfront airbag is disa-
bled. It willn ot be deployedint he event of an
accident and cannot perform its intended pro-
tective function. Aperso nint he front-
passenger seat coul dthen, for example, come
into contact with the vehicle's interior, espe-
cially if the perso nissitting too close to the
dashboard. This poses an increased risk of
injury or even fatal injury.
In this case the front-passenge rseat may not
be used .You may only transport achild on the
front-passenge rseat if they are seated in a
suitable rearward or forward-facing child 42
Children in the vehicleSafety
Page 46 of 261
restraint system. Always observe the infor-
mation about suitable positioning of the child restraint system in this Owner's Manua las
wellast he child restraint system manufac-
turer's installation instructions. G
WARNING
If you secure achild in aforward-facing child
restraint system on the front-passenge rseat
and you position the front-passenge rseat too
close to the dashboard, in the event of an
accident, the child could:
R come into contact with the vehicle's inte-
rior if the PASSENGER AIR BAG OFF indi-
cator lamp is lit, for example
R be struck by the airbag if the PASSENGER
AIR BAG OFF indicator lamp is off
This poses an increased risk of injury or even fatal injury.
Move the front-passenge rseat as far back as
possible.A lways make sure that the shoulder
belts trap is correctly routed from the vehicle
belts ash guide to the shoulderb eltg uide on
the child restraint system. The shoulderb elt
strap must be routed forwards and down-
wards from the belts ash guide. If necessary,
adjust the belts ash guide and the front-
passenger seat accordingly .Always observe
the information about suitable positioning of
the child restraint system in this Owner's
Manual as wellast he child restraint system
manufacturer's installation instructions.
i Ensure that yourv
ehicleise quipped with
automatic child seat recognitio nfor the front-
passenger seat (Y page43).Ift his is not the
case, alwaysi nstallachild restraint system on
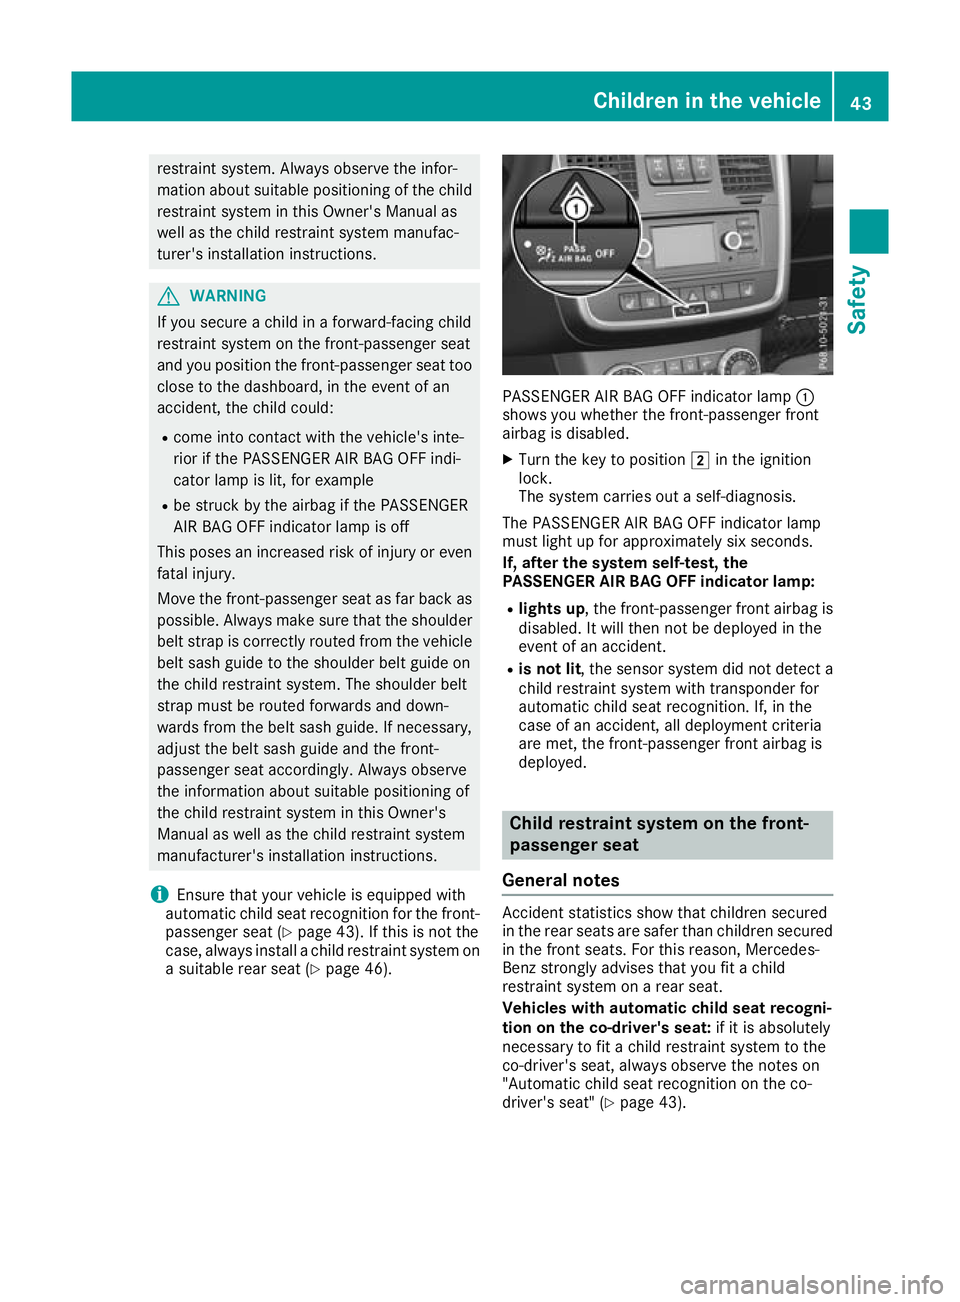
as uitable rear seat (Y page46). PASSENGER AIR BAG OFF indicato
rlamp :
shows you whether the front-passenger front
airbag is disabled.
X Turn the key to position 2in the ignition
lock.
The system carries out aself-diagnosis.
The PASSENGER AIR BAG OFF indicator lamp
must light up for approximately six seconds.
If, after the system self-test, the
PASSENGER AIR BAG OFF indicator lamp:
R lights up ,the front-passenger fronta irbag is
disabled. It will then not be deployed in the
event of an accident.
R is not lit ,the sensor system did not detect a
child restraint system with transponder for
automatic child seat recognition. If, in the
case of an accident ,all deployment criteria
are met, the front-passenger fronta irbag is
deployed. Childr
estraint system on th efront-
passenge rseat
General notes Accident statistics show that childre
nsecured
in the rea rseats ar esafer tha nchildren secured
in the front seats. For thi sreason, Mercedes-
Benz strongl yadvises tha tyou fitac hild
restraint system on arears eat.
Vehicles with automatic child seat recogni-
tio nont he co-driver' sseat:if it is absolutely
necessary to fit achild restraint system to the
co-driver' sseat, always observe the notes on
"Automatic child sea trecognitio nonthe co-
driver's seat" (Y page 43). Child
renint hevehicle
43Safety Z
Page 60 of 261
Key
Important safety notes
G
WARNING
If children ar eleft unsupervised in the vehicle,
they can:
R open doors and endange rother persons or
road users
R climb out and be injured by the traffic
R operate vehicl eequipment and, for exam-
ple,t rap themselves.
Childre ncoulda lsos et the vehicl einmotion,
for exampl eby:
R releasing the parking brake
R shifting the automatic transmission out of
park position P
R starting the engine.
There is arisk of an accident and injury.
When leaving the vehicle, alwayst ake the key
with you and lock the vehicle. Never leave
children unattended in the vehicle. Always
keep the key out of reach of children. G
WARNING
If you attach heavy or larg eobjects to the key,
the key coul dbeunintentionally turned in the
ignitio nlock. This coul dcauset he engine to
be switched off. There is arisk of an accident.
Do not attach any heavy or larg eobjects to the
key. Remove any bulky keyrings before insert-
ing the key into the ignitio nlock.
! Keep the key awayf
rom strong magnetic
fields. Otherwise, the remote control function coul dbea ffected.
Strong magnetic fields can occur in the vicin-
ity of powerful electrica linstallations.
Do not keep the key: R with electronic devices, e.g. amobilephone
or another key
R with metallic objects, e.g. coins or metal foil
R insid emetallic objects, e.g. ametal case
This can impair the key's function. Ac
heck tha tperiodically establishes aradio
connectio nbetween the vehicl eand the key
determine swhethe rav alidkey is in the vehicle.
Thi so ccurs, for example:
R during engine start
R during driving
Unite dKingd om only: G
WARNING
When the double locks are activ ated, the
doors can no longer be opened from the
inside. People in the vehicl ecan no longer get
out, e.g. in hazardous situations. There is a
risk of injury.
Therefore, do not leave any people unsuper-
vised in the vehicle, particularl ychildren, eld-
erly people or people in need of special assis-
tance. Do not activate the double lock when
people are in the vehicle.
If the vehicl ehas been locked from the outside,
the double lock function is activated as stand-
ard. It is then not possible to open the doors
from insid ethe vehicle. You can deactivate the
double lock function by deactivating the interior
motion sensor (see Digita lOwner's Manual).
The doors can then be opened from the inside
after the vehicl ehas been locked from the out-
side .The anti-theft alarm system is triggere dif
the door is opened from the inside. Switch off
the alarm (Y page56). Keyf
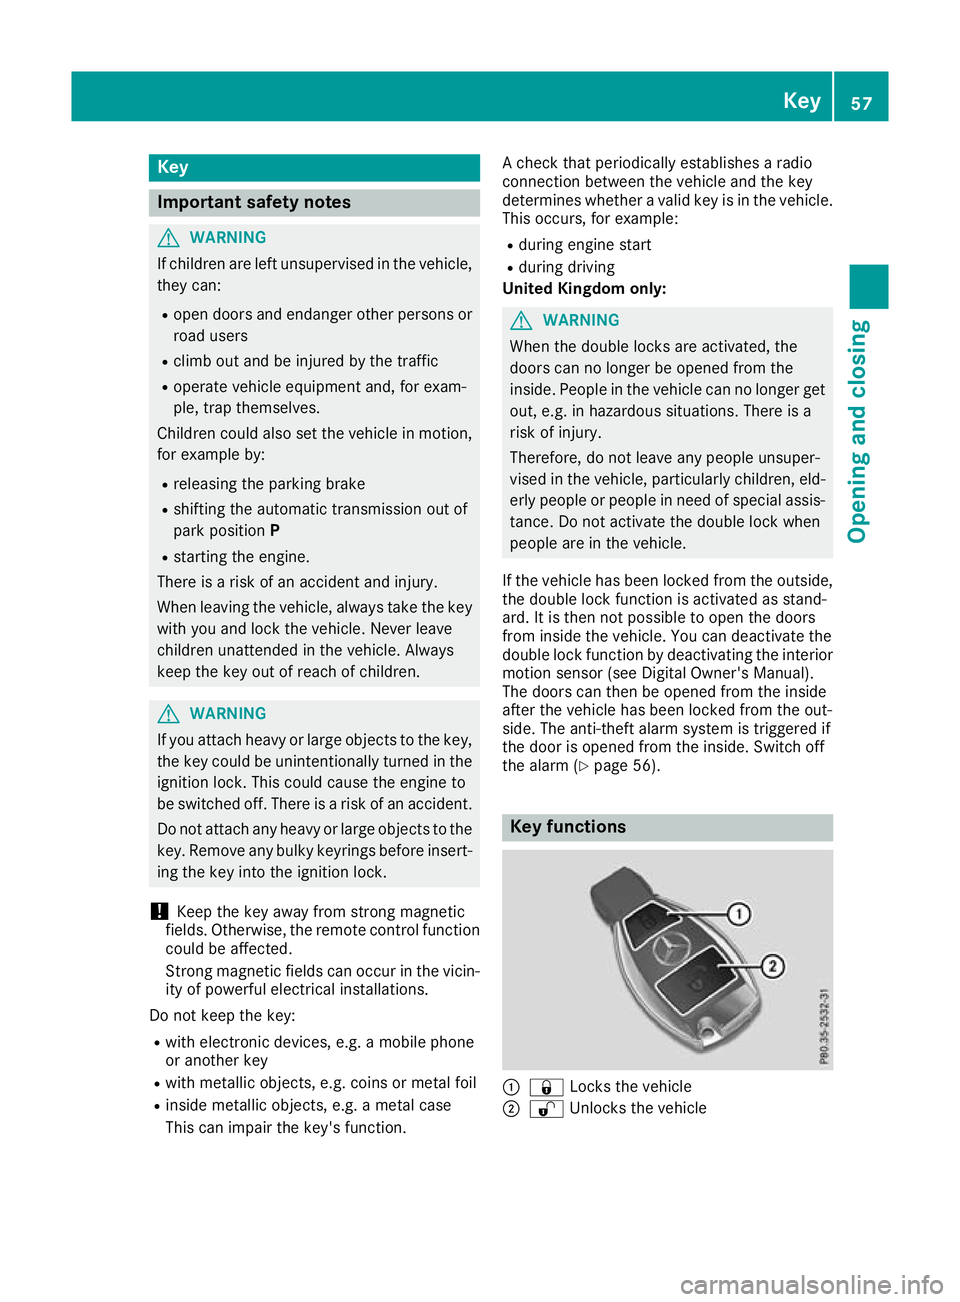
unctions :
& Lockst he vehicle
; % Unlocks the vehicle Key
57Opening and closing Z
Page 64 of 261
Problem
Possible causes/consequences and
M
MSolutions You have lost
akey. X
Have th ekey deactivated at aqualifie dspecialist workshop.
X Report the los simmediately to the vehicle insurers.
X If necessary ,havet he locks changed as well. Yo
uh ave lost the emer-
genc ykey element. X
Report the loss immediately to the vehicl einsurers.
X If necessary, hav ethe locks changed as well. Doors
Important safety notes
G
WARNING
If children ar eleft unsupervised in the vehicle,
they can:
R open doors and endange rother persons or
road users
R climb out and be injured by the traffic
R operate vehicl eequipment and, for exam-
ple,t rap themselves.
Childre ncoulda lsos et the vehicl einmotion,
for exampl eby:
R releasing the parking brake
R shifting the automatic transmission out of
park position P
R starting the engine.
There is arisk of an accident and injury.
When leaving the vehicle, alwayst ake the key
with you and lock the vehicle. Never leave
children unattended in the vehicle. Always
keep the key out of reach of children.
Unite dKingdom only: G
WARNING
When the double locks are activated, the
doors can no longer be opened from the
inside. People in the vehicl ecan no longer get
out, e.g. in hazardous situations. There is a
risk of injury.
Therefore, do not leave any people unsuper-
vised in the vehicle, particularl ychildren, eld-
erly people or people in need of special assis-
tance. Do not activate the double lock when
people are in the vehicle. If the vehicle has been locked from the outside,
the double lock function is activated as stand-
ard. It is then not possible to open the doors
from inside the vehicle .You can deactivate the
double lock function by deactivating the interior
motion sensor (see Digital Owner's Manual).
The doors can then be opened from the inside
after the vehicle has been locked from the out-
side. The anti-theft alarm system is triggered if
the door is opened from the inside. Switch off
the alarm (Y page 56). Unlockinga
nd opening the doors
from the inside
You can open adoor from inside the vehicle
even if it has been locked. You can only open the rear doors from inside the vehicle if they are not secured by the child-proof lock s(Ypage 51). If
the vehicle has previously been locked with the
key, openin gadoor from the inside will trigger
the anti-theft alarm system .Switc hoff the alarm
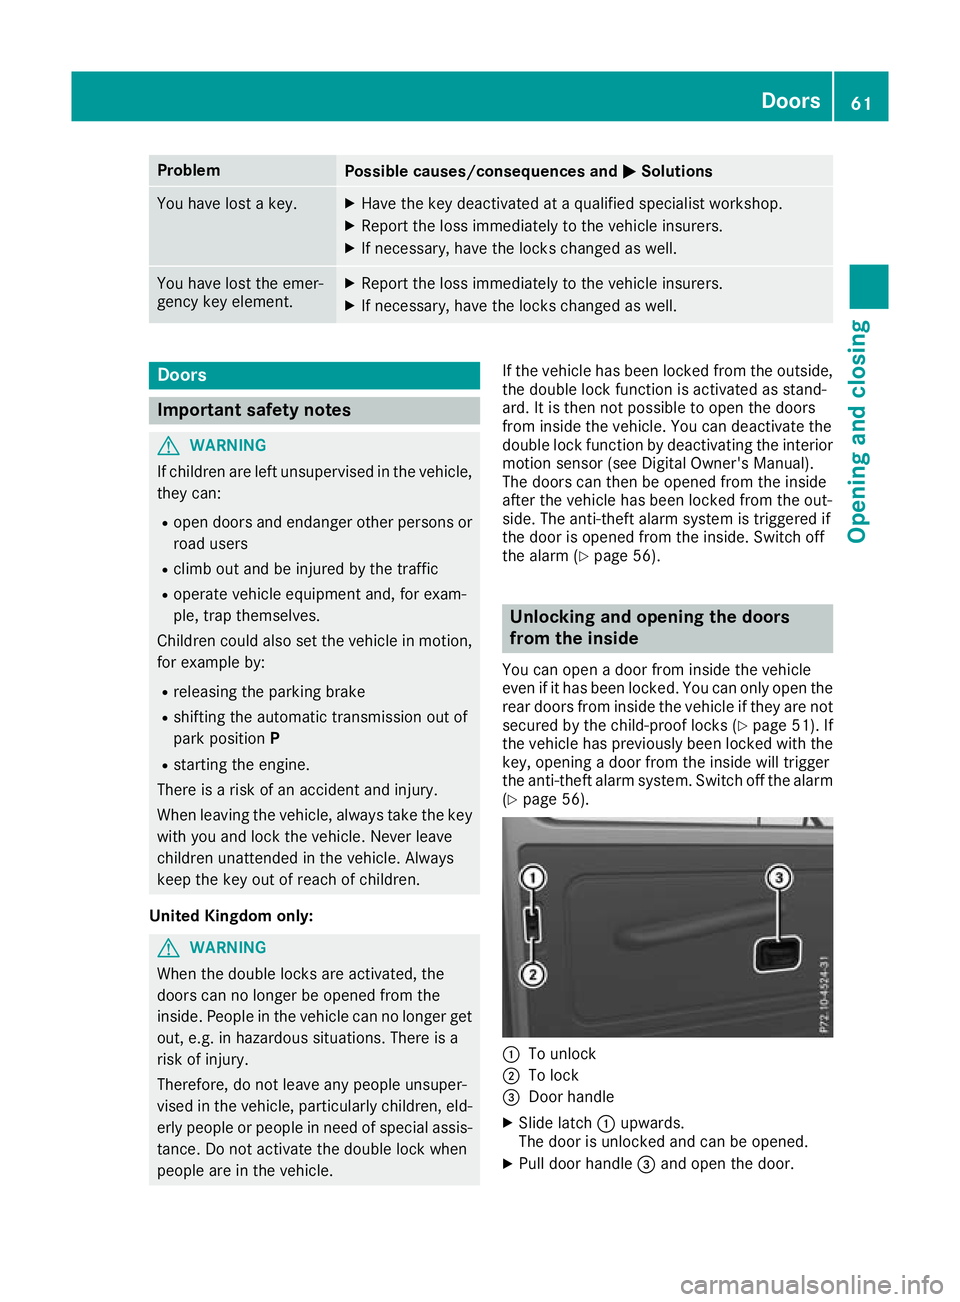
(Y page 56). :
To unlock
; To lock
= Door handle
X Slide latch :upwards.
The door is unlocked and can be opened.
X Pull door handle =and open the door. Doors
61Openingand closing Z
Page 65 of 261
Centrally lockin
gand unlocking the
vehicle from th einside
You can centrally loc korunlock th evehicle from
th ei nside.
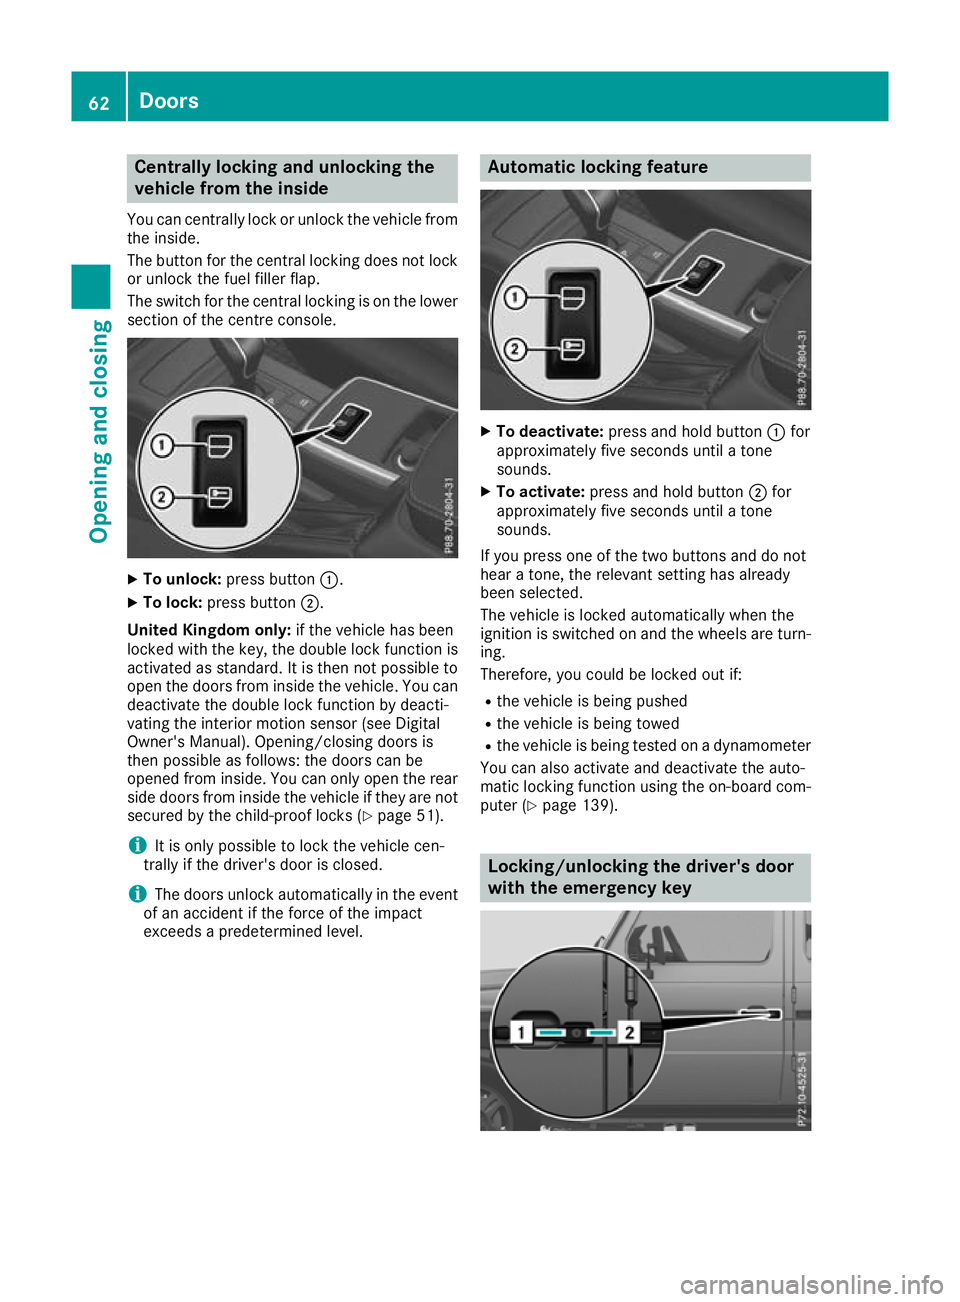
The butto nfor th ecentral lockin gdoes no tlock
or unlock th efuel fille rflap.
The switch for th ecentral lockin gisonthelower
sectio nofthecentr econsole. X
To unlock: press button :.
X To lock: press button ;.
United Kingdom only: if thevehicl ehasbeen
locked with the key ,the double lock functio nis
activate dasstandard. It is then not possibl eto
open the doors from insid ethe vehicle. Yo ucan
deactivate the double lock functio nbydeacti-
vating the interio rmotion sensor (se eDigital
Owner' sManual) .Opening/closing doors is
then possibl easfollows :the doors can be
opene dfrom inside. Yo ucan onl yopent he rear
side doors from insid ethe vehicl eifthey are not
secured by the child-proof locks (Y page 51).
i It is onl
ypossibl etol ockt he vehicl ecen-
trally if the driver's door is closed.
i The doors unlock automaticall
yinthe event
of an accident if the force of the impact
exceed sapredetermined level. Automatic locking feature
X
To deactivate: press and holdbutton :for
approximatel yfives econds unti latone
sounds.
X To activate: press and hol dbutton ;for
approximatel yfives econds unti latone
sounds.
If yo upress one of the two buttons and do not
hea rat one, the relevant setting ha salready
been selected.
The vehicl eislocked automaticall ywhent he
ignition is switched on and the wheels are turn-
ing.
Therefore, yo ucould be locked ou tif:
R the vehicl eisbeing pushed
R the vehicl eisbeing towed
R the vehicl eisbeing teste donadynamometer
Yo uc an also activate and deactivate the auto-
matic locking functio nusing the on-board com-
puter (Y page 139). Locking/unlocking the driver's door
with the emergenc
ykey 62
DoorsOpening and closing
Page 77 of 261
Exterio
rlighting General notes
For reasons of safety, Mercedes-Benz recom-
mends tha tyou drive with lights switched on
even during the daytime. In some countries,
operation of the headlampsv ariesdue to legal
requirements and voluntary recommendations. Driving abroad
Converting to sy mmetricald ipped
beam Whe
ndriving in countries where vehicles are
driven on the opposite side of the road to the
country in which the vehicle is registered, the
headlamps must be switched to symmetrical
dipped beam. This prevent soncoming traffic
from being dazzled. Symmetrical lights do not
illuminate as large an area of the edge of the
carriageway.
Have the headlamps switched at aqualified spe-
cialist workshop as close to the border as pos-
sible before driving in these countries.
Converting to asymmetrical dipped
beam after returning Hav
ethe headlamps switched back to asym-
metrica ldipped bea mataqualifiedspecialist
workshop as soon as possible after crossing the border again. Ligh
tswitch
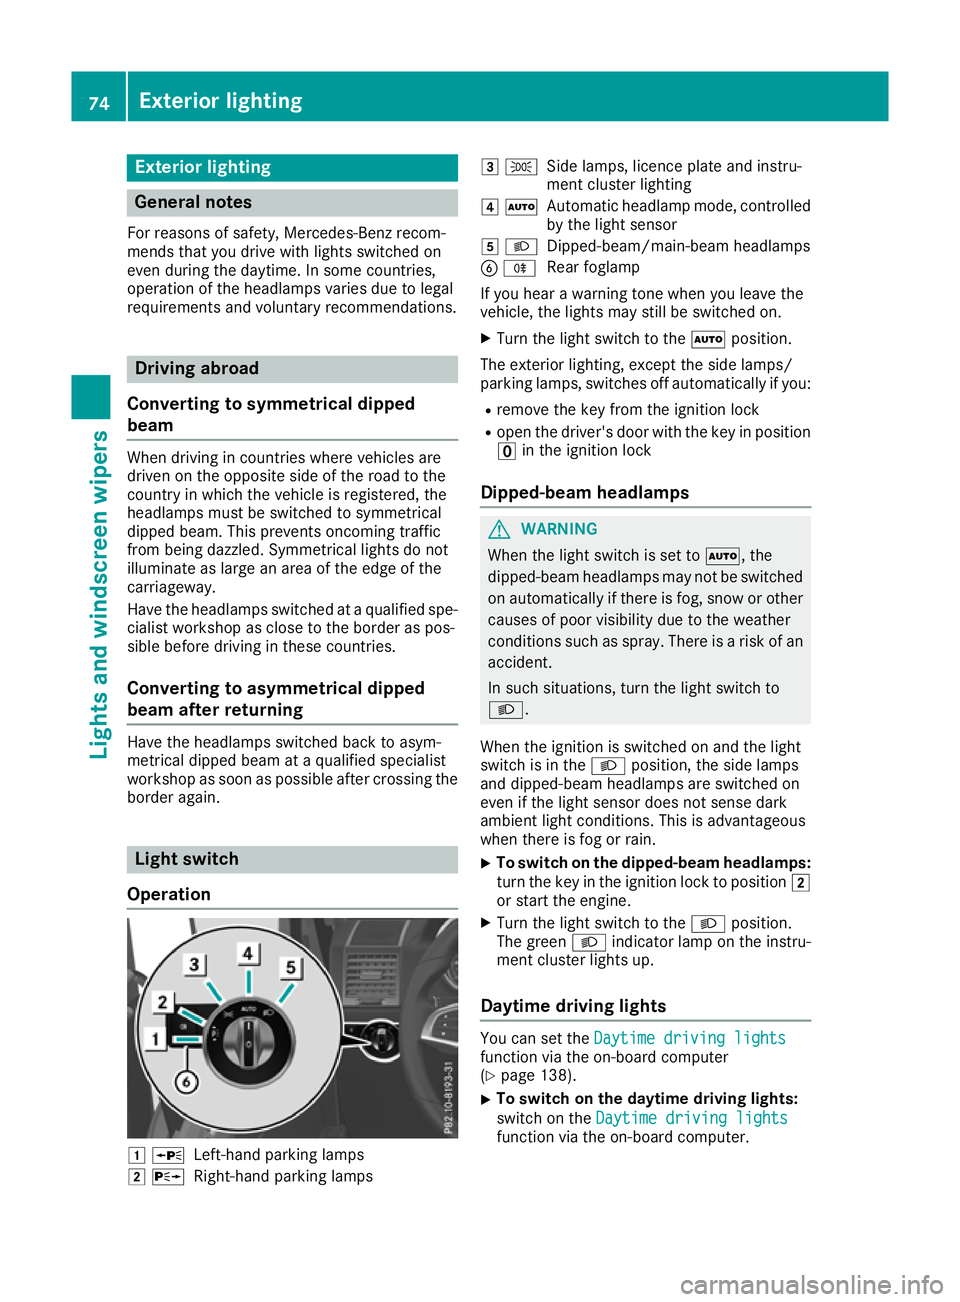
Operation 1
W
Left-hand parkin glamps
2 X
Right-hand parking lamps 3
T
Side lamps,l icence plate and instru-
ment cluster lighting
4 Ã
Automati cheadlamp mode, controlled
by the light sensor
5 L
Dipped-beam/main-beam headlamps
B R
Rear foglamp
If yo uhearaw arning tone when yo uleave the
vehicle, the lights may stil lbeswitched on.
X Turn the light switch to the Ãposition.
The exterior lighting, excep tthe sid elam ps/
parking lamps ,switches off automaticall yifyou:
R remove the key from the ignition lock
R ope nthe driver' sdoorw itht he key in position
u in the ignition lock
Dipped-beam headlamps G
WARNING
When the light switch is set to Ã,the
dipped-beam headlamp smay not be switched
on automatically if there is fog, snow or other causes of poor visibility due to the weather
conditions such as spray. There is arisk of an
accident.
In such situations, turn the light switch to
L.
When the ignitio nisswitched on and the light
switch is in the Lposition, the side lamps
and dipped-beam headlamp sare switched on
even if the light sensor does not sense dark
ambient light conditions. This is advantageous
when there is fog or rain.
X To switch on the dipped-beam headlamps:
turn the key in the ignitio nlock to position 2
or start the engine.
X Turn the light switch to the Lposition.
The green Lindicator lamp on the instru-
ment cluster lights up.
Daytime driving lights You can set the
Daytime driving lights
Daytime driving lights
fun ction via the on-board computer
(Y page 138).
X To switch on th
edaytim edriving lights:
switc hont heDaytime driving lights
Daytime driving lights
function via the on-board computer. 74
Exterior lightingLights and windscreen wipers
Page 98 of 261
Running-i
nnotes Importan
tsafety notes
In certain driving and driving safet ysystems ,the
sensor sadjust automatically while acertai ndis-
tance is bein gdriven after th evehicl ehas been
delivere dorafter repairs .Full system effective-
ness is no treached until th eend of this teach-in
process.
Brake pads/lining sand disc stha teither are new
or have been replace dachiev eoptimum braking
effec tonlya fter several hundre dkilometres of
driving .Compensat efor th ereduce dbraking
effec tbya pplyin ggreate rforce to th ebrake
pedal. Th
ef irs t1 500km
The mor eyou trea tthe engine with sufficient
car eatt he start, the mor esatisfie dyou will be
with the engine performance later on.
R Driv eatv aryingvehicl espeeds and engine
speeds for the first 1500 km
R Avoi doverstraining the vehicl eduringt his
period, e.g .drivin gatf ullt hrottle
R When shifting gear smanually, shift up in good
time ,befor et he rev counter needl ereaches
Ô of the wa ytothe red area of the rev counter
display
R Do not shift down agearm anuall yino rder to
brake
R Try to avoi ddepressing the accelerator pedal
beyond the pressure point (kickdown)
After 1500 km ,you maygradually bring the
vehicl euptof ullr oa da nd engine speeds.
Yo us houl dalsoo bserve these note sonrunning-
in if the engine or parts of the drive train on your vehicl ehaveb eenr eplaced.
Alway sobserve the maximum permissible
speed. Driving
Importan
tsafety notes G
WARNING
Objectsint he driver's footwel lcan impede
peda ltravel or block apeda lwhich is depressed. This jeopardises safe operatio
nof
the vehicle. There is arisk of an accident.
Stow all objects in the vehicle safely, so that
they cannot reach the driver' sfootwell. Make
sure the floormat sand carpet sare properly
secured so that they cannot slip and obstruct the pedals. Do not lay several floormat sor
carpet sontop of one another. G
WARNING
Unsuitable footwear can hinder correct usage of the pedals, e.g.:
R shoe swith thick soles
R shoes with high heels
R slippers
There is arisk of an accident.
Wears uitable footwea rtoensure correct
usage of the pedals. G
WARNING
If you switch off the ignitio nwhile driving,
safety-relevant functions are only available
with limitations, or not at all.T his couldaffect,
for example, the power steering and the brake
boosting effect. You willr equire considerably
more effort to steer and brake. There is arisk
of an accident.
Do not switch off the ignitio nwhile driving. G
WARNING
If the parking brake has not been fully
released when driving, the parking brake can:
R overheat and caus eafire
R lose its hold function.
There is arisk of fire and an accident. Release
the parking brake full ybefore driving off.
! Warm up the engine quickly. Do not use the
engine's full performance until it has reached operating temperature.
Only set the automatic transmission to the
respective drive positions when the vehicl eis
stationary.
Where possible,a voids pinning the drive
wheels when pulling awayons lippery roads.
Otherwise, you coul ddamage the drive train. Driving
95Drivingand parking Z
Page 134 of 261

Important safety notes
G
WARNING
Operating th eintegrated information systems
and communications equipment in the vehicle
while driving willd istract you from traffic con-
ditions. You coul dthen lose control of the
vehicle. There is arisk of an accident.
Only operate these devices if road traffic con-
ditions permit. If you are unsure about the
surrounding conditions, pullo ver toasafe
location and make entries only while the vehi-
cle is stationary.
You must observe the lega lrequirements for the
country in which you are currently driving when operating the on-board computer. G
WARNING
If the instrument cluster has failed or mal-
functioned, you may not recognise function
restrictions relevant to safety .The operating
safety of yourv ehiclemay be impaired .There
is ar isk of an accident.
Drive on carefully.H ave the vehiclechecked
at aq ualified specialist worksho pimmedi-
ately.
If the operating safety of yourv ehicleis
impaired ,park the vehicl esafel yass oon as pos-
sible. Contact aqualified specialist workshop.
! If
ab lackout lighting setting has been selec-
ted, the instrument cluster lighting is
switched off.
The instrument cluster and the display do not show any information.
The on-board computer show sonly display mes-
sage sorw arnings from certain systems on the
multifunction display.Y ou should therefore
make sure yourv ehicleiso perating safel yatall
times.
For an overview, see the instrument cluster illus-
tration (Y page26). Displays and operation
Instrument cluste
rlighting
The brightness control knob is locate donthe
botto mleftoft heinstrumen tcluster
(Y page 26).
X Turn th ebrightness control knob clockwise or
anti-clockwise.
i The ligh
tsensor on th einstrumen tcluster
automatically control sthe brightness of the
multifunction display.
In daylight, th edisplays in th einstrument
cluste rare no tlit. Re
vc ounter
! Do not drive in the overrevving range. Doing
so will damag ethe engine.
The red band in the rev counter indicates the
engine's overrevving range.
The fue lsuppl yisi nterrupted to protect the
engine when the red band is reached. Outside temperature display
You should pay specia lattention to road condi-
tion swhen temperatures are around freezing
point.
Bear in mind that the outside temperature dis-
play indicates the measured air temperature
and not the road surface temperature.
The outside temperature display is in the multi-
function display (Y page 133).
Changes in the outside temperature are dis-
played after ashort delay. Coolant temperatur
edisplay G
WARNING
If yo uopen the bonnet while the engine is
overheating or while there is afire in the
engine compartment, you coul dcome into
contact with hot gase sorother leaking ser-
vice products. There is adange rofinjury.
Allow an overheating engine to cool down
before opening the bonnet. If there is afire in Displays and operation
131On-boardcomputer and displays
Z